Master Messages
Messages has grown into a potent instant messaging tool. Messages can handle SMS messages, Apple’s own iMessage messages, and voice messages. Messages lets you add visual effects to messages, and developers can create apps that integrate with Messages.
Understand Core Messages Concepts
SMS (Short Message System) and MMS (Multimedia Messaging System) are methods of sending short text messages (or, for MMS, text messages with multimedia attachments) over a cellular network. They’re fast and convenient, but SMS limits text to 160 characters, these methods work only between cellular phones (except with Apple’s Text Message Forwarding), and some phone carriers charge per message (or provide a limited number of messages per month, charging for any above that limit).
iMessage is Apple’s alternative to SMS and MMS. iMessage allows encrypted messages of unlimited length, those messages are sent over a standard internet connection, and messages can be sent and received by the Messages app on any recent iOS device or Mac. Also, iMessage isn’t just tied to your phone number—you can associate it with other phone numbers and even email addresses. The downside is that it works only with other iMessage users—when you send a message to someone who doesn’t use iMessage, it falls back to SMS and MMS.
Here are the basics of using Messages:
Enable or disable iMessage: Go to Settings > Messages and turn on the iMessage switch.
Set send and receive addresses: In Settings > Messages, tap Send & Receive. Select your iPhone number and any email addresses where you want to receive iMessages (messages arrive in the Messages app, not your email). Still on the Send & Receive screen, specify the phone number or email address from which you want your iMessages to originate.
Share your name and photo: You can choose to share a specific name and avatar photo with contacts in Settings > Messages > Share Name and Photo. This changes how you appear to other iMessage users.
Decide about read receipts: Adjust the Send Read Receipts switch, depending on whether want to send read receipts, which tell those you’re conversing with if you’ve read their messages.
Consider Messages in the Cloud: You can turn on Messages in Settings > Your Name > iCloud to choose to store your Messages in iCloud. When you do so, those messages count against your iCloud storage quota, which you can view in Settings > Your Name > iCloud > Manage Storage, but they’re no longer included in iCloud backups, so if you use iCloud to back up multiple iOS devices, it will likely save you space (see Control Device Storage). Also, your messages sync more reliably and if you delete a message on one device, it disappears from all of them.
Send a Message
Messages gives you a bewildering number of ways to send messages, all the way from simple text messages to voice messages, video messages, hand-drawn messages—you name it.
Starting a Simple Message
Let’s start with the basics:
In the Messages app, tap the Compose
 icon.
icon.Start typing a contact name, email address, or phone number in the To field. You can keep typing or tap to accept a suggestion.
Enter your note in the message field and tap the Send
 icon.
icon.
Once a message thread is created, tap it in Messages to open it, tap the message field, and type your message as described above.
Use Emojis in Messages
Emojis are fun, but digging through the emoji picker isn’t. The QuickType bar suggests emojis as you type (Figure 56). Tap one of the suggestions to replace the current word with that emoji.

Add Bubble and Screen Effects
Messages lets you add bubble and screen effects. Bubble effects affect just the message bubble while screen effects are displayed all over the conversation.
To view effects, touch and hold the Send icon. Switch between the two types of effects with the bar at the top of the screen:
Use Bubble Effects: Tap the dot
 next to a bubble effect to see a preview. Tap the Send icon to send your message with that effect, or back out with the cancel
  button.
Use Screen Effects: Swipe to switch between screen effect previews. Tap the Send
icon to send your message with that effect. Tap the  cancel button to cancel.
Take Photos and Apply Camera Effects
Tap the camera ![]() icon to the left of the message field to open the Camera app inside Messages. But the Camera app inside Messages has a few differences from the standalone app: it displays the Camera Effects
icon to the left of the message field to open the Camera app inside Messages. But the Camera app inside Messages has a few differences from the standalone app: it displays the Camera Effects ![]() button as you’re taking the picture, and after you take a photo it displays buttons to add Camera Effects
button as you’re taking the picture, and after you take a photo it displays buttons to add Camera Effects ![]() , edit the photo
, edit the photo  , mark it up
  , or attach it to a message
  . If you tap Done in the upper-right corner, Camera places the photo in the message without sending it.
Refer back to Apply Camera Effects and Markup.
Send and Listen to Voice Messages
You can exchange audio messages with users of iOS 8 or later, users of Mac OS X 10.10 El Capitan or later, and Apple Watch wearers.
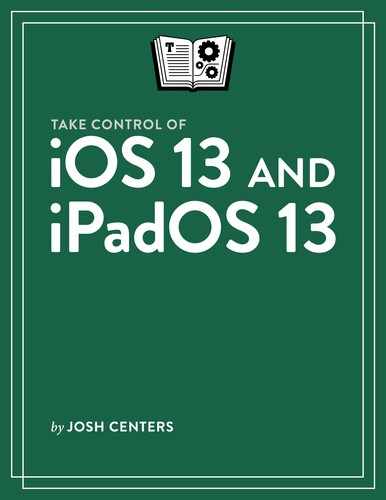
Press and hold the audio ![]() icon to the right of the message box (it appears only when there’s nothing in the message box). When a controller bar appears, recording starts, and you see an audio wave and a timer to the left. Don’t lift your finger until you’re done recording. Let go of the icon to stop recording.
icon to the right of the message box (it appears only when there’s nothing in the message box). When a controller bar appears, recording starts, and you see an audio wave and a timer to the left. Don’t lift your finger until you’re done recording. Let go of the icon to stop recording.
Tap the Play  button for a preview, delete the recording by tapping the delete
  icon, or send it by tapping the arrow
  .
.
To hear a voice message you’ve received, tap its Play  button (Figure 57). Alternatively, simply hold the iPhone up to your ear.
Write a Message by Hand
To add a personal touch, you can send a handwritten note:
Enter handwriting mode: Tap the Handwriting
 key on the keyboard—you may have to rotate the device to landscape orientation first.
Write a note: Draw on the screen with your finger, a stylus, or (on newer iPads) an Apple Pencil.
Scroll around the canvas: Drag with two fingers.
Leave handwriting mode: Tap Done to finish your note and insert it in the message. Tap the Keyboard
 icon to discard the note.
Insert previous or predefined notes: On the iPhone, tap one of the scripts at the bottom of the screen. On the iPad, tap the History
 icon to reveal previous and predefined notes.
Reply with Tapback
Tapback lets you respond quickly to messages without typing: Touch, hold, and release a message bubble to reveal a popover with tapback icons. Tap one to add it to a message (Figure 58).

You can have only one tapback response on a message at a time, but you can change it later. Also, you can remove a tapback by opening the popover again and tapping on the current tapback icon.
Discover Messages Apps
Developers can create apps for Messages—it even has its own App Store! While the keyboard is hidden, you can tap icons below the message field to activate an app. It also appears in the QuickType bar if you haven’t started typing yet. Otherwise, tap the App Store  icon to access Messages apps.
Use Messages Apps
Here’s how to use Messages apps:
If the app drawer isn’t showing, tap the App Store
 icon to the left of the message field.
Tap an app in the app drawer. If the app isn’t showing, swipe left and right to view more apps (Figure 59).

Figure 59: Tapping and holding the app drawer enlarges it and lets you swipe to see more apps. If the app isn’t in the app drawer, tap More to show all apps. You can favorite apps in this view to make them always available in the app drawer. Tap Edit and tap the green plus
 button or red delete
  button to add or remove apps from favorites.
You can also delete apps in the More view by swiping left on an app and tapping Remove from Favorites.
After you tap an app, it displays in Messages, where the keyboard usually is. Tap an icon to insert it in your message. You can also make an app fullscreen by swiping up on the drawer.
Place Stickers
Some Messages apps offer stickers, which you can tap to insert into a message, or place on top of messages by tapping, holding, and dragging them onto the message bubble.
Unfortunately, they’re a pain to remove:
Touch and hold a placed sticker.
Tap Sticker Details.
On the Sticker Details screen, swipe the sticker you want to delete from right to left to reveal Delete.
Tap Delete.
Manage Message Details
While viewing a Messages chat, tap the recipient’s name at the top of the screen followed by the info ![]() icon to uncover the Details view, which contains a host of capabilities that apply to both group and individual chats.
icon to uncover the Details view, which contains a host of capabilities that apply to both group and individual chats.
Deal with Groups
Certain options are displayed only in a group message:
Name a group: Tap Enter a Group Name to label the group message. The group name replaces the participants’ names at the top of the chat’s thread and in the chat’s entry in your messages list.
Leave a group chat: You can leave a group chat that just won’t end. Tap Leave this Conversation; you may have to scroll down to find it.
Add a contact to a chat: Not only can you leave an ongoing conversation, but you can also invite someone else to it. Tap Add Contact.
Mute a chat: To remain in the chat but stop receiving a notification each time a new message arrives, enable Hide Alerts.
Manage All Attachments
All chat attachments appear in a grid in Details view. Attachments are split into multiple sections, like photos, links, locations, and attachments.
Here’s how to work with Messages attachments:
Save and share images and attachments: Tap an image or attachment to open it. Tap the Share
 icon and either choose Save Image or Save to Files or another place to send the image or attachment.
Delete images and attachments: Touch and hold an image or attachment and tap Delete on the popover.