
17 Working with Layout
17.1 LAYOUT AND LAYOUT MANAGER
A layout manager automatically arranges the controls within a window by using some types of algorithm. In Java LayoutManager is an interface for classes that know how to lay out Containers. A layout manager is an instance of any class that implements the LayoutManager interface.
The sizes and positions of the components in a container are usually controlled by a layout manager. Different layout managers implement different ways of arranging components. There are several predefined layout manager classes in the AWT: FlowLayout, GridLayout, BorderLayout, CardLayout and GridBagLayout. It is also possible to define new layout managers, if none of these suit one's purpose. Every container is assigned a default layout manager when it is first created. For Panels, including applets, the default layout manager belongs to the class FlowLayout. For Windows, the default layout manager is a BorderLayout. The layout manager of a container can be changed using its setLayout() method. The method's signature is as shown below:
public void setLayout(LayoutManager mgr)
The method sets the layout manager mgr for this container.
At first instance, it may seem fairly difficult to get the exact layout that would be on the applets and windows, but after some practice and experimentation it will become easy for one to decide which layout manager will be most suitable for the applications.
All the LayoutManager classes defined by Java are discussed below. They are part of the java.awt package.
17.2 FLOWLAYOUT
FlowLayout is the default layout manager. A flow layout arranges components in a directional flow, much like lines of text in a paragraph. A FlowLayout simply lines up its components as they come in a form of row. After laying out as many items as will fit in a row across the container, it will move on to the next row. The components in a given row can be either left-aligned, right-aligned, or centred, and there can be horizontal and vertical gaps between components. The class defines the following constructors:
1. public FlowLayout()
This form of constructor creates a new FlowLayout with centred alignment and a default 5-unit horizontal and vertical gap.
2. public FlowLayout(int align)
This form of constructor creates a new FlowLayout with the specified alignment and a default 5-unit horizontal and vertical gap. The value of the alignment argument must be one of FlowLayout. LEFT, FlowLayout.RIGHT, FlowLayout.CENTER, FlowLayout.LEADING or FlowLayout.TRALING.
3. public FlowLayout(int align, int hgap, int vgap)
This form of constructor creates a new flow layout manager with the indicated alignment and, horizontal and vertical gaps.
For example, suppose an applet wants to contain one button, located in its upper right corner. The default layout manager for an applet is a FlowLayout that uses centre alignment. It would centre the button horizontally. The applet needs to be given a new layout manager that uses right alignment, which will show the button to the right edge of the applet. The following init() method will carry out this function.
The above code will produce the following output:
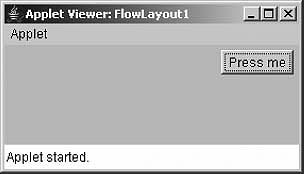
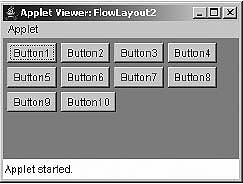
Figure 17.1 Output screen of Program 17.1
Explanation: This program is simple. The default alignment for the FlowLayout is CENTER. The LEFT alignment is set and an array of 10 buttons are created. All buttons instances are added to the applet window using the for loop.
17.3 BORDERLAYOUT
A border layout lays out a container, arranging and resizing its components to fit in five regions: north, south, east, west and centre. Each region may contain no more than one component, and is identified by a corresponding constant: NORTH, SOUTH, EAST, WEST and CENTER. A BorderLayout places one component in the centre of a container. The central component is surrounded by up to four other components that border it to the "North, "South", "East" and "West", as shown in the diagram. Each of the four bordering components is optional. The layout manager first allocates space to the bordering components. Any space that is left over goes to the centre component. BorderLayout is the default layout manager for all windows, such as Frames and Dialogs.
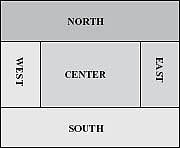
Figure 17.2 BordeLayout regions
The class defines the following constructors:
1. public BorderLayout()
This form of constructor creates a new border layout with no gaps between components.
2. public BorderLayout(int hgap, int vgap)
This form of constructor creates a border layout with the specified gap between components. The horizontal gap is specified by hgap and the vertical gap by vgap.
When adding component with BorderLayout, the other form of add method has to be used which takes two parameters: one is the component to be added and second is one of the constants defined by the BorderLayout class. This is as shown below:
void add(Component comp, Object region);
The method is defined by the Container class.
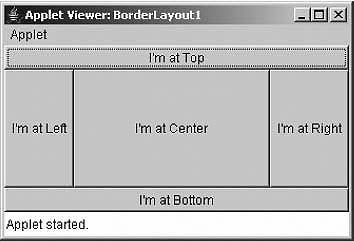
Figure 17.3 Output screen of Program 17.2
Explanation: This program demonstrates BorderLayout layout manager. Five buttons are added in the five regions defined by BorderLayout. Note the second parameter in the add method as Shown in the program 17.2. This determines where the first parameter (i.e., component) has to be placed.
17.4 GRIDLAYOUT
A GridLayout lays out components in a grid of equal-size rectangles. The illustration shows how the components would be arranged in a grid layout with three rows and two columns as given in the following program. If a container uses a GridLayout, the appropriate add method takes a single parameter of type Component (e.g., add(myButton)). Components are added to the grid in the order shown; that is each row is filled from left to right before going onto the next row.
The class defines the following constructors:
1. public GridLayout()
This form of constructor creates a grid layout with a default of one column per component in a single row.
2. public GridLayout(int rows, int cols)
This form of constructor creates a grid layout with the specified number of rows and columns. All components in the layout are given equals size. One, but not both, of rows and columns can be zero, which means that any number of objects can be placed in a row or a column.
3. public GridLayout(int rows, int cols, int hgap, int vgap)
This form of constructor creates a grid layout with the specified number of rows and columns. All components in the layout are given equal size. In addition, the horizontal and vertical gaps are set to the specified values. Horizontal gaps are placed between each of the columns, vertical gaps are placed between each of the rows.
In the second and third form of constructor specifying rows as zero allows for unlimited-length columns and specifying columns as zero allows for unlimited-length rows.
Explanation: In this program, the GridLayout of three rows and two columns are set as layout for the applet window. Six Button instances have been added. It is clear from the output that buttons are placed in a grid of 3 by 2. Note in the program if layout is set as setLayout(new GridLayout(0, 2)); output remains the same. Why is it so?
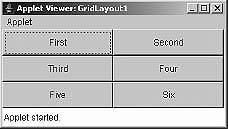
Figure 17.4 Output screen of Program 17.3
Explanation: In this program, two Panel instance P1 and P2 are created. For the applet window the two components are two Panel instance P1 and P2. These two are added onto the applet window in a grid of one row and two columns with horizontal gap and vertical gap of 10 and 0 pixels, respectively. For the first Panel instance P1, the GridLayout set is of two rows, three columns with horizontal gap and vertical gap of 5 pixels each.
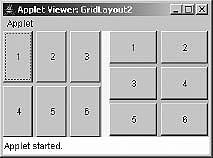
Figure 17.5 Output screen of Program 17.4
Initially Button instances are added to P1 using the for loop, then again for the P2. Both the Panel
instances P1 and P2 are then added to applet window. The background colour of two panels and applet window is chosen different just for differentiation.
17.5 GRIDBAGLAYOUT
A GridBagLayout is similar to a GridLayout in that the container is broken down into rows and columns of rectangles. However, a GridBagLayout is much more sophisticated because the rows do not all have to be of the same height, the columns do not all have to be of the same width and a component in the container can spread over several rows and columns. There is a separate class, GridBagConstraints, that is used to specify the position of a component, the number of rows and columns that it occupies and several additional properties of the component.
Using a GridBaglayout is rather complicated, so it will not be discussed here much.
17.6 CARDLAYOUT
CardLayouts differ from other layout managers in that in a container that uses a CardLayout, only one of its components is visible at any given time. Think of the components as a set of "cards". Only one card is visible at a time, but one can flip from one card to another. Methods are provided in the CardLayout class for flipping to the first card, to the last card and to the next card in the deck. A name can be specified for each card as it is added to the container, and there is a method in the CardLayout class for flipping directly to the card with a specified name. The class defines the following constructors:
1. public CardLayout()
This form of constructor creates a new card layout with gaps of size zero.
2. public CardLayout(int hgap, int vgap)
This form of constructor creates a new card layout with the specified horizontal and vertical gaps. The horizontal gaps are placed at the left and right edges; the vertical gaps are placed at the top and bottom edges.
When cards are added to the panel, they are usually given a name. For that, a new form of add method can be used. Its signature is given below:
void add(Component Pobj, Object name);
Here, name is a string that specifies the name of the card whose panel is specified by Pobj.
The class defines the methods for flipping among the cards and showing a specific card.
1. public void first(Container parent)
This method flips to the first card of the container.
2. public void next(Container parent)
This method flips to the next card of the specified container. If the currently visible card is the last one, this method flips to the first card in the layout.
3. public void previous(Container parent)
This method flips to the previous card of the specified container. If the currently visible card is the first one, this method flips to the last card in the layout.
4. public void last(Container parent)
This method flips to the last card of the container.
5. public void show(Container parent, String name)
This method flips to the component that was added to this layout with the specified name. If no such component exists, then nothing happens.
When CardLayout is used, the use of Panels is a must. The steps which must be followed in order to use CardLayout are as follow:
1. Create a new Panel instance and an instance of CardLayout.
2. Set the layout for Panel instance as CardLayout using its instance created in first step.
3. Now for each card, create a separate Panel instance and add whatever components are needed to add to that panel like buttons, checkboxes, labels, list, choice, etc.
4. Each Panel instance created in Step 3 is added to the main Panel instance created in Step 1, giving a unique card name for each card.
5. Finally, the main Panel is added to the applet window.
All these steps are illustrated in the programs given below:
Explanation: In this program, in Step1 an instance of CardLayout CLO is created and added to an instance of Panel (i.e., Main) setting the layout for Main panel as CardLayout. Next, three panels P1, P2 and P3 are created. Each panel contains one label and one button. The background for each color is set to a different color. Next, the three panels are added to the Main panel using add method where card name for each panel is set to "C1", "C2" and "C3". In the final step, the Main panel is added to the applet window.
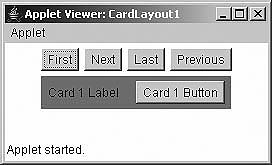
Figure 17.6 Output screen of Program 17.5
An array of Button is created and added to the main applet window. Listeners are added for the buttons to receive buttons press notifications. When any of the buttons is pressed actionPerformed method is called. In the method, it is first checked which button is pressed, depending on that, the first, next, last or previous method is called. Each method takes its parent as argument that is Main panel. By default, the first card in a deck of cards is shown.
Explanation: This program is similar to the previous one but here an array of different types are used to make the processing simpler. Just one label is added to each panel. In the actionPerformed method, show method of CardLayout class is used for showing any of the cards. The second argument to this method specifies which card is to be seen.
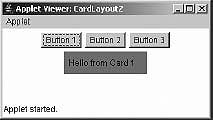
Figure 17.7 Output screen of Program 17.6
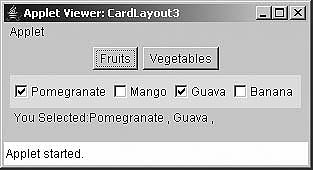
Figure 17.8 Output screen of Program 17.7 (Part 1)
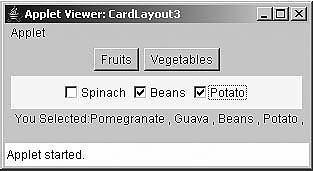
Figure 17.9 Output screen of Program 17.7 (Part 2)
Explanation: Onto the main applet window, two buttons labelled "Fruits" and "Vegetables" are created. Each of these buttons when clicked, invoke one of the two created panels. The panel instance P1 contains four checkboxes with fruit names as their labels. The Panel instance P2 contains three checkboxes with vegetable names as their labels.
For each of the checkbox ch1 to ch7, item listeners are added. When any of the panel is selected, it is shown to the user as actionPerformed method is called. In any of the Panel P1 or P2, user can check the checkboxes. As user selected/deselected the checkboxes, the state of the checkbox changes and itemStateChanged method is invoked. In the method, depending on which checkbox was checked, its label is appended to the String object msg. In the end, using drawString method msg is displayed.
17.7 INSETS
An Insets object is a representation of the borders of a container. It specifies the space that a container must leave at each of its edges. The space can be a border, a blank space or a title. These values are used by the layout manager to inset the components when it lays out the window. The class defines the following constructor:
public Insets(int top, int left, int bottom, int rigth)
The constructor creates and initializes a new Insets object with the specified top, left, bottom and right insets.
In order to use insets in the program, one has to override getInsets method of Container class. Inside a new Insets, object can be created by using the above constructor. The signature of the method is:
public Insets getInsets()
The method determines the insets of this container, which indicates the size of the container's border. A Frame object, for example, has a top inset that corresponds to the height of the frame's title bar.
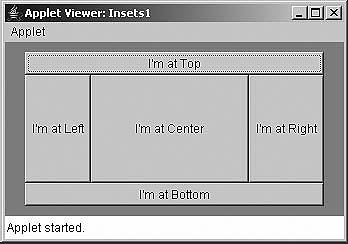
Figure 17.10 Output screen of Program 17.8
Explanation: This program is same as was seen in BorderLayout section. Here, the getInsets method is added that returns a new Insets object. The method insets the components on the applet window so that they are 10 pixels away from top and bottom and 20 pixels away from left and right. The background has been set to magenta so that insets are clearly visible.
17.8 PONDERABLE POINTS
1. A layout manager automatically arranges the controls within a window by using some type of algorithm. A layout manager is an instance of any class that implements the LayoutManager interface.
2. FlowLayout is the default layout manager. A flow layout arranges components in a directional flow, much like lines of text in a paragraph.
3. A border layout lays out a container, arranging and resizing its components to fit in five regions: north, south, east, west and center. Each region may contain no more than one component, and is identified by a corresponding constant: NORTH, SOUTH, EAST, WEST, and CENTER.
4. A GridLayout lays out components in a grid of equal size rectangles.
5. CardLayout differs from other layout managers in that it has a container that uses a CardLayout, only one of its components is visible at any given time.
6. An Insets object is a representation of the border of a container. It specifies the space that a container must leave at each of its edges.
REVIEW QUESTIONS
1. What is a Layout Manager and what are the different Layout Managers available in java.awt and what is the default Layout manager for the panel and the panel subclass.
2. How can we create a borderless window?
3. Can we add the same component to more than one container?
4. How are the elements of different layouts organized?
5. Which Containers use a BorderLayout as their default layout?
6. Which Containers use a FlowLayout as their default layout?
7. Which method is used to set the layout of a container?
8. Which method returns the preferred size of a component?
9. Which layout should be used to organize the components of a container in a tabular form?
10. What is the default layout for an applet, a frame and a panel?
11. An Applet has its Layout Manager set to the default of FlowLayout. What code would be the correct to change to another Layout manager? Justify your answer.
setLayoutManager (newGridLayout());
setLayout(new GridLayout(2, 2));
set GridLayout(2, 2);
setBorderLayout();
Multiple Choice Questions
1. _________________ returns an array that contains all the elements stored in the invoking collection. The array elements are copies of the collection elements.
(a) Object [] toArray(Objectarray[])
(b) Object [] toArray()
(c) void toArray []
(d) None of the above
2. The signature of getInsets() method is:
(a) public Insets getInsets()
(b) public Insets getInsets(int top, int left, int bottom)
(c) public Insets getInsets(int top, int left, int bottom, int right)
(d) None of the above
3. Which is the constructor of CardLayout?
(a) public CardLayout(int top, int bottom, int left, int bottom)
(b) public CardLayout(int top, int left, int bottom, int right)
(c) public CardLayout(int hgap, int vgap)
(d) public CardLayout(int hgap, int left, int vgap, int right)
4. public GridLayout() creates a grid lay out with a default of
(a) One column per component
(b) Two column per component
(c) Three columns per component
(d) None of the above
5. A border layout lays out a container and resizes its components to fit in
(a) 3 regions
(c) 5 regions
(b) 4regions
(d) 6 regions
6. The basic signature of setLayout manager is:
(a) void setLayout()
(b) public void setLayout()
(c) public void setLayout(int left, int right)
(d) public void setLayout(Layout Manager mgr)
7. All the LayoutManager classes are part of
(a) java.lang
(c) java.awt
(b) java.util
(d) java.Applet
8. ______________ is the default layout manager.
(a) FlowLayout
(c) CardLayout
(b) BorderLayout
(d) GridLayout
9. When you are using CardLayout, you must use:
(a) GridLayout
(c) Frame
(b) Panels
(d) Applet
10. Insets object is a representation of the ____________ of a container.
(a) border
(c) (a) and (b)
(b) visibility
(d) none of the above
KEY FOR MULTIPLE CHOICE QUESTIONS
1. b
2. a
3. c
4. a
5. c
6. d
7. c
8. a
9. b
10. a