
16 Working with AWT
16.1 INTRODUCTION TO AWT
AWT stands for Abstract Window Toolkit. The toolkit is defined within the java.awt package. It contains all of the classes for creating user interfaces like Buttons, Labels, TextBox, Lists, etc., and for painting graphics and images. The AWT provides many classes for programmers to use. It is the connection between an application and the native GUI. The AWT hides the system from the underlying details of the GUI, the application will be running on and thus is at very high level of the abstraction. All of the classes are arranged in a meaningful hierarchy so that many of the features of the top-most classes can be used in a number of subclasses.
16.2 STRUCTURE OF THE AWT
The structure of the AWT is rather simple: Components are added to and then laid out by layout managers in Containers. There is a variety of event handling, menu, fonts and graphics classes in addition to the above two. The hierarchy of AWT classes is as shown below:
![]() BorderLayout
BorderLayout
![]() CheckboxGroup
CheckboxGroup
![]() Color
Color
![]() Component
Component
• Button
• Canvas
• Checkbox
• Choice
• Container
![]() Panel
Panel
![]() Window
Window
![]() Dialog
Dialog
![]() Frame
Frame
• Label
• List
• Scrollbar
• TextComponent
![]() TextArea
TextArea
![]() TextField
TextField
![]() Dimension
Dimension
![]() Event
Event
![]() FileDialog
FileDialog
![]() FlowLayout
FlowLayout
![]() Font
Font
![]() FontMatrics
FontMatrics
![]() Graphics
Graphics
![]() GridLayout
GridLayout
![]() GridBagConstraints
GridBagConstraints
![]() GridbagLayout
GridbagLayout
![]() Image
Image
![]() Insets
Insets
![]() Media Tracker
Media Tracker
![]() MenuComponent
MenuComponent
• MenuBar
• MenuItem
![]() CheckboxMenuItem
CheckboxMenuItem
![]() Menu
Menu
![]() Point
Point
![]() Polygon
Polygon
![]() Rectangle
Rectangle
![]() Toolkit
Toolkit
Most commonly used classes and their brief description of AWT are given below:
Table 16.1 Classes defined by java.awt package
16.3 AWT WINDOW HIERARCHY
The AWT window hierarchy is shown by the in Figure 16.1 diagram.
All of the classes are discussed in the following sections.
16.3.1 The Component Class
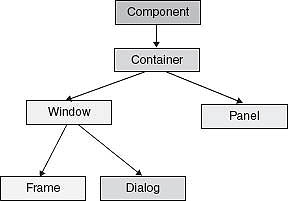
Figure 16.1 AWT window hierarchy
A component is an object having a graphical representation that can be displayed on the screen and interact with the user. Examples of components are the buttons, checkboxes and scrollbars of a typical graphical user interface. In other words the visible User Interface (UI) controls that the user interacts with all of which have been added to a Container are components. Anything that is derived from the class Component can be a component. The class contains a number of useful methods for event handling, managing graphics painting and sizing and resizing the window. This class is the topmost class in the AWT hierarchy. The Component class is the abstract superclass of the non-menu-related AWT components.
16.3.2 The Container Class
A generic AWT container object is a component that can contain other AWT components. The Container class is the subclass of the Component class. Components added to a container are tracked in a list. The order of the list will define the component's font-to-back stacking order within the container. If no index is specified when adding a component to a container, it will be added to the end of the list.
Containers (Frames, Dialogs, Windows and Panels) can contain components and are themselves components, hence can be added to Containers. Containers usually handle events that occurred to the Component, but the code for handling events can be written in the component, too. A container is responsible for laying out (i.e., positioning) any components that it contains. It does this through the use of various layout mangers that are discussed later in Chapter 17.
Every Container is a component since it is derived from Component; thus it can also behave and be used like a Component. All of the methods in Component can be used in a Container. Container has two direct subclasses, Window and Panel. They are discussed below.
16.3.3 The Panel Class
Panel is the simplest container class because Container class is the superclass for Panel class. A panel provides space in which an application can attach any other component, including other panels. A Panel is a container that does not exist independently. The Applet class is a subclass of Panel, and as has been seen, as applet does not exist on its own; it must be displayed on a Web page or in some other window. Any panel must be contained inside something else, either a Window, another Panel, or in the case of an Applet, a page in a Web browser. It means that a Panel is a window that contains no title bar, menu bar or border. Due to this, when an applet is run inside a Web browser no title, border or menu is displayed. A simple plain rectangular region is displayed. In case of running, applet using appletviewer, the appletviewer application provides the above-mentioned border, title and menus.
The component can be added to the Panel using add method as will be seen in the programs following. A number of methods defined by Component class like setSize, SetBounds and setTitle can be used for changing their shape and look. The fact that panels can contain other panels means that one can have many levels of components containing other components.
16.3.4 The Window Class
A Window objects is a top-level window with no borders and no menu bar. A Window represents an independent to-level window that is not contained in any component. Window is not really meant to be used directly. It has two subclasses: Frame, to represent ordinary windows that can have their own bars, and Dialog to represent dialog boxes that are used for limited interactions with the user.
16.3.5 The Frame Class
Applets are a fine idea. It is nice to be able to put a complete program in a rectangle on a Web page. But more serious, large-scale programs have to run in their own window, independently of a Web browser. In Java, a program can open an independent window by creating an object of type Frame. A Frame has a title, displayed in the title bar at the top of the window. It can have a menu bar containing one or more pull-down menus. A Frame is a Container, which means that it can hold other GUI components. The default layout manager for a frame is a BorderLayout. A common way to design a frame is to add a single GUI component, such as a Panel or Canvas, in the layout's center position so that it will fill the entire frame.
It is possible for an applet to create a frame. The frame will be a separate window from the Web browser window in which the applet is running. Any frame created by an applet includes a warning message such as "Warning: Insecure Applet Window". The warning is there so that one can always recognize window created by applets. When a Frame window is created by a program rather than an applet, a normal window is created.
16.3.6 Applet Frame Class
The Frame class you will use to create child window's of an applet window. The class defines the following two commonly used constructors.
1. public Frame()
This form of constructor constructs a new instance of Frame that is initially invisible. The title of the Frame is empty.
2. public Frame(String title)
This form of constructor creates a new, initially invisible Frame object with the specified title.
The useful methods of Frame class are discussed below:
![]()
setSize() method
This method is used for setting the dimensions of the frame window. The method has two forms:
   void setSize(int w, int h)
   void setSize(Dimension d)
In the first form, the width and height are specified by w and h in terms of pixels. In the second object, a dimension object d is passed that contains width and height of the frame window.
![]()
getSize()method
This method returns the dimension of the frame window as Dimension object. Its signature is given below:
Dimension getSize()
![]()
setVisible()method
This frame window after creation is invisible. To make it visible the setVisible method can be used. It has the following form:
void setVisible(boolean flag)
If the flag is true frame window will be visible else, it will be invisible.
![]()
setTitle() method
This method can be used for setting the title of the frame window. It has the following form:
void setTitle(String title)
![]()
getTitle()method
String getTitle()
This method returns the title of the frame. The title is displayed in the frame's border.
![]()
setResizeable()method
The signature of the method is given below:
void setResizable(boolean rs)
This method sets whether this frame is resizable by the user. If rs is false, the frame window cannot be resized. By default, the frame is resizable.
Some other methods will be demonstrated programmatically.
The frame class can receive the following events:
• WINDOW_OPENED
• WINDOW_CLOSING
• WINDOW_CLOSED
• WINDOW_ICONIFIED
• WINDOW_DEICONIFIED
• WINDOW_ACTIVATED
• WINDOW_DEATIVATED
• WINDOW_GAINED_FOCUS
• WINDOW_LOST_FOCUS
• WINDOW_STATE_CHANGED
One important point to note while working with frame window is that frame window cannot be closed manually by clicking at the close button. In case frame window is created by the applet window, frame window will be closed automatically as the applet window is closed. But in case frame window is created by simple application program, it cannot be closed. For both the cases the event handling code can be
written. For closing the window the windowClosing method of WindowListener interface will be written for removing the window from the screen.
Now, a few programs are presented that give an idea on how to work with Frame class. A Frame can be created inside an applet or an application program. The applications programs of Frame are first presented. Subsequently, some Frame-based applets will be dealt with.
Explanation: The program is very simple. A new Frame instance is created by the name F and with title "This is My First Frame". The size of the new frame window is 200 by 200. The window is made visible by using setVisible method. Note that after the frame window is created, it cannot be destroyed by clicking the close button. It will have to be closed forcibly by using command Ctrl-C under window or explicitly closing editor output window, in case some Java editor is used for running the programs. Note the program is a simple application program, and not an applet.
In general, the Frame class is extended by some class because events cannot be handled that occurs within Frame window. The next program shows how window can be closed and extended.

Figure 16.2 Output screen of Program 16.1
Explanation: In this program, the class MyFrame extends the Frame class. The constructor of the MyFrame class takes title as String objects and passes it to the constructor of Frame class. Similar to adapter classes for applets has been seen in the previous chapter, one adapter class is created for handling the WINDOW_CLOSING event. The window listener is added using addWindowListener method. In this method, an object of Winadp class is passed as argument. It means the frame window will be receiving window events. The constructor of Winadp class takes reference of MyFrame class as argument. Recall this is necessary as to work with methods of MyFrame class and its parent class within Winadp class. In the overridden windowClosing method, the visibility of frame window is set to false using setVisible method and the program is terminated using System.exit(0). If not used, window will be hidden, but there will be no prompt/main window back. CTRL-C will have to be pressed .
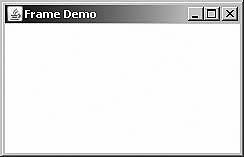
Figure 16.3 Output screen of Program 16.2
In the main, the frame window is created using constructor of MyFrame class. The reference is stored in fr. Rest is simple to understand.
Explanation: The program is simple. Similar to handling window events using adapter class, the mouse event is handled here using adapter class. MouseAdp is created that extends MouseAdapter class in which the method mouseClicked is overridden. The method displays "Hello" wherever the mouse is clicked inside the frame window. In the main method, foreground color of the frame window is set using method setForeground and setBackground.
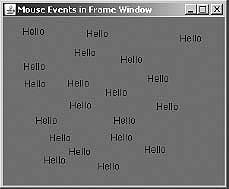
Figure 16.4 Output screen of Program 16.3
A number of other methods that have been used in the applet can be used here also. The most useful method is paint. If one wants to perform some drawings in the
frame window, simply define paint method and write code in it. To see this simply add the paint method in the MyFrame class and run the program after compiling.
public void paint(Graphics g)
{
      g.drawRect(50,50,50,50);
      g.fillOval(100,100,50,50);
}
Explanation: The program is similar to the earlier program of creation of frame with window closing event but here instead of main method, applet class has been used. A new applet class Frame1 is created and inside it the coding for creation and display of frame window is written. Note in the program, the setBounds method is used for setting the x, y coordinate and width and height of the frame window.

Figure 16.5 Output screen of Program 16.4
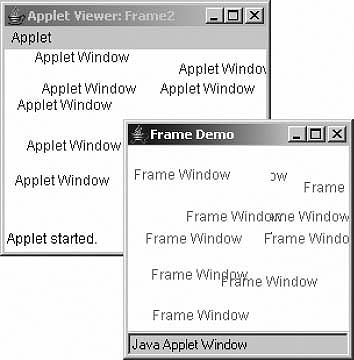
Figure 16.6 Output screen of Program 16.5
Explanation: This program demonstrates how events can be handled both in frame window as well as in applet window. The code has been explained in the earlier programs, so no need to repeat it here again. One thing to note here is that both the classes MyFrame and Frame2 implement the interfaces and define the methods of the interfaces. Both the classes write the code in mouseClicked method and provide empty implementation of other methods of the interfaces.
16.4 AWT CONTROLS
This section discusses some of the GUI interface elements that are represented by subclasses of Component. It also introduces the event classes and listener interfaces associated with each type of component that have been seen earlier.
The Component class itself defines many useful methods that can be used with components of any type. Some of these have already been used in examples. Let comp be a variable that refers to any component. Then the following methods are available (among many others):
1. comp.getSize() is a function that returns an object belonging to the class Dimension. This object contains two instance variables—comp.getSize().width and comp.getSize().height—that give the current size of the component. One warning: When a component is first created, its size is zero. The size will be set later, probably by a layout manager. A common mistake is to check the size of a component before that size has been set.
2. comp.getParent() is a function that returns a value of type Container. The container is the one that contains the component, if any. For a top-level component such as a Window or Applet, the value will be null.
3. comp.getLocation() is a function that returns the location of the top-left corner of the component. The location is specified in the coordinate system of the component's parent. The returned value is an object of type Point. An object of type Point contains two instance variables, x and y.
4. comp.setEnabled(true) and comp.setEnabled(false) can be used to enable and disable the component. This is only useful for certain types of component, such as button. When a button is disabled, its appearance changes, and clicking on it will have no effect. There is a boolean-valued function, comp.getEnabled(), that can be called to discover whether the component is enabled.
5. comp.setVisible(true) and comp.setVisible(false) can be called to hide or show the component.
6. comp.setBackground(color) and comp.setForeground(color) set the background and foreground colors for the component. If no colors are set for a component, it inherits the colors of its parent container. The command comp.setFont(font) sets the default font that is used for text displayed on the component. (These should work for all components, but might not work properly for some of the standard components, depending on the version of Java.)
For the rest of this section, subclasses of Component will be discussed that represent common GUI components. Remember that using any component is a multi-step process. The component object must be created with a constructor and added to a container. In many cases, a listener must be registered to respond to events from the component, and in some cases, a reference to the component must be saved in an instance variable so that the component can be manipulated by the program after it has been created.
For adding components to the applet or any other type of window add method have to be used defined by the Component class. The method has six forms. Only the most commonly used forms and their signatures are shown below:
Component add(Component comp)
Here, comp is the component to be added to the applet or any other type of window. The method returns a reference to the component added.
For the removal of the component, the method remove can be used. It has three forms, but only the commonly used form is shown:
void remove(Component comp)
Here comp is the component to be removed.
The various controls supported by AWT are shown below by giving their class name. All these controls have Component as their super class, so all the methods of Component class can be used by these classes.
![]()
Apart from these classes, AWT provides classes for creating menus, dialogs, etc. They will be discussed in details later.
16.4.1 The Button Control
The Button class is used for creating the most frequently used component (i.e., a push button). The class defines two constructors:
1. public Button()
This form of constructor constructs a button with an empty string for its label. Later, the label can be set using setLabel method.
2. public Button(String label)
This form of constructor constructs a button with the specified label.
The commonly used methods of this class are as follows:
1. public void addActionListener(ActionListener l)
This method adds the specified action listener to receive action events from this button. Action events occur when a user presses or releases the mouse over this button.
2. public String getActionCommand()
This method returns the command name of the action event fired by this button. If the command name is null (default), this method returns the label of the button.
3. public String getLabel()
This method returns the label of the button.
4. public void setLabel(String label)
This method sets the button's label to be the specified string.
For handling events for the button, the listener for the button has to be added using addActionListener method. The parent class must implement the ActionListener interface. Whenever the button is clicked, the method actionPerformed is called and an object of ActionEvent is passed to it. In the actionPerformed method, the code for handling the button press event can be written.
A number of examples of Button control are provided.
Explanation: In this program, a button but is created using Button (Click Me); constructor form. This creates a button with a label Click Me. The button instance but is added to the applet window using add method. The applet class button implements the ActionListener interface so that the button press event can be handled. Using method addActionListener, a listener for the button is added. When the button is clicked, actionPerformed method is called. In the method the String object is initialized to You Clicked Me and repaint method calls the paint method. Thus msg is displayed at 30, 70 in the applet window. The empty constructor form and setLabel method could also be used as:
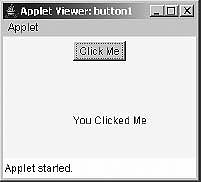
Figure 16.7 Output screen of Program 16.6
but = new Button();
but.setLabel("Click Me")
Explanation: This program is simple compared to the previous one but here there are two buttons. Code in the init method is simple to understand. Note listeners for both buttons have to be added. In the actionPerformed method, one can come to know which button was pressed. This is done by using the method getActionCommand, which returns the label of the button pressed. The label is compared with the label of both the buttons using equals method. Depending on which button was pressed, appropriate message is put into the msg. The same is displayed using paint method. In the output, msg is displayed when button2 is clicked.
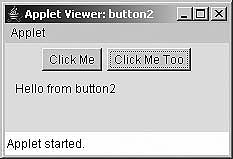
Figure 16.8 Output screen of Program 16.7
Explanation: In this program, circles of radius 6 are drawn in random colors anywhere on to the applet window. Note in the actionPerformed method getSource() method has been used. This method returns the Object that is responsible for the event. Coding in the method is simple to understand.
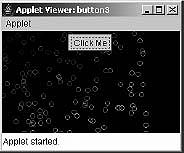
Figure 16.9 Output screen of Program 16.8
Explanation: This program is simple. The number of times the button was clicked is to be counted. For this purpose, a static member count has been taken. The count is incremented by 1 each time the button is clicked in the actionPerformed method. This count is then concatenated with the String literal " You clicked me:= count times " and is displayed in paint method.
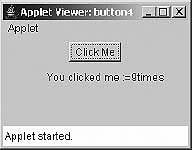
Figure 16.10 Output screen of Program 16.9
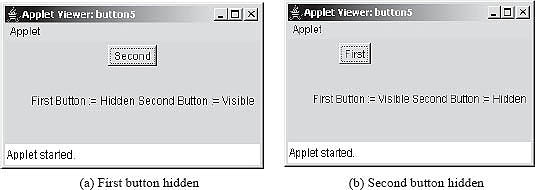
Figure 16.11 Output screen of Program 16.10
Explanation: In the actionPerformed method, when the first button (with the caption " First") is clicked it is to be hidden and the second button (with the caption " Second ") displayed. When second button is clicked, the reverse is done (i.e., display the first and hide the second). This has been made possible by using the method setVisible seen earlier.
16.4.2 The Label Class
A Label object is a component for placing text in a container. A label displays a single line of read-only text (i.e., static text). The text can be changed by the application, but a user cannot edit it directly. The Label class defines the following constructors:
1. public Label()
This form of constructor constructs an empty label. The text of the label is the empty string " ".
2. public Label(String text)
This form of constructor constructs a new label with the specified string of text, left justified.
3. public Label(String text, int alignment)
This form of constructor constructs a new label that presents the specified string of text with the specified alignment. Possible values for alignment are Label.LEFT, Label.RIGHT and Lable.CENTER.
The Label class defines a number of useful methods for getting text/alignment, setting text/alignment of the Label object. They are briefly discussed in the following.
1. public int getAlignment()
This method returns the current alignment of this label. The returned values may be any of the Label.LEFT, Lable.RIGHT, and Label.CENTER.
2. public void setAlignment(int alignment)
This method sets the alignment for this label to the specified alignment. Possible values may be Label.LEFT, Label.RIGHT and Label.CENTER.
3. public String getText()
This method returns the text of this label as String object.
4. public void setText(String text)
This method sets the text for this label to the specified text.
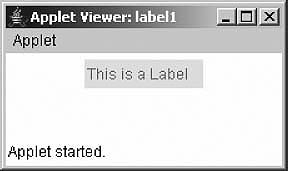
Figure 16.12 Output screen of Program 16.11
Explanation: This program is simple to understand. Most important thing to note here is that label is placed onto the applet by the default layout manager, that is, FlowLayout manager from left to right. They will be discussed in the next section.
Explanation: In this program, an array of objects of Label class is created by the name L. The array is given length in the init method. Note each element of array L is initialized separately and assigned the text "Label 1", "Label 2", and "Label 3" in the for loop. Outside the for loop in the init method the alignment for various labels is set, but from the output it is clear that it has not worked. This is because the default layout manager which is FlowLayout has not been changed, so by default labels or any other component are placed to right.
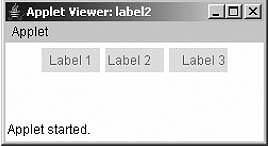
Figure 16.13 Output screen of Program 16.12
16.4.3 The Checkbox Class
A check box is a graphical component that can be in either an "on"(true) or "off " (false) state. Clicking on a check box changes its state from "on" to "off " or from "off " to "on". Along with this status of on or off, there is a label associated with check box object. For check box there is the class Checkbox.
The class defines the following constructors:
1. public Checkbox()
This form of constructor creates a check box with an empty string for its label. The state of this check box is set to "off ".
2. public Checkbox(String label)
This form of constructor creates a check box with the specified label. The state of this check box is set to "off ".
3. public Checkbox(String label, boolean state)
This form of constructor creates a check box with the specified label and sets the specified state.
4. public Checkbox(String label, boolean state, CheckboxGroup group)
5. public Checkbox(String label, CheckGroup group, boolean state)
The above two forms of constructors create a check box with the specified label, set to the specified state and in the specified check box group.
The most commonly used methods of these classes are discussed below:
1. public String getLabel()
This method returns the label of this check box.
2. public void setLabel(String label)
This method sets this check box's label to be the string argument.
3. public boolean getState()
This method determines whether this check box is in the "on" or "off " state. The Boolean value true indicates the "on" state and false indicates the "off " state.
4. public void setState(boolean state)
This method sets the state of this check box to the specified state. The Boolean value true indicates the "on" state, and false indicates the "off " state.
For handling the events for checkbox ItemListener interface have to be implemented in the parent window, that is, applet window or parent window. The listener is registered using the method addItemListener. Whenever the checkbox item state is changed, itemStageChanged method is called and an object of ItemEvent is passed to it. The method serves as an event handler for the checkbox state change event.
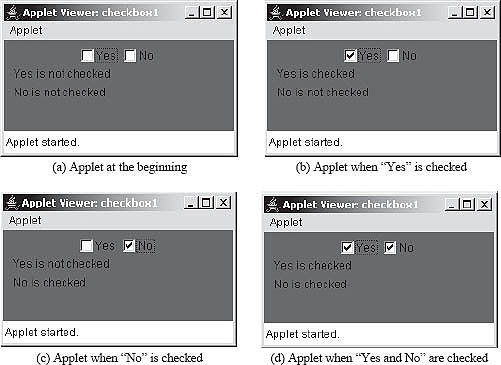
Figure 16.14 Output screen of Program 16.13
Explanation: This program creates two Checkbox instances with the name ch1 and ch2. The labels of these are "Yes" and "No". The applet class checkbox implements the ItemListener interface. Listener for both the checkboxes are added using addItemListener method. Whenever any of the checkbox's
state is changed, the itemStateMethod method is invoked and an object of ItemEvent is passed to it. Inside the method, the repaint method causes paint to be invoked. In the paint method, the state of both the checkboxes is on else, returns false. Depending on the state of checkboxes, appropriate message is displayed using drawString method.
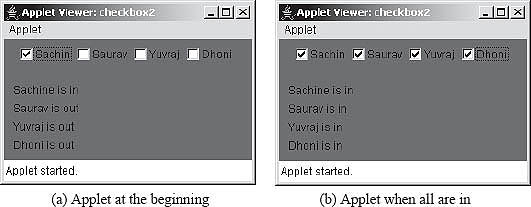
Figure 16.15 Output screen of Program 16.14
Explanation: This program is similar to the previous one with the addition of two more Checkbox instances. Note also that the state of first Checkbox instance is set to true.
16.4.4 The CheckboxGroup Class
The CheckboxGroup class is used to group tighter a set of Checkbox buttons. Exactly one check box button in a CheckboxGroup can be in the "on" state at any given time. Pushing any button, sets its state to "on" and forces any other button in the "on" state into the "off" state. In appearance, they are round shaped, and not square, so sometimes they are also known as radio buttons.
In case of checkboxes any of the checkbox can be set or unset, but after combining a number of checkboxes under one group, only one checkbox can be set.
The class defines just one constructor:
public CheckboxGroup()
The constructor creates a new instance of CheckboxGroup. The two useful methods of this class are discussed below:
1. public Checkbox getSelectedCheckbox()
This method gets the current choice from this check box group. The current choice is the check box in this group that is currently in the "on" state, or null if all check boxes in the group are off.
2. public void setSelectedCheckbox(Checkbox box)
This method sets the currently selected check box in this group to be the specified check box. It sets the state of that check box to "on" and all other check boxes in the group to "off ".
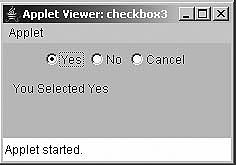
Figure 16.16 Output screen of Program 16.15
Explanation: In this program, a CheckboxGroup instance by the name group is created. Three Checkbox instances ch1, ch2 and ch3 are created and all are made members of the group. Now, out of all three checkboxes, only one can be set any time. In the paint method, the currently selected checkbox instance is obtained using the method getSelectedCheckbox(). This is stored in the temporary reference temp of Checkbox class The label of this is obtained
using getLabel method. This label is then appended to the string "You Selected" and displayed using drawString method.
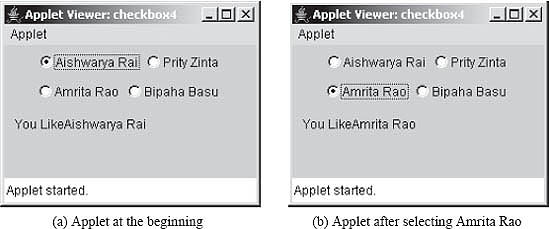
Figure 16.17 Output screen of Program 16.16
Explanation: In this program, an array of checkboxes is created by the name ch of size 4. Using for loop all array elements are initialized with default constructor of Checkbox class. The array elements are assigned the Checkboxgroup instance group using the method setCheckboxGroup. The labels of each checkbox are set separately using setLabel method. The first check box is assumed to be selected. Coding in paint method is simple to understand.
16.4.5 The List Class
The List component presents the user with a scrolling list of text items. The list can be set up so that the user can choose either one item or multiple ones. Any number of items can be shown at one time. The class provides the following constructors:
1. public List()
This form of constructor creates a new scrolling list. By default, there are four visible lines, and multiple selections are not allowed.
2. public List(int rows)
This form of constructor creates a new scrolling list initialized with the specified number of visible lines. By default, multiple selections are not allowed.
3. public List(int rows, boolean msMode)
This form of constructor creates a new scrolling list initialized to display the specified number of rows. Note that if zero rows are specified, the list will be created with a default of four rows. Also note that the number of visible rows in the list cannot be changed after it has been created. If the value of msMode is true, the user can select multiple items from the list. If it is false, only one item at a time can be selected.
There are a number of useful methods of List class, which are discussed below:
1. add
This method has two forms:
![]()
public void add(String item)
This form of add method adds the specified item to the end of the scrolling list.
![]()
public void add(String item, int index)
This form of add method adds the specified item to the scrolling list at the position indicated by the index. The index is zero based. If the value of the index is less than zero, or greater than or equal to the number of items in the list, the item is added to the end of the list.
2. public String getItem(int index)
This method gets the item associated with the specified index.
3. public String[]getItems()
This method gets the items in the list. It returns a string array containing items of the list.
4. public int getItemCount()
This method returns the number of items in the list.
5. public int getSelectedIndex()
This method returns the index of the selected item; if no item is selected, or if multiple items are selected, -1 is returned.
6. public int[] getSelectedIndexes()
This method returns an array of the selected indexes on the scrolling list; if no item is selected, a zero-length array is returned.
7. public String getSelectedItem()
This method returns the selected item on the list; if no item is selected, or if multiple items are selected, null is returned.
8. public String[]getSelectedItems()
This method returns an array of the selected items on the scrolling list; if no item is selected, a zero-length array is returned.
9. public void remove(String item)
This method removes the first occurrence of an item from the list.
10. public void remove(int position)
This method removes the item at the specified position from the scrolling list.
11. public void removeAll()
This method removes all items from the list.
12. public void select(int index)
This method selects the item at the specified index on the scrolling list.
If an application wants to perform some action based on an item in the list being selected or activated by the user, it should implement ItemListener or ActionListener as appropriate, and register the new listener to receive events from this list.
When an item is selected or deselected by the user, AWT sends an instance of ItemEvent to the list. When the user double-clicks on an item in a scrolling list, AWT sends an instance of ActionEvent to the list following the item event. AWT also generates an action event when the user presses the return key while an item in the list is selected.
Explanation: In this program, a List instance PL of four items is constructed with multiple selections allowed. Names of four programming languages are added to the list PL. The third item is shown selected using select(2). The applet window implements ItemListener interface so whenever an item is selected or deselected using mouse click, an ItemEvent instance is sent to the itemStateChanged method. In this method, repaint method causes paint method to be called. In the paint method, an array of selected indexes is obtained using getSelectedIndexes method. Then using this array and getItem method, all selected list items are concatenated to the dispstr. The same is then displayed using drawString method.
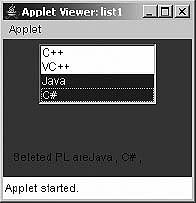
Figure 16.18 Output screen of Program 16.17
Explanation: This program is similar to the previous one but in this case ActionListener interface is implemented and listener is added using addActionListener method. Now, whenever an item in the list is double-clicked, an ActionEvent instance is passed to the method actionPerformed. In this method, all selected entries are returned using getSelectedItems method in the String array str. All array elements are then concatenated to the dispstr and then displayed. Note the same code which had been written in the previous program in the paint method, can be used here too; however, an alternative code has been used.
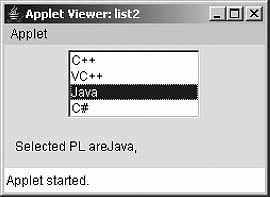
Figure 16.19 Output screen of Program 16.18
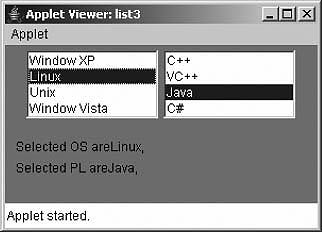
Figure 16.20 Output screen of Program 16.19
Explanation: This program is simple to understand. The only difference it has from previous two programs is that in this case two lists have been worked with.
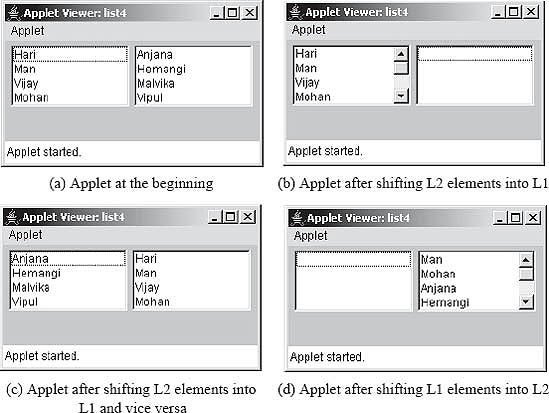
Figure 16.21 Output screen of Program 16.20
Explanation: On double-clicking an item on any of the lists, the item is removed from that list and added to another. For example, when an item is in list L1 and when it is double-clicked, it must be added to list L2 and removed from list L1. In order to identify in which of the lists the item was clicked, the method getSource is used. Assume the list L1 in which an item is double-clicked. The item is added to the list L2 as:
L2.add(L1.getSelectedItem());
And removed from L1 as:
L1.remove(L1.getSelectedItem());
16.4.6 The Choice Class
The Choice class presents a pop-up menu of choices. The current choice is displayed as the title of the menu. The menu lists a number of items; only the selected item is displayed. However, when the user clicks on the Choice component, the entire list is displayed, and the user can select one of the items from the list. There are three types of menu in Java: choice menu, pop-up menu, and pulldown menu. Pop-up and pull-down menus are not components. In fact, Choice components are not technically considered to be menus, but it is hard to find another word that adequately describes what they do.
The class defines just one default constructor.
public Choice()
Various useful methods of Choice class are discussed below:
1. public void add(String item)
This method adds an item to this Choice menu.
2. public String getItem(int index)
This method returns the string at the specified index in this Choice menu.
3. public int getItemCount()
This method returns the number of items in this Choice menu.
4. public int getSelectedItem()
This method returns the index of the currently selected item. If nothing is selected, it returns -1.
5. public String getSelectedItem()
This method returns a representation of the current choice as a string.
6. public void insert(StringItem, int index)
This method inserts the item into this choice at the specified position.
7. remove
![]()
public void remove(int position)
This method removes an item from the Choice menu at the specified position.
![]()
public void remove(String item)
This method removes the first occurrence of item from the Choice menu.
8. public void removeAll()
This method removes all items from the Choice menu.
9. select
This method has two forms:
(i) public void select(int pos)
This method sets the selected item in this Choice menu to be the item at the specified position.
(ii) public void select(String str)
This method sets the selected item in this Choice menu to be the item whose name is equal to the specified string. If more than one item matches (is equal to) the specified string, the one with the smallest index is selected.
For handling events for Choice, the parent class has to implement ItemListener interface and listener has to be registered using addItemListener method. Whenever an item is selected from the Choice instance, event notification is sent to itemStateChanged method, as seen earlier with the List class.
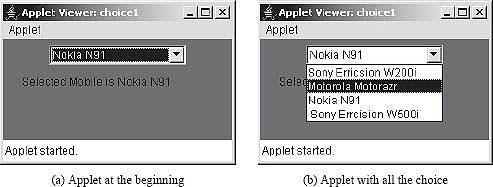
Figure 16.22 Output screen of Program 16.21
Explanation: In this program, a Choice instance by the name MC is created. In this instance, few mobile set names are added and inserted. The default choice selected is String object at index 2 using select method. A listener is added for MC using addItemListener method. Whenever a new selection from Choice instance MC is made, itemStateChnaged method is called and an instance of ItemEvent is passed to it. In this method, repaint method calls paint method. In the paint method, the selected item is retrieved using getSelectedItem method and concatenated to dispstr. The same is displayed using drawString method.
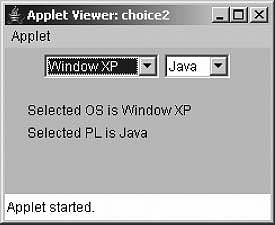
Figure 16.23 Output screen of Program 16.22
Explanation: This program is simple compared to previous one with the difference that two Choice instances are being worked with, instead of one.
16.4.7 The Scrollbar Class
The scrollbar class embodies a scroll bar, a familiar user-interface object. A scroll bar provides a convenient means for allowing a user to select from a range of values. A scroll bar can be either horizontal or vertical. It has five parts as shown in Figure 16.24.
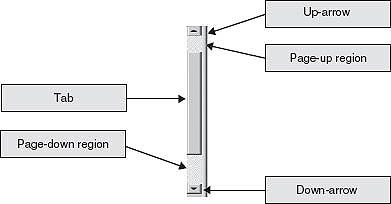
Figure 16.24 Scrollbar and its parts
The position of the tab specifies the currently selected value. The user can move the tab by dragging it or by clicking on any part of the scroll bar. On some platforms, the size of the tab tells what portion of a scrolling region is currently visible. It is actually the position of the bottom or left edge of the tab that represents the currently selected value.
A scroll bar has four associated integer values:
![]() min, which specifies the starting point of a range of values represented by the scroll bar, corresponding to the left or bottom edge of the bar.
min, which specifies the starting point of a range of values represented by the scroll bar, corresponding to the left or bottom edge of the bar.
![]() max, which specifies the end point of a range of values, corresponding to the right or top edge of the bar.
max, which specifies the end point of a range of values, corresponding to the right or top edge of the bar.
![]() visible, which specifies the size of the tab.
visible, which specifies the size of the tab.
![]() value, which gives the currently selected value, somewhere in the range between min and max (visible).
value, which gives the currently selected value, somewhere in the range between min and max (visible).
The scrollbar class defines the following constructors:
1. public Scrollbar()
This form of constructor creates a new vertical scroll bar. The default properties of the scroll bar are listed in Table 16.2.
| Property | Description | Default value |
| orientation | Indicates whether the scroll bar is vertical or horizontal. | Scrollbar.VERTICAL |
| value | Controls the location of the scroll bar's bubble. | 0 |
| visible amount | The scroll bar's range, typically represented by the size of the scroll bar's bubble | 10 |
| minimum | The minimum value of the scroll bar. | 0 |
| maximum | The maximum value of the scroll bar | 100 |
| unit increment | Amount the value changes when the Line Up or Line Down key is pressed, or when the end arrows of the scroll bar are clicked. | 1 |
| block increment | Amount the value changes when the Page Up or Page Down key is pressed, or when the scrollbar track is clicked on either side of the bubble. | 10 |
Table 16.2 Scrollbar properties
2. public Scrollbar(int orientation)
This form of constructor creates a new scroll bar with the specified orientation. The orientation argument must take one of the two values, Scrollbar.HORIZONTAL or Scrollbar. VERTICAL, indicating a horizontal or vertical scroll bar, respectively.
3. public Scrollbar(int orientation, int value, int visible, int minimum, int maximum)
This form of constructor creates a new scroll bar with the specified orientation, initial value, visible amount, and minimum and maximum value.
The various useful methods of Scrollbar class are discussed below:
1. public int getBlockIncrement()
This method gets the block increment of this scroll bar. The block increment is the value that is added or subtracted when the user activates the block increment area of the scroll bar, generally through a mouse or keyboard that the scroll bar receives as an adjustment event.
2. public void setBlockIncrement()
This method sets the block increment of this scroll bar.
3. public int getMaximum()
This method returns the maximum value of this scroll bar.
4. public void setMaximum(int newMaximum)
This method sets the maximum value of this scroll bar. When setMaximum is called, the maximum value is changed, and other values (including the minimum, the visible amount and the current scroll bar value) are changed to be consistent with the new maximum.
5. public int getMinimum()
This method returns the minimum value of this scroll bar.
6. public void setMinimum(int newMinimum)
This method sets the minimum value of this scroll bar.
7. public int getOrientation()
The method returns the orientation of this scroll bar, either Scrollbar.HORIZONTAL or Scrollbar.VERTICAL.
8. public void setOrientation(int Orientation)
This method sets the orientation for this scroll bar, either Scrollbar.HORIZONTAL or Scrollbar.VERTICAL.
9. public int getUnitIncrement()
This method returns the unit increment for this scrollbar. The unit increment is the value that is added or subtracted when the user activates the unit increment area of the scroll bar, generally through a mouse or keyboard that the scroll bar receives as an adjustment event.
10. public void setUnitIncrement(int v)
This method sets the unit increment for this scroll bar.
11. public int getValue()
This method returns the current value of this scroll bar.
12. public void setValue(int newValue)
This method sets the value of this scroll bar to the specified value.
A scroll bar generates an event of type AdjustmentEvent whenever the user changes the value of the scroll bar. The associated AdjustmentListener interface defines one method, "adjustmentValueChanged(AdjustmentEvent evt)", which is called by the scroll bar to notify the listener that the value on the scroll bar has been changed. This method should repaint the display or make whatever other change is appropriate for the new value. The method evt.getValue() returns the current value on the scroll bar. If more than one scroll bar are used and it needs to be determined which scroll bar generated the event, evt.getSource() should be used to determine the source of the event.
The getAdjustmentType() of AdjustmentEvent class can be used to find out the type of event occurred on the scroll bar. Its signature is given below:
public int getAdjustmentType()
This method returns the type of adjustment that caused the value changed event. It will have one of the following values:
![]()
UNIT_INCREMENT
![]()
UNIT_DECREMENT
![]()
BLOCK_INCREMENT
![]()
BLOCK_DECREMENT
![]()
TRACK
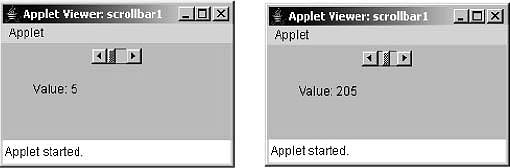
Figure 16.25 Output screen of Program 16.23
Explanation: In this program, AdjustmentListener interface has been implemented in the applet window class scrollbar1. In the init method, a horizontal scroll bar is created with minimum value 5, maximum value 500 and visible amount of thumb size 10. The unit increment of 5 is set. For the Scrollbar instance SB, adjustment listener is added using the method addAdjustmentListener. Whenever either of the arrows or inside the scroll bar area is clicked or the mouse is dragged, the adjustmentValueChanged method is
called. In this method, due to repaint method the paint method is called. In the paint method, current value of SB is shown using drawstring and getValue method.
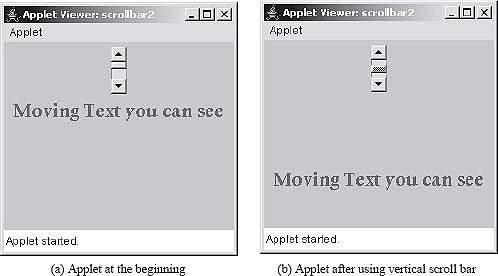
Figure 16.26 Output screen of Program 16.24
Explanation: In the init() a vertical scroll bar is created by the name SB. The minimum and maximum values for this scroll bar are 5 and 500, respectively, and unit increment is 5. In the adjustment ValueChanged method, the type of events occurring onto the scroll bar are recognized. For UNIT_INCREMENT and UNIT_DECREMENT events the value of Y was incremented/decremented by 5. For the BLOCK_INCREMENT and BLOCK_DECREMENT event, the value of Y was incremented/decremented by 25. The X and Y coordinates are used for displaying the string "Moving Text you can see" using drawString method. Each time the down arrow is clicked, values of Y increments by 5 and string is displayed at new position. Thus, the string can be moved using events of scroll bar.
16.4.8 The Textfield Class
A TextField object is a text component that allows for the editing of a single line of text. The super class for this class is the TextComponent class. The users can enter/edit/cut/paste the text of the TextField object. It is also possible to set a TextField to be read-only so that the user can read the text that it contains but cannot edit it.
The class defines the following constructs:
1. public TextField()
This form of constructor creates a new text field.
2. public TextField(int columns)
This form of constructor creates a new empty text field with the specified number of columns. The columns specify the number of characters that should be visible in the text field. This is used to determine the width of the text field. (Because characters can be of different sizes, the number of characters visible in the text field might not be exactly equal to columns).
3. public TextField(String text)
This form of constructor creates a text field initialized with the specified text.
4. public TextField(String text, int columns)
This form of constructor creates a text field initialized with the specified text to be displayed, and wide enough to hold the specified number of columns.
The various useful methods of TextField/TextComponent class are discussed below:
1. public String getText()
This method returns the current text of the TextField object.
2. public void setText(String t)
This method sets the text that is presented by this text component to be the specified text.
3. public void select(int sStart, int sEnd)
This method selects the text between the specified start and end position.
4. public String getSelectedText()
This method returns the selected text from the text that is presented by this text component.
5. public void setEditable(boolean b)
This method sets the flag that determines whether or not this text component is editable. If the flag is set to true, this text component becomes user editable. If the flag is set to false, the user cannot change the text of this text component.
6. public boolean isEditable()
This method indicates whether or not this text component is editable-true if this text component is editable; false otherwise.
7. public void setEchoChar(char c)
This method sets the echo character for this text field. An echo character is useful for text fields where user input should not be echoed to the screen, as in the case of a text field for entering a password.
8. public char getEchoChar()
This method returns the character that is to be used for echoing.
Every time the user types a key in the text field, one or more key events are sent to the text field. A KeyEvent may be one of three types: keyPressed, keyReleased or KeyTyped. The key event is passed to every keyListener or keyAdapter object which registered to receive such events using the component's addkeyListener method. (KeyAdapter object implements the keyListener interface.)
It is also possible to fire an ActionEvent. If action events are enabled for the text field, they may be fired by pressing the Return key.
Explanation: In this program, a Button instance b, a Label instance L and a TextField instance tf have been used. An action listener is added to the Button instance. When the program executes, and user presses the button after entering his/her name into the text box, and actionPerformed method is called. In this method, the entered text is retrieved using getText method and is appended to the msg string. The msg is then displayed.

Figure 16.27 Output screen of Program 16.24
Explanation: In this program, two labels and two text boxes are created for name and password. For the second TextField instance TP, the echo character "*" is set. Now whatever character is typed in this text box, '*' is displayed. After entering the text in any of the text boxes when the user presses the Enter key, ActionEvent is generated and actionPerformed method is called. In this method, the entered text is retrieved and displayed.
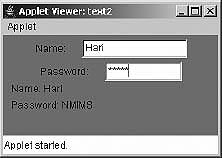
Figure 16.28 Output screen of Program 16.25
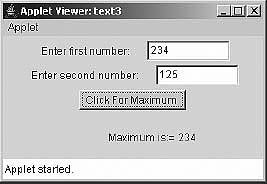
Figure 16.29 Output screen of Program 16.26
Explanation: In the actionPerformed method, the two numbers entered into the two textboxes are first converted into integers. Maximum of two numbers are then stored in the variable ans. The int variable ans is then converted into the String using valueOf() method.
16.4.9 The TextArea Class
A TextArea object is a multi-line region that displays text. It can be set to allow editing or as read-only. A TextArea displays multiple lines and might include scroll bars that the user can use to scroll through the entire contents of the TextArea. Similar to TextField class, TextArea also has TextComponent class as its parent class.
The class defines following constructors:
1. public TextArea()
This form of constructor creates a new text area with the empty string as text.
2. public TextArea(String text)
This form of constructor creates a new text area with the specified text.
3. public TextArea(int row, int columns)
This form of constructor creates a new text area with the specified number of rows and columns and the empty string as text.
4. public TextString(String text, int rows, int columns)
This form of constructor creates a new text area with the specified text, and with the specified number of rows and columns.
5. public TextArea(String text, int rows, int columns, int scrollbars)
This form of constructor creates a new text area with the specified text, and the rows, columns and scroll bar visibility as specified. All TextArea constructors refer to this one. The TextArea class defines several constants that can be supplied as values for the scrollbars argument:
![]()
SCROLLBARS_BOTH
![]()
SCROLLBARS_VERTICAL_ONLY
![]()
SCROLLBARS_HORIZONTAL_ONLY
![]()
SCROLLBARS_NONE
As TextComponent is also the parent class of TextArea so number of methods of TextComponent can be used with TextArea class. They are:
getText(), setText(), getSelectedText(), select(), isEditable(), setEditable()
Some new methods of TextArea class are discussed below:
1. public void append(String str)
This method appends the given text to the text area's current text.
2. public void insert(String str, int pos)
This method inserts the specified text at the specified position in this text area.
3. public void replaceRange(String str, int start, int end)
This method replaces text between the indicated start and end positions with the specified replacement text. The text at the end position will not be replaced. The text at the start position will be replaced (unless the start position is the same as the end position). The text position is zero based. The inserted substring may be of a different length than the text it replaces.
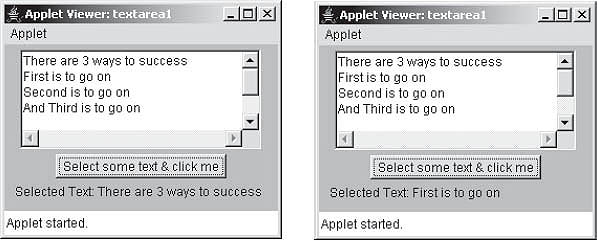
Figure 16.30 Output screen of Program 16.27
Explanation: The TextArea instance does not generate any events other than focus events. In this program, a TextArea instance text is created and some text added to it. The rows and columns for this TextArea instance text are 5 and 30, respectively. After selecting some text from the contents of text area, the button is pressed, actionPerformed method is called. In the method, call to repaint method causes paint method to be called. In the paint, selected text is retrieved using getSelectedText method. The same is displayed using drawString method.
16.5 MENU AND MENUBARS
A menu is a list of choices. A menu bar displays a list of top-level menu choices. In Java, for implementing menu, a number of classes are provided like Menu, MenuBar and MenuItem.
A Menubar contains a number of instances of Menu each of which further contains a number of instances of MenuItem. Only Frames can have menu since they implement the MenuContainer interface. Therefore, an applet must create a frame in order to use menu.
A Menu class has MenuItem as its super class. A Menu object is a pull-down menu component that is deployed from a menu bar. Each item in a menu must belong to the MenuItem class. It can be an instance of MenuItem, a submenu (an instance of Menu), or a checkbox (an instance of Checkbox MenuItem). A CheckboxMenuItem instance will have a check mark next to it when it is selected.
The Menu class defines the following constructors:
1. public Menu()
This form of constructor creates a new menu with an empty label.
2. public Menu(String label)
This form of constructor creates a new menu with the specified label.
In both the forms, the menu is not tear-off menu.
3. public Menu(String label, boolean tearOff)
This form of constructor creates a new menu with the specified label, indicating whether the menu can be torn off.
After a Menu instance has been created, MenuItem instance can be added to it. All items in a menu must belong to the class MenuItem, or one of its subclasses. The default MenuItem object embodies a simple labelled menu item.
The MenuItem class defines the following constructors:
1. public MenuItem()
This form of constructor creates a new MenuItem with an empty label and no keyboard shortcut.
2. public MenuItem(String label)
This form of constructor creates a new MenuItem with the specified label and no keyboard shortcut.
3. public MenuItem(String label, MenuShortcut s)
This form of constructor creates a menu item with an associated keyboard shortcut.
Once MenuItem instances have been created using one of the constructor forms, they can be added to the Menu instance using add method.
Checkable menu items can also be created. To do this, there is a subclass of the MenuItem named CheckboxMenuItem. This class represents a check box that can be included in a menu. Selecting the check box in the menu changes its state from "on" to "off " or from "off " to "on".
The CheckboxMenuItem class defines following constructors:
1. public CheckboxMenuItem()
This method creates a check box menu item with an empty label. The item's state is initially set to "off ".
2. public CheckboxMenuItem(String label)
This method creates a checkbox menu item with the specified label. The item's state is initially set to "off ".
3. public CheckboxMenuItem(String label, boolean state) This method creates a check box menu item with the specified label and state.
To place the Menu instances on the MenuBar instance, it has to be created first. A MenuBar instance can be created with its default constructor form:
public MenuBar()
A menu bar is attached to the frame window using setMenuBar method.
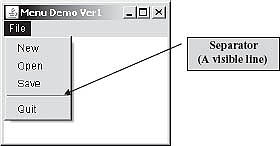
Figure 16.31 Output screen of Program 16.28
Various methods of Menu related classes are discussed below:
1. public void setEnabled(boolean b)
This method sets whether or not this menu item can be chosen, that is, can be enabled or disabled.
2. public boolean is Enabled()
This method checks whether this menu item is enabled.
3. public String getLabel()
This method gets the label for this menu item to the specified label.
4. public void setLabel(String label)
This method sets the label for this menu item to the specified label.
5. public MenuItem add(MenuItem item)
This method adds the item to the specified Menu instance and returns the same.
6. public boolean getState()
This method determines whether the state of this check box is "on" or "off ".
7. public void setState(boolean b)
This method sets this check box menu item to the specified state. The Boolean value true indicates "on" while false indicates "off ".
Methods 6 and 7 belong to CheckboxMenuItem class.
Whenever a menu item from a menu is selected, an instance of ActionEvent is generated and passed to the method actionPerformed. For CheckboxMenuItem, an instance of ItemEvent is generated and passed to itemStateChanged method. For the events, the frame class must implement ActionListener and Item Listener interface. Note events are only generated for menu items and not for frame.
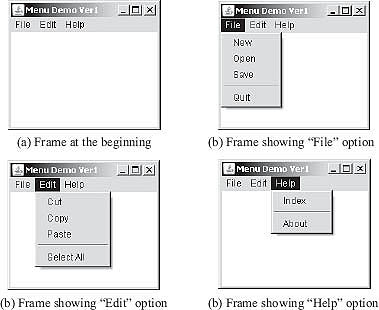
Explanation: In this program, three different types of menus are created. For that just one Menu instance m is created. For the first menu labelled "File", three MenuItems are added, then a separator and one more MenuItem instance is added. Similarly, for other menus "Edit" and "Help" different MenuItem instances have been created. Note after creation of every menu with menu items they have been added to menu bar using add method. In the end, the MenuBar instance menu bar is attached to the menu using setMenuBar method.
For closing window event, window adapter class is created as an inner class. This has been explained in the previous chapter. In the main class menu, an instance of MyFrame class is created and "Menu Demo Ver1" passed as title of the Frame window. Note the code for the event handling for the selection of the menu items is not shown. This is shown in the next program.
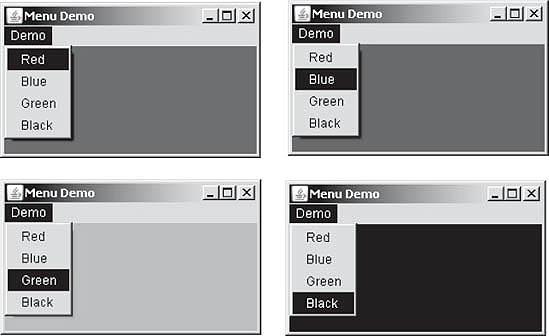
Figure 16.32 Output screen of Program 16.30
Explanation: Whenever a menu item is selected ActionEvent is generated and an instance of it is passed to actionPerformed method. In the MyFrame constructor, three listeners are added for all four menus: item1, item2, item3 and item4. Note that a separate class MMH is created that implements ActionListener interface. In the constructor of MyFrame when listener is added for the menus using addActionListener, as an argument, an instance of MMH class is passed. The constructor of MMH class takes a reference of the MyFrame class. In the actionPerformed method, the label of the currently selected menu item is retrieved using getActionCommand and stored in the arg, which is compared with any of the label "Red", "Green", "Blue" and "Black". Depending on which menu item was selected, the background color of the frame window is set to that color.
16.5.1 Adding Shortcut Key to Menu
Shortcut keys to menu items can be added using the MenuShortcut class. The MenuShortcut class represents a keyboard accelerator for a MenuItem. Menu shortcuts are created using virtual keycodes, not characters. The class provides two constructors for creating shortcuts:
1. public MenuShortcut(int key)
2. public MenuShortcut(int key, boolean Spress)
The first form of constructor creates a new MenuShortcut for the specified virtual keycode. The key is the virtual keycode that would be returned using KeyEvent class if this key were pressed.
In the second form, if Spress is true, the shift key has to be pressed along with the Strl modifier.
Both the forms can be used as:
MenuShortcut ms = new MenuShortcut(KeyEvent.VK_R);
If item is the MenuItem created earlier, the above created shortcut can be set using setShortcut method as:
item.setShortcut(ms);
Now, the MenuItem item can be selected using Ctrl+R key. In case the shortcut is created as:
MenuShortcut ms = new MenuShortcut(KeyEvent.VK_R, true);
Then Ctrl+Shift+R key has to be pressed to select the item.
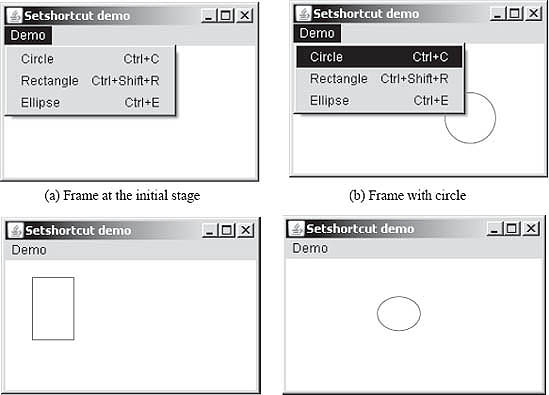
Figure 16.33 Output screen of Program 16.31
Explanation: The program is similar to the previous one but here shortcuts for menu items have been added. The menu items are for drawing various shapes. Creation of menu shortcut and adding them to menu items is discussed in theory part.
16.6 POPUP MENUS
A Popup menu is a menu which can be dynamically popped up at a specified position within a component. It is implemented in java by class PopupMenu. Popup menus differ from all the components discussed above because they are not components and they are not usually visible. The user calls up a popup menu by performing some platform-dependent action with the mouse. For example, this might mean clicking with the right mouse button, or clicking the mouse while holding down the control key.
A pop-up menu is an object belonging to the class PopupMenu. A newly created pop-up menu is empty. Items can be added to the menu with its add(String) method. A separator line can be added with the addSeparator() method (There's a lot more one can do with menu items). If pmenu is a popup menu, it can be added to a component, comp, by calling comp.add(pmenu). However, this does not make the menu appear on the screen. To make a menu appear, a program has to call pmenu.show(comp, x, y). The pop-up menu appears with its upper-left corner at the point (x, y), where the coordinates are given in comp's coordinate system.
The class defines following constructors:
1. public PopupMenu()
This form of constructor creates a new popup menu with an empty name.
2. public PopupMenu(String label)
This form of constructor creates a new popup menu with the specified name.
It is not much more difficult to use popup menus in a program than it is to use the above components. A popup menu generates an ActionEvent when the user selects a command from the menu. The action command associated with that event is the label of the menu item that was selected. One can register an ActionListener with the menu to listen for commands from the menu.
Mouse events have to be listened from the component. A mouseEvent, evt, has a boolean valued method, evt.isPopupTrigger() that one can call to determine whether the user is trying to pop up a menu. This could theoretically occur in either the mosuePressed or in the mouseReleased method, so one should test for the pop-up trigger in both of these methods. The mousePressed method might look something like this (mouseReleased would be similar):
public void mousePressed(MouseEvent evt)
{
      if(evt.isPopupTrigger())
       {
        int x = evt.getX();
        int y = evt.getY();
        pmenu.show(this, x, y);
       }
}
Note that this method just make the menu appear on the screen. Any command generated by that menu must be handled elsewhere, in an actionPerformed method.
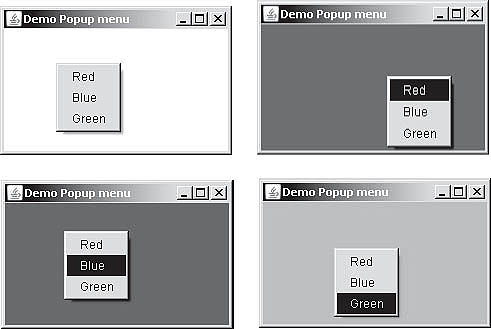
Figure 16.34 Output screen of Program 16.32
Explanation: The code in the constructor of MyFrame is easy to understand. An empty PopupMenu instance colors is created. Number of menu items are added to this PopupMenu instance colors. After adding menu items to colors, it is added to the frame window. Note actionListener is added only to the PopupMenu instance colors and not to all menu items. A mouse listener is also added to the frame window. Whenever the mouse pressed or mouse released event occurs, an instance of MouseEvent is passed to the mouseReleased and mousePressed method. Inside these methods, using isPopupTrigger method, it is checked whether or not this mouse event is the popup menu trigger event for the platform. If it is, then popup menus is shown at the current mouse position. When the popup menu appears during execution, any of the menu items can be selected. This works same as seen earlier, difference is only that menu is not attached to the menu bar.
16.7 DIALOGS
Like a frame, a dialog box is a separate window. Unlike a frame, however, a dialog box is not completely independent. Every dialog box is associated with a frame, which is called its parent. The dialog box is dependent on its parent. For example, if the parent is closed, the dialog box will also be closed.
Dialog boxes can be either modal or modeless. When a modal dialog is created, its parent frame is blocked. That is, the user will not be able to interact with the parent or even bring the parent to the front of the screen until the dialog box is closed. Modeless dialog boxes do not block their parents in the same way, so they seem a lot more like independent windows.
In Java, a dialog box is an object belonging to the class Dialog or to one of its subclasses. A Dialog cannot have a menu bar, but it can contain other GUI components, and it generates the same WindowEvents
as a Frame. Dialog objects can be either modal or modeless. A parameter to the constructor specifies which it should be. Most commonly used constructor of the Dialog class is shown below:
1. public Dialog(Frame owner)
This form of constructor creates an initially invisible, non-modal Dialog with an empty title and the specified owner frame.
2. public Dialog(Frame owner, boolean modal)
This form of constructor creates an initially visible Dialog with an empty title, the specified owner frame and modality. If modal is true the dialog box is Modal and if false then it is false.
3. public Dialog(Frame owner, String title, boolean modal)
This form of constructor creates an initially invisible Dialog with the specified owner frame, title, and modality.
When a dialog box is closed, dispose() method must be called. The method is defined by parent of the Dialog class i.e. Window class. Its signature is shown below:
public void dispose()
The method releases all of the native screen resources used by this Window, its subcomponents, and all of its owned children. That is, the resources for these Component will be destroyed, any memory they consumes will be returned to the OS, and they will be marked as undisplayable.
Explanation: In the program class dialog extends Dialog class and implements the ActionListener interface. The interface is needed as a button is created on to the dialog window. The constructor of the dialog class takes two parameter of Frame and String type respectively. Using super the constructor of parent class Dialog is called and three parameters are passed. The two are from constructor of dialog class and third parameter being false represents a modeless dialog box. The default layout for a Dialog class is BorderLayout, so it is changed to FlowLayout using setLayout method. A button to the dialog window and also a listener using addActionListener method are added. In the actionPerformed dispose method is called for closing the dialog and to terminate the program System.exit(0) is called.
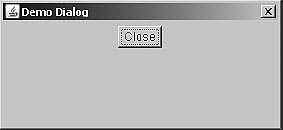
Figure 16.35 Output screen of Program 16.33
The class MyFrame extends the Frame class. In the main method, an object d of dialog class is created using the constructor. In the constructor, an instance of MyFrame class is passed and String "Demo Dialog" that denotes title of the dialog window. The dialog window must be shown by a call to setVisible method and passing argument true.
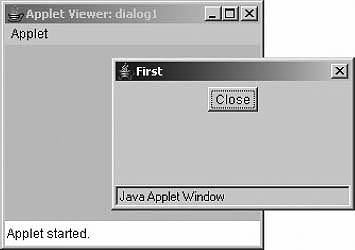
Figure 16.36 Output screen of Program 16.34
Explanation: The program is similar to previous one with the difference that instead of main method, applet window is used. In the program, there is one additional class dialog1 that denotes our applet window. The coding which was in the main in the previous program is now in init method of dialog1 class.
Explanation: In this program, the dialog box is called and displayed on clicking a menu item. The class dialog represents a dialog window. It is similar to classes seen earlier. In the constructor of this dialog class, one label and two buttons are added. When "OK" button is pressed the dialog box will be disposed.
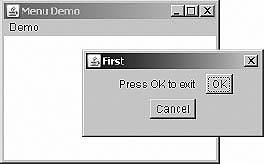
Figure 16.37 Output screen of Program 16.35
In the MyFrame class constructor a menu is created. In the menu, just one menu item is added by the name "Show Dialog". When this menu item is clicked, actionPerformed method will be called. In the method an instance of dialog class is created and displayed using setVisible method by passing argument true.
In the dialog box when OK button is pressed, actionPerformed method is called in the dialog class and code in the method disposes the dialog box.
16.8 THE FILEDIALOG CLASS
The FileDialog class displays a dialog window from which the user can select file. It is a subclass of Dialog class. The dialog window provided by an object of the FileDialog class is the standard file selection window which the operating system provides. It is modal dialog box. Since it is a modal dialog, when the application calls its show method to display the dialog, it blocks the rest of the application until the user has chosen a file.
The class defines the following frequently used constructors:
1. public FileDialog(Frame parent)
This form of constructor creates a file dialog for loading a file. The title of the file dialog is initially empty.
2. public FileDialog(Frame parent, String title)
This form of constructor creates a file dialog window with the specified title of loading a file. The file shown are those in the current directory.
3. public FileDialog(Frame parent, String title, int mode)
This form of constructor creates a file dialog window with the specified title for loading or saving file. If the value of mode is LOAD, then the file dialog is finding a file to read, and the files shown are those in the current directory. If the value of mode is SAVE, the file dialog is finding a place to write a file.
LOAD and SAVE are two properties of the FileDialog class.
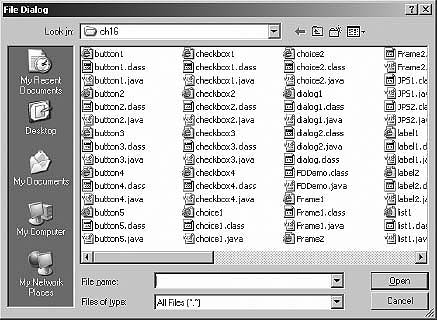
Figure 16.38 Output screen of Program 16.36
Explanation: The program is self-explanatory.
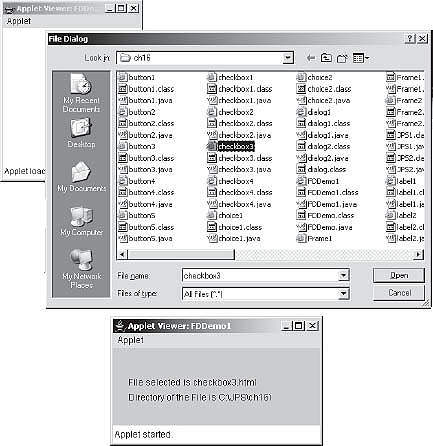
Figure 16.39 Output screen of Program 16.37
Explanation: This time an applet is created instead of an application for the creation of file dialog. The program also demonstrates how selected file name and directory name can be retrieved using getFile and getDirectory method.
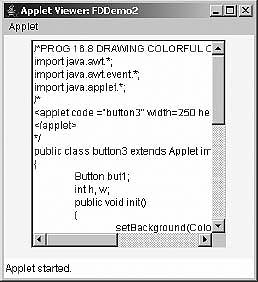
Figure 16.40 Output screen of Program 16.38
Explanation: In this program, the selected file from file dialog is retrieved and opened using FileInputStream. The contents of file are read using read method and stored in byte array b. the size of array is chosen 64*64 as an approximation of size of file. The byte array is converted into String s. the string is added as contents of the TextArea instance tb of 15 rows and 30 columns.
16.9 PONDERABLE POINTS
1. AWT stands for Abstract Window Toolkit. The toolkit is defined within the java.awt package. It contains all of the classes for creating user interfaces like Buttons, Labels, TextBox, Lists etc, and for painting graphics and images.
2. Component class is the topmost class in the window hierarchy.
3. A component is an object having a graphical representation that can be displayed on the screen and that can interact with the user. Examples of components are the buttons, checkboxes, and scrollbars of a typical graphical user interface.
4. A generic AWT container object is a component that can contains other AWT components. The Container class is the subclass of the Component class. Containers (Frames, Dialogs, Windows and Panels) can contains component and are themselves components, thus can be added to Containers.
5. A panel provides space in which an application can attach any other component, including other panels. A Panel is a container that does not exist independently. It is a plain rectangular area.
6. In Java, a program can open an independent window by creating an object of type Frame. A Frame has a tile, displayed in the title bar at the top of the window. It can have a menu bar containing one or more pull-down menus.
7. A Frame can be used within an applet or in an application program.
8. The component class is the base class for the AWT component.
9. For handling various AWT components, the respective listener interfaces are given below:
    Button                ActionListener
    Checkbox              ItemListener
    CheckboxGroup         ItemListener
    List                  ItemListener, ActionListener
    Choice                ItemListener
    ScrollBar             Adjustment Listener
    Menu                  ActionListener
10. A Label object is a component for placing text in a container. A label displays a single line of readonly text i.e. static text.
11. A check box is a graphical component that can be in either an "on" (true) or "off " (false) state. Clicking on a check box changes its state from "on" to "off ", or from "off " to "on".
12. The CheckboxGroup class is used to group together a set of Checkbox buttons. Exactly one check box button in a CheckboxGroup can be in the "on" state at any given time.
13. The List component presents the user with a scrolling list of text items. The list can be set up so that the user can choose either one item or multiple items.
14. The Choice class presents a pop-up menu of choice. The current choice is displayed as the title of the menu. The menu lists a number of items. Only the selected item is displayed.
15. The Scrollbar class embodies a scroll bar, a familiar user-interface object. A scroll bar provides a convenient means for allowing a user to select from a range of values. A scroll bar can be either horizontal or vertical.
16. A TextField object is a text component that allows for the editing of a single line of text.
17. A TextArea object is a multi-line region that displays text. It can be set to allow editing or to be read-only. A TextArea displays multiple lines and might include scroll bars that the user can use to scroll through the entire contents of the TextArea.
18. A menu is a list of choices. A menu bar displays a list of top-level menu choice.
19. Only Frame can have menus since they implement the MenuContainer interface. Therefore an applet must create a frame in order to use menus.
20. Each menu item is an instance of MenuItem class attached to the menu.
21. Shortcut keys to menu items can be added using the MenuShortcut class. The MenuShortcut class represents a keyboard accelerator for a MenuItem. Menu shortcuts are created using virtual keycodes.
22. A Popup menu is a menu which can be dynamically popped up at a specified position within a component. It is implemented in java by class PopupMenu.
23. Like a frame, a dialog box is a separate window. Unlike a frame, however, a dialog box is not completely independent. Every dialog box is associated with a frame, which is called its parent.
24. Dialog boxes can be either modal or modeless. When a modal dialog is created its parent frame is blocked. That is, the user will not be able to interact with the parent or even bring the parent to the front of the screen until the dialog box is closed. Modeless dialog boxes do not block their parents in the same way, so they seem a lot more like independent windows.
25. In Java, a dialog box is an object belonging to the class Dialog or to one of its subclasses.
26. The FileDialog class displays a dialog window from which the user can select a file. It is a subclass of Dialog class.
REVIEW QUESTIONS
1. What do you mean by Abstract Window Toolkit?
2. What are the different types of layout managers in Java?
3. What are the different components of Abstract Window Toolkit?
4. Explain the procedure to design menu in Java?
5. Differentiate between text area and text box.
6. Differentiate between the Component and Container class.
7. Explain inset value and how you can set the inset values.
8. What is the difference between checkbox and checkbox group?
9. Write a Java program using checkboxes to display different presidents' names.
10. Write a Java program to display the different TV channels using checkboxgroup.
11. Write a Java program to display the different DLF-IPL 20/20 team names using checkboxes and checkboxgroup.
12. Write a Java program to display the different prices of the books using the choice object.
13. Write Java program to display the different car names using list object.
14. Write a Java program to display the different IIT's names in India using the choice object and list object.
15. Create a menu is a frame as shown below:
![]()
The Books menu has the following items: C, C++, Java, Oracle, VB, and ASP. The language menu consists of French, German, English, Tamil, and Hindi. The File menu has the following: Titanic, Jurassic Park, Tomorrow never Dies, Jeans, and Slumdog. The search engine consists of Yahoo, Hotmail, Sify, Google, and Lycos.
Multiple Choice Questions
1. _______________ is the topmost class in the window hierarchy
(a) Component
(c) Container
(b) Event
(d) Window
2. Match the following:
1. Button a. ItemListener
2. Checkbox b. ActionListener
3. ScrollBara. c. AdjustmentListener
(a) 1-a, 2-b, 3-c
(b) 1-b, 2-c, 3-a
(c) 1-c, 2-a, 3-b
(d) 1-b, 2-a, 3-c
3. A _______________ object is a component for placing text in a container.
(a) Textbox
(c) Label
(b) Checkbox
(d) None of the above
4. The _______________ class is used to group together a set of Checkbox buttons.
(a) TextArea
(b) CheckboxGroup
(c) CheckBoxGroup
(d) MenuShortcut
5. Which is the constructor of Frame class
(a) void Frame()
(b) public setFrame()
(c) public Frame(String title)
(d) void Frame(String title)
6. Which of the following methods is used to returns the text of the label as String object
(a) public String getText()
(b) public void getText()
(c) public Char getText(String text, String s)
(d) None of the above
7. Which is the method of Checkbox class
(a) public String getLabel()
(b) public String setLabel()
(c) public boolean getState()
(d) (a) and (c)
8. The public int getSelectedIndex() method returns the index of the selected item; if no item is selected, or if multiple items are selected, it returns
(a) 0
(b) +1
(c) -1
(d) -2
9. The method public String getSelectedItem() returns the selected item on the list, if no item is selected, or if multiple items are selected, it returns
(a)0
(b) +1
(c) -1
(d) None of the above
10. Each menu item is an instance of
(a) MenuShortcut class
(b) PopupMenu class
(c) MenuItem
(d) None of the above
KEY FOR MULTIPLE CHOICE QUESTIONS
1. a
2. d
3. c
4. b
5. c
6. a
7. d
8. c
9. a
10. c