Chapter 7. Working with Graphics
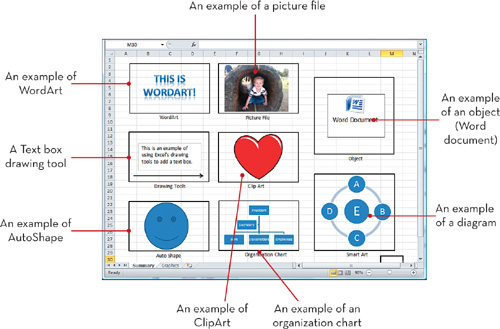
There might be instances when you’re asked to add graphics to your Excel worksheets. For example, you might need to insert your company’s logo on each worksheet you create. Well, the good news is that Excel has a whole host of tools that enable you to create and customize your own graphics and visualizations. With these tools, you can add a picture from another file, draw pictures, insert shapes, use ClipArt, and create your own WordArt.
In this chapter, you discover the ins and outs of creating and customizing your own Graphics in Excel.

Inserted Graphic Objects
Using Drawing Tools
Excel has drawing tools that you can use to draw on a worksheet or chart. In this task, you learn about the advantages of using Excel drawing tools to point out information on a worksheet.
![]()
![]() On the Insert tab, Click the Shapes drop-down.
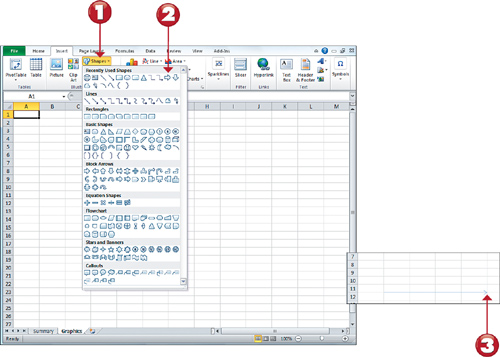
On the Insert tab, Click the Shapes drop-down.
![]() Click any of the drawing tools’ buttons—for example, the Arrow. The mouse pointer turns into a plus sign.
Click any of the drawing tools’ buttons—for example, the Arrow. The mouse pointer turns into a plus sign.
![]() Click and drag in the worksheet to draw an arrow; release the mouse button when the arrow is the length you want it to be. (The pointer end will be at the point of release.)
Click and drag in the worksheet to draw an arrow; release the mouse button when the arrow is the length you want it to be. (The pointer end will be at the point of release.)
Note: Quick Color and Style
![]()
If you click on any shape, you will see a new Drawing Tools Format tab. There, you can apply some predefined styles for your shapes by choosing a style from the Shape Styles gallery.
Tip: Using AutoShapes
![]()
You’ll notice that the Shapes Command (on the Insert tab) includes tools for drawing common shapes, such as lines, circles, squares, and so on. If you aren’t much of an artist or if you want to try some prefab symbols, insert an AutoShape. You can select from several lines, connectors, basic shapes, arrows, flowchart symbols, stars, callouts, banners, and more.
![]() As another example, click the Text Box command on the Insert tab. The mouse pointer turns into an insertion pointer.
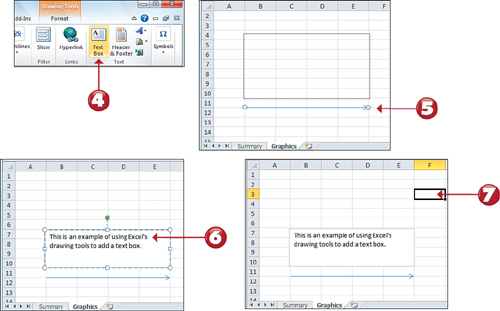
As another example, click the Text Box command on the Insert tab. The mouse pointer turns into an insertion pointer.
![]() Click and drag in the worksheet to draw a text box; release the mouse button when the box is the size you want it to be.
Click and drag in the worksheet to draw a text box; release the mouse button when the box is the size you want it to be.
![]() Type the text you want to enter in the text box.
Type the text you want to enter in the text box.
![]() Click anywhere outside the text box to see how it looks.
Click anywhere outside the text box to see how it looks.
![]()
Note: Text Boxes
![]()
Use text boxes to move, resize, and format them. This is an excellent alternative to formatting a cell in a worksheet where real estate can be limited.
Tip: Modifying Drawing Objects
![]()
A drawn object is like a picture—you can edit it as needed. To resize a drawn object, click the object; then drag the sizing handles to the size you want and release the mouse button. To move the object, click the object and drag it to the desired location.
Inserting Clip Art
Clip art adds visual interest to your Excel worksheets. With Microsoft clip art, you can choose from numerous professionally prepared images, sounds, and movie clips. After you add graphics, you can move them around in the worksheet and even assign text wrapping.
![]()
![]() Click the Clip Art button on the Insert tab to open the Clip Art task pane.
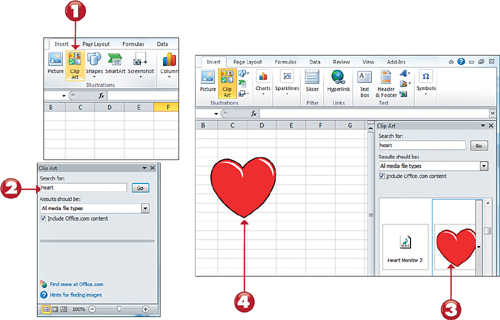
Click the Clip Art button on the Insert tab to open the Clip Art task pane.
![]() Type a description for the clip art you are looking for in the Search for Text box, and press Enter (or click the Go button).
Type a description for the clip art you are looking for in the Search for Text box, and press Enter (or click the Go button).
![]() If Microsoft has clip art that matches the description you type, it displays in the Clip Art task pane. Click an image in the results list to insert it into your worksheet.
If Microsoft has clip art that matches the description you type, it displays in the Clip Art task pane. Click an image in the results list to insert it into your worksheet.
![]() The clip art is inserted into your worksheet. (You might need to move or resize the image; see the tasks “Moving an Object” and “Resizing an Object.”)
The clip art is inserted into your worksheet. (You might need to move or resize the image; see the tasks “Moving an Object” and “Resizing an Object.”)
![]()
Tip: The Picture Tools Format Tab
![]()
If you click on any picture or clip art, you will see a new Picture Tools Format tab. There, you will find tools to crop, format, adjust contrast, apply effects, and most anything else you would typically do to a picture.
Inserting a Picture from File
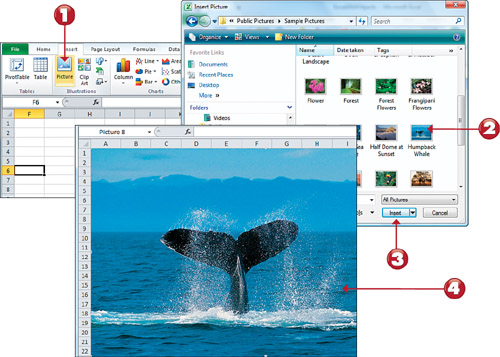
Often times, you will want to embed your own company-approved pictures into your worksheet. A good example of this is a company logo. Excel is quite flexible and allows you to insert varying types of picture files: Bitmap files, JPEG files, PNG Files, TIF files, PCX files, and many more.
![]()
![]() On the Insert tab, click the Picture button to open the Insert Picture dialog box.
On the Insert tab, click the Picture button to open the Insert Picture dialog box.
![]() Locate the file you want to use, and click it to see a preview. (You might need to select Preview from the dialog box Views button).
Locate the file you want to use, and click it to see a preview. (You might need to select Preview from the dialog box Views button).
![]() Click the Insert button.
Click the Insert button.
![]() The image is inserted into your worksheet.
The image is inserted into your worksheet.
![]()
Tip: Manage Overlapping Picture Objects
![]()
If you have multiple pictures on your worksheet, you can manage how the pictures overlap each other. Right-click on each picture and select either Send to Back or Bring to Front. This way, you can better control the layout of your pictures, and even layer your pictures to create robust visualizations.
Using AutoShapes
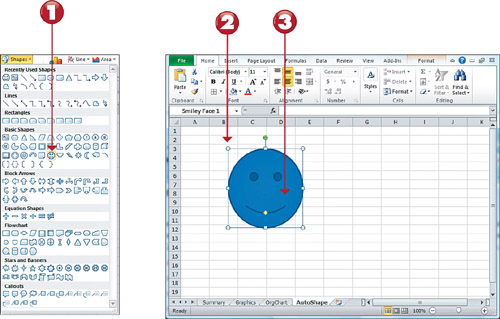
Excel enables you to add numerous predesigned shapes, called AutoShapes, to your worksheets. For example, you can insert any one of the following AutoShapes into your worksheet: Lines, Connectors, Basic Shapes, Block Arrows, Flowchart, Stars and Banners, Callouts, and more. AutoShapes are ideal when you don’t want to spend the time to draw your own fancy symbols, instead preferring to get up and running with one of Excel’s prefab symbols.
![]()
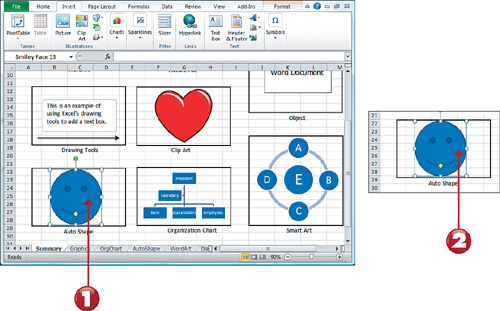
![]() On the Insert tab, click the Shapes drop-down, and select from the different shape options (here, Smiley Face).
On the Insert tab, click the Shapes drop-down, and select from the different shape options (here, Smiley Face).
![]() The mouse pointer changes to a plus sign. Click and drag the pointer to draw the object at the desired size; then release the mouse button.
The mouse pointer changes to a plus sign. Click and drag the pointer to draw the object at the desired size; then release the mouse button.
![]() The new shape is added, complete with sizing handles.
The new shape is added, complete with sizing handles.
![]()
Note: Resizing and Moving Objects
![]()
Move the mouse over an object border; the pointer becomes a four-headed arrow, and you can move it (see the “Moving Objects” task); a two-headed arrow enables you to resize it (see the “Resizing Objects” task).
Note: Formatting AutoShapes
![]()
To format your AutoShape, right-click the object, and select Format Shape from the shortcut menu. Click the Colors and Lines tab, and choose from the various colors, line types, and arrows. You can also use the Format tab that appears on the ribbon after you select an Autoshape.
Inserting WordArt
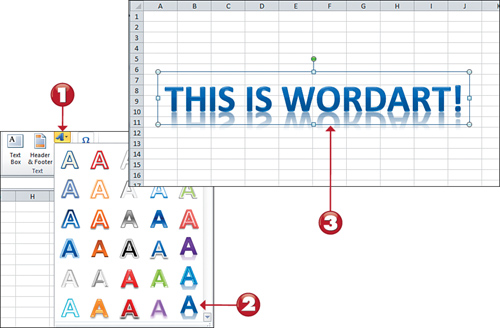
WordArt is a text-based object that Microsoft provides to apply special effects to text. You don’t have to add these text effects manually; the different styles of WordArt are indeed the text effects themselves.
![]()
![]() On the Insert tab, click the WordArt button to open the WordArt Gallery.
On the Insert tab, click the WordArt button to open the WordArt Gallery.
![]() Click the WordArt style you want to use to insert it onto the worksheet.
Click the WordArt style you want to use to insert it onto the worksheet.
![]() Type your text into the Text box placed on the worksheet, and press Enter.
Type your text into the Text box placed on the worksheet, and press Enter.
![]()
Note: Formatting WordArt
![]()
After your WordArt is inserted into your worksheet, the Drawing Tools contextual tab appears on the ribbon (while the WordArt object is selected). You can use the Drawing Tools contextual tab to edit the text, alter the style, format the text, and add more WordArt.

Using Smart Art in Excel
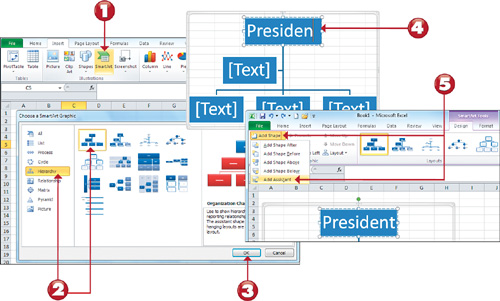
Smart Art is often described as representation of information and ideas. You can think of Smart Art as a way to visually communicate concepts that are difficult to communicate with data alone. For example, it would be difficult to build a data table that effectively communicates an organizations hierarchy. This is where Smart Art would come in.
![]()
![]() On the Insert tab, choose SmartArt.
On the Insert tab, choose SmartArt.
![]() Select Organization Chart under the Hierarchy pane.
Select Organization Chart under the Hierarchy pane.
![]() Click OK to insert the new Smart Art into your Worksheet.
Click OK to insert the new Smart Art into your Worksheet.
![]() An organization chart containing dummy text is inserted into your worksheet. To fill the chart in yourself, click a text box and type over the dummy text with your own text.
An organization chart containing dummy text is inserted into your worksheet. To fill the chart in yourself, click a text box and type over the dummy text with your own text.
![]() The Smart Art Tools tab offers options such as adding a subordinate, co-worker, or assistant, to the selected text box. For example, you can click the dropdown next to the Add Shape button and select Add Assistant.
The Smart Art Tools tab offers options such as adding a subordinate, co-worker, or assistant, to the selected text box. For example, you can click the dropdown next to the Add Shape button and select Add Assistant.
![]()
Inserting a Diagram
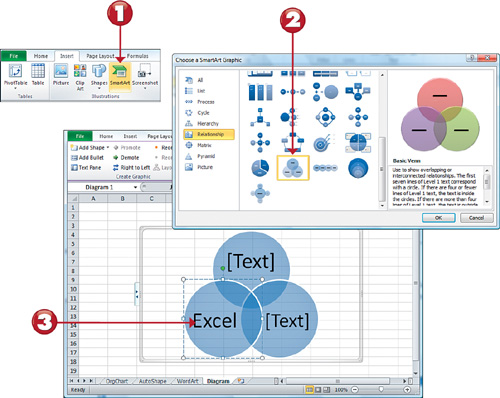
Diagrams are ideal when you need to integrate and communicate a workflow, process, or other conceptual paradigms with your spreadsheet data. You can insert the diagram and then add the appropriate information in a manner similar to inserting an organization chart.
![]() On the Insert tab click the SmartArt button to display the SmartArt Gallery dialog box.
On the Insert tab click the SmartArt button to display the SmartArt Gallery dialog box.
![]() Double-click the desired diagram type; a diagram of that type containing dummy text is inserted into your worksheet.
Double-click the desired diagram type; a diagram of that type containing dummy text is inserted into your worksheet.
![]() Click each instance of dummy text and type over it with text of your own.
Click each instance of dummy text and type over it with text of your own.
![]()
Tip: Make Use of the Layout Gallery
![]()
After your diagram is in place, use the Layout gallery under the Design tab to try out different layouts. Excel keeps all your text and settings but shows your diagram in a different layout. Often times, you’ll find one that better illustrates your message than the one you originally selected.
Inserting an Object
In addition to inserting all the different types of graphic objects that you learned about in this chapter, you can also insert objects that aren’t as commonly added to Excel worksheets. For example, you can insert a media clip, PowerPoint slide, Microsoft Works chart, video clip, and much more.
![]()
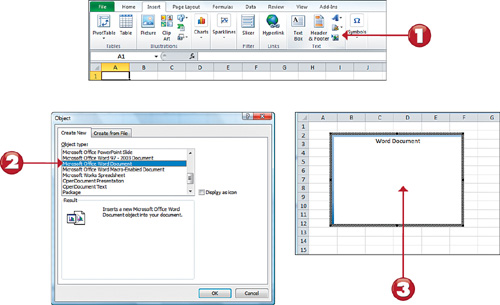
![]() On the Insert tab click the Insert Object button to open the Object dialog box.
On the Insert tab click the Insert Object button to open the Object dialog box.
![]() Scroll through the Object type list, and double-click the object you want to insert—for example, Microsoft Office Word Document.
Scroll through the Object type list, and double-click the object you want to insert—for example, Microsoft Office Word Document.
![]() Edit the object according to the individual object properties (in this example, as you would when creating a Word document).
Edit the object according to the individual object properties (in this example, as you would when creating a Word document).
![]()
Note: Getting to the Object Properties
![]()
Once your object is on your spreadsheet, you can edit the object by right-clicking it and selecting Document Object. This brings up a Properties menu of sorts. Here, you can Edit the object source, Open the object itself, or convert the object so that it is displayed as an icon.

Selecting an Object
As you have seen, you can add charts to a worksheet, draw objects, insert pictures, and more. Each of these items exists on a separate layer on top of the worksheet and is generically called an object. As you discover in the next several tasks, you can format, move, resize, and delete objects; first, however, you must select the object you want to modify.
![]()
![]() Click the object you want to select; selection handles appear around the edges of the object.
Click the object you want to select; selection handles appear around the edges of the object.
![]() Move the mouse over the object border; the pointer becomes a four-headed arrow and you can move it; a two-headed arrow enables you to resize it.
Move the mouse over the object border; the pointer becomes a four-headed arrow and you can move it; a two-headed arrow enables you to resize it.
![]()
Note: Selecting Multiple Objects
![]()
To select multiple objects, click the first object, press and hold down the Shift key, and click the second object. Continue until you select all the objects you want.
![]()
Formatting an Object
You can format objects just as easily as you format text, data, and worksheets. Depending on the object, the standard formatting options you can change are as follows: font (text changes in the object), alignment (where text aligns in the object), colors and lines (whether lines are filled, colored, or have arrows), size (the height, width, and scale of the object), protection (whether others can alter your object), properties (how you position the object and whether you can print it), and Web (text to display while the object loads online).
![]()
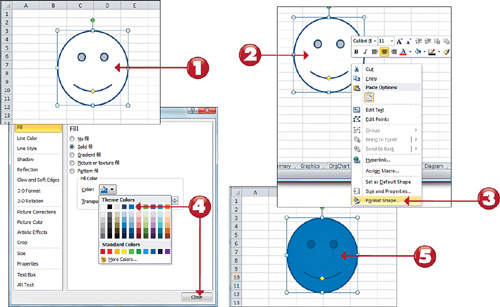
![]() Click the object you want to format; selection handles appear around the edges of the object.
Click the object you want to format; selection handles appear around the edges of the object.
![]() Right-click the object.
Right-click the object.
![]() Select Format [object name] (here, Shape) from the shortcut menu.
Select Format [object name] (here, Shape) from the shortcut menu.
![]() A Format [object name] dialog box opens. Click the available tabs, alter the formatting options as needed, and click Close.
A Format [object name] dialog box opens. Click the available tabs, alter the formatting options as needed, and click Close.
![]() The formatting changes are applied to the object.
The formatting changes are applied to the object.
![]()
Note: Double-Click to the Format Dialog Box
![]()
You can also double-click directly on the object to automatically open the Format dialog box associated with it.
Moving an Object
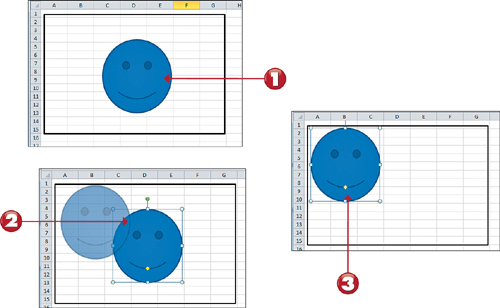
When you draw an object on or add an object to a worksheet, you might not like its placement. Perhaps the object obscures the worksheet data, or maybe it needs to be moved a little closer to (or farther away from) the data. Fortunately, you can easily move an object.
![]()
![]() Select the object you want to move; selection handles appear around the edges of the object.
Select the object you want to move; selection handles appear around the edges of the object.
![]() Click directly on the object or its border (not the selection handles) and hold the left mouse button while dragging the object to the new location.
Click directly on the object or its border (not the selection handles) and hold the left mouse button while dragging the object to the new location.
![]() Release the mouse button to drop the object in the new location. The object is moved.
Release the mouse button to drop the object in the new location. The object is moved.
![]()
Tip: Copying Objects
![]()
To copy an object, press and hold down the Ctrl key on your keyboard as you drag; a copy of the original object will be moved, with the original remaining intact where it is.
Note: Moving an Object to Another Worksheet
![]()
You can move your target object to a separate worksheet by following these simple steps. Right-click the target object, and select Cut. Next, move to the new sheet, right-click in the spot where you want the object to appear, and then select Paste. You can also use these steps to move your object to a different workbook.
Resizing an Object
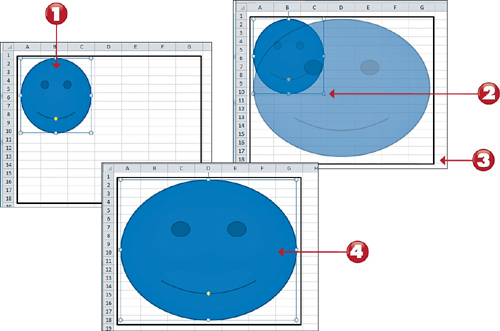
If an object is too big (or too small), change the size. You can modify any type of object, including a picture, chart, or drawn object you added. In addition, you can continue to resize the object over and over until it is the size you want.
![]()
![]() Select the object you want to resize; selection handles appear around the edges of the object.
Select the object you want to resize; selection handles appear around the edges of the object.
![]() Move the pointer over one of the selection handles (here, a corner handle). When the pointer is in the right spot, it changes to a two-headed arrow.
Move the pointer over one of the selection handles (here, a corner handle). When the pointer is in the right spot, it changes to a two-headed arrow.
![]() Click the handle, drag it, and release the mouse button when the object is the desired size.
Click the handle, drag it, and release the mouse button when the object is the desired size.
![]() The object is resized.
The object is resized.
![]()
Note: Corners Versus Sides
![]()
Dragging the sides increases or decreases the height or width of an object, whereas dragging the corners increases or decreases the height and width of an object at the same time.
Note: Resizing Proportionally
![]()
If you hold the Shift key down while dragging a corner, the image enlarges or decreases in proportion.
Deleting an Object
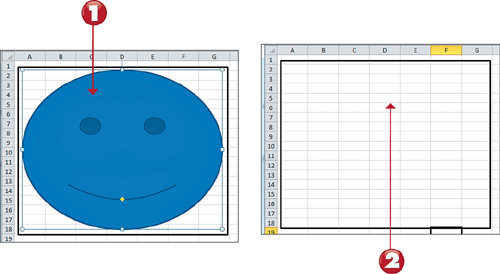
As you experiment with charts, drawings, and pictures, you might go overboard, or you might make a mistake and want to start over. In any case, if you add an object and no longer want to include it, you can delete it, as described here.
![]()
![]() Select the object you want to delete; selection handles appear around the edges of the object.
Select the object you want to delete; selection handles appear around the edges of the object.
![]() Press the Delete key on your keyboard. Excel deletes the object.
Press the Delete key on your keyboard. Excel deletes the object.
![]()
Note: Undoing a Deletion
![]()
If you accidentally delete an object, click the Undo button on the Quick Access Toolbar to undo the deletion. Alternatively, you can use the Ctrl+Z shortcut on your keyboard.


