
Chapter 3. Data In, Data Out
Whatever program we write, the intention is the same: to organize data in a way that serves our purposes. But data doesn’t consist of just random bits and bytes. We build relationships between data elements in order to represent entities, or things that exist in the real world. A name and an email address have more meaning if we know that they belong to the same person.
In the real world, though, not all entities of the same type look the same. One person might have a home telephone number, while another person has only a cell-phone number, and another might have both. One person might have three email addresses, while another has none. A Spanish person will probably have two last names, while an English person will probably have only one.
One of the reasons that object-oriented programming languages are so popular is that objects help us represent and manipulate real-world entities with potentially complex data structures. So far, so good.
The problem comes when we need to store these entities. Traditionally, we have stored our data in columns and rows in a relational database, the equivalent of using a spreadsheet. All the flexibility gained from using objects is lost because of the inflexibility of our storage medium.
But what if we could store our objects as objects? Instead of modeling our application around the limitations of spreadsheets, we can instead focus on using the data. The flexibility of objects is returned to us.
An object is a language-specific, in-memory data structure. To send it across the network or store it, we need to be able to represent it in some standard format. JSON is a way of representing objects in human-readable text. It has become the de facto standard for exchanging data in the NoSQL world. When an object has been serialized into JSON, it is known as a JSON document.
Elasticsearch is a distributed document store. It can store and retrieve complex data structures—serialized as JSON documents—in real time. In other words, as soon as a document has been stored in Elasticsearch, it can be retrieved from any node in the cluster.
Of course, we don’t need to only store data; we must also query it, en masse and at speed. While NoSQL solutions exist that allow us to store objects as documents, they still require us to think about how we want to query our data, and which fields require an index in order to make data retrieval fast.
In Elasticsearch, all data in every field is indexed by default. That is, every field has a dedicated inverted index for fast retrieval. And, unlike most other databases, it can use all of those inverted indices in the same query, to return results at breathtaking speed.
In this chapter, we present the APIs that we use to create, retrieve, update, and delete documents. For the moment, we don’t care about the data inside our documents or how to query them. All we care about is how to store our documents safely in Elasticsearch and how to get them back again.
What Is a Document?
Most entities or objects in most applications can be serialized into a JSON object, with keys and values. A key is the name of a field or property, and a value can be a string, a number, a Boolean, another object, an array of values, or some other specialized type such as a string representing a date or an object representing a geolocation:
{"name":"John Smith","age":42,"confirmed":true,"join_date":"2014-06-01","home":{"lat":51.5,"lon":0.1},"accounts":[{"type":"facebook","id":"johnsmith"},{"type":"twitter","id":"johnsmith"}]}
Often, we use the terms object and document interchangeably. However, there is a distinction. An object is just a JSON object—similar to what is known as a hash, hashmap, dictionary, or associative array. Objects may contain other objects. In Elasticsearch, the term document has a specific meaning. It refers to the top-level, or root object that is serialized into JSON and stored in Elasticsearch under a unique ID.
Document Metadata
A document doesn’t consist only of its data. It also has metadata—information about the document. The three required metadata elements are as follows:
_index-
Where the document lives
_type-
The class of object that the document represents
_id-
The unique identifier for the document
_index
An index is like a database in a relational database; it’s the place we store and index related data.
Tip
Actually, in Elasticsearch, our data is stored and indexed in shards, while an index is just a logical namespace that groups together one or more shards. However, this is an internal detail; our application shouldn’t care about shards at all. As far as our application is concerned, our documents live in an index. Elasticsearch takes care of the details.
We cover how to create and manage indices ourselves in Chapter 10,
but for now we will let Elasticsearch create the index for us. All we have to
do is choose an index name. This name must be lowercase, cannot begin with an
underscore, and cannot contain commas. Let’s use website as our index name.
_type
In applications, we use objects to represent things such as a user, a blog
post, a comment, or an email. Each object belongs to a class that defines
the properties or data associated with an object. Objects in the user class
may have a name, a gender, an age, and an email address.
In a relational database, we usually store objects of the same class in the same table, because they share the same data structure. For the same reason, in Elasticsearch we use the same type for documents that represent the same class of thing, because they share the same data structure.
Every type has its own mapping or schema definition, which defines the data structure for documents of that type, much like the columns in a database table. Documents of all types can be stored in the same index, but the mapping for the type tells Elasticsearch how the data in each document should be indexed.
We show how to specify and manage mappings in “Types and Mappings”, but for now we will rely on Elasticsearch to detect our document’s data structure automatically.
A _type name can be lowercase or uppercase, but shouldn’t begin with an
underscore or contain commas. We will use blog for our type name.
Other Metadata
There are several other metadata elements, which are presented in “Types and Mappings”. With the elements listed previously, we are already able to store a document in Elasticsearch and to retrieve it by ID—in other words, to use Elasticsearch as a document store.
Indexing a Document
Documents are indexed—stored and made searchable—by using the index
API. But first, we need to decide where the document lives. As we just
discussed, a document’s _index, _type, and _id uniquely identify the
document. We can either provide our own _id value or let the index API
generate one for us.
Using Our Own ID
If your document has a natural identifier (for example, a user_account field
or some other value that identifies the document), you should provide
your own _id, using this form of the index API:
PUT/{index}/{type}/{id}{"field":"value",...}
For example, if our index is called website, our type is called blog,
and we choose the ID 123, then the index request looks like this:
PUT/website/blog/123{"title":"My first blog entry","text":"Just trying this out...","date":"2014/01/01"}
Elasticsearch responds as follows:
{"_index":"website","_type":"blog","_id":"123","_version":1,"created":true}
The response indicates that the indexing request has been successfully created
and includes the _index, _type, and _id metadata, and a new element:
_version.
Every document in Elasticsearch has a version number. Every time a change is
made to a document (including deleting it), the _version number is
incremented. In “Dealing with Conflicts”, we discuss how to use the _version
number to ensure that one part of your application doesn’t overwrite changes
made by another part.
Autogenerating IDs
If our data doesn’t have a natural ID, we can let Elasticsearch autogenerate
one for us. The structure of the request changes: instead of using the PUT
verb (“store this document at this URL”), we use the POST verb (“store this document under this URL”).
The URL now contains just the _index and the _type:
POST/website/blog/{"title":"My second blog entry","text":"Still trying this out...","date":"2014/01/01"}
The response is similar to what we saw before, except that the _id
field has been generated for us:
{"_index":"website","_type":"blog","_id":"wM0OSFhDQXGZAWDf0-drSA","_version":1,"created":true}
Autogenerated IDs are 22 character long, URL-safe, Base64-encoded string universally unique identifiers, or UUIDs.
Retrieving a Document
To get the document out of Elasticsearch, we use the same _index,
_type, and _id, but the HTTP verb changes to GET:
GET /website/blog/123?pretty
The response includes the by-now-familiar metadata elements, plus the _source
field, which contains the original JSON document that we sent to Elasticsearch
when we indexed it:
{"_index":"website","_type":"blog","_id":"123","_version":1,"found":true,"_source":{"title":"My first blog entry","text":"Just trying this out...","date":"2014/01/01"}}
Note
Adding pretty to the query-string parameters for any request, as in the
preceding example, causes Elasticsearch to pretty-print the JSON response to
make it more readable. The _source field, however, isn’t pretty-printed.
Instead we get back exactly the same JSON string that we passed in.
The response to the GET request includes {"found": true}. This confirms that
the document was found. If we were to request a document that doesn’t exist,
we would still get a JSON response, but found would be set to false.
Also, the HTTP response code would be 404 Not Found instead of 200 OK.
We can see this by passing the -i argument to curl, which causes it to
display the response headers:
curl -i -XGET http://localhost:9200/website/blog/124?pretty
The response now looks like this:
HTTP/1.1404NotFoundContent-Type:application/json;charset=UTF-8Content-Length:83{"_index":"website","_type":"blog","_id":"124","found":false}
Retrieving Part of a Document
By default, a GET request will return the whole document, as stored in the
_source field. But perhaps all you are interested in is the title field.
Individual fields can be requested by using the _source parameter. Multiple
fields can be specified in a comma-separated list:
GET /website/blog/123?_source=title,text
The _source field now contains just the fields that we requested and has
filtered out the date field:
{"_index":"website","_type":"blog","_id":"123","_version":1,"exists":true,"_source":{"title":"My first blog entry","text":"Just trying this out..."}}
Or if you want just the _source field without any metadata, you can use
the _source endpoint:
GET /website/blog/123/_source
which returns just the following:
{"title":"My first blog entry","text":"Just trying this out...","date":"2014/01/01"}
Checking Whether a Document Exists
If all you want to do is to check whether a document exists—you’re not
interested in the content at all—then use the HEAD method instead
of the GET method. HEAD requests don’t return a body, just HTTP headers:
curl-i-XHEADhttp://localhost:9200/website/blog/123
Elasticsearch will return a 200 OK status code if the document exists:
HTTP/1.1200OKContent-Type:text/plain;charset=UTF-8Content-Length:0
And a 404 Not Found if it doesn’t exist:
curl-i-XHEADhttp://localhost:9200/website/blog/124
HTTP/1.1404NotFoundContent-Type:text/plain;charset=UTF-8Content-Length:0
Of course, just because a document didn’t exist when you checked it, doesn’t mean that it won’t exist a millisecond later: another process might create the document in the meantime.
Updating a Whole Document
Documents in Elasticsearch are immutable; we cannot change them. Instead, if
we need to update an existing document, we reindex or replace it, which we
can do using the same index API that we have already discussed in
“Indexing a Document”.
PUT/website/blog/123{"title":"My first blog entry","text":"I am starting to get the hang of this...","date":"2014/01/02"}
In the response, we can see that Elasticsearch has incremented the _version
number:
{"_index":"website","_type":"blog","_id":"123","_version":2,"created":false
}
The
createdflag is set tofalsebecause a document with the same index, type, and ID already existed.
Internally, Elasticsearch has marked the old document as deleted and added an entirely new document. The old version of the document doesn’t disappear immediately, although you won’t be able to access it. Elasticsearch cleans up deleted documents in the background as you continue to index more data.
Later in this chapter, we introduce the update API, which can be used to
make partial updates to a document. This API appears to
change documents in place, but actually Elasticsearch is following exactly the
same process as described previously:
-
Retrieve the JSON from the old document
-
Change it
-
Delete the old document
-
Index a new document
The only difference is that the update API achieves this through a single
client request, instead of requiring separate get and index requests.
Creating a New Document
How can we be sure, when we index a document, that we are creating an entirely new document and not overwriting an existing one?
Remember that the combination of _index, _type, and _id uniquely
identifies a document. So the easiest way to ensure that our document is new
is by letting Elasticsearch autogenerate a new unique _id, using the POST
version of the index request:
POST/website/blog/{...}
However, if we already have an _id that we want to use, then we have to tell
Elasticsearch that it should accept our index request only if a document with
the same _index, _type, and _id doesn’t exist already. There are two ways
of doing this, both of which amount to the same thing. Use whichever method is
more convenient for you.
The first method uses the op_type query-string parameter:
PUT/website/blog/123?op_type=create{...}
And the second uses the /_create endpoint in the URL:
PUT/website/blog/123/_create{...}
If the request succeeds in creating a new document, Elasticsearch will
return the usual metadata and an HTTP response code of 201 Created.
On the other hand, if a document with the same _index, _type, and _id
already exists, Elasticsearch will respond with a 409 Conflict response
code, and an error message like the following:
{"error":"DocumentAlreadyExistsException[[website][4] [blog][123]:document already exists]","status":409}
Deleting a Document
The syntax for deleting a document follows the same pattern that we have seen
already, but uses the DELETE method :
DELETE/website/blog/123
If the document is found, Elasticsearch will return an HTTP response code
of 200 OK and a response body like the following. Note that the _version
number has been incremented:
{"found":true,"_index":"website","_type":"blog","_id":"123","_version":3}
If the document isn’t found, we get a 404 Not Found response code and
a body like this:
{"found":false,"_index":"website","_type":"blog","_id":"123","_version":4}
Even though the document doesn’t exist (found is false), the
_version number has still been incremented. This is part of the internal
bookkeeping, which ensures that changes are applied in the correct order
across multiple nodes.
Note
As already mentioned in “Updating a Whole Document”, deleting a document doesn’t immediately remove the document from disk; it just marks it as deleted. Elasticsearch will clean up deleted documents in the background as you continue to index more data.Dealing with Conflicts
When updating a document with the index API, we read the original document,
make our changes, and then reindex the whole document in one go. The most recent
indexing request wins: whichever document was indexed last is the one stored
in Elasticsearch. If somebody else had changed the document in the meantime,
their changes would be lost.
Many times, this is not a problem. Perhaps our main data store is a relational database, and we just copy the data into Elasticsearch to make it searchable. Perhaps there is little chance of two people changing the same document at the same time. Or perhaps it doesn’t really matter to our business if we lose changes occasionally.
But sometimes losing a change is very important. Imagine that we’re using Elasticsearch to store the number of widgets that we have in stock in our online store. Every time that we sell a widget, we decrement the stock count in Elasticsearch.
One day, management decides to have a sale. Suddenly, we are selling several widgets every second. Imagine two web processes, running in parallel, both processing the sale of one widget each, as shown in Figure 3-1.
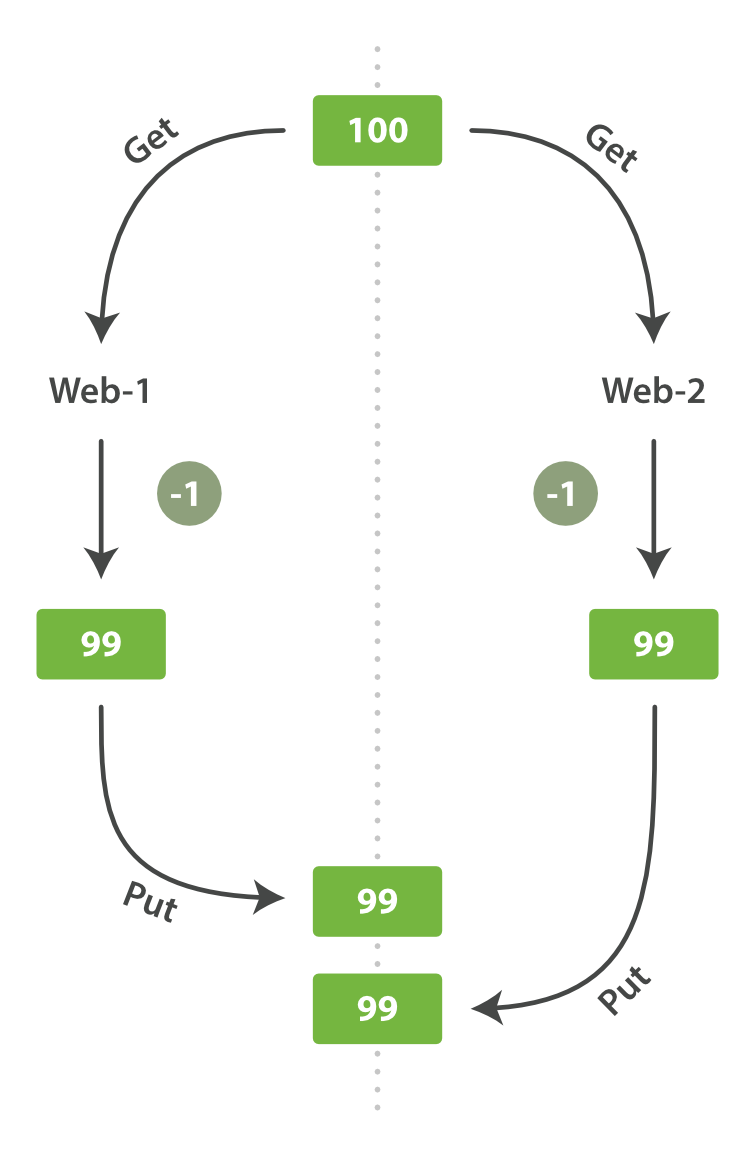
Figure 3-1. Consequence of no concurrency control
The change that web_1 made to the stock_count has been lost because
web_2 is unaware that its copy of the stock_count is out-of-date. The
result is that we think we have more widgets than we actually do, and we’re
going to disappoint customers by selling them stock that doesn’t exist.
The more frequently that changes are made, or the longer the gap between reading data and updating it, the more likely it is that we will lose changes.
In the database world, two approaches are commonly used to ensure that changes are not lost when making concurrent updates:
- Pessimistic concurrency control
-
Widely used by relational databases, this approach assumes that conflicting changes are likely to happen and so blocks access to a resource in order to prevent conflicts. A typical example is locking a row before reading its data, ensuring that only the thread that placed the lock is able to make changes to the data in that row.
- Optimistic concurrency control
-
Used by Elasticsearch, this approach assumes that conflicts are unlikely to happen and doesn’t block operations from being attempted. However, if the underlying data has been modified between reading and writing, the update will fail. It is then up to the application to decide how it should resolve the conflict. For instance, it could reattempt the update, using the fresh data, or it could report the situation to the user.
Optimistic Concurrency Control
Elasticsearch is distributed. When documents are created, updated, or deleted, the new version of the document has to be replicated to other nodes in the cluster. Elasticsearch is also asynchronous and concurrent, meaning that these replication requests are sent in parallel, and may arrive at their destination out of sequence. Elasticsearch needs a way of ensuring that an older version of a document never overwrites a newer version.
When we discussed index, get, and delete requests previously, we pointed out
that every document has a _version number that is incremented whenever a
document is changed. Elasticsearch uses this _version number to ensure that
changes are applied in the correct order. If an older version of a document
arrives after a new version, it can simply be ignored.
We can take advantage of the _version number to ensure that conflicting
changes made by our application do not result in data loss. We do this by
specifying the version number of the document that we wish to change. If that
version is no longer current, our request fails.
Let’s create a new blog post:
PUT/website/blog/1/_create{"title":"My first blog entry","text":"Just trying this out..."}
The response body tells us that this newly created document has _version
number 1. Now imagine that we want to edit the document: we load its data
into a web form, make our changes, and then save the new version.
First we retrieve the document:
GET/website/blog/1
The response body includes the same _version number of 1:
{"_index":"website","_type":"blog","_id":"1","_version":1,"found":true,"_source":{"title":"My first blog entry","text":"Just trying this out..."}}
Now, when we try to save our changes by reindexing the document, we specify
the version to which our changes should be applied:
PUT/website/blog/1?version=1{"title":"My first blog entry","text":"Starting to get the hang of this..."}
We want this update to succeed only if the current
_versionof this document in our index is version1.
This request succeeds, and the response body tells us that the _version
has been incremented to 2:
{"_index":"website","_type":"blog","_id":"1","_version":2"created":false}
However, if we were to rerun the same index request, still specifying
version=1, Elasticsearch would respond with a 409 Conflict HTTP response
code, and a body like the following:
{"error":"VersionConflictEngineException[[website][2] [blog][1]:version conflict, current [2], provided [1]]","status":409}
This tells us that the current _version number of the document in
Elasticsearch is 2, but that we specified that we were updating version 1.
What we do now depends on our application requirements. We could tell the
user that somebody else has already made changes to the document, and to review the changes before trying to save them again.
Alternatively, as in the case of the widget stock_count previously, we could
retrieve the latest document and try to reapply the change.
All APIs that update or delete a document accept a version parameter, which
allows you to apply optimistic concurrency control to just the parts of your
code where it makes sense.
Using Versions from an External System
A common setup is to use some other database as the primary data store and Elasticsearch to make the data searchable, which means that all changes to the primary database need to be copied across to Elasticsearch as they happen. If multiple processes are responsible for this data synchronization, you may run into concurrency problems similar to those described previously.
If your main database already has version numbers—or a value such as
timestamp that can be used as a version number—then you can reuse these
same version numbers in Elasticsearch by adding version_type=external to the
query string. Version numbers must be integers greater than zero and less than
about 9.2e+18--a positive long value in Java.
The way external version numbers are handled is a bit different from the
internal version numbers we discussed previously. Instead of checking that the
current _version is the same as the one specified in the request,
Elasticsearch checks that the current _version is less than the specified
version. If the request succeeds, the external version number is stored as the
document’s new _version.
External version numbers can be specified not only on index and delete requests, but also when creating new documents.
For instance, to create a new blog post with an external version number
of 5, we can do the following:
PUT/website/blog/2?version=5&version_type=external{"title":"My first external blog entry","text":"Starting to get the hang of this..."}
In the response, we can see that the current _version number is 5:
{"_index":"website","_type":"blog","_id":"2","_version":5,"created":true}
Now we update this document, specifying a new version number of 10:
PUT/website/blog/2?version=10&version_type=external{"title":"My first external blog entry","text":"This is a piece of cake..."}
The request succeeds and sets the current _version to 10:
{"_index":"website","_type":"blog","_id":"2","_version":10,"created":false}
If you were to rerun this request, it would fail with the same conflict error we saw before, because the specified external version number is not higher than the current version in Elasticsearch.
Partial Updates to Documents
In “Updating a Whole Document”, we said that the way to update a document is to retrieve
it, change it, and then reindex the whole document. This is true. However, using
the update API, we can make partial updates like incrementing a counter in a
single request.
We also said that documents are immutable: they cannot be changed, only
replaced. The update API must obey the same rules. Externally, it
appears as though we are partially updating a document in place. Internally,
however, the update API simply manages the same retrieve-change-reindex
process that we have already described. The difference is that this process
happens within a shard, thus avoiding the network overhead of multiple
requests. By reducing the time between the retrieve and reindex steps, we
also reduce the likelihood of there being conflicting changes from other
processes.
The simplest form of the update request accepts a partial document as the
doc parameter, which just gets merged with the existing document. Objects
are merged together, existing scalar fields are overwritten, and new fields are
added. For instance, we could add a tags field and a views field to our
blog post as follows:
POST/website/blog/1/_update{"doc":{"tags":["testing"],"views":0}}
If the request succeeds, we see a response similar to that
of the index request:
{"_index":"website","_id":"1","_type":"blog","_version":3}
Retrieving the document shows the updated _source field:
{"_index":"website","_type":"blog","_id":"1","_version":3,"found":true,"_source":{"title":"My first blog entry","text":"Starting to get the hang of this...","tags":["testing"],"views":0}}
Our new fields have been added to the
_source.
Using Scripts to Make Partial Updates
Scripts can be used in the update API to change the contents of the _source
field, which is referred to inside an update script as ctx._source. For
instance, we could use a script to increment the number of views that our
blog post has had:
POST/website/blog/1/_update{"script":"ctx._source.views+=1"}
We can also use a script to add a new tag to the tags array. In this
example we specify the new tag as a parameter rather than hardcoding it in
the script itself. This allows Elasticsearch to reuse the script in the
future, without having to compile a new script every time we want to add
another tag:
POST/website/blog/1/_update{"script":"ctx._source.tags+=new_tag","params":{"new_tag":"search"}}
Fetching the document shows the effect of the last two requests:
{"_index":"website","_type":"blog","_id":"1","_version":5,"found":true,"_source":{"title":"My first blog entry","text":"Starting to get the hang of this...","tags":["testing","search"],"views":1
}}
The
searchtag has been appended to thetagsarray.The
viewsfield has been incremented.
We can even choose to delete a document based on its contents,
by setting ctx.op to delete:
POST/website/blog/1/_update{"script":"ctx.op = ctx._source.views == count ? 'delete' : 'none'","params":{"count":1}}
Updating a Document That May Not Yet Exist
Imagine that we need to store a page view counter in Elasticsearch. Every time that a user views a page, we increment the counter for that page. But if it is a new page, we can’t be sure that the counter already exists. If we try to update a nonexistent document, the update will fail.
In cases like these, we can use the upsert parameter to specify the
document that should be created if it doesn’t already exist:
POST/website/pageviews/1/_update{"script":"ctx._source.views+=1","upsert":{"views":1}}
The first time we run this request, the upsert value is indexed as a new
document, which initializes the views field to 1. On subsequent runs, the
document already exists, so the script update is applied instead,
incrementing the views counter.
Updates and Conflicts
In the introduction to this section, we said that the smaller the window between
the retrieve and reindex steps, the smaller the opportunity for
conflicting changes. But it doesn’t eliminate the possibility completely. It
is still possible that a request from another process could change the
document before update has managed to reindex it.
To avoid losing data, the update API retrieves the current _version
of the document in the retrieve step, and passes that to the index request
during the reindex step.
If another process has changed the document between retrieve and reindex,
then the _version number won’t match and the update request will fail.
For many uses of partial update, it doesn’t matter that a document has been changed. For instance, if two processes are both incrementing the page-view counter, it doesn’t matter in which order it happens; if a conflict occurs, the only thing we need to do is reattempt the update.
This can be done automatically by setting the retry_on_conflict parameter to
the number of times that update should retry before failing; it defaults
to 0.
POST/website/pageviews/1/_update?retry_on_conflict=5{"script":"ctx._source.views+=1","upsert":{"views":0}}
Retry this update five times before failing.
This works well for operations such as incrementing a counter, where the order of
increments does not matter, but in other situations the order of
changes is important. Like the index API, the update API
adopts a last-write-wins approach by default, but it also accepts a
version parameter that allows you to use
optimistic concurrency control to specify
which version of the document you intend to update.
Retrieving Multiple Documents
As fast as Elasticsearch is, it can be faster still. Combining multiple
requests into one avoids the network overhead of processing each request
individually. If you know that you need to retrieve multiple documents from
Elasticsearch, it is faster to retrieve them all in a single request by using the
multi-get, or mget, API, instead of document by document.
The mget API expects a docs array, each element of which specifies the
_index, _type, and _id metadata of the document you wish to retrieve. You
can also specify a _source parameter if you just want to retrieve one or
more specific fields:
GET/_mget{"docs":[{"_index":"website","_type":"blog","_id":2},{"_index":"website","_type":"pageviews","_id":1,"_source":"views"}]}
The response body also contains a docs array that contains a response
per document, in the same order as specified in the request. Each of these
responses is the same response body that we would expect from an individual
get request:
{"docs":[{"_index":"website","_id":"2","_type":"blog","found":true,"_source":{"text":"This is a piece of cake...","title":"My first external blog entry"},"_version":10},{"_index":"website","_id":"1","_type":"pageviews","found":true,"_version":2,"_source":{"views":2}}]}
If the documents you wish to retrieve are all in the same _index (and maybe
even of the same _type), you can specify a default /_index or a
default /_index/_type in the URL.
You can still override these values in the individual requests:
GET/website/blog/_mget{"docs":[{"_id":2},{"_type":"pageviews","_id":1}]}
In fact, if all the documents have the same _index and _type, you
can just pass an array of ids instead of the full docs array:
GET/website/blog/_mget{"ids":["2","1"]}
Note that the second document that we requested doesn’t exist. We specified
type blog, but the document with ID 1 is of type pageviews. This
nonexistence is reported in the response body:
{"docs":[{"_index":"website","_type":"blog","_id":"2","_version":10,"found":true,"_source":{"title":"My first external blog entry","text":"This is a piece of cake..."}},{"_index":"website","_type":"blog","_id":"1","found":false}]}
This document was not found.
The fact that the second document wasn’t found didn’t affect the retrieval of the first document. Each doc is retrieved and reported on individually.
Note
The HTTP status code for the preceding request is 200, even though one
document wasn’t found. In fact, it would still be 200 if none of the
requested documents were found—because the mget
request itself completed successfully. To determine the success or failure of
the individual documents, you need to check the found flag.
Cheaper in Bulk
In the same way that mget allows us to retrieve multiple documents at once,
the bulk API allows us to make multiple create, index, update, or
delete requests in a single step. This is particularly useful if you need
to index a data stream such as log events, which can be queued up and indexed
in batches of hundreds or thousands.
The bulk request body has the following, slightly unusual, format:
{action:{metadata}}n{requestbody}n{action:{metadata}}n{requestbody}n...
This format is like a stream of valid one-line JSON documents joined
together by newline (
) characters. Two important points to note:
-
Every line must end with a newline character (
-
The lines cannot contain unescaped newline characters, as they would interfere with parsing. This means that the JSON must not be pretty-printed.
The action/metadata line specifies what action to do to which document.
The action must be one of the following:
create-
Create a document only if the document does not already exist. See “Creating a New Document”.
index-
Create a new document or replace an existing document. See “Indexing a Document” and “Updating a Whole Document”.
update-
Do a partial update on a document. See “Partial Updates to Documents”.
delete-
Delete a document. See “Deleting a Document”.
The metadata should specify the _index, _type, and _id of the document
to be indexed, created, updated, or deleted.
For instance, a delete request could look like this:
{"delete":{"_index":"website","_type":"blog","_id":"123"}}
The request body line consists of the document _source itself—the fields
and values that the document contains. It is required for index and
create operations, which makes sense: you must supply the document to index.
It is also required for update operations and should consist of the same
request body that you would pass to the update API: doc, upsert,
script, and so forth. No request body line is required for a delete.
{"create":{"_index":"website","_type":"blog","_id":"123"}}{"title":"My first blog post"}
If no _id is specified, an ID will be autogenerated:
{"index":{"_index":"website","_type":"blog"}}{"title":"My second blog post"}
To put it all together, a complete bulk request has this form:
POST/_bulk{"delete":{"_index":"website","_type":"blog","_id":"123"}}{"create":{"_index":"website","_type":"blog","_id":"123"}}{"title":"My first blog post"}{"index":{"_index":"website","_type":"blog"}}{"title":"My second blog post"}{"update":{"_index":"website","_type":"blog","_id":"123","_retry_on_conflict":3}}{"doc":{"title":"My updated blog post"}}
Notice how the
deleteaction does not have a request body; it is followed immediately by another action.Remember the final newline character.
The Elasticsearch response contains the items array, which lists the result of
each request, in the same order as we requested them:
{"took":4,"errors":false,"items":[{"delete":{"_index":"website","_type":"blog","_id":"123","_version":2,"status":200,"found":true}},{"create":{"_index":"website","_type":"blog","_id":"123","_version":3,"status":201}},{"create":{"_index":"website","_type":"blog","_id":"EiwfApScQiiy7TIKFxRCTw","_version":1,"status":201}},{"update":{"_index":"website","_type":"blog","_id":"123","_version":4,"status":200}}]}}
All subrequests completed successfully.
Each subrequest is executed independently, so the failure of one subrequest
won’t affect the success of the others. If any of the requests fail, the
top-level error flag is set to true and the error details will be
reported under the relevant request:
POST/_bulk{"create":{"_index":"website","_type":"blog","_id":"123"}}{"title":"Cannot create - it already exists"}{"index":{"_index":"website","_type":"blog","_id":"123"}}{"title":"But we can update it"}
In the response, we can see that it failed to create document 123 because
it already exists, but the subsequent index request, also on document 123,
succeeded:
{"took":3,"errors":true,"items":[{"create":{"_index":"website","_type":"blog","_id":"123","status":409,"error":"DocumentAlreadyExistsException
[[website][4][blog][123]:documentalreadyexists]"}},{ "index": {"_index": "website","_type": "blog","_id": "123","_version": 5,"status":200
}}]}
One or more requests has failed.
The HTTP status code for this request reports
409 CONFLICT.The error message explaining why the request failed.
The second request succeeded with an HTTP status code of
200 OK.
That also means that bulk requests are not atomic: they cannot be used to
implement transactions. Each request is processed separately, so the success
or failure of one request will not interfere with the others.
Don’t Repeat Yourself
Perhaps you are batch-indexing logging data into the same index, and with the
same type. Having to specify the same metadata for every document is a waste.
Instead, just as for the mget API, the bulk request accepts a default /_index or
/_index/_type in the URL:
POST/website/_bulk{"index":{"_type":"log"}}{"event":"User logged in"}
You can still override the _index and _type in the metadata line, but it
will use the values in the URL as defaults:
POST/website/log/_bulk{"index":{}}{"event":"User logged in"}{"index":{"_type":"blog"}}{"title":"Overriding the default type"}
How Big Is Too Big?
The entire bulk request needs to be loaded into memory by the node that receives our request, so the bigger the request, the less memory available for other requests. There is an optimal size of bulk request. Above that size, performance no longer improves and may even drop off. The optimal size, however, is not a fixed number. It depends entirely on your hardware, your document size and complexity, and your indexing and search load.
Fortunately, it is easy to find this sweet spot: Try indexing typical documents in batches of increasing size. When performance starts to drop off, your batch size is too big. A good place to start is with batches of 1,000 to 5,000 documents or, if your documents are very large, with even smaller batches.
It is often useful to keep an eye on the physical size of your bulk requests. One thousand 1KB documents is very different from one thousand 1MB documents. A good bulk size to start playing with is around 5-15MB in size.