© Neil Cameron 2021
N. CameronElectronics Projects with the ESP8266 and ESP32https://doi.org/10.1007/978-1-4842-6336-5_9

9. WebSocket

Neil Cameron1  
(1)
Edinburgh, UK
 

The WebSocket protocol (www.websocket.org) allows a two-way real-time conversation between the web server and client, through a standardized connection to allow both the server and the client to send data at any time. The client sends a request to the server to switch from an HTTP protocol to a WebSocket protocol; and if the server can host the WebSocket protocol, the HTTP connection is replaced with a WebSocket connection, but using the same port as HTTP.

An example of the WebSocket protocol is transmitting and receiving text in a conversation between the web server and the client (see Figure 9-1). To transmit to the server, text is entered in the web page transmit text box, and the send text button is clicked. The transmitted text is then displayed on the Serial Monitor connected to the server. Conversely, when text is entered on the Serial Monitor, followed by the computer or laptop keyboard <Enter> key, the text received by the client is displayed in the web page receive text box. Clicking the web page receive text box clears the text received from the server. Both the transmit text and receive text boxes are increased in size by dragging the bottom-right corner of a box.
../images/499197_1_En_9_Chapter/499197_1_En_9_Fig1_HTML.jpg
Figure 9-1

WebSocket web page

The WebSocketsServer library, listed under WebSockets, by Markus Sattler is available in the Arduino IDE. The WebSocket is connected on port 81, as the default HTTP COM port is 80, and the wsEvent function displays the received message from the client. Listing 9-1 contains the sketch for the transmit and receive text example. The Serial.write() instruction converts ASCII code for an alphanumeric character to display the alphanumeric character, while Serial.print() displays the ASCII (American Standard Code for Information Interchange) code. The loop function in Listing 9-1 still includes the server.handleClient() instruction to manage HTTP requests, but when text is transmitted by the server to the client, the instruction websocket.broadcastTXT(str.c_str(), str.length()) sends the content of the Serial buffer to the client. The text string is converted to a C-style, null-terminated string with the instruction string.c_str(). The base function sends the default web page AJAX code to the client, when the web page is initially loaded.

In this chapter, an ESP8266 or an ESP32 microcontroller is the server. The web server library instructions for the ESP8266 microcontroller are
#include <ESP8266WebServer.h>
ESP8266WebServer server
and for the ESP32 microcontroller are
#include <WebServer.h>
WebServer server(80);       // requires a port number
The web server library references the Wi-Fi library, so the #include <ESP8266WiFi.h> or #include <WiFi.h> instructions are not required.
#include <ESP8266WebServer.h>      // include web server library
ESP8266WebServer server;           // associate server with library
#include <WebSocketsServer.h>      // include WebSocket library
WebSocketsServer websocket = WebSocketsServer(81); // set WebSocket port 81
#include "buildpage.h"             // webpage AJAX code
char ssid[] = "xxxx";              // change xxxx to Wi-Fi SSID
char password[] = "xxxx";          // change xxxx to Wi-Fi password
String str;
void setup()
{
  Serial.begin(115200);            // Serial Monitor baud rate
  WiFi.begin(ssid, password);      // connect and initialise Wi-Fi
  while (WiFi.status() != WL_CONNECTED) delay(500);
  Serial.print("IP address: ");
  Serial.println(WiFi.localIP());  // display web server IP address
  server.begin();
  server.on("/", base);            // load default webpage
  websocket.begin();               // initialise WebSocket
  websocket.onEvent(wsEvent);      // call wsEvent function
}                                  // on WebSocket event
void wsEvent(uint8_t num, WStype_t type, uint8_t * message, size_t length)
{
  if(type == WStype_TEXT)          // when text received from client
  {                                // display text on Serial Monitor
    for(int i=0; i<length; i++) Serial.write(message[i]);
    Serial.println();
  }
}
void loop()
{
  server.handleClient();           // manage HTTP requests
  websocket.loop();                // handle WebSocket data
  if(Serial.available() > 0)
  {                                // read text in Serial buffer
    str = Serial.readString();     // and send to client
    websocket.broadcastTXT(str.c_str(), str.length());
  }
}
void base()                        // function to return HTML code
{
  server.send (200, "text/html", page);
}
Listing 9-1

WebSocket main sketch

Implementation of the WebSocket protocol is contained in the JavaScript section of Listing 9-2, which includes the web page AJAX code. When the web page is loaded, a table with headers is created to display the received and transmitted text, and the init function is called to open the WebSocket connection at ws://web server IP address:81/. When the client transmits a message to the server, the instruction send(document.getElementById('txText').value) in the sendText function sends the content of the variable txText, which is then cleared. When the client receives a message from the server, the message content is stored in the variable rxText, which is displayed on the web page.

The transmitted message, txText , is contained in an HTML textarea, within an HTML form, with the form action property associated with the JavaScript sendText function. The transmitted message is not included in an HTML input field, as an input field does not permit text wrap-around. If an HTML input field is required, then the sendText function is called by a carriage return at the end of the sent message with the instruction onkeydown='if(event.keyCode == 13) sendText()', as the ASCII code 13 corresponds to a carriage return. The received message, rxText , is included in an HTML textarea, which allows text wrap-around.
char page[] PROGMEM = R"(
<!DOCTYPE html><html>
<head><title>ESP8266</title>
<style>
body {font-family:Arial}
td {vertical-align: top;}
textarea {font-family:Arial; width:300px; height:50px;}
input[type=submit] {background-color:yellow;}
</style></head>
<body id="initialise">
<h2>WebSocket</h2>
<table><tr>
<td>transmit text</td>
<td>receive text (click to clear)</td>
</tr><tr>
<td><form action='javascript:sendText()'>
<textarea id="txText"></textarea><br>
<input type="submit" value="send text">
</form></td>
<td><textarea id="rxText" onfocus='this.value=""'></textarea><br></td>
</tr></table>
<script>
var wskt;
document.getElementById('initialise').onload = function() {init()};
function init()                         // open WebSocket
{
  wskt = new WebSocket('ws://' + window.location.hostname + ':81/');
  wskt.onmessage = function(rx)
  {                                     // client receive message
    var obj = rx.data;
    document.getElementById('rxText').value = obj;
  };
}
function sendText()                     // client transmit message
{
  wskt.send(document.getElementById('txText').value);
  document.getElementById('txText').value = "";
}
</script>
</body></html>
)";
Listing 9-2

WebSocket web page AJAX code

Remote control and WebSocket communication

../images/499197_1_En_9_Chapter/499197_1_En_9_Figa_HTML.jpg 
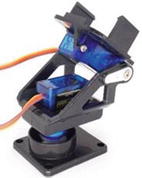
A laser, mounted on a tilt bracket with a servo motor attached to an ESP8266 or ESP32 development board, is remotely controlled by moving a slider on the client web page with the slider position information transmitted to the server, which is the ESP8266 or ESP32 microcontroller. The client receives information on the servo position and the laser state from the server (see Figure 9-2). The microcontroller moves the servo motor and turns on or off the laser according to the control information received from the client. Information on the web page is continuously updated, as the WebSocket protocol enables the server to transmit information to the client, without the client requesting the information.
../images/499197_1_En_9_Chapter/499197_1_En_9_Fig2_HTML.jpg
Figure 9-2

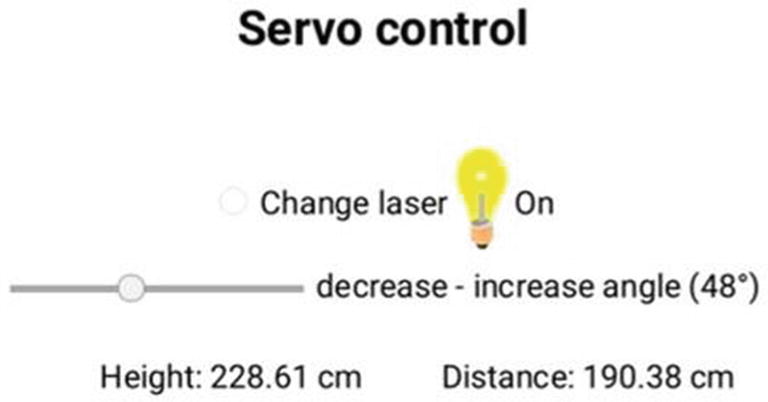
Web page with laser position and state

An application for a remotely controlled laser mounted on a tilt bracket is measurement of vertical and horizontal distance to a point identified by the laser. The vertical distance to the point is determined from the angle of tilt, and the horizontal distance from the object is measured with an ultrasonic distance sensor attached to the front of the tilt bracket. In Figure 9-3, the hinge of the tilt bracket is 5 cm above the base, with an 8 cm distance between the hinge and the front of the HC-SR04 ultrasonic distance sensor and a 2 cm height difference between the hinge and the laser. The vertical distance (cm), above the base, to a point marked by the laser is 5 + (8 + d)tan(x) + 2/cos(x), where x° is the angle of the tilt bracket.
../images/499197_1_En_9_Chapter/499197_1_En_9_Fig3_HTML.jpg
Figure 9-3

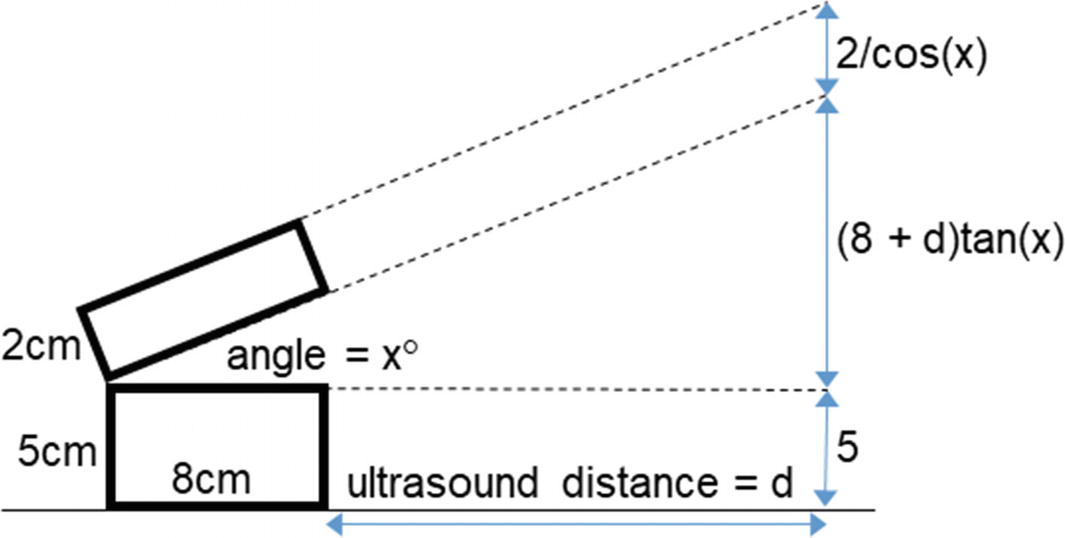
Derivation of height and distance measurement

Connections for an ESP8266 or ESP32 development board, with the ultrasonic distance sensor, laser module, and servo motor are given in Table 9-1 and shown in Figure 9-4. The HC-SR04 ultrasonic distance sensor requires a regulated 5 V supply, which is not provided by a 5 V USB power bank. The servo motor requires an external power supply, such as a 5V battery or a 9V battery with the L4940V5 voltage regulator, as the motor can use hundreds of milliamps during a few milliseconds that the rotor is turning, which is more than the output of the ESP8266 or ESP32 development board 5V or VIN pins. A 9V battery with an L4940V5 voltage regulator, with 100nF and 22μF capacitors (see Figure 9-3), powers the ultrasonic distance sensor and the servo motor. The KY-008 laser operates at 650 nm, with the red light wavelength in the 635–700 nm range.
Table 9-1

Height and distance measurement with ESP8266 and ESP32 microcontrollers

Component

Connect to

And to

Ultrasonic distance sensor VCC

VCC rail


Ultrasonic distance sensor TRIG

ESP8266 D8 or ESP32 GPIO 13

Ultrasonic distance sensor ECHO

ESP8266 D7 or ESP32 GPIO 27

Ultrasonic distance sensor GND

GND rail


Laser module S

ESP8266 D6 or ESP32 GPIO 26

Laser module -

GND rail


Servo motor signal (orange or white)

ESP8266 D5 or ESP32 GPIO 25

Servo motor (red)

VCC rail


Servo motor (brown or black)

GND rail


ESP8266 or ESP32 GND

GND rail


L4940V5 supply

9 V battery positive

100 nF capacitor positive

L4940V5 GND

GND rail


L4940V5 demand

VCC rail

22 μF capacitor positive

9 V battery negative

GND rail


100 nF capacitor negative

GND rail


22 μF capacitor negative

GND rail

 
../images/499197_1_En_9_Chapter/499197_1_En_9_Fig4_HTML.jpg
Figure 9-4

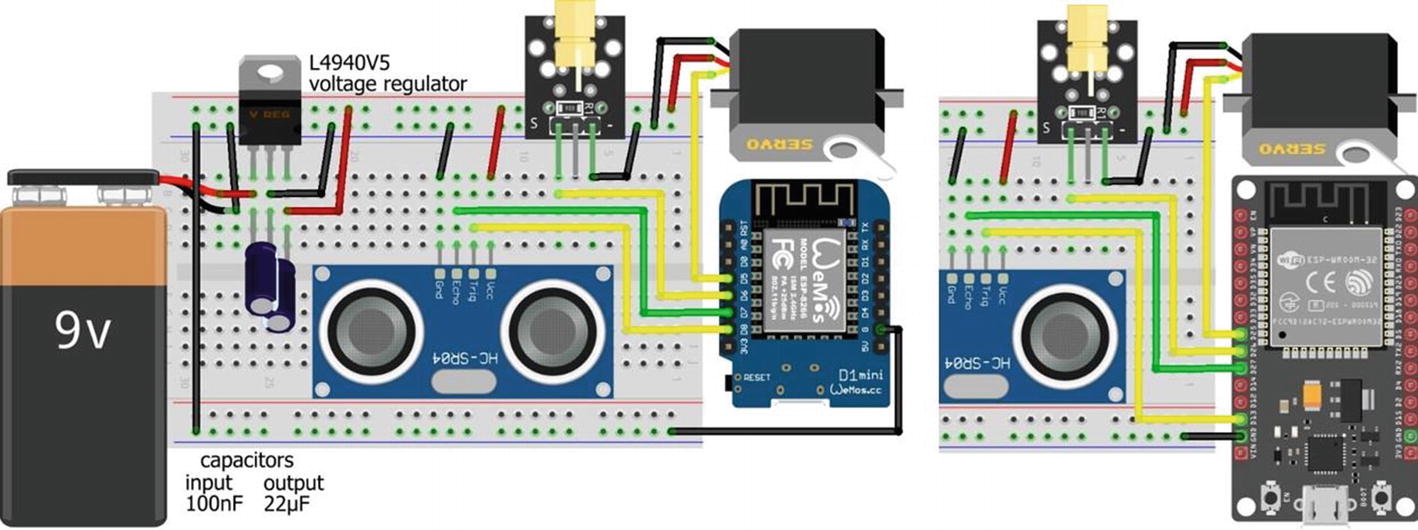
Height and distance measurement with the LOLIN (WeMos) D1 mini or ESP32 DEVKIT DOIT development board

Listing 9-3 is for an ESP8266 microcontroller, and the NewPing8266 library is downloaded from github.​com/​jshaw/​NewPingESP8266. For an ESP32 microcontroller, the WebServer and NewPing libraries replace the ESP8266WebServer and NewPing8266 libraries, with the NewPing library available in the Arduino IDE. The instruction ESP8266WebServer server is replaced with WebServer server (80). The ESP32 microcontroller also requires an ESP32-specific Servo library, rather than the Arduino IDE built-in Servo library. The ESP32Servo library by Kevin Harrington and John K. Bennett is recommended, and the library is available in the Arduino IDE. The ESP8266 microcontroller instructions with the Servo library
#include <Servo.h>                // include Servo library
servoFB.attach(FBpin)             // initialise servo motor to FBpin
are replaced with the ESP32Servo library instructions for the ESP32 microcontroller
#include <ESP32Servo.h>
servoFB.setPeriodHertz(F)         // define servo frequency (F)
servoFB.attach(FBpin, min, max)   // initialise servo motor to FBpin

The square wave frequency, F, is included in the instruction servoFB.setPeriodHertz(F), which is generally 50 Hz. In the servoFB.attach(FBpin, min, max) instruction, the min and max parameters refer to the pulse width, in microseconds, of a square wave to move the servo motor to 0° and 180°, respectively. Default values for the min and max parameters are 1000 μs and 2000 μs, with values of 500 μs and 2500 μs for the Tower Pro SG90 servo.

There is no change to the following instructions:
Servo servoFB                   // associate servoFB with Servo lib
servoFB.writeMicroseconds(T)    // move to position mapped to Tμs
servoFb.write(N)                // move to angle N°
In the sketch in Listing 9-3, the majority of instructions relate to including libraries, defining variables associated with the servo motor and the ultrasonic distance sensor, establishing the Wi-Fi connection, and loading the default web page by calling the base function to access the AJAX code, contained in the string literal page located in the buildpage tab. Instructions related to WebSocket are included in the wsEvent function. When the server receives, from the client, a message containing the servo angle and laser state, the wsEvent function is called, which loads the received message into a string that is parsed into the servo angle and laser state by locating the position of the comma separating the two values. The servo angle is mapped to the number of microseconds for a square wave pulse length to move the servo motor to the required angle. The laser state is also updated. The horizontal distance is measured by the ultrasonic distance sensor, and the vertical distance is calculated from the servo angle and horizontal distance. The two distances are converted to name and value pairs in JSON format with the JsonConvert function, which transmits the information to the client. The distance, in centimeters, between the ultrasonic distance sensor and an object is half the echo time, measured in microseconds, multiplied by 0.0343, assuming the speed of sound of 343 m/s.
#include <ESP8266WebServer.h>     // include Webserver library
ESP8266WebServer server;          // associate server with library
char ssid[] = "xxxx";             // change xxxx to Wi-Fi SSID
char password[] = "xxxx";         // change xxxx to Wi-Fi password
#include <WebSocketsServer.h>     // include Websocket library
WebSocketsServer websocket = WebSocketsServer(81);         // set WebSocket port 81
#include "buildpage.h"            // webpage AJAX code
#include <Servo.h>
Servo servoFB;                    // associate servoFB with Servo lib
int FBpin = D7;                   // forward-backward servo pin
int laserPin = D8;
int minMicrosec = 450;            // minimum and maximum time
int maxMicrosec = 1150;           // for servo motor pulse length
#include <NewPingESP8266.h>       // include NewPing library
int trigPin = D5;                 // ultrasonic trigger and echo pins
int echoPin = D6;
float maxdist = 300;              // ultrasound maximum distance
NewPingESP8266 sonar(trigPin, echoPin, maxdist);
float distance, height, temp, angle;
int microsec, laser, comma;
String text[2];                   // strings in JSON text
String str, json;
unsigned long timer = 0;
void setup()
{
  Serial.begin(115200);           // Serial Monitor baud rate
  WiFi.begin(ssid, password);     // connect and initialise Wi-Fi
  while (WiFi.status() != WL_CONNECTED) delay(500);
  Serial.print("IP address: ");
  Serial.println(WiFi.localIP()); // display web server IP address
  server.begin();
  server.on("/", base);           // load default webpage
  websocket.begin();              // initialise WebSocket
  websocket.onEvent(wsEvent);     // wsEvent on WebSocket event
  servoFB.attach(FBpin);          // initialise servo motor
  servoFB.writeMicroseconds(minMicrosec);                  // and move to initial position
  pinMode(laserPin, OUTPUT);      // define laser pin as output
}
                  // function called when message received from client
void wsEvent(uint8_t n, WStype_t type, uint8_t * message, size_t length)
{
  if(type == WStype_TEXT)
  {
    str = "";                     // convert message to string
    for (int i=0; i<length; i++) str = str + char(message[i]);
    comma = str.indexOf(",");           // location of comma
    text[0] = str.substring(0, comma);  // extract substrings
    text[1] = str.substring(comma+1);
    angle = text[0].toFloat();          // parse servo angle
    microsec = map(angle,20,90,minMicrosec,maxMicrosec);   // map angle to μs
    servoFB.writeMicroseconds(microsec); // move servo to angle
    delay(10);                          // time to move servo
    laser = text[1].toInt();            // parse laser state
    digitalWrite(laserPin, laser);      // turn on or off laser
    distance = (sonar.ping_median(10)/2.0)*0.0343;         // get horizontal distance
    angle = angle*PI/180.0;             // convert angle to radians
    height = 5.0+(distance+8.0)*tan(angle)+2.0/cos(angle); // vertical distance
    JsonConvert(height, distance);      // convert to JSON format
    websocket.broadcastTXT(json.c_str(), json.length());  
  }                                     // send JSON text
}
               // function converts variables to JSON name/value pairs
String JsonConvert(float val1, float val2)
{                                       // start with open bracket
  json  = "{"var1": "" + String(val1) + "",";         // partition with comma
  json += " "var2": "" + String(val2) + ""}";          // end with close bracket
  return json;
}
void base()                        // function to return HTML code
{
  server.send(200, "text/html", page);
}
void loop()
{
  server.handleClient();                // manage HTTP requests
  websocket.loop();                     // handle WebSocket data
}
Listing 9-3

Height and distance measurement

WebSocket and AJAX

On the web page (see Figure 9-5), clicking the Change laser button turns on or off the laser, and the relevant image is displayed on the web page. Moving the slider changes the angle of the tilt bracket, with the angle displayed on the web page. The client transmits the servo angle and laser state to the server, and the server responds by sending the client the measured horizontal distance and calculated height that the client displays on the web page.
../images/499197_1_En_9_Chapter/499197_1_En_9_Fig5_HTML.jpg
Figure 9-5

Height and distance measurement

AJAX code for the web page (see Listing 9-4) is included in the string literal page, bracketed by the characters R"( and )", with variables identified by single apostrophes, '. In the HTML code, the <head> section includes two <meta> instructions that are required to format text in the console log, which displays data received and transmitted by the client, for example, console.log(FBVal). The <style> section centers text on the web page and defines the slider, the size of an image, and the height of a table row. The content of the web page is formatted in a table, with the first row, which spans two columns, containing the Change laser button, a bulb image, and text, laserId, describing the laser state of On or Off. The second table row contains a slider to select the tilt angle, ranging from 20° to 90°, followed by text and the angle value. The slider is defined with the instruction
<input autocomplete="on" type="range" min="20" max="90" value="20"
 class="slider" id="FBSlider" oninput='sendFB()'>

which sets autocomplete to on with the slider initial position set at value, as setting autocomplete to off positions the slider in the default middle position. The instruction associates the slider with the sendFB function, which is called when the slider is moved. The third table row displays the calculated height and measured distance.

When the web page is loaded, the init function is called to open the WebSocket connection at ws://web server IP address:81/. When the client receives a message, the message content is stored in the variable rx.data, which is parsed to the variables vertical and horizontal for display on the web page. A message is transmitted by the client with the sendFB function, which combines the angle selected by the slider with the laser state. When the Change laser button is clicked, the changeLaser function is called, which changes the value of the laser state, laserVal, updates the laser state in the web page code, and alternates the bulb image, which is downloaded from the www.w3schools.com website. The location of an image to download from a website is obtained by right-clicking the image and selecting View Image Info or Copy Image Location and including the image location in the AJAX code.

When either the slider position is changed or the Change laser button is clicked, the angle selected by the slider and the laser state are transmitted by the client to the server with the instruction wskt.send(FBVal +','+ laserVal). For sketch testing purposes, the instructions console.log(obj.var1) and console.log(FBVal) display, in the console log, values of the received vertical distance and the transmitted angle by the client, respectively.
char page[] PROGMEM = R"(
<!DOCTYPE html><html>
<head>
<meta name="viewport" content='width=device-width, initial-scale=1.0'>
<meta charset='UTF-8'>
<title>ESP8266</title>
<style>
html {text-align: center}
.slider {-webkit-appearance: none; height: 2px; background: DarkGrey}
img {width:25px; height:50px}
td {height:50px}
</style>
<title>WebSocket</title>
</head>
<!-- initiate WebSocket when webpage loaded-->
<body id="initialise">
<h2>Servo control</h2>
<table align="center"><tr>
<td colspan="2"><input type="radio" id="r1" onclick='changeLaser()'>  Change laser
<img id="bulb" src='https://www.w3schools.com/jsref/pic_bulboff.gif'>
<span id="laserId">Off</span></td>
</tr>
<tr>
<!--autocomplete='off': returns slider to default mid-point position-->
<td><input autocomplete="on" type="range" min="20" max="90" value="20" class="slider" id="FBSlider" oninput='sendFB()'></td>
<td><label id="FBId">decrease - increase angle (20&deg)</label></td>
</tr>
<tr>
<td style='width:200px'>Height: <span id="vertical">0</span> cm</td>
<td>Distance: <span id="horizontal">0</span> cm</td>
</tr></table>
<script>
var FBVal = 20;
var laserVal = 0;
document.getElementById('initialise').onload = function()
{init()};
function init()
{
  wskt = new WebSocket('ws://' + window.location.hostname + ':81/');
  wskt.onmessage = function(rx)
  {
    var obj = JSON.parse(rx.data);
    console.log(obj.var1);
    console.log(obj.var2);
    document.getElementById('vertical').innerHTML = obj.var1;
    document.getElementById('horizontal').innerHTML = obj.var2;
  };
}
function sendFB()
{
  FBVal = document.getElementById('FBSlider').value;
  document.getElementById('FBId').innerHTML = 'decrease - increase angle ('+FBVal.toString() + '&deg)';
  wskt.send(FBVal +','+ laserVal);
  console.log(FBVal);
  console.log(laserVal);
}
function changeLaser()
{
  laserVal = 1 - laserVal;
  if(laserVal == 1) {laserTag = 'On';}
  else {laserTag = 'Off';}
  document.getElementById('laserId').innerHTML = laserTag;
  document.getElementById('r1').checked=false;
  wskt.send(FBVal +',' + laserVal);
  var image = document.getElementById('bulb');
  if (image.src.match('bulboff')) {image.src =
                'https://www.w3schools.com/js/pic_bulbon.gif';}
  else {image.src = 'https://www.w3schools.com/js/pic_bulboff.gif';}
}
</script>
</body></html>
)";
Listing 9-4

AJAX code for height and distance measurement

The Servo library instruction servo.write(N) moves the servo motor to an angle of N°. An alternative instruction is servo.writeMicroseconds(microsec), with the number of microseconds defining the pulse length of the square wave. A standard servo motor moves to angle 0° or 180° when the square wave pulse length is 500 μs or 2500 μs, while the pulse length for other standard servo motors is 1000 μs or 2000 μs. For the two standard cases, the formula for the number of required microseconds to move to a given angle is 500 + angle × 200/18 and 1000 + angle × 100/18. The servo motor used in this chapter was calibrated with the sketch in Listing 9-5, by entering different microsecond values on the Serial Monitor and measuring servo motor angle. For example, 700 μs and 1150 μs were required to position the servo motor at 45° and 90°, giving the equation microseconds = 250 + angle × 10 or 250 + angle × 180/18.
#include <Servo.h>             // include Servo library
Servo servoFB;                 // associate servoFB with Servo library
int FBpin = D7;                // servo pin
int microsec;
void setup()
{
  Serial.begin(115200);        // Serial Monitor baud rate
  servoFB.attach(FBpin);       // initialise servo motor
}
void loop()
{
  if(Serial.available() > 0)   // text entered in Serial Monitor
  {                            // parse Serial buffer to integer
    microsec = Serial.parseInt();   
    servoFB.writeMicroseconds(microsec); 
  }                           // move servo motor
}
Listing 9-5

Servo motor calibration

Access images, time, and sensor data over the Internet

Another example of the WebSocket protocol is the graphic display of data on a web page with the graph properties: Y-axis minimum and maximum values and the X-axis time interval, changed by the user in real time. Changing the graph Y-axis only impacts the client making the change, so the Y-axis of the graph is client specific. In contrast, when the X-axis time interval is transmitted to the server, the graphic display is updated at the same time for all clients connected to the server. Figure 9-6 illustrates a web page displaying sensor data in real time with the option to change the minimum and maximum values of the Y-axis and the time interval for data updates. The browser current date and time are also displayed as well as an image downloaded from the Internet.
../images/499197_1_En_9_Chapter/499197_1_En_9_Fig6_HTML.jpg
Figure 9-6

Real-time sensor graphics

The BMP280 sensor measures temperature and pressure, communicates with I2C or SPI, and operates at 3.3 V. For I2C communication, the I2C address of the BMP280 sensor is 0x76, with the BMP280 module SD0 pin connected to GND. Connections between a BMP280 sensor and an ESP8266 or ESP32 development board are shown in Figure 9-7 and given in Table 9-2.
../images/499197_1_En_9_Chapter/499197_1_En_9_Fig7_HTML.jpg
Figure 9-7

BMP280 with LOLIN (WeMos) D1 mini and ESP32 DEVKIT DOIT boards

Table 9-2

BMP280 with ESP8266 and ESP32 microcontrollers

Component

ESP8266 Connections

ESP32 Connections

BMP280 VCC

3V3

3V3

BMP280 GND

GND

GND

BMP280 SDI

D2

GPIO 21

BMP280 SCK

D1

GPIO 22

BMP280 SD0

GND

GND

The first section and the setup function of the sketch in Listing 9-6 are essentially the same as in Listing 9-3. The Adafruit_Sensor library, listed under Adafruit_Unified_Sensor in the Arduino IDE, and the Adafruit_BMP280 library are installed for the BMP280 sensor, which is initialized with its I2C address in the setup function. The tempUrl URL is mapped to the tempFunct function , which is attached to the Ticker library for timing web page updates.

When the server receives, from the client, a message containing the timing interval, the WebSocket wsEvent function is called, which loads the received message for parsing. In Listing 9-6, the message only contains the timing interval variable, interval, and the message string is converted to an integer with the atoi() C++ function. The tempFunct function updates the interval variable, for the Ticker library to control the timing of calls to the tempFunct function, and obtains the temperature reading from the BMP280 sensor. Both the temperature and timing interval are converted to name and value pairs in JSON format, with the JsonConvert function , and transmitted to the client. If several clients are connected to the server and one client changes the timing interval, then the timing interval displayed by each client is also updated. The base and loop functions of Listing 9-6 are identical to those in Listing 9-3. When testing the sketch, the instruction JsonConvert(bmp.readTemperature(), interval) is replaced with JsonConvert(random(20, 50)*1.0, interval) to generate variation between values.

Listings 9-1, 9-3, and 9-6 illustrate three examples of handling the client WebSocket message. The message is displayed on the Serial Monitor with the instruction Serial.write(message[i]), converted to a string as str = str + char(message[i]) or converted to an integer by interval = atoi((char *) &message[0]). The C++ equivalent of the atoi function for a real number is the atof function .
#include <ESP8266WebServer.h>     // include WebServer library
ESP8266WebServer server;          // associate server with library
char ssid[] = "xxxx";             // change xxxx to Wi-Fi SSID
char password[] = "xxxx";         // change xxxx to Wi-Fi password
#include <WebSocketsServer.h>     // include Websocket library
WebSocketsServer websocket = WebSocketsServer(81);      // set WebSocket port 81
#include "buildpage.h"            // webpage AJAX code
String json;
#include <Ticker.h>               // include Ticker library
Ticker timer;                     // associate timer with Ticker lib
int interval = 1;
int oldInterval = 1;
#include <Adafruit_Sensor.h>      // include Adafruit Sensor
#include <Adafruit_BMP280.h>      // and BMP280 libraries
Adafruit_BMP280 bmp;              // associate bmp with BMP280
int BMPaddress = 0x76;            // BMP280 I2C address
void setup()
{
  Serial.begin(115200);           // Serial Monitor baud rate
  WiFi.begin(ssid, password);     // connect and initialise Wi-Fi
  while(WiFi.status()!= WL_CONNECTED ) delay(500);
  Serial.print("IP address: ");
  Serial.println(WiFi.localIP()); // display web server IP address
  server.begin();
  server.on("/",base);            // load default webpage
  server.on("/tempUrl", tempFunct);   // map URL to tempFunct
  websocket.begin();              // initialise WebSocket
  websocket.onEvent(wsEvent);     // wsEvent on WebSocket event
  bmp.begin(BMPaddress);          // initialise BMP280 sensor
  timer.attach(interval, tempFunct);  
}               // attach timer to tempFunct
                // function called when message received from client
void wsEvent(uint8_t n, WStype_t type, uint8_t * message, size_t length)
{               // convert message to integer
  if(type == WStype_TEXT) interval = atoi((char *) &message[0]);
}
void tempFunct() // function to transmit temperature and update interval
{               // convert to JSON format
  JsonConvert(bmp.readTemperature(), interval);         
  websocket.broadcastTXT(json.c_str(), json.length());  // send JSON text
  if(interval != oldInterval)
  {
    timer.detach();
    timer.attach(interval, tempFunct);  
    oldInterval = interval;       // update timer interval
  }
}
               // function converts variables to JSON name/value pairs
String JsonConvert(float val1, int val2)
{              // start with open bracket
  json  = "{"var1": "" + String(val1) + "",";       // partition with comma
  json += " "var2": "" + String(val2) + ""}";       // end with close bracket
  return json;
}
void base()                       // function to return HTML code
{
  server.send(200, "text/html", page);
}
void loop()
{
  server.handleClient();          // manage HTTP requests
  websocket.loop();               // handle WebSocket data
}
Listing 9-6

Real-time sensor graphics

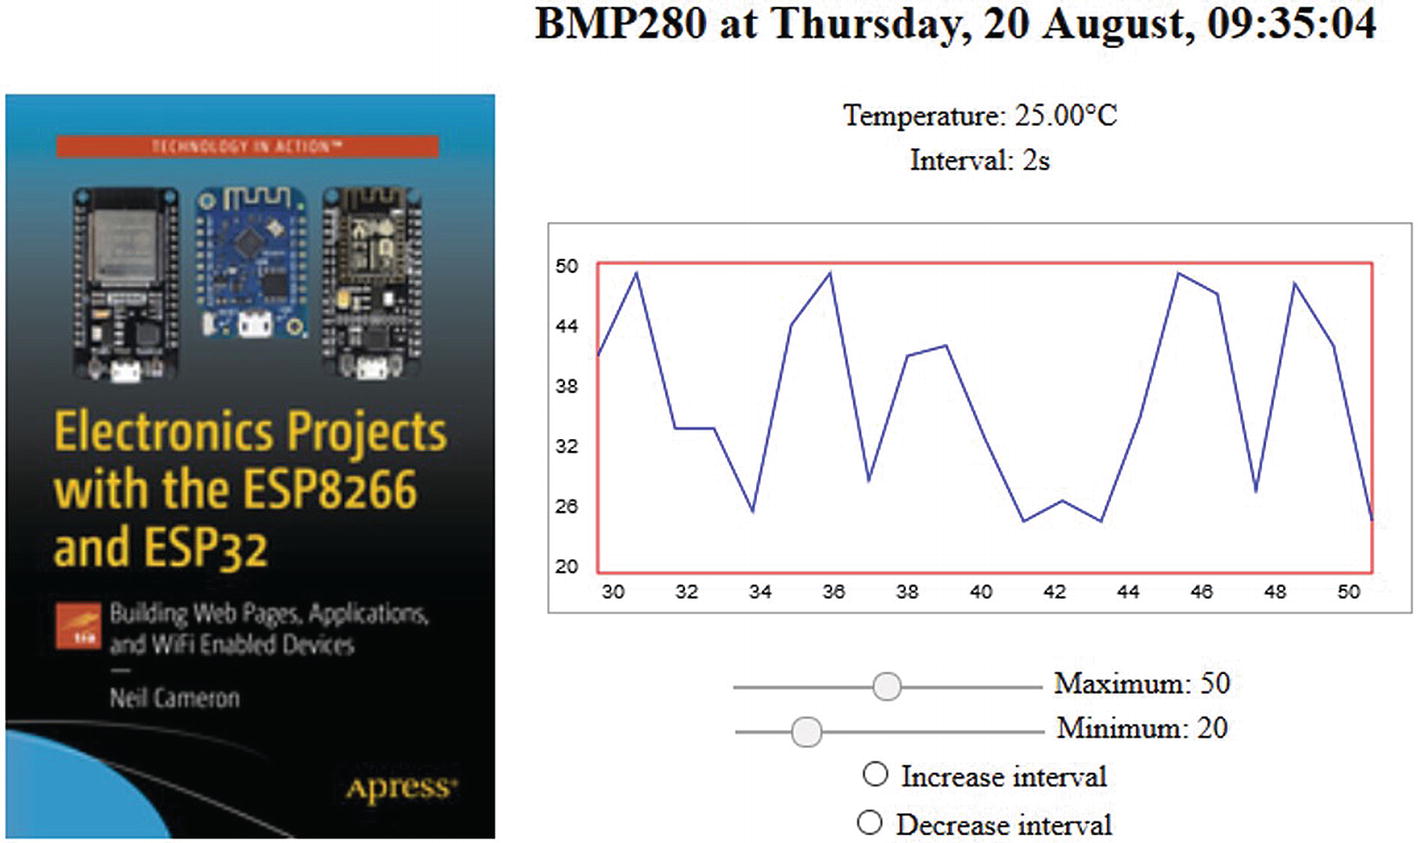
AJAX code for the web page is given in Listing 9-7. The content of the web page is formatted as a table with a header row containing the browser current date and time, with two columns consisting of seven rows. The first column, which spans all seven rows, with the instruction <td rowspan="7">, contains the image that is downloaded when the web page is initialized. The first three rows in the second column contain the updated temperature and time interval, both transmitted by the server, and a <canvas> for the graph. The four sliders to control the graph Y-axis maximum and minimum values and the buttons to increase or decrease the time interval call the functions setMaxy, setMiny, sendadd, and sendsub, respectively.

The graph function uses the canvas.getContext() instruction to access functions for drawing on a canvas, with details available at www.w3schools.com/tags/ref_canvas.asp. The clearRect and strokeRect instructions clear a rectangular space (445 × 200 pixels) in which the graph rectangle (400 × 160 pixels) is outlined, starting at pixel position (25, 20) within the rectangular space with position (0, 0) being the top-left corner. Six Y-axis labels are positioned with the instruction
ctx.fillText(Math.round(maxy-i*(maxy-miny)/5), 3, 25+31*i)
that calculates the label values from the maximum and minimum Y-axis values. The Y-axis labels are positioned in rows that are 31 pixels apart, starting at pixel position (3, 25). The 11 X-axis labels are continuously updated, based on the total number of data values, Ndata, with the instruction
ctx.fillText(String(Ndata+i-20), 27+19*i, 193)
The X-axis labels are positioned in columns that are 19 pixels apart, starting at pixel position (27, 193). Instructions to draw a line connecting the data points together are beginPath with the initial data point moveTo(x,y) and subsequent data points lineTo(x,y) followed by stroke. The graph is plotted in batches of 21 points, which are constantly updated with the 21st point being the most recent value with the instructions
Ndata++;                     // increment the number of data points
if(Ndata>maxVal) datay.shift();      // remove the first element of datay[ ]
datay.push(obj.var1);        // add new data point to end of datay[ ]

JavaScript array command details are available at www.w3schools.com/jsref/jsref_obj_array.asp.

The graph Y-axis maximum and minimum values are the corresponding slider values, and the functions setMaxy and setMiny convert a slider value to a string for displaying on the web page to the right of the slider. The functions sendadd and sendsub increase and decrease the time interval between updates of the web page by one second, with the updated value sent to the server.

When the first web page is loaded, the init function opens the WebSocket connection at ws://web server IP address:81/. When the client receives a message, the message content, stored in the variable rx.data, is parsed to the variables temp and interval for displaying, on the web page, the temperature and time interval between readings. The browser current time is obtained and formatted with the instructions
var dt = new Date();
var tm = dt.toLocaleTimeString
  ('en-GB', {weekday: 'long', day: '2-digit', month: 'long'});
document.getElementById('timeNow').innerHTML = tm;
The resulting time format is Tuesday, 16 June, 10:11:47, but if innerHTML = dt, then the display format is Tue Jun 16 2020 10:11:47 GMT+0100 (British Summer Time). If the time in hh:mm:ss format is required, then the variable tm is defined as var tm = dt.toLocaleTimeString ('en-GB'). Details on date formatting are available at www.w3schools.com/Jsref/jsref_obj_date.asp.
char page[] PROGMEM = R"(
<!DOCTYPE html><html>
<head>
<meta name="viewport" content='width=device-width, initial-scale=1.0'>
<meta charset='UTF-8'>
<!-- padding top right bottom left-->
<style>
html {text-align: center}
.slider {-webkit-appearance: none; height: 2px; background: DarkGrey}
td {padding: 0px 0px 0px 25px}
img {width:253px; height:384px}
</style>
<title>ESP8266</title>
</head>
<body onload='javascript:init()'>
<table>
<tr><th></th><th><h2>BMP280 at <span id = 'timeNow'></span></h2></th></tr>
<tr>
<td rowspan="7">
<img src=
'https://images.springer.com/sgw/books/medium/9781484263358.jpg'
   alt='book'></td>
<td>Temperature: <span id = 'temp'>0</span>&degC</td>
</tr>
<tr><td>Interval: <span id="interval">1</span>s</td></tr>
<tr><td>
<canvas id = 'myCanvas' width = '445' height = '200'
    style = 'border:1px solid DarkGrey'>
    Your browser does not support the canvas element.
</canvas>
</td></tr>
<tr><td>
<input autocomplete="off" type="range" min="1" max="100" value="25" class="slider" id="maxySlider" oninput='setMaxy()' >
<label id="maxyId">Maximum: 25</label>
</td></tr>
<tr><td>
<input autocomplete="off" type="range" min="0" max="100" value="15" class="slider" id="minySlider" oninput='setMiny()' >
<label id="minyId">Minimum: 15</label>
</td></tr>
<tr><td>
<input type="radio" id="r1" oninput='sendadd()'> Increase interval
</td></tr>
<tr><td>
<input type="radio" id="r2" oninput='sendsub()'> Decrease interval
</td></tr>
</table>
<script>
var canvas = document.getElementById('myCanvas');
var ctx = canvas.getContext('2d');
ctx.strokeStyle = 'red';
ctx.strokeRect(25, 20, 400, 160);
ctx.lineWidth = 1;
var y = 0;
var miny = 15;
var maxy = 25;
var timeval = 1;
var datay = [0];
var Ndata = 0;
var maxVal = 20;
var dt = 0;
var tm = 0;
function init()
{
  webSocket = new WebSocket('ws://' + window.location.hostname + ':81/');
  webSocket.onmessage = function(rx)
  {
    var obj = JSON.parse(rx.data);
    document.getElementById('temp').innerHTML = obj.var1;
    document.getElementById('interval').innerHTML = obj.var2;
    Ndata++;
    if(Ndata>maxVal) datay.shift();
    datay.push(obj.var1);
    dt = new Date();
    tm = dt.toLocaleTimeString
      ('en-GB', {weekday: 'long', day: '2-digit', month: 'long'});
    document.getElementById('timeNow').innerHTML = tm;
    graph()
  };
}
function graph()
{
  ctx.clearRect(0, 0, 445, 200);
  ctx.strokeStyle = 'red';
  ctx.strokeRect(25, 20, 400, 160);
  for (i=0; i<6; i++)
    ctx.fillText(Math.round(maxy-i*(maxy-miny)/5), 3, 25+31*i);
  if(Ndata<21) {for (i=0; i<21; i=i+2)
    ctx.fillText(String(i), 27+19*i, 193);}
  if(Ndata>20) {for (i=0; i<21; i=i+2)
    ctx.fillText(String(Ndata+i-20), 27+19*i, 193);}
  ctx.beginPath();
  y = 20+160*(maxy-datay[0])/(maxy-miny);
  if(y<20) y=20;
  if(y>180) y=180;
  ctx.moveTo(25, y);
  for(i=1; i<21; i++)
  {
    y = 20+160*(maxy-datay[i])/(maxy-miny);
    if(y<20) y=20;
    if(y>180) y=180;
    ctx.strokeStyle = 'blue';
    ctx.lineTo(25+20*i, y);
  }
  ctx.stroke();
}
function setMaxy()
{
  maxy = document.getElementById('maxySlider').value;
  document.getElementById('maxyId').innerHTML =
    'Maximum: ' + maxy.toString();
}
function setMiny()
{
  miny = document.getElementById('minySlider').value;
  document.getElementById('minyId').innerHTML =
    'Minimum: ' + miny.toString();
}
function sendadd()
{
  timeval = parseInt(document.getElementById('interval').innerHTML) + 1;
  document.getElementById('interval').innerHTML = timeval;
  document.getElementById('r1').checked=false;
  webSocket.send(timeval);
}
function sendsub()
{
  timeval = parseInt(document.getElementById('interval').innerHTML) - 1;
  if(timeval<1) timeval = 1;
  document.getElementById('interval').innerHTML = timeval;
  document.getElementById('r2').checked=false;
  webSocket.send(timeval);
}
</script>
</body></html>
)";
Listing 9-7

AJAX code for real-time sensor graphics

Summary

Three examples illustrate the advantage of using the WebSocket protocol for a two-way real-time conversation between the client and the web server. In the first example, a web page enabled the client to send text to and receive text from the server in real time. In the second example, the client used a web page slider and button to remotely control the position and state of a laser attached to a servo motor on a tilt bracket. The server responded with the height and distance to an object identified by the laser, with the horizontal distance measured by an ultrasonic sensor. The third example demonstrated the real-time graphic display, on a web page, of temperature sensor data transmitted by the server, with the graph properties and the interval between temperature measurements controlled remotely by the client using a web page slider and buttons.

Components List

  • ESP8266 microcontroller: LOLIN (WeMos) D1 mini or NodeMCU board

  • ESP32 microcontroller: DEVKIT DOIT or NodeMCU board

  • Temperature sensor: BMP280 module

  • Ultrasonic distance sensor: HC-SR04

  • Laser module: KY-008

  • Servo motor: SG90

  • Servo pan and tilt bracket

  • Capacitor: 100 nF, 22 μF

  • Voltage regulator: L4940V5

  • Battery: 9 V

..................Content has been hidden....................

You can't read the all page of ebook, please click here login for view all page.
Reset
3.147.238.70