© Neil Cameron 2021
N. CameronElectronics Projects with the ESP8266 and ESP32https://doi.org/10.1007/978-1-4842-6336-5_3

3. International weather station

Neil Cameron1  
(1)
Edinburgh, UK
 

International weather information is displayed on a touch screen where the user selects weather information for different cities and chooses between two screens of displayed information. Initially, this chapter describes displaying text and shapes on the screen, calibrating the touch function of the screen, and creating images by pressing the touch screen. Once sketches are developed to display information and utilize the touch function of the touch screen, the focus shifts to accessing international weather data from OpenWeatherMap.​org and the reformatting of the OpenWeatherMap data to display on a touch screen.

Displaying text and shapes on a touch screen or creating images by pressing the touch screen does not require Internet access. An Arduino Uno or Nano is sufficient to run the sketches, but a logic-level converter is required to reduce the voltage to the touch screen to 3.3 V, as the Arduino Uno and Nano operate at 5 V. Accessing OpenWeatherMap data requires connection to the local Wi-Fi network, which is provided by an ESP8266 or ESP32 microcontroller.

ILI9341 SPI TFT LCD touch screen

../images/499197_1_En_3_Chapter/499197_1_En_3_Figa_HTML.jpgThe 2.4-inch ILI9341 SPI TFT LCD touch screen with 240 × 320 pixels has touch screen functionality for displaying text and drawing shapes with different colors on the screen. The acronyms SPI, TFT, and LCD represent Serial Peripheral Interface, Thin-Film Transistor, and Liquid Crystal Display, respectively. The ILI9341 SPI TFT LCD screen and the ESP8266 and ESP32 microcontrollers operate at 3.3 V, so a logic-level converter is not required. Connections for the ILI9341 SPI TFT LCD screen with the ESP8266 and ESP32 development boards are shown in Figures 3-1 and 3-2 and given in Table 3-1. Note that the microcontroller SPI MOSI, MISO (Main-In Secondary-Out), and serial clock (SCL) pins are connected to both the display and the touch function pins of the ILI9341 SPI TFT LCD screen.
../images/499197_1_En_3_Chapter/499197_1_En_3_Fig1_HTML.jpg
Figure 3-1

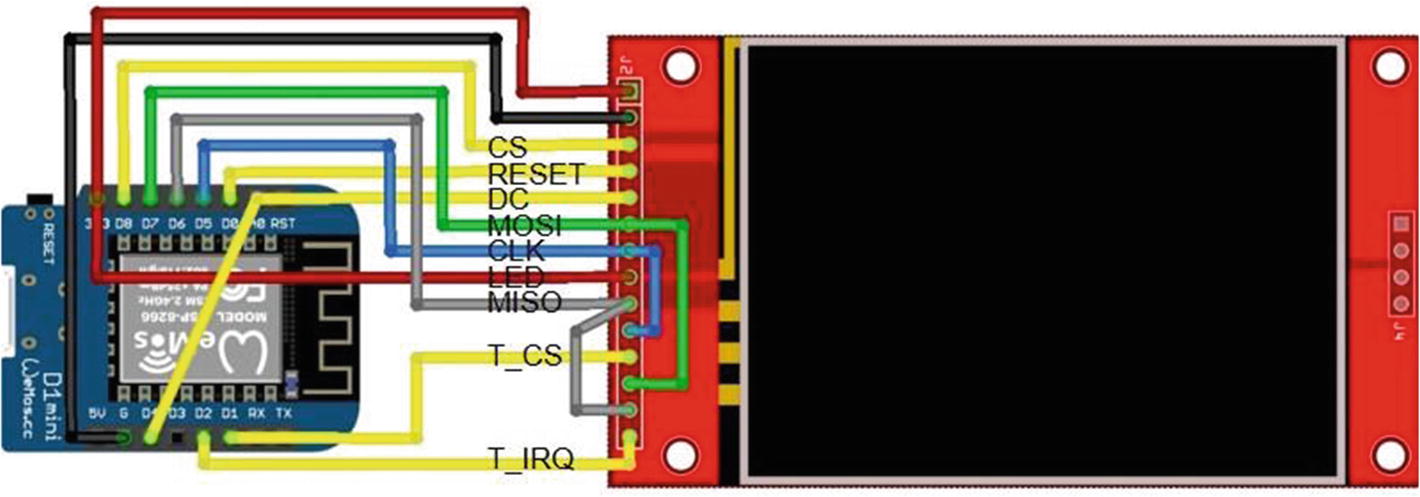
ILI9341 SPI TFT LCD screen and the LOLIN (WeMos) D1 mini development board

../images/499197_1_En_3_Chapter/499197_1_En_3_Fig2_HTML.jpg
Figure 3-2

ILI9341 SPI TFT LCD screen and the ESP32 DEVKIT DOIT development board

Table 3-1

ILI9341 SPI TFT LCD screen and ESP8266 and ESP32 development boards

Component

Pin Function

ESP8266 Pin

ESP32 Pin

ILI9341 TFT screen VCC 3.3V


3V3

3V3

ILI9341 TFT screen GND


GND

GND

ILI9341 TFT screen CS

Chip select

D8

GPIO 5

ILI9341 TFT screen RESET


D0

GPIO 25

ILI9341 TFT screen DC

Data command

D4

GPIO 26

ILI9341 TFT screen SDA (MOSI)

Serial data in (DI)

D7

GPIO 23

ILI9341 TFT screen SCL (CLK)

Serial clock

D5

GPIO 18

ILI9341 TFT screen LED


3V3

3V3

ILI9341 TFT screen SDO (MISO)

Serial data out

D6

GPIO 19

"touch"


ILI9341 TFT screen T_CLK

Serial clock

D5

GPIO 18

ILI9341 TFT screen T_CS

Chip select

D1

GPIO 27

ILI9341 TFT screen T_DIN

Data input

D7

GPIO 23

ILI9341 TFT screen T_DO

Data output

D6

GPIO 19

ILI9341 TFT screen T_IRQ

Interrupt

D2

GPIO 13

Listing 3-1 demonstrates displaying text and drawing shapes on the ILI9341 SPI TFT LCD screen. The Adafruit ILI9341 and Adafruit GFX libraries are installed within the Arduino IDE. The Adafruit GFX and SPI libraries are referenced by the Adafruit ILI9341 library, so are not explicitly included in the sketch. Color codes are available within the Adafruit ILI9341 library, so HEX codes for colors are not defined in the sketch. The screen orientation is set as portrait or landscape with the instruction setRotation(N) with value of 0 or 1, respectively, or the value of 2 or 3 to rotate the screen image by 180° for portrait or landscape, respectively. For example, portrait orientation with pin connections at the top of the ILI9341 SPI TFT LCS screen is set with setRotation(2). The default font size is 5 × 8 pixels per character that is increased to 5N × 8N pixels with the setTextSize(N) instruction.
#include <Adafruit_ILI9341.h>        // include ILI9341 library
int tftCS = D8;                      // screen chip select pin
int tftDC = D4;                      // data command select pin
int tftRST = D0;                     // reset pin
                                     // associate tft with ILI9341 lib
Adafruit_ILI9341 tft = Adafruit_ILI9341(tftCS, tftDC, tftRST);
String texts[] =                     // color names
  {"BLUE","RED","GREEN","CYAN","MAGENTA","YELLOW","WHITE","GREY"};
unsigned int colors[ ] =             // color codes
  {ILI9341_BLUE, ILI9341_RED, ILI9341_GREEN, ILI9341_CYAN,
   ILI9341_MAGENTA, ILI9341_YELLOW, ILI9341_WHITE, ILI9341_LIGHTGREY};
String text;
unsigned int color, chkTime ;
void setup()
{
  tft.begin();                        // initialise screen
  tft.setRotation(2);                 // portrait, connections at top
  tft.fillScreen(ILI9341_BLACK);           // fill screen in black
  tft.drawRect(0,0,239,319,ILI9341_WHITE);  // draw white frame line
  tft.drawRect(1,1,237,317,ILI9341_WHITE);   // and second frame line
  tft.setTextSize(4);                      // set text size
}
void loop()
{                                  // clear screen apart from frame
  tft.fillRect(2,2,235,314,ILI9341_ BLACK); 
  for (int i=0; i<8; i++)          // for each color
  {
    color = colors[i];             // set color
    text = texts[i];               // set text for color
    tft.setTextColor(color);       // set text color
    tft.setCursor(20,40*i+2);      // position cursor
    tft.print(text);                // print color text (name)
    delay(250);                    // delay 250ms between colors
  }
  for (int i=0; i<8; i++)          // for each color
  {
    color = colors[i];
    text = texts[i];
    tft.fillRect(2,2,235,314,ILI9341_BLACK);
    tft.setCursor(20,25);              // cursor to position (20, 25)
    tft.setTextColor(color);
    tft.print(text);                   // draw filled-in triangle
    if ((i+1) % 3 == 0) tft.fillTriangle(20,134,64,55,107,134,color);
                                            // draw open rectangle
    else if ((i+1) % 2 == 0) tft.drawRect(20,55,88,80,color);
    else tft.fillCircle(64,95,39,color);    // draw filled-in circle
    delay(250);
  }
  tft.fillRect(2,2,235,314,ILI9341_BLACK);
  tft.drawLine(2,158,236,158,ILI9341_RED);  // draw horizontal RED line
  delay(250);
}
Listing 3-1

Display text and shapes

In Listing 3-1, SPI pins are defined for an ESP8266 development board, which must be changed for an ESP32 development board. Alternatively, the instructions in Listing 3-2 can be included at the start of a sketch. See Chapter 21 (Microcontrollers) for more information.
#ifdef ESP32
  int tftCS = 5;                 // screen chip select pin
  int tftDC = 26;                // data command select pin
  int tftRST = 25;               // reset pin
#elif ESP8266
  int tftCS = D8;
  int tftDC = D4;
  int tftRST = D0;
#else                             // Arduino IDE error message
  #error "ESP8266 or ESP32 microcontroller only"
#endif
Listing 3-2

Pin definitions for ESP8266 and ESP32 development boards

Touch screen calibration

A library for the touch screen function with the ESP8266 and ESP32 microcontrollers, TFT_eSPI by Bodmer, is available within the Arduino IDE. Prior to using the TFT_eSPI library in sketches, the touch screen driver, pin connections to the ESP8266 or ESP32 development board, and SPI frequencies must be defined in the file User_Setup.h, which is located in the TFT-eSPI library folder. Listing 3-3 includes the settings used in this chapter for ESP8266 and ESP32 microcontrollers, with the settings for the ESP32 microcontroller commented out. Note that default pin connections for the ESP8266 SPI MOSI, MISO, and CLK are not required, but pin numbers for the ESP8266 development board are preceded with PIN_, while the ESP32 microcontroller GPIO numbers are sufficient.
#define TFT_CS   PIN_D8           // ESP8266 SPI and touch screen
#define TFT_DC   PIN_D4
#define TFT_RST  PIN_D0
#define TOUCH_CS PIN_D1
/*                     // lines between /* and */ are commented out
#define TFT_MISO 19    // ESP32 SPI and touch screen
#define TFT_MOSI 23
#define TFT_SCLK 18
#define TFT_CS    5
#define TFT_DC   26
#define TFT_RST  25
#define TOUCH_CS 27
*/
#define ILI9341_DRIVER              // ILI9341 SPI TFT LCD screen
#define TFT_RGB_ORDER TFT_BGR       // color order Blue-Green-Red
#define LOAD_GLCD                   // font 1: Adafruit 8-pixel high
#define LOAD_FONT2                  // font 2: small 16-pixel high
#define LOAD_FONT4                  // font 4: medium 26-pixel high
#define SPI_FREQUENCY 40000000           // SPI 40MHz
#define SPI_READ_FREQUENCY 20000000      // SPI read 20MHz
#define SPI_TOUCH_FREQUENCY 2500000      // SPI touch 2.5MHz
Listing 3-3

TFT-eSPI library User_Setup settings for ESP8266 and ESP32 development boards

Before using the touch screen facility of the ILI9341 SPI TFT LCD screen, the screen must be calibrated (see Listing 3-4). Arrows are displayed on the ILI9341 SPI TFT LCD screen, which the user presses with a screen pen. Five calibration parameters are displayed on the ILI9341 SPI TFT LCD screen, which are included in the calData array of subsequent sketches. The SPI library is referenced by the TFT_eSPI library, so is not explicitly included in the sketch. Listing 3-4 is adapted from the Touch_calibrate sketch in the TFT-eSPIGeneric library.
#include <TFT_eSPI.h>           // include TFT_eSPI library
TFT_eSPI tft = TFT_eSPI();      // associate tft with TFT-eSPI lib
uint16_t calData[5];            // calibration parameters
String str;
void setup()
{
  tft.init();                     // initialise ILI9341 TFT screen
  tft.setRotation(1);             // landscape, connections on right
  tft.setTextFont(1);             // set text font and size
  tft.setTextSize(1);
  calibrate();                    // call calibration function
}
void calibrate()    // function to calibrate ILI9341 TFT screen
{
  tft.fillScreen(TFT_BLACK);       // fill screen in black
  tft.setTextColor(TFT_WHITE, TFT_BLACK);  // set text color, white on black
  tft.setCursor(30, 0);            // move cursor to position (0, 30)
  tft.println("Touch corners as indicated");
  tft.calibrateTouch(calData, TFT_RED, TFT_BLACK, 15); // calibrate screen
  tft.fillScreen(TFT_BLACK);
  tft.setCursor(0, 50);
  tft.setTextSize(2);
  tft.print("Calibration parameters");
  str = "";                  // display calibration parameters
  for (int i=0; i<4; i++) str = str + String(calData[i])+",";
  str = str + String(calData[4]);
  tft.setCursor(0, 90);
  tft.print(str);
}
void loop()                  // nothing in loop function
{}
Listing 3-4

Calibration of the ILI9341 SPI TFT LCD screen

For example, the calibration parameters for the ILI9341 SPI TFT LCD screen used in this chapter of 450, 3400, 390, 3320, and 3 are copied into the calDat array of the instruction uint16_t calData[] = {450, 3400, 390, 3320, 3} of subsequent sketches. However, the calibration parameters for your ILI9341 SPI TFT LCD screen would be included in the sketches.

Painting on-screen

../images/499197_1_En_3_Chapter/499197_1_En_3_Figb_HTML.jpgThe sketch in Listing 3-5 draws images on the ILI9341 SPI TFT LCD screen when the screen is pressed with a screen pen, with colors selected from a color palette. The first section of the sketch installs libraries and defines the touch screen pins and the paintbrush size. The setup function sets the touch screen orientation and incorporates the touch screen calibration parameters obtained in Listing 3-4. When a screen press is detected, the touch position is identified; and if the x co-ordinate is less than 20, then the screen was pressed on the color palette and the selected color, mapped to the y co-ordinate, is subsequently used for drawing on the screen. Color codes are available in the file TFT_eSPI.h of the TFT_eSPI library. The clear function resets the screen, displays the title, and redraws the color palette. Have fun painting!
#include <TFT_eSPI.h>               // include TFT-eSPI library
TFT_eSPI tft = TFT_eSPI();          // associate tft with TFT-eSPI lib
uint16_t calData[] = {450, 3400, 390, 3320, 3};   // calibration parameters
uint16_t x = 0, y = 0;
int radius = 2;                       // define paintbrush radius
unsigned int color;
void setup()
{
  tft.init();                    // initialise ILI9341 TFT screen
  tft.setRotation(1);            // landscape, connections on right
  tft.setTouch(calData);         // include calibration parameters
  clear();                       // call function to reset screen
}
void loop()
{
  if (tft.getTouch(&x, &y)>0)    // if screen pressed
  {
    if(x>20) tft.fillCircle(x, y, radius, color); // draw point
    if(x>0 && x<20)                // select color from color palette
    {
           if(y>75 && y<95)   color = TFT_RED;
      else if(y>100 && y<120) color = TFT_YELLOW;
      else if(y>125 && y<145) color = TFT_GREEN;
      else if(y>150 && y<170) color = TFT_BLUE;
      else if(y>175 && y<195) color = TFT_WHITE;
                                    // display selected color
      if(y>75 && y<195) tft.fillCircle(10, 50, 10, color);
      else if(y>215) clear();       // clear screen
    }
  }
}
void clear()                            // function to reset screen
{
  tft.fillScreen(TFT_BLACK);            // fill screen
  tft.setTextColor(TFT_GREEN);          // set text color
  tft.setTextSize(2);                   // set text size
  tft.setCursor(110,5);                 // position cursor
  tft.print("Paintpot");                // screen title
  tft.fillRect(0,75,20,20, TFT_RED);
  tft.fillRect(0,100,20,20,TFT_YELLOW);
  tft.fillRect(0,125,20,20,TFT_GREEN);  // build color palette
  tft.fillRect(0,150,20,20, TFT_BLUE);
  tft.fillRect(0,175,20,20, TFT_WHITE);
  tft.drawCircle(10,225,10, TFT_WHITE); // select to clear screen
  tft.setCursor(25,217);
  tft.setTextColor(TFT_WHITE);
  tft.print("clear");
  color = TFT_WHITE;
}
Listing 3-5

Paintpot with TFT-eSPI library

ESP8266-specific touch screen calibration and paint

The advantage of the TFT-eSPI library is that one library incorporates screen display and touch functionality, with the applicability to both ESP8266 and ESP32 microcontrollers in conjunction with the ILI9341 SPI TFT LCD screen. The Adafruit_ILI9341esp library, adapted specifically for the ESP8266 microcontroller, has an excellent touch screen painting function. The Adafruit_ILI9341esp library by NailBuster Software is contained in the tft28esp.zip file that is downloaded from nailbuster.​com/​?​page_​id=​341. The Adafruit_ILI9341esp library requires the XPT2046 library by Spiros Papadimitriou, which is downloaded from github.​com/​spapadim/​XPT2046.

Calibration for the ILI9341 SPI TFT LCD screen with the XPT2046 library differs from calibration with the TFT-eSPI library. In the calibration sketch (see Listing 3-6), two crosses, at 20-pixel margins from the screen edges, are displayed on the ILI9341 SPI TFT LCD screen, which the user presses with a screen pen. Four calibration parameters are then displayed on the ILI9341 SPI TFT LCD screen, that are included in the touch.setCalibration instruction of subsequent sketches.

The getPoints function determines the touched screen position, with the & parameter referencing a pointer to a whole array, rather than a pointer to the first element of the array. A touched position, (p, q), is mapped to a display position, (np, nq), of the 240 × 320–pixel ILI9341 SPI TFT LCD screen. For the screen used in this chapter, the regression equations, np = (150 - p) × 240/145 and nq = (115 - q) × 320/100, were determined from a series of marked positions on the ILI9341 SPI TFT LCD screen and the corresponding touched positions identified by the XPT2046 library.
#include <Adafruit_ILI9341esp.h>   // include ILI9341esp and
#include <XPT2046.h>               // XPT2046 libraries
int tftCS = D8;
int tftDC = D4;
int tftRST = D0;                   // define screen and touch pins
int touchCS = D1;
int touchIRQ = D2;                 // associate tft with ILI9341 lib
Adafruit_ILI9341 tft = Adafruit_ILI9341(tftCS, tftDC, tftRST);
XPT2046 touch(touchCS, touchIRQ);  // associate touch with XPT2046
uint16_t p,q, np, nq;              // co-ordinates of touched point
String str;
void setup()
{
  tft.begin();                     // initialise ILI9341 screen
  tft.setRotation(0);              // portrait connections at bottom
  touch.begin(tft.height(), tft.width());  // XPT2046 orientated y, x
  touch.setRotation(XPT2046::ROT0);     // no screen rotation
  tft.fillScreen(ILI9341_BLACK);        // fill screen
  tft.setTextColor(ILI9341_WHITE);      // set text color
  tft.setTextSize(1);                   // set text size
  tft.setCursor(0, 100);                // position cursor
  str = "width: "+String(tft.width())+", height:"+String(tft.height());
  tft.print(str);
  calibrate();                        // calibrate touch screen
}
void calibrate()                      // function to calibrate screen
{
  uint16_t x1,y1,x2,y2,i1,j1,i2,j2;   // uint16_t is unsigned integer
  tft.setCursor(0, 50);               // position cursor
  tft.print("press screen on crosses");
  touch.getCalibrationPoints(x1, y1, x2, y2);  // values pre-set in library at 20
  getPoints(x1, y1, i1, j1);       // function to get touch position
  delay(500);
  getPoints(x2, y2, i2, j2);       // get second touch position
  touch.setCalibration(i1, j1, i2, j2);   // string with parameters
  str = String(i1)+","+String(j1)+","+String(i2)+","+String(j2);
  tft.setTextColor(ILI9341_WHITE);
  tft.setCursor(0, 175);
  tft.print("calibration parameters");
  tft.setCursor(0, 200);
  tft.setTextSize(2);              // reset text size
  tft.print(str);                  // display calibration parameters
}
void getPoints(uint16_t x, uint16_t y, uint16_t &i, uint16_t &j)
{
  marker(y, x, ILI9341_WHITE);     // draw white cross on screen
  while (!touch.isTouching()>0) delay(10);    // wait for screen touch
  touch.getRaw(i, j);
  marker(y, x, ILI9341_BLACK);       // over-write cross
  touch.getPosition(p, q);           // get position of screen touch
  np = (150.0-p)*240.0/145.0;        // transform from touch to tft
  nq = (115.0-q)*320.0/100.0;
  tft.fillCircle(np, nq, 2, ILI9341_GREEN); 
}                                    // indicated touch position
void marker(unsigned short x, uint16_t y, int col)
{
  tft.setTextColor(col);                // set marker color
  tft.drawLine(x-8, y, x+8, y, col);    // draw horizontal line
  tft.drawLine(x, y-8, x, y+8, col);    // draw vertical line
}
void loop()                             // nothing in loop function
{}
Listing 3-6

Calibration of the ILI9341 SPI TFT LCD screen for the XPT2046 library

The sketch in Listing 3-7 has the same structure as Listing 3-5, which uses the TFT_eSPI library. The differences between the sketches are that screen pins, touch pins, and rotation parameters are defined in the sketch, rather than in an external file with the TFT_eSPI library, and that colors are referenced to the Adafruit_ILI9341 and TFT_eSPI libraries. The paint function with the XPT2046 library is more responsive than with the TFT-eSPI library, which is more suited for a screen pointer. The sketch in Listing 3-7 operates with any screen rotation position, but either landscape orientation is recommended.
#include <Adafruit_ILI9341esp.h>  // include ILI9341esp and
#include <XPT2046.h>              // XPT2046 libraries
int tftCS = D8;
int tftDC = D4;
int tftRST = D0;                  // define screen and touch pins
int touchCS = D1;
int touchIRQ = D2;                // associate tft with ILI9341 lib
Adafruit_ILI9341 tft = Adafruit_ILI9341(tftCS, tftDC, tftRST);
XPT2046 touch(touchCS, touchIRQ); // associate touch with XPT2046
String str;
uint16_t x, y;
int radius = 2;                   // define paintbrush radius
unsigned int color;               // rotation: 0, 1, 2 or 3 refers to
int rotate = 1;                   // rotation of 0, 90, 180 or 270°
void setup()
{
  tft.begin();                    // initialise ILI9341 screen
  setRotation();                  // function for rotation parameters
  touch.setCalibration(1850,1800,320,300);     // calibration parameters
  clear();                        // call function to reset screen
}
void loop()
{
  if (touch.isTouching()>0)       // if screen pressed
  {
    touch.getPosition(x, y);
    if(x>20) tft.fillCircle(x, y, radius, color); // draw point
    if(x>0 && x<20)                 // select color from color palette
    {
           if(y>75 && y<95)   color = ILI9341_RED;
      else if(y>100 && y<120) color = ILI9341_YELLOW;
      else if(y>125 && y<145) color = ILI9341_GREEN;
      else if(y>150 && y<170) color = ILI9341_BLUE;
      else if(y>175 && y<195) color = ILI9341_WHITE;
                                   // display selected color
      if(y>75 && y<195) tft.fillCircle(10, 50, 10, color);
      else if(y>215) clear();           // clear screen
    }
  }
}
void clear()                            // function to reset screen
{
  tft.fillScreen(ILI9341_BLACK);        // fill screen
  tft.setTextColor(ILI9341_GREEN);      // set text color
  tft.setTextSize(2);                   // set text size
  tft.setCursor(110,5);                 // position cursor
  tft.print("Paintpot");                // screen title
  tft.fillRect(0,75,20,20, ILI9341_RED);
  tft.fillRect(0,100,20,20,ILI9341_YELLOW);
  tft.fillRect(0,125,20,20,ILI9341_GREEN);   // build color palette
  tft.fillRect(0,150,20,20, ILI9341_BLUE);
  tft.fillRect(0,175,20,20, ILI9341_WHITE);
  tft.drawCircle(10,225,10, ILI9341_WHITE);   // select to clear screen
  tft.setCursor(25,217);
  tft.setTextColor(ILI9341_WHITE);
  tft.print("clear");
  color = ILI9341_WHITE;
}
void setRotation()             // function to set rotation parameters
{
  tft.setRotation(rotate);
  switch (rotate)
  {
    case 0:                                       // no rotation
       touch.begin(tft.width(), tft.height());    // portrait
       touch.setRotation(XPT2046::ROT0);    // connections at bottom
       break;
    case 1:                             // rotation through 90°
      touch.begin(tft.height(), tft.width());     // landscape
      touch.setRotation(XPT2046::ROT90);    // connections on right
    break;
    case 2:                                // rotation through 180°
      touch.begin(tft.width(), tft.height());     // portrait
      touch.setRotation(XPT2046::ROT180);    // connections at top
    break;
    case 3:                             // rotation through 270°
      touch.begin(tft.height(), tft.width());     // landscape
      touch.setRotation(XPT2046::ROT270);     // connections on left
    break;
  }
}
Listing 3-7

Paintpot with the XPT2046 library

Weather data for several cities

../images/499197_1_En_3_Chapter/499197_1_En_3_Figc_HTML.jpgAnother example of using the ILI9341 SPI TFT LCD touch screen displays detailed weather information for several cities, with weather data from OpenWeatherMap.​org. OpenWeatherMap data is free to access within limits defined on the website. The OpenWeatherMap data requires a username, a password, an API (Application Programming Interface) key, and the city identity (ID) code. Details on opening an account and obtaining an API key for OpenWeatherMap are available at openweathermap.org/appid. The API key identifies the client to the web server. The city ID is obtained, from the OpenWeatherMap.​org website, by entering the city name in the Your city name search box. Select the relevant city, and the city ID is the number at the end of the URL. For example, the Berlin URL is openweathermap.​org/​city/​2950159.

The ESP8266WiFi or WiFi, ArduinoJson, and Time libraries are required for Wi-Fi communication, interpreting JSON (JavaScript Object Notation) formatted data, and calculating the date and time. Both the ArduinoJson library by Benoît Blanchon and the TimeLib library by Michael Margolis are available in the Arduino IDE, with the latter listed under Time. Several data providers format the date and time as the number of seconds since January 1, 1970, the Unix epoch time. The Time library converts the Unix epoch time to the corresponding minute, hour, day, month, and so on.

An example sketch (see Listing 3-8) obtains and displays the ultraviolet (UV) index for Edinburgh from OpenWeatherMap data. If there are problems with the Wi-Fi connection, HTTP request, or data receipt, then a message is displayed. The message instructions are optional and not incorporated in the connect function of Listing 3-9, but the client instructions in bold must be retained. If the instructions
if (!client.find(" "))
{
  Serial.println("Received data not complete");
  return;
}

regarding a data error are deleted, then they must be replaced with the instruction client.find(" ").

The URL is api.openweathermap.org/data/2.5/uvi?lat=55.95&lon=-3.19&appid="+APIkey which displays the following data:
lat         55.95                     // latitude
lon      - 3.19                       // longitude
date_iso  "2020-06-13T12:00:00Z"      // date
date       1592049600                 // Unix epoch time
value      6.94                       // UV index

The JSON formatted data consists of the name and value pairs, such as lat and 55.95, that form the JSON document, which is defined as the character array, jsonDoc[] , in the sketch. The value of a name and value pair is identified by the name and extracted with the instruction jsonDoc['name'].as<x>(), where x refers to float, long, or char* for a real number, an integer, or a string, respectively. For example, latitude = jsonDoc['lat'].as<float>().

In Listing 3-8, the libraries are installed, a Wi-Fi connection is established, and an HTTP request is sent to the OpenWeatherMap server for the Edinburgh UV index. The latitude, longitude, date, and UV index are extracted from the JSON document, received in response to the HTTP request. A comprehensive set of error checks are made regarding establishing the Wi-Fi connection, the HTTP request, the response to the HTTP request, the receipt of the JSON document in the HTTP response, and the extraction of the JSON document.
#include <ESP8266WiFi.h>     // library to connect to Wi-Fi network
#include <ArduinoJson.h>
WiFiClient client;           // create client to connect to IP address
char ssid[] = "xxxx";        // change xxxx to your Wi-Fi SSID
char password[] = "xxxx";    // change xxxx to your Wi-Fi password
String APIkey = "xxxx";      // and xxx to openweathermap API key
char server[]="api.openweathermap.org";
String output;
void setup()
{
  Serial.begin(115200);            // Serial Monitor baud rate
  WiFi.begin(ssid, password);      // initialise Wi-Fi and wait
  while (WiFi.status() != WL_CONNECTED) delay(500);                                  // for Wi-Fi connection
  Serial.print("IP address: ");
  Serial.println(WiFi.localIP());  // Wi-Fi network IP address
  Serial.println("Connecting...");
  client.connect(server, 80);      // connect to server on port 80
  if (!client.connect(server, 80)) // connection error message
  {
    Serial.println("Connection failed");
    return;
  }
  Serial.println("Connected!");
  client.println("GET /data/2.5/uvi?lat=55.95&lon=-3.19&"
  "appid="+APIkey+" HTTP/1.1");    // send HTTP request
  client.println("Host: api.openweathermap.org");
  client.println("User-Agent: ESP8266/0.1");
  client.println("Connection: close");
  client.println();
  if (client.println() == 0)      // HTTP request error message
  {
    Serial.println("HTTP request failed");
    return;
  }
  char status[32] = {0};
  client.readBytesUntil(' ', status, sizeof(status));
  if (strcmp(status, "HTTP/1.1 200 OK") != 0)
  {                              // HTTP status error message
    Serial.print("Response not valid: ");
    Serial.println(status);
    return;
  }
  else Serial.println("HTTP status OK");
  if (!client.find(" "))  // received data error request
  {
    Serial.println("Received data not complete");
    return;
  }
//  client.find(" ");
  DynamicJsonDocument jsonDoc(1024);
  DeserializationError error = deserializeJson(jsonDoc, client);
  if (error)
  {                              // JSON error message
    Serial.print("deserializeJson() failed: ");
    Serial.println(error.c_str());
    return;
  }
  serializeJson(jsonDoc, output);               // display all data
  Serial.print("data length: ");Serial.println(output.length());
  Serial.println(output);
  Serial.println("extracted text");
  Serial.println(jsonDoc["lon"].as<float>(), 2);  // display specific data
  Serial.println(jsonDoc["lat"].as<float>(), 2);
  Serial.println(jsonDoc["date_iso"].as<char*>());
  Serial.println(jsonDoc["date"].as<long>());
  Serial.print("UV ");  Serial.println(jsonDoc["value"].as<float>(), 2);
}
void loop()                            // nothing in loop function
{}
Listing 3-8

OpenWeatherMap data example

Listing 3-9 displays OpenWeatherMap data for a selected city with weather information displayed on different screens. The first screen displays the current minimum and maximum temperature and the forecasted weather, with the current humidity and pressure. The second screen displays cloud cover, the wind speed and direction, and more details on forecasted weather, with sunrise and sunset times. A city is selected from the city abbreviations on the right of the screen, and the screen displays are alternated by touching the ⊕ symbol on the left of the screen. The sketch is lengthy, due to processing the comprehensive weather data, and is split into functions to make the sketch more readily interpretable. The weather information is reduced by deleting the secondScreen function and the reference to it in the getWeather function.

The first section of the sketch includes the libraries and defines the screen and touch pins, OpenWeatherMap API key, and city identity codes. The first element of the days and mths arrays is a blank, so that days[1] and mths[1] correspond to Sunday and January, respectively. The setup function establishes the Wi-Fi connection, initializes the touch screen, and incorporates the touch screen calibration parameters obtained in Listing 3-4. The loop function calls the checkTime function to determine if the required time has elapsed since the screen was last refreshed and the selected city. The connect function sends a GET HTTP request to the OpenWeatherMap server, incorporating the API key, and downloads the JSON-formatted data for display on the ILI9341 SPI TFT LCD screen. The JSON-formatted data from OpenWeatherMap is displayed with the following instructions:
String output
serializeJson(jsonDoc, output)
Serial.println(output.length())
Serial.println(output)
An example of OpenWeatherMap JSON-formatted data is
{“coord”:{“lon”:-3.2,“lat”:55.95},
“weather”:[{“id”:803,“main”:“Clouds”, “description”:“broken clouds”, “icon”:“04d”}],
“base”:“stations”,
“main”:{“temp”:14.38,“feels_like”:7.99,“temp_min”:12.78,“temp_max”:15.56,
“pressure”:1024,“humidity”:62},
“visibility”:10000,“wind”:{“speed”:8.2,“deg”:80},“clouds”:{“all”:68},
“dt”:1591882710,
“sys”:{“type”:1,“id”:1442,“country”:“GB”, “sunrise”:1591846048,“sunset”:1591909066},
“timezone”:3600,“id”:2650225,“name”:“Edinburgh”, “cod”:200}

Values are referenced according to the class outside the curly brackets, {}, the category within the curly brackets, and the variable name, with each term enclosed by square brackets, [ ]. For example, the humidity value of 62 is referenced as [“main”][“humidity”]. The weather class may have two levels, referenced as [0] and [1]. Times are expressed in Unix epoch time. For example, the sunrise value of 1591846048, referenced as [“sys”][“sunrise”], is 04:27 GMT on June 11, 2020.

JSON-formatted data is equated to a string, float, or unsigned long, such as
String weather = jsonDoc["weather"][0]["main"]
float temp = jsonDoc["main"]["temp"]
unsigned long srise = jsonDoc["sys"]["sunrise"]
and displayed with a print instruction, for example, Serial.println(weather). JSON-formatted data is displayed directly by including the data reference and the output format in the print instruction, for example
Serial.println(jsonDoc["weather"][0]["main"].as<char*>())
Serial.println(jsonDoc["main"]["temp"].as<float>(), 2)  // for 2 DP
Serial.println(jsonDoc ["sys"]["sunrise"].as<long>())
The structures of the firstScreen and secondScreen functions are the same (see Figure 3-3). The citySquare function clears the screen; displays the list of city abbreviations, using the screen function that positions and displays strings; and draws a rectangle around the selected city abbreviation. The Unix epoch time for the weather update is converted to day, date, and time and displayed on the screen. Weather data is extracted from the JSON document, and the screen function positions and displays the string in the required color. To maintain text positioning, text is padded with blanks using the addb function. To make the functions in Listing 3-9 more readily interpretable, the first part of the instruction screen("variable" is in bold.
../images/499197_1_En_3_Chapter/499197_1_En_3_Fig3_HTML.png
Figure 3-3

OpenWeatherMap information by screen

#include <ESP8266WiFi.h>     // include ESP8266WiFi library
#include <ArduinoJson.h>     // include JSON library
#include <TimeLib.h>         // include TimeLib library
#include <TFT_eSPI.h>        // include TFT_eSPI library
TFT_eSPI tft = TFT_eSPI();   // associate tft with TFT-eSPI lib
uint16_t calData[] = {450, 3400, 390, 3320, 3};     // calibration parameters
uint16_t x = 0, y = 0;
WiFiClient client;           // create client to connect to IP address
char ssid[] = "xxxx";        // change xxxx to your Wi-Fi SSID
char password[] = "xxxx";    // change xxxx to your Wi-Fi password
String APIkey = "xxxx";      // change xxxx to weathermap API key
String city[] = {"ED","GZ","BR","UA"};  // Edinburgh, Günzburg, Brisbane, Ushuaia
                      // openweathermap city identity codes
String cityID[] = {"2650225","2913555","2174003","3833367"};
int Ncity = 4;               // number of cities
int cityNow = 0;             // current city, initially set at 0
int count = 99;              // run getWeather function at start
char server[] = "api.openweathermap.org";
int screenFlag = 0;          // flag for first or second screen
int touchFlag = 0;           // to indicate screen pressed
String days[] = {"",
"Sunday","Monday","Tuesday","Wednesday","Thursday","Friday","Saturday"};
String mths[] = {"",
"Jan","Feb","Mar","Apr","May","Jun","Jul","Aug","Sep","Oct","Nov","Dec"};
String wkdy, mth, addb, text;
int sunriseh, sunrisem, sunseth, sunsetm, dy, hr, mn;
unsigned int chkTime;
DynamicJsonDocument jsonDoc(1024);       // JSON formatted data
void setup()
{
  WiFi.begin(ssid, password); // initialise Wi-Fi and wait
  while (WiFi.status() != WL_CONNECTED) delay(500);                                     // for WiFi connection
  tft.init();                       // initialise screen for graphics
  tft.setTouch(calData);            // calibration parameters
  tft.setRotation(2);               // portrait, connections on top
  tft.fillScreen(TFT_BLACK);        // fill screen in black
  tft.drawRect(0,0,239,319,TFT_WHITE);    // draw white frame line
  tft.drawRect(1,1,237,317,TFT_WHITE);   // and second frame
}
void loop()
{
  checkTime();                       // check if time to refresh screen
  if(tft.getTouch(&x, &y)>0 && touchFlag == 0)      // if screen pressed
  {
    touchFlag = 1;
    if(y > 290)                     // city to be selected
    {
      screenFlag = 0;               // start with first screen
           if(x > 215)          cityNow = 0;
      else if(x > 195 && x<216) cityNow = 1;
      else if(x > 175 && x<196) cityNow = 2;     // select city
      else if(x > 155 && x<176) cityNow = 3;
    }
    if(y < 20) screenFlag = 1-screenFlag;        // change screen
    count = 99;              // run getWeather function immediately
  }
}
void checkTime()                    // check for screen refresh
{
  if(count > 4)                     // update screen every 5 minutes
  {
    getWeather();                   // call weather report function
    count = 0;                      // reset counter
  }
  else if(millis()-chkTime>60000)    // increment counter after 60s
  {
    chkTime = millis();             // reset timer
    count++;                        // increment counter
  }
}
void getWeather()                   // function to get weather data
{
  connect();                     // call Wi-Fi connection function
  if(screenFlag == 0) firstScreen();  // select screen to be displayed
  else secondScreen();
  touchFlag = 0;                      // reset touch indicator
}
void connect()                 // function for Wi-Fi connection
{
  client.connect(server, 80);  // connect to server on port 80
  client.println("GET /data/2.5/weather?id="+cityID[cityNow]+
  "&units=metric&appid="+APIkey+" HTTP/1.1");  // send HTTP // request
  client.println("Host: api.openweathermap.org");
  client.println("User-Agent: ESP8266/0.1");
  client.println("Connection: close");
  client.println();
  client.find(" ");     // essential instruction
  DeserializationError error = deserializeJson(jsonDoc, client);
}
void firstScreen()             // weather data for first screen
{
  citySquare();                // call function to display header
  String weather = jsonDoc["weather"][0]["main"];
  String weather2 = jsonDoc["weather"][1]["main"];
  String id1 = jsonDoc["weather"][1]["id"];
  float temp = jsonDoc["main"]["temp"];
  float pres = jsonDoc["main"]["pressure"];      // convert JavaScript objects
  float humid = jsonDoc["main"]["humidity"];   // to strings or real numbers
  float tempMin = jsonDoc["main"]["temp_min"];
  float tempMax = jsonDoc["main"]["temp_max"];
  if(id1.length()<1) weather2 = " ";
  screen("Temperature",TFT_GREEN,5,55,3);     // display weather variable name
  text = String(temp,1);           // convert value to string
  if(temp<9.95) text = " "+text;   // add space if less than 10
  screen(text,TFT_WHITE,45,85,4);  // display string on screen
  screen("o", TFT_WHITE,148,80,3); // add °symbol
  screen("C", TFT_WHITE,170,85,4); // add C for Celsius
  screen("min",TFT_BLUE,37,120,2); // minimum temperature
  text = String(tempMin,1);
  if(tempMin<10) text = " "+text;
  screen(text,TFT_WHITE,20,145,2);
  screen("o",TFT_WHITE,70,135,2);
  screen("C",TFT_WHITE,85,145,2);
  screen("max",TFT_RED,163,120,2);       // maximum temperature
  text = String(tempMax,1);
  if(tempMax<10) text = " "+text;
  screen(text,TFT_WHITE,145,145,2);
  screen("o",TFT_WHITE,197,135,2);
  screen("C",TFT_WHITE,212,145,2);
  screen("Forecast",TFT_GREEN,50,175,3); // forecast weather
  addb = blank(weather);                   // add spaces after text
  weather=weather+addb;
  screen(weather,TFT_WHITE,20,205,3);
  if(weather2 == "null") weather2="";
  addb = blank(weather2);
  weather2=weather2+addb;
  screen(weather2,TFT_WHITE,20,235,3);     // forecast weather detail
  screen("humidity",TFT_GREEN,20,270,2); // humidity
  text = String(humid,0)+"% ";
  screen(text,TFT_WHITE,40,295,2);
  screen("pressure",TFT_GREEN,130,270,2);  // pressure
  text = String(pres,0);
  if(pres<1000) text = " "+text ;
  screen(text,TFT_WHITE,150,295,2);
}
void secondScreen()              // weather data for second screen
{
  citySquare();                  // call function to display header
  String desc = jsonDoc["weather"][0]["description"];
  String desc2 = jsonDoc["weather"][1]["description"];
  String id1 = jsonDoc["weather"][1]["id"];   // convert JavaScript objects
  float windspd = jsonDoc["wind"]["speed"];     // to strings or real numbers
  float winddeg = jsonDoc["wind"]["deg"];
  float cloud = jsonDoc["clouds"]["all"];
  unsigned long srise = jsonDoc["sys"]["sunrise"];
  unsigned long sset = jsonDoc["sys"]["sunset"];
  if(id1.length()<1) desc2 = " ";
  screen("Cloud cover",TFT_GREEN,5,55,3);          // cloud cover
  text = String(cloud,1)+"%";
  screen(text,TFT_WHITE,65,85,4);
  screen("wind speed",TFT_BLUE,5,120,2);           // wind speed
  windspd = windspd*3.6;               // convert m/s to km/h
  text = String(windspd,0)+"km/h";
  screen(text,TFT_WHITE,20,145,2);
  screen("direct",TFT_RED,140,120,2);  // wind direction
  text = String(winddeg,0);
  if(winddeg<10) text = " "+text;
  if(winddeg<100) text = " "+text;
  screen(text,TFT_WHITE,152,145,2);
  screen("o",TFT_WHITE,197,135,2);
  screen("Forecast",TFT_GREEN,50,175,3);  // weather forecast (2)
  addb = blank(desc);
  desc=desc+addb;
  if(desc.length()<13) screen(desc,TFT_WHITE,20,205,3);
  else screen(desc,TFT_WHITE,20,205,2);  // font size depends on text length
  if(desc2 == "null") desc2="";
  addb = blank(desc2);
  desc2=desc2+addb;
  if(desc.length()<13 && desc2.length()<13)
          screen(desc2,TFT_WHITE,5,235,3);
  else screen(desc2,TFT_WHITE,5,235,2);
  screen("sunrise",TFT_GREEN,20,270,2);  // sunrise time
  text = String(minute(srise));
  if(minute(srise)<10) text = "0"+text;
  text = String(hour(srise)+1)+":"+text;
  screen(text,TFT_WHITE,40,295,2);
  screen("sunset",TFT_GREEN,140,270,2);  // sunset time
  text = String(minute(sset));
  if(minute(sset)<10) text = "0"+text;
  text = String(hour(sset)+1)+":"+text;
  screen(text,TFT_WHITE,150,295,2);
}
void citySquare()      // display header and city abbreviations
{
  tft.fillRect(2,2,235,315,TFT_BLACK);   // clear screen apart from frame
                                                                                      // display city abbreviations
  for (int i=0; i<Ncity; i++) screen(city[i],TFT_YELLOW,210,10+i*25,2);
  for (int i=0; i<Ncity; i++) tft.drawRect(208,8+i*25,29,19,TFT_BLACK);
                                  // draw rectangle for selected city
  tft.drawRect(208,8+cityNow*25,29,19,TFT_WHITE);
  screen("X",TFT_YELLOW,7,31,2);       // draw X with circle
  tft.drawCircle(11,37,11,TFT_WHITE);
  unsigned long stime = jsonDoc["dt"]; // time in secs since 1 Jan 1970
  hr = hour(stime)+1;
  mn = minute(stime);
  dy = day(stime);                     // convert time
  wkdy = days[weekday(stime)];
  mth = mths[month(stime)];
  text = wkdy+" "+String(dy)+" "+mth;  // display day, date and time
  screen(text,TFT_YELLOW,10,5,2);
  text = "at "+String(hr)+":"+String(mn);
  if(mn<10) text = "at "+String(hr)+":0"+String(mn);
  screen(text,TFT_YELLOW,60,30,2);
}
                 // function to position and display strings
void screen(String text, unsigned int color, int x, int y, int size)
{
  tft.setCursor(x, y);                 // position cursor
  tft.setTextColor(color,TFT_BLACK);    // background color: black
  tft.setTextSize(size);
  tft.print(text);
}
String blank(String txt)      // function to add spaces to text
{
  String addb = "";
  int len = 12-txt.length();  // add up to 11 spaces
  for (int i=0;i<len;i++) addb=addb+" ";
  return addb;
}
Listing 3-9

OpenWeatherMap information

Summary

The Wi-Fi functionality of the ESP8266 and ESP32 microcontrollers enabled Internet access to weather data from OpenWeatherMap. The ILI9341 SPI TFT LCD touch screen function enabled a city to be selected from the touch screen menu. The JSON-formatted weather data was extracted and displayed on the ILI9341 SPI TFT LCD screen. Use of the TFT-eSPI and XPT2046 libraries illustrated two screen calibration processes and differences in ILI9341 SPI TFT LCD touch screen function applied to a screen painting example.

Components List

  • ESP8266 microcontroller: LOLIN (WeMos) D1 mini or NodeMCU board

  • ESP32 microcontroller: DEVKIT DOIT or NodeMCU board

  • SPI TFT LCD touch screen: ILI9341, 2.4 inches, 240 × 320 pixels

..................Content has been hidden....................

You can't read the all page of ebook, please click here login for view all page.
Reset
3.145.111.183