
5.2. Submitting a job
Before showing programming examples, let us briefly review the options that are available when a job is submitted. The easiest way to do this is to look at the commands that are available. Once you understand the types of things you might do from the command line, it will help you better understand what you must do programmatically when writing your application.
5.2.1. Shells commands
The Globus Toolkit provides several shell commands that can be easily invoked by an application. In this case, the application may be a wrapper script that launches one or more jobs. The commands that can be used to launch a job include:
globus-job-run
globus-job-submit
globusrun
gsissh (not really a Globus job submission command, but provides a secure shell capability using the Globus GSI infrastructure)
All these functions use the Grid Security Infrastructure. Therefore, it is mandatory to always create a valid proxy before running these commands. The proxy can be created with the grid-proxy-init command.
globus-job-run
globus-job-run is the simplest way to run a job. The syntax is:
globus-job-run <hostname> <program> <arguments>
The program must refer to the absolute path of the program. However, by using the -s option, globus will automatically transfer the program to the host where it will be executed:
Example 5-3. globus-job-run example
[globus@m0 globus]$ echo "echo Hello World" > MyProg;chmod +× MyProg [globus@m0 globus]$ grid-proxy-init Your identity: /O=Grid/O=Globus/OU=itso-maya.com/CN=m0user Enter GRID pass phrase for this identity: Creating proxy ................................... Done Your proxy is valid until: Tue Mar 18 05:23:49 2003 [globus@m0 globus]$ globus-job-run t1 MyProg GRAM Job failed because the executable does not exist (error code 5) [globus@m0 globus]$ globus-job-run t1 -s MyProg Hello World |
The-: delimiter can be used to submit a multi-request query, as shown in Example 5-4.
Example 5-4. multi-request query
globus@m0 globus]$ echo 'echo Hello $1 from $HOSTNAME' > MyProg;chmod +× MyProg [globus@m0 globus]$ globus-job-run -args You -: a1 -s MyProg -: b1 -s MyProg -: c1 -s MyProg Hello You from a1.itso-apache.com Hello You from b1.itso-bororos.com Hello You from c1.itso-cherokee.com |
globus-job-submit
This shell command submits a job in the background so that you can submit a job, log out of the system, and collect the results later. The job is managed via a URL, also known as a job contact, created at job submission.
The syntax is the same as for globus-job-run except that the program must refer to an absolute path and the -s option cannot be used.
Example 5-5. globus-job-submit example
[globus@m0 globus]$ globus-job-submit a1 /myjobs/LongRunningJob https://al.itso-apache.com:47573/22041/1047929562/ |
The job contact returned (the https... string in the example) can then be used with the following commands:
globus-job-status <job contact> to get the status of the job (pending, active, done, failed, others)
globus-job-get-ouput <job contact> to retrieve the output of the job
globus-job-cancel <job contact> to cancel the job
globus-job-clear <job contact> to clear the files produced by a job
Example 5-6. Retrieving information about a job
[globus@m0 globus]$ globus-job-status
https://a1.itso-apache.com:47573/22041/1047929562/
ACTIVE
[globus@m0 globus]$ globus-job-cancel
https://a1.itso-apache.com:47573/22041/1047929562/
Are you sure you want to cancel the job now (Y/N) ?
Y
Job canceled.
NOTE: You still need to clean files associated with the
job by running globus-job-clean <jobID>

[globus@m0 globus]$ globus-job-clean
https://a1.itso-apache.com:47573/22041/1047929562/

    WARNING: Cleaning a job means:
        - Kill the job if it still running, and
        - Remove the cached output on the remote resource
    Are you sure you want to cleanup the job now (Y/N) ?
Y
Cleanup successful.
|
5.2.2. globusrun
All jobs in the Globus Toolkit 2.2 are submitted by using the RSL language. The RSL language is described in 2.1.2, “Resource management” on page 17. globusrun permits you to execute an RSL script.
The -s options starts up a GASS server that can be referenced in the RSL string with the GLOBUSRUN_GASS_URL environment variable. This local GASS server allows the data movement between the compute nodes and the submission node where the globusrun command is issued.
The syntax for the globusrun command is:
globusrun -s -r <hostname> -f <RSL script file>
globusrun -s -r <hostname> 'RSL script'
There is also a -b option (for batch mode) that makes the command return a job contact URL that can be used with:
globusrun -status <job contact> to check the status of a job
globusrun -kill <job contact> to kill a job
Example 5-7. globusrun example
[globus@m0 globus]$ echo 'echo Hello $1 from $HOSTNAME' > MyProg;chmod +× MyProg [globus@m0 globus]$ globusrun -s -r a1 '&(executable=$ (GLOBUSRUN_GASS_URL) '"$PWD"'/MyProg) (arguments=World)' Hello World from a1.itso-apache.com |
globus-job-run and globus-job-submit actually generate and execute RSL scripts. By using the -dumprsl option, you can see the RSL that is generated and used.
Example 5-8. globus-job-submit-dumprsl example
[globus@m0 globus]$ globus-job-submit -dumprsl a1 /bin/sleep 60 &(executable="/bin/sleep") (arguments= "60") (stdout=x-gass-cache://$(GLOBUS_GRAM_JOB_CONTACT) stdout anExtraTag) (stderr=x-gass-cache://$(GLOBUS_GRAM_JOB_CONTACT) stderr anExtraTag) |
5.2.3. GSIssh
GSI-OpenSSH is a modified version of the OpenSSH client and server that adds support for GSI authentication. GSIssh can be used to remotely create a shell on a remote system to run shell scripts or to interactively issue shell commands, and it also permits the transfer of files between systems without being prompted for a password and a user ID. Nevertheless, a valid proxy must be created by using the grid-proxy-init command.
The problem of unknown sshd host keys is handled as part of the GSIssh protocol by hashing the sshd host key, signing the result with the GSI host certificate on the sshd host, and sending this to the client. With this information the client now has the means to verify that a host key belongs to the host it is connecting to and detect an attacker in the middle.
The Grid Portal Development Kit (GPDK) provides a Java Bean that provides GSIssh protocol facilities to a Java application used in a Web portal. For more information see:
http://doesciencegrid.org/projects/GPDK/
Figure 5-1. GSI-enabled OpenSSH architecture

The installation procedure as well as a complete example is provided in “GSIssh installation” on page 116.
gsissh is used the same way as ssh. It cannot use Globus URLs; consequently, files must be staged in and out using gsiscp or sftp. The executable must be present on the remote host before execution. Below are a few examples.
Example 5-9. gsissh example
[globus@m0 globus]$ grid-proxy-init Your identity: /O=Grid/O=Globus/OU=itso-maya.com/CN=m0user Enter GRID pass phrase for this identity: Creating proxy ............................................ .......... Done Your proxy is valid until: Tue Mar 18 04:33:21 2003 [globus@m0 globus]$ gsissh t1 "date;hostname" Mon Mar 17 10:33:33 CST 2003 t1.itso-tupi.com |
The gsissh command also embeds and secures the X11 protocol that allows the user to remotely run an application that will be displayed on the local X server. This example runs the Linux monitoring software gkrellm on t1 but will display the graphical interface on m0.
Example 5-10. Running a graphical application through gsissh
[globus@m0 globus]$gsissh t1 gkrellm |
gsissh also supports proxy delegation. That means that once the GSI credentials are created on one node, a user can log onto other nodes and, from there, submit jobs that will use the same GSI credentials. In Example 5-11, a user connects to t1 and from there can submit a job without the need to regenerate a new globus proxy.
Example 5-11. Proxy delegation support
on m0 [globus@m0 globus]$ grid-proxy-init Your identity: /O=Grid/O=Globus/OU=itso-maya.com/CN=m0user Enter GRID pass phrase for this identity: Creating proxy ........................................... .......... Done Your proxy is valid until: Tue Mar 18 04:33:21 2003 [globus@m0 globus]$ gsissh t1.itso-tupi.com Last login: Fri Mar 14 15:16:59 2003 from m0.itso-maya.com on t1: [globus@t1 globus]$ globus-job-run a1 -s /bin/hostname a1.itso-apache.com [globus@t1 globus]$ grid-proxy-info subject : /O=Grid/O=Globus/OU=itso-maya.com/CN=m0user/CN=proxy/CN=proxy issuer : /O=Grid/O=Globus/OU=itso-maya.com/CN=m0user/CN=proxy type : full strength : 512 bits timeleft : 11:19:34 |
For more information, see the followings links:
http://www.OpenSSH http://www.openssh.org
http://www.GSIopenssh http://www.nsf-middleware.org/NMIR2/
GSIssh installation
GSIssh middleware is developed by the National Science Foundation Initiative and is not included in the Globus Toolkit. Therefore, it needs to be installed on top of Globus Toolkit 2.2 and its installation requires the Globus Packaging Technology (GPT).
It can be downloaded at the following site:
http://www.nsf-middleware.org/NMIR2/download.asp#GCSS
The installation instructions can be found at
http://www.nsf-middleware.org/documentation/NMI-R2/0/All/allserver_install.htm
GSIssh can be either installed by using a binary bundle (already compiled) or by using a source bundle (that needs to be compiled on site). The installation procedure is very well explained on the NMI Web site (see above).
The following steps summarize the installation procedure for GSIssh using the source package in the case where the Globus Toolkit 2 has been already installed.
1. | Download the GSIssh package from the NMI Web site. |
2. | Set up your environment according your Globus Toolkit environment: export GPT_LOCATION=/usr/local/globus export GLOBUS_LOCATION=/usr/local/globus |
3. | Build the bundle using GPT’s build command. $GPT_LOCATION/sbin/gpt-build -static gsi_openssh-NMI-2.1-src_bundle.tar.gz gcc32 |
4. | Run any post-install setup scripts that require execution. $GPT_LOCATION/sbin/gpt-postinstall |
5. | Use GPT’s verify command to verify that all of the files were installed properly. $GPT_LOCATION/sbin/gpt-verify |
6. |
Note
GSIssh can be installed concurrently with a non-gsi ssh server. However, since they both default to using the same port, you have to modify the port on which the GSIssh will listen for requests. To do this, edit /etc/rc.d/init.d/gsissh and assign a value to SSHD_ARGS, for example, SSHD_ARGS=“-p 24”, to listen on port 24.
You will then need to specify this port for all gsissh, gsiscp, and gsisftp commands:
gsissh -p 24 g3.itso-guarani.com hostname
5.2.4. Job submission skeleton for C/C++ applications
To submit a job in a C or C++ program, an RSL string describing the job must be provided. The globus_gram_client API provides an easy API for job submission. Two kinds of functions can be used:
Blocking calls that wait for the completion of the jobs before returning
Non-blocking or asynchronous calls that return immediately and call a “callback” function when the operation has completed or to inform the main program about the status of the asynchronous operation
Figure 5-2. Job submission using non-blocking calls

Note
The documentation of the globus_gram_client API is available at:
http://www-unix.globus.org/api/c/globus_gram_client/html/index.html
We only cover non-blocking calls in this chapter, as they are the more complicated from a programming perspective, but often more desirable from an application perspective. Non-blocking calls allow the application to submit several jobs in parallel rather than wait for one job to finish before submitting the next.
Job submission
The ITSO_GRAM_JOB class provided in “itso_gram_job.C” on page 321 provides an asynchronous implementation in C++ of a job submission. It is derived from ITSO_CB. ITSO_GRAM_JOB wraps C Globus GRAM API functions in its methods. Its implementation is based on the C example available in “Submitting a job” on page 358.
The first step is to create the GRAM server on the execution node that will monitor the status of the job and associate a callback with this job. This is achieved by calling the function globus_gram_client_callback_allow(). In the Submit() method of the class ITSO_GRAM_JOB, we find:
globus_gram_client_callback_allow(itso_gram_job::callback_func,
                       (void *) this,
                       &callback_contact);
The ITSO_GRAM_JOB object, derived from ITSO_CB, is itself passed as an argument so that the callback could invoke the method of this object via the ‘this’ pointer. It is associated, as well as the callback_function, with globus_gram_client_callback_allow()to manage its asynchronous behavior. &callback_contact is the job contact URL that will be set after this call. The setDone(), setFailed() methods of the ITSO_GRAM_JOB object (implemented in ITSO_CB) will permit the callback to modify the status of the job in the application. Note that the status of the job in the application is independently managed from the status of the job that is be obtained via the following globus calls:
globus_gram_client_job_status() (blocking call)
globus_gram_client_resgister_job_status() (non-blocking call)
Here is an example of a callback to the globus_gram_client_callback_allow() function. Note that callbacks have a well-defined prototype that depends on the Globus functions they are associated with. The job contact URL is received as an argument as well as the ITSO_GRAM_JOB object pointer.
Example 5-12. globus_gram_client_callback_allow() callback function
static void callback_func(void * user_callback_arg,
                   char * job_contact,
                   int state,
                   int errorcode)
{
   //The ITSO_GRAM_JOB object is retrieved in the callback via the first
   //argument that allows to pass any kind of pointer to the callback.
   //This is the second argument of the globus_gram_client_callback_allow()
   //function
    ITSO_GRAM_JOB* Monitor = (ITSO_GRAM_JOB*) user_callback_arg;

    switch(state)
    {
    case GLOBUS_GRAM_PROTOCOL_JOB_STATE_STAGE_IN:
        cout << "Staging file in on: " << job_contact << endl;
         break;
    case GLOBUS_GRAM_PROTOCOL_JOB_STATE_STAGE_OUT:
         cout << "Staging file out on: " << job_contact << endl;
         break;
    case GLOBUS_GRAM_PROTOCOL_JOB_STATE_PENDING:
         break; /* Reports state change to the user */
    case GLOBUS_GRAM_PROTOCOL_JOB_STATE_ACTIVE:
         break; /* Reports state change to the user */

    case GLOBUS_GRAM_PROTOCOL_JOB_STATE_FAILED:
         cerr << "Job Failed on: " << job_contact << endl;
         Monitor->SetFailed();
         Monitor->setDone();
         break; /* Reports state change to the user */

    case GLOBUS_GRAM_PROTOCOL_JOB_STATE_DONE:
         cout << "Job Finished on: " << job_contact << endl;
         Monitor->setDone();
         break; /* Reports state change to the user */
    }
}
|
The next step is to submit the job itself. This is achieved by calling the globus_gram_client_register_job_request() function that is an asynchronous or non-blocking call, that also needs (in our example) a C callback function and an ITSO_CB object. The request_cb attribute of the class ITSO_GRAM_JOB will be used for this purpose. The callback function used with globus_gram_client_register_job_request() is request_callback(). See “ITSO_GRAM_JOB” on page 316 for implementation details. It calls the method SetRequestDone() of the ITSO_GRAM_JOB object that itself calls the setDone() method of the ITSO_CB class through the request_cb attribute.
The RSL submission string is passed as an argument, as well as the host name of the execution node, to globus_gram_client_register_job_request(). GLOBUS_GRAM_PROTOCOL_JOB_STATE_ALL specifies that we want to monitor all states (done, failed, staging files). The ITSO_GRAM_JOB object itself is passed as an argument ((void*)this). This way the callback can invoke its SetRequestDone() method. See Example 5-14 on page 121.
Example 5-13. globus_gram_client_register_job_request call
int rc = globus_gram_client_register_job_request(res.c_str(),
                         rsl.c_str(),
                         GLOBUS_GRAM_PROTOCOL_JOB_STATE_ALL,
                         callback_contact,
                         GLOBUS_GRAM_CLIENT_NO_ATTR,
                         itso_gram_job::request_callback,
                         (void*) this);
|
Here is an example of a globus_gram_client_register_job_request() callback. The callback is called whether the job has been submitted successfully or not.
Example 5-14. globus_gram_client_register_job_request() callback
static void request_callback(void * user_callback_arg,
                             globus_gram_protocol_error_t failure_code,
                             const char * job_contact,
                             globus_gram_protocol_job_state_t state,
                             globus_gram_protocol_error_t errorcode) {
    ITSO_GRAM_JOB*  Request = (ITSO_GRAM_JOB*) user_callback_arg;
    cout << "Contact on the server " << job_contact << endl;
    Request->SetRequestDone(job_contact);
}
|
The callback calls the SetRequestDone() method of the ITSO_GRAM_JOB object that actually calls the setDone() method of the request_cb ITSO_CB object associated with the function globus_gram_client_register_job_request().
The Submit() method of the ITSO_GRAM_JOB class implements the job submission.
Example 5-15. GRAM job submission via an ITSO_GRAM_JOB object
bool ITSO_GRAM_JOB::Submit(string res, string rsl) {
    failed=false;
    globus_gram_client_callback_allow(itso_gram_job::callback_func,
                       (void *) this,
                       &callback_contact);
    int rc = globus_gram_client_register_job_request(
                       res.c_str(),
                       rsl.c_str(),
                       GLOBUS_GRAM_PROTOCOL_JOB_STATE_ALL,
                       callback_contact,
                       GLOBUS_GRAM_CLIENT_NO_ATTR,
                       itso_gram_job::request_callback,
                       (void*) this);
    if (rc != 0) /* if there is an error */
    {
        printf("TEST: gram error: %d - %s
",
                rc,
                /* translate the error into english */
                globus_gram_client_error_string(rc));
        return true;
    }
   else
      return false;
};
|
Checking if we can submit a job on a node
The function globus_gram_client_ping() can be used for diagnostic purposes to check whether a host is available to run the job.
Example 5-16. CheckHost.C
#include "globus_gram_client.h"
#include <iostream>

int main(int argc, char ** argv)
{

    globus_module_activate(GLOBUS_GRAM_CLIENT_MODULE);

    cout << argv[1];
    if (!globus_gram_client_ping(argv[1]))
          cout << " is okay " << endl;
    else
          cout << cannot be used " << endl;

    globus_module_deactivate(GLOBUS_GRAM_CLIENT_MODULE);
}
|
To compile the above program:
1. | Generate the globus variables used in the Makefile. globus-makefile-header --flavor gcc32 globus_gram_job > globus_header |
2. | Then use the following Makefile. include globus_header all: CheckNodes %.o: %.C g++ -g -c -I. $(GLOBUS_CPPFLAGS) $< -o $@ CheckNodes: CheckNodes.o g++ -g -c -I. $(GLOBUS_CPPFLAGS) $(GLOBUS_LDFLAGS) $^ $(GLOBUS_PKG_LIBS) |
3. | Issue make to compile. |
When this program executes, you will see results similar to the following:
[globus@m0 JYCode]$ ./CheckNodes al.itso-tupi.com
a1.itso-tupi.com cannot be used
[globus@m0 JYCode]$ ./CheckNodes t1.itso-tupi.com
t1.itso-tupi.com is okay
Job resubmission
In this example, by using ITSO_GRAM_JOB, we submit a job, check if it has failed, and, if so, submit it again to another host.
One (simple) method is to get three nodes from the broker and submit the job to the next node when it fails on the previous one.
The job state management is managed in the callback function shown in Example 5-12 on page 119. We declare that we want to monitor all changes in the state of the job (GLOBUS_GRAM_PROTOCOL_JOB_STATE_ALL option passed to the globus_gram_client_register_job_request() function). Then the callback modifies (or not) the status of the job via the SetFailed() method provided by the ITSO_GRAM_JOB class.
The SureJob.C program is the implementation of such a job submission that checks the state of the job after the Wait() method has returned, by using the HasFailed() method. If failed, the job is submitted to the next host provided by the broker.
HasFailed() simply checks the value of a boolean attribute of an ITSO_GRAM_JOB object that becomes true when the job has failed. This attribute is set to false by default, but can be modified in the callback function of the globus_gram_client_callback_allow() function by calling the setFailed() method of the ITSO_GRAM_JOB object when a failure is detected.
The broker returns a vector of hostnames via the GetLinuxNodes() call (see “Broker example” on page 127 for more details). It internally tests if the user is able to submit a job on the node with a globus ping before returning the vector of host names. For various reasons the job may fail to execute on this node, and SureJob.C provides a simple way to overcome this failure.
Example 5-17. SureJob.C
#include <string>
#include <vector>
#include <broker.h>
#include "globus_gram_client.h"
#include "itso_gram_job.h"

using namespace itso_broker;

int main(int argc, char ** argv)
{
    vector<string> Nodes;
    GetLinuxNodes(Nodes,3);

    // Quickly check if we can run a job
    globus_module_activate(GLOBUS_GRAM_CLIENT_MODULE);

    ITSO_GRAM_JOB job;
    vector<string>::iterator i;
    for(i=Nodes.begin();1!=Nodes.end();++i) {
      cout << "Try to submit on " << *i << endl;
      job.Submit(*i, "&(executable=/bin/hostname)");
      job.Wait();
      if (!job.HasFailed())
         break;
    };

    globus_module_deactivate(GLOBUS_GRAM_CLIENT_MODULE);
}
|
Here is the result when a1 and c2 are down.
[globus@m0 JYCode]$ ./SureJob
Try to submit on a1.itso-apache.com
Contact on the server https://a1.itso-apache.com:48181/27222/1047945694/
Job Failed on: https://a1.itso-apache.com:48181/27222/1047945694/
Try to submit on c2.itso-cherokee.com
Contact on the server https://c2.itso-cherokee.com:40304/20728/1047945691/
Job Failed on: https://c2.itso-cherokee.com:40304/20728/1047945691/
Try to submit on c1.itso-cherokee.com
Contact on the server https://c1.itso-cherokee.com:47993/25310/1047945698/
Job Finished on: https://c1.itso-cherokee.com:47993/25310/1047945698/
5.2.5. Simple broker
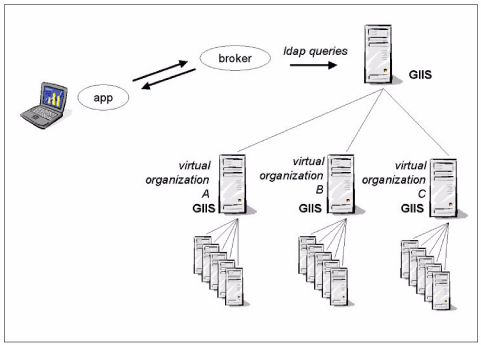
A user application should not have to care about locating the resources it needs. It just needs to describe to a broker the kind of resources it will use to run the applications: Operating systems, SMP, number of nodes, available applications, available storage, and so on. This task needs to be done at the application level via a component called a broker that can be implemented in the application itself, or as a service that will be queried by the applications. The Globus Toolkit 2.2 does not provide a broker implementation, but it does provide the necessary functions and framework to create one through the MDS component.
The broker software will communicate via the LDAP protocol in the Globus Toolkit 2 with the GIIS and GRIS servers. The broker can be linked with other information stored in databases or plain files that provide other information such as customer service level agreement, resources topology, network problems, and cost of service. This third-party data may influence the decisions of what resource to use in conjunction with the technical information provided by default with MDS.
Using Globus Toolkit tools
grid-info-search as well as ldapsearch are the shell tools used to query information through the GIIS server. The -h option allows the user to specify a specific host, usually the master GIIS server (on top in Figure 5-3), m0 in our lab environment. The connection to the GIIS can be controlled through GSI security, such that a valid proxy certificate needs to be generated before running either of the two commands:
Figure 5-3. Working with a broker
dluser@d1 d1user]$ grid-proxy-init
Your identity: /O=Grid/O=Globus/OU=itso-dakota.com/CN=d1user
Enter GRID pass phrase for this identity:
Creating proxy ....................................... Done
Your proxy is valid until: Sat Mar 15 06:55:55 2003
An LDAP query implements sophisticated query operations that include:
Logic operators: AND (&), OR (|), and NOT (!)
Value operators: =, >=, <=, -= (for approximate matching)
For example, here is a way to look up host names of the resources of all nodes running Linux that use a Pentium processor with a CPU speed greater than 500 Mhz:
ldapsearch -x -p 2135 -h m0 -b "mds-vo-name=maya,o=grid" -s sub
'(&(Mds-Os-name=Linux)(Mds-Cpu-model=Pentium *)(Mds-Cpu-speedMHz>=500))'
Mds-Host-hn
version: 2

#
# filter: (&(Mds-0s-name=Linux)(Mds-Cpu-model=Pentium
II*)(Mds-Cpu-speedMHz>=500))
# requesting: Mds-Host-hn
#

# a1.itso-apache.com, apache, maya, Grid
dn: Mds-Host-hn=a1.itso-apache.com,Mds-Vo-name=apache,Mds-Vo-name=maya,o=Grid
Mds-Host-hn: a1.itso-apache.com

# t2.itso-tupi.com, tupi, maya, Grid
dn: Mds-Host-hn=t2.itso-tupi.com,Mds-Vo-name=tupi,Mds-Vo-name=maya,o=Grid
Mds-Host-hn: t2.itso-tupi.com

# t1.itso-tupi.com, tupi, maya, Grid
dn: Mds-Host-hn=t1.itso-tupi.com,Mds-Vo-name=tupi,Mds-Vo-name=maya,o=Grid
Mds-Host-hn: t1.itso-tupi.com
The following command can be included in a program to retrieve the list of the machines that match the criteria:
[d1user@d1 d1user]$ ldapsearch -x -p 2135 -h m0 -b "mds-vo-name=maya,o=grid" -s
sub '(&(Mds-Os-name=Linux)(Mds-Cpu-model=Pentium *)(Mds-Cpu-speedMHz>=500))'
Mds-Host-hn | awk '/Mds-Host-hn:/ { print $2 }' | xargs

t2.itso-tupi.com t1.itso-tupi.com a1.itso-apache.com
In the next example, we look for all machines that have a Pentium processor and that either runs at a frequency greater than 500 Mhz, or has more than 5 Gb of available diskspace.
ldapsearch -x -p 2135 -h m0 -b "mds-vo-name=maya,o=grid" -s sub
'(&(Mds-0s-name=Linux)(Mds-Cpu-model=Pentium*)(|(Mds-Cpu-speedMHz>=500)(Mds-Fs-
Total-sizeMB>=5000)))' Mds-Host-hn | awk '/Mds-Host-hn:/ { print $2 }' | xargs

a1.itso-apache.com a2.itso-apache.com b2.itso-bororos.com d2.itso-dakota.com
d1.itso-dakota.com t2.itso-tupi.com t3.itso-tupi.com t1.itso-tupi.com
t0.itso-tupi.com c2.itso-cherokee.com c1.itso-cherokee.com
Graphical tools
There are a variety of GUI tools can be used to browse the Globus MDS server. Under Linux, a graphical client named gq permits easy browsing. If not available on your distribution, it can be downloaded from the following URL:
Figure 5-4. GQ LDAP browser

Broker example
In our example, we use a basic broker that can be called via a function that takes the number of required Linux nodes as a parameter and a vector of strings (as defined in C++) that will contain the list of nodes when the function returns.
This simple broker checks the average CPU workload measured in a fifteen-minute period of time, the number or processors, and the CPU speed. All this information is available from the GIIS server for each host as Mds-Cpu-Free-15mnX100, Mds-Cpu-Total-count, and Mds-Cpu-speedMHz attributes, respectively. The broker multiplies the three attributes and performs a quick sort to return the nodes that apparently are the best available. Each node is checked with the function globus_gram_client_ping() to check if the node is available.
The complete source code is available in “Broker.C” on page 327.
We use the LDAP API provided by the Globus Toolkit 2.2 to send the request to the main GIIS server located on m0 in our lab environment. The definition is statically defined in the program, but can be easily provided as a parameter to the GetLinuxNodes() function if needed:
#define GRID_INFO_HOST "m0"
#define GRID_INFO_PORT "2135"
#define GRID_INFO_BASEDN "mds-vo-name=maya, o=grid"
In the function GetLinuxNodes(), the connection with MDS is managed by a structure of type LDAP* initialized by the two calls, ldap_open() and ldap_simple_bind_s(), for the connection.
Example 5-18. LDAP connection
 char *           server   = GRID_INFO_HOST;
 int              port     = atoi(GRID_INFO_PORT);
 char *           base_dn  = GRID_INFO_BASEDN;
 LDAP *           ldap_server;
/* Open connection to LDAP server */
 if ((ldap_server = ldap_open(server, port)) == GLOBUS_NULL)
 {
     ldap_perror(ldap_server, "ldap_open");
     exit(1);
 }

/* Bind to LDAP server */
 if (ldap_simple_bind_s(ldap_server, "", "") != LDAP_SUCCESS)
 {
     ldap_perror(ldap_server, "ldap_simple_bind_s");
     ldap_unbind(ldap_server);
     exit(1);
}
|
We are only interested in the resources running the Linux operating system. This can be expressed by the following LDAP query:
(&(Mds-Os-name=Linux)(Mds-Host-hn=*))
Then we can submit the query, as shown in Example 5-14 on page 121.
Example 5-19. Submitting the LDAP query
string filter= "(&(Mds-Os-name=Linux)(Mds-Host-hn=*))";
if (ldap_search_s(ldap_server, base_dn,
                       LDAP_SCOPE_SUBTREE,
                       const_cast<char*>(filter.c_str()), attrs, 0,
                       &reply) != LDAP_SUCCESS)
   {
       ldap_perror(ldap_server, "ldap_search");
       ldap_unbind(ldap_server);
       exit(1);
}
|
The result of the query is a set of entries that match the query. Each entry is itself a set of attributes and their values. The ldap_first_entry() and ldap_next_entry() functions allow us to walk the list of entries. ldap_first_attribute() and ldap_next_attrubute() allow us to walk the attribute list, and ldap_get_values() is used to return their value.
Example 5-20. Retrieving results from Globus MDS
LDAPMessage *   reply;
LDAPMessage *   entry;
vector<Host*>   nodes;

for (entry = ldap_first_entry(ldap_server, reply);
entry != GLOBUS_NULL;
entry = ldap_next_entry(ldap_server, entry) )
{
   //cout << endl << ldap_get_dn( ldap_server, entry ) << endl;
   BerElement * ber;
   char**       values;
   char *       attr;
   char *       answer = GLOBUS_NULL;
   string hostname;
   int cpu;
   for (attr = ldap_first_attribute(ldap_server,entry,&ber);
      attr != NULL;
      attr = ldap_next_attribute(ldap_server,entry,ber) )
      {

         values = ldap_get_values(ldap_server, entry, attr);
         answer = strdup(values[0]);
         ldap_value_free(values);
         if (strcmp("Mds-Host-hn",attr)==0)
            hostname=answer;
         if (strcmp("Mds-Cpu-Free-15minX100",attr)==0)
            cpu=atoi(answer);
         if (strcmp("Mds-Cpu-Total-count",attr)==0)
            cpu_nb=atoi(answer);
         if (strcmp("Mds-Cpu-speedMHz",attr)==0)
            speed=atoi(answer);
         //printf("%s %s
", attr, answer);


   }
// check if we can really use this node
if (!globus_gram_client_ping(hostname.c_str()))
   nodes.push_back(new Host(hostname,speed*cpu_nb*cpu/100));
};
|
Only valid nodes (that are available) are selected. The globus_gram_client_ping() function from the globus_gram_client API is used for this purpose. We also calculate a weight for each node, speed*cpu_nb*cpu/100. The higher the weight is, the higher our ranking of the node will be. The broker will return the best nodes first, as shown in Example 5-21.
Example 5-21. Check the host
if (!globus_gram_client_ping(hostname.c_str()))
    nodes.push_back(new Host(hostname,speed*cpu_nb*cpu/100));
|
In a real environment, the broker should take into account a variety of factors and information. Not all of the information has to come from MDS. For instance, some other factors that might affect the broker’s choice of resources could be:
Service level agreements
Time range of utilization
Client location
And many others
The broker finally proceeds to sort and set up the vector of strings that will be returned to the calling function. This logic, as well as the LDAP query, can be easily customized to meet any specific requirements, as shown in Example 5-22.
Example 5-22. Broker algorithm implementation
class Host {
      string   hostname;
      long     cpu;
   public:
      Host(string h,int c) : hostname(h), cpu(c) {};
      ~Host() { };
      string getHostname() { return hostname; };
      int getCpu() { return cpu; };
};


bool predica(Host* a, Host* b) {
 return (a->getCpu() > b->getCpu());
}
..................................
   globus_module_activate(GLOBUS_GRAM_CLIENT_MODULE);
..................................
   { // for each entry do
      values = ldap_get_values(ldap_server, entry, attr);
        answer = strdup(values[0]);
        ldap_value_free(values);
     if (strcmp("Mds-Host-hn",attr)==0)
        hostname=answer;
     if (strcmp("Mds-Cpu-Free-15minX100",attr)==0)
        cpu=atoi(answer);
     if (strcmp("Mds-Cpu-Total-count",attr)==0)
        cpu_nb=atoi(answer);
     if (strcmp("Mds-Cpu-speedMHz",attr)==0)
        speed=atoi(answer);
     //printf("%s %s
", attr, answer);
   }
   // check if we can really use this node
   if (!globus_gram_client_ping(hostname.c_str()))
      nodes.push_back(new Host(hostname,speed*cpu_nb*cpu/100));

   };
  sort(nodes.begin(),nodes.end(),predica);
   vector<Host*>::iterator i;
   for(i=nodes.begin();(n>0) && (i!=nodes.end());n--,i++){
      res.push_back((*i)->getHostname());
      //cout << (*i)->getHostname() << " " << (*i)->getCpu() << endl;
      delete *i;
   }
   for(;i!=nodes.end();++i)
       delete *i;

globus_module_deactivate(GLOBUS_GRAM_CLIENT_MODULE);
|
Example 5-23 is a quick example that uses the broker.C implementation. The application takes the first argument as the number of required nodes running the Linux operating system.
Example 5-23. Application using GetLinuxNodes() to get n nodes
#include <string>
#include <vector>
#include <broker.h>

using namespace itso_broker;

int main(int argc, char ** argv)
{
    vector<string> Y;
    GetLinuxNodes(Y,atoi(argv[1]));
    vector<string>::iterator i;
    for(i=Y.begin();i!=Y.end();++i)
            cout << *i << endl;
}
|
Executing the program in our environment results in:
[globus@mO GLOBUS]$ ./mds 6
c1.itso-cherokee.com
d2.itso-dakota.com
a1.itso-apache.com
t1.itso-tupi.com
c2.itso-cherokee.com
d1.itso-dakota.com
Note
Do not forget to modify the MDS attributes to suit your environment in broker.C:
#define GRID_INFO_HOST "mO"
#define GRID_INFO_PORT "2135"
#define GRID_INFO_BASEDN "mds-vo-name=maya, o=grid"