Like you may remember, in Chapter 4 we took a quick glance at encryption solutions for three of the most popular operating systems as of 2020: Microsoft Windows, MacOS, and Linux. In this chapter we’ll not only expand on this topic, but also cover the best general security measures available for these operating systems in detail. We’ll tackle the best anti-malware and other related solutions of today, in both software and hardware. After all, there’s no effective cryptography without defensive technologies against every variety of serious malware. Feel free to implement as many of these countermeasures as you can.
Due to the possibility of backdoors, in this chapter we’ll also have a focus on open source solutions for all software presented. Closed-source encryption software will still be featured as it does have its uses, even when/if backdoored.
On Multilayer Encryption
As it stands, the mighty Advanced Encryption Algorithm (AES) is pretty much invincible until the unforeseeable future. Using a single layer of AES should be enough for even the most fervent cryptographers. However, there is an ongoing debate over the use of multilayered encryption. This approach and its associated concepts will be discussed next.
On the surface additional layers of encryption seem like great countermeasures against cryptographic attacks. Now, there are two schools of thought on this. Some proponents of multilayer encryption rightfully claim that in theory each additional implementation of an encrypting algorithm fortifies a dataset considerably. Others feel each such implementation only adds attack vectors for malicious actors to utilize. In addition, using numerous encryption algorithms simultaneously creates more strain on a system’s resources, whether it seems negligible or not to involve human actors. Still, backdoors in closed-source commercial encryption products, such as Windows BitLocker, are a legitimate concern for many cryptographers.
Provided well-established algorithms such as AES are used, the biggest threat to a secure system lies in malicious software, often facilitated by human incompetence. This is why a large section of this chapter is dedicated to presenting the most effective countermeasures against malware known in 2020.
Whether one is suspicious of commercial encryption products or not, such a full-disk encryption is a great way to fend off data leaks obtained during burglaries and many forms of espionage. The government is unlikely to side with the offenders in these cases. Now, as demonstrated in Chapter 4, one solution against those pesky backdoors is to store your most delicate data within secure file containers. These should be naturally encrypted with open source solutions only, such as the much loved VeraCrypt. A double layer of, say, BitLocker and file containers consisting of another dose of 256-bit AES data is a tough nut to crack for any actor, whether highly skilled and malicious or not.
Now, should one implement multilayer encryption, some practices should be adhered to. For one, the passwords for each layer should be completely different and under no circumstance share patterns in any way. Also, weak algorithms for both encryption and hashing should be steered clear of. These include the Digital Encryption Standard (DES) in all of its varieties, as well as the SHA-1 and MD5. The public-key mammoth that is the RSA algorithm, while not obsolete, doesn’t represent the cutting edge in encryption any longer; it has some issues in both security and performance. Some cryptographers suggest either using RSA at its higher key sizes of 2048 bits (or more) or abandoning it altogether. Remember, the cryptographic quantum revolution is right around the corner as of 2020. Its first casualty may very well be algorithms like the once-venerable RSA.
Small vs. Big Business Readiness
While organizations of all sizes obviously need to implement proper security measures both online and in the traditional sense, there’s often a different approach to these matters when it comes to smaller and established businesses. Larger enterprises have much more resources to spare, while the smaller actors tend to prioritize growth instead of security. This chapter is primarily for these less established business owners/organizations, who may have not had the opportunity to outsource their cybersecurity solutions yet.
A well-trained staff. Your crew needs to be savvy to face the many threats the Internet throws at them. For one, bringing one’s own online-capable devices into work may create issues with organizational security and should be addressed.
Update awareness. Out-of-date security software is usually useless. Make sure yours doesn’t get to that point. Apply reliable vendor patches whenever they arrive.
Secure B2B networks. Even if your organization is up to speed when it comes to the latest in cybersecurity, doing business with a compromised party may infect your systems as well. The Internet at large is not the only potential infected agent. Care must be taken with robust protocols and digital hygiene must be considered in B2B communications as well.
Compartmentalization. All data in your organization should be accessible on a need-to-know basis only. Only trusted IT staff should be granted with user accounts which allow software installation.
A Refresher on Network Security
Many cryptographic attack vectors are coming from an online environment. It makes sense to know at least the basics of current-day network hardware security which we’ll delve into next.
Networks and Routers
Like you probably know, an interconnected series of devices sharing data using specific protocols constitutes a network . This can be a large corporate solution consisting of thousands of devices or a small home network consisting of exactly one router and a mere handful of devices, usually including a desktop computer (i.e., a typical local area network, or LAN). The Internet is basically one large network of servers and clients.
Now, a router is an important piece of hardware which transmits data between devices in a network. Website data, email, and other information coming in from the Internet enter a router in the form of data packets. All of these packets contain destination information (i.e., an Internet protocol address or IP address) which naturally belong to the device which made the request. Within a matter of seconds, these data packets find their way from the Internet into the router, which directs them toward a connected device.
First, you need to access the router’s console. This is usually done by typing in a default IP address into a web browser on a device connected to the network (see Figure 6-1). There are a variety of these IP addresses as they vary between hardware manufacturers. A one-size-fits-all solution isn’t unfortunately available. For example, some routers accept 192.168.1.1, while others work with 192.168.0.1.
- In addition to the default IP address, you also need a username and a password to access the router console. See Table 6-1 for some common combinations.
 Figure 6-1
A partial router console screen of a Zyxel-brand device
Table 6-1Some common default router usernames and passwords as of Q2 2020
Manufacturer
Default IP Address
Default Username
Default Password
Asus
192.168.1.1
admin
admin
Belkin
192.168.2.1
admin
admin
Digicom
192.168.1.254
admin
Michelangelo
Huawei/SUN/ZTE
192.168.0.1
admin
admin
Samsung
192.168.0.1
admin
password
Telco Systems
192.168.0.1
telco
telco
Zcom
192.168.0.1
root
admin
Zyxel
192.168.1.1
admin
1234
Usually the router’s backside contains a sticker with the default username and password. If none of the preceding combinations work and/or you can’t find the aforementioned sticker, refer to the manufacturer’s website.
Next, you need to change the router’s default password into a stronger one. Remember the makings of a strong password: length, complexity, and not using a dictionary for inspiration.
When using Wi-Fi, make sure the strongest available encryption is in use. Navigate to your router console’s wireless page; it’s usually listed under Wireless LAN or something to that effect.
For your Wi-Fi encryption, you’ll probably have the choice of Wi-Fi Protected Access (WPA) protocol in its three incarnations. The original WPA aside, you have the ubiquitous WPA2 and, in the case of newer routers, the WPA3 of 2018. While WPA2 has vulnerabilities, it’s not practically obsolete like WPA. Always choose the latest possible version of this protocol.
Many older network devices also offer Wired Equivalent Privacy (WEP) as an option. This standard was introduced in 1999 and came originally with mere 64-bit key length. WEP was later bolstered with 128- and 256-bit key lengths, but it remains a compromised protocol you should avoid. If your hardware only offers you this method for your Wi-Fi security, it’s time to upgrade your routers.
Disable remote access and Universal Plug and Play. The last thing you want is someone outside of your network to administer your router settings. In some devices remote access might enabled by default. Use the console to untick the box on this feature which is usually listed simply under Remote Management or Remote MGMT. Another feature you should seriously consider disabling is Universal Plug and Play (uPnP) . For one, a router with uPnP enabled may offer a method for hackers to bypass your device’s firewall entirely.
Switch off Wi-Fi Protected Setup (WPS) as soon as you can. This feature exists to facilitate a quick one-button solution for setting up a wireless network. Aimed mostly at the less geeky users, WPS is actually a major security problem in many cases. The system is implemented using either a four-digit PIN code or a push-button-connect approach. The latter is very susceptible to brute-force attacks, while having a malicious actor on the premises of your router neutralizes the former’s effectiveness.
Get acquainted with network address translation (NAT) . This is a technique which takes a single public IP address and shares it with a multitude of connected devices using a router/firewall. For example, a router in a network might have the local IP of 192.168.1.1 and a public one of, say, 86.1.70.30 as assigned by your Internet service provider, visible for all the websites you or your employees visit using this setup. Now, under NAT the router will assign local IP addresses for any devices connected to it, for example, 192.168.1.2 for your desktop and 192.168.1.3 for your colleague’s tablet (see Figure 6-2). These IP addresses will remain clandestine from the public at large.
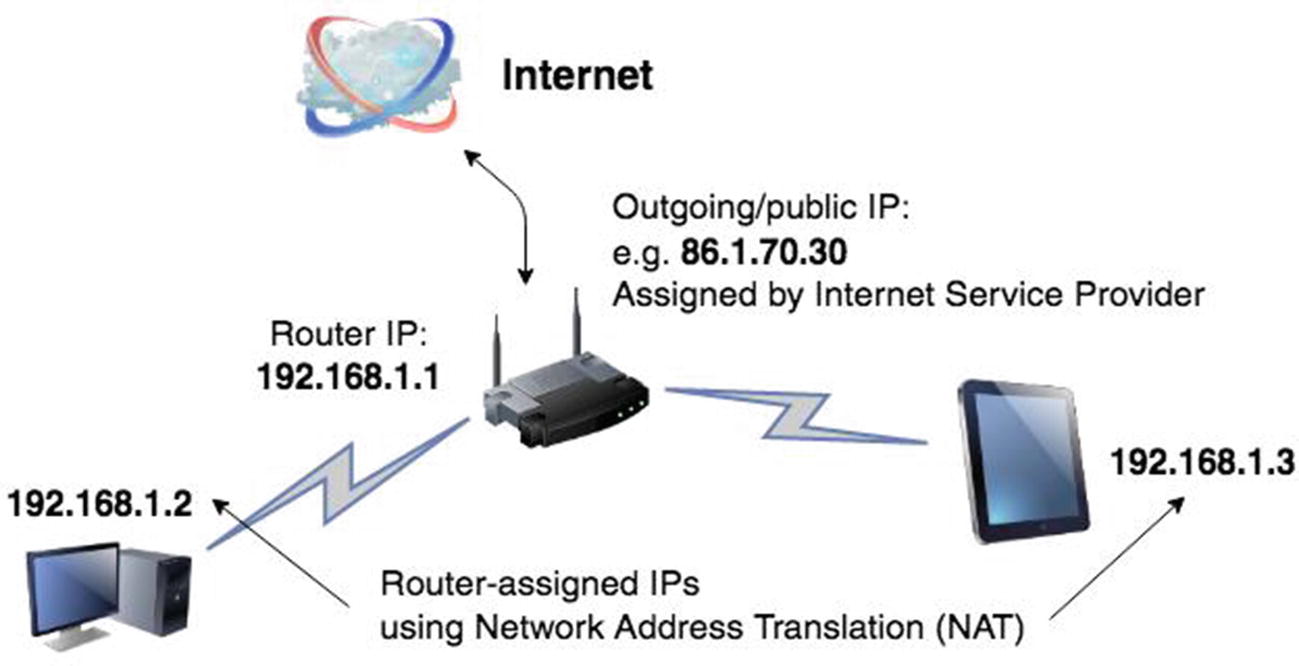
A simple local area network using the NAT technique
How to make sure your router is running on NAT? Make sure the device uses routing instead of bridging for its mode of operation. This is usually the default setting. With bridging, you lose NAT in exchange for somewhat faster traffic flow; this is generally not recommended.
Update your router’s firmware. The firmware in a router is a writeable chunk of nonvolatile memory which holds the device’s operating system. If you’re running your device on old firmware, chances are you’re either missing out on some good features or flat-out compromising your security. You’ll find the latest firmware updates on your router’s manufacturer’s website usually under Support ➤ Firmware.
Make MAC filtering your best friend. All networking devices, including routers and smartphones, have a unique media access control (MAC) address. It consists of six groups of hexadecimal values separated by colons and looks something like this: b8:66:4c:f4:3d:6c. For now, a MAC is allocated from a 48-bit address space. This allows for some 281 trillion unique strings and is designed to last us until 2080. A newer 64-bit implementation for MACs has been devised, but not yet widely adopted.
MAC filtering is a technique where only safe hardware, identified through their unique MAC addresses, is allowed to access a local area network. In other words, a MAC filter is a user-maintained whitelist which blocks everything except your trusted devices; you administer it usually from your router console under Wireless Settings or a similarly titled panel. Although a potentially arduous technique, using a MAC filter puts some major obstacles between malicious actors snooping on Wi-Fi and your network.
Unlike one might assume, MAC addresses are not an Apple-specific invention by any means; rather it is a universally embraced technology for all networking devices devised by Xerox Network Systems.
Become mysterious by concealing your wireless connection. Many routers offer the option of hiding the name of your wireless network or the service set identifier (SSID) . You should enable this feature. At the very least, change your Wi-Fi’s default name, as not doing this might inform your potential attackers of the make of your router, facilitating their nefarious activities.
Some devices allow you to set the broadcasting power of your router, usually donated in percentages. Try dropping that from 100% down to whichever amount still gets picked up by your devices.
Finally, lock up your routers in secure areas of your home or office to make physical access to them as difficult as possible. Only you and/or your trusted system administrators need to service them.
- Change your DNS settings. Like you may know, Domain Name Service (DNS) is a protocol which controls the translation of IP addresses, which devices like, into domain names, which humans tend to prefer (e.g., www.apress.com). While the default DNS settings (usually provided by one’s Internet service provider) work just fine, there are better alternatives out there. Many third-party DNS products offer faster data transmission and added security than their default counterparts; they often block malicious websites from loading altogether (see Table 6-2). Changing your DNS is simple and can be done either in router devices (recommended) or on a software level within an operating system.Table 6-2
Some popular third-party providers of DNS as of Q2 2020
DNS Provider
IP Addresses (Primary/Secondary)
Notes
Quad9.net
9.9.9.9, 149.112.112.112
Blocks malicious domains, collects anonymous usage and geolocation data, cooperates with IBM X-Force for state-of-the-art threat intelligence
Open DNS
Home: 208.67.222.222, 208.67.220.220
FamilyShield: 208.67.222.222, 208.67.220.220
Claims 100% uptime, FamilyShield DNS is preconfigured to block adult content
Google Public DNS
8.8.8.8, 8.8.4.4
Provides global coverage for a fast service to a worldwide clientele, collects user data
Verisign Public DNS
64.6.64.6, 64.6.65.6
Claims no user data is ever sold to 3rd parties
Consider investing in a hardware-based firewall for your organization. While usually overkill for home users, organizations and businesses shouldn’t spend a day online without a dedicated hardware firewall. While quite expensive, these units offer a plethora of benefits to software- or router-based solutions. Unlike their software-based brethren, hardware firewalls are online 24/7; they employ more sophisticated forms of traffic analysis and are generally more apt at detecting malicious activities. Configuring a single hardware unit instead of every individual computer running a software firewall saves a lot of time in business settings. Also, larger organizations depending solely on routers for blocking nefarious online elements often end up bottlenecking their data traffic. Many hardware firewalls also come with extensive support for virtual private networks, which are discussed next. This allows secure remote access by trusted employees, for one.
Popular manufacturers of business-oriented hardware firewall units include Netgear, Cisco, Juniper, Zyxel, and Netgate.
When configured correctly, the different varieties of firewalls aren’t usually mutually exclusive. Even with a hardware firewall guarding your network, you should have a secondary system in place. Popular operating systems all have their built-in software firewalls in 2020. A reliable third-party software-based solution should also do the trick. We’ll discuss some of these later in this chapter.
IPv6
IPv4 is slowly being superseded by IPv6, a 128-bit specification with approximately 340 undecillion (i.e., 340 followed by a whopping 36 zeros) unique IP addresses. This should last us a while, unless we somehow colonize numerous other planets in the very near future and the colonists breed on them rather uncontrollably.
IPv6 looks something like this: 09f7:9cd0:0ed0:1538:0000:0000:7360:0090. Compared to the quaint dot-separated four-octet notation of IPv4, this may seem rather intimidating to us humans. However, we can at least remove all leading zeros from IPv6 addresses, changing our example earlier to 9f7:9cd0:ed0:1538:::7360:90. That’s slightly more memorable.
During 2020, around 25–30% of the Internet was provided in IPv6 (Internet Society, 2020). These numbers are in flux due to the still somewhat maturing technology. Organizations and individuals have been increasingly provided with IPv6 support in both network devices and operating systems since 1998. Dating back to Windows Vista, Microsoft began offering IPv6 support out of the box, while on the Apple side of town, the 2011 release of MacOS 10.7 Lion saw the same for Mac users. Many modern Linux distributions, too, work beautifully with the new protocol.
How soon the new protocol becomes omnipresent is down to providers of online services. So far, some big players, including Google, AT&T, and Facebook, have been involved in promoting the joys of IPv6 to the masses. Thousands of major ISPs and web-based companies vowed to enable IPv6 support permanently on the World IPv6 Launch Event, organized by the Internet Society, in June of 2012.
IP Security (IPsec). This is an important feature and built right into the IPv6 protocol. Although available for IPv4, data sent using IPsec with this older protocol was sometimes blocked by firewalls, due to malware being capable of piggybacking on these data packets. Not so much with IPv6 IPsec.
Speed. Due to IPv6 not needing any network address translation (NAT), data communications over IPv6 tend to be less congested. As a result, your Internet traffic may feel slightly snappier, at least when using a fully IPv6-compliant Internet service provider (ISP).
Facilitating Internet of Things (IoT). With IPv4, getting IoT devices (e.g., smartphones and wearable gadgets) communicating with each other is sometimes a chore. This is usually attributable to the use of NAT. With IPv6, addressing devices in the IoT realm becomes a more secure and streamlined process.
Virtual Private Network (VPN)
There’s a pretty safe way to transmit data even in the virtual wild west of the Internet: this is known as a virtual private network (VPN) . A connection secured with this approach is called a tunnel. In an ideal situation, no outside actor, be they scammers or governments, can snoop in on VPN traffic. Secure virtual private networks use various varieties of tunneling protocols for their encryption. Basically, the transmitted data is repackaged, thus being secured even when sent over public networks. Popular tunneling protocols include the aging, but fast Point-to-Point Tunneling Protocol (PPTP) and OpenVPN, a modern and robust protocol available for all popular operating systems. The latter is also capable of passing through most firewalls which are sometimes configured to block VPN access. OpenVPN is open source with a free Community Edition and a paid Access Server version which provides additional features.
In theory VPNs are never a bad idea. There are some issues, however, when it comes to states with less than amazing human rights records spying on their VPN-powered citizens. Many paid providers of these services maintain more or less thorough logs of their users’ activities. A government opposed to specific opinions might demand access to these logs disposing of the element of anonymity from the proceedings altogether.
On the whole the benefits of implementing a VPN into your online life outweigh the drawbacks. Even casual browsers benefit from the added security it provides when using public Wi-Fi connections around cafés and other establishments; such unsecured traffic can be eavesdropped on rather trivially. Casual browsers aside, this is also important for both political activists and businesspeople having their morning latte with Wi-Fi. For a less critical purpose, VPNs can be harnessed to sidestep geo-blocking in which a service, such as Netflix, limits geographic regions a user is trying to connect from.
A kill switch in the context of virtual private networks refers to an automated process of shutting down a secure tunnel if the system detects a breach or simply malfunctions.
Some popular providers of virtual private networks as of Q2 2020. The pricing presented is an approximation subject to some fluctuation
Product | Cost | Features |
|---|---|---|
Nord VPN | From 3.50 USD per month for a three-year plan | A promise of a “strict no logging policy,” kill switch, secures up to six devices, over 5500 servers |
Mullvad VPN | 5 USD per month | Easy setup, open source, over 500 servers |
Express VPN | 7.50 USD per month for a 12-month plan | Over 3000 servers in 94 countries, 24/7 tech support, immune to Google and YouTube, etc. geo-blocking |
Hotspot Shield | 3 USD per month for a three-year plan | Over 3200 servers, 24/7 tech support |
Setting Up a VPN for Windows
Access Settings. Navigate to Network & Internet.
Select “VPN”. Click Add a VPN connection. This will take you to a settings screen.
Choose “VPN Provider”. Select the option Windows (built-in).
Fill in the Connection name. You should give your VPN connection a title which makes sense, as in it reflects the name of the actual VPN provider (e.g., Nord VPN).
Fill in the Server name or address. These details will be issued by your VPN service. Generally, this is presented in the form of a URL, for example, apress-is.thebest.com.
Select a VPN protocol. Out of the several protocols available, pick the one supported by your VPN provider (e.g., PPTP).
Navigate to the drop-down menu labeled Type of sign-in info. In most cases you’ll be entering your username and password, as issued by your VPN provider, into the associated fields.
Click Save. Go back to Network & Internet settings. Choose your new VPN connection and click Connect. You should now be able to go online using a secure virtual private network.
VPN in MacOS
Navigate to System Preferences. You can do this by clicking the Apple logo found on the top-left part of the screen.
Select Network. A new window will appear. Click the plus sign (+) on the bottom-left part of this window.
Choose “VPN” from the list of options. Also select the type of VPN your provider has issued you with.
Click Create. Enter a meaningful and/or memorable service name.
Fill in the Server Address. This can be in the form of a URL or an IP address.
Enter your account name. Your account name is provided by the vendor of the VPN.
Click Authentication Settings. Enter the type of encryption method which your VPN provider supports.
Select User Authentication. Usually you will need to choose the option of Password. Follow this up by selecting the type of Machine Authentication your VPN provider offers. In many cases it’ll be Shared Secret. Click Ok.
Click Advanced. Tick the checkbox on Send all traffic over VPN connection in Options.
Click Ok, Apply, and Connect.
VPN in Ubuntu Linux
Make an account with the VPN provider of your choosing. They should provide configuration files for Linux on their website (with the file extension of .ovpn); for example, Nord VPN offers theirs at https://nordvpn.com/ovpn.
Download and install Ubuntu OpenVPN packages. Open a Terminal window and type in the following: sudo apt-get install network-manager-openvpn-gnome.
Click the NetworkManager icon in Ubuntu. Navigate to VPN Off ➤ VPN Settings ➤ VPN. Click the plus (+) button next to VPN.
Select OpenVPN in the dialog window for Add VPN. If this option is not visible, restart your computer and try again.
Click Import from file. Navigate to the folder where you downloaded the .ovpn-files into. Double-click these files.
A window title Add a VPN will appear prepopulated with server information. Enter your username and password into the appropriate fields.
Navigate back to NetworkManager. Select the VPN server you wish to connect to.
Safe Emailing with OpenPGP
A secure cryptographic system needs secure communications with the outside world. Touted as “the most widely used email encryption standard,” implementations of OpenPGP do have a good track record of securing communications in the digital era. OpenPGP is maintained by the OpenPGP Working Group of the Internet Engineering Task Force (IETF) , an open standards organization founded in 1986. OpenPGP itself was standardized in 1997. Originally, the IETF was supported by the US federal government. Since 1993 the organization has developed standards under the aegis of the Internet Society, which in turn is a global nonprofit organization.
Several implementations of this public-key solution are available for Windows, MacOS, Linux, Android, and iOS. The current OpenPGP specification (i.e., RFC 4880) names numerous robust algorithms such as ElGamal, RSA, and AES in several varieties of strength.
Some varieties of OpenPGP implementations as of Q2 2020
Product | Platform(s) | Cost | URL |
|---|---|---|---|
Canary Mail | MacOS & iOS | MacOS 20 USD, iOS 10 USD | |
Flowcrypt for Gmail | Extension for Firefox & Chrome, app for Android | None for limited version, 5 USD a month for advanced version | flowcrypt.com |
GPG Suite | MacOS | Free (25 USD for extended support plan for GPG Mail) | gpgtools.org |
GPG4Win | Windows | Free | |
Enigmail for Mozilla Thunderbird | MacOS, Windows, Linux | Free | enigmail.net |
Pretty Easy Privacy | Windows Outlook extension, Android | 20 USD for Outlook (5 devices per license), 3 USD for Android |
Draft Begone! Securing Windows
In this section, we will review how to build the most secure Windows-based system from the ground up. We’ll be focusing on the latest iteration of the operating system, Windows 10, since support for version 7 was phased out in January 2020 and its follow-up Windows 8.1 will be joining it soon enough.
Windows-Security Musts
Download and install every critical/security update offered by Windows Update. You can access the Windows Update in Settings under Update and Security. Windows is usually more than happy to have you restart your computer after an update to fully install it. Do so, too, without hesitation.
Make sure the Windows Defender Firewall is enabled. This feature should be enabled out of the box on Windows 10. To confirm this, navigate to Control Panel ➤ System and Security ➤ Windows Defender Firewall. Click Turn Windows Defender Firewall on or off. Whenever this firewall is triggered by suspicious-sounding programs, it’s usually best to select Cancel in the ensuing prompt.
Keep your Microsoft Defender running and up to date. This is a free anti-malware software package shipped with every copy of Windows 10. Although its ability to detect malicious software was modest at first, since 2016 or so it has turned out to be a very useful addition to your security stack providing robust real-time threat scanning. The software also integrates with Microsoft browsers (i.e., Internet Explorer and Microsoft Edge) and also provides automatic scans of files downloaded with other non-Microsoft browsers. Microsoft Defender was called Windows Defender prior to a late 2019 update.
A Bit More on BitLocker
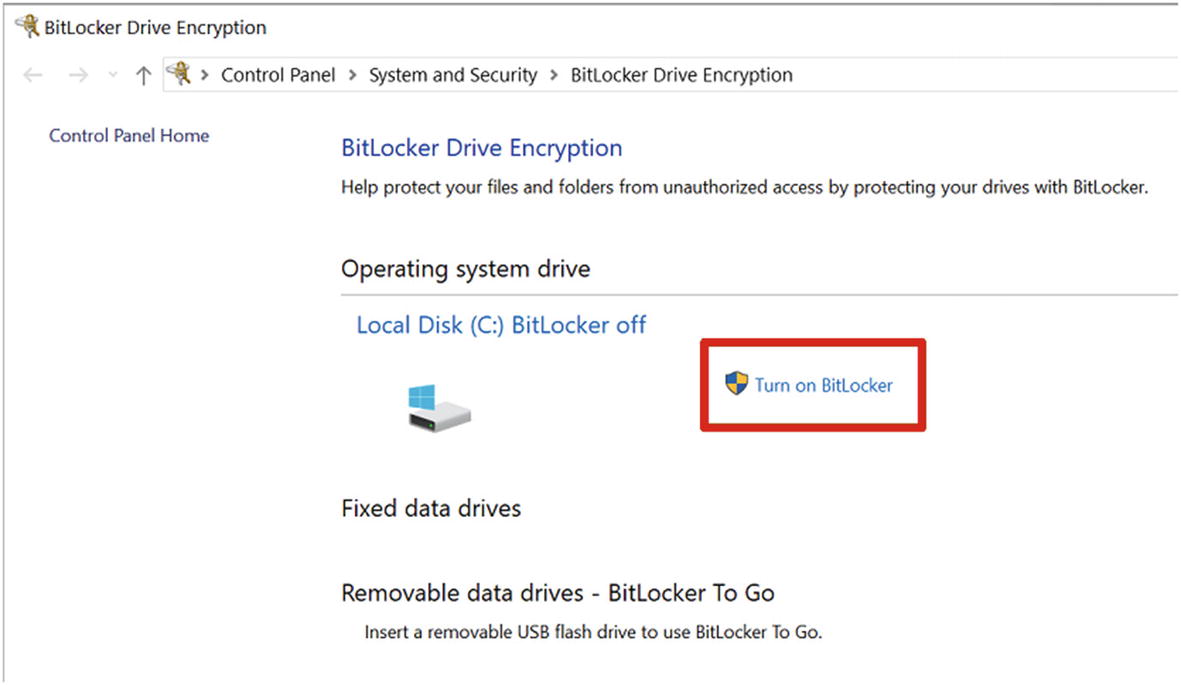
The Windows 10 BitLocker setting
Please refer to Chapter 4 for a refresher on the basic implementation of BitLocker.
Now, elaborating on more advanced features of BitLocker, we’ll get more in depth with some additional security measures on offer such as Trusted Platform Modules (TPMs) . Like you may remember, these are types of hardware-based cryptoprocessors which can greatly enhance the security of your system. Often built-in into a computer’s motherboard, these devices aren’t always switched on by default. Windows 10 manages TPM chips on autopilot, making their manual configuration unnecessary in some cases.
Most computers marketed as enterprise or business class have built-in TPM-devices out of the box. Cheaper PCs might contain a socket for these devices, but you may have to purchase and install the chip yourself. Some older consumer PCs in particular offer no support for TPMs of any kind. Pay attention to the product specifications.
BIOS, UEFI, and TPM

A BIOS screen on a typical Windows PC of the late 1990s
In these older systems, you can usually enter BIOS settings by holding down either the delete or F2 key. Navigate to the page mentioning TPM and set it to “enabled”.
Now, the closer we got to 2010, the more PC’s came out equipped with technology known as Unified Extensible Firmware Interface (UEFI) .
Apple made a switch from an Open Firmware BIOS equivalent to an implementation of EFI when swapping PowerPC processors in their products to their Intel-manufactured counterparts. The process took place between late 2005 and early 2006. As of 2020 all new Macs still use Intel CPUs.
A replacement for BIOS, a UEFI served the same purpose but offered more features, improved boot-up speed, and additional security features. For one, a UEFI-equipped computer is immune against many of the threats BIOS had as a feature called secure boot mitigates a lot of them. However, a UEFI makes installation of other operating systems than what a computer came shipped with a tad inconvenient. Still, if given a choice of either an older, BIOS-equipped PC or one with UEFI, the latter is a far better bet from a security standpoint. Again, you should make sure your UEFI-equipped computer has its TPM setting on “enabled” at all times; it may or may not default to this setting out of the box.
TPM 1.2 vs. 2.0
There are two important revisions of TPM technology: versions 1.2 and 2.0. The former only supports the RSA algorithm with the SHA-1 hashing technique. Many industry professionals are therefore steering clear from TPM version 1.0 due to these limitations; it’s recommended you do too. For one, version 2.0 has support for the mighty AES up to its most robust 256-bit variety. It also supports such hashing algorithms as SHA-384, SHA-512, and even the most rugged varieties of the SHA-3 family. Using TPM 2.0 simply makes sense. However, not all TPM-devices are built equal and the algorithms they support may vary. Again, read the specs before investing in a computer.
A Fresh Start: Resetting a TPM
Some scenarios exist which justify resetting a TPM-device (i.e., deleting the passwords contained within one). The strongest case for this is when one is reinstalling the operating system. On occasion Windows Defender might prompt you to clear the TPM as well. Remember, Windows 10 will automatically take control of the cleared TPM once reinstalled and fill it with data that needs to be there. Before resetting a TPM-device, make sure you have backups of your passwords and other related information; it can’t be retrieved after a reset.
This process is quite simple for Windows 10. Navigate to Settings ➤ Update & Security ➤ Windows Security ➤ Device security. Click Security Processor Details. Next, select Security Device Troubleshooting. Finally, click Clear TPM. You’ll be asked to restart the computer. Do so, and Windows will rebuild the data on your TPM on its next launch.
You might have the option of using non-Microsoft drivers for your TPM. This might prove to be an issue at some point; it’s best to stick with certified Windows-based drivers. Also, with Windows 10 it’s better to not utilize any TPM-clearing function found in the UEFI interface. Rather, let the operating system take care of that.
A Nice, Ripe Stick of USB, Please
Like discussed in Chapter 4, BitLocker can be configured to utilize a USB-stick in case a TPM isn’t available – and even when it is. This is a fine additional countermeasure against malicious actors not in possession of said stick and one that’s easy to implement. In BitLocker parlance, this is known as the USB Key Mode, and as previously mentioned, it can be combined with a password, a TPM, or both. While the option for relying solely on a USB device is available, this is not a recommended approach. Have you ever lost a memory-stick or two? That’s why. Again, whenever feasible, secure your BitLocker equipped with every means available.
Utilizing a USB device in conjunction with BitLocker requires a computer with a BIOS/UEFI which supports booting up from USB. These days that is pretty much the norm. Your mileage with older computers may vary significantly.
Minding Your MacOS
Moving on to the Apple ecosystem, you should be aware that all varieties of MacOS since version 10.7 (Lion) come built-in with a great encryption solution in the form of FileVault 2. As with other closed-source solution, it may or may not come with corporate/government backdoors. As a Mac user, your best bet is to at least enhance your system’s security by applying a second layer of encryption in the form of file containers. For this, the 100% open source VeraCrypt is probably your best choice; like FileVault 2 it supports all versions of MacOS since version 10.7. There are other choices for your MacOS-related cryptographic solutions. We’ll go in depth with these soon. But first, let’s review some basic security measures every Mac user should be aware of at all times.
MacOS-Security Musts
Install updates without delay. When you get the prompt to update, do it immediately. Updates aren’t just a bunch of pretty new emoticons; an unpatched, vulnerable system can be potentially compromised in seconds. Also, restart your Mac to complete the installation process without delay.
Enable the MacOS application firewall. This feature is usually not switched on by default. Navigate to System Preferences ➤ Security & Privacy ➤ Firewall. Click the lock in the bottom left of the window and enter your system password. Proceed to click Enable Firewall. You should also click Firewall Options and tick the box next to Enable Stealth Mode to make your system slightly harder to find for the numerous malicious actors out there. This setting won’t make a world of a difference if you are behind a firewalled router but it can’t hurt.
- Limit sharing. Your Mac is willing to communicate with the outside world through numerous avenues. From a security point of view, it’s a wise move to limit these communications to a bare minimum. Visit System Preferences ➤ Sharing and you’ll get to choose which forms of data your computer gets to share (see Figure 6-5). Under many scenarios, you can simply untick all of the boxes; of most critical scrutiny should be Remote Management and Remote Login.
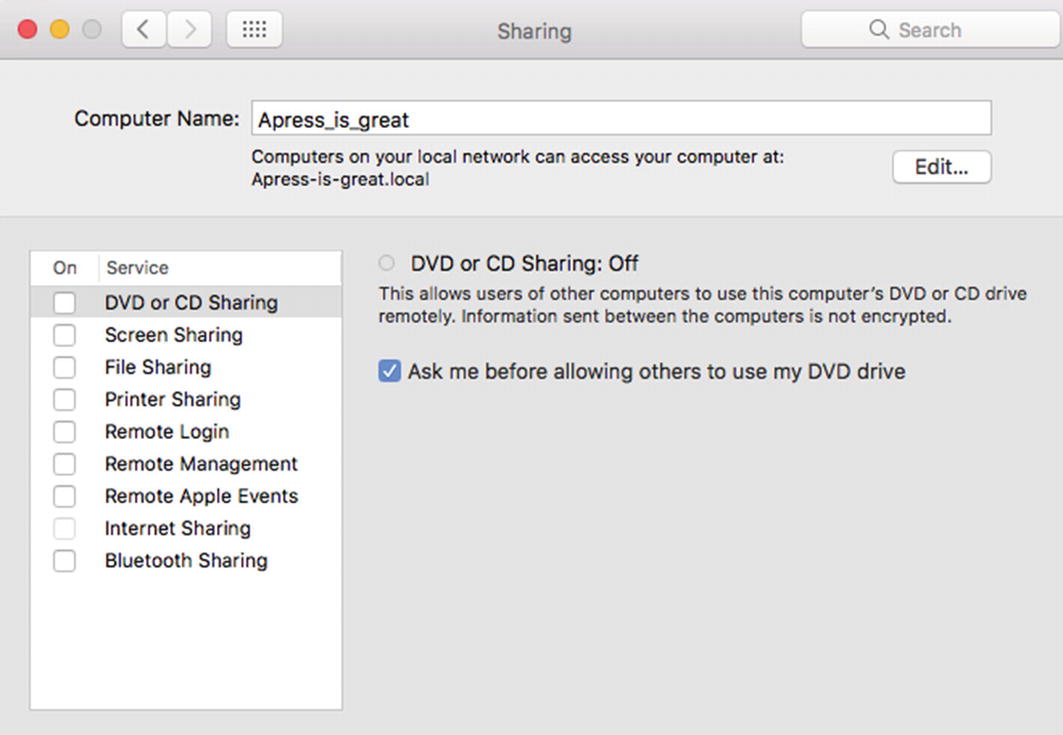 Figure 6-5
The MacOS sharing settings screen
Review your Gatekeeper settings. Since MacOS 10.7 (Lion), Apple has included a security feature called Gatekeeper in its operating systems. This is a relatively solid tool for blocking many varieties of malicious software from executing on one’s system. Now, as of MacOS 10.12 (Sierra), there are only two settings for Gatekeeper: either allowing the execution of software downloaded from the Apple App Store or both from the App Store and (Apple) Identified Developers. For maximum security it’s a good idea to only trust software which originates from the App Store. If you’re on a Mac with an older operating system (e.g., MacOS 10.11 “El Capitan” or earlier), you will also see a third Gatekeeper option: allow apps downloaded from anywhere. You should never enable this setting. To review your Gatekeeper settings, navigate to System Preferences ➤ Security & Privacy ➤ General.
Create a nonadministrator account for trivial use. Administrators are great and necessary people, but an administrator’s account falling into the wrong hands can be a disaster. Therefore, it makes sense to have a secondary account without administrator privileges. For this, you should navigate to Users & Groups in your Mac’s System Preferences. Also, make sure to disable automatic login from Login Options (see Figure 6-6).

The MacOS user settings screen. Note Login Options in the bottom left
T2, Judgment Chip: TPM, Apple Style
With the release of the mighty 2017 iMac Pro, Apple has been including a hybrid TPM/accelerator chip in many of their computers. The T2 chip is Apple’s second-generation custom microchip used for on-the-fly encryption and several other purposes. Its functions include dedicated audio management, webcam-related image processing, and cryptographic functions for one’s solid-state drive(s). The T2 runs on a discrete operating system known as BridgeOS with which the average user rarely needs to tamper with. Having a T2 in your Mac not only makes it more secure, but also slightly faster as quite a number of tasks are offloaded from the CPU onto this chip. The only downside is it’s pretty much impossible to recover data from a Mac with a failed T2 chip as the system is quite impenetrable.
All T2-equipped Macs are issued a Mac Unique ID (UID) and a Device Group ID (GID) during manufacturing. Both the UID and GID are tied to a particular device only. These strings are inaccessible by any software or hardware outside of their environment, which Apple calls the Secure Enclave. The UID and GID are used by the cryptographic engine in a T2 device. To the outside world, this engine shows only the results of its encryption or decryption operations. Not even Apple or their suppliers can later access the UID contents directly. This is the first layer of security in a T2 chip.
Now, when FileVault is enabled in MacOS, your SSD-drives are quite safe from prying eyes combined with Apple’s custom chip. The T2 chip’s cryptographic functions operate under FileVault using the rock-solid AES-256 algorithm using the XTS operating mode as discussed in Chapter 4. As the encryption/decryption process is also completely offloaded onto Apple’s custom chip, there is no longer any additional speed penalty to any of your solid-state disks. Even when FileVault is disabled on a T2-equipped Mac, the SSDs in the system remain encrypted. However, they are then only protected by the hardware UID. As all the drives are subjected to encryption in every case, switching FileVault on later isn’t a time-consuming process and is highly recommended for the extra layer of security it provides.
Desktops: iMac Pro (2017), Mac Mini (2018), Mac Pro (2019), and presumably later models
Laptops: MacBook Air (2018), MacBook Pro (2018), and later models
Not sure if a particular Mac has the T2 chip or just feel like perusing some information concerning one? Open About this Mac and click System Report. Select the Hardware tab. If it has a subtab called Controller also mentioning the chip, you’re in luck.
T2 Maintenance 101
As with traditional TPM modules, issues may turn up which might require you to refresh your T2 chip settings. Apple has integrated its System Management Controller (SMC) within the T2; therefore, if your computer has sudden issues with its cooling fans, external ports, or power management, a reset of the SMC might be in order. We’ll now review the procedure for newer T2-equipped Macs.
For your Apple desktop, first shut your computer down. Disconnect its power lead for 15 seconds. After this reconnect the power lead and wait for five seconds. Finally, press the power button like you normally would to start up your Mac.
As for T2-equipped Apple laptops, the process to reset the chip is a tad more complex. First, shut down your MacBook. Then press and hold the right Shift, left Option, and left Control keys for at least seven seconds. Continue by holding those keys while you also press and hold the power button for yet another seven seconds. Now, release the keys and the power button, wait for a couple of seconds, and finally just power up the laptop.
Security Software for Mac
AppCrypt by Cisdem (30/45 USD for a lifetime home/business license)
A tool catered perfectly not just for worried parents but also for the organizational clientele, AppCrypt works to block specific websites. Bid farewell to your employees wasting time on Facebook and Twitter with this Mac-specific solution. In addition to websites, you also get to prohibit the use of specific applications you’re not particularly fond of, such as games and other time-consumers, with the use of a master password only you should be aware of. AppCrypt makes it somewhat hard to circumvent its blocking prowess by forcing said master password on MacOS System Preferences, Terminal, Activity Monitor, and Console.
AppCrypt has scheduling functionality, so you can set the exact date and time to lift your app usage bans. This feature won’t work for website blocking, however. AppCrypt is available for MacOS versions 10.10 (Yosemite) or newer.
Discover AppCrypt here and download a demo version: www.cisdem.com/appcrypt-mac.html.
Encrypto by MacPaw
Sometimes just a few of your files need that extra layer of security. Encrypto is a nifty and free solution for securing your individual files and folders on the MacOS. Relying on the 256-bit variety of AES, it offers without a doubt robust cryptographic capabilities. Not only that, you can share your encrypted files with Windows users, as Encrypto is also available for Microsoft’s range of operating systems starting from Windows XP. On a Mac the software also allows for easy integration into your OS with an additional Share button that’s there for sending your files over to iMessages or AirDrop. Support for decrypting .crypt-files in iOS devices is lacking as of early 2020.
The program features a clean, user-friendly graphical user interface so no typing into terminal windows is needed to create a very secure file container with a .crypto extension. By simply dragging and dropping a file into the program window and entering a password is all it takes.
Download Encrypto here: https://macpaw.com/encrypto.
Staying Safer in Linux
Now it’s time to take a deeper look into the Linux side of things. Although we took a glance at a few cryptographic solutions for this great operating system in Chapter 3, it’s time to review a couple more popular pieces of security software for this fine operating system.
CryFS
Offering pretty much a complete cryptographic solution, CryFS is a wonderful piece of open source software for most distributions of Linux. Not only does it protect local data on your computer, but it can also be harnessed for cloud-based services, such as DropBox. CryFS makes sure only encrypted data leaves your system. This encompasses not only your files and directories, but metadata (including file size information) as well.
The encryption approach in CryFS actually consists of a double-layer process. First, it uses the most robust algorithm we currently have, the AES-256, for an external layer. After this the user can choose to implement a different encryption scheme for an inner layer. Both of these layers share the password given by the user. A truly unique solution, CryFS is highly recommended for more advanced cryptographers looking for the current state of the art in Linux security.
Let’s now go through the basic steps of getting CryFS running on your Linux distribution, shall we?
- 1.
Installation of CryFS for Ubuntu and Debian is simple. Just enter the following into a terminal window: $ sudo apt install cryfs
- 2.
Next we create two new directories with CryFS. Type in the following: $ cryfs realdir virtdir. You can naturally choose whatever names you want for both of these. The latter (i.e., virtdir in our example) is the name for a virtual, encrypted directory which is managed in the background by the CryFS system. The program will ask for specific settings when making these directories; it’s okay to go with the defaults.
- 3.
You can now operate with this CryFS virtual directory to store, modify, and delete any data you wish in a very secure environment. Simply use the cd command to enter the encrypted portion by typing $ cd virtdir. The actual data will be stored and encrypted by CryFS in the first directory we specified (i.e., realdir) at all times.
- 4.
Unmounting an encrypted CryFS partition is simple. Just enter $ cryfs-unmount virtdir (or whichever name you chose for the virtual directory).
Discover CryFS here: www.cryfs.org.
CryFS is also available for Windows. However, this version is only supported to an experimental degree. See the project website for installation instructions and proceed with caution; it’s best to use other Windows-based cryptographic solutions as of Q2 2020.
FireStarter
Nearly all Linux distributions come with iptables, a piece of software which functions as a firewall. Being a command-line utility, it can be hard to grasp by beginners and can actually cause major issues with security and connectivity if poorly configured. Luckily graphical user interfaces for this vital part of Linux security do exist. One of the more established ones is FireStarter , a free and intuitive firewall interface which works great for the less experienced users.
Download FireStarter here: http://sourceforge.net/projects/firestarter.
You vs. Malware
As discussed previously, nothing can cripple even the most well-encrypted system faster than a dose of potent malware. We’ll now delve into this issue in detail, presenting some of the best solutions against even the most ingenious varieties of malicious software in Windows-, MacOS-, or Linux-based environments.
Contrary to a somewhat popular belief, there are in fact a plethora of well-established free anti-malware software suites for your immediate download. We’ll now go more in depth with some of these solutions. However, corporations and smaller organizations love their commercial anti-malware licenses. And this is for a reason; these usually provide better support, features, and in some cases, less strain on one’s hardware. We’ll also explore the world of paid security software, focusing only on solutions with the best features and minimal hits on performance.
Avast Antivirus by Avast
One of the most popular anti-malware solutions on the market, Avast products are available for Windows, MacOS, Linux, Android, and iOS. Their free antivirus tool provides solid protection against malware of all types as well as scanning for threats on Wi-Fi. The only downside in the suite is the inclusion of a touch of advertisement.
The available varieties of Avast solutions for businesses in Q2 2020. The pricing presented is an approximation subject to some fluctuation
License | Cost Per Annum Per Computer | Main Selling Points |
|---|---|---|
Antivirus | 30 USD | Automatic signature updates, Avast Firewall, CyberCapture file analysis of suspicious programs |
Antivirus Pro | 40 USD | Secure file shredder, Microsoft SharePoint and Exchange (email) security |
Antivirus Pro Plus | 50 USD | Webcam protection, additional password security |
Download Avast Antivirus for free: www.avast.com.
Avira Antivirus by Avira Operations GmbH & Co
With its roots in 1986 Germany, Avira is a long-standing antiviral product of a very high caliber. Some coming in both free and paid versions, Avira offerings are a sturdy, well-received line of products available for multiple platforms. Unfortunately, support for Linux was dropped in 2013.
Avira claims their anti-malware software is among the most lightweight (i.e., easiest on a device’s hardware). In addition, their offerings have received numerous awards in several categories over the years. The company also insists that they are unwilling to sell your information to any third parties. To their credit Germany does have a good recent track record of protecting the privacy of its citizens and the users of information systems in general. This is in part due to historical reasons.
A zero-day vulnerability is a flaw in any piece of software which may or may not be known to its creators but remains unfixed for the time being. Usually, this is due to time constraints and will be addressed more or less swiftly in the form of an update. However, malicious actors can cause a lot of damage to the users of software with these types of vulnerabilities.
The available main varieties of Avira products in Q2 2020. The pricing presented is an approximation subject to some fluctuation
Solution | Cost Per Annum | Main Selling Points |
|---|---|---|
Free Antivirus | n/a | Robust protection against most types of malware and malicious websites |
Antivirus Pro | 40 USD | Customer support, email attachment, and USB-device scanning, ad-free |
Free Security Suite | n/a | Includes free antivirus, system speedup, VPN (500 MB/month), Software Updater, and seven other programs |
Internet Security Suite | 50 USD | Automatic software updates, advanced ransomware protection, customer support |
Avira Prime | 115 USD | Computer speed optimization components, support for up to five devices, premium apps for iOS and Android |
Antivirus Pro Business Edition | 30 USD | Avira Protection Cloud, AI-based zero-day vulnerability –protection, ransomware protection |
Antivirus for Endpoint | 120 USD | File server protection, content filtering policies |
Antivirus for Small Business | 180 USD | Additional email security, email receiver protection, Microsoft Exchange security |
Download Avira Antivirus for free: www.avira.com.
Bitdefender Antivirus
The main varieties of Bitdefender products in Q2 2020. The pricing presented is an approximation subject to some fluctuation
Product | Cost (Per First Year) | Platform | Main Selling Points |
|---|---|---|---|
Antivirus Plus 2020 | 30 USD for 3 computers | Windows | Multilayer ransomware protection |
Internet Security 2020 | 40 USD for 3 computers | Windows | Parental controls |
Total Security 2020 | 45 USD for 5 computers | Windows, MacOS, iOS, Android | Support for three additional platforms, operating system-optimization tools |
Explore Bitdefender’s range of products here: www.bitdefender.com.
SpyBot – Search and Destroy by Safer-Networking Ltd
Bursting to the scene all the way back in 1999, SpyBot is a popular and effective countermeasure against malicious software of most varieties for Microsoft Windows operating systems. In addition to its anti-malware tools, the software offers fine anti-rootkit capabilities. The latter come in two varieties, namely, “quick scan” and “deep scan.” Like its name states, the former is a fast but somewhat limited type of system analysis. The latter, while more robust, can take anything between half an hour to several hours per your average computer as SpyBot scours hard drives and Windows registries rather vigorously. Unfortunately, the program can occasionally prompt you with more false alarms (i.e., harmless software is appearing as something malicious) than other anti-malware software.
Other functionality offered by SpyBot includes “immunization,” a type of preemptive measure against specific vulnerabilities found in Windows and in some of its most popular Internet browsers (e.g., Internet Explorer, Firefox, and Opera). This feature simply blocks your system’s access to known malicious websites. Immunizing Windows with SpyBot usually takes only a few seconds and is highly recommended.
The available varieties of SpyBot – Search and Destroy in Q2 2020. The pricing presented is an approximation subject to some fluctuation
License | Cost Per Annum | Main Selling Points |
|---|---|---|
Free | n/a | Anti-spyware, system immunization, rootkit scan |
Home | 15 USD | Automatic signature updates |
Professional | 25 USD | Secure file shredder, system registry repair, command-line tools |
Corporate | 35 USD per device | Customized feature set according to the needs of the business |
Technician | 55 USD | FileAlyzer file analysis including hex data viewing and editing capabilities |
Download SpyBot – Search and Destroy for free: www.safer-networking.org/products.
TDSS Killer and Virus Removal Tool 2015 by Kaspersky Lab
Founded in 1997 in Moscow, Kaspersky Lab is a well-respected actor in the business of anti-malware software solutions. Just to be on the safe side, the US Department of Homeland Security banned the use of Kaspersky products in all US government departments as of 2017. This move is likely to have been an overreaction as Kaspersky products consistently score very well in many independent security experts’ tests.
Download TDSS Killer for free: https://usa.kaspersky.com/downloads/tdsskiller.
Download Virus Removal Tool 2015 for free: https://support.kaspersky.com/8527.
TDSS, also known as Alurion, was the second most active rootkit in the world in 2010. The program did/does its best to disable all anti-malware solutions on a system and gather sensitive data such as credit card numbers and online credentials.
Stinger by McAfee
Download Stinger for free: www.mcafee.com/enterprise/en-us/downloads/free-tools/stinger.html.
In Closing
What BIOS and UEFI refer to and how they differ
The best practices for securing a modern operating system
How to implement proper router security policies, including Wi-Fi security
How virtual private networks (VPNs) benefit you and your organization
Which anti-malware software suites are out there for Windows, Linux, and MacOS in 2020
In the next chapter we’ll be taking a breather from the technical side of things and explore the many fascinating legal aspects surrounding cryptography. For one, did you know being in possession of any type of encrypted material in select countries may in itself constitute a crime? Read all about it in Chapter 7!
References
Internet Society (2020): Measurement activities of IPv6 deployment. Retrieved from: www.worldipv6launch.org/measurements