
1.3. Open Directory
Open Directory is the network directory services implementation that is native to Mac OS X. Mac OS X Server leverages a number of open source products with a little bit of Apple's special sauce to form Open Directory. Open Directory provides client systems with a centralized location for accounts, passwords, mount points, and the like.
Like the FSMO (Flexible Single Master of Operation) roles in Active Directory, Open Directory is made up of a number of parts. Open Directory utilizes LDAPv3 to store data, Kerberos to provide single sign-on, Apple Password Server to securely store passwords, and SASL (Simple Authentication and Security Layer) to provide authentication integration with other services.. Each of these components is accessible using standard protocols, and each can therefore be integrated with other standard directory services such as Active Directory and Novell's eDirectory, typically using what is commonly referred to as a triangle topology. In the most common triangle configuration, the three points of the triangle are represented by the client system, Apple's Open Directory, and Active Directory. In such a setup, Active Directory is used for authentication, while Open Directory provides management capabilities. As an alternative to a triangle setup, augmented records can be used to virtually extend a single service's capabilities. A triangle is most useful when not all of the attributes needed by Mac OS X for policy management are available by the primary directory service (the NFSHomeDirectory attribute, for example).
1.3.1. LDAP
A directory is a logically grouped collection of objects with attributes organized in a hierarchical fashion. LDAP directories can track anything from users and groups to computers, printers, and mount points on servers. The LDAP implementation for Mac OS X Server is slapd. The slapd process uses a number of schema files, located in the directory /etc/openldap/schema, to define the structure of the directory services database. These schema files include the object classes and attributes that the LDAP server presents to LDAP clients. Attributes are the same as those located in property list files, as noted earlier in this chapter. An ObjectClass is a set of attributes.
New schema files can be added, thus extending the functionality of LDAP and therefore Open Directory. Schema files can also be augmented to include new attributes. When you enhance the metadata stored for objects in LDAP, it is therefore typically referred to as extending the schema.
1.3.2. Kerberos
Kerberos is the gold standard with regard to single sign-on. Active Directory, Open Directory, and a variety of other solutions use Kerberos. Mac OS X clients also run a Kerberos server to secure peer-to-peer networks. With Kerberos, users and servers verify one another's identity, which helps to prevent a number of sophisticated (and some not so sophisticated) exploits when users are attempting to authenticate to services.
Kerberos makes use of a Key Distribution Center (KDC) that consists of two parts, an Authentication Server (AS) and a Ticket Granting Server (TGS). Kerberos works through the use of tickets and principals. A ticket is a session-based key that is used to obtain various service principals to provide access to a respective service. The KDC maintains a database of three types of principals: user; host; and service. These principals are sensitive, shared only between the KDC and the device, service, or user that corresponds to the principal. Upon requesting access to a particular Server Service (SS), say file services over AFP (Apple Filing Protocol), the user must first obtain what is referred to as a Ticket Granting Ticket (TGT). The TGT is obtained by properly authenticating with the Authentication Server. Once a user has a TGT, it can be presented to the TGS to obtain service tickets; in this case a user would request the afpserver service ticket. Once the user is granted this ticket from the TGS, the ticket is presented to the afpserver, which validates the ticket and the session. Assuming no problems are found, the server then grants the user access to the service. The ability to provide the TGT proves an entity's identity. By default, the TGT has a lifetime of 10 hours, which can be renewed without re-authenticating. Once the ticket has expired, the user must re-authenticate to obtain a new TGT and active service principals.
Apple's implementation of the MIT Kerberos Key Distribution Center (KDC) is krb5kdc. Apple has modified Kerberos to handle communication with the Apple Password Server, which is responsible for building and replicating the Kerberos Database. Clients who are using Open Directory for authentication (known as binding) will be automatically configured to use Kerberos using special entries provided and updated by the LDAP server. You can manually initiate this auto-configuration by using the kerberosautoconfig command. The Apple Active Directory service plug-in was developed to provide interconnectivity with Microsoft's Active Directory and also supports Kerberos auto-configuration for bound client using DNS entries known as Service (SRV) records. This automatically generated configuration file is stored at /Library/Preferences/edu.mit.Kerberos and /etc/krb5.conf. This file can be manually edited by removing auto-generation comments from the top of the file. More on Kerberos clients in Chapter 2.
Users can specify multiple Kerberos realms by editing this file, or in 10.5 by using /System/Library/CoreServices/Kerberos.app and choosing Edit ![]() Edit Realms as in Figure 1-7.
Edit Realms as in Figure 1-7.
Figure 1.7. Editing realms in Kerberos.app


One of the most critical aspects of Kerberos configuration is time. If a client is more than 5 minutes apart from its KDC server, authentication will fail. The time value is normally best synchronized using the Network Time Protocol (NTP). To enable the NTP service on the Mac OS X server configured as your Open Directory master, mark the NTP check box in the General settings section of the Server Admin Application. This setting can then be pushed out using scripts or applications such as Apple Remote Desktop (an example of changing this setting is available in the Send Unix Command Templates section of the Apple Remote Desktop Admin software).
The systemsetup command can be used to set the NTP server:
systemsetup -setnetworktimeserver time.apple.com
This client setting can be configured manually in the Date & Time pane of the System Preferences; note that multiple time servers are supported when separated by a space. You can manually initiate time synchronization by using:
sudo ntpdate -u
In addition to authenticating the identity of a host in a Kerberos environment, safeguards are also put into place to protect the authenticity of each service running on a system in the form of a Service Principal. In order for a client to obtain tickets and authenticate with a daemon, the client will request a ticket using a TGT and a name constructed from the daemon/hostname:port. This information, in the form of Service Principals, can be viewed in Mac OS X by using the klist command from a Mac OS X host.
klist
Kerberos 5 ticket cache: 'API:Initial default cache'
Default principal: [email protected]

Valid Starting     Expires            Service Principal
07/06/09 13:12:40  07/06/09 23:12:40  krbtgt/[email protected]
        renew until 07/07/09 13:12:40
To access information regarding Kerberos tickets using a graphical interface, open Keychain Access from /Applications/Utilities, click on the Keychain Access menu item and then on Kerberos Ticket Viewer.
1.3.3. Setting up Open Directory Using Server Admin
Open Directory begins with the Open Directory Master. The Open Directory Master houses the Password Server and Kerberos KDC roles. It also provides a centralized repository for Open Directory Replicas to use for synchronizing the contents of the LDAP and password server databases. Much like with Active Directory (although oddly enough, less so), Open Directory needs DNS.
|
Before you upgrade a server to an Open Directory Master, first check that the IP address that Open Directory will be running on matches the information contained in your network's DNS zones for the server and vice-versa. Start out with the changeip command located at /usr/sbin. This command utilizes a number of support scripts found in the /usr/libexec/changeip directory. In its most basic form, changeip can be called with the -checkhostname flag and can be run as follows:
/usr/sbin/changeip -checkhostname
With any luck, the script will return a success. But if it doesn't, stop and fix your DNS. changeip will fail if either forward or reverse DNS resolution fails to properly map out to the same respective values. Do not promote an Open Directory Master that does not have perfect DNS as reported by the changeip command.
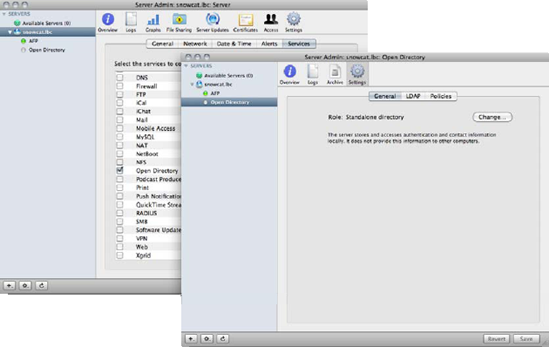
First you need to display the Open Directory service on the server. To do so, open Server Admin from the /Applications/Server/ directory and click on the name of the server in the SERVERS list on the left side of the screen (adding it if it's not there). Then click on Settings from the toolbar and navigate to the Services tab, checking the box for Open Directory. Click on Save and then Open Directory will appear in the SERVERS list for your server (see Figure 1-8).
Figure 1.8. Enable the Open Directory Service in Server Admin
Next, we're going to promote the server to an Open Directory master. To do so, click on Open Directory and fire up the Service Configuration Assistant by clicking on the Change button. The first option will be the role that the server will be fulfilling. Here, select Open Directory Master and click on the Continue button.
You will then be prompted to specify the required information for the Open Directory administrator account. This account will be used to administer the shared domain, although it will not be granted local administrative rights to computers bound to the domain. By default, the Directory Administrator account has a name of Directory Administrator, a Short Name of diradmin, and a User ID of 1000. This information is editable, and the administrator name probably should be obscured for increased security by changing to a value specific to your environment, such as corpdiradmin. Since Open Directory policies can be bypassed by administrative accounts, choosing a common administrator short name represents a significant chink in the armor. Once you have entered information about the desired account into the required fields, type the password first in the Password field and again in the Verify field. While setting up a new Open Directory Master, you will also be prompted to specify the LDAP search base and the Kerberos REALM, as seen in Figure 1-9. By default, OS X Server will enter a machine-specific entry for both. That is, when promoting server myhost.myco.com, the default search base is dc=myhost,dc=myco,dc=com, and the Kerberos realm would be MYHOST.MYCO.COM. In many cases, it may be undesirable to include the host name in a company-specific domain. If myhost is ever retired, its hostname will still be forever etched into your directory system. To avoid this, remove the hostname specific values from both the search base and the realm. Thus, in the previous example, the desired search base would be dc=myco,dc=com, and the realm would by MYCO.COM. After specifying these values, proceed with the setup by clicking on the Continue button.
Figure 1.9. Specify Kerberos REALM and LDAP Search Base

Next you'll see the Confirm screen. Review the contents, which should mirror what was entered in the preceding screens. When you are satisfied with the settings, click Finish and Mac OS X Server will finish configuring Open Directory for you (see Figure 1-10).
Figure 1.10. Confirm final settings

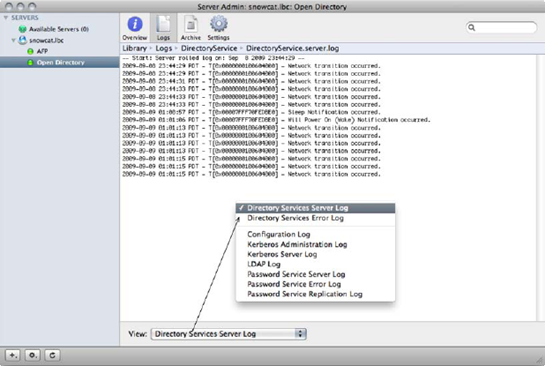
Now you can verify that all components of Open Directory are properly functional with your Open Directory setup by going into Server Admin, clicking on the Open Directory service listed in the SERVERS list, and then clicking on the Overview button in the Server Admin toolbar. In a standard Open Directory setup, LDAP, Password Server, and Kerberos should all be running. In a triangle environment with Active Directory, typically the AD Kerberos system is utilized. In such setups, it is normal for Kerberos not to be running. Should any of the services fail to start, consult the Open Directory logs found in Server Admin under the logs tab of the Open Directory service (as shown in Figure 1-11). Look for any errors and make corrections as needed.
Figure 1.11. Open Directory logs
1.3.4. Setting up Open Directory from the Command Line
Setting up LDAP, Kerberos, the Password Server, SASL, and creating a directory services administrative account could seem daunting if you were to do it manually. But as with many tasks, Apple has made setup easier if you choose to go the command-line route. This functionality is provided by using the slapconfig command binary, the same tool utilized by the Server Admin application.
NOTE
For the Active Directory guru readers, slapconfig can be thought of as being similar to dcpromo, but with many, many more options, and therefore similar to dcpromo only from the perspective of promoting and destroying a directory server! In addition to promotion, slapconfig can also be used to configure various Open Directory settings, replication, and global password policies.
To create an Open Directory master using the command line, you could simply run the following command:
slapconfig -createldapmasterandadmin
In the above example, the default values presented in all of the Server Admin screens from the previous section were used. The Name of the account was set to Directory Administrator and the Short Name was set to diradmin. The password was set to the same value as the password for the administrative account that ran the command, and the Unique ID was set to 1000.
You can also use slapconfig to define custom settings. In the command below,we will define a new administrative account with a short name of corpodadmin, a full name of Corporate OD Administrator, and a UID of 1100:
slapconfig -createldapmasterandadmin corpodadmin "Corporate OD Administrator" 1100
There are still a couple of default settings that slapconfig is using during the Open Directory Master promotion process. These include the search base suffix and the Kerberos realm. According to Microsoft, "A search base (the distinguished name of the search base object) defines the location in the directory from which the LDAP search begins." The search base suffix is, by default, derived using the DNS name of the server. To obtain the search base suffix for a given Open Directory Master, you can run the slapconfig command with the -defaultsuffix query.
The realm is the name of the Kerberos realm that will be used. This, too, is generated based on an enumeration of the server's host name (are you starting to put together why DNS is so important?). However, it can be customized during the -createmasterandadmin process.
1.3.4.1. Demoting an Open Directory Master
Demoting an Open Directory Master can be done using either the command line or Server Admin.
If demotion is done at the command line, the following command would get the job done:
slapconfig -destroyldapserver
1.3.5. Set up an Open Directory Replica
An Open Directory Replica can be set up using Server Admin. Once you have opened the application, connect to the server that is destined to perform the Replica role. Under the Open Directory service, select the Settings tab. This tab will specify the current role of the server. To promote the server to a Replica, simply click the Change button, and specify the role Open Directory Replica. The interface will then query you for information about the Open Directory system to connect to. Specifically, you will need to specify the Open Directory Master's IP/DNS name, the root user's password, and the Open Directory admin's short name and password. After specifying this information and continuing, the server will contact the Open Directory master and begin replicating all of the relevant databases. This process does involve taking the Open Directory Master's LDAP database offline during initial setup, so plan accordingly. In a typical scenario, it will be offline for roughly a minute. That being said, it is always a good idea to perform this operation during non-peak times.
If the server that you're promoting to replica status is not already in the role of a stand-alone server, it's a good idea to demote it to stand alone before it is configured as a replica. However, it's an even better idea to start off with a nice clean server as your replica, so this situation should be completely avoidable.
Replicas can also be created using the slapconfig binary. From the replica, run the command with the syntax:
slapconfig -createreplica myodmaster.myco.com myodadmin
1.3.5.1. Removing a Replica
Removing a Replica from an Open Directory environment should be done any time you are decommissioning a server running as an Open Directory replica. You should first attempt to do this using the Server Admin tool. Simply open Server Admin and connect to the OD Replica. Under the Open Directory service, click on the Settings tab, where you'll see the Server's role, listed as Open Directory Replica. Click on the Change button, and select Stand Alone Server. This will require you to enter various credentials that will facilitate the proper demotion between the OD master and the replica in question. When that's done, the replica will be removed from the system.
For a variety of reasons, you may not be able to remove a replica from Open Directory using Server Admin. When that happens, try doing so using slapconfig. For example, if the replica has an IP address of 192.168.53.249, the command would be:
slapconfig -removereplica 192.168.53.249
1.3.6. Using Workgroup Manager to Create New Users
Using Workgroup Manager, you can create Open Directory users and alter attributes for their user accounts. You can also add computers, configure automounts, and perform other tasks. In this module we will create a user. As a prerequisite, you will want to have a functional Open Directory Master.
To create a new Open Directory user, open Workgroup Manager. As you can see in Figure 1-12, you will see the "domain" that you are connected to listed in the directory bar (below the toolbar). If the credentials that you provided in Workgroup Manager do not have Directory admin rights, you will not be authenticated to the domain and you'll need to authenticate. To do so, click on the lock icon on the directory bar. You will be asked for a username and a password. The default username is diradmin, although this might have been customized (and should be!) when the Open Directory Master was created. Type the username and password in the Authenticate to directory: dialog box and then click on the Authenticate button. If the authentication is successful, you'll notice that the directory bar will appear, also shown in Figure 1-12 (and with an open lock on the right-hand side). As per standard OS X behavior, you will not be able to make any changes to the selected directory if the lock is not open.
Figure 1.12. Ensure proper directory is selected and you are authenticated to create a user

Once you are authenticated to Open Directory, you can create a user account. To do so, click on the New User button in the toolbar, or select New User from the Server menu.
Next, fill in the general user information using the Basic tab of the New User window. You can customize the Short Name at this point (but not in the future without a complicated process), apply a Name (the user's full name in most cases) and enter a password. While you can change the User ID, it is wise to simply stick with the one that is automatically applied in this field.
Next, click on the Groups tab. Here you will add any groups that the user should be a member of. To do so, click on the plus sign (+) and then drag the group into the Other Groups: field from the resultant floating menu of users and groups (see Figure 1-13).
Figure 1.13. Assign users to the appropriate groups

Next, click on the Info tab and fill in any other pertinent information you would like to track, including the user's physical address, phone information, email address, and so on. In addition to the information that is easily accessible about a user, you can also access data that at first glance seems hidden by enabling the Inspector, which allows you to view raw directory information. To enable the Inspector, open Workgroup Manager and click on the Workgroup Manager menu (immediately to the right of the Apple menu). Then check the box for Show "All Records" tab and inspector and click OK to save the changes (see Figure 1-14).
Figure 1.14. Enable the All Records tab and Inspector in Workgroup Manager

You will now be able to view a far more detailed account of what is hosted in your directory service. When you are viewing information using the Inspector, you will be able to change information that should not be changed unless you know exactly what you are doing, so be very careful. However, it is worth noting that with the Inspector you can view a far more detailed account of the data stored in each record of the LDAP database. Once you have enabled the Inspector, you will see the Inspector tab in your new test account. Click it to see the information now available.
1.3.7. Backing up Open Directory
While much attention is placed on files and folders on a many servers, an integral part of rebuilding a server from scratch is not just having a back up of data, it's also having a back up of the accounts and permissions references that go along with that data. Manually backing up Open Directory is a straightforward process. Simply click on the Archive tab of the Open Directory service in Server Admin. From there, you can choose a directory to save the OD archive to. After you've chosen a destination path, the Archive button will become enabled. Click on this button to specify a name and a password for the OD archive. Be sure not to place any whacks (/) in the name of the Archive, or the process will silently fail, leaving you with a false sense of security. As always with any backup routine, an occasional spot-check is necessary to be absolutely certain that you have clean data. In this case, you can simply mount the produced disk-image file by double-clicking on it, and verify that data has been written to it. The OD Archive process is decently broad. It archives both Network and Local directory services databases, launchd.plist files for relevant services, as well as numerous configuration files and preferences.
One limitation of the Server Admin archive process is that it is a manual process, which can often be a detriment to the consistency of an important function. To back up Open Directory with a script can be easier and more reliable. You can do this from the command line by scheduling the following script with cron or launchd:
#!/usr/bin/perl -w

use strict;

my $archive_password = 'MYPASSWORD';
my $archive_path = '/Volumes/Data/backups/opendirectory/';

my $max_keep_time = 1; # MONTHS TO KEEP ARCHIVES AROUND

my @date = localtime();
my $year = $date[5] + 1900;
my $month = sprintf("%.2d",$date[4] + 1);
my $day = sprintf("%.2d",$date[3]);

my $filename = $year.$month.$day;
my $archive_file = $archive_path.$filename;

print "Archiving to $archive_file...
";

if (open(CMD,"|/usr/sbin/serveradmin command")) {
  print CMD "dirserv:backupArchiveParams:archivePassword = $archive_password
" ;
  print CMD "dirserv:backupArchiveParams:archivePath = $archive_file
";
  print CMD "dirserv:command = backupArchive
";
  close(CMD);
  print "Archive successful.
";
} else {
  print "Error: $!
";
  exit;
}

$month -= $max_keep_time;
if ($month < 1) {
  $month = 12;
  $year--;
}

my $expire_date = sprintf("%.4d%.2d%.2d",$year,$month,$day);

print "Cleaning up old archives...
";

if (opendir(DIR,$archive_path)) {
  while (my $file = readdir(DIR)) {
    chomp($file);
    next unless ($file =~ /^d{8}.sparseimage$/i);
    my $file_date = $file;
    $file_date =~ s/[^0-9]//g;
    if ($file_date < $expire_date) {
      print "Removing ".$archive_path.$file."
";
      unlink($archive_path.$file);
    }
  }
print "Cleanup successful.
";
} else {
print "Error: $!
";
}