
7.2. Managed Preferences in Action
Here's where you get to the core of Managed Preferences: applying it to workstations. Over the next few pages, we will detail the more notable capabilities in the Managed Preferences system and the steps required for their implementation.
7.2.1. Preference Manifests and Custom Preferences
As mentioned in the "Managed Preferences" section earlier in this chapter, managed preferences are applied via the preference pane of workgroup manager. Through this tool, Apple provides a nice, clean, and simple graphical interface for managing the most common applications. However, this is not a definitive list of what can and cannot be managed through MCX. After all, third party programs can be constructed in such a way to fully support MCX management. Apple's system provides support in two different ways. Preferably, Application will support management via Apple's Preference Manifest system. Preference manifests allow a third party application to provide an interface that can be utilized by system administrators to apply management settings to the application. In Workgroup Manager, preference manifest support is accessed via the Details tab of the managed preference interface. In this interface, you can click the plus button and navigate to the application on the file system that you want to manage. Upon selecting the desired app, the interface presents the option to import current settings (see Figure 7-4).
Figure 7.4. Preference manifest keys

To determine if an application supports preference manifests, uncheck this option. If the application has no manifest, you will immediately be presented with an error stating this. Once a manifest has been added to Workgroup Manager, it will be presented permanently for that user. Each manifest is stored in the directory at ~/Library/Preferences/com.apple.mcx.manifests and in the file ~/Library/Preferences/com.apple.mcx.plist. If desired, you can clear them out by deleting these files.
If the application does have preference manifest support, then upon importing the application into the system (without importing your personal settings), the details pane in Workgroup Manager will have an entry for the applications preference domain, such as com.myco.myapp. The new management functionality isn't apparent until you try to add a new key under the Once, Often, or Always sections in that domain. When you create a new key, you will be presented with a menu selection of supported attributes. Each attribute will often have associated applicable values presented via a selection menu. However, often custom values can be entered in and properly utilized. It all depends upon the application.
If an application does not support manifests, you're not completely out of luck. If this is the case, you must resort to the second method that Apple provides to manage an app: you can push out just about any defaults-based setting to an app. That is, any application that properly utilizes Apple's provided preference system and results in preferences being stored in a file found at ~/Library/Preferences/com.myco.myapp.plist. By selecting the option to import settings, regardless of manifest support, it will copy settings for the application in question from your current operating environment and apply them to the managed machines. Alternatively, in WGM you can add the preference file itself. Be careful when doing so as there is often junk that will be in the file. If you push out your starting window position, other users might not be too happy with your choice.
NOTE
One big limitation to this method is that the %@ string substitution (discussed further in Chapter 8) used for preference manifests is not supported. This means that preferences with user-specific settings are not well suited to be deployed from an existing preference file. If you really must cross that road, some heavy scripting would be needed to parse the settings file and then deploy the customized MCXSettings attribute additions to each individual user object. As always, test thoroughly before unleashing on the masses.
The most comprehensive preference manifests is provided by Apple in the ManagedClient MCX. To utilize this manifest, under the details tab of Workgroup Manager preference management add the ManagedClient.app application found on any OS X system at the path /System/Library/CoreServices/ManagedClient.app. The ManagedClient app contains a manifest which exposes a great deal of various settings for management. This includes the ability to manage Screen Saver preferences, Login Redirections, Menu Items, VPN Settings, and Finder Sidebar Items to name a few. It is definitely worth consulting this manifest if the management setting you wish to deploy cannot be found in the provided GUI.
7.2.2. Setting MCX from the Command Line
It is certainly possible to set MCX settings from the command line. To access this functionality, the dscl tool is used. dscl has numerous commands, such as mcxread, mcxset, mcxedit, mcxexport, and mcximport. Using these commands you can fully manipulate mcx settings programmatically. For example, you can use mcxset to set a very basic value:
dscl -u mydiradmin /LDAPv3/dirserv.myco.com mcxset /Groups/coolpeople com.apple.dock no-glass always -boolean true
The previous command will set the appearance of the dock (key no-glass) to display without the 3D-background for all members of the group coolpeople, applied always. Likewise, if you wanted to push out a setting to enable the Debug menu in Safari to aid in troubleshooting a user issue you could use the same method:
dscl -u diradmin /LDAPv3/dirserv.myco.com mcxset /Groups/coolpeople com.apple.Safari IncludeDebugMenu always 1
This tool can be very handy for duplicating settings, like duplicating some home directory syncing values from one group to another. To do this, first export the good group's com.apple.homeSync settings:
dscl -u mydiradmin /LDAPv3/dirserv.myco.com mcxexport /Groups/syncpeeps -o /tmp/syncpeeps_homesync.plist com.apple.homeSync
Next, import those settings into your new group:
dscl -u mydiradmin /LDAPv3/dirserv.myco.com mcximport /Groups/newsyncgroup /tmp/syncpeeps_homesync.plist
This is by far the easiest way to duplicate a group's synchronization settings across a domain, but the tool is not limited there. For example, if you wanted to simply duplicate ALL MCX settings the same mcxexport/mcximport process can be run, omitting the com.apple.homeSync domain to capture all managed preference domains for that group.
The man page for dscl is unfortunately light on details regarding the various mcx interaction devices. However, the file located at /System/Library/DirectoryServices/dscl/mcxcl.dsclext/Contents/Resources/mcxdsclhelp.txt provides much information about using dscl to manipulate MCX.
7.2.3. Automated Client Setup
In this section, I will discuss various MCX configurations that can be deployed to assist with configuration of the user environment: managing application preferences and configuration, network proxy configuration, and printer deployment.
7.2.3.1. Mail
MCX has the ability to automatically configure mail account for your users. It is fairly basic in nature and provides the ability to populate a single email account. Unfortunately, preference interactions for Mail result in an override, so it is not possible at this time to deploy both a personal mail account at one tier, and a departmental or group account at a different tier. The single account that you do deploy can be either a POP or IMAP account.
In order to deploy mail accounts, first get com.apple.mail.managed and com.apple.mail (aka Mail-10.6) into your Details screen following the steps covered in the "Preference Manifests and Custom Preferences" section earlier in this chapter. Once this has been added into Workgroup Manager, you can automatically deploy email accounts for clients by using the com.apple.mail.managed domain in 10.5 and the com.apple.mail domain in 10.6. In either domain, you will have a number of keys that allow you to manage client settings for Mail.app, as shown in Figure 7-5.
Figure 7.5. Deploying managed preferences for Mail.app
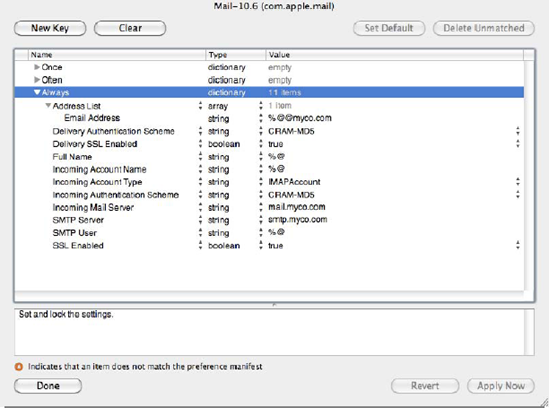
Figure 7-5 represents a recommended configuration for a mail account (mileage may vary according to the setup of each organization). Notice the variable substitution being used here as well, the string %@ is substituted for the user's short name.
NOTE
In Mac OS X 10.5, the com.apple.mail.managed manifest would be used rather than com.apple.mail, which is for Mac OS X 10.6. The com.apple.mail.managed domain only provides Mac OS X 10.5 and doesn't have as much functionality as the 10.6 implementation. For instance, the com.apple.mail.managed also does not support deploying SSL settings.
In this example, you are setting up an IMAP account with CRAM-MD5 authentication. To deploy a POP account, you specify a Mail Account Type of POP Account. Attempting to deploy account types ExchangeAccount or iToolsAccount (Mobile Me) will fail because they are not supported. Supported authentication schemes in the manifest is limited to GSSAPI, however, you can successfully utilize values CRAM-MD5 and NTLM. With the latter option, there is no provided way to deploy the domain setting, so it is of limited use.
Overall, the mail preference manifest is rather limited. For example, it is not possible to deploy authenticated SMTP settings, nor Exchange accounts at the time this book is written. If you want to deploy these, you'll need to use a scripted solution, which is described further in Chapter 5. Hopefully, in the future, these features will be added so that you will not need a scripted solution for deployments requiring more custom setups.
7.2.3.2. iCal
Deploying CalDAV accounts for iCal is pretty straightforward. Also accessed through the ManagedClient manifest (as with Mail before it), iCal is only possible to leverage managed preferences to deploy a single account. It allows for specifying account name, server address, and SSL, as well as a few lesser used settings. Figure 7-6 is a screenshot of a configured iCal preference manifest, deployed at the "Often" level.
Figure 7.6. Managed iCal preferences

Here, you have configured the server address, the URI to the calendars themselves, which is relative to the server address and enabled SSL authentication. Again, we have chosen to make use of the %@ to push out settings specific to each user connecting to the iCal solution.
NOTE
While Managed Preferences can be used when setting up automatic iCal configuration, you are better off using DNS as described in the iCal Server Administration document at http://www.apple.com/server/macosx/resources/documentation.html.
7.2.3.3. Address Book
Strictly speaking, there is no preference manifest support for Address Book even in 10.6. However, it is still possible to deploy a custom LDAP server for inclusion in Mail.app lookups. Because there is no preference manifest support for Address Book, you will need to begin by importing a current preference file. The easiest way to do this is simply to configure the LDAP server in Address Book on your admin station. Next, add the preference file located at ~/Library/Preferences/com.apple.addressbook.plist and specify the "Once" for management. Next, you will want to edit the preference domain and par down all of the unwanted garbage in the file. Specifically, you only need to save the key AB3LDAPServers, and its children, as shown in Figure 7-7.
Figure 7.7. Deploying LDAP accounts via MCX

7.2.3.4. Application Preferences
Many users will want to customize a particular application's preferences or behavior that isn't otherwise included in the stock ManagedClient bundle. This may be something as simple as pre-populating registration information for Microsoft Office, possibly for deploying LDAP server connections utilized for lookups with Address Book and Mail. If you're security conscious, you may want to deploy a preference for Safari to disable its infamous Open safe files after download option.
As discussed earlier, in order for MCX to manage an application, that application needs to utilize Apple's defaults preference system. While the majority of native OS X applications fall into this realm, a good chunk of third party vendors don't yet support managed client preferences. The largest offenders here are educational software, as well as large cross-platform packages, such as Adobe's Creative Suite and Firefox. MS Office has a mixed history with MCX, though Office 2008 is much better in this regard, short of Entourage, which still relies primarily on its database for configuration.
The easiest way to deploy application settings is to first configure the application in a clean environment, specifically with your settings. Once done, you can utilize Workgroup Manager to import your preferences, and then whittle them down to a clean, deployable set. In this case, Word has been installed and configured with the desired settings. To deploy these settings, open up Workgroup Manager and select the preference management layout. Next, highlight the desired group for deployment, then in the far right pane select the Details tab. Click the plus button at the bottom, navigate to and select Microsoft Word, make sure the option to Import my Preferences is checked, and click add (see Figure 7-8). Because the settings are pulled from the active environment, you must be running Workgroup Manager from the computer which configured Office with your settings.
Figure 7.8. Adding the Office preferences manifest

Alternatively, you can copy the preference file from the configured user's ~/Library/Preferences folder to your admin machine, and then add the preference file rather than the MS Word app in Workgroup Manager. After performing either of these actions, there will be a new entry in the list, labeled com.microsoft.word in italics. The italic text signifies that this is an imported preference which does not match a known preference manifest. Nonetheless, MS Word will honor the settings.
If you edit the new managed settings for com.microsoft.word, you see there are several dozen various preferences that are now managed, not all of which are pertinent to your purposes. In order to ensure as clean an environment as possible for your users, you will want to narrow this list down to only the specific preferences that you want to deploy. Figure 7-9 shows a managed preference on the com.microsoft.office domain, added by adding the preference file found at ~/Library/Preferences/com.microsoft.office.plist. The managed preferences for this domain have been reduced to the keys 2008FirstRunSetupAssistantCompleted, and 2008ToolbarsShowWysiwyg, which prevent the setup assistant from launching, and enable Fonts in the toolbar to be displayed in their appropriate typeset.
Figure 7.9. Configuring the office preference manifest

Figure 7-10 shows the Word specific management settings. Notice that several options have been moved from Once to Often. Background save, for example, is managed in the Often category to ensure that user's don't permanently shoot themselves in the foot by disabling autosave. Next, you'll enable auto grammar and spell checks, but allow the user the option to turn those off on their own. Moving items between categories Once and Often can be accomplished through copy and paste. Try to avoid deploying third party preferences in the Always category—support for this in third party apps is fairly rare and may not be honored by the application.
Figure 7.10. More granularity with the office preferences manifest

This general workflow can be applied to most applications provided the developer includes support for Apple's default preferences system. If there is a preference manifest available for the application, make sure to thoroughly test whether the managed preferences are actually honored. If the application that you add supports preference manifests, then the details list will display the domain in non-italic text, and will provide key validation to affirm proper management settings are applied for that application. To determine whether an application supports the defaults command to manage preferences, look for a property list (plist) that stores the preferences for the application.
NOTE
You can also use the defaults read command to see all registered property lists and then pipe output into the grep command to limit the output. However, this can be a difficult way to try and isolate preferences.
7.2.3.5. Deploying Proxy Settings via a PAC File
A PAC file is a Proxy Auto Configuration file. PAC files automation configure proxy settings for users and are commonly utilized in large organizations with complicated network architectures. Support for configuring network proxy settings is provided via Workgroup Manager's managed preference GUI, shown in Figure 7-11. Found under the Network section, it is possible to deploy a multitude of various proxy settings. Closely resembling the proxy configuration found in every OS X client's Network Preference Pane, it is possible to deploy application specific proxy settings for http, https, gopher, ftp, or rtsp. SOCKS layer 5 tunneling is also supported here. Additionally, .pac automatic proxy configuration files can be deployed to your clients via MCX as well.
Figure 7.11. Proxy managed preferences configuration

Proxy configuration is available at all MCX levels. However, it is important to note that not all applications will utilize these settings. Firefox is by far the most notorious offender here. It has its own internal proxy configuration and ignores the global system setting. Indeed, Firefox generally snuffs Apple's defaults system and is immune to the reach of MCX. Likewise, command-line apps will often require either their own internal proxy configuration or will require the configuration of environmental variables for the purpose. The exact configuration will vary from application to application, but if needed environmental variables can be deployed via MCX as well.
To configure the proxy auto config option, open Workgroup Manager and then click on Preferences. Click on the computer or computer list to manage, click on Network, and then the Proxies tab. Figure 7-11 represents the deployment of a .pac proxy configuration file located at http://myco.com/userproxy.pac. You can also use the Bypass proxy settings for these Hosts and Domains field. In the previous example, you are also deploying an exception for internal myco.int domain.
7.2.3.6. Network Printing
The ability to easily deploy printers to your user base can be a huge time saver—managing printers across multiple locations and hundreds of users by hand would take enormous amounts of time. The good news is that MCX works very well for managing which network printers are available to users, allowing an administrator to remotely assign printers at all of the typical MCX management layers. From an end user's perspective, they will simply see all of their deployed printers from the available printer list in any printer dialog box. Beyond this, MCX provides numerous facilities: setting default printers (useful for deploying at the computer and computer group levels); forcing a footer on the printout which includes the user's name, date, and optionally the printing computer's MAC address; and restricting access to a printer by requiring administrative access.
In order to deploy a network printer via MCX, you must first configure the printer on your administrative computer. Once configured and tested, open up Workgroup Manager, select the object that you wish to manage, and then select the Printing preferences pane, as shown in Figure 7-12. There is no right answer here for deploying printers. In some cases, it may make sense to deploy the occasional printer to an individual user. In lab or kiosk environments, it makes more sense to deploy at the computer group and set a default printer. This way, when a user logs into that computer, their default printer will be the closest one to the computer.
In large environments, it may even be desirable to create and utilize groups specifically for printer management to provide better visibility and scalability.
Figure 7.12. Managed printers

The one major "gotcha" to MCX printer management is that it has somewhat limited support. Its support lies primarily in network printers, which support the postscript protocol and ppd files. Printers, which require specialized binary drivers, are not going to function properly with this system. If you desperately need to support such a printer through MCX, your best bet is to utilize an OS X print server, which can re-share the printer and provide an abstraction layer. To pull this off, configure the print server to print to the printer, and share out the printer using the Printer's service in Server Admin. Next, configure your admin client to print to the server's shared printer, and then deploy it via MCX.
In Mac OS X 10.4, it was possible to use MCX to enable an option to display only managed printers. This was a very handy option to ensure that only the printers that are managed are displayed in the list. This was a handy feature to ensure that any other printers which had been set up at one point or another will no longer be accessible. Fortunately, the option is still available in 10.5, it's just hidden a bit. To access the functionality, first deploy the desired printer preferences to your desired target. Next, select the Details tab of managed preferences, and edit the preference domain com.apple.mcxprinting. Under the always domain, add a new key named ShowOnlyManagedPrinters. Set the value type to boolean, and specify a value of true, as shown in Figure 7-13. From here on, the printers you specify in MCX will be the only printers listed in a user's print dialog box.
Figure 7.13. com.apple.mcxprinting managed preference manifest

It is also possible to deploy printer presets using managed preferences. Printer presets are simply pre-configuring a printer's values, such as to turn on duplexing for a supported printer or to turn on grayscale output for another. Though there is no GUI facility for it, the process is pretty straightforward. You'll want to start off with a user environment that has a clean preset list. Configure the printers and the specific presets that you want to deploy. Once perfected, snag the preference file stored in the user's preference folder, specifically ~/Library/Preferences/com.apple.print.custompresets.plist. In Workgroup Manager, select the object where you want to deploy the presets, and select the Preferences interface. Once here, click on Details, and click the plus button to add a preference file. Navigate to the com.apple.print.custompresets.plist file and add it in. When adding the plist, you'll likely want to manage import as an Once only setting. Otherwise, you will prevent users from creating their own presets.
Managed Printers deployed across multiple groups will result in a combined MCX interaction. That is, a user will have access to all printers deployed from all applicable workgroups, computer groups, etc. Other settings, such as custom presets, or the default printer will result in an override, following the standard MCX pecking order.
|

7.2.3.7. Restricting Applications
MCX application restrictions have been a bit of a moving target.10.4 had a fairly configurable setup, allowing the option to explicitly allow applications or to specifically deny applications. Unfortunately, the system wasn't terribly resilient and was pretty easy to bypass. With 10.5, a new take on application restrictions were put in place. For this context, you will be referring primarily to the system introduced with 10.5 and carried forward to 10.6.
In 10.5 and later, restricting applications with MCX is done on an explicit allow basis. That is, once you choose to restrict applications for a user, an implicit deny will be applied to all applications that are not in the allowed applications list. Because of this, it is important to have a good understanding of the applications that will be utilized in the managed environment prior to embarking on this endeavor. If not properly planned, you will be flooded with support requests from users, claiming that they can't access their applications. However, when implemented using application signing, the system proves to be extremely resilient to various hacks that might be used to subvert it.
When restricting applications with MCX, you have two primary options, both accessible from the Applications pane of Workgroup Managers Preference interface, as shown in Figure 7-14.
Figure 7.14. Configuring application whitelisting

Using this interface, you can allow a specific application, or you can specify a whitelisted folder wherein any application resides is always trusted. The latter, if setup improperly, can be easily exploited. However, if you ensure that you specify only directories, which are not writeable by the user, then it can be an acceptable measure. However, local file system permissions can be easily bypassed through single user mode, so it may be desirable to configure a firmware password to prevent this easy avenue.
There are a few general whitelist folders, which will make life a bit easier. Specifically, enabling all applications located in the folder locate at /System/Library/CoreServices will allow numerous support applications to run. Whitelisting the /Library/Quicktime folder is needed to prevent numerous QuickTime plug-ins from malfunctioning and whitelisting /Library/Printers is necessary for certain printer drivers. Each of these folders is immutable to non-admin users, so they are generally fine for whitelist exclusions. /Library/Application Support is another directory, which can contain binary support files needed by various applications.
For the most part though, you will want to allow specific applications. This allows for fine-grained targeting without the need to worry whether file system restrictions have been bypassed. Combined with application signing, the system is a very secure way to ensure that the only applications which launch are the intended applications. Application signing is a feature introduced with Leopard, and allows for an application to be signed by a trusted certificate, similar to a standard SSL environment. Application signing is without a doubt the way of the future. The Mach-O binary format is a bit notorious for being an easy target for code injection, exposing a potential avenue for viral infection. By signing an application, you can ensure that the code present in the executable is in the state shipped by the manufacturer. If it is modified, it will no longer match your signature, and will thereby be treated as a foreign entity.
Application signing is utilized very heavily by the iPhone and iPod Touch (described further in Chapter 10), as well as in Mac OS X, which as of 10.5 ships with all Apple apps signed. In 10.5, it is utilized primarily in my MCX application restrictions and the application firewall. When an OS X client has an active application firewall that specifies which applications have access, it utilizes code signing to ensure the identity of the application. If an unsigned application is added to the list, the system will sign the application for you behind the scenes.
NOTE
When adding an application to an allowed applications list, you must first specify the application from the client machine running Workgroup Manager. If the application that you wish to allow is not resident on this computer, you will not be able to select it from the list, and thereby will not be able to provision access to the app.
Likewise, when you add an unsigned application to the allowed applications list, you will be greeted with an option to sign the application, or add it to the list without signing it. If you choose the latter, the application will be allowed to launch, but it will be possible to utilize this inclusion for exploitative purposes. Because the application is not signed, it is possible to alter any arbitrary application to impersonate the application, and thereby bypass any restrictions that would otherwise be applied. As such, if any allowed application is unsigned, it represents the ability for the user to launch any application, provided they have the skills to do so. When an allowed application is not signed, it will appear with a yellow triangle next to its entry, as seen for Firefox in Figure 7-15.
Figure 7.15. Adding an unsigned applications

There are some ramifications for signing an application when adding via Workgroup Manager as well. Most notably, when you sign the application with Workgroup Manager, you are signing only the local copy of that application. As such, all those hundreds of copies of that application in the field remain unsigned, and therefore restricted from launching. In order to fulfill a securely restricted environment, it will be necessary to deploy the signed applications to all of your clients. Alternatively, Apple has provided the command-line utility codesign which allows for the signing of applications from the command line. The syntax to sign an application is as follows:
codesign -s identity /Path/to/Application.app
For most environments, the identity in the previous command will be the name of the certificate as you see it listed in the keychain in which it is stored. Whereas the identity is determined by searching the keychain search path for a certificate whose subject matches the provided string, using this utility and a self-signed certificate you can sign any applications client-side through automation. As long as you have deployed your RootCA to all of your clients as outlined in Chapter 2, then you can ensure proper validation of your applications.
NOTE
You cannot use an invalid certificate to sign applications. If you see a red "x" on the certificate in Keychain Access this will have to be resolved prior to using the certificate to accomplish a successful codesign.
Using the codesign command, you can sign the Microsoft Word application using a certificate in the keychain. For this example, you will call the certificate mycert. Simply use the following command:
codesign -s mycert /Applications/Microsoft Office 2008/Microsoft Word.app
Deployed applications result in an additive process. If a user's management surface has application restrictions applied at any level, those application restrictions will be applied everywhere. This is particularly noticeable when application restrictions are applied at the computer level. When this occurs, all managed users on that computer will have application restrictions. If an administrator opts to not disable management globally, the admin will also inherit the computer's application restrictions. While the application preference pane does indeed allow an option to uncheck "Restrict which applications are allowed to launch," this setting will be overridden based upon standard MCX search policy. Thus, if you apply management to an admin group, and deploy this setting unchecked, it will be overridden because of the MCX search policy. Computer and computer groups take precedence over standard groups, meaning that you need to deploy this option at the user object to override your computer settings. Unfortunately, this becomes a pretty big hassle, and isn't even possible in some environments, such as an AD/OD triangle, where user objects are stored in AD and outside of the purview of MCX.
Thus, deploying application restrictions at the computer and computer group demands a decent amount of consideration and testing. In many cases, it makes more sense to create separate user groups for computer-specific application classes, and then using computer access filters to grant access to that specific application-based group.
7.2.3.8. Computer Access Filters
In larger environments, the likelihood of having groups, which have conflicting settings, is increased. In many cases, it may be desirable to filter out which group settings are applied to specific levels. Alternatively, it may be desirable to control which users actually have access to login to a particular computer. Both of these features are provided in Workgroup Manager preferences management, under the access tab of the login managed preference pane (see Figure 7-16). Because computer access is a computer-specific task, the access tab is only accessible under the computer and computer group sections.
Figure 7.16. Computer access control lists

This interface allows for control of which groups have access to login to specific computers. This has the additional effect of filtering out which groups apply MCX. As with Application management, once you define access restrictions, an implicit deny is applied to any user or group not in the list.
For example, consider a scenario where a user is a member of two groups Mobile Home Users and Network Home Users. Perhaps the former group has mobility configured for the user, such that a mobile account is created for the user of this group on login. It may be desirable to suppress this behavior on certain computers, therefore you would simply create an allow rule on these computers for the group "Network Home Users." When the user logs in, they will not inherit any of the management settings defined for Mobile Home Users, due to the implicit deny nature of login restrictions. This in turn becomes a very handy tool for you to filter group MCX application. The down side of this is that you must now explicitly allow all groups, including the entire nested hierarchy, if you want all of these tiers' management settings to be applied. Suddenly, you now have allowed entries for numerous groups, including some potentially very broad groups (such as an All Staff).
If you want to use a tiered management hierarchy along with actual computer access restrictions, you have a rather large conundrum. On one hand, you want to apply the management settings applied to the All Staff group, but the unintended consequence is that you now have granted login window access to all members of the All Staff group. From here, you must use explicit denies to deny access to the desired users and groups. Using explicit denies isn't a bad idea anyway, but this means that your computer access list may easily reach 20 to 30 entries in larger environments.
NOTE
Implementing an explicit deny entry on a group will always take precedent over any explicit allow entries. An explicit deny on a group will prevent all members of that group access, regardless of whether they have membership to a different group that is allowed access. This means that deny entries should only be utilized where login access to all members of a group must be unconditionally prohibited.
7.2.3.9. Common Tasks
There are many other common Managed Preferences management tasks which are worthy of a mention, but not an extensive write-up. Notably, one of the most common Managed Preferences to apply is automated login items, which specify applications, documents, or SharePoints that launch upon login to a computer. Login items are very handy for initiating user environments, such as firing up support applications or by auto mounting a network share.
To add a login item, simply add it to the Items section found under the Login Workgroup Manager preferences pane. This item can be an application, a document, or a network share. For the former two, the added asset will need to be accessible at the same path on the target client. To deploy a network share login item, simply connect to the SharePoint from your admin station. Once the SharePoint is mounted on the desktop, simply drag it into the login items list. With the network share highlighted, make sure to check the box Mount share point with user's name and password, shown in Figure 7-17. This will ensure that proper access to the share is provided to the user.
Figure 7.17. Adding login items

This list is additive, so login items across all of a user's managed groups will be applied. It is worth noting the options for users to be able to add their own items. This can be handy if you want a few things to launch, but you want the user to be able to customize their own environment as well.
At some point, you may also want to modify a user's dock, perhaps adding in a reference to a company SharePoint or a business application (to some end user's after all, an application does not exist unless it's in the Dock). Apple has a nifty GUI both for adding items to the dock, and for organizing the order in which they appear. Like login items, managed dock items are additive across management groups. The option Merge with User's Dock allows users to modify the dock, outside of the management preferences that you want. This is probably preferable in none-kiosk environments, as the Dock is a powerful, important part of the OS X experience.
To add in a network SharePoint, first mount it on your administrative workstation then drag it into the Documents and Folders list. This will create an .afploc file with the information used to mount the SharePoint initially. Alternatively, you can construct your own .afploc file and drag that in. This is definitely useful if you do not want to, or simply can't connect to, the SharePoint at the time of management. Constructing your own .afploc. file can only be done from the command line:
## defaults requires absolute paths to the file!
defaults write /Users/myuser/Desktop/myhost URL "afp://myhost.myco.com/MyCoShare"
mv ~/Desktop/myhost.plist ~/Desktop/MyCoShare.afploc

The contents of the .afploc are as follows:
<?xml version="1.0" encoding="UTF-8"?>
<!DOCTYPE plist PUBLIC "-//Apple//DTD PLIST 1.0//EN" "http://www.apple.com/DTDs/PropertyList-1.0.dtd">
<plist version="1.0">
<dict>
        <key>URL</key>
        <string>afp://192.168.210.2</string>
</dict>
</plist>
You can replace the URL information (in this case, afp://192.168.210.2) with the FQDN for your server, allowing you to create new .afploc property lists on the fly. From here, you can simply drag the location file into the Documents and Folders section. These files can also be utilized by the login items pane, and they can be double-clicked upon from the Finder. When added to the Dock, the resulting dock item will utilize the file name for the mouse-over display text.
Other Options in the Dock preference management pane are options to add a My Applications folder to the dock, which is a dynamically generated list of allowed apps for a user to use. This is a handy folder in heavily managed environments. If you plan to deploy these apps, make sure to test it thoroughly, as you may be presenting applications to the user that you weren't aware you have granted them privileges to. Outside of this, you can add links to the User's documents folder or to mount their network home. (This is useful if you configure users with local home directories, but want them to have easily accessible personal storage space on a server.)
NOTE
Apple utilizes another popular location file, the .webloc file for numerous other purposes. For instance, you can embed vnc://, smb://, cifs://, and http:// URLs in a .webloc file, utilizing the same procedure specified here.
Another common MCX management setting involves the deployment of a Software Update Server. Configuration for this is provided via a very basic Software Update Workgroup Manager Preference pane, which allows you to specify a Software update server to query.
Many other management settings are available through the GUI, preference manifests, and custom .plist files. Worthy of another mention is the Apple provided Managed Client Preference manifest, which exposes a great deal of various settings for management. This includes the ability to manage Screen Saver preferences, Home directory redirections (discussed later in the section titled User Home Folders), Menu Bar Items, VPN Settings, and Finder Sidebar Items to name a few. It is definitely worth your time to add in this manifest and peruse its offerings.
7.2.4. Troubleshooting and Testing
In elaborate environments, it can become difficult to track all of the different groups and tiers where specific preferences are managed. On top of that, accurately predicting how all of the various preference interactions will unfold obviously becomes more difficult as more elements are included. Luckily, Apple provides several tools with the ability to review the resultant policy in a particular environment. The first method to determine the final applied management settings for an environment is to take a look at System Profiler from the managed desktop. Under the Managed Client heading of the Software section of System Profiler.app can be found a breakdown of each active managed preference by domain, including the source of each applied setting. Alternatively, the command line equivalent can be used by querying the datatype: SPManagedClientDataType:
%system_profiler SPManagedClientDataType
The primary limitation to both of these tools is that they must be run from the actual environment. That environment may even have application restrictions to prevent the running of these tools, which naturally makes troubleshooting a fun endeavor. In this case, there are a few options. On option is to temporarily enable access to System Profiler.app, so that it can be opened and managed client settings can be reviewed and tweaked. This is a bit of a pain and care has to be taken to ensure the restrictions are put in place when done. Another option is to invoke the system_profiler command-line binary remotely via an Apple Remote Desktop (ARD) admin station. This works fine, but the main limitation here is that the output can be a bit difficult to parse.
Apple provides another command line tool, mcxquery, which can be used to query the resulting MCX settings from arbitrarily passed data. It is possible to specify user, group, and a computer, and view the resulting MCX data. For instance, to query the MCX for user johndoe, logging into computer 'johndoe-macbook', I would use the syntax:
mcxquery -user johndoe -computer 'johndoe-macbook$'
Note the $ at the end of the computer name. This character will be suffixed to the names of computers when they perform a trusted bind to Open Directory. In the previous example, 'johndoe-macbook$' should be the corresponding name for the computer when viewed in Workgroup Manager. Because the character $ is a bash special character, you must wrap the computer name in single quotes. Alternatively, a MAC address can be specified:
mcxquery -user johndoe -computer 00:1f:f3:d1:d5:c7
Or the guest computer:
mcxquery -user johndoe -computer guest
This command becomes very handy for testing new policy changes, but it of course has caveats. The most important mcxquery limitation lies in the fact that the tool does not do automatic user membership lookups. That is, if you don't explicitly specify a group with the -group option, then NO workgroup management settings will be output, regardless of group membership of the specified user. This limitation becomes a larger issue when logging into a computer involves combining several workgroup settings. Outside of nested groups, determining combined workgroup settings isn't possible with this tool at this time. Oddly, computer group resolution is fully supported. When specifying a computer, you will see all the applicable computer group settings that are in play.
Compared to this, the second caveat is really more of a quibble. Output isn't the cleanest. There isn't a great way to query specific preference domains, so you just have to sort through all of the settings until you find what you're looking for. The tool supports outputting to XML, but that isn't really pleasant to read either. Luckily, you can take advantage of the powerful tools in OS X to make your life easier. One key tool is the Apple application Property List Editor, which is installed as part of Apple's development tools. With this app installed, you can pretty easily send it output from mcxquery, giving a pretty decent way of traversing through the MCX domain. This can be done with the syntax:
mcxquery -user johndoe -group editors -computer
'johndoe-macbook$' | open -f -a
/Developer/Applications/Utilities/Property List Editor.app
Once this command is run, Property List Editor will open up and display the mcxquery data in a nice presentable fashion. If you're like me, and will be constantly testing settings like this, you may even want to create an alias for this command.
To accomplish this in the bash shell, open your ~/.bash_profile file and add the following text, all on a single line:
function gmcxquery() { /usr/bin/mcxquery -format xml $@ | open -f -a /Developer/Applications/Utilities/Property List Editor.app ;}If you use tcsh shell, then edit ~/.tcshrc and add the following text as a single line:
alias gmcxquery='/usr/bin/mcxquery -format xml !:* | open -f -a /Developer/Applications/Utilities/Property List Editor.app'
After completing the edits, save the file and reload your shell (most easily accomplished by quitting Terminal and reopening Terminal). Now, type the command:
gmcxquery -user johndoe -group editors -computer guest
If all went well, the output will be nicely displayed in Property List Editor. With identical syntax to the original mcxquery executable, you now have a very easy way to test managed preferences on a machine without actually logging into the machine. Believe me, this can be a significant time saver.
At some point after changing an applications managed preferences via the GUI, you may find remnants of management settings. This symptom most often occurs when you switch management settings from Once or Always to Never. Every once in a while, MCX gremlins can rear their ugly little heads and have you pulling your hair out. Never fret. Use gmcxquery to determine the source of the errant management setting, and then follow it up with a dscl mcxdelete command. For instance, I recently had an issue where a lab decided to remove applications restrictions for the summer, but despite the GUI claiming the application restriction were set to never, users still could not open up supposedly allowed applications. Using gmcxquery, this is an easy problem to solve. After a quick untrusted bind of my machine to the domain:
gmcxquery -user myUser -group lab -computer 'lab2-par145$'
From here, I look for application of the com.apple.applicationaccess.new, which I am quickly able to spot. However, I also easily spot some legacy settings in the com.apple.application domain, which is used for legacy 10.3 and 10.4 support. In each case, the source of the settings was the 'lab' computer group. Resolving the issue is easy enough, harnessing the power of dscl's mcx capabilities:
dscl -u hunterbj /LDAPv3/mydirserv mcxdelete /Groups/lab com.apple.applicationaccess
dscl -u hunterbj /LDAPv3/mydirserv mcxdelete /Groups/lab com.apple.applicationaccess.new
Upon next login, users proceed to successfully open previously restricted applications. Between System Profiler, its command-line equivalent system_profiler, and mcxquery, you have some decent tools to troubleshoot an MCX environment. Each tool has their own benefits: mcxquery is highly accessible and can be utilized to test basic policy application changes, but will not always give the whole picture due to its failure to perform group lookups on specified users. System Profiler on the other hand displays the final absolute settings, but must be run from within the managed environment, limiting its usefulness outside of a troubleshooting environment.