Chapter 7. Implementing Mobile Device Management for Office 365
![]() Planning for MDM for Office 365
Planning for MDM for Office 365
![]() Configuring MDM for Office 365
Configuring MDM for Office 365
In Chapter 6, “Introducing Mobile Device Management for Office 365,” you learned how Mobile Device Management for Office 365 (MDM for Office 365) helps you meet the challenges of managing mobile devices and protecting company information, without making changes to your existing on-premises infrastructure. By defining organization-wide access requirements and configuring security policies, you can manage how user devices are enrolled in the service and how they connect to Office 365 services and resources, as well as managing other requirements like device passwords. Remember, security policies define and enforce requirements for devices enrolled in the service, and these policies focus primarily on the state and compliance status of the mobile device.
In this chapter, you’ll adopt the persona of the senior enterprise administrator for Blue Yonder Airlines responsible for managing the mobile device management strategy for new acquisitions and remote offices. To meet the mobile device management requirements described at the end of Chapter 1, “Understanding Microsoft enterprise mobility solutions,” you’ll deploy MDM for Office 365 for the remote offices, configure access and security policies, enroll mobile devices, and manage device compliance and reporting.
Scenario
As a senior enterprise administrator for Blue Yonder Airlines, you’re responsible for planning, designing, and implementing MDM for Office 365 for Blue Yonder’s new remote offices that became part of the company in a recent merger. Because of legal requirements established in the merger, the remote offices can’t be added to the existing Blue Yonder Airlines network infrastructure right now and must be maintained separately until a later date. Because Blue Yonder Airlines already uses Microsoft Intune to manage most of its employee mobile devices, you’re familiar with the fundamentals of enterprise mobility management and know how to use Microsoft solutions for mobile device management.
You know that the new remote offices already use Microsoft Office 365 and host employee mailboxes in Microsoft Exchange Online. Employees in the remote offices use a mix of mobile devices, including Android phones, Apple iPads, iPhones, and Microsoft Windows Phones, most of which are employee owned. They access corporate email mailboxes hosted in Exchange Online from their mobile devices, managed using Exchange ActiveSync policies. However, you need to plan and implement more robust mobile device management features to meet Blue Yonder Airlines’ information technology standards, which have more stringent device security and compliance requirements. MDM for Office 365 is a great option for filling this gap until the remote offices can be included in your Intune configuration.
Implementation goals
Building on the existing investment in Office 365 and the mobile management features of Exchange ActiveSync, you now need to address the following implementation goals to successfully complete the MDM for Office 365 rollout for the Blue Yonder Airlines remote offices:
![]() Require remote-office employees to have managed access to company resources and services from their personal mobile devices and corporate work devices, including remote offices bound by restrictive noncompete agreements
Require remote-office employees to have managed access to company resources and services from their personal mobile devices and corporate work devices, including remote offices bound by restrictive noncompete agreements
![]() Enable IT to enforce security, encryption, email, and device policy settings for remote offices using MDM for Office 365
Enable IT to enforce security, encryption, email, and device policy settings for remote offices using MDM for Office 365
Solution diagram
To meet the MDM for Office 365 implementation goals for this phase of the project, you’ll implement the solution shown in Figure 7-1.
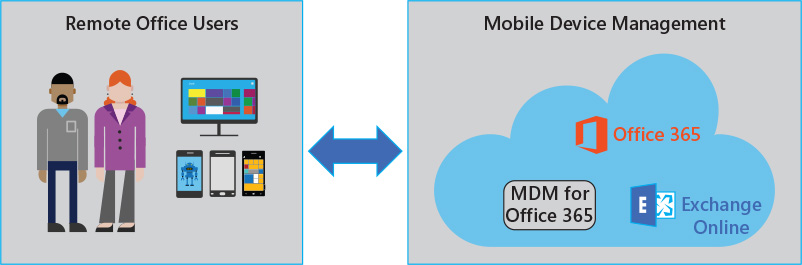
FIGURE 7-1 Using MDM for Office 365 to implement mobile device management to manage remote-office mobile devices and control access to Office 365 resources
Tip
This solution diagram provides a high-level overview and basic description of the intended solution architecture. Planning and design considerations for each element of the solution are described in the next section.
This solution is comprised of the following components:
![]() Remote-office user Remote-office users employed by Blue Yonder Airlines need to access company resources, especially corporate email hosted in Exchange Online in Office 365.
Remote-office user Remote-office users employed by Blue Yonder Airlines need to access company resources, especially corporate email hosted in Exchange Online in Office 365.
![]() Mobile device management MDM for Office 365 will be used to manage mobile devices of remote-office users and ensure that they are in compliance with Blue Yonder Airlines data and resource access policies. These mobile devices will be enrolled in MDM for Office 365, and there aren’t any on-premises network infrastructure changes or requirements.
Mobile device management MDM for Office 365 will be used to manage mobile devices of remote-office users and ensure that they are in compliance with Blue Yonder Airlines data and resource access policies. These mobile devices will be enrolled in MDM for Office 365, and there aren’t any on-premises network infrastructure changes or requirements.
Planning for MDM for Office 365
Now that you’ve identified your implementation goals and decided on an MDM for Office 365 solution, you need to make sure you understand the planning and design considerations that must be addressed for the deployment to be successful. These considerations include
![]() Managing user identities
Managing user identities
![]() Creating device security policies
Creating device security policies
![]() Supporting required device types
Supporting required device types
These design considerations were introduced at a high level in Chapter 6, but you should carefully review the information in this section again to make sure you fully understand the impact of your design choices and that you’re ready to continue deploying MDM for Office 365.
Identity management
Modern mobile device management solutions really start with and center around user-identity management. How identity is managed and connected is truly the foundation of secure access to company resources, no matter if the resources are located on the premises or in cloud-based services. And because users typically want to be able to work from anywhere and from any mobile device, it’s crucial that your identity infrastructure makes it simple and easy for users to reliably access company resources just like they do when in the office. How you configure identity management with MDM for Office 365 will depend on the needs of your organization and the mobile device management solution you deploy.
For organizations using Office 365, there are several options for managing identity:
![]() Office 365 accounts (cloud identity) When you subscribe to Office 365, you automatically have access to Azure Active Directory services and can immediately start creating Office 365–based user accounts from the Users node in the Office 365 admin center. However, creating user accounts in this way doesn’t integrate or synchronize these accounts with your existing on-premises directory services, such as accounts hosted in Windows Server Active Directory. This approach might be fine (and even preferable) for smaller organizations without significant on-premises network infrastructure, but it likely isn’t the best choice for larger, enterprise-level organizations.
Office 365 accounts (cloud identity) When you subscribe to Office 365, you automatically have access to Azure Active Directory services and can immediately start creating Office 365–based user accounts from the Users node in the Office 365 admin center. However, creating user accounts in this way doesn’t integrate or synchronize these accounts with your existing on-premises directory services, such as accounts hosted in Windows Server Active Directory. This approach might be fine (and even preferable) for smaller organizations without significant on-premises network infrastructure, but it likely isn’t the best choice for larger, enterprise-level organizations.
![]() On-premises Active Directory accounts (federated identity) You can connect your existing on-premises Windows Server Active Directory–based accounts with Azure Active Directory services in Office 365 to configure account synchronization and enable single sign-on. Most enterprise-level organizations have made significant investments in their on-premises Active Directory infrastructure and don’t want to have to re-create or duplicate user accounts in Office 365, so it makes sense for these organizations to integrate the directories. Synchronizing these directories also enables users to sign in to Office 365–based resources using the same user name and password credentials that they use to access on-premises resources.
On-premises Active Directory accounts (federated identity) You can connect your existing on-premises Windows Server Active Directory–based accounts with Azure Active Directory services in Office 365 to configure account synchronization and enable single sign-on. Most enterprise-level organizations have made significant investments in their on-premises Active Directory infrastructure and don’t want to have to re-create or duplicate user accounts in Office 365, so it makes sense for these organizations to integrate the directories. Synchronizing these directories also enables users to sign in to Office 365–based resources using the same user name and password credentials that they use to access on-premises resources.
Before you get started with MDM for Office 365, you need to decide which identity-management option is best for your organization and how your employees will access resources from their mobile devices. If you choose to configure federated identity with Office 365, you need to complete additional steps and meet additional configuration requirements before configuring access and compliance policies in MDM for Office 365. If you choose to use cloud identity with Office 365, you can start creating user accounts and configuring MDM for Office 365 immediately after the Office 365 service is provisioned. In this chapter, we’ll use cloud-identity examples and Office 365–based user accounts only.
More Info
For more information about Office 365 user management, see “User Account Management” at https://technet.microsoft.com/en-us/library/office-365-user-account-management.aspx. There’s also a detailed overview and a step-by-step implementation guide for hybrid (federated) identity with mobile device management, see Chapters 3 and 4 in the Enterprise Mobility Suite: Managing BYOD and Company-Owned Devices book from Microsoft Press at https://aka.ms/EMSdevice/details.
Policy considerations
Before users enroll mobile devices in MDM for Office 365, you need to carefully plan and configure your access and security policies. Ideally, you’ll have all access and security policies configured and assigned to users before users enroll their devices. This approach prevents instances where users have enrolled their devices but aren’t managed in accordance with your compliance policies. Understanding and correctly configuring these policies will likely require discussions and coordination with personnel in several areas in your organization, including the following:
![]() Business or department management
Business or department management
![]() IT administration
IT administration
![]() IT security
IT security
![]() Legal
Legal
Make sure you plan to consult and coordinate with people in these areas (and any other required areas) as you develop your policy’s deployment requirements. If needed, review the planning considerations covered in Chapter 1 before you meet with representatives in these areas. In this chapter, we’ll cover the Blue Yonder Airlines requirements as we configure the access and security policies in MDM for Office 365.
Device considerations
Understanding and verifying the types of mobile devices that need to be supported in your organization is also important. It isn’t prudent to guess or assume you know what types of devices are in use or will be used in your organization. Reach out to employees and management to learn what devices are being used and how those device types affect your policy requirements. What you discover might amaze you!
For Blue Yonder Airlines, remote-office employees use a wide variety of mobile devices: Android phones, Android tablets, iPhones, iPads, Windows Phones, and Windows tablets. Each of these devices must be able to connect to Blue Yonder Airlines resources in Office 365.
Deploying MDM for Office 365
Now that you’ve planned for MDM for Office 365 and have a deeper understanding of the needs of Blue Yonder Airlines, you’re ready to start implementing your MDM for Office 365 deployment plan. You’ll start by preparing the Office 365 tenant and initializing MDM for Office 365 by setting the initial MDM Authority.
Office 365 tenant
The remote offices already have an Office 365 tenant, so you just need to follow the steps in this section to make sure that the tenant supports MDM for Office 365. Remember, Office 365 has several types of subscriptions and not all subscriptions include MDM for Office 365. For a list of the Office 365 subscriptions that include MDM for Office 365, see the “Planning for MDM for Office 365” section in Chapter 6.
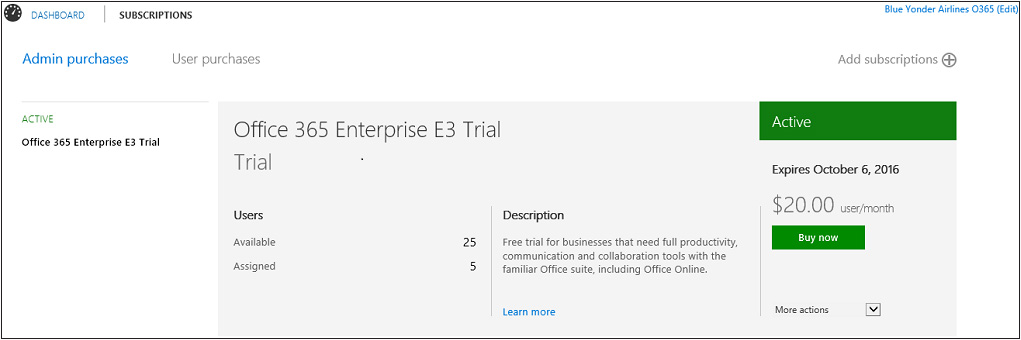
Complete the following steps to check your Office 365 subscription:
1. Sign in to the Office 365 admin portal with administrator permissions.
2. In the Office 365 admin center, click Billing and then Subscriptions in the left navigation pane.
3. On the Admin Purchases page (shown in Figure 7-2), verify that the subscription plan listed is the one you wanted (one that includes MDM for Office 365).
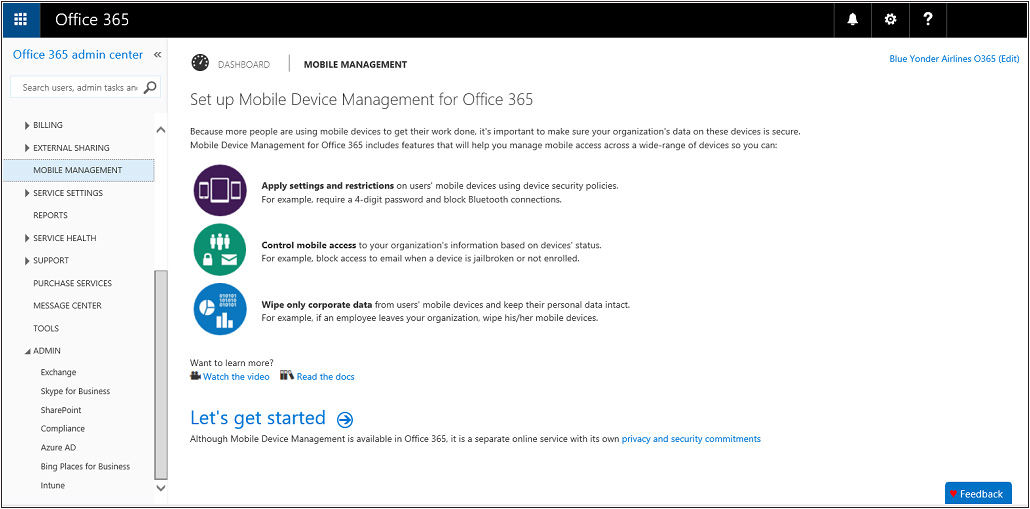
You can also verify that you see the Mobile Management node in the Office 365 admin center left navigation pane. (See Figure 7-3.) If you have an eligible Office 365 subscription that should include MDM for Office 365 and don’t see the Mobile Management node, you’ll need to contact Microsoft Support to resolve this issue.
Setting the MDM Authority
The next step to get started with MDM for Office 365 is to provision the connection with Microsoft Intune (which actually handles the MDM actions in the background) so that the mobile management features can be configured and assigned to the users at the Blue Yonder Airlines remote offices.
Complete the following steps to provision MDM for Office 365:
1. Continuing in the Office 365 admin center, click Mobile Management in the left navigation pane.
2. Click the Let’s Get Started link, shown in Figure 7-3, to start the activation process with Microsoft Intune.
This activation process can take several hours to complete, but typically it takes less than an hour.
After the activation process is completed, you’ll see the Mobile Device Management for Office 365 console on the Mobile Management page in the Office 365 admin center.
Configuring MDM for Office 365
Now that you’ve verified your Office 365 tenant supports MDM for Office 365 and have provisioned the connection with Microsoft Intune, you’ve completed the prerequisites to successfully start implementing mobile device management for the Blue Yonder Airlines remote offices. By configuring access and security policies (and the policy prerequisites), you’ll allow remote-office users to access Office 365 resources and enforce company-information and device-security standards. You’ll start by requesting and configuring an Apple Push Notification service (APNs) certificate for iOS-based mobile device management, configure organization-wide access settings, and then configure device-security settings.
Apple Push Notification service certificate for iOS devices
Before iOS-based mobile devices can be enrolled in MDM for Office 365, you need to obtain an APNs certificate and configure it in Office 365. Without this certificate, MDM for Office 365 won’t be able to communicate securely with iOS-based mobile devices. Because some Blue Yonder Airlines employees at remote offices use iOS-based mobile devices (iPhones and iPads), you’ll need to complete this requirement.
To obtain and install this certificate, download an APNs Certificate Signing Request (CSR) file using the Set Up Mobile Device Management Wizard in the Office 365 admin center and then upload it to the Apple Push Notification Certificates Portal using an Apple ID.
Important
Remember that this APNs certificate requires renewal on a yearly basis, so make sure you’ll have access to the same Apple ID and password used to originally request the APNs certificate. Don’t use an Apple ID belonging to someone who might later leave the company. To create an Apple ID, visit https://appleid.apple.com/account.
To obtain the Blue Yonder Airlines APNs certificate, you need to complete the following steps:
1. Continuing in the Office 365 admin center, click Mobile Management in the left navigation pane.
2. On the Mobile Device Management For Office 365 page, you should see a Configure APNs For iOS Devices alert in the Settings section of the page. Click Manage Settings to start the Set Up Mobile Device Management Wizard and configure the APNs certificate.
3. In the wizard, next to Create An APNs Certificate For An iOS Device, click Set Up.
4. On the Install Apple Push Notification Certificate, in the Download Certificate Signing Request pane, click Download Your CSR File. Save the .csr file to a location on your computer that you’ll remember.
5. Click Next on the Install Apple Push Notification Certificate page.
6. On the Install Apple Push Notification Certificate, in the Create An APNs Certificate pane, click Apple APNs Portal to open the Apple Push Certificates Portal. You’ll upload the .cer file to the portal to generate your APNs certificate.
7. Sign in to the Apple APNs Portal with an Apple ID.
8. Click Create A Certificate, and accept the terms of use.
9. On the Create A New Push Certificate page, browse to the Certificate Signing Request you downloaded to your computer from Office 365, and click Upload. You might need to refresh your browser to continue to the next step.
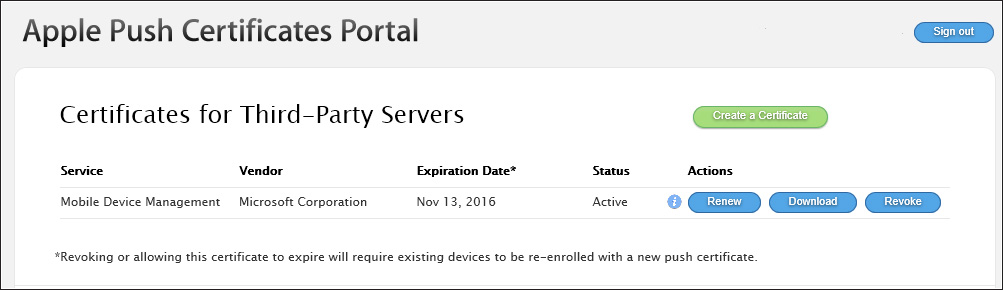
10. Click the Download button, which is shown in Figure 7-4, to save the APNs certificate to your computer. This APNs is usually named something like MDM_Microsoft Corporation_Certificate.pem.
11. Return to Office 365, and on the Install Apple Push Notification Certificate page in the Create An APNs Certificate pane click Next.
12. On the Install Apple Push Notification Certificate page, in the Upload APNs Certificate pane, browse to the APNs certificate you downloaded from the Apple Push Certificates Portal. Select the certificate and then click Open.
13. After you upload the APNs certificate to Office 365, you’ll see a message indicating that your APNs was uploaded successfully. Click Finish to complete the APNs process and return to the Office 365 admin center.
14. After you return to the Office 365 admin center, click Manage Settings to verify the status of the APNs certificate. As shown in Figure 7-5, you should see that the Configure an APNs Certificate for iOS Devices set up has completed successfully.
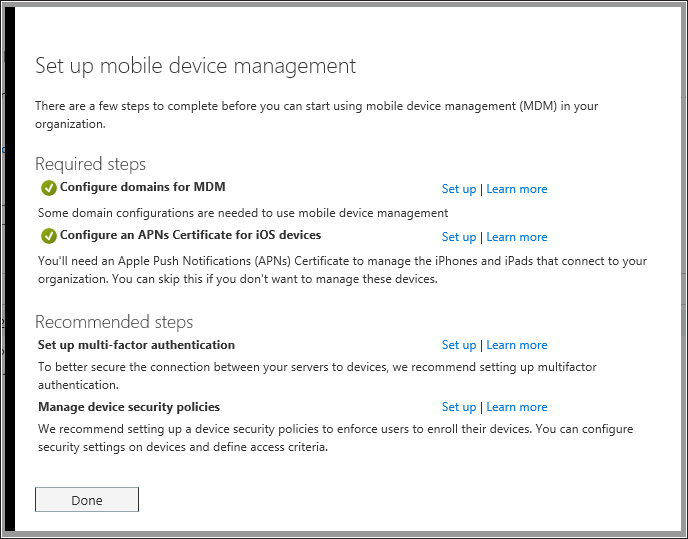
FIGURE 7-5 Successful setup of an APNs certificate in the Setup Mobile Device Management Wizard in Office 365
More Info
For the most current guidance for configuring APNs certificates, see “Create an APNs certificate for iOS devices” at http://aka.ms/EM2/iOSAPN.
Organization-wide access settings
After you configure the APNs certificate in Office 365, the next step is to configure organization-wide access settings for Blue Yonder Airlines’ remote offices. There are two settings you can configure here. The first one lets you allow or block Exchange Online email access for devices that aren’t supported by MDM for Office 365. You can also provide a list of security groups that you don’t want to be included under MDM for Office 365 access control.
A few things to keep in mind when you’re configuring these settings:
![]() Some devices aren’t supported by MDM for Office 365. If any employees have devices that aren’t supported, you need to decide if you want to allow or block them from using an Exchange Online account to access Blue Yonder Airlines email. You have to allow all unsupported devices or block all unsupported devices.
Some devices aren’t supported by MDM for Office 365. If any employees have devices that aren’t supported, you need to decide if you want to allow or block them from using an Exchange Online account to access Blue Yonder Airlines email. You have to allow all unsupported devices or block all unsupported devices.
![]() Some mobile device management features in MDM for Office 365 aren’t supported for some mobile device operating system platforms. Make sure you understand these exceptions when configuring those policies.
Some mobile device management features in MDM for Office 365 aren’t supported for some mobile device operating system platforms. Make sure you understand these exceptions when configuring those policies.
![]() Decide if any security groups should be excluded from accessing Blue Yonder Airlines Office 365 resources. Users in these security groups will always be able to access Blue Yonder Airlines Office 365 information, even if their mobile devices aren’t compliant with the requirements specified in MDM for Office 365 device-security policies.
Decide if any security groups should be excluded from accessing Blue Yonder Airlines Office 365 resources. Users in these security groups will always be able to access Blue Yonder Airlines Office 365 information, even if their mobile devices aren’t compliant with the requirements specified in MDM for Office 365 device-security policies.
For Blue Yonder Airlines’ remote-office employees, you want to block any devices that aren’t supported by MDM for Office 365. You won’t add any security groups to be blocked from all access. You’ll set up policies for the security groups later in this chapter.
To configure the organization-wide access settings for the remote offices, take the following steps:
1. In the Office 365 admin center, navigate to Mobile Management in the left navigation pane.
2. On the Mobile Device Management For Office 365 page, click Manage Device Security Policies And Access Rules. This will take you to the Mobile Device Management page in the Office 365 Compliance Center.
3. In the Mobile Device Management pane, select Manage Organization-Wide Device Access Settings. The page shown in Figure 7-6 will be displayed.
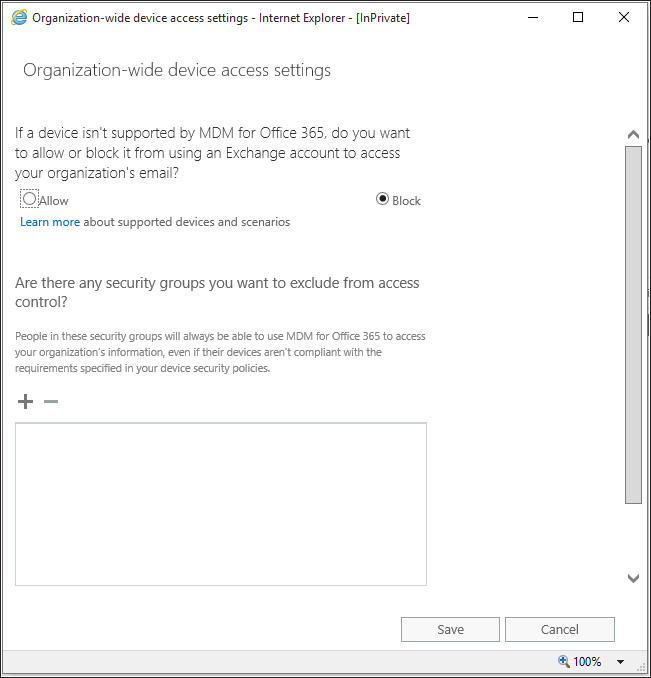
4. Because you want to increase the level of access security to Blue Yonder Airlines Office corporate email, verify that Block is selected on the Organization-Wide Device Access Settings page. This will prevent noncompliant mobile devices from accessing email hosted on Exchange Online. Additionally, you don’t want to exclude any security groups from this policy, so leave the exclusion list blank.
5. Click Save for these updates, and return to the Office 365 Compliance Center.
Security policies
Your next step is to create and deploy security policies for managing mobile devices used at Blue Yonder Airlines remote offices. You’ll use these policies to define the security requirements that devices (and users) must meet in your organization to connect to Office 365 and use cloud-based resources such as Office apps. Mobile devices that don’t meet the security-policy requirements will not be able to access Office 365–based resources, including email hosted on Exchange Online. It’s a good idea to refer to your security planning documentation as you create these policies because you need to ensure you enforce the same requirements. Because you have three different types of mobile device operating system platforms in use at the Blue Yonder Airlines remote offices, you’ll create a separate device security policy for each platform. This approach allows for more flexibility and is easier to update as new operating system platform versions are released.
Use the following steps to create security policies for Blue Yonder Airlines remote-office users and devices:
1. Continuing in the Office 365 Compliance Center, click Device Management in the left navigation pane.
2. Click the New icon (+) to start the New Device Security Policy Wizard.
3. On the New Device Security Policy page, give the device security policy a name and description. Choosing a friendly policy name makes it easy to find it again later, as well as describing what devices the policy governs. In this scenario, name the policy Android, enter a description, and click Next.
4. Next, you’ll select the security requirements you want applied to the Android mobile devices used by employees at the Blue Yonder Airlines remote offices. Following the Blue Yonder Airlines security-policy requirements planning documents, configure the following access-requirement settings:
![]() Select Require A Password.
Select Require A Password.
![]() Ensure that the Minimum Password Length option is selected, and change the character length value to 6.
Ensure that the Minimum Password Length option is selected, and change the character length value to 6.
![]() Verify that the default Require Data Encryption On Devices option is selected.
Verify that the default Require Data Encryption On Devices option is selected.
![]() Verify that the default Prevent Jail Broken Or Rooted Devices From Connecting option is selected.
Verify that the default Prevent Jail Broken Or Rooted Devices From Connecting option is selected.
![]() Click the Block Access And Report Violation option in the If A Device Doesn’t Meet The Requirements Above section.
Click the Block Access And Report Violation option in the If A Device Doesn’t Meet The Requirements Above section.
Tip
When creating the device security policy for iOS devices, make sure you select the Require Managing Email Profile option on this page. This is required for supporting selective wipes on iOS devices.
5. Click Next.
6. On the next page, configure the following device connection settings:
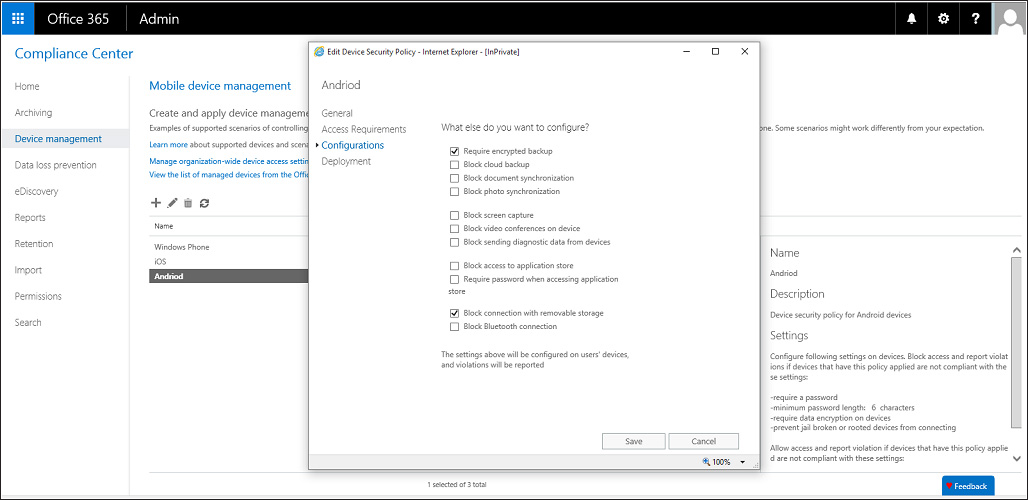
![]() Select the Require Encrypted Backup option.
Select the Require Encrypted Backup option.
![]() Select the Block Connection With Removable Storage option.
Select the Block Connection With Removable Storage option.
Make sure you understand what impact configuration settings will have on each type of device operating system platform. For details, see the “What is the impact of security policies on different device types” section of the “Create and deploy device security policies” topic at http://aka.ms/EM2/Impact.
7. Click Next.
8. Now you can choose to apply the device security policy to the security group by clicking either Yes or No for the “Do you want to apply this policy now?” question. Blue Yonder Airlines has a security group named Android Users that was created to manage remote-office employees using Android devices. To assign this policy to this security group, do the following:
![]() Click Yes for the Apply It To One Or More Security Groups option.
Click Yes for the Apply It To One Or More Security Groups option.
![]() Click the Add icon (+).
Click the Add icon (+).
![]() Type Android Users in the search box and press Enter.
Type Android Users in the search box and press Enter.
![]() Click Add.
Click Add.
![]() Click OK.
Click OK.
Tip
You don’t have to apply the policy to a security group when creating the policy. You can click No, and the policy will be saved but not applied to any devices.
9. Click Next. On the Review And Confirm The Details page, review the device security-policy configuration settings.
10. Click Finish.
Now you’ll see the new device security policy Android in the policy list, and the status will be listed as Turning On. When the policy is configured (typically after just a few minutes), the status will be updated to On. Be sure to create additional device security policies for iOS and Windows Phone mobile devices for the Blue Yonder Airlines remote offices.
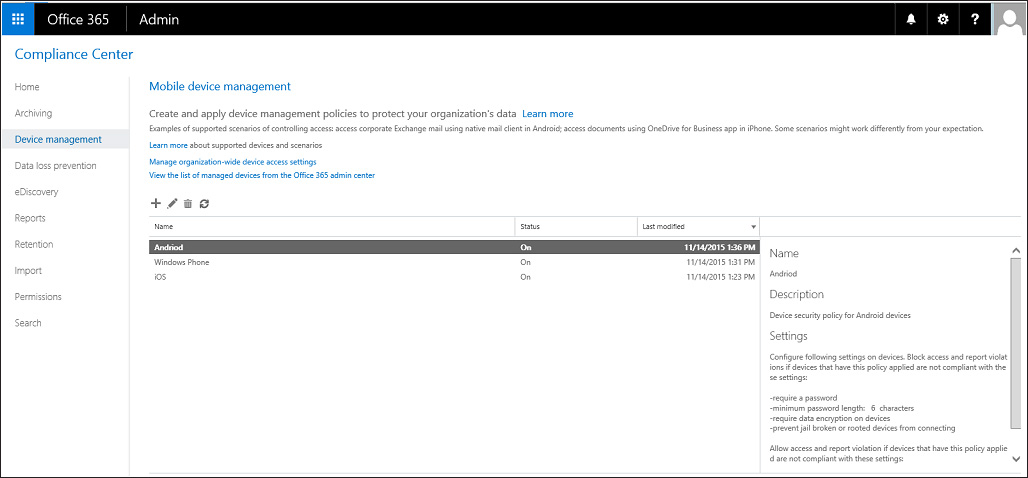
On the Mobile Device Management page in the Office 365 Compliance Center (shown in Figure 7-7), you see a list of all the device security settings you configured for Blue Yonder Airlines remote offices. By selecting a policy in the list, you can quickly view the device security-policy details in the Settings pane. Remember, you can update the policy configuration settings by clicking the Edit icon or by double-clicking the security policy.
More Info
For the most current guidance on creating and deploying device security policies, see “Create and deploy device security policies” at http://aka.ms/EM2/DevicePolicy.
Enrolling devices
Now that you’ve configured the organization-wide access settings, configured device security policies, and assigned the device security policies to users in the Blue Yonder Airlines remote offices, you’re ready for employees to enroll their devices into MDM for Office 365. Because you configured access policies to block access to Blue Yonder Airlines Office 365 resources until devices are compliant, employees won’t be able to access these resources until they’ve completed the enrollment process and addressed any compliance-related issues (such as configuring a device access password).
Users can install the Company Portal app and then configure their email account on the mobile device, or they can choose to configure their Blue Yonder Airlines email account on their device and follow the process outlined in the enrollment message. Although both methods will certainly work, many users find that installing the Company Portal app first is simpler and more straightforward. After the enrollment process is completed, they can add their company email account to the device and it immediately is ready to send and receive email messages. For users that already have their Blue Yonder Airlines email configured before a MDM for Office security policy has been assigned to their account, they’ll receive the enrollment message and have to enroll their mobile device before they can continue to access their corporate email.
The following sections describe the enrollment process for each of the devices supported in the device policies you’ve configured for Blue Yonder Airlines:
![]() Android
Android
![]() iOS
iOS
![]() Windows Phone
Windows Phone
More Info
For the most current device enrollment guidance for all operating system platforms, see “Enroll your mobile device in Office 365” at http://aka.ms/EM2/EnrollDevice.
Enrolling Android devices
The next step is for remote-office employees using Android devices to enroll in MDM for Office 365 so that they can access their Blue Yonder Airlines email hosted on Exchange Online. Unlike Apple mobile devices, Android devices do not require any additional service-side configuration settings to connect to MDM for Office 365. Android device users should simply install the Microsoft Intune Company Portal app from the Google Play store, or they should follow the enrollment instructions provided in the native Android Mail app message when they try to connect to Office 365.
Users should complete the following steps to enroll their Android devices and access mailboxes hosted on Exchange Online in Office 365:
1. Open the Google Play store on your Android device, and search for Intune Company Portal.
2. Install the Intune Company Portal App and then select Open.
3. When the Company Portal App opens, sign in, and enter your Blue Yonder Airlines account and password.
4. On the Device Enrollment page, select Enroll.
5. Review the settings on the Activate Device Administrator page, and then select Activate.
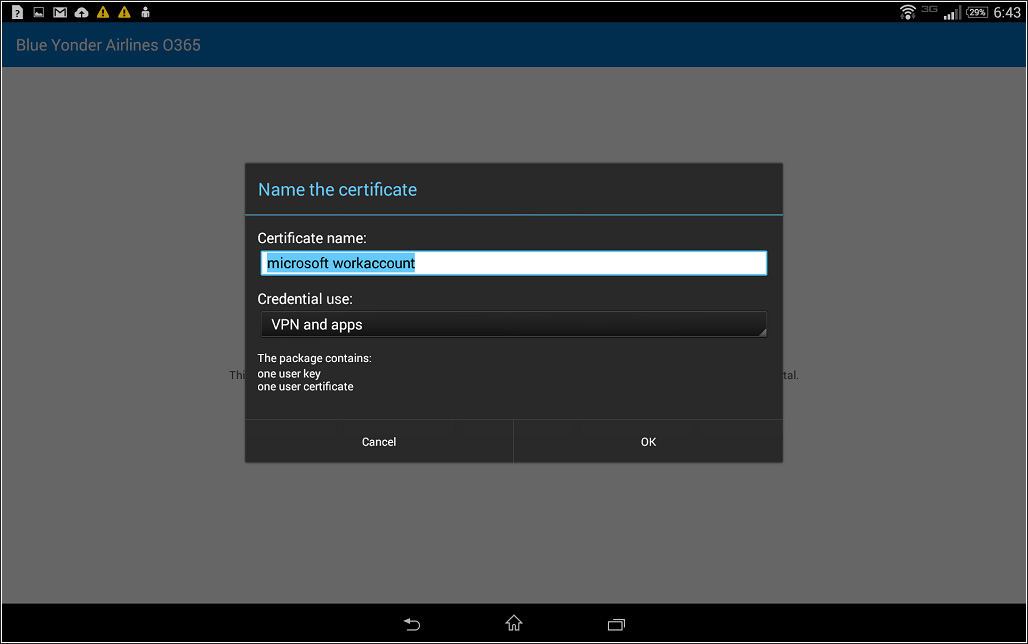
6. As shown in Figure 7-8, click OK to install your site certificate on the Android mobile device.
7. Depending on the device security policy, you’ll typically have to resolve compliance-related issues before the mobile device can be enrolled in MDM for Office 365 as shown in Figure 7-9. For example, you might be prompted to set a device password and encrypt the device. Because you set both of these requirements in the Android device security policy, and the device user is a member of the Android User security group with this policy assigned, this user will need to resolve both of these compliance issues.
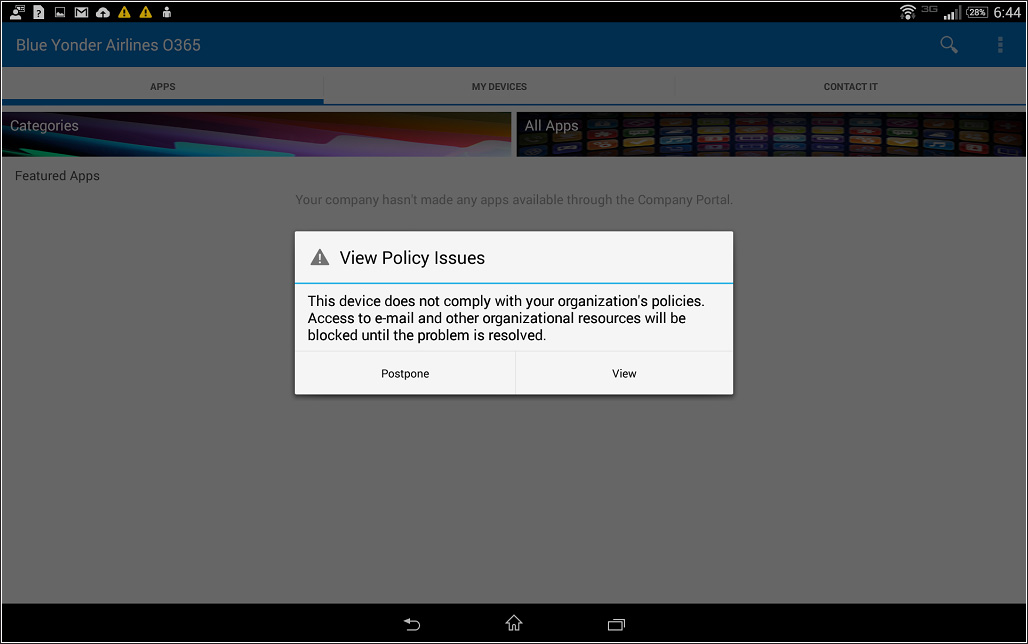
Resolving some compliance issues, like encrypting a mobile device, can take several hours. Be sure your users understand these potential enrollment factors and that they plan accordingly before they enroll their device.
8. After the compliance requirements have been resolved, you’ll recheck compliance using the Company Portal app by choosing the Check Compliance option. Select My Devices, select the name of your Android device, and then click Check Compliance.
9. After the compliance checks are complete, select Complete On The Company Access Setup page, and then click Done.
Now the remote-office employee has completed the enrollment process, the Android device is compliant with Blue Yonder Airlines device security policy, and the employee can access Blue Yonder Airlines corporate email on their device after configuring an email profile.
More Info
To help your end users understand how to manage their Android devices with MDM for Office 365 and Microsoft Intune, you can point them to “Using your Android device with Intune” at https://technet.microsoft.com/library/mt502762.aspx.
Enrolling Apple iOS devices
iPhones and iPads are enrolled into MDM for Office 365 following the same process, and both use the APNs certificate you configured and provisioned earlier. Blue Yonder Airlines remote-office employees can either add their corporate email account to the native iOS mail app or first download and install the Microsoft Intune Company Portal app for iOS from the Apple App Store. The Company Portal app will be installed automatically during the enrollment process outlined by the enrollment email message.
To enroll Apple devices using the enrollment message in the native email profile, device users should complete the following steps:
1. On the iOS device, open the Settings app, click the Mail, Contacts, Calendars section, and choose Add Account.
2. Add the Blue Yonder Airlines Exchange Online account by clicking Exchange, enter your work credentials, click Next, and then click Save.
3. Open the Mail app to synchronize the account with the mobile device.
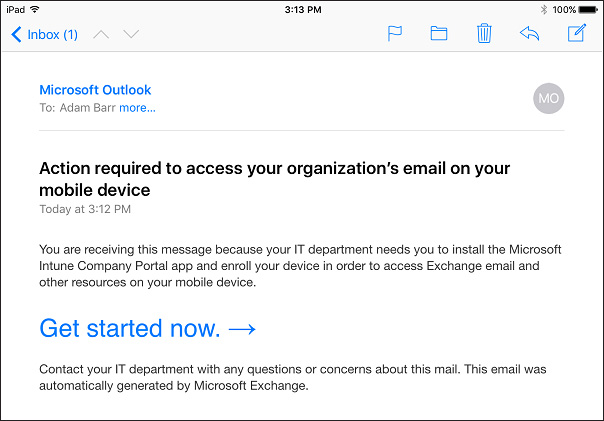
4. You should see a single email message in your mail account as shown in Figure 7-10. Because you configured the device security policy and assigned the security group to the policy that contains this user, this account won’t be synchronized with the Exchange Online mailbox until the device is compliant with the settings defined in the policy. Open the enrollment email message in the Inbox of your email app, and then tap the Get Started Now link.
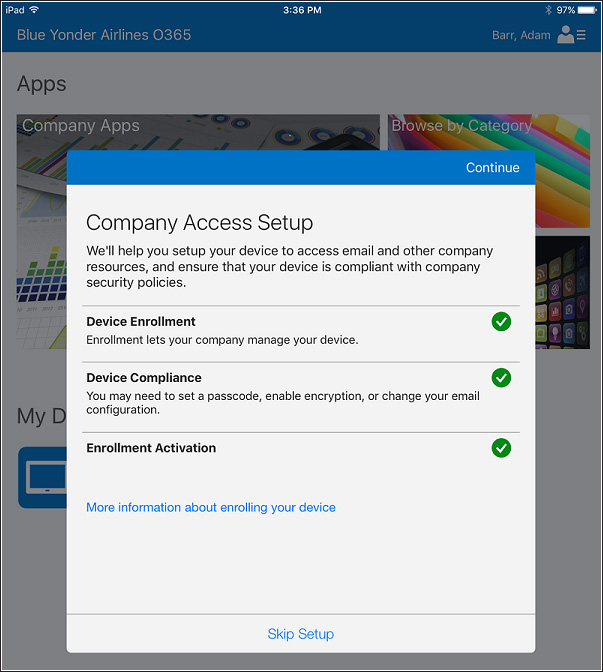
5. On the Company Access Setup page, choose View.
6. Click Get and then click Install to install the Company Portal app.
7. Select your Apple ID, and enter your credentials (if required).
8. Open the Company Portal app after it is installed.
9. Sign in with your Blue Yonder Airlines email credentials.
10. Choose Begin on the Company Access Setup page, and then choose Enroll.
11. Click Install on the Install Profile page to install your APNs certificate. You might need to enter your device passcode to continue. Click Install, and on the Mobile Device Management Warning page, click Install to continue when prompted. When the Remote Management dialog box appears, click Trust. When profile installation is complete, click Done. When the Device Enrolled dialog box appears, click OK.
12. Click Continue on the Company Access Setup page. The compliance check might take a few minutes. Depending on the device security policies settings you configured, the user might be prompted to correct compliance-related settings. For example, because you configured a minimum password length requirement of six characters for Blue Yonder Airlines remote employees, these users will need to update the password configuration on the device to meet this requirement and complete the compliance checks successfully.
13. After the compliance checks are complete, click Complete on the Company Access Setup page and then click Done.
As shown in Figure 7-11, the remote-office employee has completed the enrollment process, the iOS device is compliant with the Blue Yonder Airlines device security policy, and the employee has access to Blue Yonder Airlines corporate email on his device.
More Info
To help your end users understand how to manage their iOS devices with MDM for Office 365 and Microsoft Intune, you can point them to “Using your iOS device with Intune” at https://technet.microsoft.com/library/mt598622.aspx.
Enrolling Windows Phone devices
The process for your users to follow when enrolling Windows Phone devices is similar to the enrollment steps used by both the Android and iOS devices. To enroll Windows Phone devices in MDM for Office 365 for the Blue Yonder Airlines remote-office employees, complete the following steps:
1. On the Windows Phone device, open the Microsoft Store and search for the Microsoft Intune Company Portal app.
2. Install the Company Portal app and then select View. Open the app from the app list. Even though you installed the Company Portal app, you still need to enroll the device in the Intune service before you can access any company resources.
3. Sign in with your Blue Yonder Airlines credentials.
4. Swipe right and select Tap To Enroll or Identify This Device. This takes you to your device Workplace page.
5. On the Workplace page, select Add Account.
6. On the Workplace page, enter your Blue Yonder Airlines email address and select Sign In.
7. Sign in with your Blue Yonder Airlines credentials, and select Sign In. The device will begin checking for compliance issues and will be enrolled in MDM for Office 365. When the process is completed, tap Done as shown in Figure 7-12.
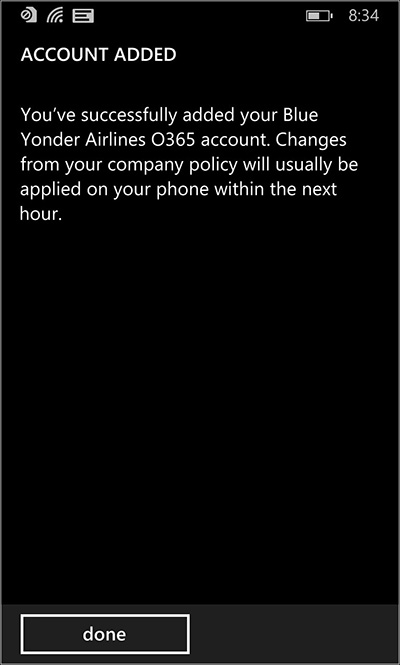
8. Although your device is technically enrolled, you won’t have access until all the compliance requirements are met. For example, you’ll be prompted to update your device password in the Blue Yonder Airlines Windows Phone policy and you will have to set the password before you can access Office 365 resources from the device, as shown in Figure 7-13.
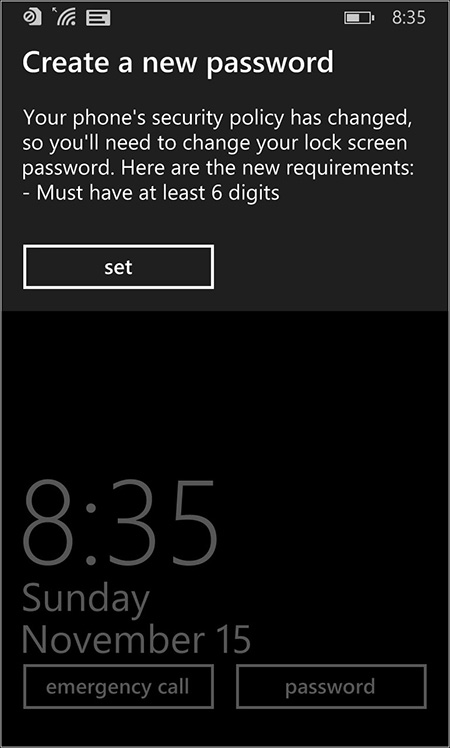
FIGURE 7-13 A security-policy compliance prompt to set a new device password on a Windows Phone mobile device
More Info
To help your end users understand how to manage their Windows devices with MDM for Office 365 and Microsoft Intune, you can point them to “Using your Windows device with Intune” at https://technet.microsoft.com/library/mt427782.aspx.
Managing devices
Now that you’ve enrolled Blue Yonder Airlines remote-office mobile devices, you can manage them using MDM for Office 365. From the Office 365 admin center, you can view enrolled devices using the All or Blocked filter, view device configuration settings, and initiate a full or selective device wipe. Additionally, the Blue Yonder Airlines remote-office employees can manage their devices using the Company Portal app installed on their devices. Let’s take a look at some device management features in MDM for Office 365 you have available as an enterprise administrator for Blue Yonder Airlines.
Viewing enrolled devices
To view devices enrolled in MDM for Office 365 as an enterprise administrator for Blue Yonder Airlines, complete the following steps:
1. Log in to Office 365, and navigate to the Office 365 admin center.
2. Click the Mobile Management node in the left navigation pane.
As shown in Figure 7-14, you can view and sort devices enrolled in MDM for Office 365 by Device Name, Operating System, and Operating System Version. You can also filter the device view by All and Blocked devices. If needed, you can also search the list for devices and manually refresh the device list.
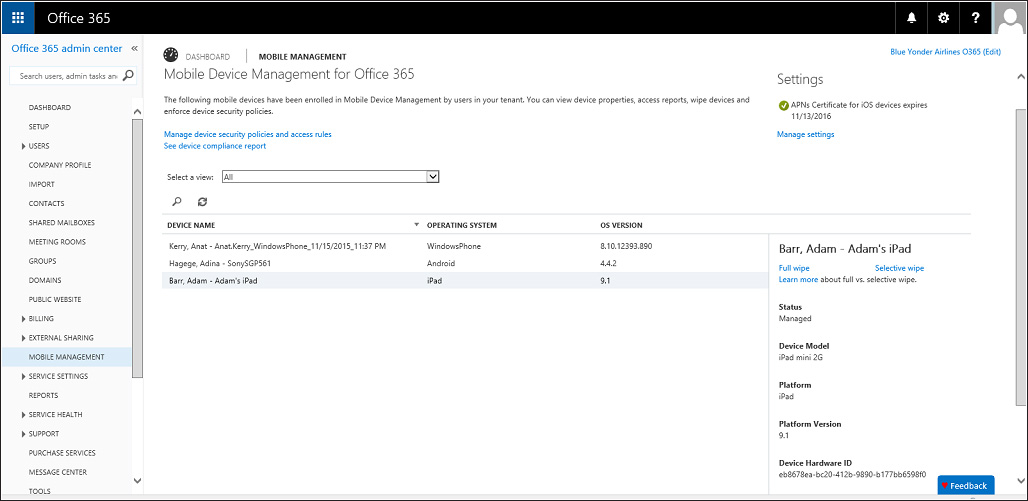
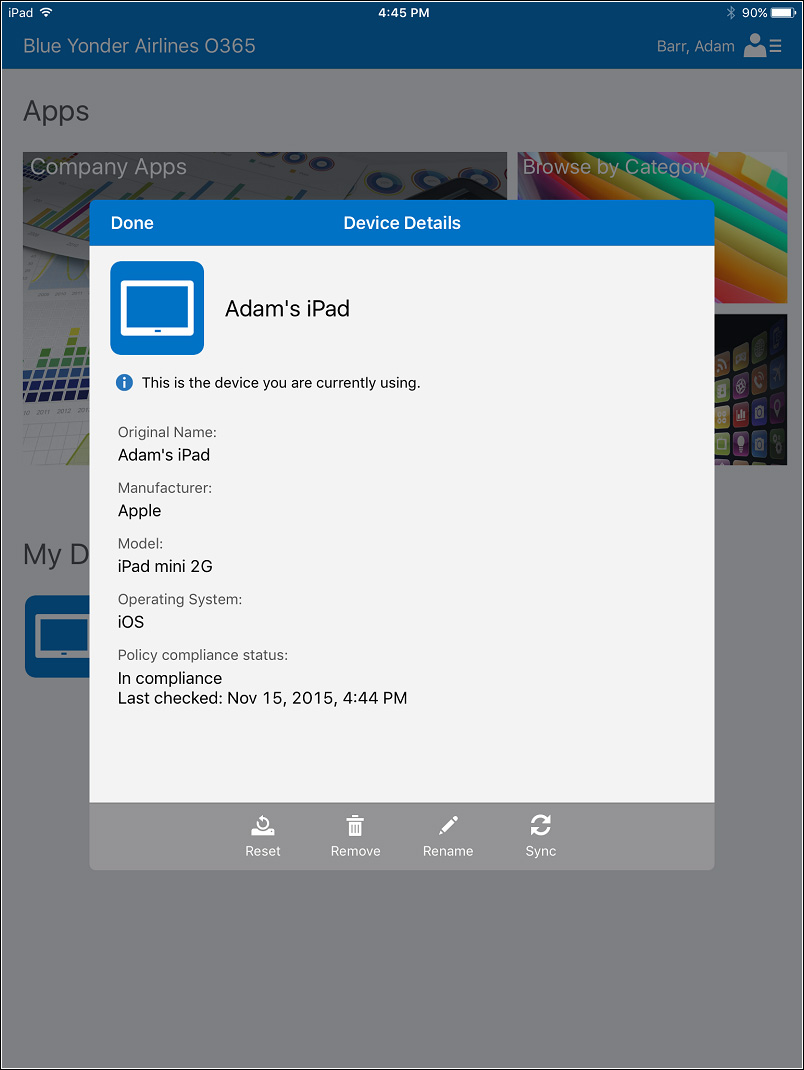
3. When you select an enrolled device in the device view, the device details are displayed on the right side of the device list.
Viewing the device compliance report
To view the device compliance report in MDM for Office 365 as an enterprise administrator for Blue Yonder Airlines, complete the following steps:
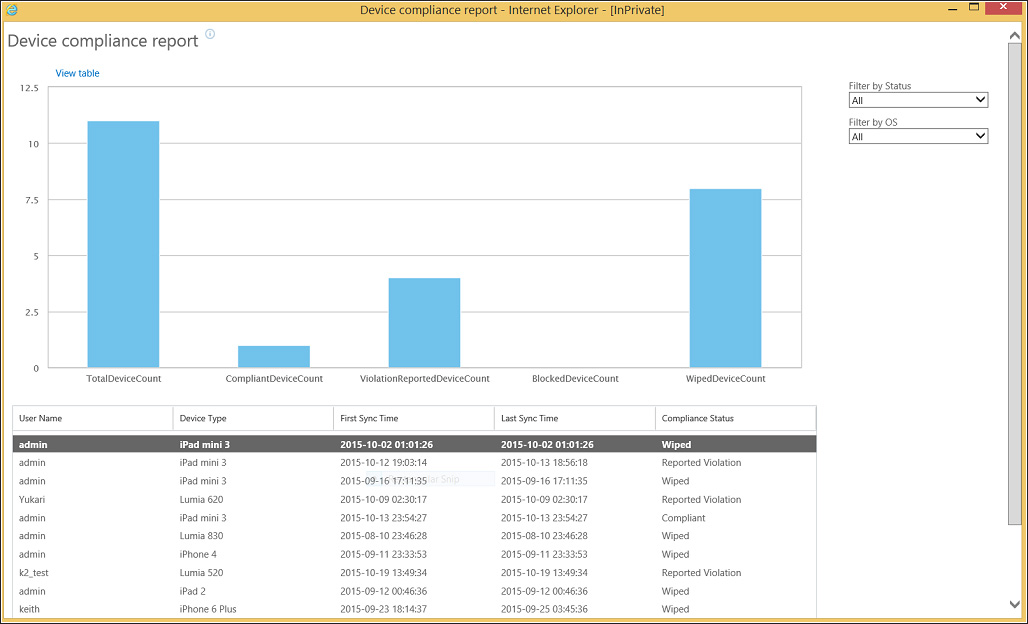
1. Continuing in the Office 365 admin center, click Mobile Management in the left navigation pane.
2. Select See Device Compliance Report. As shown in Figure 7-15, you can view this report to see more detailed information for enrolled devices, including current compliance status, sync status, and totals for different status types for enrolled devices.
Viewing and updating device security policies
To view, manage, or update device security policies as an enterprise administrator for Blue Yonder Airlines, complete the following steps:
1. Continuing in the Office 365 admin center, click Mobile Management in the left navigation pane and select Manage Device Security Policies And Access Rules. This opens the Office 365 Compliance Center.
2. Select a device security policy from the policy list by double-clicking the policy or single-clicking and selecting Edit.
3. As shown in Figure 7-16, update the device security-policy settings and click Save. This saves the policy changes. If you close the policy settings window, you’ll see the policy status update to Turning On while the policy is updated. When the update is complete, the policy status will display On.
User device management
Managing enrolled devices isn’t restricted to enterprise administrators. The Blue Yonder Airlines remote-office employees can also manage their mobile devices using the Company Portal app installed on their devices. Using the app, users can manage the following device areas:
![]() Rename the device.
Rename the device.
![]() Sync the device with MDM for Office 365.
Sync the device with MDM for Office 365.
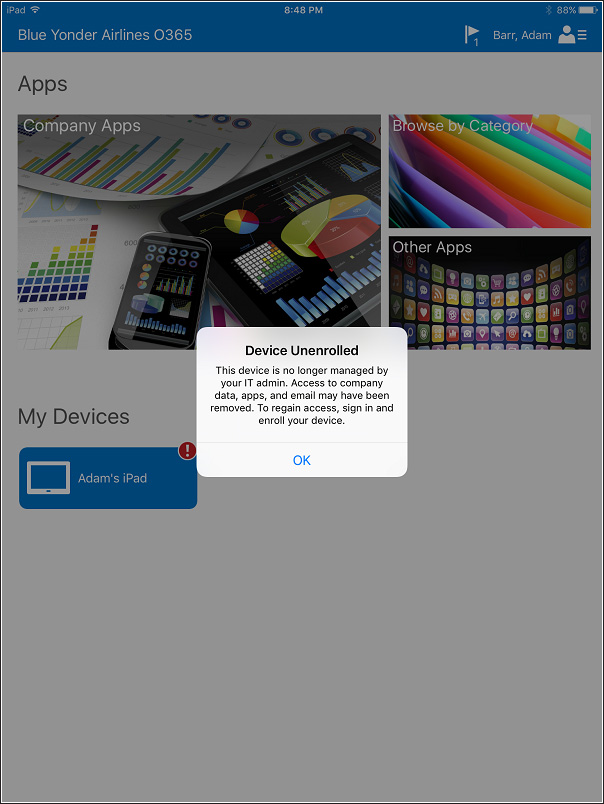
![]() Remove the device from management. Removing the device unenrolls the device from MDM for Office 365 and deletes all company data, apps, and data-access permissions.
Remove the device from management. Removing the device unenrolls the device from MDM for Office 365 and deletes all company data, apps, and data-access permissions.
Depending on the device platform type (Android, iOS, or Windows), the Company Portal app user experience will differ, though each platform will have the same functionality. To manage a mobile device with the Company Portal app as a remote-office employee for Blue Yonder Airlines, complete the following steps:
1. Sign in to your mobile device.
2. Navigate to and open the Company Portal app.
3. Select your device from the device list in the Company Portal to manage the device settings.
4. As shown in Figure 7-17, select the device details setting you want to modify.
Wiping mobile devices
Mobile devices can be protected if they’re lost or stolen by initiating a selective or full device wipe from the Office 365 admin center. This feature is also useful when devices need to be reassigned to a different user. A selective device wipe only removes company data and access settings from the mobile device. All personal information—such as personal email, pictures, texts, and contacts—remain intact on the device. A full device wipe restores the mobile device to its original factory settings and deletes all data on the device, including all installed applications, photos, and personal information. If needed, you can also set up a mobile device management policy that automatically wipes a device after the user unsuccessfully tries to enter the device’s password a specific number of times. The mobile device is automatically unenrolled in MDM for Office 365 whenever a selective or full wipe is performed.
Selective device wipe
Now that you’ve enrolled devices for Blue Yonder Airlines remote-office employees, let’s see how you can perform a selective device wipe. Complete the following steps:
1. Sign in to the Office 365 admin portal with administrator permissions.
2. Navigate to the Office 365 admin center and the Manage Mobility node.
3. Select the device you want to selectively wipe from the device list.
4. In the rightmost device settings pane, select Selective Wipe.
5. Read the selective wipe warning, and confirm you want to selectively wipe the device by selecting Yes.
6. After selecting Yes, you’ll see the device status change to RetireIssued. When the selective wipe is complete, the device will be removed from the device list and unenrolled in MDM for Office 365.
7. As shown in Figure 7-18, the device owner will be notified of the device unenrollment in the Company Portal app.
Full device wipe
Now let’s see how you can perform a full device wipe. Complete the following steps:
1. Sign in to the Office 365 admin portal with administrator permissions.
2. Navigate to the Office 365 admin center and the Manage Mobility node.
3. Select the device you want to fully wipe from the device list.
4. In the rightmost device settings pane, select Full Wipe.
5. Read the full wipe warning, and confirm you want to fully wipe the device by selecting Yes, as shown in Figure 7-19.
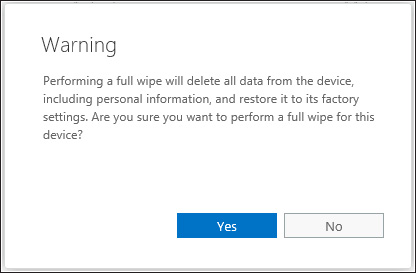
FIGURE 7-19 Full device wipe confirmation message displayed in the Office 365 admin center when wiping a mobile device
6. After selecting Yes, you’ll see the device status change to RetireIssued. When the full wipe is complete, the device will be removed from the device list and unenrolled in MDM for Office 365. The device will also be reset to its factory default settings, and all data of the device will be erased.
More Info
For the most current selective and full device wipe guidance, see “Wipe a mobile device in Office 365” at http://aka.ms/EM2/DeviceWipe.