


Developing Bluemix applications from a local workstation
This unit covers the following topics:
•Review: Creating a Bluemix Node.js application from the Bluemix web interface
•Build an application with the Cloud Foundry command-line interface
•Build an application with the IBM Eclipse Tools for Bluemix
3.1 What you should be able to do
After completion of this unit, you should be able to:
•Describe how to create an IBM SDK for Node.js application that runs on Bluemix
•Describe the features in Bluemix that help you to set up a cooperative workstation environment
•Explain how to manage your Bluemix account with the Cloud Foundry CLI
•Describe how to setup and use the Bluemix plug-in for Eclipse
•Describe the role of Node.js for server-side scripting
3.2 References
The following publications are useful for further research on the topic presented in this unit:
•The Eclipse project:
•Most recent cf installer from the Git project:
•Deploying your app with the command line interface documentation:
•Developing with Eclipse tools documentation:
3.3 Create an application using the Bluemix dashboard

Figure 3-1 Create an application using the Bluemix dashboard
Notes:
As a review from the last unit, the steps to create an app are:
1. At the Bluemix dashboard, click CREATE APP under Cloud Foundry Apps.
2. Select WEB to build a web application.
3. Select SDK for Node.js as the runtime language and framework on which to base your application and click CONTINUE.
4. Enter a name for your app and click FINISH.
After your app is created and deployed, you have three ways to modify your Bluemix application:
•You can install the Eclipse tools for Bluemix in the Eclipse integrated development environment (IDE) on your workstation.
•You can use the Cloud Foundry command line interface to push changes from your local directory to your IBM Bluemix account.
•If you want to develop your application in the cloud, you can manage your source code with your own Git repository, or from a Git repository that is provided by the Bluemix DevOps services.
3.4 Node.js

Figure 3-2 Node.js
Notes:
Node.js is open source language that runs on V8. V8 is an open source engine developed by Google for the Google Chrome browser.
Developers use JavaScript for client-side functionality very often. Node.js is the server component in the same language.
Although developers can still use JavaScript for browser functionality in frameworks like angularJS, dojo, and jQuery, they can now use Node.js in the same components of the architecture where they use Java, Perl, C++, Python, and Ruby.
Node.js is used in production by companies such as Uber, Yahoo!, LinkedIn, GoDaddy, eBay, and PayPal. It is event-driven and uses asynchronous, non-blocking I/O.
3.5 Cloud Foundry command-line interface: Overview

Figure 3-3 Cloud Foundry command-line interface: Overview
Notes:
Cloud Foundry is an open source PaaS. Cloud Foundry provides an open source command-line interface, available for multiple platforms. You can use the command-line interface to log in to Bluemix, deploy an application to Bluemix, and to manage domains, routes, organizations and spaces.
3.6 Why use command-line tools?
Figure 3-4 Why use command-line tools?
Notes:
As mentioned previously, Bluemix integrates into the Eclipse IDE. With this graphical user interface available, why would you want to use command-line tools? Some possible reasons are that you want to use a tool that is quick to install and has a minimal footprint on your development workstation.
You may want to automate the management and deployment process with shell scripts, or you want to use different tools for different projects to provide some project-level separation.
3.7 Step 1: Review the documentation

Figure 3-5 Step 1: Review the documentation
Notes:
You can review the documentation for the command-line tool at the webpage shown on this slide. From this page, you can also download the Cloud Foundry command-line interface by clicking Download CF Command Line Interface.
3.8 Step 2: Install the Cloud Foundry command-line interface

Figure 3-6 Step2: Install the Cloud Foundry command-line interface
Notes:
The Download CF Command Line Interface link will take you to the link provided on this slide, which has a list of installers and binaries downloadable for most systems. Generally, download an installer because they are faster and easier to use than the raw binaries. After you download and run the installer, open a command prompt on your system and run the command line tool by entering cf --version.
More details on this process are included in the exercises accompanying this unit.
3.9 Step 3: Connect to your IBM Bluemix account

Figure 3-7 Step 3: Connect to your IBM Bluemix account
Notes:
Next, log in to Bluemix using the command-line interface. The login command requires five parameters:
•The Cloud Foundry API endpoint
•Username
•Password
•Organization name
•Space name
The exercises provide step-by-step instructions for how to log in this way. You can use the command-line client with other Cloud Foundry regions by pointing to other API endpoints, for example api.eu-gb.bluemix.net.
This course uses the US South region. You can use the flags (dash a, dash u, and so on) to specify the parameters at the command line. If you do not specify one of the parameters, the command-line utility will prompt you to enter it later. In the example shown in the slide, the password was not entered, so the command-line utility prompts the user to enter the password.
3.10 Step 4: Deploy your application to IBM Bluemix

Figure 3-8 Step 4: Deploy your application to IBM Bluemix
Notes:
The push command uploads, deploys, and starts the application in your Bluemix space.
When you are ready to deploy your application to IBM Bluemix, run the cf push command. Pushing your app is the terminology used to indicate that you are going to deploy the latest changes of your app to Bluemix.
Keep in mind that when you push your application, it overwrites the current contents of your application in your Bluemix account. Write down the application route to your application. You can test your application with this entry point.
Note that this slide shows the command-line utility accessing a manifest file. You can control various aspects of the deployment, such as the amount of memory an app receives, the route of the application, and so on, by specifying them as flags in the command. However, you can also store these settings in a manifest YAML file to make the command you need shorter to type in later iterations of your app.
3.11 Step 5: Test your Bluemix application

Figure 3-9 Step 5: Test your Bluemix application
Notes:
After the command-line utility finishes pushing your application, browse to the route name you wrote down in the previous step to test whether the application is running.
3.12 IBM Bluemix and Eclipse

Figure 3-10 IBM Bluemix and Eclipse
Notes:
Eclipse is a popular open source integrated development environment or IDE that provides development tools in a desktop application. You can learn more about Eclipse at eclipse.org. IBM Eclipse tools for Bluemix is an open source plugin for interacting with Bluemix to manage and deploy your applications and services from within the Eclipse interface.
3.13 Step 1: Review the documentation

Figure 3-11 Step 1: Review the documentation
Notes:
To start developing with the IBM Eclipse Tools for Bluemix plugin, you must first have Eclipse Luna for Java EE Developers installed, which requires having the Java Development Kit installed. You can then browse to the URL on this slide to review the documentation for Eclipse tools.
3.14 Step 2: Install Eclipse Luna and Eclipse tools for Bluemix

Figure 3-12 Step 2: Install Eclipse Luna and Eclipse tools for Bluemix
Notes:
The simplest way to install the IBM Eclipse Tools for Bluemix is to drag the Install button from the documentation on top of your Eclipse toolbar.
3.15 Step 3: Connect to your IBM Bluemix account

Figure 3-13 Step 3: Connect to your IBM Bluemix account
Notes:
After you have successfully installed the IBM Bluemix tools for Eclipse plugin, you can set up a server object within Eclipse that links to your Bluemix account. Create a server object, and then enter the IBM ID and password that you use to log in to your Bluemix account.
3.16 Step 4: Create a Node.js application project
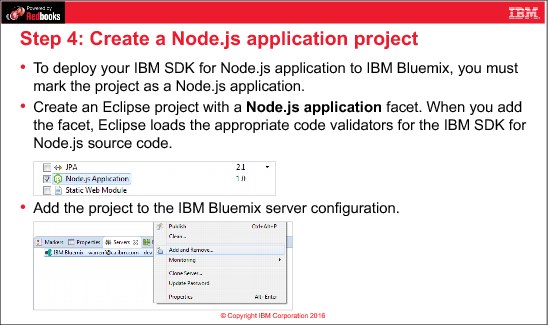
Figure 3-14 Step 4: Create a Node.js application project
Notes:
You can only add projects for server runtime environments that Bluemix supports. For example, you must mark your Eclipse project as a Node.js application to deploy it for the IBM SDK for Node.js runtime. You “mark” your project using Eclipse project facets.
To view or modify the facets for your project, select the Properties for your project and select Project Facets. Once you have added the Node.js facet to your application, it will show up in Eclipse as an item that you can deploy to Bluemix.
3.17 Unit summary

Figure 3-15 Unit summary
Notes:
In this unit, we have described how to create an IBM SDK for Node.js application that runs on Bluemix, described the features on Bluemix that help you to set up a cooperative workstation environment, explained how to manage your Bluemix account with the Cloud Foundry CLI, described how to integrate workstation development platforms with the Bluemix plug-in for Eclipse, and described the role of Node.js for server-side scripting
3.18 Exercise 1 objectives

Figure 3-16 Exercise 1 objectives
Notes:
(none)
3.19 Exercise 2 objectives

Figure 3-17 Exercise 2 objectives
Notes:
(none)
3.20 Checkpoint questions

Figure 3-18 Checkpoint questions
Notes:
(none)
3.21 Checkpoint answers

Figure 3-19 Checkpoint answers
Notes:
(none)
..................Content has been hidden....................
You can't read the all page of ebook, please click here login for view all page.