


Using IBM Bluemix DevOps services
This unit covers the following topics:
•IBM Bluemix DevOps overview
•Web IDE (edit code)
•Source Code Management (SCM)
•Automated Delivery Pipeline (Build & Deploy)
•Agile Planning Tools (Track & Plan)
4.1 What you should be able to do
After completion of this unit, you should be able to perform these tasks:
•Describe DevOps.
•Describe IBM Bluemix DevOps Services.
•Describe the capabilities of IBM DevOps Services.
•Identify the Web IDE features in IBM Bluemix DevOps.
•Describe how to connect the Git repository client to your IBM Bluemix DevOps Services project.
•Explain the pipeline build and deploy processes that IBM Bluemix DevOps Services use.
•Describe how IBM Bluemix DevOps Services integrate with the IBM Bluemix cloud.
•Describe the agile planning tools in IBM Bluemix.
4.2 References
The following publications are useful for further research on the topic presented in this unit:
•Documentation about Agile:
•Open source Git project:
•An Overview of IBM Bluemix DevOps Services:
•Tutorials/Documentation for Bluemix DevOps Services:
4.3 What is DevOps?
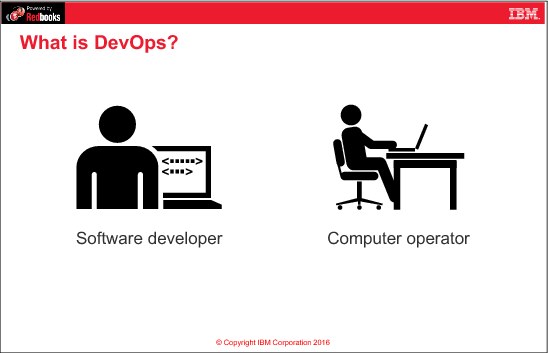
Figure 4-1 What is DevOps?
Notes:
Before DevOps, there were two teams responsible for code delivery:
•Development team: Designed the code, delivered new features, fixed bugs, and tested the code.
•Operations team: Deployed the code to the different environments, maintained the uptime on production, and diagnosed failures.
The term DevOps comes from merging the words development and operations. With DevOps, both the operations and development teams work together to support the software lifecycle, from code design all the way to deployment to production. This includes automating all the tasks. The developer only has to develop code, and can then rely on the DevOps platform to do the rest. For example, the developer can automate the build process, code testing, and deployment to the different environments.
4.4 Benefits of DevOps
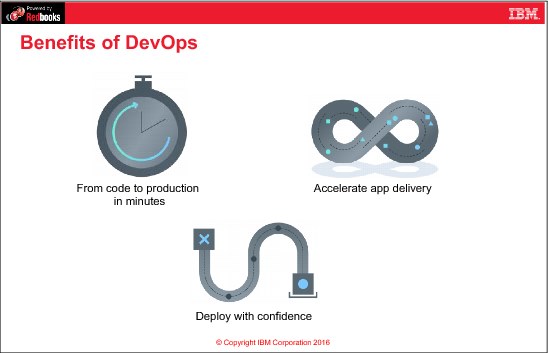
Figure 4-2 Benefits of DevOps
Notes:
DevOps provides the following benefits, among others:
•From code to production in minutes: Work on your own or use the collaboration tools to work with a team. In minutes, you can go from source code to a running app.
•Accelerate app delivery: Innovate like a startup, and scale for the enterprise. You can host an open source project, run a hackathon, or start a skunkworks project. Plan anything, even monthly meetings. DevOps code is continuously delivered and integrated into the main shared repository.
•Deploy with confidence: Automatically deploy your projects whenever a project member pushes code to your repository. Simply deploy files as they are pushed, or you can configure more advanced build options.
4.5 What is IBM Bluemix DevOps Services?

Figure 4-3 What is IBM Bluemix DevOps Services?
Notes:
IBM Bluemix DevOps Services are Software as a Service (SaaS) capabilities that support continuous delivery for:
•Developing
•Tracking
•Planning
•Deploying
With Bluemix DevOps Services, you can develop, track, plan, and deploy software in one place.
IBM Bluemix DevOps Services complement the Bluemix cloud platform. Your organization can produce working applications in minutes, starting from a Bluemix boilerplate or sample application.
4.6 What services does Bluemix DevOps provide?

Figure 4-4 What services does Bluemix DevOps provide?
Notes:
IBM Bluemix DevOps provides a comprehensive set of features for the operations and software development teams.
You develop your code (for example, Node.js, Java, or any other code) in a web-based integrated development environment (Web IDE). No additional software is necessary, other than your web browser. The Web IDE saves your current work in a cloud-based file directory, which is known as the local repository. Although using the Web IDE is great, you can still use a desktop IDE such as Eclipse with DevOps Services.
The local repository is a copy of your latest edits before you submit your work to a source control system (SCM). IBM Bluemix DevOps creates a Git repository as a change management system. The Git repository, which is known as the remote repository, is hosted on the Bluemix DevOps Services infrastructure.
Bluemix Build & Deploy automates the process of building and deploying your code as a Bluemix application. You can also configure the build, deploy, or test scripts within the Web IDE.
To track the progress of your development and operations, Bluemix DevOps Services provide agile planning tools. You can use these tools to track and plan your agile project. You can manage any type of project with an agile approach by using the Track & Plan feature in IBM Bluemix DevOps Services. The Track & Plan tools simplify project planning and speed your workflow.
4.7 Setting up a Bluemix DevOps Services project

Figure 4-5 Setting up a Bluemix DevOps Services project
Notes:
You must create a project to manage, build, and deploy your application from Bluemix DevOps Services.
From the Bluemix dashboard, select your app and then click ADD GIT. Create Git Repository creates a Git repository that contains the code of your app. It also creates a DevOps Services project that you can use to develop the app online.
4.8 Add Bluemix DevOps capabilities

Figure 4-6 Add Bluemix DevOps capabilities
Notes:
You can create an empty project or selecting Populate the repository with the starter application package and enable the Build & Deploy pipeline. This option populates the local repository with a starter application, and also creates a simple delivery pipeline that packages the application and pushes it to your Bluemix account.
4.9 Web IDE: Edit Code features

Figure 4-7 Web IDE: Edit Code features
Notes:
The Edit Code features in IBM Bluemix DevOps provide two capabilities:
•Web IDE capabilities:
– No installations, just code now.
– The Edit Code feature provides a workspace to develop source code and configuration files.
– It provides a fully featured environment for writing your application, right within your web browser.
– It provides rich code completion capabilities for CSS, HTML, and JavaScript.
– You can deploy, stop, and run applications from the Run bar.
– You can also view the logs from the Run bar.
•Bluemix Live Sync features:
– Live Edit (Currently only allowed for Node.js applications): Allows you to make changes to your application from the Web IDE without the need of redeploying it.
– Debug (Currently only allowed for Node.js applications): While a Node.js application is in Live Edit mode, you can shell into it and debug it. You can edit code dynamically, insert breakpoints, step through code, restart the runtime, and more by using the Node Inspector debugger.
– Desktop Sync: You can synchronize any desktop directory tree with a cloud-based project workspace similar to the way Dropbox works.
4.10 Web integrated development environment: Overview

Figure 4-8 Web integrated development environment: Overview
Notes:
The figure shows the Edit Code perspective for the Web IDE in Bluemix DevOps. Project Navigator displays the contents of the Bluemix DevOps user directory for the project.
You can quickly switch between the EDIT CODE, TRACK & PLAN, and BUILD & DEPLOY modes with the buttons on the top of the page.
When you select a file, the editor displays its contents on the right side of the page. You can edit source code, configuration files, and other artifacts directly within your web browser.
This view is for your local workspace on IBM Bluemix DevOps. To commit the code changes, switch to the GIT view that will be described in the next sections
4.11 Editing source code in Bluemix DevOps Services

Figure 4-9 Editing source code in Bluemix DevOps Services
Notes:
When you open an IBM SDK for Node.js script file, the editor provides real-time validation and syntax checking of the source code. It uses tools like JSHint, which is a JavaScript quality tool that helps to detect errors and potential problems in the code. A preview window flags warnings and errors on the right side of the page.
4.12 Editor features: Code completion

Figure 4-10 Editor features: Code completion
Notes:
To execute the code completion shortcut, place your cursor within the editor and press Ctrl + Space bar. This feature displays the libraries that are available at the cursor point, including third-party modules that you imported in the script. For example, in this figure the code completion feature displays functions and templates for the Express web application framework for Node.js because that is what the cursor is near.
4.13 Editor features: Run bar

Figure 4-11 Editor features: Run bar
Notes:
You can quickly build and deploy your application to a test environment on IBM Bluemix without committing your code to the Git repository.
1. The status area displays which launch configuration the run bar uses during the build and deploy task.
2. When you press the Play button from the Run bar, you build and deploy the code in your user directory to your Bluemix account.
3. You can Stop the application
4. You can open the application route
5. You can open application logs
6. You can access the dashboard from the same bar as shown in points.
4.14 Bluemix Live Sync features

Figure 4-12 Bluemix Live Sync features
Notes:
If you are building a Node.js application, you can use IBM Bluemix Live Sync to quickly update the application instance on Bluemix and develop as you would on the desktop without redeploying.
When you make a change, you can see that change in your running Bluemix application immediately (without the need to recompile and redeploy). In addition, you can access your application from the browser on the desktop or a mobile device.
Bluemix Live Sync works from both the command line and in the Web IDE. You can debug applications written in Node.js by using Bluemix Live Sync.
Bluemix Live Sync consists of three features:
•Desktop Sync
You can synchronize any desktop directory tree with a cloud-based project workspace similar to the way Dropbox works. The Web IDE directly edits the same cloud-based workspace, so both stay in sync. Desktop Sync works for any kind of application. To use Desktop Sync, you must download and install the BL command-line interface, which is the Bluemix Live Sync command line. Desktop sync works with all types of applications.
•Live Edit (only for Node.js applications)
You can make changes to a Node.js application running in Bluemix and test them in your browser right away. Any changes that you make in a synchronized desktop directory or in the Web IDE are propagated to the application's file system immediately.
•Debug (only for Node.js applications)
While a Node.js application is in Live Edit mode, you can debug it on the Web IDE. You can edit code dynamically, insert breakpoints, step through code, restart the runtime, and more. You must use a Chrome browser to be able to use the Debug feature.
4.15 Source control with a Git repository

Figure 4-13 Source control with a Git repository
Notes:
By default, the Add Git feature in the Bluemix dashboard creates a Bluemix DevOps Services project and Git repository. Git is an open source change management system. If your organization uses IBM Rational® Team Concert™, you can set up a Jazz™ SCM environment to manage your code. You can also point your Bluemix DevOps Services project to an external, third-party Git repository provider, such as GitHub.
The Git repository perspective in the Bluemix DevOps Services web IDE supports common Git commands to manage your code. You can also develop your application on your own workstation and commit your changes to the Git repository with a standard Git client. For more information, see the open-source Git project at www.git-scm.com.
4.16 Git repository overview

Figure 4-14 Git repository overview
Notes:
The numbers in the figure correspond to these steps:
1. Switch to the Git perspective from the navigation bar on the left side of the web application.
2. You can review the commit history with the time/date for each commit. You can perform actions for each commit such as view the files committed, and revert changes introduced by any commit.
3. The Working Directory Changes pane detects any updated files in the Bluemix DevOps user directory. Click any file to review the changes that have been made in that file.
4. Select the files that you want to commit, add a descriptive comment about that change, then click Commit to commit the changes to your local repository.
5. The Outgoing pane lists the files that you want to commit to the remote repository. View the outgoing changes, then click Push to push the committed changes to the remote repository.
6. If another user updated the files in the remote repository, the Incoming pane lists the updated files.
4.17 Connect a Git client to your Bluemix DevOps project

Figure 4-15 Connect a Git client to your Bluemix DevOps project
Notes:
You can still develop your application on your own local workstation. Start by retrieving a copy of the Bluemix application source code with the git clone command. After you have a copy of the source code, use a text editor or integrated development environment to write and test your application.
To check whether another developer on your team updated the source code, run the git status command.
When you want to save your updated source code, run the git add command to stage the needed files to be committed.
Then the run git commit command and save a message for the history log to commit all the added files to your local repository.
Finally, run git push to send your committed changes to the remote repository.
4.18 Bluemix DevOps Services: Build & Deploy

Figure 4-16 Bluemix DevOps Services: Build & Deploy
Notes:
By default, Bluemix DevOps Services automatically runs the build and deploy tasks when you commit changes to the Git repository. If you want to quickly test your code without committing your changes, click Play from the Run bar.
Each job can be either to Build, Deploy, or Test the application. These jobs are grouped into stages.
4.19 Customizing the delivery pipeline
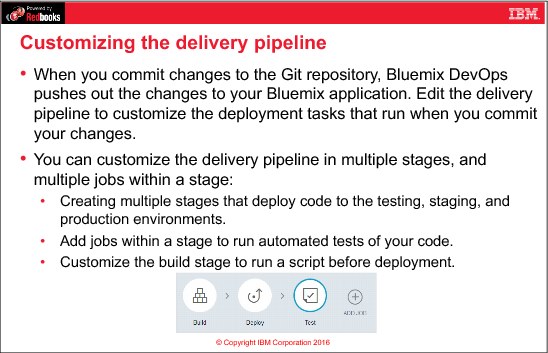
Figure 4-17 Customizing the delivery pipeline
Notes:
When you select Add Git from the Bluemix dashboard, the wizard provides you with the Populate the repository with the starter application package and enable the Build & Deploy pipeline option. If you do not select this option, Bluemix DevOps does not create any Build & Deploy stages for your project. You will have no jobs defined in your delivery pipeline. In this case, you must manually configure the Build & Deploy jobs.
4.20 Example: Default delivery pipeline

Figure 4-18 Example: Default delivery pipeline
Notes:
The default build script is simple: It takes the files that are pushed to the remote Git repository and triggers Bluemix to build your code in the server runtime. For example, Bluemix downloads the IBM SDK for Node.js modules that you imported into your script.
You can customize the settings for the server runtime through the manifest.yml file.
After the build stage completes successfully, the deploy stage runs. Bluemix DevOps deploys the built files to your IBM Bluemix space.
4.21 Example: Customizing the build stage

Figure 4-19 Example: Customizing the build stage
Notes:
By default, Bluemix DevOps runs the Build stage when a client pushes any change to the master branch in the remote Git repository.
If you do not want to automatically push your changes to your Bluemix account, change the State trigger setting to Only execute jobs when a user manually runs this stage in the build stage.
4.22 Example: Configuring build jobs
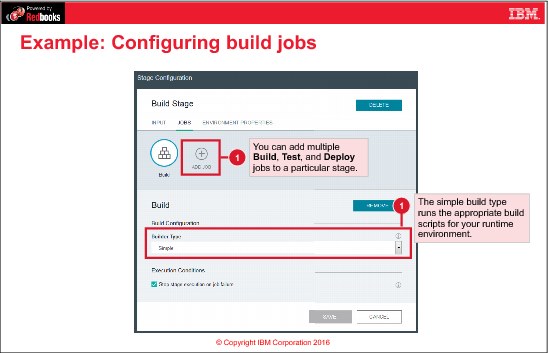
Figure 4-20 Example: Configuring build jobs
Notes:
You can extend the features of the build stage by adding additional jobs. Although Bluemix DevOps named this stage configuration the Build Stage, you can add build, test, or deploy jobs.
Builder Type currently supports these types:
•Simple
•Ant
•Gradle
•Grunt
•IBM Container Service
•IBM Globalization Pipeline
•Maven
•npm: For Node.js projects.
•Shell Script.
The simple build type runs the appropriate build scripts for your runtime environment. For example, the IBM SDK for Node.js run time resolves modules that your application requires.
4.23 Example: Configuring deploy job

Figure 4-21 Example: Configuring deploy job
Notes:
In this example, you create a more complex deploy task that pushes the application to a specific space on Bluemix.
There are three Deployer Types:
•Cloud Foundry: Deploys applications to Cloud Foundry servers, such as IBM Bluemix. This is the default deployer type for the deploy job.
•Active Deploy: You can update running apps with zero downtime when you use the IBM Active Deploy service in your pipeline. The Active Deploy - Begin job contains a script that starts the deployment process to increase instances of your new app until both versions of your app are live in production. Active Deploy - Complete ends that deployment process and decreases the original version of the app if the test phase was successful.
•IBM Containers on Bluemix: Provides a set of default deployment patterns for containers on the IBM Containers service. Containers are typically built using the Docker Builder.
In this example, your application is pushed to the dev space in your organization. You can also publish your application to your staging and production spaces.
You can customize the Cloud Foundry command-line interface commands in the deploy process in the Deploy Script section. The default deploy action is equivalent to running cf push from the command-line interface. You can add custom shell script commands as well. ${CF_APP} in the figure refers to the application name.
4.24 Example: A successful build and deploy result

Figure 4-22 Example: A successful build and deploy result
Notes:
The default settings for the delivery pipeline are two stages:
•Build Stage:
– Input: This stage is triggered whenever a change is pushed to Git.
– Jobs: Simple Builder Type.
•Deploy Stage:
– Input: This stage is triggered whenever the Build Stage is completed successfully. It takes the build artifacts produced from the Build Stage as input.
– Jobs: Deploys the application to IBM Bluemix.
In this example, all the jobs in the Build Stage and Deploy Stage were completed successfully as shown in the JOBS pane of Build Stage and Deploy Stage.
The LAST EXECUTION RESULT pane shows that Bluemix DevOps successfully deployed the application to your Bluemix account, and shows that the application is currently running on Bluemix.
You can also check the build logs in the JOBS pane in the Build Stage column, the deploy logs in the JOBS pane in the Deploy Stage column, and the runtime logs from LAST EXECUTION RESULT pane in Deploy Stage column.
You can also clone the Deploy Stage and deploy the application to any number of spaces in your IBM Bluemix account by clicking the settings wheel icon on top of Deploy Stage, then selecting Clone Stage.
4.25 Track & Plan Tools

Figure 4-23 Track & Plan Tools
Notes:
Agile software development values:1
•Individuals and interactions over processes and tools.
•Working software over comprehensive documentation.
•Customer collaboration over contract negotiation.
•Responding to change over following a plan.
IBM Bluemix DevOps supports the agile development ideology. Track & Plan is one of the features of Bluemix DevOps Services. It is an agile tool that makes viewing, editing, and planning tasks fast and easy. It provides these features:
•Track work for you and your team
•Quickly create work items of different types including Defect, Task, and Story.
•Check what is incoming to your project
•Groom your backlog
•Plan work for future releases and sprints
You can manage any type of project with an agile approach by using the Track & Plan feature in Bluemix DevOps Services. The Track & Plan tools simplify project planning and speed your workflow.
4.26 Track & Plan Tools capabilities

Figure 4-24 Track & Plan Tools capabilities
Notes:
The Track & Plan Tools allow the project members to perform these tasks:
•Create Work Items
– In Agile programming, an Epic captures a big chunk of functionality that is decomposed later into Stories. Each Story has a group of assigned tasks, and each task is assigned to a user. You can model that using the Track & Plan Tools in Bluemix DevOps. You can create a work item of type Epic and compose it into sub work items of type Story. For each created story, you can create list of relevant work items of type Task or Defect.
– You can assign work items to any member of the team by using the Owned By attribute.
– You can set the priority of the work item according to urgency to Low, Medium, or High.
– You can subscribe to any work item or manage the Subscribers.
•View Incoming Work
– By default the new work items are added into INCOMING WORK view. You can triage the needed work items to the backlog.
•View and Manage the Backlog
– This view contains all the work items that have been triaged from the incoming work but have not been assigned to any sprint yet.
– Work Items in the backlog are ranked automatically based on Priority. You have the option to change the ranking manually.
•View and Manage Sprint Planning
– It allows the members to add a Sprint, add new work items to a Sprint, and change the assign any work item from the backlog to the Sprint.
•View Team's Work
– View the status of the work items assigned to the current sprint (New, In Progress, Implemented, Done (Completed Testing), Deferred, or Rejected (Invalid)).
•View All Work
– View the status of all work items.
4.27 Enable Track & Plan
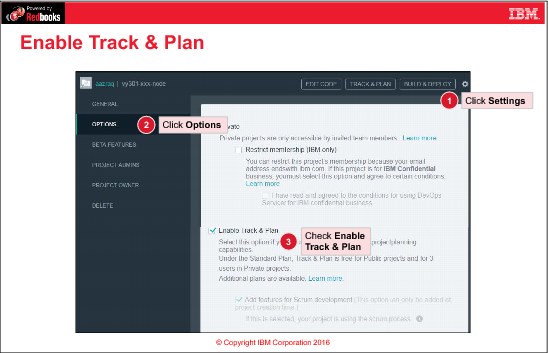
Figure 4-25 Enable Track & Plan
Notes:
Track & Plan is not enabled by default for the projects on Bluemix DevOps Services. To enable Track & Plan, complete these steps:
1. Open Settings by clicking the wheel icon on the upper right.
2. Click OPTIONS on the left navigation bar.
3. Select Enable Track & Plan.
4. Click SAVE.
4.28 Track & Plan: Example

Figure 4-26 Track & Plan: Example
Notes:
To access the Track & Plan features, click Track & Plan on the navigation bar shown here in Bluemix DevOps.
This figure shows an example of a backlog of two stories. The first one has a Medium priority and the second one has a Low priority. Notice that the story with a higher priority is automatically sorted to the top of the list.
4.29 Unit summary

Figure 4-27 Unit summary
4.30 Exercise 3 objectives

Figure 4-28 Exercise 3 objectives
Notes:
(none)
4.31 Checkpoint questions

Figure 4-29 Checkpoint questions
Notes:
(none)
4.32 Checkpoint answers

Figure 4-30 Checkpoint questions
Notes:
(none)
..................Content has been hidden....................
You can't read the all page of ebook, please click here login for view all page.