
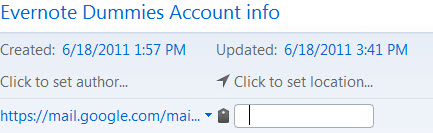
Figure 8-1: Adding tags to a note.
Chapter 8
Categorizing, Finding, Sorting, and Securing Information
In This Chapter
![]() Adding tags to your notes
Adding tags to your notes
![]() Organizing a list of notes
Organizing a list of notes
![]() Searching your notes
Searching your notes
![]() Working with more than one note at a time
Working with more than one note at a time
![]() Including your notes in Internet searches
Including your notes in Internet searches
![]() Printing a list of a group of notes
Printing a list of a group of notes
With Evernote, you have several ways to get your notebook or notebooks situated for easier searching and storing. In this chapter, I give you the keys that make Evernote the one-stop shop that has made it award-winning software and the external brain for so many. After all, if you aren’t organized with Evernote, what’s the point? In this chapter, you find out everything you need to know to become more organized and start password-protecting your notes.
Tagging
Evernote offers several fantastic methods for organizing your notes. (See Chapter 7 for a preview of some of these tools.) Tagging is one of those many methods, and a very important one. (For more on tagging and titling, see Chapter 1.)
![]() The ways to tag a note are as numerous as Evernote-compatible devices and apps. Because you have so many choices in how you can tag a note, I group the types of devices and the best method of tagging for each type. Regardless of which device you’re using to access Evernote, you need to look for the tag icon.
The ways to tag a note are as numerous as Evernote-compatible devices and apps. Because you have so many choices in how you can tag a note, I group the types of devices and the best method of tagging for each type. Regardless of which device you’re using to access Evernote, you need to look for the tag icon.
 Tagging is meant to be helpful; that’s why you are able to apply multiple tags to every note. However, if you tag every note with a unique label, go overboard on tagging, or add the same tags to every note, you’ll find that the feature doesn’t work very well. Before you begin tagging notes, consider how you want to set up your tags based on the types of notes you know you’ll use most often (such as by research project, book you’re reading, list or chore type, note type, and so on).
Here are a few tips I’ve found useful when tagging:
![]() Don’t overtag. Evernote has a great and speedy full-text search engine. You usually don’t need to tag words in the note’s title,
Don’t overtag. Evernote has a great and speedy full-text search engine. You usually don’t need to tag words in the note’s title,
![]() Tag related notes with the same tag. Tagging is most useful for making sure that notes containing different words for the same thing are retrieved together, even if only one of the terms appears in any single note. I suffer from chronic kidney disease, and I use Evernote to save information I come across that’s related to the disease, which is sometimes referred to as CKD ESKD (end-stage kidney disease) or renal failure. I tag all related notes with the CKD tag.
Tag related notes with the same tag. Tagging is most useful for making sure that notes containing different words for the same thing are retrieved together, even if only one of the terms appears in any single note. I suffer from chronic kidney disease, and I use Evernote to save information I come across that’s related to the disease, which is sometimes referred to as CKD ESKD (end-stage kidney disease) or renal failure. I tag all related notes with the CKD tag.
![]() Keep the tags short. Brevity is the soul of wit, and short tags reduce typing and make it easier for you to tag as you go along.
Keep the tags short. Brevity is the soul of wit, and short tags reduce typing and make it easier for you to tag as you go along.
![]() Words in the document or title will be found by a search without the need to tag them specifically. I use the tag Medical David for all prescription and lab test results because the phrase isn’t in the body of the note and wouldn’t be found when I just use a text search for Medical David.
Words in the document or title will be found by a search without the need to tag them specifically. I use the tag Medical David for all prescription and lab test results because the phrase isn’t in the body of the note and wouldn’t be found when I just use a text search for Medical David.
![]() Notes can have more than one tag. Up to 100 tags per note are supported; 2-3 are usually adequate.
Notes can have more than one tag. Up to 100 tags per note are supported; 2-3 are usually adequate.
When you start typing the tag, Evernote automatically provides tags that begin with the same letters you’ve typed. The feature is kind of like autocorrect except that it doesn’t try to replace what you’ve done; it just helps you along by reducing how much new material you have to type. Also, if (like me) you’re a poor typist or have an inexact memory, Evernote’s helpful suggestions let you click to select tags you’ve already saved, which prevents you from having multiple similar tags for the same thing.
Tagging on PCs, Macs, and tablets
Tagging is fundamentally similar for all platforms and is extremely useful as you dash about trying to enter notes with whatever device you’re using at the time.
To create a tag for a note using a PC, Mac, or tablet, follow these steps:
1. Highlight the note you want to tag.
If you’re creating a new note, refer to the “Creating Your First Note” section in Chapter 3 and work your way to Step 5.
![]() 2. Click the Tag icon or the Click to Add Tag link.
2. Click the Tag icon or the Click to Add Tag link.
A small window opens as shown in Figure 8-1.
3. Enter your tag name.
Your tag name can be a new tag or an existing tag. If you create a new tag, Evernote includes it in its collection of possible tags.
4. Click anywhere outside the area (or press Enter/Return), and save the note.
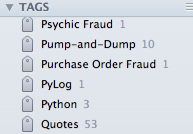
As you create more and more tags, you may lose track of tags you’ve already created. The side panel labeled Tags, shown in Figure 8-2, shows you all the tags you have and how many notes are associated with each one.
Figure 8-2: The side panel helps you keep track of your tags.
Tagging on phones
Tagging is a little more difficult to do on a phone because of the smaller keys and the need to tap just the right spot to get the tag added, but in the long run, tagging keeps your notes properly organized. Don’t worry. With a little practice, you’ll become adept at getting the tags set up.
The tagging feature for phones is pretty universal, regardless of what device you use. Follow these steps:
1. Tap New Note.
2. Enter whatever information you need, including pictures, recordings, and so on.
![]() 3. Tap the i, then the Tag icon, and add your tag.
3. Tap the i, then the Tag icon, and add your tag.
4. To add tags, tap I and then tap the Tag button.
You can create a new tag or use the name of an existing tag. Tap Select from All Tags below the text box, and check the tag or tags you want to add.
5. Complete your note and save after you’ve added your tag.
Tagging is just like adding a title, but it gives you a little more information to narrow the results of your searches.
From the Home menu, you can check out all your tagging options. Tap the Tag icon, and review the notes specific to each tag.
Sorting Lists of Notes
Evernote provides several criteria by which you’re able to sort a list of notes. The group of notes in question doesn’t make a difference, whether you’re viewing the contents of a notebook or the results of a search. Any group of notes is sorted the same way.
Sorting on PCs
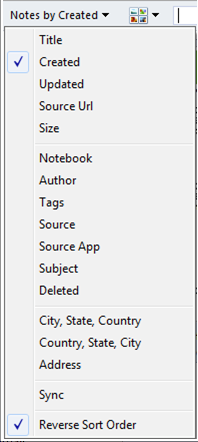
To sort a group of notes in Evernote for Windows, click Notes by Created. The default setting sorts notes by the date they were created. Several other sorting options are available, including title, size, and author (see Figure 8-3). To re-sort, click the down arrow next to Notes by Created and choose another sorting option.
Figure 8-3: You have several options when it comes to sorting a group of notes in Windows.
Sorting on Macs
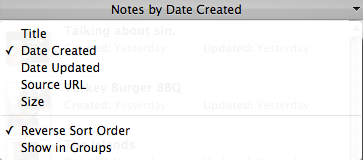
Sorting notes in Evernote for Mac works similarly to sorting on the PC. Clicking Notes by Date Created shows the list of potential sort criteria that you can select. Your sorting options, shown in Figure 8-4, include date created, source URL, and size.
Figure 8-4: Sort options for the Mac are similar to those for a PC.
Sorting on an iPhone
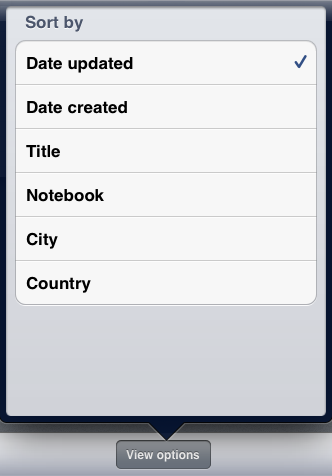
When you view a collection of notes on an iPhone, you can tap the View Options button, shown in Figure 8-5, to access the various sorting options available. Your options are pretty much what you’d expect from a sorting method, such as title, dates, or sizes.
Figure 8-5: Tapping the View Options button shows you your sorting options on an iPhone.

Sorting on an iPad
When you’re working on an iPad, tapping View Options shows you a list of sorting options (see Figure 8-6). You can sort by note creation date or the last time notes were updated, for example.
Figure 8-6: Tapping View Options shows you your sorting options on an iPad.
Sorting on an Android phone
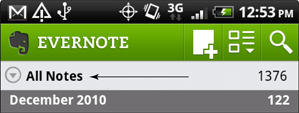
On an Android phone, you can tap the small gray down-pointing arrow (see Figure 8-7) to the left of the list of notebooks to see the available sorting options.
Figure 8-7: Clicking the gray arrow reveals the notebooks.
Then tap the Choose Sort Order menu to see your sorting choices, including date created, title, and notebook (see Figure 8-8).
Figure 8-8: You can choose your sort order when you tap Choose Sort Order.

 All Evernote devices have an All Notes feature, which is the easiest way to access all your notes in one place. As the number of your notes grows, you probably won’t want to view them all at once, but this chapter shows you a lot of ways to search, merge, manipulate, and tag with all notes available so that you don’t have to work through multiple notebooks.
Merging Notes
If you’ve captured notes that are similar in content from different devices that you plan to use on the same project, you can use Evernote’s merge feature to put them all in one place. However, you can merge only on desktops, laptops, and Apple and Android tablets.
 After you merge notes, you can’t unmerge them. Make sure that merging is truly the best option.
To merge your notes, follow these steps:
1. Open the notebook with the notes you want to merge.
If you’re not sure what notebook contains the notes you want to merge, open All Notebooks on the side panel so that all notes are visible.
2. Highlight the notes you want to merge.
To highlight the different notes on a PC, Ctrl+click. If you’re working on a Mac, Command+click.
3. Right-click the highlighted note and choose Merge Notes from the contextual menu.
Alternatively, instead of right-clicking, you can choose Note⇒Merge Notes on either a PC or a Mac.
Conducting a Simple Search through Your Notes
You can search through your notes in many ways, some of which are more effective than others. You can start by doing a simple search by keyword, title, or tag.
A simple search is exactly as it sounds — pretty simple. Regardless of your device, you can quickly type a keyword or phrase and run a search over all your notes or notes in a specific notebook.
Keep these tips in mind when conducting a simple search:
![]() If you want to review the notes that include your simple search by tag, check out the Tags pane on the left side of your screen. If you have a tag called Projects, all the notes that have that tag (and only the notes that have that tag) appear when you click that tag.
If you want to review the notes that include your simple search by tag, check out the Tags pane on the left side of your screen. If you have a tag called Projects, all the notes that have that tag (and only the notes that have that tag) appear when you click that tag.
![]() If you want to run a simple search on more than one topic, go to the search box, and type the word you’re searching for. To find notes with both the words Android and iPhone, for example, type Android iPhone. Evernote returns everything that has both words in it.
If you want to run a simple search on more than one topic, go to the search box, and type the word you’re searching for. To find notes with both the words Android and iPhone, for example, type Android iPhone. Evernote returns everything that has both words in it.
![]() Don’t type extra words in your search. Words such as the, and, or, and a will be highlighted and will be part of the search requirement. So if you want A Comparison between Android and iPhone, go ahead and type A Comparison. Evernote returns only the messages that contain all these words.
Don’t type extra words in your search. Words such as the, and, or, and a will be highlighted and will be part of the search requirement. So if you want A Comparison between Android and iPhone, go ahead and type A Comparison. Evernote returns only the messages that contain all these words.
When you’re done with a search, you need to clear it by either deleting the text or clicking Reset at the top right. If you go to the search box and delete all text from the search box, you see all existing notes because you have cleared the contents of the search box.
The following sections give you the tools you need to run rudimentary searches on different platforms.
Doing a simple search on a PC, Mac, or tablet
To do a simple search on a PC, Mac, or tablet, follow these steps:
1. In the search box, type the word you want to search for.
Suppose that you’re getting a new phone and have researched Android devices and iPhones. You can run a search on Android just to see what notes you’ve already saved by typing Android. Evernote displays your notes down the side of the panel for all the notes in this particular notebook that contain the word Android. And yes, these results include anything that has Android handwritten in it. So cool!
The search isn’t case-sensitive, so don’t worry about including both android and Android in the search. Misspelling is another issue. If you type Androd, you’re not likely to have any results displayed unless you also misspelled the word in your notes.
2. Press Enter or Return.
3. Start reviewing the notes.
Evernote highlights all instances of Android in each note. This search includes any notes that have Android in the title or in the tag.
Doing a simple search on phones (iPhone and Android)
To do a simple search on a mobile device, no matter which type it is, follow these steps:
1. Open your Evernote app.
2. Tap the magnifying glass at the top right of the screen.
The search area opens. If you haven’t previously run a search, you won’t have much to look at. If you have run a search, you see a list of all words that you’ve searched on, as well as the notebooks that you included in the search.
3. Type the words you’re looking for in the search box, and tap the magnifying glass beside the box.
If you type Android iPhone, the search returns all notes from all notebooks with the words Android and iPhone, or android and iphone.
Searching by title or tag is even easier. Follow these steps:
1. Click the magnifying glass.
You return to the search area.
2. Click the clock (title search) or the tag (tag search).
If you searched for iPhone and Android, the clock looks for notes with iPhone and Android in the title. If you click the tag, the tag looks for notes with iPhone and Android in the tag.
Searching on Autogenerated Attributes
Autogenerated attributes are labels placed on notes that provide information about its creation, such as the date the note was created or updated, where it was created, or in what notebook it was saved and that you don’t have to enter yourself. Evernote lets you search on those autogenerated attributes.
Searching on a PC or Mac
Whether your collection of Evernote notes runs in the hundreds or thousands, the text-search feature provides instant results. In fact, almost as quickly as you can type just a few letters of your search keyword(s), Evernote filters the display to show the found notes, displays the count of how many notes it found (in the left portion of the status bar at the bottom of the screen), and highlights the keywords found.
To find words contained anywhere within the note, follow these steps:
1. In the search box, type the words you’re searching for.
For this example, I typed Android iPhone.
2. Press Enter or Return.
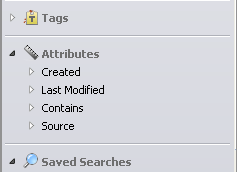
3. If you’re using a PC, go to the list on the left sidebar and click the Attributes option; on a Mac, go to the list of notes titled Notes by Date Created, and click the drop-down list.
Your PC lets you search by several options, as shown in Figure 8-9.
Figure 8-9: You can search by several autogenerated attributes.
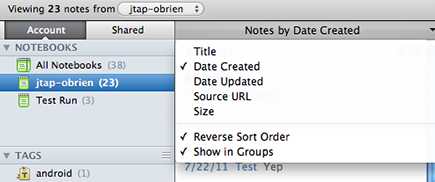
On a Mac, Notes by Date Created is the default, but you can sort by several autogenerated fields, as shown in Figure 8-10.
As soon as you change what you’re sorting on, the view is reordered to suit your revised preference.
Evernote creates or updates these attributes automatically every time you create or update a note.
Figure 8-10: Mac autogenerated fields.
Sorting by attributes
The attributes you can sort on are the following:
![]() Title: Sorts by — what else? — the note’s title.
Title: Sorts by — what else? — the note’s title.
![]() Date Created: Sorts by date creation, is the default, and the simplest to understand.
Date Created: Sorts by date creation, is the default, and the simplest to understand.
![]() Date Updated: Sorts notes in order of the most recently updated.
Date Updated: Sorts notes in order of the most recently updated.
![]() Source URL: Sorts by source URL. (If you return to a website often or have a few locations you’re using for research, this option makes life a lot easier.)
Source URL: Sorts by source URL. (If you return to a website often or have a few locations you’re using for research, this option makes life a lot easier.)
![]() Size: Lists a range by 100KB (10KB to 200KB, 200KB to 300KB, and so on), making it easier to isolate merged notes, notes with attachments, or notes with images or recordings. Smaller notes are grouped by 10KB or solo because most people don’t tend to have as many of them.
Size: Lists a range by 100KB (10KB to 200KB, 200KB to 300KB, and so on), making it easier to isolate merged notes, notes with attachments, or notes with images or recordings. Smaller notes are grouped by 10KB or solo because most people don’t tend to have as many of them.
Sorting by organization
You can also sort on organization of the notes:
![]() Reverse Sort Order: The default is in descending order, so clicking this option gets the opposite order from what you usually get for a search. (It’s a binary switch; every time you click, the search order is reversed.)
Reverse Sort Order: The default is in descending order, so clicking this option gets the opposite order from what you usually get for a search. (It’s a binary switch; every time you click, the search order is reversed.)
![]() Show in Groups: If you don’t want your files grouped, you can show them all as stand-alone notes.
Show in Groups: If you don’t want your files grouped, you can show them all as stand-alone notes.
Searching attributes on phones
Running a search from your phone is just as easy as running a search from a desktop or laptop, and the directions are similar across the different supported phones. Follow these steps:
1. Open your Evernote app.
2. Tap the magnifying glass at the top right of the screen.
On the iPhone, the magnifying glass is on the bottom right.
3. Tap the drop-down arrow next to Notes Found For.
On an iPhone, you don’t need to do this step. Skip straight to Step 4.
The Display Options menu appears. If you want to see a List View of results, you can switch to the less detailed view. Otherwise, Snippet View is the default; it shows you a thumbnail with the title and date. (For more on the different types of views, see Chapter 7.)
4. Tap Choose Sort Order, and select your preference.
You have a bit wider range of choices than in Step 3. Date Updated, Date Created, and Title are pretty self-explanatory. Notebook lets you search by which notebook the notes are in. City lets you sort by the location of the source of your note, which is useful if you clip articles from newspapers or magazines to read later. Country is a slightly expanded version of City.
Now you can go through your search results and find the note or notes you need.
City and Country display notes with an unknown location first, which isn’t very helpful if the vast majority of your notes don’t have known origins. Most notes created from mobile phones include geo-location information, which notes created on desktops do not include. If you have a notebook just with geotagged photos from a phone, or from a digital camera that captures geo-location information or uses an Eye-Fi card (see Chapter 19), it can be very helpful indeed.
After the notes are reordered as you like, you can do anything you want with them: e-mail them, print them, move them, and so on. It’s just another view of your note collection.

Doing a Simultaneous Search in Google, Bing, and Yahoo!
One of the coolest things about Evernote is that you can search any of the three big search engines and your notes at the same time. The feature works in Chrome, Firefox, and Safari. Here’s how:
1. Open the desired search engine.
2. Click the Evernote icon next to the address.
The sign-in page appears — the page where you go to log in (see Figure 8-11). Notice the top check box? It tells you that you can search Google, Bing, or Yahoo!.
Figure 8-11: Simul-taneous search setting.
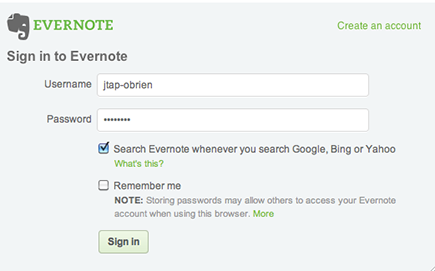
3. Check the box titled Search Evernote Whenever You Search Google, Bing, or Yahoo!.
Now whenever you run a search in one of these search engines, you see a window showing the number of notes in your notebooks that contain the same information. (Check out Figures 8-12, 8-13, and 8-14 for examples in each search engine.)
Bet you didn’t see that trick coming! It’s simply amazing, the number of things you can do with Evernote, and this is just about the pinnacle of getting yourself organized and comparing what you have with what you can find online.
Figure 8-12: Simul-taneous search results in Google.
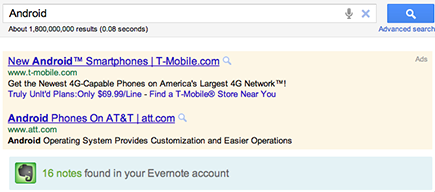
Figure 8-13: Simul-taneous search results in Bing.

Figure 8-14: Simul-taneous search results in Yahoo!

Doing an Advanced Search
An advanced search is for the times when you have an idea what you’re looking for but don’t remember exactly how you stated it. This type of search relies on the use of syntax to find what you need.
Syntax means the parameters and words you use to execute a search, allowing the search to work like an Internet a search in Microsoft Word. Tag syntax looks like this:
Tag: “name of tag”
A basic search starts at the beginning, but when you add the syntax (everything that appears up to the colon, like Tag), you free Evernote from the constraint of matching the exact text.
You can run these types of searches on titles or tags, your to-do list, and many other items. Table 8-1 lists some of the most basic and useful syntax. The best way to learn the most up-to-date syntax is to check out bit.ly/udURQk. For now, I focus on the advanced search that you’re most likely to want to use first: the initial search.
Table 8-1 Basic Syntax
|
Syntax |
Description |
|
|
Executes and returns notes based on the titles. |
|
|
Executes and returns notes according to their associated tags. |
|
|
Executes and returns notes that are not associated with tags. |
|
|
Executes and returns notes based on the source where the notes were generated, such as e-mail, picture, or typed. |
|
|
Executes and returns notes based on any of the criteria entered in the search. |
|
|
Executes and returns notes that have a check box. |
The advanced search is nearly identical across platforms, with the method of accessing it matching the type of device, as discussed in the earlier section “Searching on Automatically Generated Attributes.” For example, in the search box you could type intitle:bills to pull up every note within a highlighted notebook that has bill in the title.
Don’t add punctuation if you didn’t originally include it in the title. The colon is the only piece of punctuation that you should use. You also should avoid adding spaces.
Saving Searches
At first, the simple and advanced searches are enough to cover what you need for your notes. After several years, however, you’ll have so many notes that you’ll find yourself periodically running searches repeatedly. Well, you probably don’t want to have to remember exactly what you typed two months ago. If you soon realize that you’re using the same searches, saving them can really speed your ability to find notes quickly, particularly if you’re running advanced searches often.
Saving Searches on PCs
To save your searches on a PC, follow these steps:
1. Type the text you’d like as your criteria in the search box.
This view looks just like the regular search.
2. Click the blue arrow next to the search box.
After you click the arrow, a pop-up window appears, giving you the details of the search you’re about to save.
3. Click the blue magnifying glass with the plus sign in the bottom-right corner.
4. Enter the name you want to give the search. (See Figure 8-15.)
Figure 8-15: The Create Saved Search window.
5. Click OK.
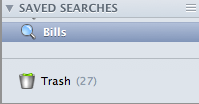
Your search is saved. Evernote stores your saved searches down the left side of the window (see Figure 8-16).
Figure 8-16: Location of saved searches (PC).
Saving Searches on Macs
To save your searches on a Mac, follow these steps:
1. Type the text you’d like to use as your search criteria in the search box.
2. Press Return.
Figure 8-17 shows you how a search for the word Bills looks.
Figure 8-17: Create a new saved search (Mac).

3. Choose File⇒New Saved Search.
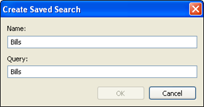
A Create Saved Search window appears for you to enter the new name of the search and also the query.
4. Enter a new name for the search — one that you’ll remember later.
5. Click OK.
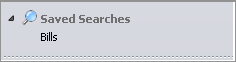
The note is saved. Evernote stores your saved searches down the left side of the window (see Figure 8-18).
Figure 8-18: Location of saved searches (Mac).
Saving Searches on Phones and tablets
Tablets automatically save your searches, so the first time you run one, you’ve saved a search. So all you need to do is discover how to find searches. Follow these steps:
1. Open your Evernote app.
2. Click the magnifying glass at the top right of the screen.
On an iPhone, the magnifying glass is on the bottom right.
You see the old familiar search area. It shows you searches you’ve recently run on your phone as well as the notebooks that you included in the search. Better yet, even if you run a simple search, Evernote saves an advanced search.
Viewing Notes in a Text-Only View
All devices have a way to display a text-only view of your notes. This view is helpful because it maximizes the number of notes you can see.
Unfortunately, the text-only view is unavailable on the iPhone, iPod touch, and iPad. On those devices, Snippet View is the default view.
Here’s how to change the view on different devices:
![]() PC: Open Evernote on your desktop. Select List View or press Ctrl+F5.
PC: Open Evernote on your desktop. Select List View or press Ctrl+F5.
![]() Mac: Open Evernote on your Desktop. Select List View or press Command+1.
Mac: Open Evernote on your Desktop. Select List View or press Command+1.
![]() Android phone: Open your Evernote app. Tap All Notes or Notebooks (if you know which notebook you need to check). Tap the menu across the top, titled All Notes or next to the notebook name. Tap the drop-down arrow below Choose Information Level, and choose List View.
Android phone: Open your Evernote app. Tap All Notes or Notebooks (if you know which notebook you need to check). Tap the menu across the top, titled All Notes or next to the notebook name. Tap the drop-down arrow below Choose Information Level, and choose List View.
Now you can see more notes at a time.
For Windows and Mac, the full note displays in the note area if you highlight it. You can maximize the number of notes you see by extending the list area to the right, shrinking the amount of a single note you see on the side.
Working with Multiple Notes
Evernote makes it possible to work with multiple notes. Working with multiple notes is extremely useful if you have notes spread over several notebooks that you need to merge into a new notebook or want to print for a meeting, export, or combine into a single note.
Tagging Multiple Notes on PCs
You can work with multiple notes at a time in several ways on a PC. Here’s how you can see what is available on a PC:
1. Open Evernote on your desktop.
2. Highlight the notes that you want to work with, and right-click the highlighted note.
To highlight notes out of sequence, hold down the Ctrl key, and click the notes you want to highlight.
3. From the contextual menu, choose what you’d like to do with the notes you have highlighted.
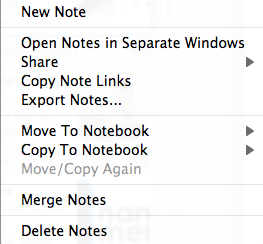
You have several options, as shown in Figure 8-19:
Figure 8-19: Menu for working with multiple notes.
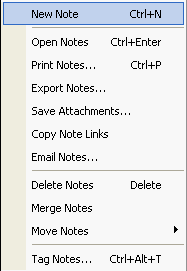
• New Note: Creates a new note. This one really isn’t for working with multiple notes, but it’s there anyway, just in case you need it.
• Open Notes (Ctrl+Enter): Opens all the highlighted notes in new windows.
• Print Notes (Ctrl+P): Prints all the highlighted notes.
• Export Notes: Creates new files (.enex, .html, .mht, or .html) from the highlighted notes. Check out Chapter 10 for more details on exporting notes and what the different formats do.
• Save Attachments: Saves attachments for the highlighted notes. Check out Chapter 7 for more details on working with attachments.
• Copy Note Links: Saves all the links within the highlighted notes.
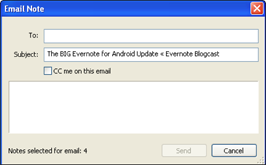
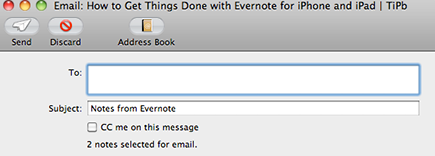
• Email Notes: Sends the notes to an e-mail account, whether personal or professional. You get something that looks like Figure 8-20, with the subject being the title of the first highlighted note. You can change the subject. Don’t forget to add the e-mail address, and feel free to add a message to your notes. Check the box titled CC Me on This Email if you’re sending the notes to someone else.
• Delete Notes: Deletes all your notes. You also can just press Delete without right-clicking for the same effect.
• Merge Notes: Merges your notes. See the section “Merging Notes,” earlier in this chapter, for the details.
Figure 8-20: E-mail options (PC).
• Move Notes: Gives you options on where to move the files. Check out Chapter 7 for details.
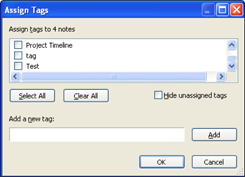
• Tag Notes (Ctrl+Alt+T): Tags several notes at a time. This feature is the coolest of all. The pop-up window, shown in Figure 8-21, lists your tags. (For more on tagging, see the sidebar “Tagging multiple notes.”)
From here, you can start working with the notes.
Figure 8-21: You can assign tags to multiple notes.
Tagging Multiple Notes on Macs
On a Mac, you have several ways to work with multiple notes at a time. What’s available on a Mac is essentially the same stuff you get when you check out the Note menu on the menu bar.
To work with multiple notes on a Mac, follow these steps:
1. Open Evernote on your Desktop.
2. Highlight the notes that you want to work with, and Ctrl+click to open a contextual menu.
To highlight notes out of sequence, hold down the Command key and click the notes you want to highlight.
3. From the contextual menu, choose what you’d like to do with the notes.
Figure 8-22 shows you your options:
Figure 8-22: Menu for working with multiple notes.
• New Note: Creates a new note. This one really isn’t for working with multiple notes, but it’s there anyway just in case you need it.
• Open Notes in Separate Windows: Opens all the highlighted notes in new windows.
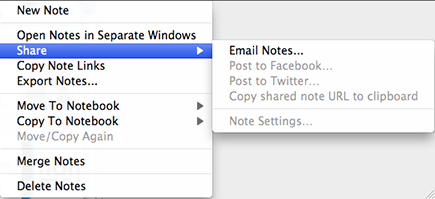
• Share: Has several different options that help you share your notes with others (see Figure 8-23). Check out Chapter 10 for more information on sharing.
Figure 8-23: Sharing notes (Mac).
• Email Notes: Sends the notes to an e-mail account. You get something that looks like Figure 8-24, with the subject being the title of the first highlighted note. You can change the subject. Don’t forget to add the e-mail address, and feel free to add a message to your notes. Check next to CC Me on This Email if you’re sending the notes to someone else.
Figure 8-24: Email options (Mac).
4. Click the check box to indicate what you’d like to do with your notes.
You have several options:
• Post to Facebook: Posts your notes to Facebook.
• Post to Twitter: Posts to Twitter.
• Copy Shared Note URL to Clipboard: Saves all the links within the highlighted notes.
• Note Settings: Helps you set up defaults for sharing by note. You can only modify settings after you’ve executed one of the other elements of the Share menu that have setting options.
• Copy Note Links: Saves all the links within the highlighted notes.
• Export Notes: Creates new files from the highlighted notes (.enex, .html, .mht, or .html). Check out Chapter 10 for more details on exporting notes.
• Move to Notebook: Gives you options on where to move the notes. Check out Chapter 7 for more details.
• Copy to Notebook: Gives you options on where to copy the notes. Check out Chapter 7 for more details.
• Move/Copy Again: Gives you options on where to move or copy your notes again. You can only use this option after you have executed Copy to Notebook for the highlighted notes.
• Merge Notes: Merges the notes you’ve selected. For more details, see the earlier section “Merging Notes.”
• Delete Notes: Deletes the highlighted notes. You can also just press Delete without right-clicking for the same effect.
From here, you can start working with the notes.
Tagging multiple notes
If you choose to tag multiple notes at the same time on your PC or Mac, you have a few things to do after you choose the Tag Notes command:
1. Select all the tags that you want to apply.
2. Choose what you’d like to do with the tags:
![]() If you want to apply all your tags, click Select All.
If you want to apply all your tags, click Select All.
![]() If you want to clear the selected tags, click Clear All.
If you want to clear the selected tags, click Clear All.
![]() If you want to hide the tags not currently applied to the notes, click Hide Unassigned Tags.
If you want to hide the tags not currently applied to the notes, click Hide Unassigned Tags.
![]() If you want to create a new tag, use the Add a New Tag: field.
If you want to create a new tag, use the Add a New Tag: field.
3. Click OK.
Evernote incorporates the tags into whatever tags are already applied. (To add a tag, click Click to Add Tag.)
Printing a Combined List
Have you ever wanted to print several to-do lists so that you can easily review them at a glance (say, while running errands) but still keep those lists as separate notes for updating? It’s not only easier to work with a single list of errands, but also, you can help save trees by avoiding unnecessary printing.
The obvious solution is to merge the note, but because you can’t undo a merge, here’s a simple workaround suggested by Brad Berens (http://bradberens.com/2011/06/17/new-evernote-trick-combine- print-notes): Print a combined list, which still keeps the note unmerged. Just make a copy of the notes in a temporary location and merge them.
Here are the detailed steps:
1. Create a new notebook called Combine Lists.
For this example, I assume that you keep all your to-do lists in a notebook called To Do to distinguish these pressing items from all the other important things that Evernote keeps for you.
2. Select the notes in the To Do notebook one at a time by highlighting each note.
3. Right-click (PC) or Ctrl+click (Mac) the highlighted note, select Copy Note and then select the notebook you created in Step 1.
4. Go to the Combine Lists notebook; press Ctrl+A (PC) or Command+A (Mac) to select the contents; then select Merge Notes from the Note menu (Mac) or right-click and click Merge Notes (PC) to create a single combined note from the copy you just created.
The original notes remain untouched.
5. (Optional) Edit the combined list to make it more readable by increasing the font size and selectively highlighting.
6. Print (Ctrl+P for PC or Command+P for Mac) your list.
7. Delete the merged note so that you’re ready to combine and print again at a later time.
..................Content has been hidden....................
You can't read the all page of ebook, please click here login for view all page.