
Terms you’ll need to understand:
✓ | Server roles |
✓ | Add/Remove role |
✓ | Configure Your Server Wizard |
✓ | The Manage Your Server window |
✓ | File server |
✓ | Print server |
✓ | Application server |
✓ | Mail server |
✓ | Terminal server |
✓ | Remote access/virtual private network (VPN) server |
✓ | Domain controller |
✓ | Domain Name System (DNS) server |
✓ | Dynamic Host Configuration Protocol (DHCP) server |
✓ | Streaming media server |
✓ | Windows Internet Naming Service (WINS) server |
✓ | The |
✓ | Active Directory Installation Wizard |
✓ | Flexible Single Masters of Operation role |
✓ | Security templates |
✓ | Microsoft Management Console (MMC) |
✓ | Post Office Protocol version 3 (POP3) |
✓ | Simple Mail Transfer Protocol (SMTP) |
✓ | File Transfer Protocol (FTP) |
✓ | Network News Transfer Protocol (NNTP) |
✓ | The |
✓ | Internet Explorer Enhanced Security Configuration |
✓ | The |
Techniques you’ll need to master:
✓ | Adding a role to a server |
✓ | Removing a role from a server |
✓ | Using Add/Remove Windows Components to add or remove a server role |
✓ | Installing domain controllers |
✓ | Applying default security templates |
✓ | Creating and using custom MMCs |
✓ | Configuring baseline environment security |
Windows Server 2003 can have any number of different roles in the enterprise. You can deploy the system as a domain controller and it can function in that role as an Operations Master or a Global Catalog server. It could also be set up as a file server, a print server, or an application server, which includes setting the system up as an Internet Information Services (IIS) version 6 server. For example, by installing it with the Post Office Protocol version 3 (POP3) and Simple Mail Transfer Protocol (SMTP) services, you can set it up as a mail server. You could also enable Terminal Services, configure the server as a streaming media server, or configure Routing and Remote Access Service (RRAS). The system could also be set up as a Domain Name System (DNS) server, a Dynamic Host Configuration Protocol (DHCP) server, or a Windows Internet Naming Service (WINS) server.
Because there are four different versions of the Windows Server 2003 operating system, it’s important to choose the one that is right for your network’s needs. The four versions are:
Windows Server 2003 Web Server Edition
Windows Server 2003 Standard Edition
Windows Server 2003 Enterprise Edition
Windows Server 2003 Datacenter Edition
Exam Alert
Be prepared to encounter exam questions that test your knowledge on the differences and features of the four operating system versions. For example, you need to know why you would choose to install one version instead of another.
Microsoft designed Windows Server 2003 Web Server Edition specifically for low-end and entry-level web hosting environments, providing a specific platform for deploying web services and applications.
Although you can install Windows Server 2003 Web Server Edition with some of the same functionalities of the other operating system versions, it is also limited in the following ways:
The system can be set up as a virtual private network (VPN) server but with limited functionality. Connections are limited to one per media type: Local area network (LAN), remote access (dial-up), direct cable connections, and Server Message Block (SMB) connections are limited to 10 simultaneous connections.
It cannot be installed as part of server clusters via the operating system.
It cannot be installed as a terminal server (a system that runs Remote Desktop for Administration).
It cannot be installed as a file or print server for Macintosh systems.
It does not have support for printer and fax sharing, nor does it support infrared devices.
It cannot be deployed as a Remote Installation Service (RIS) server, nor can Internet Security and Acceleration (ISA) Server be installed on it for the system to perform as a firewall/proxy device.
It cannot be established as a domain controller, a certification authority (CA), an Exchange server, a Microsoft SQL server, or a streaming media server.
You cannot run
DCPROMOto install Active Directory.Remote Storage and Universal Description, Discovery, and Integration (UDDI) services are not available.
Windows Server 2003 Standard Edition is designed with the day-to-day needs of the average business in mind and is the progressive replacement for the Windows NT Server 4/Windows 2000 Server line of server operating systems. It offers solutions for file and printer sharing, centralized management through Active Directory, secure Internet connectivity, and web services. It offers a certain level of scalability supporting two-way symmetric multiprocessing and up to 4GB of RAM. One of the main limitations of Standard Edition is that it does not support server clusters.
Windows Server 2003 Enterprise Edition is designed specifically for the needs of larger organizations because their needs surpass the functional levels of Windows Server 2003 Standard Edition. For example, if you need the operating system to support server clusters or if you require more advanced hardware scalability. Enterprise Edition is the progressive replacement for the Windows NT Server 4 Enterprise Edition/Windows 2000 Advanced Server line of server operating systems.
Windows Server 2003 Datacenter Edition is designed to provide the highest levels of scalability and availability. For example, it offers a reliable solution for businesses that need to support high-volume real-time transaction processing. Datacenter Edition is the progressive replacement for the Windows 2000 Datacenter Server line of operating systems.
The following list outlines the minimum system requirements and some additional information for Windows Server 2003 Standard Edition:
The minimum supported processor speed is 133MHz.
The minimum recommended processor speed is 550MHz.
Windows Server 2003 Standard Edition supports a maximum of four CPUs per server.
The minimum supported amount of RAM is 128MB.
The minimum recommended amount of RAM is 256MB.
The maximum supported amount of RAM is 4GB.
The minimum amount of space required for installation is approximately 1.25GB. Additional space might be needed under the following circumstances:
When a FAT16 partition is in use, it requires 100MB to 200MB more free disk space than other supported file systems because of cluster sizes. NTFS is the recommended file system for any server deployment.
If you are installing Windows Server 2003 Standard Edition from a network share, you need approximately 100MB to 200MB more space than if you ran the setup from the CD-ROM because Setup needs to use that space for temporary files associated with the installation. In addition, the drive must have a formatted partition before the installation process starts so that those files can be copied. If the partition does not exist beforehand, the over-the-network installation fails.
The amount of disk space required for the swapfile affects the initial partition’s size because the swapfile is directly proportional to the amount of physical memory installed in the system. Larger amounts of RAM require a larger swapfile, so the minimum hard drive free space requirements must also increase.
A VGA or higher resolution monitor and display adapter is required, and an SVGA 1024×768 or higher is recommended.
A keyboard and mouse (or other pointing devices) are also minimum requirements.
The optional hardware list includes items such as CD-ROM or DVD drives, which are usually required only for local installations. The optional hardware list also includes a listing for network adapters and related cables from the Hardware Compatibility List (HCL).
Table 2.1 outlines the different requirement levels of the Windows Server 2003 family, as listed on the Microsoft website. This site (http://www.microsoft.com/windowsserver2003/evaluation/features/compareeditions.mspx) has another table that compares major features for each version.
Table 2.1. Windows Server 2003 Requirements
Requirement | Standard Edition | Enterprise Edition | Datacenter Edition | Web Edition |
|---|---|---|---|---|
Minimum CPU speed | 133MHz | 133MHz for x86-based computers 733MHz for Itanium-based computers | 400MHz for x86-based computers 733MHz for Itanium-based computers | 133MHz |
Recommended CPU speed | 550MHz | 733MHz | 733MHz | 550MHz |
Minimum RAM | 128MB | 128MB | 512MB | 128MB |
Recommended minimum RAM | 256MB | 256MB | 1GB | 256MB |
Maximum RAM | 4GB | 32GB for x86-based computers 64GB for Itanium-based computers | 64GB for x86-based computers 512GB for Itanium-based computers | 2GB |
Multiprocessor support | Up to 4 | Up to 8 | Minimum 8 required Maximum 64 | Up to 2 |
Disk space for setup | 1.25GB | 1.5GB for x86-based computers 2.0GB for Itanium-based computers | 1.5GB for x86-based computers 2.0GB for Itanium-based computers | 1.5GB |
The 64-bit computing landscape can also add a bit of confusion. Systems based on the Intel Itanium processor require Windows Server 2003 64-bit Itanium Edition. 64-bit systems based on AMD x64 or Intel EMT64 processors can install any of the various editions in the Windows Server 2003 x64 Edition product family. None of these products can be installed on 32-bit hardware platforms.
Tip
There is a known issue with some Intel Pentium Pro and Pentium II processors in which Windows Server 2003 sees only one processor, regardless of how many are physically installed. You can find additional information on this issue at the end of the chapter in the “Need to Know More?” section.
If you elect to upgrade your current server operating system, you need to be aware that the Setup program automatically installs Windows Server 2003 into the same folder as the currently installed operating system, regardless of its naming convention.
You can perform direct upgrades to Windows Server 2003 from the following versions of Windows:
Windows NT Server 4.0 with Service Pack 5 or later
Windows NT Server 4.0, Terminal Server Edition, with Service Pack 5 or later
Windows 2000 Server
Remote Storage is not included with Windows Server 2003 Standard Edition. If you are using Windows 2000 Server with Remote Storage, you can’t upgrade the system to Windows Server 2003 Standard Edition. You have the option to upgrade to Windows Server 2003 Enterprise Edition, which has Remote Storage included. You can remove Remote Storage through Add/Remove Programs in Control Panel from your currently installed version of Windows 2000 Server, and then upgrade to Windows Server 2003 Standard Edition; or install Windows Server 2003 Standard Edition as a new installation, which effectively sets it up as a dual-boot system.
You cannot upgrade from Windows 9x, Me, Windows NT Workstation, Windows 2000 Professional, or Windows XP Home or Professional directly to any Windows Server 2003 version. (Clean installations from within those existing operating systems to other partitions or over the existing partition are allowed.)
Also, if you have Windows NT 4.0 Server Enterprise Edition running Service Pack 5 or later, you can upgrade directly to Windows Server 2003 Enterprise Edition, but not to Windows Server 2003 Standard Edition. A clean installation to Windows Server 2003 Standard Edition is available. If you have a version of Windows NT earlier than 4.0, such as Windows NT Server 3.x, you cannot upgrade directly to any product in the Windows Server 2003 family. You can upgrade to Windows NT 4.0, apply Service Pack 5, and then perform a direct upgrade, but this method is not recommended.
Note
Although upgrade paths are supported, it is strongly recommended that you do not perform an upgrade installation. Instead, backup essential data and perform a fresh install.
Server roles in Windows Server 2003 enable you, as the administrator, to configure specific roles for your system. To do this, you start the Configure Your Server Wizard through the Manage Your Server window.
Depending on your settings, the Manage Your Server window might be automatically available at login (see Figure 2.1). If it’s not, you can find it on the Start menu under All Programs, Administrative Tools.

In this window, you can add a role to your existing server, which enables you to configure it for a specific task. You can also manage the current role from this window. You can pick one of the following listed roles, all of which are selfexplanatory by their titles:
The steps for configuring a server in any role are straightforward; however, they do vary from one role to the other.
To start the Configure Your Server Wizard, click Add or remove a role in the main Manage Your Server window (refer to Figure 2.1). After you have read the onscreen information, ensured that all the network connections are verified, and have the necessary installation path information (or the CD) to the Windows Server 2003 setup files, click the Next button to continue.
The setup wizard then tests your available network connections and brings you to the Server Role page. From this point, you configure the server in its specific role. To set up a second or third role for a server, you need to run the Configure Your Server Wizard again; only one role can be established at a time.
If you need to install any additional software or services, the wizard prompts you to do so. Therefore, it is a good idea to keep the installation files or original CD close at hand during server configuration. The Summary of Selections page shows the options you selected to install for the server role and continues with the role configuration. After the process is completed, the final page of the Configure Your Server Wizard is displayed.
Configuring your system with the Configure Your Server Wizard is the same as doing it manually. Using the wizard, select the domain controller role. The wizard then runs DCPROMO.EXE to start the Active Directory Installation Wizard, which is discussed next.
The actual process of configuring your Windows Server 2003 system as a domain controller is fairly straightforward; however, it should be noted that a lot of behind-the-scenes planning often goes on before configuration. There are also subtle differences in the process, depending on whether the system is to be a new domain controller in a new forest, a domain controller in a new child domain, or a domain controller in an existing domain.
To configure your server as a domain controller, log on locally to the Windows Server 2003 system you want to promote to the role of domain controller, and run DCPROMO (from the command line or from Start, Run) to start the Active Directory Installation Wizard. (You could also use the Configure Your Server Wizard, but it’s not necessary.)
Note
To run DCPROMO, you must be logged on to the system as a local administrator. To join the server to an existing domain and successfully complete the installation, you must have Domain Administrator rights (or higher rights, such as Enterprise Administrator, or have been delegated the permissions needed to complete the task).
After you move past the Welcome window, how you continue with the installation depends on your current environment and where this new domain controller needs to fit in your environment.
In the Domain Controller Type page, you can install the domain controller for a new domain or install it as an additional domain controller in an existing domain. If you choose an existing domain, the installation continues from this point, as you are adding this server as a peer domain controller in an existing domain. This allows the necessary services to be installed and enabled so that the system can function as a domain controller after Active Directory has been installed and updated.
If you choose to install the domain controller in a new domain, DCPROMO prompts you in the Create New Domain page, asking whether this new domain should be installed as a new child domain or a new domain tree. If you choose to create a new child domain, the installation wizard continues, prompting you for a name for the domain and database locations.
If you decide to install this domain controller as a new domain tree, DCPROMO prompts you to select whether you are installing the domain controller in an existing forest or a new forest of domain trees. Regardless of your choice, the installation wizard continues to the New Domain Name page, which is where you enter the name of the new domain.
Note
The only real difference in the process depends on whether you are installing the server in an existing forest or a new forest. If you are installing the server in an existing forest, schema and configuration information is copied from the forest into the new domain tree. If you are installing the server in a new forest, the schema and configuration information must be created. Visit the following URL for more information about creating a new forest: http://technet2.microsoft.com/WindowsServer/en/Library/31ce4349-7046-496a-a3cfa8b49f7dbb5e1033.mspx?mfr=true.
Next, in the NetBIOS Domain Name page, verify the NetBIOS name for the domain for backward-compatibility with legacy systems. This means that a domain name of gunderville.com entered in the New Domain Name text box would show up as gunderville in the NetBIOS Domain Name text box. As with all NetBIOS entries, the NetBIOS domain name is truncated to the first 15 characters of the domain name. That means a NetBIOS domain name of thecityofgunderville.com would default to the NetBIOS name of THECITYOFGUNDER because the number of characters exceeds the allowed maximum.
In the Database and Log Folders page, the installation wizard prompts you to choose a path for the installation location of the database and log folders. You can accept the listed defaults, enter a new path manually, or browse to a new location.
Note
The default location for the database and database log files is systemrootNTDS. Whenever possible, you should choose an installation path for the database and the log files so that they are installed on different physical hard drives for the best performance.
In the Shared System Volume page, the installation wizard prompts you to choose a path for the installation location of the shared system volume. You can accept the listed default path, enter a new path manually, or browse to a new location.
The shared system volume stores scripts and domain-level Group Policy objects for the domain and, in certain instances, the entire enterprise. (This organization depends on whether this server holds any Flexible Single Masters of Operation roles—also known as Operations Masters—for the forest.) The default installation path for the shared system volume is systemrootSYSVOL, and the partition must be formatted with NTFS version 5 at a minimum. The version of NTFS used with Windows NT 4 Server (now referred to as version 4) cannot be used.
Note
Normally, you run into the NTFS issue only during the upgrade of a domain controller running Windows NT Server 4 with less than Service Pack 4; in most cases, the installation wizard asks you to upgrade the file system to NTFS version 5. (This is usually found only in upgrades from NT Server 4 to 2000 Server.)
One of the minimum system requirements for upgrading Windows NT Server 4 directly to Windows Server 2003 is that the system needs to be running with Service Pack 5 or later installed. DCPROMO is designed to not complete the installation if it detects anything lower.
Next, in the DNS Registration Diagnostics page, the DNS server that is authoritative for this forest is displayed. If the DNS server cannot be contacted because of a network issue or if there is no available DNS server to use, you are given the option to install and configure DNS on this server. You then need to configure this server’s TCP/IP properties to use this DNS installation as its preferred DNS server.
Next, in the Permissions page, you need to select one of the following options:
Permissions Compatible with Pre-Windows 2000 Server Operating Systems
Permissions Compatible Only with Windows 2000 or Windows Server 2003 Operating Systems
Note
Choosing the option to set permissions compatible with pre–Windows 2000 Server operating systems is used only for backward-compatibility in certain instances. It weakens the security structure for the entire environment because it causes the installation wizard to add the Everyone group to the Pre–Windows 2000 Compatible group. This setting is undesirable because “everyone” includes anonymous users who have logged on to a network without any additional identification or authentication. For a new forest, choosing this option weakens the default security for the entire forest.
So far, in this wizard, you have been gathering data and configuring installation parameters. When you reach the Summary page and click Next, continuing from this point actually installs Active Directory. After restarting, the server will be running as a domain controller.
When a new domain controller is installed on a Windows Server 2003 system, the default template (DC Security.inf) is applied using Group Policy objects linked to the Domain Controllers Organizational Unit (OU).
To change the level of security for domain controllers, you can apply either the Securedc.inf security template, which increases the default security, or the Hisecdc.inf template, which maximizes the security settings. Table 2.2 shows the policy’s Password Policy section with the default settings from each template available for domain controllers.
Table 2.2. Password Policy Settings from Security Templates
Password Policy | Default Template | Secure Template | High-Security Template |
|---|---|---|---|
Enforce password history | Not defined | 24 passwords remembered | 24 passwords remembered |
Maximum password age | Not defined | 42 days | 42 days |
Minimum password age | Not defined | 2 days | 2 days |
Minimum passwordlength | Not defined | 8 characters | 8 characters |
Passwords must meet complexity requirements | Not defined | Enabled | Enabled |
Store password using reversible encryption | Not defined | Disabled | Disabled |
Table 2.3 shows the policy’s Account Lockout Policy section with the default settings from each template.
Table 2.3. Account Lockout Policy Settings from Security Templates
Account Lockout Policy | Default Template | Secure Template | High-Security Template |
|---|---|---|---|
Account lockout duration | Not defined | 30 minutes | 0 |
Account lockout threshold | Not defined | 5 invalid logon attempts | 5 invalid logon attempts |
Reset account lockout counter after | Not defined | 30 minutes | 30 minutes |
Table 2.4 shows the policy’s Audit Policy section with the default settings from each template.
Table 2.4. Audit Policy Settings from Security Templates
Audit Policy | Default Template | Secure Template | High-Security Template |
|---|---|---|---|
Audit account logon events | Not defined | Success/Failure | Success/Failure |
Audit account management | Not defined | Success/Failure | Success/Failure |
Audit directory services access | Not defined | Failure | Success/Failure |
Audit logon events | Not defined | Success/Failure | Success/Failure |
Audit object access | Not defined | No auditing | Success/Failure |
Audit policy change | Not defined | Success/Failure | Success/Failure |
Audit privilege use | Not defined | Failure | Success/Failure |
Audit process tracking | Not defined | No auditing | No auditing |
Audit system events | Not defined | No auditing | Success/Failure |
By default, the policy’s User Rights section is not defined in each template. Options for user rights include the following:
Audit system events
Access this computer from the network
Add workstations to the domain
Back up files and directories
Bypass traverse checking
Change system time
Create a token object
Create pagefile
Create permanent shared objects
Debug programs
Force shutdown from a remote system
Generate security audits
Increase quotas
Load device drivers
Lock pages in memory
Log on locally
Log on as a batch job
Log on as a service
Manage auditing and security log
Modify firmware environment variables
Profile a single process
Profile system performance
Replace a process level token
Restore files and directories
Shut down the system
Take ownership of files and other objects
Table 2.5 shows the policy’s Security Options section with the default settings from each template.
Table 2.5. Security Options Settings from Security Templates
Security Options | Default Template | Secure Template | High-Security Template |
|---|---|---|---|
Accounts: Administrator account status | Not defined | Not defined | Not defined |
Accounts: Guest account status | Not defined | Disabled | Disabled |
Accounts: Limit local account use of blank passwords to console logon only | Not defined | Not defined | Not defined |
Accounts: Rename administrator account | Not defined | Not defined | Not defined |
Accounts: Rename guest account | Not defined | Not defined | Not defined |
Audit: Audit the access of global system objects | Not defined | Disabled | Disabled |
Audit: Audit the use of backup and restore privilege | Not defined | Disabled | Disabled |
Audit: Shut down system immediately if unable to log security audits | Not defined | Disabled | Disabled |
Devices: Allow undock without having to log on | Not defined | Disabled | Disabled |
Devices: Allowed to format and eject removable media | Not defined | Administrators | Administrators |
Devices: Prevent users from installing printer drivers | Not defined | Enabled | Enabled |
Devices: Restrict CD-ROM access to locally logged-on user only | Not defined | Enabled | Enabled |
Devices: Restrict floppy access to locally logged-on user only | Not defined | Enabled | Enabled |
Devices: Unsigned driver installation behavior | Not defined | Do not allow installation | Do not allow installation |
Domain controller: Allow server operators to schedule tasks | Not defined | Disabled | Disabled |
Domain controller: LDAP server signing requirements | Not defined | None | Require signing |
Domain controller: Refuse machine account password changes | Not defined | Disabled | Disabled |
Domain member: Digitally encrypt or sign secure channel data (always) | Not defined | Disabled | Enabled |
Domain member: Digitally encrypt secure channel data (when possible) | Not defined | Enabled | Enabled |
Domain member: Digitally sign secure channel data (when possible) | Not defined | Enabled | Enabled |
Domain member: Disable machine account password changes | Not defined | Disabled | Disabled |
Domain member: Maximum machine account password age | Not defined | 30 days | 30 days |
Domain member: Require strong (Windows 2000 or later) session key | Not defined | Disabled | Enabled |
Interactive logon: Do not display last user name | Not defined | Disabled | Enabled |
Interactive logon: Do not require Ctrl+Alt+Del | Not defined | Disabled | Disabled |
Interactive logon: Message text for users attempting to log on | Not defined | ||
Interactive logon: Message title for users attempting to log on | Not defined | ||
Interactive logon: Number of previous logons to cache (in case domain controller is not available) | Not defined | 10 logons | 0 logons |
Interactive logon: Prompt user to change password before expiration | Not defined | 14 days | 14 days |
Interactive logon: Require domain controller authentication to unlock workstation | Not defined | Enabled eEnabled | |
Interactive logon: Require smart card | Not defined | Not defined | Not defined |
Interactive logon: Smart card removal behavior | Not defined | Force logoff | Force logoff |
Microsoft network client: Digitally sign communications (always) | Not defined | Disabled | Disabled |
Microsoft network client: | |||
Digitally sign communications (if server agrees) | Not defined | Enabled | Enabled |
Microsoft network client: Send unencrypted password to third-party SMB servers | Not defined | Disabled | Disabled |
Microsoft network server: Amount of idle time required before suspending session | Not defined | 15 minutes | 15 minutes |
Microsoft network server: Digitally sign communications (always) | Not defined | Disabled | Enabled |
Microsoft network server: Digitally sign communications (if client agrees) | Not defined | Enabled | Enabled |
Microsoft network server: Disconnect clients when logon hours expire | Not defined | Enabled | Enabled |
Network access: Allow anonymous SID/name translation | Not defined | Disabled | Disabled |
Network access: Do not allow anonymous enumeration of SAM accounts | Not defined | Enabled | Enabled |
Network access: Do not allow anonymous enumeration of SAM accounts and shares | Not defined | Enabled | Enabled |
Network access: Do not allow storage of credentials or .NET Passports for network authentication | Not defined | Disabled | Enabled |
Network access: Let Everyone permissions apply to anonymous users | Not defined | Disabled | Disabled |
Network access: Named pipes that can be accessed anonymously | Not defined | Not defined | Not defined |
Network access: Remotely accessible registry paths | Not defined | Not defined | Not defined |
Network access: Remotely accessible registry paths and subpaths | Not defined | Not defined | Not defined |
Network access: Restrict anonymous access to named pipes and shares | Not defined | Enabled | Enabled |
Network access: Shares that can be accessed anonymously | Not defined | Not defined | Not defined |
Network access: Sharing and security model for local accounts | Not defined | Not defined | Not defined |
Network security: Do not store LAN Manager hash value on next password change | Not defined | Enabled | Enabled |
Network security: Force logoff when logon hours expire | Not defined | Enabled | Enabled |
Network security: LAN Manager authentication level | Not defined | Send NTLMv2 response only efuse LM | Send NTLMv2 response only efuse LM and NTLM |
Network security: LDAP client signing requirements | Not defined | Negotiate signing | Negotiate signing |
Network security: Minimum session security for NTLM SSP based (including secure RPC) clients | Not defined | No minimum | No minimum |
Network security: Minimum session security for NTLM SSP based (including secure RPC) servers | Not defined | No minimum | No minimum |
Recovery console: Allow automatic administrative logon | Not defined | Disabled | Disabled |
Recovery console: Allow floppy copy and access to all drives and all folders | Not defined | Disabled | Disabled |
Shutdown: Allow system to be shut down without having to log on | Not defined | Disabled | Disabled |
Shutdown: Clear virtual memory pagefile | Not defined | Disabled | Enabled |
System cryptography: Force strong key protection for user keys stored on the computer | Not defined | Not defined | Not defined |
System cryptography: Use FIPS compliant algorithms for encryption, hashing, and signing | Not defined | Not defined | Not defined |
System objects: Default owner for objects created by members of the Administrators group | Not defined | Not defined | Not defined |
System objects: Require case insensitivity for non-Windows subsystems | Not defined | Enabled | Enabled |
System objects: Strengthen default permissions of internal system objects (e.g. symbolic links) | Not defined | Enabled | Enabled |
System settings: Optional subsystems | Not defined | Not defined | Not defined |
System settings: Use Certificate Rules on Windows executables for software restriction policies | Not defined | Not defined | Not defined |
Exam Alert
Memorizing everything laid out in these tables isn’t critical. What you do need to know for the exam are the subtle differences between the templates—for example, Network security: LAN Manager authentication level is set to send NTLM response only by default, send NTLMv2 response only efuse LM under the secure template, and send NTLMv2 response only efuse LM and NTLM under the high-security template.
You also need to know that Hisecdc.inf causes issues with legacy clients because of configuration settings that refuse LAN Manager (LM) and NT LAN Manager (NTLM) authentication.
You should also be aware that configuring the default domain controller policy, which is tied to the Domain Controllers OU (or any other policies linked to that OU) affect only the domain controllers in most cases. To make changes at the domain level and affect users and domain member systems, edit the default domain policy or other policies linked to the domain.
If you have found, for example, that using the Hisecdc.inf template in your enterprise has some undesired side effects that did not show up during testing, you can reapply the default template to the domain controllers and then choose the Securedc.inf template.
To apply the Securedc.inf template, perform the following steps:
Click Start, Run, type
MMC, and click the OK button.From within the MMC, choose File, Add/Remove Snap-in from the menu.
Click the Add button.
Click Security Configuration and Analysis, click the Add button, and click the Close button.
Click OK on the Add/Remove Snap-in dialog box.
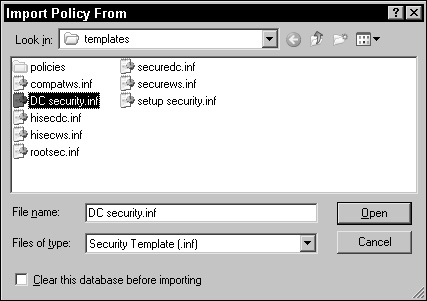
In the left pane of the MMC, right-click Security Configuration and Analysis, choose Import Template.
In the Import Template From dialog box, browse to WINDOWS security emplates, select the
DC Security.inftemplate (see Figure 2.2), and click OK. (You also need to make sure you select the Clear this database before importing check box.)
After you have opened the template, right-click Security Configuration and Analysis, and then click Configure Computer Now to configure the system with the default settings. (You can also choose Analyze Computer Now to simply review the difference between the current system configuration and the one the template would provide.)
When you choose Configure Computer Now, you need to use the specified default log file path, or choose a new one and click OK to continue. To specify a different log file path, type a valid path and filename in the Error Log File Path text box, and click OK.
When the configuration is done, you can view the changes that were made by right-clicking Security Configuration and Analysis, and then clicking View Log File.
The following code is a small sampling of the log; the full log is too unwieldy to print here.
Log file: C:Documents and SettingsJasonzMy DocumentsSecurityLogsDC History.log
-------------------------------------------
Saturday, March 15, 2003 12:54:18 PM
----Configuration engine was initialized successfully.----
----Reading Configuration Template info...

----Configure User Rights...
User Rights configuration was completed successfully.

----Configure Group Membership...
Group Membership configuration was completed successfully.

----Configure Registry Keys...
Configure users.default.
Configure users.defaultsoftwaremicrosoft
etdde.
Configure machinesoftware.
An alternative to using one of the preconfigured templates is to create your own. You might want to create your own template if you need settings that the available templates do not provide or you need to customize the settings in some way. Follow these steps to create a custom template:
Click Start, click run, type
mmc, and click OK.Click File, and then click Add/Remove Snap-In.
Click Add.
Select Security Templates and click Add.
Click Close.
Click OK.
Expand the Security Templates container.
Right-click the default path location, and select New Template.
Type in a name and description for the template, and click OK.
The new template displays within the right pane, from which you can begin configuring the security settings.
After you configure the required settings in the template, you can import it to a local computer using the Security Configuration and Analysis tool. You can also apply the template to multiple computers using Group Policies.
To apply a template to multiple computers:
Open Active Directory Users and Computers, and select the Domain Controllers OU or the OU that contains the servers to which you want to apply the policies.
Right-click Domain Controllers, and choose Properties.
In the Group Policy tab, you can select the default policy (or disable the default policy and create a new one), and click the Edit button.
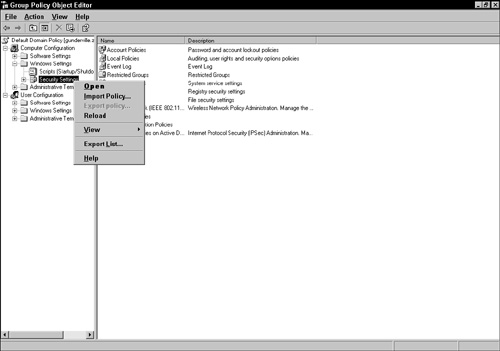
When the Group Policy Object Editor opens, expand Computer Configuration and then Windows Settings. Select Security Settings.
Right-click Security Settings and choose Import Policy (see Figure 2.3), which enables you to choose from the available default templates and any others you have created or modified on your own.
Windows Server 2003 installs Routing and Remote Access Service (RRAS) by default during its installation, but it is not configured or enabled.
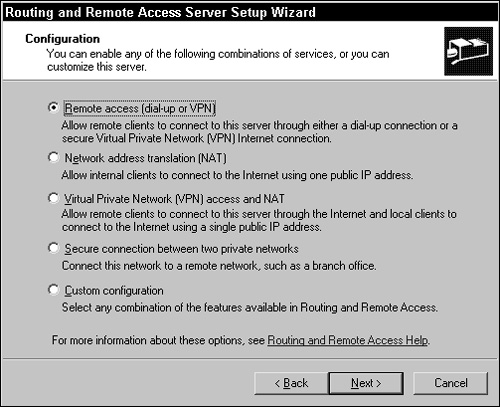
When you configure your server in the remote access/VPN server role, you can give remote users the proper access permission to access resources on the local area network (LAN) over a dial-up or DSL/cable connection.
When you run the Configure Your Server Wizard to set up your server as a remote access/VPN server, it starts the Routing and Remote Access Server Setup Wizard (see Figure 2.4).
Note
Chapter 4, “Planning, Implementing, and Maintaining Routing and Remote Access,” covers this server role in depth.
The file server role for a Windows Server 2003 implementation is as simple as it sounds: a server role designed to enable administrators to set up a location for data to be stored and shared in the enterprise.
You use the Configure Your Server Wizard to step through the entire process and configure settings for disk quotas and the Indexing Service. You can also set up the shares themselves and permissions.
The File Server Disk Quotas page is where you enable disk quotas by selecting the Set up default disk quotas for new users of this server check box (see Figure 2.5).
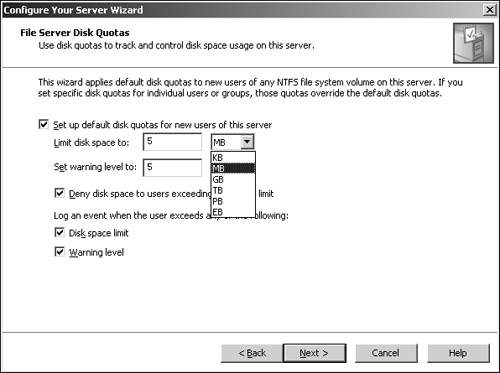
After you enable quotas, you can limit the total space to any number of kilobytes, megabytes, gigabytes, terabytes, petabytes, and, finally, exabytes.
You can also set up a warning threshold numerically or by parameter (KB, MB, GB, and so on) so that a warning is sent when users approach their limits. For instance, if a user has a 100MB disk-writing limit, a warning could be set at 80MB.
To enforce the setting, you need to select the Deny Disk Space to Users Exceeding Disk Space Limit check box. If you do not select this check box, users can continue writing to the disk.
Two other settings can be enabled on this page: the Disk Space Limit check box and the Warning Level check box. Use these settings to configure the system logs to record each occurrence of these events.
Note
The total amount of disk space available to a user is calculated from actual file size before any type of compression. When a 100MB file is compressed down to 80MB, Windows counts the file’s original 100MB toward the quota limit, for example.
Administrator level accounts are not limited to disk space limitations set in this manner. Regardless of the settings, they are not denied write access.
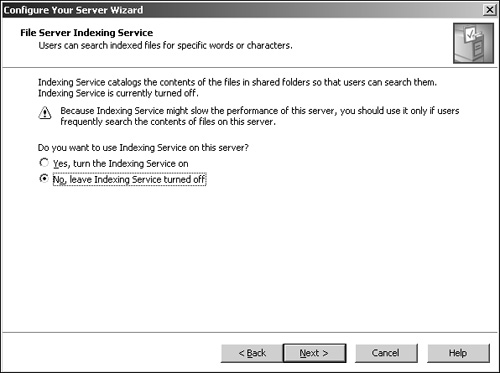
After you have configured any disk space limits (you can also opt to not choose any), you arrive at the File Server Indexing Service page (see Figure 2.6). Usually, leaving this setting disabled on a server is recommended because it affects performance; if only limited searches will be performed, leaving this option disabled makes sense. If the server can handle the load or there will be enough searches against the existing data, you can enable this option.
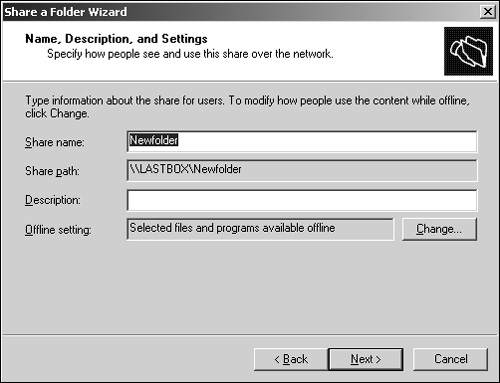
After you review the summary page of the options you have set and continue the role configuration process, the Share a Folder Wizard is displayed, where you can create new shares and paths to the shares (see Figure 2.7). You can also perform this action the “standard” way through Windows Explorer by right-clicking the folder you want to share and choosing Properties, and then electing to share the folder in the Sharing tab. In the next page (see Figure 2.8), you can supply a description for the share and configure offline settings for data in the share (whether the files should be made available when not connected to the network).

Next is the Permissions page, where you set up permissions for a share. There are a few preconfigured settings (all users have Read access, Administrators have Full Control, and so on), and there is the option to configure your own access control. The initial setting is for share access, but you can customize the setting and set security permissions through NTFS. The final page is the summary page, which shows you that the share was successful and enables you to complete this process or run the wizard again to create another share (see Figure 2.9).

Note
Regardless of whether you use the Configure Your Server Wizard, you set the server into a file server role as soon as you right-click on any share in Windows Explorer and choose to share a folder in the Sharing tab of the Properties dialog box.
Also, regardless of how the server got into the role of file server, when you use the Configure Your Server Wizard to remove the role, all shares on the server are removed by default, regardless of whether they were created via the wizard, manually, or a combination of both methods.
Unlike Windows 2000, which installs Internet Information Services (IIS) 5 by default, IIS 6 is not deployed on standard versions of Windows Server 2003 unless you explicitly choose to install it. You can install IIS 6 by using the Configure Your Server Wizard as outlined previously or by going to the Control Panel, choosing Add or Remove Programs, and choosing Add/Remove Windows Components.
If you use the Configure Your Server Wizard to enable the server’s role as an application server, the wizard installs IIS 6. A quick look shows that only the World Wide Web service is installed. File Transfer Protocol (FTP), Network News Transfer Protocol (NNTP), and Simple Mail Transfer Protocol (SMTP) are not added by default when you establish the server role in this way.
If you want to add those other services, you must go to Add or Remove Programs and choose Add/Remove Windows Components. In the Windows Components dialog box, highlight Application Server, and click Details to choose Internet Information Services. Then highlight Internet Information Services and click Details to select just the services you want to install.
Note
You could perform your entire IIS installation (or any other Windows component, for that matter) using the Add or Remove Programs method if you want. Also, if you simply want to install everything associated with ISS, you could select the check box next to the name instead of drilling lower into the list by clicking Details.
Installing only the services you need, and nothing else, is recommended. In most cases, even if you think you might need a service later, you should usually wait until you actually need a service to install it.
Under Windows 2000 Server, default security templates for web servers as well as secure and high-security templates were deployed on IIS systems through the Group Policy linked to an OU where the accounts for IIS servers were found.
This deployment method is no longer applicable under Windows Server 2003. When you install IIS, it runs with almost everything disabled and almost fully locked down. At the end of the installation, about the only thing you can do with the server is have it respond to client requests and serve up static (HTML) content. Therefore, no other content, such as Active Server Pages (ASP), ASP.NET pages, WebDAV publishing, and FrontPage Server Extensions, can be hosted from the server until you explicitly enable it.
In fact, a new Group Policy setting, Prevent IIS from Installing, enables Domain and Enterprise Administrators to control which Windows Server 2003 systems are allowed to install IIS 6.
Exam Alert
For most Microsoft exams, you need to know other configuration tasks for IIS servers, such as configuring Internet Connection Firewall and setting proper access permissions for files and folders on the IIS server.
This information is explained in more detail in the “Securing Servers: Standards and Best Practices” section of this chapter because these two specific actions are best practices across the board, not just when configuring an application server role.
You can use the Configure Your Server Wizard to enable your server as a print server. After you select the print server role, the wizard displays the Printers and Printer Drivers page (see Figure 2.10), where you select which network clients should have printers installed. You can choose one of two options: Windows 2000 and Windows XP Clients Only or All Windows Clients.

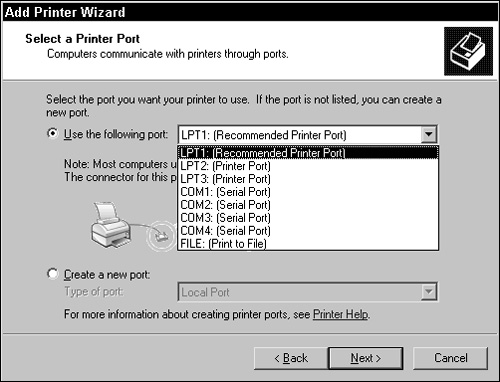
At this point, the Add Printer Wizard starts, and you step through the prompts of choosing a local printer or a network printer. You can specify the local printer yourself or let Plug and Play find it. You then have the option of choosing one of the local ports already available on the system or creating a new one (see Figure 2.11).
You then choose the make and model of the printer attached to the port you selected earlier. On Windows Server 2003 configurations, all printers added with the Add Printer Wizard are shared by default. If for some reason you do not want to share the printer, you must manually deselect this default option. If the server is a member of a domain, the printer is also published in Active Directory by default.
When you run the Configure Your Server Wizard to set up your server in the mail server role, you can choose how your users are authenticated to the POP3 service: through the accounts that are local to the server, through Active Directory, or via an encrypted password file (see Figure 2.12).

This setting enables users to connect to the server and download email to their local systems by using Outlook, Outlook Express, or any other email client that supports POP3. After making your selection, the POP3 and SMTP services are installed on the local system.
After the process is completed, the Internet Information Services (IIS) Manager appears on the Administrative Tools menu. The IIS Manager enables administrators to configure the SMTP service that the Configure Your Server Wizard installed.
Note
The other IIS 6 components are not installed unless the server was already set up as an application server. If you have previously run the Configure Your Server Wizard to install the server as an application server, the wizard would have enabled only the World Wide Web publishing service. SMTP, FTP, and NNTP are not added by default.
However, if you run the Configure Your Server Wizard to install the mail server role, you’ll see that both POP3 and SMTP services are installed and enabled at completion of the installation.
Configuring the SMTP service for this use is no different than any other SMTP configuration in Exchange Server 5.x, 2000, and 2003 or within IIS 4 and 5. Configuring the POP3 service is done through the POP3 Service MMC or through the command line by using WINPOP.
The usable WINPOP commands are as follows:
WINPOP.EXE <cmd> [<parameters>]
ADD, CHANGEPWD, CREATEQUOTAFILE, DEL ¦ DELETE, GET, LIST, LOCK, MIGRATETOAD, SET, STAT, UNLOCK
Options:ADD <domainname> ¦ <user@domainname [/CREATEUSER <password>]>
CHANGEPWD <user@domainname> <new password>
CREATEQUOTAFILE <user@domainname> [/USER:user]
Note: Quota files are created by default when adding mailboxes (for SAM and AD authentication)
/USER: To specify a different user account the quota file will reference.
DEL ¦ DELETE <domainname> ¦ <user@domainname [/DELETEUSER]>
GET <property>
LIST [domainname]
LOCK <domainname ¦ user@domainname>
MIGRATETOAD <user@domainname>
SET <property> <value>
STAT [domainname]
UNLOCK <domainname ¦ user@domainname>
The POP3 Service MMC also enables you to perform all these actions through a graphical user interface (GUI). You can complete tasks such as setting the authentication method, configuring the POP3 mail store, and setting the mail server to require Secure Password Authentication in whatever way you’re most comfortable working. You can also set the POP3 service state, the number of sockets, and the number of threads the service uses.
Exam Alert
You don’t need to delve deeply into the POP3 Service from a server role perspective for the exam. You mainly need to know how it is installed, which is through the Configure Your Server Wizard or through Control Panel, Add or Remove Programs, Add/Remove Windows Components, Email Services. You also need to familiarize yourself with how to configure the services, whether you use WINPOP from the command line or the POP3 Service MMC.
Like many of the other roles described so far, the terminal server role can be set up by running the Configure Your Server Wizard or by opening the Add or Remove Programs applet in the Control Panel, selecting Add/Remove Windows Components, and then Terminal Server.
Note that when you install Terminal Services by running the Configure Your Server Wizard, you see a warning that the system will be rebooted as part of the installation process. There is no option to cancel the reboot until later; it occurs as part of the process. No forewarning is given about a reboot when you install the role through Control Panel; however, you are given the option to reboot later through a dialog box.
The installation process has changed since Windows 2000 Server, most noticeably in the capability to configure security modes for operating the terminal server and the lack of an option to install Terminal Services in Application or Remote Administration mode. However, if you install it using the Add or Remove Programs icon it is the same as the application mode in Windows 2000.
Remote Desktop for Administration is now used in place of the Terminal Services in Remote Administration mode. This new feature allows server administration from most systems on your network. No licenses are required, and up to two simultaneous remote connections are allowed in addition to someone logged in at the local console.
To enable Remote Desktop on a system, go to the Remote tab of the System Properties dialog box and select the Allow Users to Connect Remotely to This Computer check box (see Figure 2.13).

Running in the terminal server role, your server can operate in two security modes:
Full Security mode—. This mode is the default deployment of Terminal Services in Windows 2000 Server and Windows Server 2003. This configuration mode forces all applications that need to be installed and run by Terminal Services users to be written to run in the security context of an ordinary user. Applications written so that a higher level of system permission is required do not operate properly (or at all) in this mode. If they are necessary in the enterprise, require the system to be set up in Relaxed Security mode.
Relaxed Security mode—. This mode enables you to run programs that otherwise might not work under the higher settings of Full Security mode. Relaxed Security mode is also known as Windows NT 4.0/Terminal Server Edition permissions compatibility mode and runs in much the same manner; any user with a session can change certain files and some Registry settings because of the less rigorous security settings.
After the terminal server role has been established on the server, you need to configure two additional items: Internet Explorer Enhanced Security Configuration settings and configuring the Terminal Server License Server.
When you enable Internet Explorer Enhanced Security Configuration, users that log on as an administrator have high security settings configured for the Internet and local intranet security zones to disable scripts from running. The Microsoft Virtual Machine (VM) and Microsoft ActiveX controls are disabled, and users are prevented from downloading files in these zones.
Medium security settings are configured for the trusted sites zone only, which effectively means that trusted sites, by default, are the only ones that allow Internet Explorer to completely render websites as they are actually designed. Although static HTML pages are usually not affected in the Internet and local intranet zones, pages designed with Microsoft VM and ActiveX controls are not displayed or don’t function correctly.
The Terminal Server License Server must also be configured so that it continues to function normally after installation. When a server is set up in the terminal server role on a Windows Server 2003 system, it runs for only 120 days from the date of the first client logon without the license server in place. After that time, the system stops accepting connections from unlicensed clients.
The Terminal Server Licensing Service is installed via Control Panel, Add or Remove Programs, Add/Remove Windows Components, Terminal Server Licensing and can be enabled at the enterprise level, domain level, or workgroup level. After the service is installed, you can activate the Terminal Server License Server in the Terminal Server Licensing MMC. Right-click the Terminal Server License Server you want to activate, and choose Activate Server to start the Terminal Server License Server Activation Wizard. In the Connection Method page, click the Automatic Connection to Connect over the Internet link after providing the required information for your company.
After completing this process, you need to install the client access licenses (CALs) on the Terminal Server License Server for your clients to use when they connect to the terminal server. When a client makes a first-time connection to a terminal server, the server locates a Terminal Server License Server to issue a new CAL to the client.
You can set up the DNS server role by running the Configure Your Server Wizard or through Control Panel, Add or Remove Programs, Add/Remove Windows Components, Networking Services, Domain Name System (DNS). (To install DNS only, click the Networking Services option in the Components list, and click the Details button.)
If you opt to use the Configure Your Server Wizard, click the Add or Remove Role prompt in the Manage Your Server window, click Next, and then click DNS Server, which installs DNS and runs the Configure a DNS Server Wizard (see Figure 2.14).

In the wizard’s Configuration Action page, you can create a forward lookup zone only, a forward and reverse lookup zone, or root hints only.
Note
You can create lookup zone or root hints manually after the DNS service is installed by using the DNS MMC.
In the Primary Server Location page, you have the option to choose where the DNS and SRV records for your zone are maintained. You can choose the server you are configuring, which enables you to set up a primary forward lookup zone. You can also choose a secondary forward lookup zone, which is set up if another DNS server is authoritative for the zone, and the copy to be installed on this server should be a read-only copy.
Next, in the Zone name page, enter the name of the DNS zone you are enabling on this server, such as cert.zandri.net or gunderville.com.
The next page is the Zone File page, where you set the path of the standard primary or standard secondary DNS zone file. (The type depends on the answer you provided in the Primary Server Location page.)
In the Dynamic Update page (see Figure 2.15), notice that the default selection is Do Not Allow Dynamic Updates because this is the most secure option when zones are set up as standard primary zones. (A standard secondary zone is a readonly copy and can’t be edited directly.)

In the Forwarders page, you can enter IP addresses to specify whether your DNS server should forward lookup queries to DNS servers outside your location to another DNS server in your enterprise, or whether it should forward lookup queries to an ISP-owned DNS server.
In the next page, Completing the Configure a DNS Server Wizard, you can click Back to change any of the settings or click the Finish button to complete the installation of the service as configured.
The Configure Your Server Wizard then displays the This Server Is Now a DNS Server page. If needed, you can review the installation logs at systemrootDebugConfigure Your Server.log.
Under security information for DNS in “Need to Know More?” at the end of this chapter, the link supplied there takes you to a page listing a few of the typical threats your DNS infrastructure might be susceptible to, including denial-of-service (DoS) attacks, data modification, and DNS redirection. Proper setup and configuration of your DNS server provide some defense against these attacks; the rest is up to the defenses and firewalls enabled on your network.
Note
For more information on additional security against attacks for DNS servers and systems in general, see the “Securing Servers: Standards and Best Practices” section of this chapter.
You can set up the DHCP server role by running the Configure Your Server Wizard or through Control Panel, Add or Remove Programs, Add/Remove Windows Components, Networking Services, Dynamic Host Configuration Protocol (DHCP). To install only DHCP, highlight Networking Services in the Components list, and click the Details button.
In the Manage Your Server window, click Add or Remove a Role, click Next, select DHCP Server, and then click Next. The Configure Your Server Wizard installs the DHCP service and starts the New Scope Wizard to configure a new IP address scope for your DHCP server.
In the Scope Name page, enter a name for the scope. In the Description text box, you can optionally enter a descriptive entry for the scope.
Next is the IP Address Range page, where you define the IP address range this particular scope hands out to clients. To do this, type the IP address for the start of the range and the IP address for the end of the range. The wizard uses the IP address class denominator that you enter to determine the correct subnet mask in the Subnet Mask section. For example, the wizard knows that 131.15.0.1 is the start of the Class B range of addresses and sets the default subnet mask to 255.255.0.0. If necessary, you can change the default address to another address in use in your environment.
Note
Chapter 3, “Planning, Implementing, and Maintaining a Network Infrastructure,” covers many of the TCP/IP addressing aspects that apply to DHCP configuration and IP addressing in general.
Excluding certain IP addresses in the Add Exclusions page configures the DHCP server to not lease these addresses to client systems. If the range of addresses in this scope is 199.168.1.5 through 199.168.1.254, and you want to exclude the 199.168.1.15 address (which belongs to a server with this address as a static entry, for example), enter the single address as an exclusion. If a range from this scope is dedicated as manually entered IP addresses for 10 printers on the floor where this scope is active, for example, enter the entire range as an exclusion, such as 199.168.1.21 through 199.168.1.30.
Note
Another way of doing excluding IP addresses is to exclude the known range from the scope at the start. Then there is no reason to have entries in the Add Exclusions page.
If you know that you need to set up the scope for the 199.168.1.x address range and need 15 static IP addresses for servers and printers, you could always craft the valid range for the scope as 199.168.1.16 through 192.168.1.254. Then addresses 199.168.1.2 through 199.168.1.15 could be used for static systems, and you would have no entries in the Add Exclusions page.
After you have entered any exclusions necessary for this scope, you arrive at the Lease Duration page, where you can define the length of time (in days, hours, and minutes) a client can use an IP address from this scope.
The DHCP server leases IP addresses to its clients. Each lease has an expiration date and time; the default duration is eight days. The client must renew the lease if it will continue to use that IP address. Defining the lease’s duration eases client administration, but this step is optional. If you leave all fields of the Lease Duration page blank and click Next, clients can still obtain IP addresses from the DHCP server.
In the Configure DHCP Options page, you can specify whether to configure additional DHCP options at this time. (If you decide not to, you can always return to the scope later and make these changes.) Using the default setting, Yes, is best, as one of the settings is the IP address of the router (default gateway), which allows clients that obtain a lease to have a default path out of their local subnet.
In the Configure DHCP Options section of the Domain Name and DNS Server page, you can assign DHCP clients the IP addresses of the preferred DNS servers they should use. You can also configure IP addresses of preferred NetBIOS name servers (WINS) for clients in the following page. Activating this newly created scope is the final step of setting up a DHCP server role.
You can set up the Windows Internet Naming Service (WINS) server role by running the Configure Your Server Wizard or through Control Panel, Add or Remove Programs, Add/Remove Windows Components, Networking Services, Windows Internet Naming Service (WINS). To install only WINS, highlight Networking Services in the Components list, and click the Details button.
Of all the server roles discussed in this chapter, this one is the easiest to configure with the Configure Your Server Wizard. In the Manage Your Server window, select Add or Remove Role and click Next. Then choose WINS Server, which installs WINS. After this process is completed on the server end, the WINS server will be running on your network.
The setup wizard uses several default configuration parameters for how NetBIOS name records are managed in the WINS server database; these parameters are fine for most environments.
Removing the role is just as easy: Simply run the Configure Your Server Wizard a second time and choose WINS to remove the role.
Note
Originally, it was hoped during Windows 2000 builds that reliance on WINS would fade and the service could finally be retired. This was not the case and still isn’t today, even with Windows Server 2003 having been on the shelves for some time. Because of legacy systems and backward-compatibility requirements for older software, NetBIOS name resolution and WINS services are still needed in many enterprises.
When it comes to securing enterprise domain controllers and member servers in the enterprise, there are several considerations. Physical security plays a large role. The doors to the server room (or whatever room is being used to house the server) should be locked at all times, regardless of whether it’s by key, smart card, or combination lock. Access to the room should be limited to only those who need it. If someone needs access that does not normally have it, you can issue a temporary badge to the room or have someone with access to the room escort the person in and stay there until he or she leaves the room. When servers are installed in server racks in rooms with doors that close and lock, keeping them locked should be a standard practice, with the keys left in the charge of the responsible person.
When it comes to securing domain controllers, ask why someone needs to log on locally at the console. This question is valid for many member servers as well. There should be a valid business reason (and proper change control) for working locally on a domain controller or any server system when most work can be done remotely with remote tools.
This brings me to my next point—limiting administrative access. Very few people should have Domain Administrator access, and even fewer should have Enterprise administrator permissions. Domain Administrator access should be limited to a select few people who need that level of access control over the domain. These users should also be trained and instructed (if they are not fully aware already) on the use of these domainwide unrestricted accounts.
They should not log in with administrative access to perform day-to-day work on their desktop systems and on servers except when necessary. More often than not, logging in on a daily basis with a standard user account (or perhaps a power user or server operator account) is usually good enough. When additional rights are necessary, administrators can always run the Run As service to be authenticated to the services they need to access with their administrator account.
By default, power users on local systems can install programs that do not modify operating system files or install system services. They can also create and manage local user accounts and groups, stop and start system services, and modify resources on systems through the Control Panel.
Server operators can log on interactively to domain controllers and create and delete shared resources. They also have permissions to start and stop some domainwide services, back up and restore data, format disk drives, and shut down the system.
The RUNAS command enables you to run EXE and MMC programs as another user. In this way, you can run the program at a higher level of privilege than your current settings allow. The Run As service requires the Secondary Logon service to be running on the local system. To start the Run As service for Control Panel programs, you still need to hold the Shift key down, right-click the shortcut you want to run, and choose Run As. For other Start menu icons and actual EXEs from within Windows Explorer, you just need to right-click them to get RUNAS to appear on the shortcut menu. You can also issue the command from the Run dialog box or at a command prompt.
When providing Domain Administrator access, users should be given their own accounts so that if necessary, administrative actions can be traced back to the specific user. If everyone used the default Administrator account, there would be no way to know who performed a certain action because it could have been anyone with that account access. Best practices dictate that the default Administrator account should be renamed; use a complex password and limit access to that password for emergencies only.
Enterprise Administrator accounts should be handed out even more sparingly because they have Full Control permissions over all domains in the enterprise. They too should be assigned to just those users who need this level of access and protected even more rigorously.
Many white papers and KnowledgeBase articles state that Windows Server 2003 is “secure out of the box.” I would counter that it is “more secure out of the box” because the only system that’s truly secure is one that is “never taken out of the box.” There have been great strides to make Windows Server 2003 as secure out of the box as possible. These efforts have brought the server operating system light years ahead of Windows NT Server 4 and Windows 2000 Server.
On the one hand, more than half of the system services installed by default under the basic Windows Server 2003 installation are not enabled for automatic startup (instead, they’re set to Manual) or are outright disabled. Most network services are not enabled until an administrator explicitly does so. With all these advances in default settings, it is still up to system administrators to have (or get) the required level of training and acquire the necessary level of knowledge to keep systems secure.
As mentioned earlier, there are steps you can take to limit system controls. In addition to limiting services on systems to only those who need them, you can, for example, take steps to allow only necessary traffic on your networks.
From an external to internal perspective, there is no need to allow certain port traffic through your firewall at the network’s perimeter if this type of access is not necessary. You might use FTP (port 20 and 21) to push data from one segregated subnet to another on the WAN, but if you never cross the firewall to the public network (in or out), there is no need to have that port open full time. If organizational needs required opening this port, however, you could enable change controls to make the necessary configuration changes and then close the ports when they’re no longer needed. Table 2.6 explains some of the more commonly used default Transmission Control Protocol (TCP) ports.
Table 2.6. Commonly Used TCP Ports
Port Number | Use |
|---|---|
7 | ECHO |
18 | Message Send Protocol (MSP) |
20 | FTP |
21 | FTP |
22 | SSH Remote Login Protocol |
23 | Telnet |
25 | Simple Mail Transfer Protocol (SMTP) |
29 | MSG ICP |
37 | Time |
42 | Host Name Server (Nameserv) |
43 | WhoIs |
49 | Login Host Protocol (Login) |
53 | Domain Name System (DNS) |
69 | |
70 | Gopher Services |
79 | Finger |
80 | HTTP |
103 | X.400 Standard |
108 | SNA Gateway Access Server |
109 | POP2 |
110 | POP3 |
115 | Simple File Transfer Protocol (SFTP) |
118 | SQL Services |
119 | Newsgroup (NNTP) |
137 | NetBIOS Name Service |
139 | NetBIOS Datagram Service |
143 | Internet Message Access Protocol (IMAP) |
150 | NetBIOS Session Service |
156 | SQL Server |
161 | Simple Network Management Protocol (SNMP) |
179 | Border Gateway Protocol (BGP) |
190 | Gateway Access Control Protocol (GACP) |
194 | Internet Relay Chat (IRC) |
197 | Directory Location Service (DLS) |
389 | Lightweight Directory Access Protocol (LDAP) |
396 | Novell NetWare over IP |
443 | HTTPS |
444 | Simple Network Paging Protocol (SNPP) |
445 | Microsoft-DS |
458 | Apple QuickTime |
563 | SNEWS |
569 | MSN |
1080 | Sock |
If there is no reason to allow this port traffic, the outside firewalls should deny it. This is especially critical for demilitarized zone (DMZ) systems that Internet users access; you should have those firewalls finely tuned to only the necessary traffic, and you might want to consider blocking the ports on the servers themselves.
One method to stop traffic to specific servers is by using Internet Connection Firewall (ICF). For example, if you have an FTP server in the DMZ next to an IIS server, the FTP server could be subjected to port 80 attacks because the firewall allows that traffic to pass through to connect to the IIS server. If port 80 is open on the FTP server (it would be by default), the system could be compromised on that allowed port.
Note
Internet Connection Firewall has now been renamed Windows Firewall in Windows Server 2003 Service Pack 1.
You can configure ICF on the server to deny that traffic. To do that, follow these steps:
Open the Properties dialog box of your local area connection.
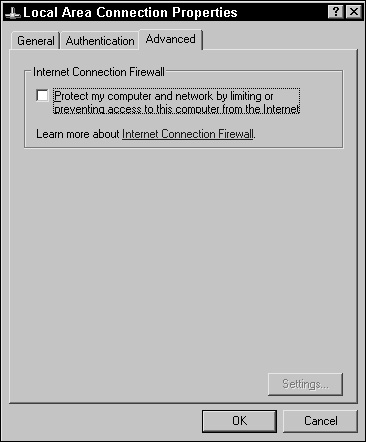
In the Advanced tab, select the check box in the Internet Connection Firewall section (see Figure 2.16). After selecting this option, the grayed out Settings button is available.
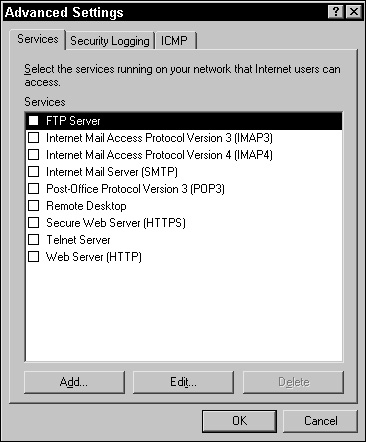
Click the Settings button and, in the Services tab of the Advanced Settings dialog box (see Figure 2.17), configure the services you want to have access to the local system by selecting the corresponding check boxes. (By default, after ICF is enabled, no traffic is allowed to pass inward to the system.)
If a service or TCP port is not listed but required, you can add it by clicking the Add button and supplying the TCP port number, service name, and any other pertinent information.
ICF also enables you to set logging information on system attempts and Internet Control Message Protocol (ICMP) traffic behavior. Network cards on servers can also be configured to allow only specific traffic.
If you are concerned that ICF could be defeated, you can configure the TCP/IP protocol bound to the specific network card to allow only specific traffic. To do this, follow these steps:
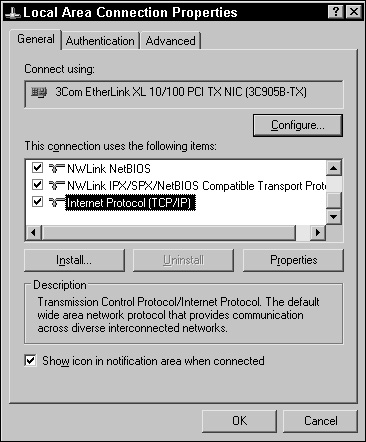
Select the General tab in the Local Area Connection Properties dialog box.
Select Internet Protocol (TCP/IP) and click the Properties button (see Figure 2.18) to open the Internet Protocol Properties dialog box.
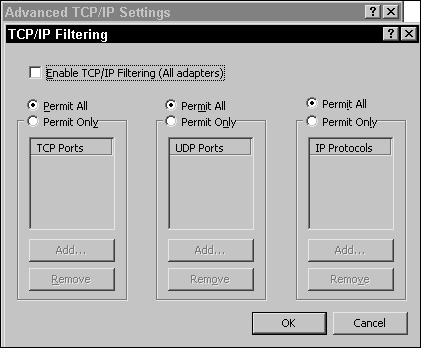
The Internet Protocol Properties dialog box has only the General tab. Click the Properties button to open the Advanced TCP/IP Settings dialog box. Select the Options tab and click TCP/IP Filtering (see Figure 2.19).
As you can see in the TCP/IP Filtering dialog box, by default, all traffic is permitted. To configure an adapter to permit only specific TCP and/or UDP traffic based on port number, select the Permit Only radio button above TCP Ports or UDP Ports (or both). You can also select the Enable TCP/IP Filtering (All Adapters) check box to enable these settings on all installed network adapters in the system that are bound to TCP/IP.
Exam Alert
In discussions of local firewalling, ICF is often a main point of contention. You should be aware of the “old school” method of port filtering in the TCP/IP Filtering dialog box outlined in this section.
Note that limiting the IIS server to ports 80 and 443 or the SMTP server to port 25 traffic means that domain services, such as LDAP and DNS registration, are not available to these systems because they are blocking all but those listed allowed ports. Also, a port 80 attack using a known vulnerability on an unpatched web server will be successful because web traffic rides port 80, as do certain attacks.
The correct answer is D. You should create a template using the Security Templates snap-in and configure the required settings. The template can be imported into a GPO that is linked to the OU containing the servers. That way all servers in the OU are configured with the same settings. Answers A and B are incorrect because they require more administrative effort. Answer C is incorrect because the security settings are applied to all computers in the domain. The settings should only be applied to the new servers. | |
The correct answers are B and D. Windows Server 2003 Web Server Edition can be installed with some of the same functionalities of the other OS versions. You can set the system up as a virtual private network (VPN) server, but in limited functionality. Connections are limited to one media type: Local area network (LAN), remote access (dial-up), or direct cable connection. Server Message Block (SMB) connections are limited to 10 simultaneous connections. Therefore, answer B is correct. The server can be set up as a file and print server; therefore, answer D is correct. The server cannot be installed as a terminal server or a streaming media server; therefore, answers A and C are incorrect. Windows Server 2003 Web Server Edition cannot be established as a domain controller; therefore, answer E is incorrect. | |
The correct answers are A and C. The minimum amount of space required for installation is approximately 1.25GB. When a FAT16 partition is in use, it requires 100MB to 200MB more free disk space than other supported file systems because of cluster sizes. Therefore, answer A is correct. If you are installing Windows Server 2003 Standard Edition from a network share, you need approximately 100MB to 200MB more space than if you ran the setup from the CD because the Setup program needs to use that space for temporary files associated with the installation. Therefore, answer C is correct. FAT32 uses smaller cluster sizes and although it might require slightly more space than NTFS, it is not in the 100MB to 200MB range; therefore, answer B is incorrect. At this time, there is no floppy disk installation procedure because there are no Windows Server 2003 Setup floppy disks. Therefore, answer D is incorrect. An RIS installation does not require an additional 100-200MB; therefore, answer E is incorrect. | |
The correct answers are B, D, E, and F. If you elect to upgrade your current server operating system, you need to be aware that the Setup program automatically installs Windows Server 2003 into the same folder as the currently installed operating system, regardless of its naming convention. You can perform direct upgrades to Windows Server 2003 from the following versions of Windows:
There are no service pack requirements for Windows 2000 Server; any version and service pack level of Windows 2000 can be directly upgraded to Windows Server 2003. | |
The correct answer is B. With the Configure Your Server Wizard, you select the Domain Controller role. All the wizard does then is run | |
The correct answers are A and D. DNS needs to be available on the network. Without DNS, | |
The correct answer is B. When a new domain controller is installed on a Windows Server 2003 system, the default template, | |
The correct answer is D. If a custom security template has caused some undesired side effects that did not show up during testing, you can reapply the default template to the domain controllers through Group Policy objects and the Domain Controllers OU by using the Security Configuration and Analysis snap-in. Choose Open Database, and import the Active Directory Domains and Trusts is normally used to handle external or manually created trusts between domains. Therefore, answer A is incorrect. Computer Management is normally used to configure the local system services and hardware configuration. Therefore, answer B is incorrect. Active Directory Sites and Services is used to configure sites, replication between sites, and network protocols used for replication. Therefore, answer C is incorrect. | |
The correct answer is A. Whether or not you use the Configure Your Server Wizard, you set the server into a file server role as soon as you right-click any share in Windows Explorer and specify sharing a folder in the Sharing tab of the Properties dialog box. Removing the file server role does not remove all the current NTFS permissions, as the file server role does not affect these security settings nor does it remove the | |
The correct answer is D. If you use the Configure Your Server Wizard to remove the IIS role, you will remove only the WWW service. All the other services will remain; therefore, answers A, B, C, E, and F are incorrect. |
Best practices for security: http://www.microsoft.com/technet/treeview/default.asp?url=/technet/prodtechnol/windowsserver2003/proddocs/server/sec_checklist.asp.
Locking down IIS: http://www.microsoft.com/technet/treeview/default.asp?url=/technet/prodtechnol/windowsserver2003/proddocs/server/sec_aboutsecurity.asp.
What’s changed in Windows Server 2003: http://www.microsoft.com/technet/treeview/default.asp?url=/technet/prodtechnol/windowsserver2003/proddocs/server/gs_whatschanged.asp.
Windows Server 2003 system requirements: http://www.microsoft.com/windowsserver2003/evaluation/sysreqs/default.mspx.
Microsoft KnowledgeBase Article #319091: “Windows Server 2003 May Not Use Multiple Processors with Some Pentium Pro or Pentium II Processors”: http://support.microsoft.com/default.aspx?scid=kb;en-us;319091.
Choosing between NTFS, FAT, and FAT32: http://www.microsoft.com/windowsxp/home/using/productdoc/en/default.asp?url=/WINDOWSXP/home/using/productdoc/en/choosing_between_NTFS_FAT_and_FAT32.asp.
File Manager displays maximum disk space of 1.99GB: http://support.microsoft.com/default.aspx?scid=kb%3Ben-us%3B128794 (includes information on maximum file system sizes).
Windows NT file size and partition size limits: http://support.microsoft.com/default.aspx?scid=kb%3Ben-us%3B93496.
Security information for DNS: http://www.microsoft.com/technet/treeview/default.asp?url=/technet/prodtechnol/windowsserver2003/proddocs/server/sag_DNS_imp_Security.asp.
Authorizing a DHCP server in Active Directory: http://www.microsoft.com/windows2000/en/server/help/default.asp?url=/windows2000/en/server/help/sag_DHCP_pro_AuthorizeServerInDirectory.htm.
Authorizing DHCP servers: http://www.microsoft.com/windows2000/en/server/help/sag_DHCP_imp_AuthorizingServers.htm.
What’s new in Active Directory: http://www.microsoft.com/windowsserver2003/evaluation/overview/technologies/activedirectory.mspx.
Upgrading from Windows 2000 Server to Windows Server 2003: http://www.microsoft.com/windowsserver2003/evaluation/whyupgrade/win2k/default.mspx.
Technical overview of Windows Server 2003 security services: http://www.microsoft.com/windowsserver2003/techinfo/overview/security.mspx.
The application server role: http://www.microsoft.com/windowsserver2003/techinfo/serverroles/appserver/default.mspx.
Securing the Windows Server 2003 application platform: http://www.microsoft.com/windowsserver2003/techinfo/serverroles/appserver/secplat.mspx.
For more articles on Windows Server 2003: http://windows2003.2000trainers.com.
To see a list of well-known IP port numbers: http://www.iana.org/assignments/port-numbers.