Chapter 3. Upgrade and migrate a SharePoint environment
Upgrading a SharePoint environment can be a complicated task, especially if you’re running in an environment that allows only minimal downtime. People have come to rely on their SharePoint solutions to get their work done, and your job is to minimize the impact that the SharePoint migration has on their day-to-day functionality. SharePoint Server 2013 supports both the SharePoint 2010 and SharePoint 2013 user interfaces, allowing for a gradual transition to the SharePoint 2013 user experience depending on your organization’s technical and business requirements. Depending on the level of customization of the earlier SharePoint environment, you might need to upgrade in stages to allow for changes in branding and custom solutions. This chapter goes over many of the issues and concerns of upgrading the SharePoint environment so that you can be prepared both for the related exam questions and for upgrading your environment in real life.
Objectives in this chapter:
Objective 3.1: Evaluate content and customizations
This objective focuses on the tasks necessary to ensure a smooth transition between SharePoint 2010 and SharePoint 2013. SharePoint is a platform that uses a relational database to store most of its data. Users create custom solutions, branding is applied, code is written, and sometimes data is deleted, leaving orphans that need to be cleaned up. These customizations and possible database issues need to be addressed before a successful migration can be attempted.
You also need to consider how users authenticate and how the authentication method migrates. Claims authentication has opened up a whole new world of authentication, spawning custom authentication solutions that also need to be migrated.
Fortunately for those of you doing migrations, SharePoint Server 2013 provides several tools to help you get ready for your migration. These tools go a long way toward ensuring a successful migration, but don’t make the mistake of upgrading without a fallback plan. Covering every single possible configuration that exists is impossible, and the potential always exists for a disaster to occur during the middle of the migration process. Always make sure that the SharePoint environment—the SharePoint server environment as well as all data files and any remote storage files—is totally backed up before initiating the migration process. With those tasks accomplished, you can safely proceed with the migration process.
Performing migration pre-check tasks
You should perform a number of tasks before you start a migration. Following best practices, you should—ideally—make a full survey of the current environment before doing any other task. Making a thorough list of all your SharePoint components can help you determine what needs to be cleaned up before migration as well as the steps involved in the migration process. The following items need to be surveyed:
All servers involved
Service application databases
Content databases
Web apps
Site collections
Customizations
Large lists
Views
Blocked file types
This list is intended to help you determine what needs to be upgraded as well as what items need to be redone on the SharePoint 2013 system (such as blocked file types).
More Info: SharePoint 2013 Products Preview Upgrade worksheet
A spreadsheet is available to help guide you in this process. You can download the SharePoint 2013 Products Preview Upgrade worksheet from http://go.microsoft.com/fwlink/?LinkId=252097.
With SharePoint 2010, you could do an in-place upgrade from SharePoint 2007—meaning that you could install SharePoint 2010 on the same server as SharePoint 2007. SharePoint 2013 doesn’t support in-place upgrades, which means that you have to install SharePoint 2013 on a different server from the one on which SharePoint 2010 is installed. For some organizations, this presents additional costs, but some benefits have been gained as well. This was done to separate the process of upgrading the software and databases with the process of upgrading the site collections.
Exam Tip
For the exam, you will be expected to know that in-place upgrades aren’t supported (a major shift from SharePoint 2010). The only valid upgrade path is the database-attach method.
The database-attach method requires that a separate farm be installed and configured before the migration process can begin. After this is accomplished, the databases need to be moved over and upgraded. All content databases can be upgraded, as can some of the service application databases. The following service applications can be upgraded to SharePoint 2013:
Business Data Connectivity
Managed Metadata
Performance Point
Secure Store
User Profile
Search Administration
More Info: Services upgrade overview
See http://technet.microsoft.com/en-us/library/ee731990.aspx for more information on the services upgrade overview for SharePoint Server 2013.
After you conduct a thorough survey, you need to clean up your environment (and make any necessary adjustments to the survey). First, you need to remove any underused or unused site collections. As part of the survey, you can determine the sites that are truly needed. Also, if any sites can be archived during this process, you can move them to content databases that can be migrated later (or possibly left on SharePoint 2010 until they have been disposed of). Make sure that you communicate with the site users during this process to ensure that the sites required for reporting, compliance, and other business needs aren’t deleted.
The next stage of cleanup is to manage lists and document libraries. Lists or libraries with a large number of items should be trimmed, if possible. By default, list throttling is turned on in SharePoint 2013 just as it is in SharePoint 2010 and could cause problems if the lists are too large. Plus, now is a good time to look at your lists to see if some of the data can be deleted or archived, thereby speeding up the migration process when it occurs. Additional benefits include speeding up crawl times and decreasing the size of the search index, thus improving the overall quality of searches.
Also consider that lists with a large number of columns can actually cause an upgrade to fail. You can test a content database for this problem by running the following PowerShell command:
Test-SPContentDatabase
You should test all your content databases to ensure that no lists have too many columns. If you do have a list with too many columns, you can remove extraneous columns and run the command again, or you can leave the lists as they are rather than migrate them to SharePoint 2013.
Another potential source of trouble in migration is content databases with too many site collections. SharePoint 2010 had a hard limit of 15,000 site collections per content database and a default warning level of 9,000 site collections; SharePoint 2013 has a suggested limit of 5,000 site collections per content database and a default warning level of 2,000 site collections. If the number of site collections exceeds 5,000 in a content database that will be migrated, it could result in broken site collections and leave you in an unsupported situation. Deleting unneeded site collections is the best way to clean up a content database, but if all the site collections need to be migrated, you should create additional content databases and migrate some of the site collections over to the new databases. The maximum number of site collections per database can be changed, but more than 10,000 site collections isn’t supported. A list of content database supported limits follows:
500 content databases per farm
200 GB of content per content database in general usage scenarios
4 TB of content per content database in specialized usage scenarios
60 million items per content database (documents and lists)
10,000 site collections
More Info: Content database limitations
See http://technet.microsoft.com/en-us/library/cc262787.aspx#ContentDB for more information on the limits for content databases.
Large numbers of document versions also can greatly increase the amount of time needed to migrate. Verify that you really need to keep all these versions before you waste precious migration time. Determining which versions to delete can be a large task that’s best handled by governance and some programming. Individually removing versions from hundreds or thousands of lists and libraries can take considerable more resources than are available.
Removing unused items such as features, site templates, and web parts also increases the likelihood of a successful migration. The survey used in the earlier part of this objective can help you determine which of these items are being used. You can use the stsadm command EnumAllWebs to double-check that you aren’t removing a web part or feature that’s actually in use:
stsadm - enumallwebs -databasename <database name> -includefeatures -includewebparts
This command also lists setup files and event receivers associated with the web.
A couple types of sites aren’t supported and must be removed before the upgrade:
PowerPoint Broadcast. Office web apps are now installed separately from the SharePoint environment.
FAST Search Center. FAST is no longer a separate product and therefore doesn’t have a search center of its own. The FAST Search Center can continue to function after the upgrade in the SharePoint 2010 mode, but the user experience can’t be upgraded to 2013. The Enterprise Search Center in SharePoint Server 2013 replaces the FAST Search Center.
Web Analytics also needs to be stopped. The architecture of Web Analytics is different in SharePoint 2013 and doesn’t upgrade. The presence of Web Analytics information in content databases could cause errors during the upgrade.
Exam Tip
The Web Analytics application needs to be stopped before databases are backed up for upgrade. The importance of this step makes it a prime subject for exam questions.
The preceding pre-check tasks can definitely help prepare you to begin the migration process; it’s your job to make the SharePoint 2010 environment as clean as possible before the upgrade. For example, if the environment had originally been a SharePoint 2007 environment, make sure that all the visual upgrades are finished. This goes for any tasks that might have been left over from the previous upgrade. Deleting or archiving as much data as possible has additional benefits, such as a cleaner search experience and reduced crawl times, and you can save money on storage as well (both for storing the data and the backups).
More Info: Cleaning up an environment before an upgrade
See http://technet.microsoft.com/en-us/library/ff382641.aspx for more information on how to clean up an environment before an upgrade to SharePoint 2013.
Analyzing content database test results
The preceding section introduced the PowerShell command Test-SPContentDatabase, a tool that helps you determine whether the SharePoint content databases are ready to be migrated. Every content database needs to have Test-SPContentDatabase run against it and any migration-blocking issues resolved. You can run the command against attached and unattached content databases in two ways.
The first way is just against the content database. The full syntax here is followed by a description of the parameters:
Test-SPContentDatabase [-Identity] <SPContentDatabasePipeBind> [-AssignmentCollection
<SPAssignmentCollection>] [-DatabaseCredentials <PSCredential>] [-ExtendedCheck
<SwitchParameter>] [-ServerInstance <SPDatabaseServiceInstancePipeBind>] [-ShowLocation
<SwitchParameter>] [-ShowRowCounts <SwitchParameter>]
Identity. A required parameter that can be the name of the database or the database GUID
AssignmentCollection. A PowerShell parameter used to dispose of memory objects
DatabaseCredentials. A PSCredential object that contains the user credentials for SQL Server authentication
ExtendedCheck. A parameter that checks to make sure that the authentication methods match (claims or classic) in the different web application versions
ServerInstance. A parameter that specifies which SQL Server instance to use
ShowLocation. A parameter that shows locations where missing templates and features are being used
ShowRowCounts. A parameter that returns row counts for the various tables within the content database
Important
Although Test-SPContentDatabase doesn’t alter any data in the content databases, it does require significant resources to run, especially if a rather large content database is used. This can make the content database unresponsive for a period of time, so running it only on unused databases or during low-usage periods (such as on the weekend or during off hours, depending on the organization) is recommended.
The second method of using Test-SPContentDatabase involves testing a web application with a content database. This verifies customizations that are associated with the web application. The only difference in parameters is that Test-SPContentDatabase uses Name instead of Identity, and strings must specify the database name and the WebApplication (which can be the web app’s URL or GUID). The full syntax is as follows:
Test-SPContentDatabase -Name <String> -WebApplication <SPWebApplicationPipeBind>
[-AssignmentCollection <SPAssignmentCollection>] [-DatabaseCredentials <PSCredential>]
[-ExtendedCheck <SwitchParameter>] [-ServerInstance <SPDatabaseServiceInstancePipeBind>]
[-ShowLocation <SwitchParameter>] [-ShowRowCounts <SwitchParameter>]
Example:
Test-SPContentDatabase -Name WSS_Content -WebApplication http://contoso
Test-SPContentDatabase lists all the issues that it found, whether an issue will block an upgrade, the issue’s remedy, and the message of what the issue is. It returns the following items for each issue it finds:
Category tells you what category the issue falls under, such as missing feature, configuration, or missing web part.
Error is a true/false value indicating whether it’s an error.
UpgradeBlocking is a true/false value indicating whether it will prevent the upgrade from occurring.
Message describes the issue that was found, such as Database [WSS_Content] Has Reference(s) To A Missing Feature: Id =[<GUID>].
Remedy suggests a solution for the issue.
Locations shows where the issue occurs, unless it’s a global issue such as configuration.
Configuring web application authentication for upgrades
The authentication methods of the web application must match when doing an upgrade. If you are migrating from a claims-based web application, the path is pretty straightforward because the default authentication method in SharePoint 2013 is claims. Running Test-SPContentDatabase on the content database that you want to upgrade can help you determine whether you need to configure the web application before the upgrade. If you need to do additional configuration, one of the issues found by running Test-SPContentDatabase should match the following criteria:
Category should be Configuration.
Error should be False.
UpgradeBlocking should be False.
Message should show that the web application is configured with Claims authentication mode and that the content database you are trying to attach will be used against a Windows Classic authentication mode.
Remedy should show that an inconsistency exists between the authentication mode of target web application and the source web application. You need to ensure that the authentication mode setting in the upgraded web application is the same as what you had in the SharePoint 2010 web application.
If you are facing this issue, you should upgrade your SharePoint 2010 web application from classic-mode authentication to claims-based authentication before you upgrade. Converting the web application to claims-based authentication while still in the SharePoint 2010 environment allows for testing of claims before the migration and allows for any potential fixes before migration (such as making sure the search application still functions in claims-based mode). Converting it after the database-attach upgrade process is also possible. If for some reason you absolutely need to stick with the classic authentication method, you can create a SharePoint 2013 web application that uses classic authentication.
Exam Tip
As part of the exam, you will be asked to put steps in order. Configuring your SharePoint 2010 web application for claims before you upgrade to a SharePoint 2013 web application that uses claims authentication is a perfect example of an upgrade step that must be done in a certain sequence.
Converting a SharePoint 2010 web application from classic-mode authentication to a SharePoint 2010 claims-based authentication involves the following steps:
Important
You should approach this process with caution. If it fails, you might need to restore the whole web application from a backup and start over.
Open the SharePoint 2013 Management Shell with an account that has the following permissions:
Member of the Administrators group on the server on which you are running the PowerShell commands
Securityadmin fixed server role on the SQL Server instance that contains the web application
Db_owner fixed server role on all databases to be updated
Enable claims authentication on the target web application by typing the following PowerShell commands, replacing <WebAppUrl> with the URL of the target web application:
$WebAppName = http://<WebAppUrl>
$wa = get-SPWebApplication $WebAppName
$wa.UseClaimsAuthentication = $true
$wa.Update()
Enable a site collection administrator on the claims-based enabled application, replacing yourDomainSiteCollectionAdminUser with the account name for the site collection administrator:
$account = "yourDomainSiteCollectionAdminUser"
$account = (New-SPClaimsPrincipal -identity $account -identitytype
1).ToEncodedString()
$wa = get-SPWebApplication $WebAppName
$zp = $wa.ZonePolicies("Default")
$p = $zp.Add($account,"PSPolicy")
$fc=$wa.PolicyRoles.GetSpecialRole("FullControl")
$p.PolicyRoleBindings.Add($fc)
$wa.Update()
Use the following PowerShell command to migrate users:
$wa.MigrateUsers($true)
After migration is completed, finish with the provisioning process by using the following PowerShell command (still in the same PowerShell window):
$wa.ProvisionGlobally()
After the web application is converted, it should be fully tested to ensure that the change to a claims-based authentication process was successful. This includes running a full crawl on the search service to ensure that the search account has the proper permissions. Validation of search results should also be done. If everything appears to be in order, migrating the web application to SharePoint 2013 is an easy process—as far as authentication goes.
Important
The process of converting a web application to claims-based authentication is a one-way process. Going back to classic-mode authentication isn’t supported and might require a full system restore (databases and SharePoint farms) to return to classic-mode authentication, if that’s required.
If you want a SharePoint 2013 web application that uses classic-mode authentication (such as a custom solution that requires classic-mode authentication that can’t be rewritten due to budget and/or time constraints or comes from a third party), use PowerShell. Using classic-mode authentication requires an overwhelming need because claims-based authentication is the preferred method of authentication for SharePoint 2013 going forward. This process, via PowerShell, involves the following steps (when you create a web application via Central Administration, classic-mode isn’t an option):
Open up the SharePoint 2013 Management Shell on a SharePoint 2013 server with an account that has farm-level administration rights.
Use the following PowerShell command to create the web application, where <WindowsAuthType> is either NTLM or Kerberos and the other options are similar to creating any other web application:
New-SPWebApplication –Name <Name> –ApplicationPool <ApplicationPool>
                                  -AuthenticationMethod <WindowsAuthType>
                                  –ApplicationPoolAccount <ApplicationPoolAccount>
                                  -Port <Port> -URL <URL>
After creating the classic-mode web application in SharePoint Server 2013, you will see a warning whenever you go to the web application page. This warning indicates that the web application is using the classic-mode authentication. This is to emphasize that claims mode is the preferred authentication mode.
Converting a SharePoint 2013 classic-mode web application to a claims-based web application is a fairly straightforward process. You need to open the SharePoint 2013 Management Shell with the proper permissions and run the following command:
Convert-SPWebApplication -Identity "http:// <servername>:port" -To Claims
–RetainPermissions [-Force]
Again, whenever you switch authentication modes, you should thoroughly test the web application to make sure that nothing permissions-related is broken. This is especially true for any search-related items.
More Info: Migrating from classic-mode to claims-based authentication
See http://technet.microsoft.com/en-us/library/gg251985.aspx for more information on how to migrate from classic-mode to claims-based authentication in SharePoint 2013.
Resolving orphan objects
Orphan objects are items that exist in a database but have no reference to an existing item—for example, a site that has no parent site, or a site collection or a document library that has no parent site. Orphaned objects can cause an upgrade to fail because when SharePoint reaches an orphaned item, it doesn’t know where to put it. Orphaned objects can be caused by various reasons, such as the following:
A database is corrupt. Corruption can occur at the disk level or logical level.
Moving site collections from one content database to another can occasionally leave orphans.
A site collection fails to be provisioned.
The power fails during a write operation.
Unsafe code causes a problem.
Regardless of how the orphans occurred, they need to be cleaned up before you upgrade. Before you dive into cleaning up the database, you should check your survey information against the list of sites found in each content database to locate missing sites and duplicate sites. You can get a list of all the sites in a content database by using the stsadm command enumallwebs:
stsadm -o enumallwebs -databasename <database name> [-databaseserver <database server
name>]
You also can use the enumallwebs command can to list all the features and web parts, as shown earlier.
After you determine orphaned or duplicate sites (and after you choose which one to keep), you should remove them by using the PowerShell command Remove-SPSite:
Remove-SPSite [-Identity] <SPSitePipeBind> [-AssignmentCollection
<SPAssignmentCollection>] [-Confirm [<SwitchParameter>]] [-DeleteADAccounts
<SwitchParameter>] [-GradualDelete <SwitchParameter>] [-WhatIf [<SwitchParameter>]]
The Identity parameter can be either the URL of the site or the GUID that the enumallwebs command can obtain. The other important parameter to consider when dealing with a production environment is the GradualDelete parameter, which allows for a gradual rather than immediate deletion. A large site or site collection deletion can potentially make a SharePoint farm unresponsive for several minutes (or longer).
More Info: Using Remove-SPSite
See http://technet.microsoft.com/en-us/library/ff607948.aspx for more information on the PowerShell command Remove-SPSite.
SharePoint 2010 provides some additional tools to help you detect and repair orphans. These tools can also help to repair other issues, such as the following:
Removal of a site or subsite that has no parent site
Removal of a list that has no parent list
Removal of a list (including a document library) that has no parent site
Removal of list items that have no parent list
Removal of documents that have no parent document library
Removal of web pages that have no parent site
Missing security scopes on subsites, lists, and items
The available tools are the stsadm command databaserepair and the PowerShell Repair function that exists on database objects. Both tools show the corruption that exists and provide the option of repairing it. Before attempting any database repairs, however, you should always make a backup, as with any operation that changes the database significantly. The first tool to look at is the stsadm command databaserepair:
stsadm -o databaserepair -url <url name> -databasename <database name>
[-deletecorruption]
The deletecorruption parameter is required if you truly want to delete the corruption. Don’t run this command while the database is being used during your company’s usual production hours. You can also delete corruption with the SharePoint 2010 Management Shell (PowerShell). Both options are included here because stsadm and PowerShell coexist; although stsadm eventually will be deprecated, it’s still widely used. The PowerShell method of deleting corruption is done by opening the SharePoint 2010 Management Shell and running the following commands:
$db = Get-SPContentDatabase "<content database name>"
$db.Repair($true)
If you want to use these PowerShell commands just to list the corruption, you would use $db.Repair($false) instead of $db.Repair($true). Use of these tools is highly recommended to remove orphans of various types before beginning the migration process.
Exam Tip
Removal of orphans is listed as an exam objective for a reason. It is essential that all orphans are dealt with before migration begins. Both the stsadm method and the PowerShell method were included for completeness. Either method could show up on the exam. Stsadm is being deprecated, but it’s still used extensively by SharePoint administrators.
Resolving missing files
Missing files can cause upgrades to fail or, if an upgrade succeeds, can cause sites not to work correctly and pages not to display correctly. SharePoint Server 2013 supports both the SharePoint 2010 experience as well as the SharePoint 2013 experience. It does this by maintaining both a 14 directory and a 15 directory (sometimes referred to as the SharePoint hive or SharePoint folder) under %COMMONPROGRAMFILES%Microsoft SharedWeb server extensions. The SharePoint 2010 files are located under the 14 directory, and the SharePoint 2013 files are located under the 15 directory. This allows for both experiences to exist on the same farm but prevents an in-place upgrade.
All the customizations that you want to keep have to be brought over and installed on the SharePoint 2013 farm. This can cause some confusion over where some files should exist. SharePoint files reside in four main areas:
GAC. The Global Assembly Cache stores DLLs that are used by SharePoint as well as globally deployed solutions. These are located in the Windows directory.
SharePoint 14 folder. The files necessary for the SharePoint 2010 experience reside in this folder, which is found in the %COMMONPROGRAMFILES%Microsoft SharedWeb server extensions14 directory.
SharePoint 15 folder. This is the main folder for SharePoint 2013 files, which reside in the %COMMONPROGRAMFILES%Microsoft SharedWeb server extensions15 directory.
Inetpub. This folder is necessary on every WFE that serves up SharePoint content. The location for SharePoint files are under the inetpubwwwrootwssVirtualDirectories directory.
Important
When a SharePoint 2010 solution is installed on a SharePoint 2013 farm, the files generally go in the 14 folder but are still be accessible to SharePoint 2013 websites until the site is upgraded to the SharePoint 2013 experience.
These four directories will be where missing files need to be placed. Finding out what files are missing is often a difficult task. After installing all the customizations from your SharePoint 2010 farm to your SharePoint 2013 farm, you might want to make some comparisons to ensure that all necessary files were copied over. Luckily, you have tools available, such as Windiff and comp, to help you do this.
Using Windiff and comp
Windiff and comp are two tools from Microsoft Windows Server 2008 that can help you figure out what files are missing. For example, you could compare files between multiple WFEs to make sure that they are in sync. They can also help you figure out missing files between the SharePoint 2010 and SharePoint 2013 systems.
You use Windiff to compare two ACSII files (such as XML files) or two folders that contain ASCII files. The Windiff graphical tool is available on installation media under support ools and needs to be installed before it can be used. You can view whether a file is different as well as use a view that allows for line-by-line inspection of files.
More Info: Using the Windiff.exe utility
See http://support.microsoft.com/kb/159214 for information on how to use Windiff.exe.
Comp is a command-line utility that you can use to compare both ASCII and binary files. Comp.exe should already exist on the server that SharePoint is installed on. Several options can be found by typing comp /? on the command line. The syntax is fairly straightforward. For example, if you want to compare the GAC of two different computers, you can run the following command on one of the two servers:
comp.exe C:WinntSystem32*.dll \<other computer name>C$WinntSystem32*.dll
Then you can use the results of the output to look for missing assemblies. This can also help determine whether you have the right version of the assembly.
Using the SharePoint Products Configuration Wizard for missing files
During the course of a SharePoint farm’s life, some system files might go missing, become corrupted, or be modified. This can affect the migration and upgrade process, so keeping the originals in a backed-up location is important. On a SharePoint 2010 farm or a SharePoint 2013 farm, you can run the SharePoint Products Configuration Wizard to replace missing system files necessary to run SharePoint. Before you do this, of course, you should back up everything in the SharePoint folder as well as anything under the inetpub directory. This process checks for necessary files and replaces them if they are missing. It also checks and/or changes a host of other things, such as the web.config files, registry keys, and xml files.
Resolving configuration issues
When migrating to SharePoint 2013 from a customized SharePoint 2010, you need to be concerned about a number of configuration issues. You can’t simply copy over configurations, and the lack of an in-place upgrade means that all configuration customizations required have to be created on the SharePoint 2013 farm. The survey listed earlier in this objective can help you determine the configuration issues you need to copy over. The following configuration items might present issues:
Trust between servers
User Profile Service
Forms-Based Authentication
SPNs for Kerberos
SSL certificates
Special IIS settings
Trusted locations for Excel
Secure Store settings
Network Load Balancing
This list is by no means exhaustive, but it gives you an idea about the kinds and amount of configuration required on a SharePoint farm. Diagnosing the cause of configuration issues can be one of the most difficult tasks in configuring a SharePoint farm. Fortunately, you have diagnostic tools available to help. This section focuses on the SharePoint Diagnostic Studio.
The SharePoint Diagnostic Studio is part of the SharePoint Administrator’s Toolkit. At the time of this writing, the latest version is the SharePoint 2010 Administrator’s Toolkit, which also works well with SharePoint 2013. The toolkit includes the following tools:
SharePoint Diagnostic Studio 3.0 (SPDiag 3.0)
User Profile Replication Engine 2010
Load Testing Toolkit
Security Configuration Wizard (SCW) manifests
Content Management Interoperability Services (CMIS) connector for SharePoint Server 2010
More Info: Downloading SharePoint Administrator’s Toolkit v2.0
You should install the SharePoint Administrator’s Toolkit to help diagnose a wide variety of configuration issues as well as other issues that can affect performance. See http://www.microsoft.com/en-us/download/details.aspx?id=20022 to download the SharePoint Administrator’s Toolkit v2.0.
After you install the SharePoint 2010 Administrator’s Toolkit, you can run reports and get diagnostic information by following these steps:
Navigate to the server that you want to diagnose. (Remote diagnosis is also available but requires a separate set of steps.)
Click Start | SharePoint 2010 Administration Toolkit | SharePoint Diagnostic Studio.
In the SharePoint Diagnostic Studio user interface, click New Project.
In the Create Project dialog box, enter the name of the current server and then click Create Project. This creates a project with the same name as the configuration database, with a .ttfarm extension.
Wait until the process finishes and returns you to the diagnostic studio. You might have to close the SharePoint Diagnostic Studio, return, and then click Open Project and choose the project you just created to view results.
Important
If you’re creating a new project in the SharePoint Diagnostic Studio on a production system, be advised that it can cause a brief service outage. After the project is created, it can be run at any time.
After you connect to the server, you can run a number of reports to help determine configuration issues. For instance, you can click Failed User Requests in the Availability section under Reports to determine which users have tried to access the SharePoint server and failed. This could show you that the authentication method in use isn’t configured correctly. Another useful report in figuring out configuration issues (as well as other issues) is the ULS Trace Issues report. This displays the ULS (Universal Logging Service) items in a grid-like format and can help diagnose a wide range of issues, including configuration issues.
Some issues, such as IIS configuration, are best tackled through the use of proper documentation. This is also true for SSL configurations, but SharePoint Diagnostic Studio can help you with this by identifying failed https requests. Tools can definitely help with identifying issues, but they can’t always help with solving the issues, especially customizations such as forms-based authentication or third-party claims authentication methods.
Objective summary
Test-SPContentDatabase is one of the most useful tools to identify issues that need to be resolved before migration.
Authentication methods need to match for web applications that are being migrated.
Claims-based authentication is the default authentication method in SharePoint Server 2013.
Orphan removal (sites, subsites, lists, documents, and list items) is an important step in preparing for migration.
Use of tools such as Windiff and comp can help identify missing files.
You can use the SharePoint Diagnostic Studio to diagnose a wide range of issues, including configuration issues.
Objective review
Answer the following questions to test your knowledge of the information in this objective. You can find the answers to these questions and explanations of why each answer choice is correct or incorrect in the “Answers” section at the end of this chapter.
What is the recommend limit on the number of site collections that are contained within a single content database?
200
5,000
10,000
1 million
You want to migrate a classic-mode web application from SharePoint 2010 to SharePoint 2013. What are your options with regards to configuring authentication before the web application is migrated?
Convert the SharePoint 2010 to claims-based authentication and then upgrade.
Convert the SharePoint 2010 web application to claims-based authentication after the database upgrade.
Create a classic-mode SharePoint 2013 web application and then upgrade.
All of the above
What method name is used to remove orphan objects from a content database using the SharePoint 2010 Management tool?
deletecorruption
Test-SPContentDatabase
Repair
Upgrade-SPContentDatabase
Windiff.exe is a graphical Windows Server tool that you can use to compare files in different directories. What file types can it compare?
ASCII files
All binaries
DLLs
EXEs
The SharePoint Administrator’s 2010 toolkit comes with which of the following items?
SharePoint Diagnostic Studio
User Profile Replication Engine
Load Testing Toolkit
All of the above
You want to install a feature so that it will be available for both the SharePoint 2010 experience and the SharePoint 2013 experience. How can you install it?
Use the PowerShell command Install-SPFeature a single time.
Use the PowerShell command Install-SPFeature twice, using the CompatibilityLevel parameter to install the feature for both experiences.
Features are automatically upgraded during the database-attach method.
Features are either compatible with the SharePoint 2010 experience or the SharePoint 2013 experience, but not both.
Objective 3.2: Plan an upgrade process
Migration to SharePoint Server 2013 can be quite an undertaking depending on the size and level of customization of your SharePoint 2010 installation. Because in-place upgrades aren’t supported, you can’t install SharePoint 2013 on top of SharePoint 2010. Removing a SharePoint 2010 installation and then installing SharePoint 2013 isn’t recommended, either. SharePoint Server 2013 should be installed on a clean install of Microsoft Windows Server 2008 R2 or greater. These requirements to the upgrade process can provide additional difficulties for companies wanting to use the same hardware. Before beginning the upgrade, you should outline each step necessary to complete the upgrade with minimal impact and effort.
Exam Tip
The exam will focus some of its questions on planning for this upgrade process. Questions will center on the topics discussed in this objective, but this information will also help you in your own upgrade process.
Planning removal of servers in rotation
Part of your migration process might include the removal of servers on the SharePoint 2010 farm so that they can be used in the SharePoint 2013 farm. This strategy would enable the gradual transition of content to the new server farm.
SharePoint servers shouldn’t just be turned off. You need to remove the SharePoint 2010 servers in a way that allows the farm or farms to function as long as necessary for your organization’s requirements. Several tasks might be involved in the removal process, such as the following:
Moving Central Administration
Moving Search
Removing WFE from NLB
Moving WFE functionality
Moving Application Services
Moving the User Profile Service
The most important issue to consider is keeping all the services necessary for SharePoint to function correctly to be running on at least one server at all times. This generally means turning on a service on a server before turning it off on another server. Central Administration is one service that must be functioning at all times for SharePoint to be functional. Luckily, Central Administration can be running on any server in the SharePoint farm and can even be on multiple servers at the same time.
Using Psconfig
One command-line tool that you can use to provision Central Administration is Psconfig, which provides an alternative to the graphical user interface and allows for scripting. For example, if you want to use Psconfig to provision the Central Administration web application on a server, you would open a command-line interface with farm-level permission and run the following command:
psconfig.exe -cmd adminvs -provision -port <port number>
             -windowsauthprovider onlyusentlm
Exam Tip
psconfig is a powerful command-line utility that could very well be on the exam as a possible answer or choice. You should be familiar with it and the main functionality it provides.
The Psconfig command creates the Central Administration web application on the server it was run on, with the port number specified by <port number> and with NTLM used as the authentication mechanism. Using the enablekerberos parameter instead enable Kerberos on all Central Administration web applications in the farm.
Provisioning any web application is a resource-intensive operation and should be performed only during non-critical hours on production farms. Psconfig can also be used to unprovision a Central Administration web application:
psconfig.exe -cmd adminvs -unprovision
Of course, one Central Administration web application should be running at all times. Psconfig is a very useful command utility and can be used to do a whole host of configuration items that are useful for the configuration of the SharePoint farm.
More Info: Psconfig command-line reference
You can find the Psconfig command-line reference at http://technet.microsoft.com/en-us/library/cc263093.aspx.
Servers that run parts of the Search service application need their components removed or moved, depending on the search topology. The Search service requires three components that can exist on different servers: the Search Administration service, the Crawl component, and the Index Partition and Query component.
The Crawl component and the Index Partition and Query component can exist on one or more servers. If you want to move one of these components, you can do so through Central Administration by following these steps (this isn’t necessary if components already exist on more than one server):
Navigate to the Search service application.
Click Farm Search Administration | Modify Topology.
Under New, choose the component to be moved.
Choose the server to which the component is being moved, the associated database, and location (on the server where the component is being created) of files the component creates.
Click OK and wait for the component to be created.
After the new search component is created, you can delete the one from the server that’s being removed from rotation. This can also be done in Central Administration. To accomplish this, go back to the Modify Topology page and click the component to be removed. An option to delete the component will become available.
Important
Creating and removing search components can take a very long time—up to an hour or more in some cases. The process will degrade SharePoint performance, especially on the server being affected, so you need to take this into consideration if your SharePoint farm is in production.
You can remove the Search Administration component in Central Administration also. The Search Administration component for a Search service application can exist on only one server. To move the Search Administration component, follow these steps:
Make sure that the SharePoint Server Search service is running on the destination server.
Click Farm Search Administration | Modify Topology.
Click Administration Component in the Admin section.
Click Edit Properties.
Change the server hosting the Search Administration component by choosing one of the servers from the Administration Component Server drop-down list.
Click OK to save changes.
Removing services
After you remove a server’s components, you should stop all the services on it before you remove it. Central Administration provides a visual display of all the SharePoint services that you can use to stop them. You can also stop them by using the PowerShell command Stop-SPServiceInstance (or start with Start-SPServiceInstance), but these commands require the GUID of the service instance, which you can obtain with the command Get-SPServiceInstance. To stop all the services with Central Administration, follow these steps:
Navigate to Central Administration with a farm administrator account.
Click Manage Services On Server in the System Settings section.
Select the server on which you want to stop services from the Server drop-down list.
Under the Action column, click Stop for each service running on the server, waiting until each service stops before proceeding to the next one.
Leave the page after all services on the server are stopped.
After you stop all the SharePoint services on the server to be removed, you can go to the actual server and ensure that all the SharePoint services (in the Services MMC) are stopped. At this point, you can safely remove the server (in this case, only search services were running on the server).
Moving User Profile Synchronization
The User Profile Synchronization (UPS) service is a special case in that it must be stopped before it’s started on another server. The UPS service can’t run on more than one server at a time. Before moving the UPS service, you should make a full backup of the farm (using the built-in Central Administration backup tool) and the related UPS databases (defaults are Profile DB, Synch DB, and Social DB). To move the UPS by using Central Administration, follow these steps:
On the server to which the UPS is being moved, make sure that the Forefront Identity Manager Service and the Forefront Identity Manager Synchronization Service are set up identically to the server that currently hosts the UPS.
Verify that the account being used to perform this process is a member of the Farm Administrator’s group and is a member of the local Administrator’s group on the server on which you want to install the UPS. (The account can be removed from the local Administrator’s group after the UPS is started.)
Navigate to Central Administration on the server that’s currently running the UPS and click Manage Service Applications in the System Settings section.
On the User Profile Synchronization Service line, click Stop to stop the current UPS service.
Navigate to the server on which you want to start the UPS service and open Central Administration.
Click Manage Service Applications in the System Settings section.
On the User Profile Synchronization Service line, click Start.
Wait several minutes until the UPS service starts.
Navigate to Manage Service Applications in the Application Management section on the home page of Central Administration.
Click User Profile Service Application (or whatever you named it) on the Service Applications page.
In the Synchronization section on the User Profile Service Application page, click Start Profile Synchronization.
Start a full profile synchronization on the Start Profile Synchronization page.
More Info: Maintaining UPS settings
See http://technet.microsoft.com/en-us/library/ff681014.aspx for more information on how to maintain User Profile Synchronization settings in SharePoint Server 2013.
Removing other servers
You can take out of rotation servers that provide service applications (other than Search and User Profile Synchronization) by simply starting the services they provide on other SharePoint servers in the farm and then stopping them on the server to be removed. This is assuming that the services they provide aren’t being consumed by other SharePoint farms. This scenario would involve reestablishing the connection after the service is moved. You first would want to unpublish the service and then stop it. After that, you would start the service on the server providing the service and then publishing it from that server. This would require establishing trusts as well, if they don’t already exist. You should plan for an outage associated with publishing and consuming the service to avoid loss of services during production hours.
Configuring parallel upgrades
The upgrade path to SharePoint 2013 requires the use of the database-attach upgrade method. This process can take a long time, especially if you are upgrading one database at a time. Luckily, content databases can be upgraded in parallel. Before looking at the process of configuring a parallel upgrade, you should look at the different phases of the upgrade process. The process typically follows this order:
Create the SharePoint Server 2013 farm.
Copy databases to the new farm.
Upgrade the service applications.
Upgrade the content databases.
Upgrade site collections.
Notice that the content databases should be upgraded after the service applications. Database upgrades are a resource-intensive process, but enabling them to proceed in parallel can decrease the amount of time it takes. The number of databases that can be upgraded in parallel depends on the type of hardware being used.
Important
Before you begin the upgrade process, you must make sure that the account being used to attach the database is a member of the db_owner fixed database role on the database being upgraded.
Content databases are attached to a web application. If you have more than one content database that needs to be attached to the web application, the one that contains the root site collection needs to be the first one attached. A content database needs to be connected to a web application with the following PowerShell command:
Mount-SPContentDatabase -Name <Database Name> -DatabaseServer <Server Name>
-WebApplication <URL>
More Info: Using Mount-SPContentDatabase
See http://technet.microsoft.com/en-us/library/ff607581.aspx for more information on how to use the PowerShell command Mount-SPContentDatabase.
The act of mounting the database to the web application begins the upgrade of the database to SharePoint 2013. You can monitor the progress of the upgrade by navigating to the Upgrade Status page in Central Administration. After you upgrade the first content database and verify its success, you can begin the parallel upgrade of the remaining content databases. To perform parallel upgrades of the content databases, follow these steps:
Open a command prompt on the SharePoint server on which you want to initiate the upgrade process.
Run the Mount-SPContentDatabase PowerShell command to begin the database upgrade of the next content database to be upgraded.
Wait several minutes to allow the upgrade process to begin and to avoid database locks.
Open a new command prompt (one for each database being upgraded) and repeat steps 2 and 3 for the next database.
Repeat steps 2 through 4 for each additional content database that needs to be upgraded.
Exam Tip
Mount-SPContentDatabase is one of the few PowerShell commands that you are expected to know in detail. You can expect to see the command as an option in an exam question or used in a case study.
The speed of the parallel upgrades depends on the hardware capabilities of the servers involved and the databases being upgraded. Upgrading very large content databases individually is advisable because the parallel upgrade process can result in a slower upgrade experience. If you plan to upgrade many content databases at the same time, you should monitor the performance on both the SQL Server instance where the databases are being upgraded and the SharePoint server where the database upgrade is initiated. The following factors can affect the speed of the upgrade process:
SQL Server disk performance
SQL Server CPU and memory
Web Server CPU and memory
Network performance
Content database complexity (number of site collections, documents, versions, and so forth)
How data is organized (for example, lots of lists take longer than a few lists with lots of items)
More Info: Planning for performance during an upgrade
See http://technet.microsoft.com/en-us/library/cc262891.aspx for more information on how to plan for performance during an upgrade to SharePoint 2013.
Configuring read-only access for content
Migrating content in a production environment is a tricky process that takes careful planning and scheduling to minimize the impact on production as well as keep people from losing any work. The loss of work can be minimized by making the content databases read-only before they are migrated. A communication plan should be in place to let users know before the content databases are made read-only so they can prepare by saving their work ahead of time. Any open documents can’t be saved after the database is made ready-only, which results in lost work unless users save the items to another location.
The method used to make content read-only varies depending on your needs (such as making site collection read-only before making the content database read-only). For example, if you have a huge number of site collections (such as personal sites), you probably want to make just the content database(s) read-only, but if you have a set of heavily used site collections within a content database, you might want to make the site collections read-only first so that the content can be made read-only gradually. Site collections can be made read-only by following these steps:
Navigate to Central Administration with a Farm Administrator account.
Click Application Management and then click Configure Quotas And Locks in the Site Collections section.
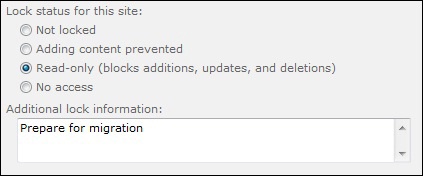
Choose the site collection that is to be made read-only in the Site Collection section and then choose Read-Only (Blocks Additions, Updates, And Deletions), as shown in Figure 3-1.
Add information in the Additional Lock Information text box and click OK to save changes.
You can also use PowerShell to set a site collection to read-only:
Set-SPSite -Identity "<URL of site collection>" -LockState "ReadOnly"
More Info: Locking or unlocking site collections
For more information on how to lock or unlock site collections, see http://technet.microsoft.com/en-us/library/cc263238(v=office.14).aspx.
Setting a site collection (or a content database) to read-only affects the end-user experience for that content. Many items that allow for addition and/or modification of data are removed from the user interface, to help prevent users from trying to add or modify content. Some items that are removed or disabled are as follows:
Edit and New Page are disabled on the Site Actions menu.
Check In, Check Out, New Document, Upload Document, Delete Document, and other options are disabled on the Library Tools tab for Documents.
The ribbon isn’t displayed on the Search page (and FAST Search page).
Create View, Modify View, New Row, Form Web Parts, and other options are disabled on the Library Tools tab for Library.
For Permissions New, Remove Users from Group, and Settings are disabled.
If users aren’t warned ahead of time, making a site read-only will most likely result in a lot of confusion because users will see the items as broken and will report them as such. Other items will appear to be available, but the OK button will be disabled. This can cause some concern as well, but at least the functionality is removed so that users won’t get an error. However, some items will display an error message if they are clicked:
Clicking Restore Selection, Delete Selection, or Empty Recycle Bin in the Recycle Bin causes an Access Denied error.
Clicking Create for sites or workspaces causes an Access Denied error.
Trying to apply a theme causes an Access Denied error.
Clicking Create New Content in Site Libraries and Lists displays a message that an unexpected error has occurred.
Clicking Customize Form displays a message that a Microsoft InfoPath is required.
Additional error messages appear in other locations. Again, let end users know that such errors might show up and that they aren’t truly errors but are a result of the content being read-only.
More Info: User experience on read-only sites
See http://technet.microsoft.com/en-us/library/ee517786(v=office.14).aspx for more information on the User experience on read-only sites (SharePoint Server 2010).
To set the entire content database to read-only, you can go through SQL Server. Setting a content database as read-only makes the entire set of site collections contained within as read-only. Follow these steps:
Log onto the SQL Server instance with an account that has the db_owner fixed database role on the content database to be made read-only.
Open SQL Server Management Studio and connect to the SQL Server for the SharePoint farm.
Right-click the content database to be made read-only in the Object Explorer and choose Properties.
Click the Options link in the Select A Page section.
Find the Database Read-Only property under the State section and change the property to True.
Click OK to save changes.
Repeat steps 1 through 6 for all content databases that need to be set to read-only.
The end-user experience will be similar to that when a site collection is made read-only through Central Administration, so you still need to alert users. After you make a content database read-only, it can be copied safely to the SQL Server instance that’s being used for SharePoint 2013. Attaching a database with the Mount-SPContentDatabase PowerShell command makes the database read-write.
Exam Tip
The very act of connecting a content database to the SharePoint 2013 farm changes it from read-only to read-write. No additional steps need to be taken.
As mentioned earlier, when you attach a content database using the Mount-SPContentDatabase it begins the upgrade process (and hence can’t remain read-only). The content database and all the site collections within are ready to use after the database is attached and upgraded, but it’s still in the SharePoint 2010 user experience. Each site collection needs to be upgraded to the SharePoint 2013 user experience individually. This can be done by the site collection administrators or by the farm administrators.
More Info: Attaching and restoring a read-only content database
See http://technet.microsoft.com/en-us/library/ee748633(v=office.15).aspx for more information on attaching and restoring a read-only content database in SharePoint 2013.
Configuring upgrade farms
The SharePoint 2013 farm should be configured before content is upgraded. This helps ensure that the content is ready to use after the upgrade process. The first step after you install SharePoint 2013 on the servers in the farm is to start applying the configuration needed based on the survey information that you gathered earlier during the pre-upgrade datagathering step. Some of the configuration items that need to be reviewed and documented before migrating content databases are as follows:
Authentication methods on all applicable web applications
Alternate Access Mappings
Managed paths
Email settings
Self-service site management settings
Quotas
Farm-level customizations
After the farm is configured with these items, the service applications needs to be configured if they will be upgraded. Service applications require special consideration when being upgraded and need to be addressed individually.
You need to perform a few important steps after the SharePoint 2013 farm is installed. Before you start configuring the service applications, you should install the language packs for SharePoint 2013. Even if you aren’t upgrading the service application, you should install the language packs before you start upgrading any of the content databases. After you install the language packs, you should run the SharePoint Products Configuration Wizard.
More Info: Installing or uninstalling language packs
See http://technet.microsoft.com/en-us/library/cc262108 for more information on how to install or uninstall language packs for SharePoint 2013.
After the language packs (if any) are installed, the service applications should be upgraded and/or configured. One of the first steps is to configure the Secure Store Service, which requires that you have the passphrase. If you don’t know the passphrase, you can refresh the key and then back up the Secure Store database. The passphrase is required so that you can use it in the SharePoint 2013 farm.
More Info: Configuring the Secure Store service
See http://technet.microsoft.com/en-us/library/ee806866.aspx for more information on how to configure the Secure Store service in SharePoint 2013.
The next important step has to do with the User Profile service. If you want to upgrade the User Profile Sync database, you need to export the encryption key for the User Profile Synchronization service application. This key is stored separately from the database. This key must be imported into the SharePoint 2013 environment after you upgrade the User Profile service application. This fairly complicated process typically isn’t performed on servers, so the following steps are for the export process:
Open a command prompt on the server that runs the User Profile Synchronization service with an account that’s a member of the Administrators group.
Change the directory to %Program Files%Microsoft Office Servers14.0Synchronization ServiceBin at the command prompt.
Run miiskmu.exe from the command prompt.
In the Microsoft Identity Integration Server Key Management Utility wizard, make sure that Export Key is selected.
Click Next, and then enter the farm administrator account into the Account Name text box and the password for the account in the Password text box.
In the Domain text box, enter in the domain name of the farm administrator account.
Enter the filename and location of the export file in the Specify Export File Name And Location text box and click Next.
Click Finish and then close the dialog box.
You should now have an encryption key that can be imported into the SharePoint 2013 farm. After the User Profile databases are upgraded using the database-attach method, you need to import the key into the SharePoint 2013 environment on the server that runs the User Profile Synchronization service (the server that runs the FIM services).
More Info: Creating a SharePoint 2013 farm for a database-attach upgrade
See http://technet.microsoft.com/en-us/library/cc263026 for more information on how to create the SharePoint 2013 farm for a database-attach upgrade, including exporting the User Profile Synchronization service encryption key.
Before you upgrade any content databases, you must upgrade all the service applications that need to be migrated. Any service applications that aren’t being migrated also should be created before the content database upgrades. The following service applications can be upgraded:
Note: Upgrading the Business Data Connectivity service application
The Business Data Connectivity service is available for upgrade from SharePoint 2010 to SharePoint Foundation 2013 and SharePoint Server 2013. The other service applications can be upgraded only from SharePoint Server 2010 to SharePoint Server 2013.
The process of upgrading service applications follows a general set of rules for each application. After the service application databases are copied over to the new server, you can perform the following steps to upgrade them:
Start the service instances. (You can start all but the SharePoint Search service instance via Central Administration; you must use PowerShell to start the Search service.)
Create the service applications and upgrade the databases. This must be accomplished via PowerShell commands.
Create proxies for all service applications except Business Data Connectivity (which automatically creates its own proxy).
Verify that the proxies exist in the default group.
After the User Profile service application is created, you need to import the encryption key that you exported earlier. The same command, miiskmu.exe, can be used to import it on the SharePoint 2013 server. After you import the encryption key, you can start the User Profile Synchronization service.
More Info: Upgrading service applications
See http://technet.microsoft.com/en-us/library/jj839719.aspx for more information on how to upgrade service applications to SharePoint 2013.
Measuring upgrade performance
A test farm is the best way for you to test the performance of upgrading your content databases. Getting your test farm to be an exact replica of your production farm might not be possible, but you can still get a fairly decent measurement of performance if your SQL Server instance in the test environment is close to the one that will be in production and you’re using actual backups of your content databases. Performance varies greatly for content databases of the same size, depending on how the data is organized. You can’t say that a database that’s twice the size will take twice as long; it could take the same amount of time or go many times longer. The only way to properly determine how long a content database or set of content databases takes to upgrade is to measure how long it takes to upgrade them on a test environment. After you create your test environment, you can start measuring the performance of the upgrades and determine whether actions need to be taken to improve performance before the actual migration.
More Info: Configuring SharePoint Server in a Three-Tier Farm
See http://www.microsoft.com/en-us/download/details.aspx?id=30386 to download the test lab guide titled “Configure SharePoint Server 2013 in a Three-Tier Farm.”
After you create a test farm and configure it to be as close to production as possible, you can copy over the content databases you want to test by first backing them up and then copying them over to the SQL Server instance to which you want to attach them. Some of the items that you should keep track of are as follows:
Amount of time to upgrade a single content database
Amount of time to upgrade using parallel upgrading
Memory usage on the SQL Server instance
CPU usage on the SQL Server instance
Disk space on the SQL Server instance
The amount of time required to upgrade content databases (whether singly or in parallel) is fairly straightforward because you simply monitor how long it takes.
You should also measure how much disk space is used during the upgrade process; a lot of temp space is potentially used by the paging file, the temp database, and the transaction log on the database that’s being upgraded. You might have to shrink the log file by backing up the database after it’s upgraded and then checking for empty space on both the log file and the data file. Depending on your SQL Server hardware, you could gain significant improvements simply by adding more memory. To monitor CPU and memory usage, follow these simple steps:
To start the Resource Monitor by itself, type resmon.exe in the Start text box. The Resource Monitor allows for some very detailed information about several performance-related items, such as the following:
CPU
Memory
Disk
Network
The Overview tab gives you an overview of all four performance items, as shown in Figure 3-2.
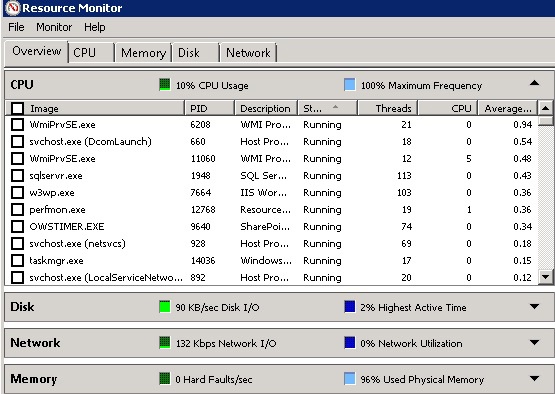
From the Resource Monitor you can determine what’s causing your bottleneck. In Figure 3-2, physical Memory is topping out at 96 percent. Depending on which operation is using that much memory, you could determine that if you added more memory, performance would increase.
You should test all your scenarios of content database upgrades—and site collection upgrades, if those are to be done as part of the upgrade—to determine how long you can expect the upgrades to take. This helps with user expectations, the amount of downtime, and possible ways to improve performance.
More Info: Troubleshooting resource availability
See http://technet.microsoft.com/en-us/library/dd883276(v=WS.10).aspx for a getting-started guide on resource availability troubleshooting.
Planning an installation sequence
You need to consider many factors when determining an installation sequence for your SharePoint farm. The main factor is whether you plan to use all new hardware or reuse some (or all) of the existing hardware. Three main components must exist before you can start creating or migrating content:
SQL Server (database component)
Web front end (WFE)
Application Server component
All these components can exist on the same server (a standalone installation), but because this exam is about advanced solutions, assume that at least the SQL Server installation is on a separate server:
SQL Server should be the first server configured because you can’t install SharePoint 2013 without a SQL Server database. You can use the same database for SharePoint 2013 as you do for SharePoint 2010, although doing so will put quite a strain on the server if both SharePoint installations are trying to use it at the same time.
The second server that needs to be installed is the one hosting Central Administration that’s also a WFE. This doesn’t have to be a WFE in the long term, but SharePoint needs a web site to host Central Administration.
The third component to be installed is the Application Server. It can exist on the same server as the WFE, although typically it would be on its own server in a three-tier system.
You might want to combine these roles if you plan to reuse the SharePoint 2010 servers in your new farm. A whole set of brand-new servers (and the cost of the software that goes on them) can be cost-prohibitive.
Exam Tip
Determining the order of installation might be on the exam. It’s definitely a listed exam topic and fits well with one of the ordering types of questions. The questions aren’t designed to trick you, but pay special attention to the wording on any sort of question that asks you to put steps in order.
As you move content databases and web applications off SharePoint 2010, you can reuse the servers on the SharePoint 2013 farm. The sequence depends on the organization’s needs and the load on each web application. For example, after you move over a heavily used web application, you might decide to allocate a WFE or two to the SharePoint 2013 farm. Whenever you move a server from the SharePoint 2010 farm, you should do a fresh install of the Windows Server software to help keep any setting or DLL conflicts from occurring.
More Info: Installing SharePoint 2013
See http://technet.microsoft.com/en-us/library/cc303424.aspx for more information on how to install SharePoint 2013.
Objective summary
The removal of a server from a SharePoint farm should be planned to avoid loss of services.
Parallel upgrades can greatly speed up the process of upgrading to SharePoint 2013, depending on the type of hardware being used.
You can make both site collections and content databases read-only so that a gradual stoppage of production use can occur.
You need to upgrade service applications before you can upgrade content databases.
Use the Resource Monitor to test the resource required to migrate content and diagnose any bottlenecks.
Installation of servers needs to be planned out to provide optimal performance during the migration of content.
Objective review
Answer the following questions to test your knowledge of the information in this objective. You can find the answers to these questions and explanations of why each answer choice is correct or incorrect in the “Answers” section at the end of this chapter.
You can use the command-line utility Psconfig to perform which of the following functions on a SharePoint farm?
Unprovision a SharePoint Central Administration web application
Install features
Provision SharePoint product services
All of the above
When you are connecting databases to a web application for the purposes of upgrading to SharePoint 2013, in which order should you connect them using the PowerShell command Mount-SPContentDatabase?
Largest first, because it takes the most time to upgrade
The one with the root site collection first
Smallest first, so that the web application can be available as soon as possible
It doesn’t matter because they can be upgraded in parallel
You can make an individual site collection read-only with all except which of the following?
Central Administration
The PowerShell command Set-SPSite
SQL Server
The stsadm command setsitelock
Which of the following can be upgraded to SharePoint 2013?
PowerPoint Broadcast sites
Web Analytics
User Profile service application
A FAST search center
The Resource Monitor can be used to monitor all except which of the following?
CPU usage
Time to complete a content database
Network latency
Memory usage
Which services can run on only one server in a SharePoint 2013 farm?
User Profile Synchronization service
Excel Calculation Services
Central Administration
Machine Translation service
Objective 3.3: Upgrade site collection
The upgrade process in SharePoint 2013 is separated into two parts: Upgrade the content database and then upgrade the site collections in the content databases. When the content database upgrade process is complete, the site collections are left in the SharePoint 2010 user experience. The separation of these two steps makes the content database upgrade process significantly faster than it was in SharePoint 2010.
This objective covers upgrading site collections to the SharePoint 2013 experience. The upgrade of site collections can be done by the farm administrator or by the site collection administrator, if the farm administrator has allowed for self-service upgrades.
Performing a health check
You should run a health check to determine any issues before upgrading a site collection to the SharePoint 2013 user experience. Health checks can be done by the site collection owner. They are also automatically run in repair mode (as covered later in this objective). The pre-upgrade health check examines a site collection by using several health check rules, reports back on the issues that need to be resolved, and (in many cases) suggests how to fix them. Health checks use the following rules:
Check for files that were customized (or unghosted) within the site collection or one of the subsites.
Ensure that all default galleries are available.
Validate that the template on which the site collection is based is available.
Check for any unsupported multi-user interface (MUI) elements to ensure that they exist and are referenced correctly.
Make sure that any language packs used by the site collection are available and referenced correctly.
Before you start using the health check process, make sure that all configurations and customizations have been performed on the SharePoint 2013 farm. Of course, the content database on which the site collection resides must be upgraded to SharePoint 2013 before any health check on the site collections can be performed. To run the pre-upgrade health check on an individual site collection, follow these steps:
Navigate to the Site Settings page of the site collection to be analyzed with an account that’s a site collection administrator.
In the Site Collection Administration section, click Site Collection Health Checks.
Click Start Checks on the Run Site Collection Health Checks page.
When you run the health check, you should see a list of the items that were checked and any issues that need to be fixed. The health check can be run repeatedly so that you can be sure the site collection is ready to be upgraded to the SharePoint 2013 experience.
Exam Tip
Running the pre-upgrade health check on the site collections to be upgraded to the SharePoint 2013 experience is an important step in the upgrade process. You can expect to see this step on the exam.
You can also perform the pre-upgrade health check by using PowerShell. The health check can be run in two modes: test mode and repair mode. If you want to run in test mode, the account running the PowerShell command must have the securityadmin server role on the SQL Server database and the db_owner role on the content databases that are being analyzed. The account must also be a site collection administrator or be given the full read permission. The following PowerShell command performs the health check in test mode:
Test-SPSite -Identity <SiteURL> [-Rule <RuleID>]
The RuleID is available if you want to run the command for just an individual rule. If the Rule parameter isn’t specified, all the rules are applied.
You can also run the pre-upgrade health check in repair mode. The account running the health check in repair mode must also have the same rights as running the health check in test mode except that it needs to be a site collection administrator or have full control over the site collection being analyzed. The syntax for the PowerShell command to run the health check in repair mode is as follows:
Repair-SPSite -Identity <SiteURL> [-Rule <RuleID>]
If it can, repair mode tries to repair the issues that it finds (such as unghosting a file and setting it to the default). When a site has all its issues resolved, it can be upgraded to an evaluation site or directly to the SharePoint 2013 user experience.
More Info: Running site collection health checks
See http://technet.microsoft.com/en-us/library/jj219720(v=office.15) for more information on how to run site collection health checks in SharePoint 2013.
Analyzing and resolving health check results
The pre-upgrade provides information on the issues that it found that will affect the upgrade as well as a way to correct them in some cases. Running the health checks in the site settings of the site collection by clicking Start Checks displays the lists of issues it found, grouped by the rule that found it. For some of the items, you are given an option to fix it. For instance, in the Customized Files section of the report, you could see a line such as the following:
http://contoso/search/Pages/default.aspx - Reset page to default
Reset Page To Default is a link that can be used to ghost the file (set it to default). Simply clicking that link takes you to the Reset To Site Definition page (see Figure 3-3), where you are given the option of resetting that one page or resetting all the pages in the site to the site definition version.
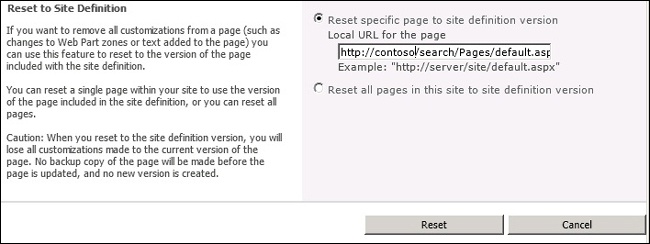
Choosing the Reset All Pages In This Site To Site Definition Version option causes you to lose all the customizations, and you can’t get them back unless you retrieve them from the original SharePoint 2010 site.
Exam Tip
Be aware of the issues concerning upgrading to the SharePoint 2013 user experience and resolving them. Resetting all pages to site definition is automatic if the Repair-SPSite PowerShell command is used.
A customized page isn’t a serious issue because it affects only that one page. The look and feel of the page might be affected depending on the level of branding and customization, but it won’t stop the upgrade. However, you might discover some other issues that can cause your site collection not to function. One issue that the health checker looks for is conflicting content types. SharePoint 2013 has many new content types that might conflict with ones that were created in your SharePoint 2010 sites. A typical example of this would be the Video content type, which is used in SharePoint 2013 for better multimedia support but is also one that many organizations might have created. Having two content types with the same name would cause issues. This type of issue could even affect the site’s functionality. To rename the existing site content type, follow these steps:
Navigate to Site Settings of the site that contains the content type to be renamed.
Click Site Content Types in the Web Designer Galleries group.
Click the name of the content type to be renamed on the Site Content Types page.
Change the name of the content type in the Name text box.
Click OK to save changes.
In the health check report, you can click Tell Me More to get additional information that can help to resolve these issues. Whenever you make changes that affect the health check issues, you should rerun the health check to verify that you’ve solved all your issues.
If you have a missing gallery (such as site columns that could have been corrupted or accidentally deleted), SharePoint 2013 attempts to rebuild it for you when you do the health check. If an error occurs, you might have to delete it and try to rerun the health check to get it repaired. Any custom data in the gallery could potentially be lost. This data can be recovered from the SharePoint 2010 site collection, assuming that it’s still available (and not corrupted or deleted).
One rule run by the health checker makes sure that all the content types have parents. If content type is found to be orphaned, you need to do one of the following:
Delete the orphaned content type
Associate the content type with another parent
Re-create the missing parent and then reattach the orphan
Modifying content types can be done on the Site Settings page by clicking Site Content Types in the Galleries section. Orphans could be the result of accidentally deleting a parent site content type, or perhaps of adding and removing a solution that relied on content types, but the solution not removing cleanly.
The absence of a site template can cause the upgrade to the SharePoint 2013 experience to fail. This might occur for a couple of reasons:
In any case, the absence of a site template needs to be resolved before upgrading to the SharePoint 2013 experience. If for some reason the site template isn’t available, the site needs to be re-created using an available site template. This issue might require the importation and export of data (lists and document libraries) to succeed.
Missing language packs are another issue that must be resolved before a site collection can be upgraded to the SharePoint 2013 user experience. The pre-upgrade site collection health check shows which language packs aren’t available and which must be installed. If the language pack you need isn’t available for some reason, you can’t upgrade until it is available. (Most, if not all, language packs should be available on the Microsoft download site.)
The last health check rule that’s run by the health check tests for unsupported MUI references. The MUI allows for user interface items such as the ribbon, navigation bars, and column headings to appear in the default language of the user’s browser. These issues will probably be similar to those found in the missing language pack rule, but the MUI check might cause additional issues to surface. You won’t be prevented from upgrading to the SharePoint 2013 if issues are found, but the functionality of being able to use multiple languages will be affected until the language pack is found and installed.
Planning and configuring available site collection modes
By default, site collection administrators are allowed to upgrade their site collections to the SharePoint 2013 experience whenever they want. This might or might not be what your organization wants. Some site collections will need extensive testing before they are upgraded, and the decision of when to upgrade the site collection shouldn’t fall within the site collection administrator’s realm. Sites that might fall under this group might include the following:
Heavily customized sites. These sites are prime candidates for not allowing site collection administrators permission to upgrade. A site should go through thorough testing before it’s upgraded.
Critical sites. These sites are critical for day-to-day business needs and can’t endure any sort of downtime during production hours without disrupting the organization’s function.
Very large sites. For these sites, the upgrade process could put undue strain on the SharePoint farm, causing it to be sluggish (or even non-responsive) during production hours.
Identification of sites that need to be upgraded by the farm administrator should be identified early (before the content database upgrade) to ensure that a site collection isn’t accidentally upgraded to the SharePoint 2013 experience.
When a site collection is available for upgrade, a banner appears at the top of the site collection, indicating that it’s available for upgrade but hasn’t been upgraded (see Figure 3-4).
The reminder delay and the maintenance link can both be modified using PowerShell commands. Your organization’s needs determine the amount of time and the link to be used and can vary as much as you want. The modifications are at the web application level and are modified by using the following PowerShell commands:
$webApp=Get-SPWebApplication <Web App URL>
$webApp.UpgradeReminderDelay <Value in Days>
$webApp.UpgradeMaintenanceLink='<Link to Maintenance Page>'
The reminder delay is in number of days as indicated in the code. That is the only option available; no option exists for a particular site collection. Remember that only site collection administrators can see the reminder.
Farm administrators can determine the site creation mode for an application as well. The options are to be able to create site collection in 2010 mode, 2013 mode, or allow the site collection administrator to be able to choose either one. The choice depends on your business needs and the schedule of migration to the SharePoint 2013 user experience. You can determine which versions of the SharePoint experience are supported for a web application by using the following PowerShell command:
$webApp=Get-SPWebApplication <Web App URL>
$webApp.CompatibilityRange
You are returned a minimum and a maximum compatibility range as well as the default compatibility level. The SharePoint 2010 experience is compatibility level 14, and the SharePoint 2013 experience is compatibility level 15. Those are your only two choices in SharePoint 2013. If you want to modify the range for a web application, you can do this with PowerShell by specifying a range (RangeName) for a web application. The available RangeName options are as follows:
OldVersions
NewVersion
AllVersions
You can use the following PowerShell commands to limit a web application to either the SharePoint 2010 experience or the SharePoint 2013 experience:
$webApp=Get-SPWebApplication <Web App URL>
$webApp.CompatibilityRange=[Microsoft.SharePoint.SPCompatibilityRange]::<Range Name>
$webApp.Update()
This way, you can limit web applications to just having one of the SharePoint experiences available or switch back to allowing for both SharePoint options available. Going forward, limiting it to just the SharePoint 2013 user experience is probably wise so that the next upgrade will be smoother. Of course, knowing the future is impossible, but keeping your sites as current as possible is always a good idea when looking toward future upgrades.
More Info: Managing site collection upgrades
See http://technet.microsoft.com/en-us/library/jj219599.aspx for more information on how to manage site collection upgrades to SharePoint 2103.
Planning and configuring site collection upgrade availability
Part of the planning process for upgrading to the SharePoint 2013 experience involves determining which sites will allow site collection administrators to do self-service upgrades and which sites won’t. By default, self-service version-to-version upgrades are available to site collection administrators, as long as the throttle limits for content haven’t been exceeded. You should use PowerShell to control the self-service ability on site collections if you want to keep site collection administrators from upgrading their site collections themselves. The following PowerShell commands can be used to disable self-service upgrade on an individual site collection:
$site=Get-SPSite <URL>
$site.AllowSelfServiceUpgrade=$FALSE
If this command is run, the site collection in the <URL> parameter will require that the upgrade to the SharePoint 2013 experience be done by the farm administrator. If you want to turn self-service upgrades back on, just replace $FALSE with $TRUE in the preceding command.
If you have many site collections to disable (or enable) for an entire web application, doing so manually would take a long time. You can use piping to enable or disable self-service site collection upgrades via a single PowerShell command. The syntax for disabling an entire collection is as follows:
Get-SPWebApplication "<Web App URL>" | Get-SPSite -Limit ALL | ForEach-Object{ $_.AllowS
elfServiceUpgrade=$FALSE}
The command might take a while, depending on the number of site collections contained within the web application. This command also covers all content databases used by the web application. Depending on your business needs, you might want to turn off all site collections and then turn back on just the ones that you want users to be able to self-service. In any case, this command allows bulk control of version-to-version self-service upgrades.
Generally, you should plan an upgrade to the SharePoint 2013 experience in stages. The default is for everything to be turned on so that site collection administrators can use self-service upgrade. This causes a lot of confusion if end users haven’t had any training, because they will encounter both the SharePoint 2010 and the SharePoint 2013 experiences. This means they will have two different user interfaces to deal with because it’s highly unlikely that all the site collection administrators will decide to upgrade at the same time.
Planning and configuring evaluation mode
If you have any questions about how your site collection will look in the SharePoint 2013 experience, you should use an evaluation site first. An evaluation site provides a preview of how a site collection will look after it’s upgraded to the SharePoint 2013 experience. Site collection administrators and farm administrators can request an evaluation site.
Requesting an evaluation site for each site collection will end up being quite tedious for most farms, but representative site collections can be evaluated to determine how other sites will look and perform when they are upgraded. An evaluation site leaves the site to be upgraded alone so that you’re in no danger of losing functionality.
An evaluation site is set to expire (and be deleted) after a certain amount of time; the default is 30 days. You can change this value depending on your organization’s needs. An evaluation site is also be deleted when the site collection it’s based on is upgraded to the SharePoint 2013 experience.
Important
Data that’s modified and/or created in the evaluation site isn’t replicated back to the production site collection. This is also true for the other direction: Data modified in the production site collection isn’t replicated to the evaluation site collection.
Evaluation sites are created by using a snapshot or by using backup and restore, depending on the SQL Server version used by the SharePoint farm. The SQL Server snapshot option is available for SharePoint installations that use either the Microsoft SQL Server Enterprise edition or Microsoft SQL Server Datacenter edition. If another version is used, the backup and restore APIs are used. The main difference is that SQL Server snapshots don’t require an outage, but the backup and restore APIs require that the site collection be made read-only during the backup process, keeping users from writing to the database during the backup process. Users are notified of the read-only status through System Status Notifications.
The creation of evaluation sites can be a resource-intensive process, using up valuable SQL Server disk space as well as CPU and memory resources. By using PowerShell, farm administrators can determine whether site collection administrators can request an evaluation site collection. This is done at the site collection level via the SPSite object. You can use the following PowerShell syntax to disable the ability to request an evaluation site collection:
$site=Get-SPSite <URL of site collection>
$site.AllowSelfServiceUpgradeEvaluation=$FALSE
More Info: Using the AllowSelfServiceUpgradeEvaluation property
See http://msdn.microsoft.com/en-us/library/microsoft.sharepoint.client.site.allowselfserviceupgradeevaluation.aspx for more information on the AllowSelfServiceUpgradeEvaluation property.
If a site collection can have an evaluation site, its site collection administrator can request an evaluation site by following these steps:
Navigate to the Site Settings page as a site collection administrator.
Click Site Collection Upgrade in the Site Collection Administration section.
On the Step Up To SharePoint 2013 page, click the Try A Demo Upgrade link.
Click Create Upgrade Evaluation Site Collection in the Create Upgrade Evaluation Site Collection section.
Click Close.
The evaluation site collection is put into a queue, and the site collection administrator is emailed when the evaluation site is available. The request is added to the timer job Create Upgrade Evaluation Site Collection, which is run once daily (between 1 AM and 1:30 AM locally, by default). This means that up to 24 hours can pass before the evaluation site collection is available. One Create Upgrade Evaluation Site Collection timer job is created per web application, so if you want to change the timer job to create a more responsive experience, you need to modify all the timer jobs for each application. The changes required depend on your business needs and can vary per web application.
Farm administrators can request evaluation site collections by using the PowerShell Request-SPUpgradeEvaluationSiteCollection command. The account requesting the evaluation site collection needs the following permissions:
The db_owner role on the content database in which the evaluation site collection is being created
The securityadmin fixed server role on the SQL Server instance that contains the content database where the evaluation site collection is being created
Membership in the Administrators group on the server on which the PowerShell command is being run
Site collection administrator permissions or full control of the site collection
The syntax for the PowerShell command to request an evaluation site collection is as follows, where the URL of the site collection refers to SharePoint 2010 site collection that you want to evaluate:
Request-SPUpgradeEvaluationSiteCollection -Identity <URL of site collection>
Exam Tip
Creating an evaluation site is much different from the Visual Upgrade process that was part of the SharePoint 2010 upgrade. The changes made in the evaluation site aren’t reflected in the production site. You can expect to be quizzed on some aspect of the creation of an evaluation site on the exam.
Planning and configuring site collection upgrade queues and throttling
Giving site collection administrators the ability to upgrade site collections to the SharePoint 2013 user experience can take a large load off farm administrators by allowing site collection administrators to determine when a site collection is ready to be upgraded. When the site upgrade process is initiated, a job is created and placed in a queue, even if the process starts immediately. The job is removed from the queue when it is finished or has failed. If the job is stopped midstream for some reason, such as hardware failure or service unavailability, the job is restarted as soon as the timer service can start it.
Farm administrators can manage the queue. Sites can be added, removed, or manually upgraded. Each web application has its own queue, and farm administrators can view the sites in each queue for each content database associated with the web application. To manage the site collection upgrade queue, the account being used should have the following permissions:
Membership in the Administrator group on the server where the PowerShell commands will be run
The securityadmin fixed server role on the SQL Server instance where the content databases to be queried are located
The db_owner role on any database to be updated
After the necessary permissions are validated, farm administrators can use PowerShell commands to control the queue. To view all the site collections (those in progress, those completed, and those failed) in the queue for a content database, use the Get-SPSiteUpgradeSessionInfo PowerShell command:
Get-SPSiteUpgradeSessionInfo -ContentDatabase <Content Database Name>
                             -ShowInProgress -ShowCompleted -ShowFailed
More Info: Using Get-SPSiteUpgradeSessionInfo
See http://technet.microsoft.com/en-us/library/fp161278.aspx for more information on the PowerShell command Get-SPSiteUpgradeSessionInfo.
If you want to see the sites now being processed, use just the ShowInProgress parameter and leave off the others. To see whether a site collection is now in the queue, use the Get-SPSiteUpgradeSessionInfo command by passing it the URL of the site to be queried, as follows:
Get-SPSiteUpgradeSessionInfo -Site <URL of site>
You can add site collections to the queue manually by using the PowerShell command Upgrade-SPSite. You might want to do this for several reasons. For example, if you’ve turned off self-service upgrades, you need to add the site collections to the queue manually. If you have a site that you want to upgrade but the throttle limit has been exceeded, you can override the throttle with the command and allow for the site collection to be upgraded sooner that it would be otherwise.
Be aware of a couple of considerations when using Upgrade-SPSite:
By default, Upgrade-SPSite performs build-to-build upgrades, so the VersionUpgrade parameter must be specified to get it to do a version-to-version upgrade.
When a version-to-version upgrade is done with Upgrade-SPSite, the site collection health checks are run automatically in repair mode.
The syntax for adding a site collection to the upgrade queue using the PowerShell command Upgrade-SPSite is as follows:
Upgrade-SPSite <URL of site> -VersionUpgrade -QueueOnly
The absence of the QueueOnly parameter causes the upgrade process to start immediately. If you want to put all the site collections for a web application into the upgrade queue, you can use the piping feature of PowerShell.
More Info: Using Upgrade-SPSite
See http://technet.microsoft.com/en-us/library/fp161257 for more information on the PowerShell command Upgrade-SPSite.
After a site collection is moved to the queue, it can be removed with the following PowerShell command:
Remove-SPSiteUpgradeSessionInfo -Identity <URL of site>
You might want to use this command if you’ve added a lot of site collection upgrades by using piping but want to remove a few site collections from the list, such as ones that might have lots of customization and need more testing or will take a very long time to upgrade. Doing so might save a lot of typing time. If you use this method, put it all in a script so that it can be run all at the same time.
More Info: Using Remove-SPSiteUpgradeSessionInfo
See http://technet.microsoft.com/en-us/library/fp161276.aspx for more information on the PowerShell command Remove-SPSiteUpgradeSessionInfo.
The process of upgrading site collections to the SharePoint 2013 experience can consume significant server resources, such as disk space, CPU, and memory. To minimize the impact that upgrading can have, farm administrators can throttle the number of site collections that can be in the upgrade queue at any specific time by upgrading the site collection manually; farm administrators can also override this manually by starting an upgrade with the Unthrottled parameter.
Farm administrators can use PowerShell to view the throttle settings of a web application. The SiteUpgradeThrottleSettings property of the SPSite object returns the throttle values of the site:
$webApp=Get-SPWebApplication <web app URL>
$webApp.SiteUpgradeThrottleSettings
The results from running these PowerShell commands should look similar to the following results:
AppPoolConcurrentUpgradeSessionLimit : 5
UsageStorageLimit                    : 10
SubwebCountLimit                     : 10
Name                                 :
TypeName                             : Microsoft.SharePoint.Administration.
                                       SPSiteUpgradeThrottleSettings
DisplayName                          :
Id                                   : a3097994-1acb-4947-9979-7889d6305e1d
Status                               : Online
Parent                               : SPWebApplication Name=SharePoint - 80
Version                              : 722459
Properties                           : {}
Farm                                 : SPFarm Name=SharePoint_Config
UpgradedPersistedProperties          : {}
A lot of data is listed here, and what’s being throttled isn’t readily apparent because throttles are built in at the web application, content database, and content levels. The following list shows the items and their default values:
Web Application level. The default is five concurrent site collection upgrades per web application instance (per web server).
Content Database level. The default is ten concurrent site collection upgrades per content database.
Content level. If a site collection has more than 10 MB of content or more than ten subsites, the default is that the site collection can’t be upgraded via self-service.
That three different throttle options are available can provide for tricky scenarios because the most restrictive throttle will win out. For example, if you have one web application, one WFE, and one content database, you could process only five concurrent version-to-version upgrades at one time, assuming that they were all under the content-level throttle threshold. Most site collections will exceed the content throttle threshold because 10 MB is a very low limit for a site collection, and ten subsites is also a low limit for most production site collections (except for personal sites).
Exam Tip
That you can throttle version-to-version upgrades in three different areas lends itself to some interesting test questions. You need to have a good grasp on what can be throttled and how changing the throttle of one area affects the other areas.
Throttle settings can be set in two areas: in the web application and in the content database.
The first area is the web application, where you can set the limits for concurrent session, storage, and subsites by modifying the property values of the SPSite object. The properties related to throttling are as follows:
AppPoolConcurrentUpgradeSessionLimit. The maximum number of concurrent upgrade sessions allowed in the app pool
SubwebCountLimit. The maximum number of subsites allowed in a site collection allowed for self-service upgrades
UsageStorageLimit. The maximum amount (in megabytes) allowed for a site collection to be upgraded with self-service
You can use PowerShell to change these limits, but keep in mind that version-to-version upgrades can consume considerable resources. SharePoint might even become non-responsive if the load becomes too heavy. The syntax for changing the properties is shown in the following PowerShell script, where <value> is an integer:
$webApp=Get-SPWebApplication -URL <URL of web application>
$webApp.SiteUpgradeThrottleSettings.AppPoolConcurrentUpgradeSessionLimit=<value>
$webApp.SiteUpgradeThrottleSettings.SubwebCountLimit=<value>
$webApp.SiteUpgradeThrottleSettings.SubwebCountLimit=<value>
$webApp.Update()
If site collection administrators exceed the throttle settings for the AppPoolConcurrentUpgradeSessionLimit, the version-to-version upgrades are placed in the queue and processed when a spot becomes available. If the SubwebCountLimit or UsageStorageLimit is exceeded, a farm administrator must perform the upgrade via PowerShell; otherwise, the throttle limits must be changed. Content-level throttles prohibit self-service upgrades, and only a farm administrator can upgrade the site collections that exceed the throttle limits.
More Info: Understanding SPSSiteUpgradeThrottleSettings properties
See http://msdn.microsoft.com/en-us/library/microsoft.sharepoint.administration.spsiteupgradethrottlesettings_properties.aspx for more information on SPSiteUpgradeThrottleSettings properties.
The second area where throttling can occur is with the content database. Each content database can have its own throttle rule that works with the web application throttle limits. If a content database has a lot of site collections or if you want to minimize the effects of upgrades, you should consider modifying the throttle from the default of 10. The appropriate throttle limit is best determined by performing thorough throttle testing in a test environment that’s close to the production environment.
You can view the throttle settings for a content database by using PowerShell commands. The permissions required for the account used for viewing or modifying the throttle limits are as follows:
Needs to have the securityadmin fixed database role on the SQL Server instance where the content database resides
Needs to have the db_owner fixed database role on the content database if it is to be modified
Needs to be part of the Administrators group on the server where the PowerShell commands are to be run
The number of concurrent sites that can be upgraded is shown by the ConcurrentSiteUpgradeSessionLimit of the SPContentDatabase object. The syntax for the script is as follows:
$db=Get-SPContentDatabase <Database Name>
$db.ConcurrentSiteUpgradeSessionLimit
PowerShell commands can also be used to modify the throttle settings. The syntax is similar to the following:
$db=Get-SPContentDatabase <Database Name>
$db.ConcurrentSiteUpgradeSessionLimit=<value>
Content databases, such as the ones that store personal sites, can have thousands of site collections. These content databases should be considered for throttling. Typically, site collections are upgraded in bulk because most users find out at about the same time. The special case of personal sites (SkyDrive Pro locations in SharePoint 2013) is that each individual in the organization is a site collection administrator. Either these users need some training, or the site collections need the version-to-version upgrade performed for them. If you plan to allow self-service upgrades on personal site collections, you want to look at the throttle values on both the content databases and the web applications to make sure that the upgrades don’t affect the overall performance of the SharePoint farm.
More Info: Using SPContentDatabase.ConncurrentSiteUpgradeSessionLimit
See http://msdn.microsoft.com/en-us/library/microsoft.sharepoint.administration.spcontentdatabase.concurrentsiteupgradesessionlimit(v=office.15).aspx for more information on the ConcurrentSiteUpgradeSessionLimit property of SPContentDatabase.
Objective summary
The pre-upgrade check helps you identify (and in some cases resolve) issues before upgrading to the SharePoint 2013 experience.
Determine early which site collections you will allow site collection administrators the ability to have self-service upgrades to the SharePoint 2013 experience.
Self-service upgrades can be turned on or off in bulk at the web application level by using PowerShell commands.
Evaluation sites can help determine the look and feel of a site collection before it’s upgraded to the SharePoint 2013 experience.
Evaluation sites are copies of the production data, and changes in either site aren’t reflected in the other.
Farm administrators can determine whether self-service upgrades should be made available to site collection administrators.
Site collection version-to-version upgrades are throttled by default, but throttle settings can be modified as needed.
Objective review
Answer the following questions to test your knowledge of the information in this objective. You can find the answers to these questions and explanations of why each answer choice is correct or incorrect in the “Answers” section at the end of this chapter.
The PowerShell command Test-SPSite can be used to do which of the following functions?
Test a site collection for possible upgrade issues.
Test a site collection for possible upgrade issues and fix the issues if found.
Test an individual subsite for possible upgrade issues.
All of the above
By using the pre-upgrade health check on a site collection, you have discovered that you have a content type with the same name. What should you do to resolve this issue?
Delete the pre-existing content type.
Rename the pre-existing content type.
Upgrade to the SharePoint 2013 user experience and then delete the newer content type.
Nothing additional is required. SharePoint 2013 will fix it for you.
By default, SharePoint 2013 allows you to create what kind of site collections within an upgraded content database?
Only SharePoint 2013 experience site collections.
Only SharePoint 2010 experience site collections, until all site collections are upgraded to the SharePoint 2013 experience.
Both SharePoint 2013 and SharePoint 2010 experience site collections can be created.
No site collections can be created in an upgraded site collection.
You’ve just finished attaching the backup of a SharePoint 2010 content database to a SharePoint 2013 web application and verified that it functions on the new farm and that the health checks are clean. You now want to upgrade to the SharePoint 2013 experience using PowerShell. Which command-line syntax can you use for your site collection http://contoso?
Upgrade-SPSite http://contoso.
Upgrade-SPSite http://contoso -VersionUpgrade.
Upgrade-SPSite http://contoso -VersionUpgrade -QueueOnly.
Nothing is needed. When the health check runs clean, it will automatically upgrade to the SharePoint 2013 experience.
You have a web application with 20 site collections that are all contained in one content database that needs to be upgraded to the SharePoint 2013 experience. Three WFEs are available, and the default throttle limits are in place. How many site collections can be upgraded at the same time without overriding the throttle limits (and so that the site collections don’t exceed the content throttle limits)?
20
15
5
10
As a site collection administrator, you’ve requested an evaluation site collection. When can you expect the evaluation site to be available (as long as the default settings are in place)?
Within 24 hours
Within an hour
Within 5 minutes, plus the time it takes to process
Immediately
Chapter summary
The default authentication method for SharePoint 2013 web applications is claims.
Upgrading from SharePoint 2010 to SharePoint 2013 is a two-step process. No in-place upgrade is supported.
The first step in the upgrade process should be cleaning up and cataloging your existing SharePoint farm.
Service applications should be upgraded before moving over to content databases.
A health check is used to determine whether site collections are ready to be upgraded to SharePoint 2013 mode.
SharePoint 2013 supports both SharePoint 2010 mode and SharePoint 2013 mode site collections.
Evaluation sites are temporary and content isn’t kept in sync with production sites.
Answers
This section contains the solutions to the thought experiments and answers to the lesson review questions in this chapter.
Objective 3.1: Thought experiment
In this thought experiment, you were told to decide how to proceed with upgrading to a SharePoint 2013 claims-based authentication web application from a SharePoint 2010 classic-mode authentication web application. You have a couple of options here:
You could convert the SharePoint 2010 web application to a claims-based authentication web application. This would allow you to solve any issues that came up with that process (such as Search not working) while still in an environment that you are familiar with and while avoiding the compounding of the issues with those involved with the upgrade process. The downside of this process is that the conversion is a one-way process; if it fails and you are working on a production environment, the environment could be down for quite a while until the issues are resolved.
You could migrate the web application to a claims-based SharePoint 2013 web application and then do the conversion on the migrated content databases (converting to claims and upgrading simultaneously). The benefit of this process is that the conversion can take place on a SharePoint server that’s probably not in production, and it might provide enough time to deal with any conversion issues as well as any upgrade issues. The drawback is that it might prove more difficult with the combined issues (assuming that some exist) and, as with the first solution, the conversion to claims is a one-way process. Best practices indicate that you should migrate to claims while still in the SharePoint 2010 environment.
If for some reason you still want to stick with classic-mode authentication, you can create a classic-mode authentication web application using the SharePoint 2013 Management Shell.
Objective 3.1: Review
Correct answer: B
Incorrect: 200 is the limit for number of content databases in a single SharePoint 2013 farm.
Correct: 5,000 is the recommend limit for the number of site collections in a single content database.
Incorrect: Although up to 10,000 site collections per content database is supported, it’s beyond the recommend limit of 5,000.
Incorrect: A million is way off. However, up to 60 million items (documents and list items) are supported per content database.
Correct answer: D
Incorrect: This valid path for upgrading allows for troubleshooting any issues with claims-based authentication before the upgrade, but it’s just one of the valid methods.
Incorrect: This supported method is just one of the valid methods.
Incorrect: This is just one of the valid methods and should be used only if you have a strong reason to keep the web application in classic mode.
Correct: All three of these methods are valid.
Correct answer: C
Incorrect: Deletecorruption is a parameter used with the stsadm command databaserepair.
Incorrect: Test-SPContentDatabase can help you determine issues with content databases, but it’s not used to remove orphaned objects.
Correct: Repair is the method of a content database object used to remove orphaned objects using the SharePoint 2010 Management Shell.
Incorrect: Upgrade-SPContentDatabase doesn’t remove orphaned objects. It can detect them, however, but is used only to resume a failed upgrade or begin a build-to-build upgrade.
Correct answer: A
Correct: Windiff compares only ASCII files such as XML, text, ASPX, INI, CSS, HTML. and other similar type files.
Incorrect: Binaries aren’t compared by Windiff, but other programs such as comp and third-party products can do so.
Incorrect: DLLs are binaries and therefore not handled by Windiff.
Incorrect: EXEs are binaries and therefore not handled by Windiff.
Correct answer: D
Incorrect: The SharePoint Diagnostic Studio is part of the administrator’s toolkit, but so are the rest of the options.
Incorrect: The User Profile Replication Engine, which allows the copying of User Profile Information from one SharePoint farm to another, is part of the toolkit, but so are all the other options.
Incorrect: The Load Testing Toolkit, which can be used for SharePoint 2010 as well as SharePoint 2013, is part of the toolkit, but so are the other options.
Correct: All the preceding options are part of the SharePoint Administrator’s 2010 Toolkit.
Correct answer: B
Incorrect: When you install a feature on a SharePoint 2013 farm, it defaults to the max version level. This can be SharePoint 2013 or SharePoint 2010. If you install it only once, it will be available only for the max version level.
Correct: The feature needs to be installed once for the max version level and once for the other version. The CompatibilityLevel parameter is used (14 for SharePoint 2010 and 15 for SharePoint 2013) to force the install into the version necessary.
Incorrect: Features aren’t upgraded by SharePoint 2013. They have to be upgraded using Visual Studio or another tool.
Incorrect: Features can generally be used in SharePoint 2010 or SharePoint 2013; however, some will have to be rewritten to be compatible with SharePoint 2013. Features are not incompatible by default.
Objective 3.2: Thought experiment
In this thought experiment, you were assigned the task of doing an upgrade on several content databases in the shortest amount of time possible. The first step would be to upgrade the content database that contains the root site collection. Second, upgrade the large content database and wait for that process to complete. Third, upgrade the rest of the content databases in parallel. Because they are smaller content databases, they should upgrade in parallel without issue.
Objective 3.2: Review
Correct answer: D
Incorrect: You can unprovision a SharePoint Central Administration web application with the command psconfig.exe -cmd adminvs –unprovision, but it is just one of the right answers.
Incorrect: Features can be installed by using the command psconfig.exe -cmd install features, which registers any SharePoint Products and Technologies features located on the file system, but this is just one of the right answers.
Incorrect: Psconfig can be used to provision services on standalone installations (but not farm installations). This is just one of the right answers.
Correct: All the preceding answers are correct, although C is a bit tricky in that it applies only to standalone installations, which aren’t covered on this exam.
Correct answer: B
Incorrect: Connecting the largest database first can minimize the total amount of time, but not necessarily, and if it doesn’t contain the root site collection, it could fail.
Correct: The content database that contains the root site collection should first be connected with the command Mount-SPContentDatabase so that other site collections can be connected to the root.
Incorrect: The root site collection must be available before any of the other site collections can be accessed.
Incorrect: Because B is the correct answer, D can’t be correct.
Correct answer: C
Incorrect: You can use Central Administration to set an individual site collection to read-only in the Quotas and Locks section.
Incorrect: You can use the PowerShell command Set-SPSite to set a site collection to read-only, using the -LockState “ReadOnly” parameter.
Correct: SQL Server can’t be used to set an individual site collection as read-only. It can be used only to set an entire content database as read-only.
Incorrect: The stsadm command setsitelock can still be used, even though it is deprecated.
Correct answer: C
Incorrect: PowerPoint Broadcast sites aren’t upgradable to SharePoint 2013 because Office Web Applications is no longer an integrated application.
Incorrect: Web Analytics uses a different architecture in SharePoint 2013 and therefore can’t be upgraded. In fact, it should be turned off before any content databases are backed up for migration.
Correct: The User Profile Service application is one of the service applications that can be upgraded.
Incorrect: The FAST Search center can’t be upgraded. FAST is no longer a separate product in SharePoint 2013.
Correct answer: B
Incorrect: You can use the Resource Monitor to monitor CPU usage.
Correct: The amount of time that it takes to complete a content database upgrade needs to be measured manually or with some other program.
Incorrect: You can use the Resource monitor to monitor network latency.
Incorrect: You can use the Resource Monitor to monitor memory usage.
Correct answer: A
Correct: Only one server can be running the User Profile Synchronization service per farm.
Incorrect: The Excel Calculation service can be run on any and/or every server in the SharePoint farm.
Incorrect: The Central Administration service can be run on any server in the SharePoint farm. Although Central Administration is usually run on only one server, having it on multiple servers provides redundancy.
Incorrect: Machine Translation service can be run on multiple servers.
Objective 3.3: Thought experiment
In this thought experiment, you were asked to determine what changes were required so that 20 concurrent version-to-version upgrades can occur on the content database where the personal sites are located. Because the farm has four WFEs, the throttle limit is 20 by default for the web application that’s hosting the personal sites. Theoretically, it can support 20, assuming that the requests are spread across the four servers. You might want to increase the number of concurrent session per app pool to account for uneven distribution of self-service upgrade requests though. Two hard limits need to be changed:
The first is the limit on the content database. The default is 10 concurrent upgrades per content database, so this value needs to be changed to 20 because all the personal sites reside on the same site collection. End users could still request that their personal site be upgraded to the SharePoint 2013 experience, but requests that couldn’t be handled immediately would be put on the queue.
The second is the content limit, which is a real concern because the default is 10 MB per site collection and the personal site collections have a limit of 250 MB. This will cause many issues because end users will get different self-service options. Those with less than 10 MB of data can upgrade their site collection to the SharePoint 2013 experience, but those with more than 10 MB can’t. The throttle for content needs to be changed at the web application level to 250 MB so that each user has the same experience and can use the self-service upgrade. This is because content-level throttles prohibit self-service upgrades, whereas the other throttles just put the upgrade on the queue and don’t prohibit the self-service upgrade process.
Objective 3.3: Review
Correct answer: A
Correct: You can use the PowerShell command Test-SPSite to test site collections for possible issues to the upgrade process.
Incorrect: You can’t use the PowerShell command Test-SPSite to repair issues, but you can use the PowerShell command Repair-SPSite to repair some of the issues (such as setting customized sites back to their defaults).
Incorrect: You can’t use the PowerShell command Test-SPSite to target an individual subsite. It can target only a site collection.
Incorrect: Because the only correct answer was A, D has to be incorrect.
Correct answer: B
Incorrect: Deleting the content type will cause issues if it’s used by a list, library, or the parent of another content type.
Correct: Renaming the site content type allows you to keep the functionality of the pre-existing content type.
Incorrect: Trying to upgrade the site collection to the SharePoint 2013 user experience will cause an error.
Incorrect: This type of error needs to be resolved manually.
Correct answer: C
Incorrect: Unless the farm administrator has turned off the ability to create SharePoint 2010 site collections, they can still be created within an upgraded (or new) content database.
Incorrect: SharePoint 2013 site collections can be created in an upgraded content database unless explicitly turned off by the farm administrator.
Correct: Both the SharePoint 2010 user experience and the SharePoint 2013 user experience are supported in SharePoint 2013 by default.
Incorrect: Site collection can be created in upgraded content databases in the same way as they are in new content databases.
Correct answers: B and C
Incorrect: By default, the Upgrade-SPSite command does a content-to-content upgrade and not a version upgrade.
Correct: This command upgrades the site collection to the SharePoint 2013 experience because it has the VersionUpgrade parameter specified.
Correct: This command upgrades the site collection to the SharePoint 2013 experience because it has the VersionUpgrade parameter specified. The additional parameter QueueOnly means it will go in the queue rather than be run immediately.
Incorrect: The process of upgrading to the full SharePoint 2013 experience is a two-stage process. The upgrade is a manually started process that must be initiated either by the farm administrator or a site collection administrator.
Correct answer: D
Incorrect: Twenty would be the answer if you had no throttling.
Incorrect: Fifteen seems like it would work because of the three WFEs, but the amount is limited by the content database throttle of ten.
Incorrect: Five would be the answer if you had only one WFE.
Correct: Ten is the correct answer because the content database throttle is the limiting factor.
Correct answer: A
Correct: Evaluation sites are generated by a timer job that runs once daily. Therefore, it can take up to 24 hours before an evaluation site gets created.
Incorrect: An hour would only be correct if the Create Upgrade Evaluation Site Collection timer job were changed to one hour instead 24 hours.
Incorrect: If the timer job was changed to run every five minutes, this would be correct as long as the system resources were available.
Incorrect: Evaluation sites aren’t created right away. They are created via a timer job process that runs every 24 hours by default.