Chapter 2. Plan, install, configure, and manage client access
The Client Access server (CAS) role in Exchange 2013 has evolved to account for changes in newer hardware, such as cheaper and more powerful central processing units (CPUs). The CAS role in Exchange 2013 is designed for simplicity of scale. Unlike previous versions of Exchange server, Client Access in Exchange 2013 is loosely coupled, meaning it’s no longer responsible for rendering mailbox data. All processing and activity for a given mailbox occurs on the Mailbox server that holds the active copy of the mailbox. Because all of the data processing is carried out by the Mailbox server role, it eliminates concerns of version compatibility between the CAS and the Mailbox server.
Because of these changes, CAS is now a thin and stateless server. It provides authentication, redirection, and proxy services. Clients connect to CAS using Hypertext Transfer Protocol (HTTP), Post Office Protocol (POP), Internet Message Access Protocol (IMAP), or Single Mail Transfer Protocol (SMTP) and CAS redirects or proxies as necessary. Client Access does not queue or store anything on behalf of a Mailbox server.
 Exam Tip
Because of the loosely coupled architecture and the fact that Client Access is a stateless proxy, you must install the Exchange 2013 Mailbox server role before you install Exchange 2013 CAS. If you install CAS first, you will not be able to connect to the Exchange Management Shell because an Exchange 2013 Mailbox server does not exist and a connection to the virtual directory for the Shell can’t be made successfully.
With new architecture in Exchange 2013 and a redefined Client Access role, you benefit from version upgrade flexibility, session indifference, and deployment simplicity. You are no longer required to upgrade CAS roles to a newer version before you can upgrade the Mailbox server role. The ability to independently upgrade the roles is a welcome development for many organizations.
Compared to Exchange 2013, where session affinity to the CAS was required, Exchange 2013 Client Access eliminates a session affinity requirement because it’s a stateless proxy. This, in turn, simplifies the configuration of load balancers, reducing the administrative overhead and improving cost efficiencies.
The namespace requirements in Exchange 2013 are also less demanding. If you are coexisting with Exchange 2010, you need only two namespaces: one for client protocols and one for Autodiscover. If you are using SRV records or HTTP redirection, you can even use a single namespace for both client protocols and Autodiscover. When coexisting with Exchange 2007, an additional legacy namespace is also required.
Because of the architectural changes, clients can no longer use the RPC protocol to connect. All Outlook clients must connect using a remote procedure call (RPC) over HTTP, including internal clients. This change removes the need of RPC CAS on CASs, resulting in a reduction of namespaces that would be required when deployment spans more than one site.
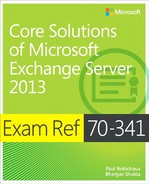
The connection endpoint that an Outlook client uses to connect has also changed from the server Fully Qualified Domain Name (FQDN) used in previous versions of Exchange to the mailbox GUID@SMTP domain of the primary email address of the user. Combined with the removal of Client Access Array, this change enables users to connect to any of the CASs without getting prompted to restart the Outlook client. Figure 2-1 shows an example of a user profile.
Certificate management is also simplified in Exchange 2013. Because the CAS role is a stateless proxy, it must connect to the Mailbox server role. You need a certificate on CAS, which is used by Outlook and other clients, and a certificate on Mailbox server, which is used by CAS. While the client facing certificate must be from a certificate authority trusted by clients, the certificate on the Mailbox server can be a self-signed certificate. This is because CAS automatically trusts the self-signed certificate on the Mailbox server. Exchange 2013 also makes it easier to see certificates nearing expiration with notification in EAC, as well as email notification if the administrator opts for it.
![]() Objective 2.1: Plan, deploy, and manage a Client Access Server (CAS)
Objective 2.1: Plan, deploy, and manage a Client Access Server (CAS)
![]() Objective 2.2: Plan and configure namespaces and client services
Objective 2.2: Plan and configure namespaces and client services
![]() Objective 2.3: Deploy and manage mobility solutions
Objective 2.3: Deploy and manage mobility solutions
![]() Objective 2.4: Implement load balancing
Objective 2.4: Implement load balancing
![]() Objective 2.5: Troubleshoot client connectivity
Objective 2.5: Troubleshoot client connectivity
Objective 2.1: Plan, deploy, and manage a Client Access Server (CAS)
Because of the architectural changes in the CAS role in Exchange 2013, you benefit from the simplified stateless connection requirements and a higher scalability of the Client Access tier. Because session affinity is no longer a requirement, it does not matter which CAS in an array of CAS servers receives each individual client request. In Exchange 2010, you needed to define a Client Access array per each Active Directory site. This was, in turn, tied to a unique namespace that Outlook clients connected to. No such requirement exists for CAS servers in Exchange 2013.
When CAS servers connect to a Mailbox server, a machine account used to authenticate is a privileged account that is a member of the Exchange Servers group. This allows CAS servers to pool connections to Mailbox servers from multiple clients. This results in fewer connections used to proxy the requests to the Mailbox servers, improving processing efficiency and end-to-end latency.
This objective covers how to:
![]() Design to account for differences between legacy CAS and Exchange 2013 CAS
Design to account for differences between legacy CAS and Exchange 2013 CAS
![]() Configure Office Web Apps server
Configure Office Web Apps server
Designing to account for differences between legacy CAS and Exchange 2013 CAS
When a client application makes a connection to Exchange 2013 Client Access, CAS authenticates the user, locates the mailbox and the server where the mailbox is active, and either proxies the connection to the Mailbox server or redirects it, where appropriate. When coexisting with older versions of Exchange server, Exchange 2013 CAS acts differently, based on the client application or protocol in use and the destination server version where the client mailbox is located. It’s important to understand how Exchange 2013 CAS reacts to different scenarios, when it proxies the connection, and when the connection is redirected.
Coexistence with Exchange 2007
When you deploy Exchange 2013 in coexistence with Exchange 2007 servers, you must configure a legacy host name in DNS and change Exchange 2007 servers to use the legacy name as the ExternalURL. When Exchange 2013 Client Access is deployed, you need to associate an existing namespace, for example, mail.contoso.com, to newly deployed Exchange 2013 CAS servers. When this switch is complete, users will not need to use a legacy host name. The legacy host name is used by the Autodiscover and Client Access servers when redirecting users hosted on Exchange 2007 to the appropriate server.
When users whose mailboxes are hosted on Exchange 2007 connect using Outlook Anywhere or ActiveSync, Exchange 2013 proxies their connections to Exchange 2007. For Outlook clients, the transition becomes easier if all clients are configured to use Autodiscover and Outlook Anywhere is enabled and configured on the Exchange 2007 server.
When an Outlook client connects to Exchange 2013, but the user mailbox is located on Exchange 2007, Exchange 2013 CAS proxies the connection to Exchange 2007 CAS. For the proxy process to work, Outlook Anywhere must be enabled on Exchange 2007 CAS servers. You must also ensure that client authentication on all CAS servers, including Exchange 2013 and Exchange 2007, is set to Basic and the Internet Information Services (IIS) authentication method includes NTLM. NTLM is required on IIS because the Exchange 2013 CAS uses Windows authentication to authenticate to Exchange 2007 servers.
In Exchange 2007, for deployments with multiple sites where you have an Internet facing site and another site with no Internet connectivity, you can configure Outlook Anywhere only on the site with Internet connectivity. However, during coexistence with Exchange 2013, you must also enable Outlook Anywhere on all Exchange 2007 servers, regardless of their location and whether the site they’re located on has Internet connectivity.
Exam Tip
You might wonder what the Outlook Anywhere host name should be when configuring Outlook Anywhere on Exchange 2007 servers on non-Internet facing site. You must use the same host name as the one assigned to servers in the Internet facing site. This name is different from the legacy host name and it usually resolves to Exchange 2013 CAS servers in DNS.
Outlook Web App (OWA) connections are redirected to Exchange 2007 using the legacy host name configured on Exchange 2007 servers using the ExternalURL parameter. For this reason, you must maintain at least one Exchange 2007 server with the ExternalURL parameter configured to use the legacy host name until all users are migrated from Exchange 2007 servers.
When a user logs on to Exchange 2013 OWA using Forms Based Authentication (FBA), which is the default, Exchange 2013 CAS then determines the user mailbox being located on Exchange 2007. It sends a redirect to the legacy namespace it determined using Autodiscover and ExternalURL configured on Exchange 2007 servers in the site where the user’s mailbox is located. For Exchange 2013 RTM and CU1, the behavior is a redirect resulting in an FBA logon page being presented to the user from the Exchange 2007 server. This isn’t an optimal user experience, but it’s expected behavior. This was changed for the better when Exchange 2013 CU2 was introduced. From CU2 onward, Exchange 2013 sends a single sign-on (SSO) redirect, so that user does not get prompted for credentials twice when logging onto OWA.
When you have multiple site deployment with a non-Internet facing site where Exchange 2007 servers and mailboxes are located, Exchange 2013 redirects OWA users to the legacy namespace that’s associated with Exchange 2007 servers located in the Internet facing site. Exchange 2007 servers from the Internet facing site then proxy the connection to a non-Internet facing site and the user is presented with their mailbox in OWA.
The deployments with multiple Internet facing sites containing Exchange 2007 servers require multiple namespaces configured to allow users to connect to their appropriate location. This is determined by ExternalURLs configured on relevant Exchange 2007 CAS servers, as appropriate. In the Exchange 2013 coexistence scenario, when a user logs on to OWA, Exchange 2013 determines the location and correct namespace assigned to Exchange 2007 servers in the site where the user’s mailbox is located. An SSO redirect is then issued if Exchange 2013 servers are running CU2 or later. A redirect without SSO is issued if Exchange 2013 is running RTM or CU1 versions.
When dealing with ActiveSync clients, Exchange 2013 no longer issues a 451 redirect. This means that when an ActiveSync client connects to an Exchange 2013 server, Exchange 2013 proxies the connection, even if the mailbox is located in an Internet facing site with an external URL configured on Exchange 2007 server. If an ActiveSync device was already configured to connect to the Internet facing site using its external URL, unlike Outlook clients, ActiveSync doesn’t periodically check for changes. It continues connecting to the namespace it was configured for when set up. If you retire the namespace that was in use when the device was set up, it results in an interruption of service to the client, and then the client must reestablish ActiveSync partnership with the server.
Exam Tip
ActiveSync devices continue using the namespace even after the user is moved to a different site. The device will change the namespace it connects to only when it receives a 451 redirect. Since Exchange 2013 servers do not issue a 451 redirect, ensure that the Exchange 2007 CAS servers and associated namespace are preserved until migration of all users is complete and no ActiveSync devices are connecting to the Exchange 2007 servers.
For an Exchange Web Services (EWS) connection to be successful, the clients must connect to the appropriate version of CAS servers. This is usually addressed by an Autodiscover response, which includes the appropriate CAS server for the given user mailbox. However, for clients that are not configured to use Autodiscover, you must ensure that the clients are connecting to the correct CAS server. If a user whose mailbox is located on Exchange 2007 connects to Exchange 2013 CAS, the EWS connection fails because Exchange 2013 won’t proxy the connection.
If both IMAP and POP service are in use, coexistence is quite simple. If an Exchange 2013 CAS server receives a POP/IMAP request for a user hosted on Exchange 2007 server, Exchange 2013 CAS determines the FQDN of the Exchange 2007 CAS server and proxies the request. Because IMAP and POP services don’t have health checking, you must ensure that POP/IMAP services are running on Exchange 2007 servers.
Coexistence with Exchange 2010
One of the important differences between coexisting with Exchange 2007 and Exchange 2010 is that Exchange 2013 servers don’t require legacy namespace when coexisting with Exchange 2010 servers. As long as no Exchange 2007 servers are in the mix, you can move the primary namespace to Exchange 2013 CAS servers. Then all client connectivity for users whose mailboxes are located on Exchange 2010 are handled by Exchange 2013 CAS servers.
For Outlook Anywhere and ActiveSync clients, the logic of their connection doesn’t change at all when compared to the logic used with Exchange 2007 servers. Clients can connect to the primary namespace associated with Exchange 2013. Exchange 2013 CAS servers then proxy the connection to Exchange 2010 CAS servers. The same configuration requirements apply as described earlier. Outlook Anywhere must be enabled on Exchange 2010 CAS servers, and the IIS authentication method must include NTLM.
The logic for OWA connections is a bit different when a user’s mailbox is located on Exchange 2010. Because there’s no legacy host name requirement for coexistence with Exchange 2010, the Exchange 2013 CAS server receiving a OWA request from a user simply proxies the request to an Exchange 2010 server if it’s located in the same site. If Exchange 2010 is located in a non-Internet facing site, the proxy behavior is the same. The behavior is different when a user mailbox is located on the Exchange 2010 server in an Internet facing site that has its own namespace. This is different from the primary namespace associated with Exchange 2013. In this case, Exchange 2013 CAS servers receiving the user’s OWA request issues a redirect to the namespace associated with the site where the user’s mailbox is located. Whether the redirect is SSO or requires the user to logon again, is dependent on whether the Exchange 2013 servers are running the RTM/CU1 or CU2 version.
ActiveSync behavior, when coexisting with Exchange 2010, isn’t different from what was covered earlier in the coexistence scenarios for Exchange 2007. Regardless of the namespace configuration of Exchange 2010 servers, if a partnership existed before introducing the Exchange 2013 servers, then ActiveSync clients connect to the namespace they were configured for and they’ll continue to connect to their mailboxes accordingly. If a new partnership is being established, ActiveSync connects to the namespace returned by Autodiscover, which is normally associated with the primary namespace, which, in turn, is associated with Exchange 2013 servers. In this case, Exchange 2013 CAS servers proxy the ActiveSync request, regardless of the location of the Exchange 2010 servers and their configured external URLs. This change was designed to eliminate issues with different ActiveSync implementations that didn’t always honor 451 redirect and resulted in connectivity errors.
When an EWS client connects to the Exchange 2013 CAS servers and the target mailbox is located on Exchange 2010, Exchange 2013 CAS servers send a proxy request to Exchange 2010 CAS servers. This behavior is different from Exchange 2007 coexistence scenarios. If Exchange 2010 servers are located in another Internet facing site, while Exchange 2013 CAS servers won’t send a redirect, the Autodiscover process would provide an appropriate external URL to the client and the client would connect to the servers associated with the given namespace.
When compared to Exchange 2007 coexistence, POP and IMAP connectivity to Exchange 2010 differs slightly. If the target server is Exchange 2010 CAS, Exchange 2013 CAS server enumerates POP/IMAP property InternalConnectionSettings. The value of this property should be set to a server FQDN and not a load-balanced FQDN. Once the value is determined, Exchange 2013 CAS proxies the connection to the selected Exchange 2010 server.
Configuring Office Web Apps server
Office Web Apps server delivers browser-based file viewing and editing services for Office applications, such as Word, PowerPoint, and Excel. Through the Web Application Open Platform Interface (WOPI) protocol, Office Web Apps server works with products such as Exchange 2013, Lync 2013, and SharePoint 2013. It allows these applications to offload online Office documents rendering and editing functionality to the dedicated Office Web Apps server farm.
You can configure Exchange 2013 to use the Office Web Apps server farm for previewing Office file attachments that aren’t protected using Information Rights Management (IRM). When configured, OWA users can preview Office file attachments in the browser without downloading files before viewing them. This is also helpful for traveling or kiosk users who might not have access to locally installed Office applications.
To configure Exchange 2013 integration with the Office Web Apps server, you must first ensure that Office Web Apps server is installed and configured appropriately. The Office Web Apps server can be configured to accept unencrypted HTTP connections, encrypted HTTPS connections, or even offloaded SSL connections where a load balancer or a proxy device accepts encrypted Secure Sockets Layer (SSL) connections from clients and sends unencrypted data to the Office Web Apps servers. As an Exchange administrator, you need to gather this information, along with the internal URL as configured on the Office Web Apps server farm.
Configure the Exchange 2013 organization before you can use Office Web App servers to render Office attachments. Exchange 2013 servers use the Office Web Apps discovery URL to determine the required configuration details of the Office Web Apps server or server farm. To configure the Exchange organization for the Office Web Apps discovery endpoint, run the Set-OrganizationConfig cmdlet with the WACDiscoveryEndPoint parameter. The value of the parameter is the Office Web Apps server discovery URL, which looks similar to http(s)://(server or farm FQDN)/hosting/discovery. Ensure that the URL is reflecting the expected protocol, and HTTP if encryption isn’t configured on the Office Web Apps server farm, and HTTPS if encryption is required or offloaded to the load balancer/proxy device. After setting the URL on the Exchange 2013 organization configuration, recycle MSExchangeOWAAppPool on Exchange 2013 CAS servers. After doing so, Exchange 2013 CAS servers perform Office Web Apps discovery using the URL configured and, after successful discovery, OWA can use the Office Web Apps servers to render attachments. You can confirm setup and success of discovery using two events in the Application event log on Exchange 2013 Mailbox servers. Event ID 140 from source MSExchange OWA indicates that the Office Web Apps discovery URL was successfully read from the organization configuration. The second event from the same source can be either Event ID 141, indicating failure to complete discovery, or Event ID 142, indicating successful discovery. A failure event usually means the misconfiguration of a discovery URL, an incorrect load balancer or Office Web Apps farm configuration, or that a firewall is blocking required ports to the Office Web Apps servers.
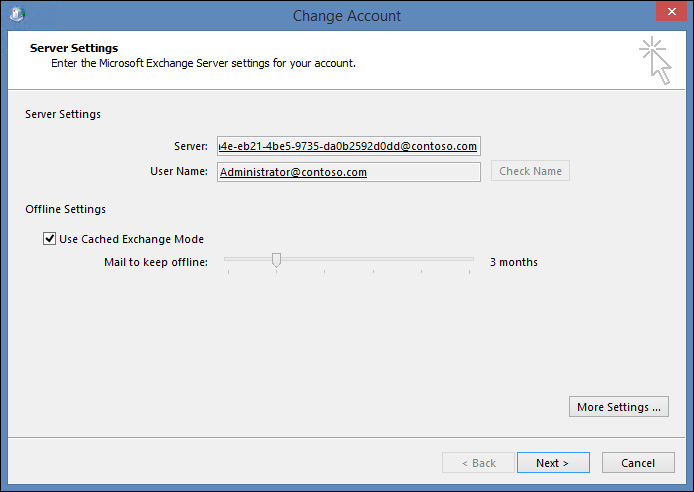
If the discovery is successful, users are displayed an option to open the attachment in the browser. No further configuration is needed. Users should be able to click the link and open the document in the browser. Figure 2-2 shows an example email with an attachment.
When a user opts to open the attachment in the browser, a new window opens and Office Web Apps server is invoked to render the document in the browser. When the Client Access server sends the request to render the attachment, and the Office Web Apps server is configured to require encryption using SSL, the request to render only succeeds if the certificate assigned to IIS on the Client Access server is trusted by the Office Web Apps server. By default, Exchange 2013 CAS servers use a self-signed certificate created during installation. You should assign a certificate obtained from a certification authority (CA) that is trusted by the Office Web Apps server.
Figure 2-3 shows a failure when the certificate presented by the CAS server is not trusted by the Office Web Apps server.

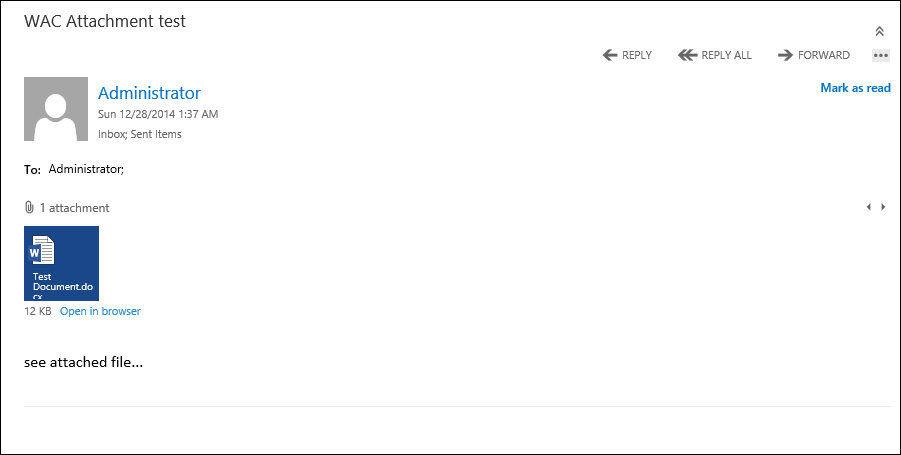
Figure 2-4 shows a successful rendering of an attachment in the browser window when the CAS server is configured with a certificate issued by the CA trusted by the Office Web Apps server.
After enabling the organization configuration, you don’t need to configure any additional properties before the user can view the attachment in the browser. This is because the default OWA virtual directory configuration allows OWA users on public and private computers to render the attachments using the Office Web Apps server. The settings also allow users to download the attachment before viewing the attachment in the browser.
The properties WacViewingOnPrivateComputersEnabled, WacViewingOnPublicComputers Enabled, ForceWacViewingFirstOnPrivateComputers and ForceWacViewingFirstOnPublicComputers on the OWA virtual directory allows the administrator to control the behavior of how attachments must be rendered or downloaded.
By default, WacViewing* parameters are set to $true. When set to $false, this can prohibit user from rendering the attachment in a browser on a public or a private computer, or both.
The parameters ForceWacViewing* are set to $false by default, allowing users to select whether to render the document in a browser or download the attachment in any order they choose. When set to $true, these parameters force the user to view the attachment in the browser before they can download the attachment.
![]() Thought experiment: Coexistence
Thought experiment: Coexistence
1. What would you recommend to meet the requirements for Outlook clients?
2. What would you recommend to meet ActiveSync requirements?
3. If you’re required to reduce the number of namespaces in use, can you avoid impacting Outlook and ActiveSync clients? How?
Objective summary
![]() When coexisting with Exchange 2007 and Exchange 2010, Exchange 2013 behavior is different for each version. The behavior is also different for each workload. It’s important to understand how each workload, Outlook Anywhere, ActiveSync, and EWS are impacted during coexistence.
When coexisting with Exchange 2007 and Exchange 2010, Exchange 2013 behavior is different for each version. The behavior is also different for each workload. It’s important to understand how each workload, Outlook Anywhere, ActiveSync, and EWS are impacted during coexistence.
![]() Legacy namespace is required when coexisting with Exchange 2007. This impacts certificate requirements, as well as the process of moving a primary namespace to Exchange 2013 CAS servers. When moving a primary namespace to Exchange 2013 CAS servers, you must ensure enough capacity is available on Exchange 2013 CAS servers to service all users who are connecting to the existing primary namespace.
Legacy namespace is required when coexisting with Exchange 2007. This impacts certificate requirements, as well as the process of moving a primary namespace to Exchange 2013 CAS servers. When moving a primary namespace to Exchange 2013 CAS servers, you must ensure enough capacity is available on Exchange 2013 CAS servers to service all users who are connecting to the existing primary namespace.
![]() When changing a primary namespace, you must account for impact of DNS infrastructure and caching. Propagation delays and caching can impact clients, and clients can continue connecting to previously associated Exchange 2007 servers until all the DNS servers are updated.
When changing a primary namespace, you must account for impact of DNS infrastructure and caching. Propagation delays and caching can impact clients, and clients can continue connecting to previously associated Exchange 2007 servers until all the DNS servers are updated.
![]() The Office Web Apps server enables document rendering in a browser for OWA users. The integration must be enabled at the organization level and defaults must be accounted for to ensure it meets your requirements of desired user experience and behavior.
The Office Web Apps server enables document rendering in a browser for OWA users. The integration must be enabled at the organization level and defaults must be accounted for to ensure it meets your requirements of desired user experience and behavior.
![]() When encryption is required, the Office Web Apps servers require SSL certificate presented by CAS servers to be from a trusted authority. There are default self-signed certificates assigned to IIS on CAS servers fail to meet this requirement, impacting the ability to render documents in the browser.
When encryption is required, the Office Web Apps servers require SSL certificate presented by CAS servers to be from a trusted authority. There are default self-signed certificates assigned to IIS on CAS servers fail to meet this requirement, impacting the ability to render documents in the browser.
Objective review
Answer the following questions to test your knowledge of the information in this objective. You can find the answers to these questions and explanations of why each answer choice is correct or incorrect in the “Answers” section at the end of this chapter.
1. You are planning to migrate all users from an existing Exchange 2007 deployment to a planned Exchange 2013 deployment. All users connect internally and over VPN using Outlook clients. Users aren’t allowed to connect from the Internet when they aren’t using VPN. What must you do to deploy Exchange 2013? Select all that apply.
A. Create legacy namespace and associate it with Exchange 2007 servers.
B. Enable Outlook Anywhere on Exchange 2007 servers.
C. Associate primary namespace with Exchange 2013 CAS servers.
D. Configure ExternalURL property on Exchange 2007 servers.
E. Configure ExternalURL property on Exchange 2013 servers.
2. You have deployed Exchange 2013 CU1 with the primary namespace mail.contoso.com, assigned to the New York location. The branch site is associated with the namespace London.contoso.com. When a user, whose mailbox is located on Exchange 2013 server in London, logs on to OWA by connecting to mail.contoso.com/owa, how will the Exchange 2013 server handle the request?
A. A redirect is issued for the London.contoso.com namespace. The user is presented with a FBA logon page.
B. Proxies the user request to Exchange 2013 CAS server at the London site.
C. Proxies the user request to Exchange 2013 Mailbox server at the London site.
D. SSO redirect is issued for London.contoso.com namespace. The user won’t need to logon again.
3. You have deployed Exchange 2013 server and configured the organization properties to include the discovery endpoint of the Office Web Apps server farm. Exchange servers were installed using a GUI setup and no other properties were changed yet. You want users to be able to download attachments only after they have opened the attachment in the browser. What must you do? Select two.
A. Set ForceWacViewingFirstOnPrivateComputers property to $true.
B. Set WacViewingOnPrivateComputersEnabled property to $true.
C. Set WacViewingOnPublicComputersEnabled to $true.
D. Obtain a SSL certificate from a trusted authority and assign it to the Exchange 2013 CAS server.
Objective 2.2: Plan and configure namespaces and client services
A successful Exchange deployment is highly dependent upon careful planning and the deployment of namespaces for a given environment. User experience is also dependent on proper configuration of certificates in use. Without it, connectivity issues and certificate trust warnings become more than an annoyance for users.
Exchange 2013 has greatly simplified namespace configuration requirements. This helps reduce the number of namespaces needed for an environment, as well as simplifying SSL certificate requirements.
![]() Design namespaces for client connectivity
Design namespaces for client connectivity
![]() Configure URLs
Configure URLs
![]() Plan for certificates
Plan for certificates
![]() Configure authentication methods
Configure authentication methods
![]() Implement Autodiscover for a given namespace
Implement Autodiscover for a given namespace
Designing namespaces for client connectivity
For each workload that Exchange 2013 supports, Exchange server provides you with the ability to configure a URL that can be used for both internal and external clients. The URL needs to be configured for each workload, such as OWA, EWS, and so on. Ideally, if split-brain DNS is deployed for a given environment, you can possibly associate a single FQDN to both internal and external URL parameters of the given workload.
To design a namespace configuration that best suits the environment, you must understand how client connectivity works in different environments. Most of this was covered earlier in Objective 2.1. Let’s look at some Exchange 2013 specifics in a bit more depth.
Exchange 2013 workloads include HTTP-based protocols, which include OWA, ECP, EWS, EAS, OAB, RPC, MAPI, and AutoDiscover, as well as non HTTP protocols, which include SMTP, POP, and IMAP. In a simple, single site deployment, you have a minimum of two namespaces: one for AutoDiscover and the other for all other workloads. The AutoDiscover namespace is used for clients capable of using the AutoDiscover service to find appropriate connection endpoints and URLs for different workloads. Once the discovery process is complete, the client uses discovered namespaces to connect to the relevant workload, such as Outlook Anywhere, Exchange Web Services, or ActiveSync.
Unlike OWA, ECP, and other workloads, you can’t just configure internal and external URLs for AutoDiscover virtual directories. Even if you did, would it really help clients find the Autodiscover service? Thinking logically, the purpose of the Autodiscover process is to find the configuration for user profile and connection end points for each client type. Because the process is about finding the URLs that aren’t known to the client, you can’t just configure internal and external URLs on the AutoDiscover virtual service and expect clients to know where to connect for Autodiscover. Some static information must exist that every client can use to get to the AutoDiscover service. Autodiscover logic for Exchange 2013 clients is a well-defined process that every client should follow. This ensures that just by providing the user’s primary email address and authentication information, the client can connect to the AutoDiscover service and, in turn, can download the user profile and connection endpoint information from the Exchange 2013 servers.
For internal Outlook clients that are installed on domain joined computers, the process starts with looking up the Service Connection Point (SCP) in Active Directory. The Outlook client is hard coded to look for well-known globally unique identifiers (GUIDs) of SCP URLs stored in the configuration container of Active Directory. The search results of SCP lookup include Active Directory site information and the URL for the AutoDiscover service. On an out-of-box configuration of an Exchange server, this URL is configured to the user server FQDN and looks similar to the following: Server1.Contoso.com/Autodiscover/Autodiscover.xml.
When multiple Exchange servers are installed in the environment, the client receives multiple URLs it can connect to. It then prioritizes the URLs. The first preference is given to the SCP record that belongs to the same Active Directory site as the client computer. If no such SCP record is found, SCP records that contain an Active Directory site keyword are given preference. If both conditions fail to find an appropriate SCP record, the SCP records that don’t contain an Active Directory site keyword are used.
Once an SCP record is selected, the AutoDiscover URL from the SCP record is used to connect to the AutoDiscover service on the given Exchange 2013 server. Upon a successful connection, the client obtains profile information needed to connect to the user’s mailbox and other available Exchange features.
When starting the Outlook client for the first time, it provides you with an option to connect to an email account. If you opt for it, the Outlook client automatically retrieves the user’s name and email address from Active Directory. This only works if the user’s account is enabled and associated with an Exchange mailbox. When you proceed to the next step, the Outlook client establishes a connection with an AutoDiscover URI it retrieved from SCP, as discussed earlier. This is where you can notice the first sign of trouble!
As mentioned earlier, a default configuration contains the server FQDN of Exchange 2013 CAS server in the AutoDiscover URI. The server also has a self-signed certificate associated with IIS by default. This results in an Outlook client not trusting the certificate and prompting the user with a security alert. Figure 2-5 is an example of such an error.
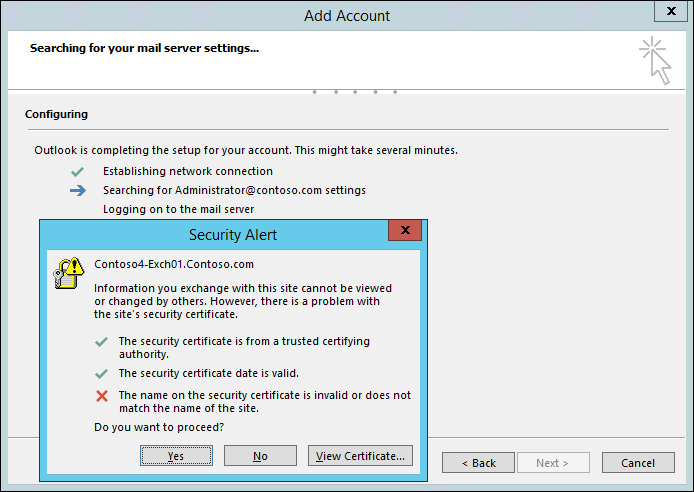
The resolution to this problem brings us to our first namespace: the AutoDiscover namespace. Even for internal clients, this namespace should be something other than a server FQDN. The most commonly used namespace for this purpose is autodiscover.contoso.com, where contoso.com is the SMTP domain name of the user’s primary email suffix.
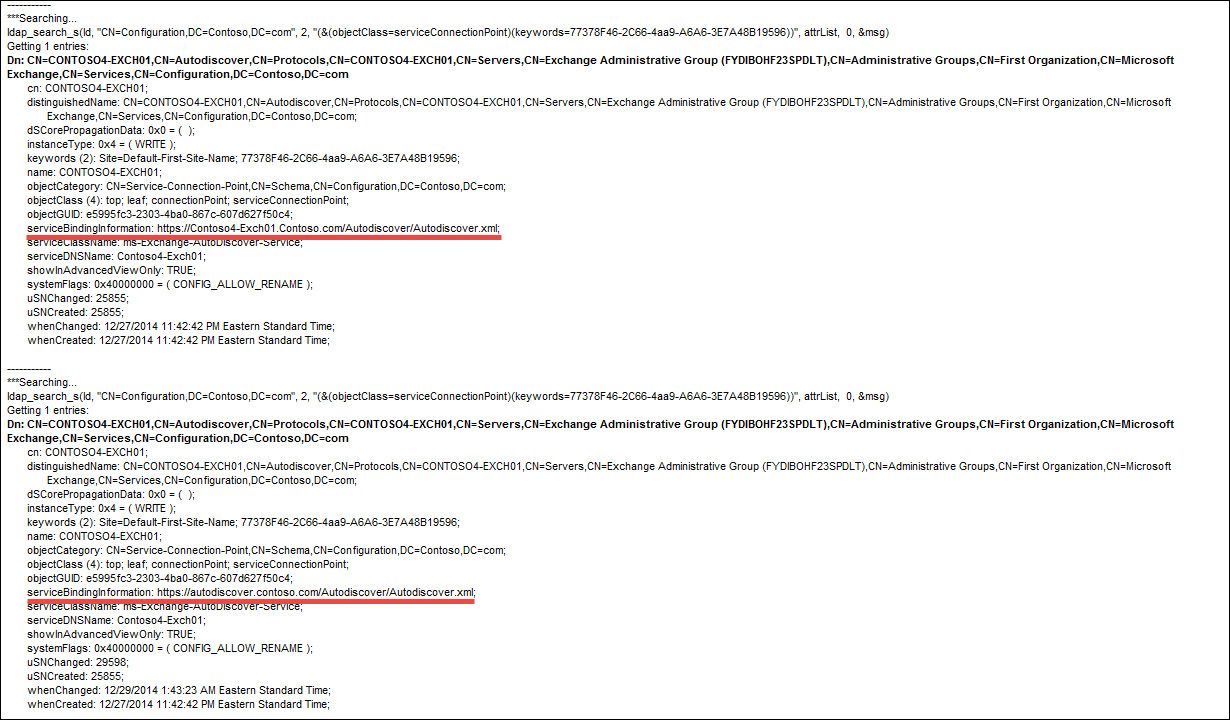
To change the URL associated with the SCP record, use the Set-ClientAccessServer cmdlet and change the AutoDiscoverServiceInternalUri parameter. When changing the value of this parameter, it’s important to include a complete Autodiscover URI, such as autodiscover.contoso.com/Autodiscover/Autodiscover.xml. You must run this cmdlet for each Exchange 2013 CAS. Figure 2-6 shows the SCP record as seen using LDP.exe before and after changing the URI.
Resolving the security alert is a two-part process. The first step is to change the AutoDiscover URI to an appropriate namespace similar to what we did earlier. The second step is to obtain an SSL certificate that contains the AutoDiscover namespace from a trusted CA. You learn more about certificates in “Planningfor certificates” later in this chapter. It might not be as obvious, but the namespace assigned to the AutoDiscover URI must also exist in DNS and it must be associated with an appropriate IP address, ideally resolving to a load balanced IP.
The process for an external client or a client not connected to the domain is different. Because the computer is external or not domain joined, it doesn’t have the ability to look up SCP records. It must resort to hard coded logic to search for the AutoDiscover endpoint. This process starts with the Outlook client requesting the user’s name, the email address, and the password. Figure 2-7 displays an external Outlook client requesting user details before the AutoDiscover process can commence.

Once the user provides the required information, Outlook uses the SMTP domain from the user’s email address and tries to connect to https://<SMTP domain>/autodiscover/autodiscover.xml. In most cases, the company’s corporate website might not be ideal for hosting the AutoDiscover service and this step could fail. If it does fail, the Outlook client tries to connect to https://autodiscover.<SMTP domain>/autodiscover/autodiscover.xml. If the Outlook client fails again, it then tries the unencrypted connection to the Autodiscover namespace, http://autodiscover.<SMTP domain>/autodiscover/autodiscover.xml. If all of these steps fail, then the Outlook client tries to locate the SRV record for AutoDiscover autodiscover._tcp.<SMTP domain>.
As you might have noticed, this hard-coded process affords Exchange administrators tremendous flexibility, allowing them to choose the most appropriate way to provide the AutoDiscover service to external clients.
The second namespace usually addresses all other web-based workloads, as discussed earlier. These workloads include OWA, ECP, EWS, EAS, OAB, RPC, and MAPI. Depending on how the load balancing is configured, and if the deployment spans more than one datacenter, you might be able to use a single namespace for all HTTP protocols, as well as non-HTTP protocols, such as SMTP, POP, and IMAP.
Going from a simple, single-location deployment to multiple locations, whether designed as a primary and standby datacenter configuration or as multiple active sites, the namespace planning becomes more involved. You need to account for all of the different ingress points and decide whether you can use a single namespace for a multiple datacenter or should you deploy a regional namespace model.
When you deploy a single namespace for a pair of datacenters serving a single set of users and acting as an active/passive pair, this is known as an unbound model. User mailboxes are protected by DAG, and the DAG spans two datacenters to provide site resilience. DNS resolves the name (for example, mail.contoso.com) to load the balanced IP address of CAS servers in each site. CAS servers located in any site can serve client requests. If a client request lands on a CAS server located in a different site than where the user’s mailbox is active, CAS simply proxies the request across the site. The benefit of this model is a simplified namespace and certificate planning.
Exam Tip
When using a single namespace for both internal and external clients, there is a common scenario when split-brain DNS infrastructure is in use. The authentication value for both internal and external Outlook Anywhere settings must be the same. This is because Outlook gives priority to the internal settings when a single namespace is used for both internal and external clients. The Outlook client utilizes internal Outlook Anywhere authentication settings even when the Outlook client is connected externally.
In a similar deployment that contains two datacenters, but contains active users in both sites that are usually protected by two different DAGs, a bound model is usually preferred. In a bound model, each datacenter is assigned a unique namespace. This design aims at keeping user connections to their local datacenter, reducing cross datacenter traffic over WAN connections between datacenters. For example, mail.contoso.com might be assigned to one datacenter, while mail2.contoso.com could be assigned to another. Users receive their relevant namespace in the AutoDiscover response and can connect accordingly. If a failure causes the user’s mailbox to fail over to a second site, the user continues to connect to the CAS servers in their site and CAS servers proxy the client connections to the appropriate Mailbox server, which isn’t active in a different site. If a disaster affects the entire site, the DNS change is necessary to send traffic associated with the affected namespace to CAS servers located in a second site.
Configuring URLs
The Exchange 2013 CAS server installation configures internal URLs to use server FQDN by default. External URLs are always left null. One of the first steps is to configure CAS servers to use the correct internal and external namespaces, as discussed previously.
Configuring internal namespaces requires you to use EAC or Shell to configure each workload’s virtual directory. The change needs to be made on every Client Access server associated with the given namespace. If configuring external URLs, Exchange provides a wizard to configure the external URL. The wizard configures external URLs on all virtual directories on a given server and also enables you to select multiple CAS servers. You can select all CAS servers that are associated with a given namespace to configure the external URL. To launch the wizard, from EAC, select Servers, and then select Virtual Directories tab. Then, click the Configure External Access Domain link, which is represented by an icon that looks like a wrench. Figure 2-8 shows the resulting dialog box that allows you to configure the external domain name.
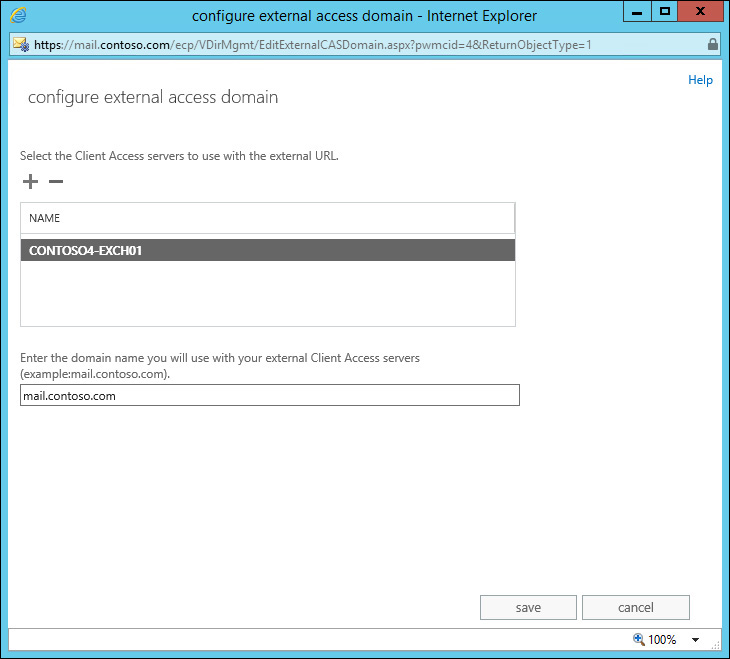
Notice that the wizard only asks for the domain name associated with external URLs. Once the external domain name is provided, the wizard automatically configures an appropriate external URL for each virtual directory. Looking at cmdlet logging, it looks similar to the following:
Cmdlets issued by the Configure External Access Domain Wizard
Set-PowerShellVirtualDirectory -ExternalUrl 'https://mail.contoso.com/powershell'
Set-EcpVirtualDirectory -ExternalUrl 'https://mail.contoso.com/ecp'
Set-OABVirtualDirectory -ExternalUrl 'https://mail.contoso.com/OAB'
Set-OWAVirtualDirectory -ExternalUrl 'https://mail.contoso.com/owa'
Set-WebServicesVirtualDirectory -ExternalUrl 'https://mail.contoso.com/ews/exchange.asmx'
-Force:$true
Set-ActiveSyncVirtualDirectory -ExternalUrl 'https://mail.contoso.com/Microsoft-Server-
ActiveSync'
While the identity parameter isn’t visible in the log, you won’t be able to simply copy-and-paste these cmdlets and run them without an error. This is because an identity parameter is required and must be supplied. Also note the absence of the MAPI virtual directory. Future updates should address the lack of the MAPI virtual directory configuration. Until then, you must set an external URL on it manually.
You can also use the cmdlets listed earlier and switch the ExternalUrl parameter with the InternalUrl parameter to configure an internal URL on each virtual directory. The following example shows how to set the internal URLs on each virtual directory, including the MAPI virtual directory:
Set-PowerShellVirtualDirectory -InternalUrl 'https://mail.contoso.com/powershell'
Set-EcpVirtualDirectory -InternalUrl 'https://mail.contoso.com/ecp'
Set-OABVirtualDirectory -InternalUrl 'https://mail.contoso.com/OAB'
Set-OWAVirtualDirectory -InternalUrl 'https://mail.contoso.com/owa'
Set-WebServicesVirtualDirectory -InternalUrl 'https://mail.contoso.com/ews/exchange.
asmx' -Force:$true
Set-ActiveSyncVirtualDirectory -InternalUrl 'https://mail.contoso.com/Microsoft-Server-
ActiveSync'
Set-MAPIVirtualDirectory -InternalUrl 'https://mail.contoso.com/mapi'
You might have noticed that in the previous examples, the same DNS name, mail.contoso.com, was used for both internal and external URLs. This simplifies the namespace planning, but requires split-brain DNS infrastructure, as discussed earlier.
When you change an internal or external URL on either a OWA (or ECP) virtual directory using Shell, you also get a warning, informing you that you changed URL on the OWA virtual directory and you must also change it on the ECP virtual directory.
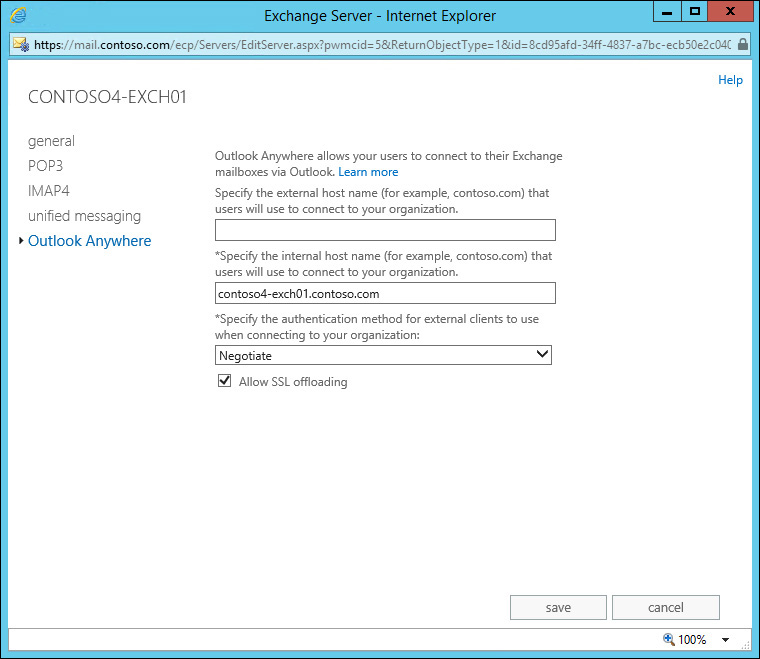
As we configure all required URLs, there’s one more URL to configure. And this is also one of the very important URLs. It’s the Outlook Anywhere URL, used by Outlook clients to connect. This URL can be changed from the EAC from Client Access server properties. Figure 2-9 shows the default configuration of Outlook Anywhere in which the external URL is empty and the internal URL is set to FQDN of the Client Access server.
You can simply change URLs for Outlook Anywhere clients from here or use the Shell. If using Shell, the cmdlet you issue would look similar to the following:
Set-OutlookAnywhere `
-ExternalHostname 'mail.contoso.com' `
-InternalHostname 'mail.contoso.com' `
-ExternalClientsRequireSsl:$strue `
-InternalClientsRequireSsl:$true `
-ExternalClientAuthenticationMethod 'Negotiate' `
-Identity 'Server01Rpc (Default Web Site)'
You need to configure this for each Exchange 2013 Client Access server in the environment. Also, when deploying in a coexistence environment where an older version of Exchange servers exist, it’s important to note that negotiated authentication isn’t supported by earlier versions. If the user mailbox is located on Exchange 2013 server and the user tries to connect to public folders or a shared mailbox located on the Exchange servers running Exchange 2010 or Exchange 2007, the users can encounter issues. These issues include a repeated authentication prompt and the inability to access the resource if the authentication is set to negotiate. In the coexistence environment, set the authentication method to other valid choices, such as NTLM.
URL management couldn’t be simpler in Exchange 2013, despite the existence of the Exchange Back End website, as visible in IIS. While this website is essential and is used to proxy traffic from the CAS server to the Mailbox server, with the Mailbox server being the back end, you only need to configure URLs on the Default Web Site. Protection against error is provided by surfacing only the relevant virtual directories when using EAC or the Get-*VirtualDirectory cmdlets. The virtual directories that exist in the Exchange Back End website are not visible when running Get-*VirtualDirectory cmdlets.
Planning for certificates
Certificate planning for any deployment is directly tied to the planning of namespaces. When it comes to selecting the right type of SSL certificate, knowing the required namespaces and the type of certificate makes the process efficient.
Besides the namespaces discussed earlier, you also need to consider whether split-brain DNS is in use. If the environment uses an internal domain name that is different from the external domain name, and the internal domain name isn’t a publicly registered domain name, such as contoso.local, you also need to account for the new certificate requirements set forth by the CA/Browser forum. These new requirements state that certification authorities (CAs) cannot issue new certificates that contain an internal server FQDN that can’t be externally verified as owned by the organization requesting the certificate, if the certificate expires after November 1, 2015.
This requirement creates a unique problem for environments with internal private namespaces. Because you can only assign one certificate to a given service, such as IIS, you can’t have two different certificates, one containing appropriate internal names issued by an internal CA and another containing appropriate external names issued by an external CA.
One solution is to rename the internal domain. This is a daunting task at best, considering all the dependencies a domain name might have not only limited to an Exchange organization, but also with other systems and business applications in use.
Another, and a more elegant solution, is to create appropriate certificates containing internal names, issued by the internal CA. Assign these certificates to Client Access servers. Obtain certificates containing public names from a trusted third-party CA. These certificates are assigned to all external access points, which can be a reverse proxy solution, such as a TMG server or even a load balancer that’s designated to handle external client traffic. Using this approach, external clients negotiate with an endpoint that’s presenting certificate issued by a trusted CA and containing only externally verifiable domain names. The connection from areverse proxy device or a load balance to the Client Access server is encrypted using the certificate containing the internal private domain name issued by the internal CA and assigned to the appropriate services on Exchange server, including IIS.
Another consideration when planning for certificates is a wildcard certificate. While a wildcard certificate is supported by Exchange 2013, you must ensure all of the applications integrating with Exchange and whether they support wildcard certificates. For example, when you enable the Unified Messaging integration with Lync server, the Subject Name (also known as Certificate Principal Name) as presented by the certificate must be a non-wildcard name. You can, however, have a wildcard in the Subject Alternate Name (SAN).
When using the wildcard certificate with Outlook Anywhere, you must set the Outlook provider settings to indicate that the certificate principal name is a wildcard. You must set the same for both EXCH and EXPR providers. EXCH setting is used for the Exchange RPC protocol used internally and includes internal URLs. EXPR refers to HTTP protocol used by Outlook Anywhere clients and includes external URLs. The cmdlets to configure EXCH and EXPR for use with a wildcard certificate are as follows:
Set-OutlookProvider EXCH -CertPrincipalName msstd:*.contoso.com
Set-OutlookProvider EXPR -CertPrincipalName msstd:*.contoso.com
When considering a simple configuration that is using only two namespaces, autodiscover.contoso.com and mail.contoso.com, and isn’t planning to use wildcard certificates, you need to use a SAN certificate that contains both names and is issued by a trusted CA.
The same also applies when you have multiple regional namespaces. The difference, however, is that you have more than two names. You have one for Autodiscover, and one or more names for each regional datacenter. The number of names per location depends on which of the namespace design models, as discussed earlier, is in use.
You also need certificates for TLS used for transport, whether opportunistic or mutual. You can use a self-signed certificate if mutual TLS negotiation isn’t required. Mutual TLS negotiation only passes when the certificate assigned to SMTP service is issued by a trusted CA.
Lastly, you need to consider Unified Messaging (UM) certificate requirements if you plan to deploy UM with Lync servers. UM has two components: Exchange UM service is located on Mailbox servers, whereas UM call router service is located on CAS servers. For each service, you must include server FQDN in the certificate. If the server FQDN contains an internal private domain name, a trusted third party CA might not issue the certificate due to the restrictions discussed earlier. You might need to issue a separate certificate for UM using internal CA that’s mutually trusted by Exchange and Lync servers.
To avoid confusion and misconfiguration, Exchange 2013 provides a wizard to create and assign certificates. The wizard also makes the process of creating and assigning certificates much easier when compared with cmdlets that you must manually issue if you were to use Exchange Management Shell. You can access the certificate wizard user interface (UI) from EAC using the Servers menu item and by selecting the Certificates tab. Click New (+) to start the New Certificate Wizard. The first dialog box presents you with a choice to create a self-signed certificate or to create a request that can be submitted to a CA. After selecting to create a request, you’re presented with a field for a friendly name. The name you use here is visible in the Name column of the Certificates tab. The next option is to request a wildcard certificate, if desired. When you proceed without selecting the check box, you’re presented with selecting the Exchange server where you want to store the certificate. Select one of your Client Access servers and proceed further. Next, you’re presented with a dialog box that provides a list of client types and associated FQDN. If you populated all of the URLs discussed earlier, this dialog box reflects both the internal and external namespaces you configured. The dialog box also includes both POP and IMAP namespaces, which defaults to the server name, which isn’t a server FQDN. If you haven’t deployed POP and IMAP, these namespaces can be removed in the next step. You also need to remove all internal namespaces if your internal namespace is a private domain name that can’t be resolved externally and you plan to obtain a certificate from the external certificate authority due to restrictions discussed earlier. The Domain Name Selection dialog box looks similar to Figure 2-10.
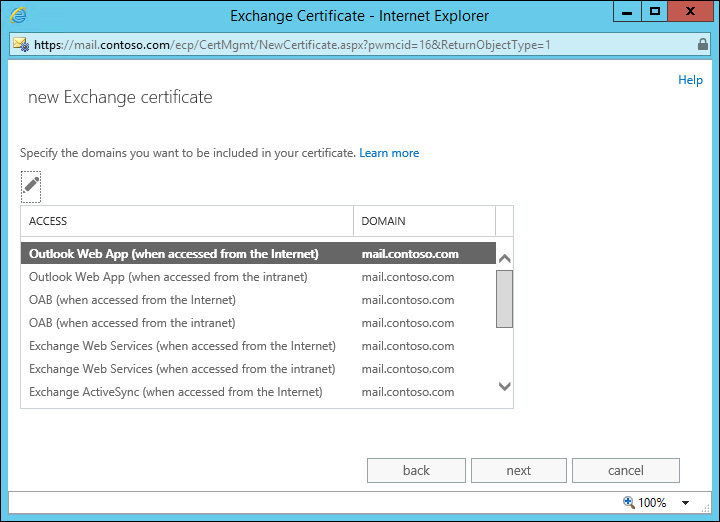
While this dialog box lists the same domain name mail.contoso.com multiple times, when you proceed to the next step, the duplicates are removed to create a list of unique namespaces derived from this dialog box. This would normally contain an Autodiscover namespace, a primary namespace such as mail.contoso.com, and a server name for POP/IMAP. You can safely remove the server name if POP/IMAP isn’t in use. You might have more namespaces displayed if you used different domain names for each workload when configuring URLs, as discussed earlier.
You can also select which one of the listed namespaces should be the common name, also known as the subject name or the certificate principal name. Usually, this is your primary namespace, such as mail.contoso.com.
In the next dialog box, you’re required to provide organization information, such as Organization Name, Department Name, and Address details. Third-party certificate-issuing authorities require this information to be accurate for verification.
The next step requires you to select a shared location where the request is to be stored. Ideally, this location is an Exchange server because it has required file level permissions. If you chose a server that isn’t an Exchange server, ensure that the Exchange Trusted Subsystem has permissions to write to the share specified.
The entire wizard can be summed up into the following cmdlet:
New-ExchangeCertificate `
-PrivateKeyExportable:$true `
-FriendlyName 'Trusted Certificate' `
-SubjectName 'C=US,S="WA",L="Redmond",O="Contoso",OU="IT",CN=mail.contoso.com' `
-DomainName @('mail.contoso.com','AutoDiscover.Contoso.com') `
-RequestFile '\contoso4-exch01c$certreq.txt' `
-GenerateRequest:$true `
-Server 'Contoso4-Exch01' `
-KeySize '2048'
At this point, you now have a certificate request file that can be submitted to the certificate issuing authority. The server you selected in the process also contains a private key that corresponds to the certificate request. The Certificates tab of EAC will display a certification with a pending request.
When the CA issues the certificate, you can click complete on the pending request or issue the following cmdlet:
Import-ExchangeCertificate -PrivateKeyExportable:$true -FileName '\contoso4-exch01c$
certnew.cer' -Server 'Contoso4-Exch01'
When complete, the certificate request process is finished. You can now assign the certificate to the appropriate services using the Enable-ExchangeCertificate cmdlet. You can also now export the certificate and import it on other Exchange servers, either using the cmdlets or the Certificate Export/Import Wizards from EAC.
As discussed earlier, both the Client Access servers and the Mailbox servers have self-signed certificates created and assigned during the installation. However, you don’t need to manage certificates installed on the Mailbox servers. All clients connect through Client Access servers and are presented with a certificate installed on the Client Access server. The Client Access server connects to the Mailbox server and it automatically trusts the self-signed certificate on the Mailbox servers. So the clients won’t receive a certificate trust warning due to a self-signed certificate on the Mailbox servers as long as trusted certificates are correctly installed on the Client Access servers.
Configuring authentication methods
When configuring the Exchange 2103 environment, one of the key considerations is what authentication method to use to authenticate the clients. Most commonly, the default configuration of each virtual directory is sufficient and shouldn’t need to be changed. However, there are scenarios that occur when you might want specific authentication configuration for a given workload.
The authentication methods available in general are Negotiate, NTLM, and Basic. The Negotiate process allows clients to select between Kerberos and NTLM authentication. NTLM is selected for authentication when the Outlook client provides insufficient information to use the Kerberos authentication. When an Outlook client connects from an internal domain-joined machine, it can connect to the Exchange server and provide Kerberos with the authentication information required to connect.
When an external client connects to the Exchange server, because it doesn’t have connectivity to the domain controller, even if it’s a domain-joined laptop user working from home, it falls back to NTLM authentication. This is because the required Kerberos information isn’t present.
By default, however, Outlook Anywhere is configured to use Negotiate as an external client authentication method and NTLM as an internal client authentication method. If you’re using a single namespace for internal and external clients, as discussed earlier, Outlook uses the authentication method configured for internal clients.
Exam Tip
Pay close attention to the namespace configuration and client configuration, such as domain joined laptop vs. user’s personal computer at home running Outlook client. These factors affect your selection of authentication mechanisms and which ones can be effective for a given scenario.
The configuration of firewalls, load balancer devices, or reverse proxy solutions, such as Microsoft TMG, also affect Kerberos and NTLM functionality. For example, if a firewall examines HTTP traffic and modifies it in any way, the trust of authentication is broken due to “man in the middle” configuration. In such configurations, Kerberos and NTLM don’t work due to protocol security requirements. Without an additional server configuration to account for such networks, only Basic authentication can work. For NTLM to work for external clients in such a scenario, additional configuration, such as Kerberos Constrained Delegation, is required to trust the intermediary device that sends authentication to servers on the client’s behalf.
Another consideration for selecting the appropriate authentication is user experience in environments where reverse proxies such as Microsoft TMG are deployed and configured to use pre-authentication. In such scenarios, the client authenticates to the reverse proxy device and the reverse proxy, in turn, sends authentication to the servers. If the user is logging into OWA, for example, then the user is presented with the FBA form that is generated by the reverse proxy server. When the user provides the authentication information, the reverse proxy sends the information to the Exchange server. The default configuration for OWA, however, is to use FBA. If the configuration isn’t changed from the default, the user will see the FBA logon screen generated by the Exchange server. This makes up for unpleasant and undesired user experience. To remove the extra authentication prompt, you must configure Exchange servers to use basic authentication, so that reverse proxy devices can send the authentication to the servers and authenticate users without an additional authentication prompt. When using basic authentication, you must also ensure the connection between the reverse proxy device and the Exchange server is also encrypted with SSL for security.
Also consider user experience when connecting internally. Internal clients usually don’t connect to reverse proxy devices described earlier when connecting to Exchange servers internally. Because they could connect directly to Exchange servers bypassing reverse proxy, and FBA logon experience presented by reverse proxy, they might now get the basic authentication prompt when connecting to OWA if you configured Exchange to use basic authentication for the OWA virtual directory.
While it’s beyond the scope of the exam and thus, this book, configuring Exchange 2013 Service Pack 1 is also possible, and later, using Active Directory Federated Services (AD FS) to provide authentication for Exchange 2013 clients. When configuring Exchange for AD FS authentication, you can benefit from advanced claims functionality offered by AD FS, which allows you to set restrictions on client location and other behavior. You can also use smart card authentication or Azure two-factor authentication to further secure access to Exchange environment.
Also worth noting is that while you can change authentication methods on IIS directly, the configuration is managed by Exchange server and is periodically overwritten with parameters configured on Exchange servers. The preferred mechanism to manage Exchange client authentication parameters is to configure them using Exchange Shell or EAC.
![]() Thought experiment: Namespace planning
Thought experiment: Namespace planning
1. Is it possible to use a unified namespace in such deployment?
2. What is the minimum number of namespaces required?
Objective summary
![]() Namespace planning, certificate planning, and load-balancing configuration are interdependent for any Exchange 2013 deployment.
Namespace planning, certificate planning, and load-balancing configuration are interdependent for any Exchange 2013 deployment.
![]() Configuring appropriate authentication methods must account for the configuration of intermediary devices, such as firewalls, reverse proxy servers, and load balancers.
Configuring appropriate authentication methods must account for the configuration of intermediary devices, such as firewalls, reverse proxy servers, and load balancers.
![]() Exchange 2013 CAS server proxy logic is applied differently to different versions of legacy Exchange servers. This directly impacts namespace planning and configurations in coexistence environments.
Exchange 2013 CAS server proxy logic is applied differently to different versions of legacy Exchange servers. This directly impacts namespace planning and configurations in coexistence environments.
![]() The wizard-driven configuration of an external namespace simplifies administration. Internal namespaces must be configured manually, however, either using Shell or EAC.
The wizard-driven configuration of an external namespace simplifies administration. Internal namespaces must be configured manually, however, either using Shell or EAC.
![]() Certificate configuration is simplified in Exchange 2013 by certificate management user interface (UI). Creating an appropriate certificate request is easier if internal and external namespaces are configured before using the Certificate Wizard.
Certificate configuration is simplified in Exchange 2013 by certificate management user interface (UI). Creating an appropriate certificate request is easier if internal and external namespaces are configured before using the Certificate Wizard.
Objective review
Answer the following questions to test your knowledge of the information in this objective. You can find the answers to these questions and explanations of why each answer choice is correct or incorrect in the “Answers” section at the end of this chapter.
1. You are an Exchange administrator for Contoso, Ltd. You just deployed an Exchange 2013 server running CAS and Mailbox role. You haven’t changed load balancer and reverse proxy servers to include the new CAS server. Internal users are reporting that they’re receiving popups regarding an untrusted certificate. Select two actions you must perform to resolve the issue.
A. Run the Set-ClientAccessServer cmdlet.
B. Run the Set-AutodiscoverVirtualDirectory cmdlet.
C. Request a certificate from a trusted CA and assign it to IIS.
D. Configure internal namespace to resolve to load balanced IP.
2. Contoso has deployed Exchange 2013 in multiple locations. You need to change the external URL for all locations to use the unified namespace. What must you do to complete the task? Select all that apply.
A. Configure the External Access Domain Using Wizard from EAC; select all CAS servers from multiple locations.
B. Configure the External Access Domain Using Wizard from EAC; select CAS servers from each location. Run the wizard once per location.
C. Run the Set-OutlookAnywhere cmdlet.
D. Run the Set-MapiVirtualDirectory cmdlet.
3. Contoso has deployed Exchange 2013 and Lync 2013. Multiple locations are assigned regional namespaces. Lync will be integrated with UM for voicemail. You need to determine the appropriate certificate type. Which certificate should you choose?
A. A self-signed certificate.
B. A Unified Communications (UC) SAN certificate from internal CA.
C. A UC SAN certificate from external CA.
D. A wildcard certificate.
Objective 2.3: Deploy and manage mobility solutions
Mobile access to email has become increasingly important to organizations of all sizes. Exchange was an early leader, first by delivering the first full-featured web client (Outlook Web Access made its debut in Exchange 5.5), and then by delivering the first truly integrated email sync system, delivered in Exchange 2003 Service Pack 1 (SP1). That system, known as Exchange ActiveSync (EAS), is still a key part of Exchange 2013 and Exchange Online, although the EAS code and the sync protocol itself have evolved quite a bit since their introduction.
One thing you should know about EAS is that it combines two different aspects of mobile device access: synchronization and device management. EAS is normally used to synchronize data between the server and the devices, but it also includes management policies that you can use to control which users are allowed to sync, what types of devices can connect to your Exchange servers, and what policies (such as password strength) those devices must apply. Most of the questions you are likely to see on the 70-341 exam relate to device and policy management. This is because the basic sync operations don’t require any setup or adjustment once you enable a user for EAS and they’ve paired their device with Exchange.
Another thing to remember is that a multistep process is required before a device is allowed to synchronize. First, the device must be able to connect to an Exchange CAS. Second, once it connects, the device must be able to supply a valid set of credentials for a user who has an Exchange mailbox. And, third, that user must have permission to use EAS. If all three of these requirements are true, then the device can attempt to synchronize. It might be unable to, though, depending on what limits you set on which device types are allowed.
EAS itself isn’t the only mobility solution that Exchange supports, of course. First, Outlook Web App still runs well on a wide variety of tablets and mobile devices. For example, you can comfortably use OWA 2013 on an Apple iPad running iOS, a Windows desktop running Google Chrome, or a Google Android tablet. Second, in 2013, Microsoft introduced its own line of email clients for Apple iOS and Google Android devices. These clients are collectively known as “OWA for Devices,” but internally (and on the 70-341 exam), Microsoft refers to this family as “”Mobile OWA” or just “MOWA.” In 2015, Microsoft released a new Outlook app (based on their acquisition of Acompli) for iOS and Android devices, followed by a touch-friendly “universal” version of Outlook for Windows 10. Finally, there are a number of device management tools (including the Microsoft InTune and products from Good Technologies and others) that either supplement or replace the device management and policy features of EAS. These products won’t be discussed any further.
This objective covers how to:
![]() Deploy Mobile OWA (MOWA)
Deploy Mobile OWA (MOWA)
![]() Configure OWA policies
Configure OWA policies
![]() Configure Microsoft ActiveSync policies
Configure Microsoft ActiveSync policies
![]() Configure allow/block/quarantine
Configure allow/block/quarantine
![]() Deploy and manage Office Apps
Deploy and manage Office Apps
Deploying Mobile OWA
OWA for Devices is designed as a replacement for the built-in mail and calendar clients on iOS and Android. By releasing OWA for Devices, Microsoft is trying to simultaneously address two weak areas of Exchange support for these devices. First, a number of features are included in OWA and/or EAS that aren’t included in the built-in apps. Apple and Google have little incentive to support new features in Exchange as Microsoft deploys them, so features such as support for Office 365’s Clutter feature have not been available on mobile clients. Second, the way that remote device wipes are implemented in EAS means that the device manufacturers have chosen to erase the entire device when a valid remote wipe command arrives. This is very user-unfriendly because it erases all of the data on the device, not just data that was being synchronized with Exchange—so family photos, personal email, photos, and applications that belong to the device user vanish along with data belonging to the user’s workplace. Because OWA for Devices includes its own separate storage mechanism, a wipe command or removing the app from the device removes all of the data synchronized with Exchange.
Microsoft has made OWA for Devices available in the Apple App Store and the Google Play Store. As an administrator, you can push these applications to managed mobile devices if you are using a device management solution that supports application push, or users can install the application themselves. Setup is simple. The user needs only to enter an email address and password, and the app then uses Exchange Autodiscover to locate the appropriate CAS server and connect. Interestingly, OWA for Devices looks to Exchange as a sort of an OWA client, rather than a pure EAS client. This is because OWA for Devices consumes the same rendering code that OWA uses. As new features are added to OWA, they immediately become visible in OWA for Devices. For example, as soon as Microsoft added the People view to Office 365 Exchange Online, the People view appeared in OWA for Devices for users who connected to an Exchange Online mailbox.
By default, every user in your Exchange organization can connect to their mailbox with OWA for Devices. If you want to change this, use the Set-CASMailbox cmdlet with the OWAforDevicesEnabled parameter. For example, to disable OWA for Devices for all members of the Research distribution group, you could use something like the following:
Get-DistributionGroupMember "Research" | `
Set-CASMailbox -OWAforDevicesEnabled $false
Disabling a user who already has OWA for Devices installed doesn’t remove the app (or your synchronized data) from their devices. If you want to ensure that the data was removed, you must issue a wipe command to the device using the Clear-MobileDevice cmdlet or the Mobile Devices tab in EAC.
Configuring OWA policies
Exchange 2013 enables you to define Outlook Web App policies to control the OWA features that users have access to. Just like the other policy types that Exchange supports, Outlook Web App policies let you create a group of settings, and then apply those settings to mailboxes without having to modify the settings on the individual mailboxes. All of the features Outlook Web App policies can control can also be controlled by changing settings on an individual Mailbox server. Many of them can be modified by changing settings on user mailboxes.
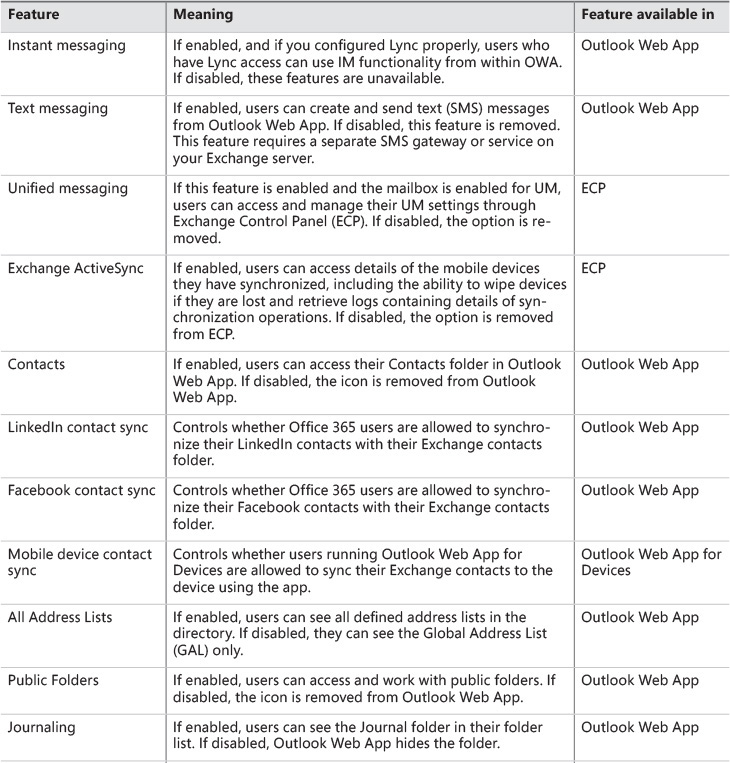
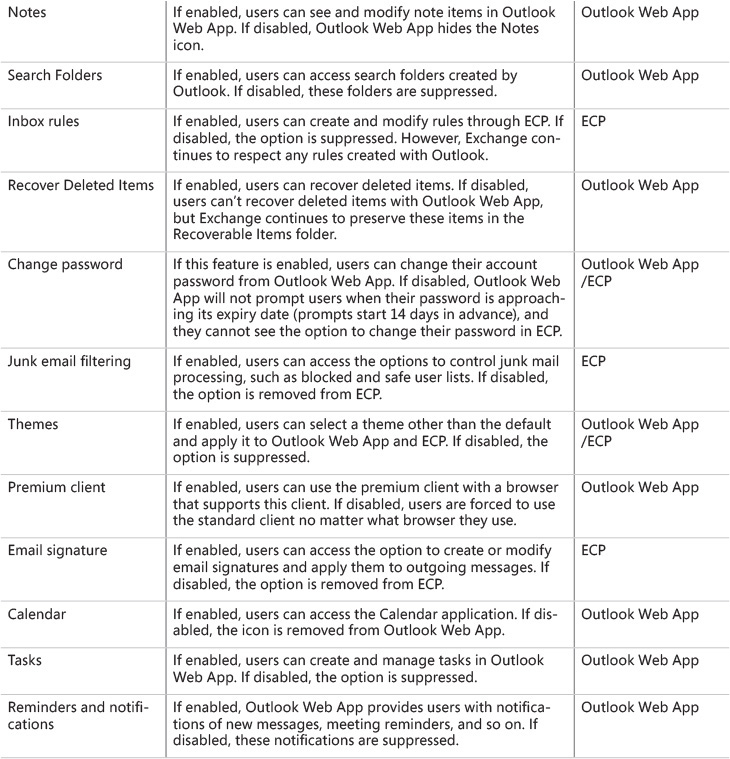
Speaking of settings: Table 2-1 shows the policy settings available in OWA mailbox policies. Remember that the features you enable or disable in a policy only control whether the user can access those features in OWA. They don’t grant or deny those features to the user. For example, if you have an OWA mailbox policy that enables unified messaging and you assign it to some users, those users won’t see any UM UI unless their mailbox is enabled for UM.
Exchange includes a default Outlook Web App policy, but that default isn’t applied to any mailboxes. You have to manually apply the policy if you want to use it. You can create as many Outlook Web App mailbox policies as you like, and then apply a maximum of one Outlook Web App policy to each mailbox. If you don’t apply any policies to a mailbox, a user’s access to Outlook Web App features is controlled by the segmentation properties defined for the Outlook Web App virtual directory on each CAS server by Set-OWAVirtualDirectory.
Figure 2-11 shows the EAC view for Outlook Web App mailbox policies, which you use to create and modify policies. To get there, open EAC, switch to the Permissions slab, and then select the Outlook Web App Policies tab.

FIGURE 2-11 OWA policies section of EAC shows you which policies are defined and what settings are part of the currently selected policy
Creating and managing policies in EAC
The easiest way to control what users can do in OWA, assuming you want all users to have the same settings, is to modify the policy named Default, and then apply its settings to users. If you prefer, you can create a new policy with the + icon. In that case, you get the OWA mailbox policy dialog box shown in Figure 2-12. This dialog box contains nearly all of the OWA mailbox policy settings listed in the previous Table 2-1. The settings that aren’t shown become visible when you click the More Options link.
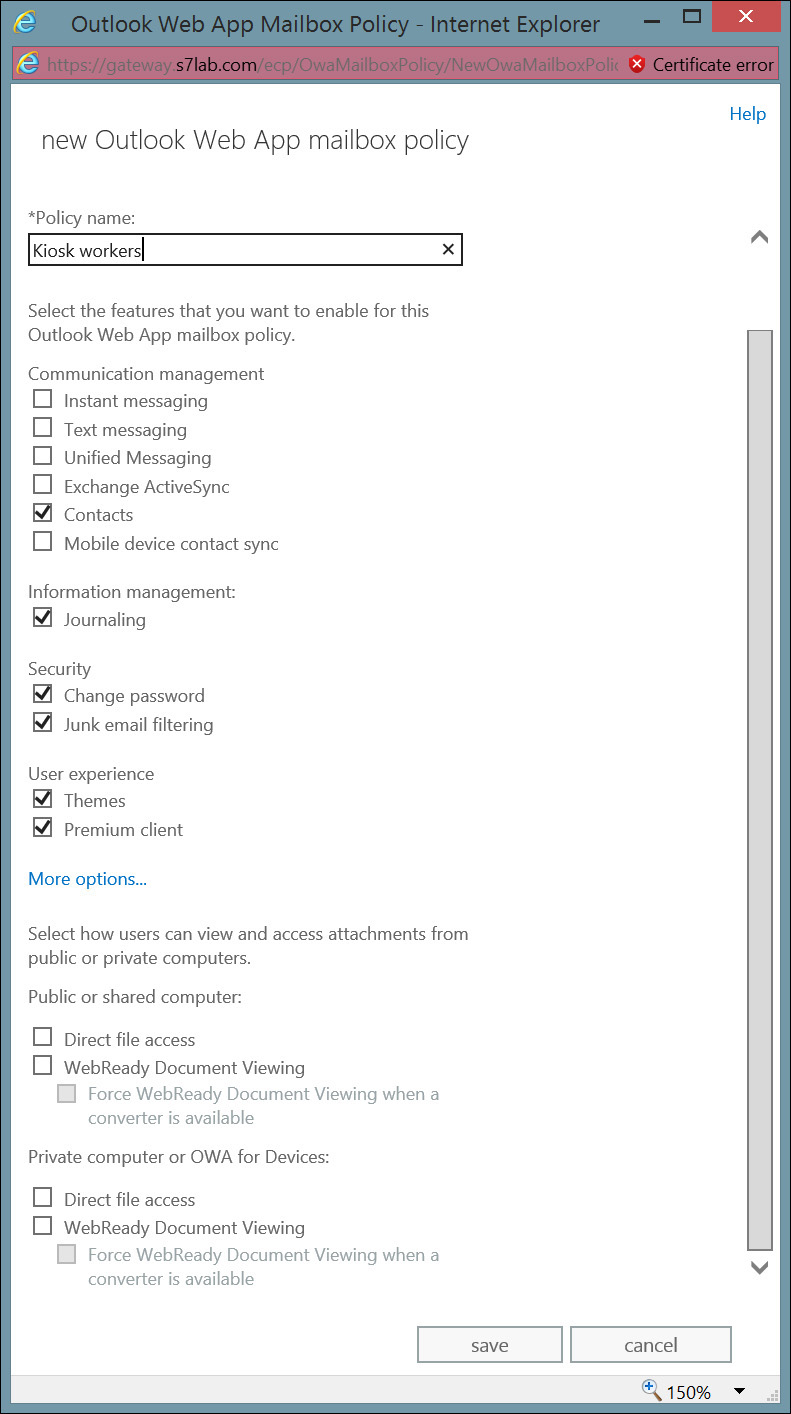
FIGURE 2-12 Use the New OWA mailbox policy to create a policy with the settings you want applied to recipients of the policy.
For any OWA policy you create, you can edit it by selecting it in EAC and clicking the pencil icon in the toolbar, or just by double-clicking it. This brings up a different dialog box, as shown in Figure 2-13. This dialog box contains the same policies as the version in Figure 2-12, but they are arranged into a slightly less-confusing tabbed interface.
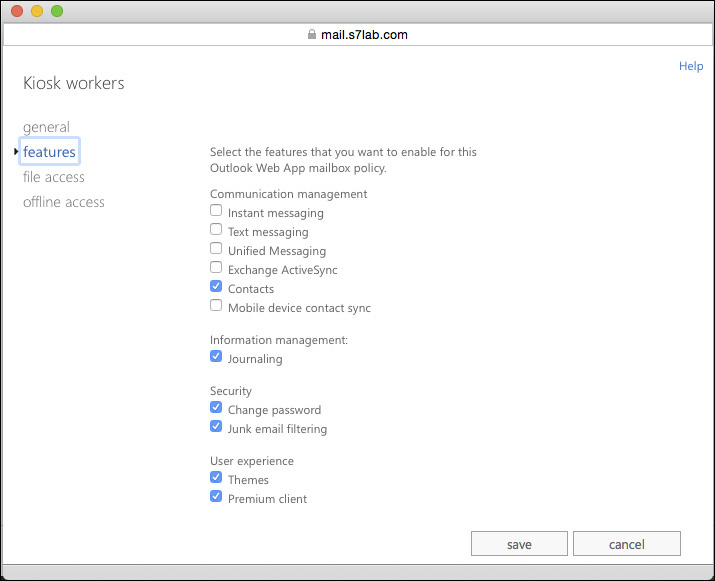
FIGURE 2-13 The New OWA mailbox policy section of EAC shows you which policies are defined and what settings are part of the currently selected policy
In either case, once you have the policy settings configured the way you want them, the next step is to apply the policy to the users who should have it. In EAC, the only way to do this is to do the following:
1. Open EAC and switch to the Recipients slab.
2. Double-click the user to whom you want to apply the policy (or select the user, and then click the pencil icon). The user’s mailbox properties dialog box opens.
3. Switch to the Mailbox Features tab.
4. Scroll down until you see the Email Connectivity section, and then click View Details.
5. A dialog box opens (Figure 2-13) so that you can select the policy you want to apply to this mailbox. Select it, and then click Save to close this dialog box.
6. Click Save in the mailbox properties dialog box to save your policy selection.
Obviously, this process would be quite tiresome if you had to do it for large numbers of users. In such a case, you’d probably be better off using EMS, as described in the next section.
Creating and managing OWA policies in EMS
A new policy can also be created with EMS. For some odd reason, this is a two-step process. First, you create the new policy with the New-OWAMailboxPolicy cmdlet, and then you use the Set-OWAMailboxPolicy cmdlet to define which features are enabled or disabled by the policy. For example, here’s a policy that allows users to use the premium client, while removing some of the more esoteric or less-used features:
New-OWAMailboxPolicy -Name 'Limited OWA features'
Set-OWAMailboxPolicy -Identity 'Limited OWA features' `
-ActiveSyncIntegrationEnabled $True `
-AllAddressListsEnabled $True `
-CalendarEnabled $True `
-ContactsEnabled $True `
-JournalEnabled $True `
-JunkEmailEnabled $True `
-RemindersAndNotificationsEnabled $True `
-NotesEnabled $false `
-PremiumClientEnabled $True `
-SearchFoldersEnabled $False `
-SignaturesEnabled $false `
-ThemeSelectionEnabled $False `
-UMIntegrationEnabled $False `
-ChangePasswordEnabled $True `
-RulesEnabled $True `
-PublicFoldersEnabled $False `
-SMimeEnabled $false `
-RecoverDeletedItemsEnabled $True
A number of Outlook Web App mailbox policy settings are also only available through EMS, including settings for controlling whether users are allowed to use delegate access permissions if they have them (DelegateAccessEnabled and ExplicitLogonEnabled), plus various other settings that are described in the Set-OWAMailboxPolicy documentation on TechNet (see https://technet.microsoft.com/library/dd297989.aspx).
To apply an OWA mailbox policy to a user or a set of users, you use the Set-CASMailbox cmdlet. The beauty of this approach is that you can quickly apply OWA mailbox policies to large collections of mailboxes based on OU or a distribution list membership, or any other criterion that you can think of. For example, to grab all the mailboxes that belong to the Huntsville organizational unit and apply the Factory OWA mailbox policy, you only need one line of code:
Get-Mailbox -OrganizationalUnit 'Huntsville'| `
Set-CASMailbox -OwaMailboxPolicy 'Factory'
Configuring Exchange ActiveSync Policies
You don’t have to do anything to enable your users to synchronize their mobile devices by using EAS. Exchange already enables the protocol for all users by default. However, you have some fairly flexible options for controlling which devices are allowed to sync and what they can do once they do (as described in the section “Configure allow/block/quarantine policies” later in this chapter).
Turning EAS on or off
No global Off switch exists for EAS. If you want to disable EAS for all users, you have two options:
![]() You can use Get-CASMailbox | Set-CASMailbox -ActiveSyncEnabled:false to turn off EAS for all existing mailboxes. However, as soon as you create a new mailbox, it’s enabled for EAS by default, unless you use a cmdlet extension agent to run a script to disable it (or you do so manually). See http://eightwone.com/2012/06/19/postconfiguring-mailboxes-cmdlet-extension-agents-part-2/ for a primer on how to work with cmdlet extension agents.
You can use Get-CASMailbox | Set-CASMailbox -ActiveSyncEnabled:false to turn off EAS for all existing mailboxes. However, as soon as you create a new mailbox, it’s enabled for EAS by default, unless you use a cmdlet extension agent to run a script to disable it (or you do so manually). See http://eightwone.com/2012/06/19/postconfiguring-mailboxes-cmdlet-extension-agents-part-2/ for a primer on how to work with cmdlet extension agents.
![]() You can use a firewall product such as Kemp Technology ESP or various products from F5 (or even the venerable ISA/TMG product line) to block or allow access to the EAS virtual directory based on user ID or group membership. This approach enables you to let users on the corporate network sync, while preventing sync from the Internet except for permitted users.
You can use a firewall product such as Kemp Technology ESP or various products from F5 (or even the venerable ISA/TMG product line) to block or allow access to the EAS virtual directory based on user ID or group membership. This approach enables you to let users on the corporate network sync, while preventing sync from the Internet except for permitted users.
Three other ways of disabling EAS will work and you might see them mentioned in exam questions. They aren’t good choices for use with Exchange 2013. This is because Managed Availability interprets them as an application failure and then tries to “fix” your changes, possibly by rebooting your servers we advise you not to use them, but they’re included here for completeness:
![]() You can remove the EAS virtual directory on all your Internet-facing CAS servers with the Remove-ActiveSyncVirtualDirectory cmdlet. This is easy to do, but it requires you to re-create the virtual directory later if you ever want to use EAS again. You can do this with the New-ActiveSyncVirtualDirectory cmdlet.
You can remove the EAS virtual directory on all your Internet-facing CAS servers with the Remove-ActiveSyncVirtualDirectory cmdlet. This is easy to do, but it requires you to re-create the virtual directory later if you ever want to use EAS again. You can do this with the New-ActiveSyncVirtualDirectory cmdlet.
![]() You can disable all authentication methods on the EAS virtual directory of all Internet-facing CAS servers. This effectively prevents any client from connecting through EAS, and it’s easy to change back if you want to enable it in the future.
You can disable all authentication methods on the EAS virtual directory of all Internet-facing CAS servers. This effectively prevents any client from connecting through EAS, and it’s easy to change back if you want to enable it in the future.
![]() You can use the Internet Information Services (IIS) management tools to stop the MSExchangeSyncAppPool application pool. This prevents the EAS server component from running. You must do this on all servers, and it might restart when the server restarts.
You can use the Internet Information Services (IIS) management tools to stop the MSExchangeSyncAppPool application pool. This prevents the EAS server component from running. You must do this on all servers, and it might restart when the server restarts.
Mobile device mailbox policies
Exchange starts with a single default mobile device mailbox policy. You can create new policies and assign them to users but, by default, every user gets the default policy. For many organizations, that’s enough because they want to apply the same policies to all users. However, if you want different settings for different users, you can do that by creating multiple policies and apply them. You can change the policy that is applied to a mailbox at any time. For example:
Set-CASMailbox -Identity 'Shukla, Bhargav' -ActiveSyncMailboxPolicy "Research"
Most of the settings included in mobile device mailbox policies are self-explanatory. Figure 2-14 shows the window that appears when you create a new policy. The same settings are available when editing a policy through EAC, but they’re separated into two tabs (General and Security). Selecting the This Is The Default Policy check box tells Exchange to apply this policy to all mailboxes that are EAS-enabled going forward, and it applies that policy to any device that doesn’t currently have an explicitly assigned policy on its owning mailbox. However, checking that box doesn’t change any existing mobile device mailbox policy assignments.
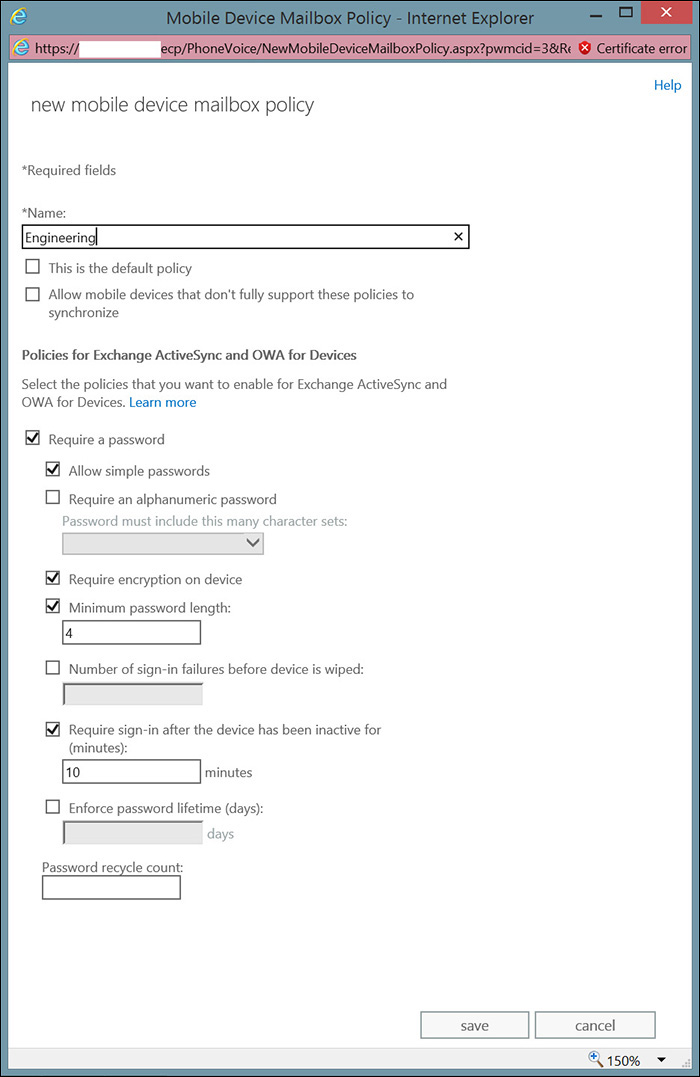
FIGURE 2-14 Creating a new mobile device mailbox policy, so you can choose the password policy that will apply to the device
The Allow Mobile Devices That Don’t Fully Support These Policies To Synchronize check box (and the corresponding AllowNonProvisionableDevices parameter to the Set-MobileDeviceMailboxPolicy cmdlet) is important. A device that recognizes and applies 100 percent of the settings in a policy is said to be fully compliant. Devices that can’t apply some policy settings are partially compliant. They accept the policy, but at least one policy setting can’t be applied, either because it doesn’t apply (for instance, a policy that turns off the camera applied to a device with no camera) or because the device doesn’t honor that particular policy setting (for instance, a policy that turns off Wi-Fi on Apple iOS devices, whose EAS client doesn’t honor that setting). Devices that actively refuse the policy (usually because the user cancels policy application) or that can’t apply the policy are said to be noncompliant. In Exchange 2007 and Exchange 2010, these devices were called nonprovisionable devices, which is a better name because it indicates where the problem lies—the device can’t or won’t accept the policy through the normal provisioning mechanism. When this check box is selected, Exchange allows any device with proper credentials to synchronize, even if it can’t apply the policy. This box is set by default, meaning that customizing the default policy to apply the security settings you want still won’t prevent noncompliant devices from syncing.
Many more policy settings are available when you use the Get/Set-MobileDeviceMailboxPolicy cmdlets, however, it’s important to note that virtually no modern devices actually support the majority of these settings. For example, some policy settings enable you to restrict the use of Bluetooth, the on-device camera, removable storage cards, POP/IMAP, and Internet-access tethering. Of these, only the camera policy is supported on modern devices, and then only by iOS 5+ and Android Ice Cream Sandwich and later. Even Windows Phone 8 doesn’t support the majority of existing EAS policies. This is unlikely to change in the future. If you need to control mobile device behavior beyond the basics of password policy control, you probably need a third-party solution.
Configuring allow/block/quarantine policies
Exchange 2013 lets you define device access rules that control whether specific devices or device families are allowed to connect, whether they are blocked from connecting, or are quarantined until an administrator releases them. This feature is implemented by the device access rules that administrators define to control what devices are allowed to synchronize with the Exchange server.
It’s important to understand that device access rules control whether a given device is allowed to talk to the server at all. If a device access rule exists to allow, block, or quarantine a given device explicitly, that rule controls whether the client can establish an EAS sync partnership. However, this decision doesn’t happen until the device has already connected and authenticated to the Exchange CAS. If the device can’t connect, or if it doesn’t authenticate with valid credentials, the device access rules won’t be checked for that device. Once the partnership is established, mobile device mailbox policies (described in the previous section) are applied to control the settings and the behavior required or banned on the device, but first it must go through the allow/block/quarantine (ABQ) process.
ABQ depends on the fact that each device that connects has a unique ID, known as a DeviceID. Some devices might also provide other unique identifiers, such as a phone number or International Mobile Equipment Identifier (IMEI). You can see these other identifiers in the sync logs, but the DeviceID is the primary key that makes decisions about which devices can connect. Apart from device-unique identifiers, there are other ways to identify devices, such as the device operating system, friendly name, or model. This sample of output from the Get-MobileDevice cmdlet shows these identifiers as provided by the device:
FriendlyName : Yellow Lumia 920
DeviceId : 3A50E6862817DB02477264117CD3F0F6
DeviceImei : 353680056015391
DeviceMobileOperator : AT&T
DeviceOS : Windows Phone 8.10.14219
DeviceOSLanguage : en
DeviceTelephoneNumber : XXX-XXX-XXXX
DeviceType : WP8
DeviceUserAgent : MSFT-WP/8.10.14219
DeviceModel : RM-820_nam_att_100
FirstSyncTime : 7/26/2014 5:18:07 PM
UserDisplayName : betabasement.com/Users/Paul Robichaux
DeviceAccessState : Allowed
DeviceAccessStateReason : GlobalPermissions
ClientVersion : 14.1
ClientType : EAS
When a device connects and authenticates, Exchange then uses the process shown in Figure 2-15 to decide whether it should be allowed to connect. Restrictions can be applied in three places:
![]() A device or device family can be allowed, blocked, or quarantined for an individual user. This is often used to allow certain individuals to use unsupported devices (perhaps for testing) in organizations that normally block nonstandard devices. User-level blocks or allows take precedence over device access rules and the generic rule. Unfortunately, there’s no good way to allow a single user to sync with an entire device family. You have to specify the devices individually.
A device or device family can be allowed, blocked, or quarantined for an individual user. This is often used to allow certain individuals to use unsupported devices (perhaps for testing) in organizations that normally block nonstandard devices. User-level blocks or allows take precedence over device access rules and the generic rule. Unfortunately, there’s no good way to allow a single user to sync with an entire device family. You have to specify the devices individually.
![]() A device class or device family can be allowed, blocked, or quarantined. For example, you might put a block rule in place to keep old versions of Apple iOS devices from connecting because those versions have bugs that can lead to corrupt or missing calendar appointments. You could also use this feature to block beta versions of a given operating system to keep your early adopters in check until the device operating system has been tested.
A device class or device family can be allowed, blocked, or quarantined. For example, you might put a block rule in place to keep old versions of Apple iOS devices from connecting because those versions have bugs that can lead to corrupt or missing calendar appointments. You could also use this feature to block beta versions of a given operating system to keep your early adopters in check until the device operating system has been tested.
![]() Devices or families for which no specific rule exists can be allowed, blocked, or quarantined.
Devices or families for which no specific rule exists can be allowed, blocked, or quarantined.
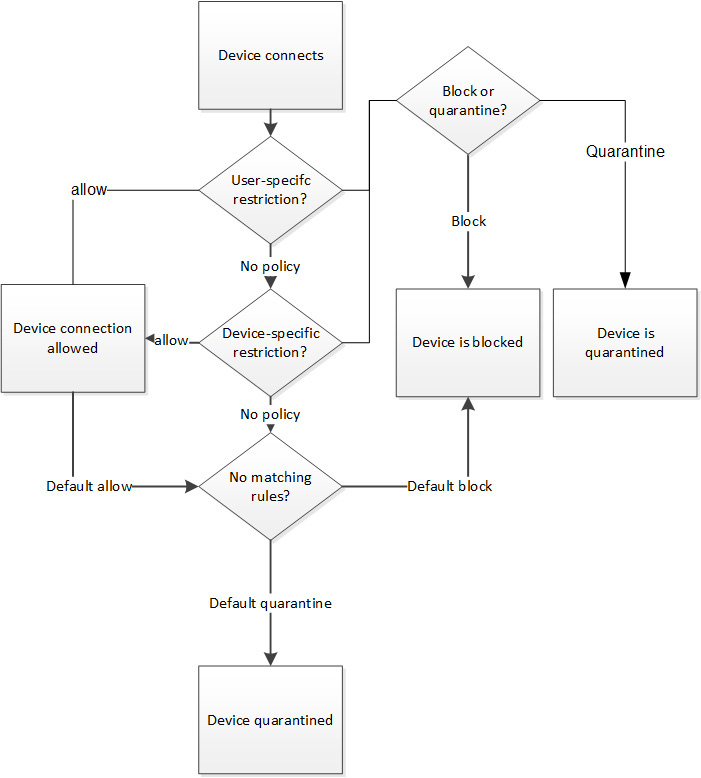
FIGURE 2-15 The device rule evaluation process starts by checking for user-specific restrictions, and then device access rules. If none of these are triggered, the default organizational rule is triggered
This last point is worthy of a bit more discussion because it’s where most organizations define their device connection policy. The default is that any device not specifically blocked elsewhere is allowed to connect. This is perfect for organizations that want to allow unrestricted Bring Your Own Device (BYOD). However, you can choose to configure that default rule to block all devices that aren’t specifically approved elsewhere. This gives you a simple way to control which users and devices are permitted to use EAS. You can also have the default rule quarantine devices that don’t have a specific match, which is useful if you want to be flexible about allowing devices, while retaining some control over new devices. By using this approach, you can allow any device to sync after you approve it.
Managing device access rules
New mobile devices and operating system updates appear all the time, and users buy them. Once they get a shiny new device, it’s natural that they’d want to connect it to their Exchange mailbox. Often, these connections occur without the knowledge or the intervention of an administrator—that’s pretty much the nature of BYOD. This isn’t a problem if everything works properly, but it can become a problem when the device misbehaves in some way. Perhaps, like the original Palm Pre, it doesn’t enforce some part of your EAS policy. Perhaps, as with several versions of the Apple iOS, it contains a bug that hammers your server with excess traffic. At that point, you have a problem to solve.
The way many organizations choose to solve this problem is by using device access rules to control which devices are allowed to connect. This decision can be made based on a very specific combination of device type and operating system, just on the device type, or just on the operating system. For example, you could block all traffic coming from Android 3.x devices, but allow newer devices to connect. Or, you could create a rule that says that any device is quarantined and can’t synchronize until an administrator approves it.
The simplest way to apply this restriction is to click the Edit button in the Mobile Device Access tab of the Mobile slab in EAC. This brings up the EAS global configuration dialog box shown in Figure 2-16. In this dialog box, you can choose the default behavior that should apply to any device that doesn’t match a specific rule or exemption. In Figure 2-16, we chose the Quarantine option, meaning that any new device that connects is quarantined unless it matches a rule or exception that allows it.
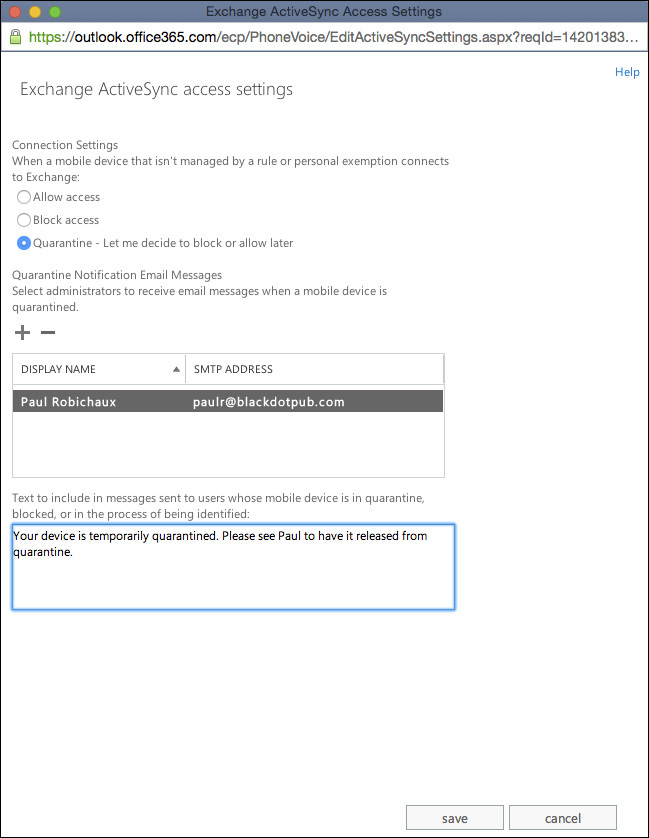
FIGURE 2-16 Modifying the global EAS configuration is the fastest way to block or quarantine all devices that aren’t explicitly approved
After you configure the default behavior, if you chose to quarantine devices that aren’t specifically allowed, you’ll see a list of quarantined devices when you open the Mobile Device Access page in EAC (see Figure 2-17). The icons above the list of devices display device statistics (the pencil icon), allow the device to connect, block it permanently, or create a device access rule.

You can create access rules based on the device type, model, user agent, or operating system. Examples of these values for a third-generation Apple iPad are shown in Figure 2-18. For this specific device, the device type is iPad, the device model is iPad3c1, the user agent is Apple-iPad3C1/1202.435, and the device operating system is iOS 8.1.1 12B435. A little thought shows that you can block all iPads (using the device type), all iPads of a similar vintage to mine (using the device model), or all revisions of a specific device operating system.

FIGURE 2-18 The device details for a specific device tell you what manufacturer-set user agent, device operating system, and device family the device reports
You can find these entries in the IIS logs on the CAS, but it’s hard to pick out a specific device among all the noise in those logs. The easiest way to retrieve the most useful subset of this information is to use the Get-ActiveSyncDeviceClass cmdlet, which returns several interesting properties for each synchronized device (including the device model and device type) that your Exchange organization has seen so far. For example, running Get-ActiveSyncDeviceClass | ft DeviceType, DeviceModel in our test lab produces output like the following:
DeviceType DeviceModel
---------- -----------
EASProbeDeviceType EASProbeDeviceType
iPhone iPhone
iPhone iPhone3C1
WP8 WP8
WP8 RM-820_nam_att_100
iPad iPad
iPad iPad3C1
Microsoft has provided two ways to create device access rules. First, the easy way. When you click the + icon in the Device Access Rules section of the Mobile Device Access page, shown in Figure 2-16, the resulting New Device Access Rule dialog box includes buttons that enable you to browse through the list of device families and models that Exchange already knows about (based on devices that were synchronized successfully). If you want to quickly create a device access rule based on one of these characteristics, you can easily do so from EAC, as long as you don’t want to use the operating system or user agent fields to make decisions.
The second way to create device access rules is with the New-ActiveSyncDeviceAccessRule cmdlet, which gives you a very flexible system for creating rules using any of the supported criteria. To create a rule, you need to specify a characteristic (that tells the rule what to base its decisions on), a query string (the value that will be matched by the rule), and an access level (that tells the rule what to do when it matches). Here are two quick examples:
![]() New-ActiveSyncDeviceAccessRule -characteristic DeviceModel -queryString “iPad” -AccessLevel block blocks all iPad devices from synchronizing.
New-ActiveSyncDeviceAccessRule -characteristic DeviceModel -queryString “iPad” -AccessLevel block blocks all iPad devices from synchronizing.
![]() New-ActiveSyncDeviceAccessRule -characteristic UserAgent -queryString “Apple-iPad3C1/*” -AccessLevel block blocks all third-generation iPad devices from synchronizing, no matter what version of iOS they’re running.
New-ActiveSyncDeviceAccessRule -characteristic UserAgent -queryString “Apple-iPad3C1/*” -AccessLevel block blocks all third-generation iPad devices from synchronizing, no matter what version of iOS they’re running.
Sadly, device access rules don’t have names that you can set, but you can see the names, characteristics, and so on for any rules in your environment with the Get-ActiveSyncDeviceAccessRule cmdlet. For example, this output shows that the organization has three device access rules in place. All iPhones and Windows Phone 8 devices are allowed to connect, but other devices are blocked by the default rule:
Get-ActiveSyncDeviceAccessRule | Format-Table Name, Characteristic, QueryString,
AccessLevel -AutoSize
Name Characteristic QueryString AccessLevel
-------- -------------- ----------- -----------
iPhone (DeviceType) DeviceType iPhone Allow
WP8 (DeviceType) DeviceType WP8 Allow
EASProbeDeviceType (DeviceType) DeviceType EASProbeDeviceType Allow
When a user’s device is blocked by a device access rule, the device isn’t allowed to synchronize at all. If a device access rule or the default rule causes a device to be quarantined, the device is allowed to synchronize just long enough to receive a quarantine warning message, such as the one shown in Figure 2-19. This message shows all the device-specific data, along with an indication that the device is quarantined by the global default setting, not a specific device access rule. The policy specified earlier in Figure 2-16 included some custom text to be included in quarantine mails, and you can see that text present in the screen shot in Figure 2-19.

Controlling individual users’ devices
In addition to creating device access rules to control the types of devices that can be connected to ActiveSync, you can allow or block individual devices for a user’s mailbox. Microsoft refers to these mailbox-level allow/block settings as personal exemptions. They’re checked first, so that if you block or allow a device for a given user, that choice takes precedence over the device access rules you have in place.
By selecting the target mailbox in EAC, and then clicking the View Details link under Mobile Devices in the right sidebar, you see the Mobile Device Details dialog box (Figure 2-20).

FIGURE 2-20 The Mobile Device Details dialog box through which to change the assigned mobile device mailbox policy and manage devices associated with the mailbox
The toolbar over the device list enables you to allow or block the selected device for this mailbox only, so you can remotely wipe the device, see the device details, or create a new device access rule based on the selected device. This last capability is the easiest way to create a new device access rule based on a particular device or device type. First, sync the new device to your own mailbox, then log in to EAC and then use that device to create a device access rule to allow or block the target device family.
If you prefer, you can use the Set-CASMailbox cmdlet to set the ActiveSyncAllowedDeviceIDs and ActiveSyncBlockedDeviceIDs parameters with a list of device identifiers that should be allowed or blocked for a mailbox. The default value for these parameters is $Null, meaning any device can synchronize with a mailbox. Using Set-CASMailbox requires you to know the device ID, however. You can get it by selecting a device in the Mobile Device Details box and clicking the pencil icon. In addition, some devices show the device ID (for example, Apple iOS 8.x devices label the field as Exchange Device ID in the account settings dialog box). You can also use the Get-ActiveSyncDeviceStatistics cmdlet to retrieve details about users’ ActiveSync activity, including the identifiers for each mobile device they have connected to Exchange. For example:
Get-ActiveSyncDeviceStatistics -Mailbox 'Orton, Jon'
You can add multiple device identifiers to the list, separating the identifiers with semicolons. For example, this command allows just one specific device to synchronize with Jon Orton’s mailbox.
Set-CASMailbox -Identity 'Orton, Jon' -ActiveSyncAllowedDeviceIDs
'4B9207650054671AD0AEE83A424BCD7F'
To clear the device identifier, so that any device can connect to the mailbox:
Set-CASMailbox -Identity 'Orton, Jon' -ActiveSyncAllowedDeviceIDs $Null
If you have a list of devices and want to remove only a single device from the list, export the list to a variable, update the list in the variable, and then write it back with Set-CASMailbox.
$Devices = Get-CASMailbox -Identity 'Orton, Jon'
$Devices.ActiveSyncAllowedDeviceIDs -= '4B9207650054671AD0AEE83A424BCD7F'
Set-CASMailbox -Identity 'Orton, Jon' -ActiveSyncAllowedDeviceIDs
$Devices.ActiveSyncAllowedDeviceIDs
The same techniques can be used to block devices. Simply update the ActiveSyncBlockedDeviceIDs parameter instead of ActiveSyncAllowedDeviceIDs. Grab the device ID, and then use Set-CASMailbox -ActiveSyncBlockedDeviceIDs on the target mailbox.
Another device blocking-related trick you might need is to adjust the number of devices an individual user is allowed to synchronize with their mailbox. By default, Exchange allows 10 device partnerships per mailbox. Depending on your user population, you might want to raise or lower this number. For example, the average user probably doesn’t have more than three or four devices. To change this, you must update the EasMaxDevices setting on the policy by using Set-ThrottlingPolicy. If you have users who need more than 10 devices, you should create a separate throttling policy for them and apply it as needed, rather than modifying the default policy.
Managing organization-wide ABQ settings
You don’t really set organization-wide settings for EAS, apart from controlling which types of devices are allowed to connect. Almost all of the parameters available to the Set-ActiveSyncOrganizationSettings cmdlet relate to how the device access rules you set up are interpreted. You can change the default behavior that is applied to new devices that aren’t specifically managed by a device access rule or personal exemption. When a new device connects to Exchange, you can choose to allow it to connect, to block it, or to put it in quarantine. You can specify one or more email addresses that should receive quarantine notifications. The user who syncs the quarantined device always gets one. Finally, you can specify some text to be included in the quarantine message. To change settings at this level, you can use either the Set-ActiveSyncOrganizationSettings cmdlet or the Mobile Device Access page in EAC.
Deploying and manage Office Apps
Office Apps are a new feature in Exchange 2013, SharePoint 2013, and Office 2013. Rather than requiring you to download and install executable code on client computers, you install Office Apps, which are written using HTML5 and JavaScript on your servers. They can then be used by any client that supports them. As of this writing, that includes OWA for Devices, Office 2013, Outlook Web App, and Outlook for Mac (the 2014 version for Office 365, not Outlook 2011). When you install an Office App and make it available to a user or group, the app shows up in the user’s clients. For example, if you deploy the Message Header Analyzer app, it appears in OWA, as shown in Figure 2-21. Microsoft has created an app store for Office Apps, and users can install their own apps through OWA or their local browsers if you give them permission to do so.
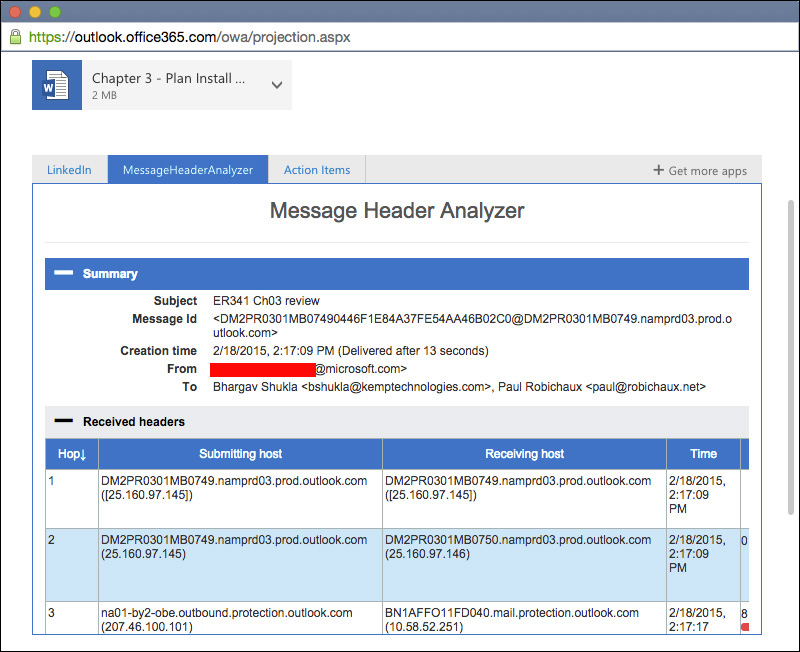
Installing and removing apps
You can get access to apps that run in Outlook and OWA in three ways:
![]() If you have permission, you can install them directly from within OWA or Outlook
If you have permission, you can install them directly from within OWA or Outlook
![]() You can download and install apps from within EAC
You can download and install apps from within EAC
![]() You can download apps and use EMS cmdlets to install and provision them
You can download apps and use EMS cmdlets to install and provision them
Exchange 2013 provides four RBAC roles that control app installation and usage. The Org Marketplace Apps role grants permission to install and configure apps that come from the Microsoft Office Store. The Org Custom Apps role grants the ability to install and manage apps that come from internal enterprise distribution points. Normally, administrators should have these roles, not users. The My Marketplace Apps user role and the My Custom Apps user role grant users the ability to install and manage their own apps and are, by default, available to all users in the organization.
Managing apps in EAC
As an administrator, you can control apps through the Apps tab of the Organization slab in EAC (see Figure 2-22). This tab shows the installed apps, whether each app is available to users, and which users have access to the apps. Selecting an individual app displays the app details (including which permissions the app requires) in the details pane on the right side of the EAC window.
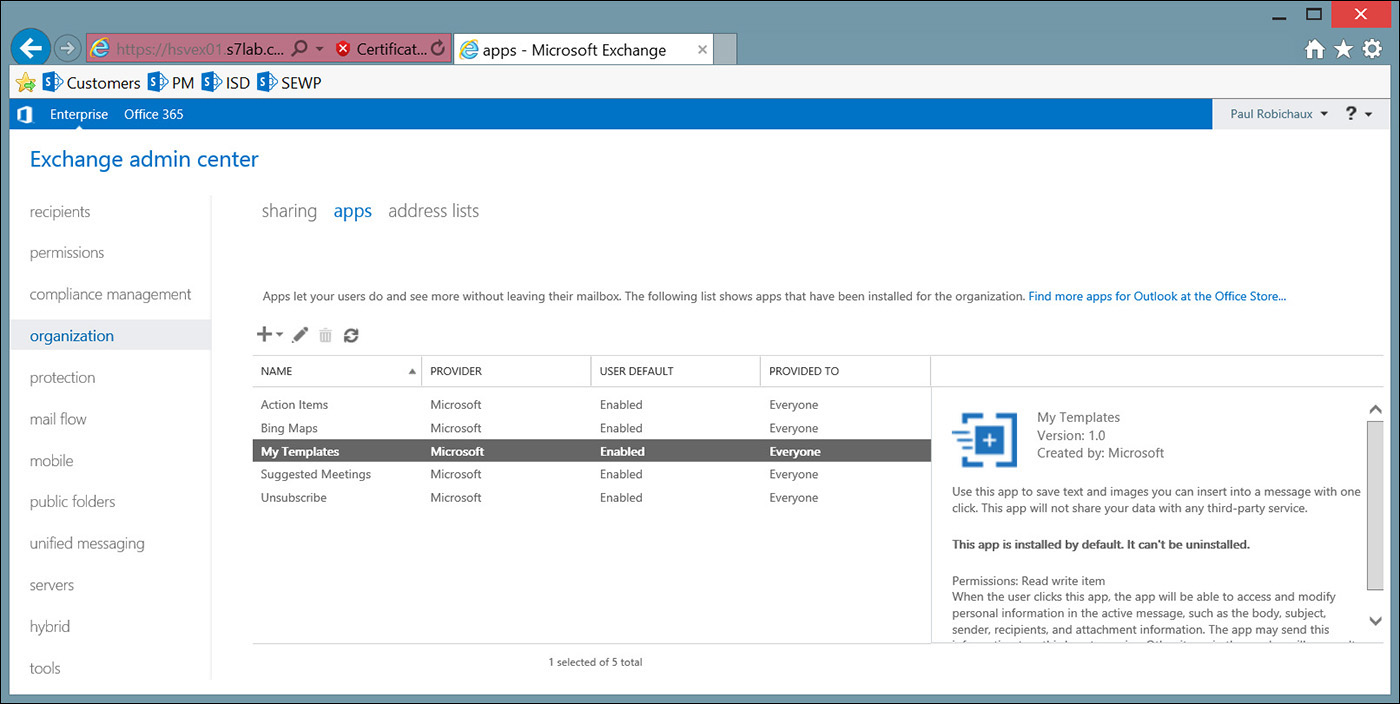
You can add or remove apps by using the icons in the toolbar. You can add apps from the Office Store or by providing a URL to the app. This URL can be used to install custom apps inside an enterprise from a SharePoint app catalog, or a local or shared directory. When you install an app, EAC prompts you to confirm that you want to install the app. The confirmation dialog box includes a summary of the permissions that the app has requested.
When you add an app, it’s disabled, so users can’t use it until you grant them permission. To change the app’s availability, click the pencil icon to open the settings’ dialog box, shown in Figure 2-23. The app can be made available to users by selecting the Make This App Available To Users In Your Organization check box. Just making it available doesn’t mean that users are necessarily able to use it, however. The group of three option buttons in this dialog box lists the states an individual app can take on: optional and enabled by default, optional and disabled by default, or mandatory. The “by default” in the first two options is there because users can enable or disable optional apps themselves, whereas apps marked as mandatory are always enabled. Exchange doesn’t notify users when new apps are available, and clients only load the list of available apps when they start, so newly installed apps won’t appear until the next time users launch their preferred client.

Installing and Managing apps with the Exchange Management Shell
The Exchange Management Shell (EMS) offers six primary cmdlets for working with apps: New-App and Remove-App for installing and removing apps, Enable- and Disable-App for controlling app availability, and Get-App and Set-App for managing application settings. Each app has a display name and an AppId (basically a GUID), but the management cmdlets require use of the AppId for pretty much everything, although it isn’t visible to users or used commonly in EAC.
To install a new app, you use the New-App cmdlet. When you install an application using this cmdlet, you need to provide the XML application manifest that Exchange uses to correctly install the application’s components. You can provide a URL using the Url switch (although this is primarily useful when you’re installing custom apps inside your organization), or you can read the manifest data from its file into a PowerShell variable, and then pass it to New-App, like this.
$myApp = Get-Content -Path "c:devappsScreenShotCheckerApp.xml" `
-Encoding Byte `
-ReadCount 0
New-App -FileData $myApp
To get a list of the installed applications in your organization, you can use a command such as this:
Get-App -OrganizationApp | ft DisplayName, AppId
DisplayName AppId
----------- -----
LinkedIn 333bf46d-7dad-4f2b-8cf4-c19ddc78b723
MessageHeaderAnalyzer 62916641-fc48-44ae-a2a3-163811f1c945
Bing Maps 7a774f0c-7a6f-11e0-85ad-07fb4824019b
Suggested Meetings bc13b9d0-5ba2-446a-956b-c583bdc94d5e
Unsubscribe d39dee0e-fdc3-4015-af8d-94d4d49294b3
Action Items f60b8ac7-c3e3-4e42-8dad-e4e1fea59ff7
Note, the Bing Maps, Suggested Meetings, Unsubscribe, and Action Items apps are installed as part of Exchange 2013 SP1. In this example, we added the free LinkedIn and MessageHeaderAnalyzer apps and made them available to the organization. Get-App won’t show applications installed by individual users unless you use the Mailbox switch. For example, Get-App -Mailbox paulr returns the list of applications installed for the user with the specified mailbox.
You use Enable-App and Disable-App to change the application state both for individual users and the entire organization. If you use these cmdlets alone (for example, Enable-App -Identity 62916641-fc48-44ae-a2a3-163811f1c945) the app is enabled or disabled for the entire organization. Add the Mailbox switch if you want to enable or disable the app for a specific user. You have the same three choices for enabling apps when you use EMS as you do in EAC, although it’s a little harder to distinguish among them because they’re so similar.
![]() To enable an app by default, but to let users turn it off, use Set-App -Enabled $true -DefaultStateForUser Enabled.
To enable an app by default, but to let users turn it off, use Set-App -Enabled $true -DefaultStateForUser Enabled.
![]() To disable an app by default, but to let users turn it on, use Set-App -Enabled $true -DefaultStateForUser Disabled.
To disable an app by default, but to let users turn it on, use Set-App -Enabled $true -DefaultStateForUser Disabled.
![]() To enable an app by default, and not let users turn it off, use Set-App -Enabled $True -DefaultState AlwaysEnabled.
To enable an app by default, and not let users turn it off, use Set-App -Enabled $True -DefaultState AlwaysEnabled.
Providing an App to Specific Users
Enabling an application means users can add it themselves (as described in the upcoming section, “Self-service app management for users”). You might need to assign an application to a group of users, instead of to everyone in the organization, without waiting for users to set up apps for themselves. If you want to do this, you can use the Set-App cmdlet with its ProvidedTo parameter. You can either enable an app for every user (Set-App -ProvidedTo Everyone) or for a specific set of users (Set-App -ProvidedTo SpecificUsers -UserList). In this latter case, you must also provide a list of users with the UserList parameter. Suppose you want to load a new app named ScreenShotChecker and assign it to all members of the Production group. You could do something like this:
$myApp = Get-Content -Path "c:devappsScreenShotCheckerApp.xml" -Encoding Byte
-ReadCount 0
$installedApp = New-App -FileData $myApp
$theUsers = Get-DistributionGroupMember Production
Set-App -OrganizationApp -Identity $installedApp.appID -ProvidedTo SpecificUsers
-UserList $theUsers
When you use Set-App -ProvidedTo SpecificUsers, that prevents other users from seeing the installed app, although they can install it themselves if they have access to the app. However, users who are specified with this command can’t install or remove the app.
Self-service app management for users
Users can manage apps from Outlook Web App by clicking the Options icon (the gear in the upper-right corner of the window) and choosing Manage Apps. Or, they can manage apps from Outlook 2013 by opening the backstage view and choosing the Manage Apps link. In either case, the view similar to that shown in Figure 2-24 appears. One important difference between this view and the one shown earlier in Figure 2-22 is this view includes a user-installed app (as indicated by the value of User in the Installed By column).
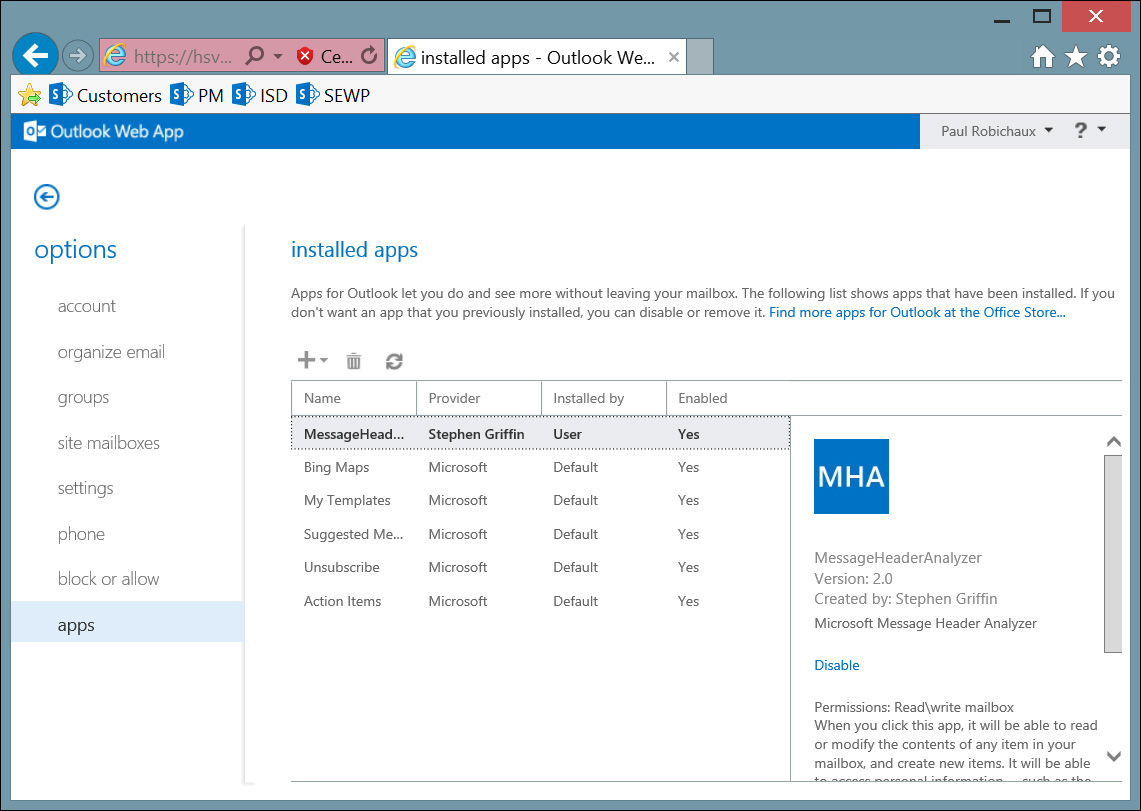
Blocking or allowing apps
By default, Office Apps are enabled for all clients that can display them. You can use Set-OrganizationConfig -AppsForOfficeEnabled to change this. When this parameter is set to $false, no new apps can be activated for or by any user in the organization. Changing this setting doesn’t remove any existing apps or keep users from using them. If you want to disable user access to apps completely, you must remove any apps you added, and then disable the built-in apps (Action Items, Unsubscribe, Bing Maps, and Suggested Meetings).
![]() Thought experiment: Preparing for mobile device upgrades
Thought experiment: Preparing for mobile device upgrades
1. What would you recommend that Contoso consider when planning which devices to support?
2. What are some tools you might recommend to Contoso to help control how users connect and use devices?
3. Contoso has a number of users who work remotely most of the time. Would you apply any special considerations or policies to these users?
Objective summary
![]() OWA for Devices is intended to be the Microsoft replacement for vendor-specific mail and calendar clients from Apple and Google. Users install it on their iOS or Android devices, and then they use it to sync mail, calendar, and contact data. To control its use, you can enable or disable it for the entire organization or for specific users.
OWA for Devices is intended to be the Microsoft replacement for vendor-specific mail and calendar clients from Apple and Google. Users install it on their iOS or Android devices, and then they use it to sync mail, calendar, and contact data. To control its use, you can enable or disable it for the entire organization or for specific users.
![]() OWA mailbox policies control which specific features of OWA a given user can access. Each mailbox can have zero or one OWA mailbox policy assigned to it. Exchange creates a default policy for you, but it turns on all features and isn’t assigned to any mailboxes.
OWA mailbox policies control which specific features of OWA a given user can access. Each mailbox can have zero or one OWA mailbox policy assigned to it. Exchange creates a default policy for you, but it turns on all features and isn’t assigned to any mailboxes.
![]() To customize OWA for your users, you can edit the default policy or create new ones. Either way, you need to apply the policies to the mailboxes before they take effect.
To customize OWA for your users, you can edit the default policy or create new ones. Either way, you need to apply the policies to the mailboxes before they take effect.
![]() While you can create and manage OWA mailbox policies from either EAC or EMS, it’s much faster to do so with EMS.
While you can create and manage OWA mailbox policies from either EAC or EMS, it’s much faster to do so with EMS.
![]() Exchange ActiveSync has a system of device access rules that you can use to control which types of devices specific users, or all users, can sync with Exchange.
Exchange ActiveSync has a system of device access rules that you can use to control which types of devices specific users, or all users, can sync with Exchange.
![]() Device access rules can allow, block, or quarantine devices based on the device family, the device operating system, or the user agent string. You can allow exceptions for specific users that allow or block specific devices, families, or types just for those users.
Device access rules can allow, block, or quarantine devices based on the device family, the device operating system, or the user agent string. You can allow exceptions for specific users that allow or block specific devices, families, or types just for those users.
![]() There’s a single organization-wide access rule that will allows, blocks, or quarantines any device that isn’t targeted by a more specific rule.
There’s a single organization-wide access rule that will allows, blocks, or quarantines any device that isn’t targeted by a more specific rule.
![]() Administrators or users can install Office Apps that run inside Outlook, OWA, and OWA for Devices. User-installed apps are stored in users’ mailboxes and are only available to that user, while organizational apps are available to the users you select.
Administrators or users can install Office Apps that run inside Outlook, OWA, and OWA for Devices. User-installed apps are stored in users’ mailboxes and are only available to that user, while organizational apps are available to the users you select.
![]() You can control whether individual apps are available, blocked, or mandatory. Apps that you mark as available can be enabled or disabled by default, but users can change that state on their own. When you block an organizational app, users can still download and install it themselves, unless you turn off app access.
You can control whether individual apps are available, blocked, or mandatory. Apps that you mark as available can be enabled or disabled by default, but users can change that state on their own. When you block an organizational app, users can still download and install it themselves, unless you turn off app access.
![]() You can install apps from EAC or EMS. In the case of EMS, you can specify a URL or read the app contents from a file using the Read-Content cmdlet, and then pass that to New-App.
You can install apps from EAC or EMS. In the case of EMS, you can specify a URL or read the app contents from a file using the Read-Content cmdlet, and then pass that to New-App.
Objective review
Answer the following questions to test your knowledge of the information in this objective. You can find the answers to these questions and explanations of why each answer choice is correct or incorrect in the “Answers” section at the end of this chapter.
1. You need to install an app named ScreenShotChecker from a file at \appsrv03sscscreenshotchecker.xml and make it available to your users. Which of the following commands would you need to use? (Choose all that apply.)
A. Set-App -OrganizationApp -Identity $sscApp.appId -ProvidedTo Allusers.
B. $sscApp = New-App -FileData $myApp.
C. New-App -OrganizationApp -Url \appsrv03sscscreenshotchecker.xml.
D. $myApp = Get-Content -Path \appsrv03sscscreenshotchecker.xml -Encoding Byte -ReadCount 0.
2. You want to allow users of any Android or iOS device to connect and sync using Exchange ActiveSync, but you want to block all other devices. Choose the solution to accomplish this with the minimum administrative effort.
A. Create device access rules for the device types you want to support, and then set the organizational default rule to block other devices.
B. Set the organizational default rule to allow all devices, and then create device access rules to block the device types you don’t want users to use.
C. Set the organizational default rule to quarantine all devices, and then approve only those devices that meet your organizational guidelines.
D. Use Get-ActiveSyncDeviceStatistics to get a list of device IDs, and then use Set-CASMailbox -AllowedActiveSyncDeviceID to assign them to user mailboxes.
3. You’re asked to apply a new mobile device policy with a stronger password requirement for users who have a CustomAttribute1 value of “Manager”. You create the new policy and start writing an EMS command to accomplish this task, beginning with “Get-Mailbox | where {$_.CustomAttribute1 -match “Manager”}”. Which of the following cmdlets should come next in your command pipeline?
A. Set-Mailbox.
B. Set-ActiveSyncVirtualDirectory.
C. Set-CASMailbox -OwaMailboxPolicy.
D. Set-CASMailbox -ActiveSyncMailboxPolicy.
Objective 2.4: Implement load balancing
High availability is provided by many of Exchange’s features. Features such as DAG use clustering features provided by the operating system, while connectivity to CAS must be managed through separate a load-balancing mechanism. This could be an external load balancer whether it’s software, such as a virtual machine running on hypervisor, deployed on your server hardware, or a hardware-based offering. While Microsoft Windows NLB is also supported, it isn’t a preferred choice due to limitations documented by Microsoft.
Deploying a load balancer allows you to handle more connections than a single server might be able to handle, thus distributing them to healthy servers, as appropriate. With health checks, a load balancer can detect a failed CAS server and remove it from the distribution of client connections automatically, providing clients with uninterrupted access to the Exchange environment.
With simplified load balancing in Exchange 2013, Layer 7 load balancing configuration is no longer a requirement. Because of changes in Client Access logic, a Layer 4 load balancer can serve the clients efficiently without requiring additional configuration and the management complexity of a Layer 7 load-balancing mechanism. Layer 4 load balancing also results in reduced resource usage requirements. This makes load balancer more efficient in handling large amount of requests compared to a Layer 7 load-balancing configuration.
Exchange 2010 introduced the concept of CAS arrays. The CAS array was created per each Active Directory site that the Exchange servers were in. Client Access servers from given Active Directory site automatically belonged to the CAS array for that site. In Exchange 2013, CAS arrays are no longer required. You don’t need to create a CAS array object. Changing mailbox database properties to configure appropriate CAS array FQDN is no longer necessary. You simply need to configure internal and external URLs for different workloads appropriately, and then configure DNS to resolve the namespaces to the load balancer IP address.
This objective covers how to:
![]() Configure namespace load balancing
Configure namespace load balancing
![]() Configure Session Initiation Protocol (SIP) load balancing
Configure Session Initiation Protocol (SIP) load balancing
![]() Configure Windows Network Load Balancing (WNLB)
Configure Windows Network Load Balancing (WNLB)
Configuring namespace load balancing
Earlier, in Objective 2.2, you learned how to configure different namespaces. Once you correctly configure all the namespaces, you can configure load balancer to accept traffic on a given IP address that the namespace resolves to. Then, you can add CAS servers to the pool that load balancer monitors for health and distributes client connections to. Before discussing the configuration requirements, let’s discuss some load balancing basics.
In Exchange 2010, client connections and processing were handled by Client Access servers. Many protocols required affinity, which ensured a client to server pairing is maintained throughout the lifecycle of a given connection. Breaking the pairing meant that the client must authenticate again to a different server and the server must then perform necessary processing and rendering of client data. This results in an inefficient usage of resources on load balancer, as well as Client Access servers.
Affinity requirements also meant that load balancer needed to be a Layer 7 load balancer, which works at application layer, gaining understanding of protocols in use and visibility into application layer traffic. To achieve the Layer 7 functionality, load balancer needs to decrypt SSL connections from the client and re-encrypt it when sending data to Client Access servers. SSL decrypt and re-encrypt functionality requires significant processing power, especially as larger keys for SSL certificates are preferred over weaker 1,024 bit and smaller keys used in the past.
In contrast, Exchange 2013 CAS servers simply proxy client connections to an appropriate Mailbox server where the client mailbox is active. Load balancers no longer need to maintain client to server pairing and provide affinity. Because affinity is no longer required, SSL decryption and re-encryption requirement becomes optional. A load balancer can simply pass the traffic to a healthy Client Access server and the server can take appropriate actions, based on information received from the client. Because the load balancer processes traffic at the transport layer instead of at the application layer, it’s considered a Layer 4 load balancer.
Depending on the namespace model selection and the number of planned namespaces, a load balancer deployment in any Exchange 2013 deployment usually starts with load balancing at least two namespaces. The first one is Autodiscover namespace. The client connections received for Autodiscover are sent to a healthy server for further processing. The rest of the connections are sent to the appropriate namespaces as discovered through the Autodiscover process. These namespaces resolve to the load-balanced IP address, which could be the same IP address as Autodiscover.
For all HTTP workloads, Exchange 2013 leverages managed availability to create a dynamic healthcheck.htm page. For example, if OWA component state is healthy, as determined by managed availability, an HTTP GET request sent to /OWA/healthcheck.htm results in a 200 OK response from the server. The same logic applies to AutoDiscover, ECP, EWS, MAPI, RPC, OAB, ActiveSync, and PowerShell virtual directories. Figure 2-25 shows a response from a healthy CAS server for an /OWA/healthcheck.htm request. When leveraging a simplified Layer 4 load-balancer configuration, you can only perform one health check per server. This means when the health check on given URL fails, the entire CAS server is deemed unhealthy and the load balancer stops sending client connections until it returns to a healthy state.

Because the Layer 4 load balancer configuration means a single health check per server, it takes only a single workload failure to take the entire server out of the load-balanced pool. In the previous example where we’re checking for OWA health, if the OWA process fails on the server or the administrator manually changes the OWA state to inactive using managed availability cmdlets, the load balancer sees that as an unhealthy server and stops sending clients connections to it. What if the other workloads are functional on that server? This is when a single namespace with the Layer 4 load balancer configuration results in inefficient server usage.
This scenario can be addressed in different ways. One of the ways is to create multiple namespaces, one per workload. Instead of mail.contoso.com for all workloads, for example, you can configure owa.contoso.com, ecp.contoso.com, and so on. Now you have a namespace for each workload. It can resolve to an individual load-balanced IP address per workload. Each IP configured to perform a health check for a given workload, such as /owa/healthcheck.htm, /ecp/healthcheck.htm, and so on. Now, if one workload is experiencing problems, it won’t result in the entire server being removed from the load balanced pool. The downside is you have to allocate more IP addresses and maintain individual workload-based load-balancing configuration. If the load balancer is configured for external clients, this might mean multiple public IP addresses. Because publicly addressable IP addresses are limited in most deployments, this might be an undesirable configuration, despite its benefits.
Another option is to use the Layer 7 load balancer. In this configuration, you can utilize a single namespace, but unlike the Layer 4 configuration, you configure SSL termination on the load balancer. This allows the load balancer to become application-aware and differentiate between the traffic destined for different workloads. The load balancer can now perform a health check for any given workload, independently of each other, and maintain a separate pool of healthy CAS servers for a given workload. You can now gain the best of both worlds by allocating only a single IP for the namespace, while being able to perform health checks for individual workloads and distributing client connections accordingly. You can also achieve the best possible CAS server utilization, even when one of the components on the server is in an inactive or failed state. The tradeoff is a more involved configuration compared to Layer 4 configuration, and additional processing overhead of decrypting and re-encrypting the client to server connections.
As always, no solution is without tradeoffs. It comes down to unique design requirements of each deployment that should be used to determine the right approach for any given solution.
The Exchange 2013 CAS architecture changes enable you to configure load balancers with no affinity required. This translates to CAS servers built with required logic that identifies client requests and their authentication state to allow a client connection to be sent to any CAS server in the load-balanced pool, without the client repeatedly being requested for authentication. This is possible because when a client establishes a connection with any CAS server for the first time, the CAS server exchanges an authentication (auth) token, session keys, and other relevant information with the client. This information is encrypted by an SSL certificate installed on the CAS server. When the load balancer switches the client connection to different CAS servers for the subsequent requests, the same set of encrypted information is still embedded within the client request. As long as the CAS server receiving the client connection request is configured with the same SSL certificate, the CAS server can successfully decrypt the connection, read the relevant information, and process the connection. When the request lands on a CAS server configured with a default self-signed certificate or a different SSL certificate than the certificate used to encrypt the auth token and other information, the CAS server receiving the request fails to decrypt the required information and fails to identify the client request. This results in often-observed repeated logon prompts or the client’s inability to successfully maintain the connection through the load balancer. Trying to remove the load balancer from the client connectivity for testing would be easy. When using a host’s file for name resolution and sending all the client traffic to one CAS server, or using session affinity on a load balancer, resolves the issue, then it’s incorrectly assumed the load balancer configuration is to blame for the problem. This is where the common logic of elimination doesn’t always help pinpoint the actual problem. The correct understanding of requirements, however, always helps to quickly and accurately identify the issue.
As discussed in Objective 2.2 and in the previous paragraph, you’re now armed with the understanding of why all the CAS servers in the same site or in the same load-balanced pool must be configured with the same SSL certificate.
Another important configuration aspect is how the load balancer presents the source IP address to the server. When a client connects to a load balancer, the source IP address is the IP address of the client and the destination IP address is that of the load-balanced namespace IP owned by the load balancer. The load balancer sends the packet from the client to the appropriate CAS server. If it’s configured to network address translation (NAT) the client connections, the source IP of the request as seen by the CAS server is that of the load balancer. This setup simplifies the routing of packets. You don’t need to use load balancer as the default gateway of the server, or configure the server for Direct Server Return, in which the server pretends to own the load-balanced IP address. Because the server only sees the load balancer IP as source IP, it responds to the load balancer, which, in turn, responds to the client. The client receives the traffic from the load balancer as expected and communication carries on.
Load balancing also involves multiple different ways of configuring networking. For example, in a small environment where a single subnet is used for both servers and clients, the load balancer has a single interface connected to the network. This configuration is known as one-arm configuration. In one-arm configuration, configuring the load balancer to the NAT source IP address of the client becomes a necessity because the client and the servers are on the same subnet, and they can communicate directly without any additional routing. Configuring servers to use the load balancer as their default gateway doesn’t help because servers never use the load balancer if the client IP is known to the server, as reflected in the source IP headers.
In larger networks where server subnets are dedicated and clients reside on separate subnets, the load balancer can be configured with two interfaces: one interface is connected to the client subnet and another is connected to the server subnet. In this configuration, servers can be configured to use the load balancer as the default gateway, and using NAT for client IP addresses becomes optional, although it’s the preferred and recommended configuration.
Source NAT is the recommended configuration because in most routed networks it’s desired to use the core router equipment for routing function. This is because the routers have a knowledge of the complex dynamic routes to different destinations within the enterprise network and are designed to handle all the routing traffic. When NAT isn’t used, and servers are required to use the load balancer as a gateway, the routing configuration could become complex. Load-balancer sizing also needs to account for all the inter subnet traffic that must pass through the load balancer, regardless of the type of traffic and whether it’s being load balanced.
When load-balancing CAS servers on the internal network, Kerberos doesn’t work automatically. Additional configuration is required for Kerberos to work in a load-balanced CAS server environment. All load-balanced CAS servers must use the same account, known as the Alternate Service Account (ASA). The recommendation is that ASA is created in Active Directory as a computer account because a computer account doesn’t allow interactive login. This results in better security. After an ASA account is created, you must associate it with all CAS servers, and then associate all the Service Principal Names (SPNs) with an ASA credential. To associate an ASA account with a CAS server, run Set-ClientAccessServer cmdlet with the AlternateServiceAccountCredential parameter. SPNs are a combination of service and workload FQDN. For example, there is http/autodiscover.contoso.com, where http is the service type and autodisover.contoso.com is the URL associated with the service. In a unified namespace configuration, you might have http/mail.contoso.com SPN, along with Autodiscover SPN, as described earlier. In a multisite environment with regional namespaces, you might need to associate additional SPNs with an ASA account. To associate ASA to a given SPN, run “setspn -S http/mail.contoso.com ContosoExchangeASA$”, where httpmail.contoso.com is SPN and the ASA computer account is ExchangeASA.
When considering load balancer vs. Windows Network Load Balancing (WNLB), it’s important to note that while WNLB is supported, if you have multirole servers deployed with CAS and Mailbox roles installed on the same server and the server is a member of a DAG, you can’t use WNLB. This is because installing clustering and WNLB on the same server isn’t supported. In such a configuration, you must use the external load balancer.
Configuring Session Initiation Protocol (SIP) load balancing
Exchange 2013 deploys a different architecture for Unified Messaging (UM). The Client Access server runs the Microsoft Exchange Unified Messaging Call Router service. The UM call router service listens on TCP port 5060 and 5061. The TCP port 5060 is used in unencrypted communications with clients such as IP PBX, VOIP Gateway, or SBC. If secure configuration is in place, clients are expected to communicate over secure Session Initiation Protocol (SIP) port TCP 5061.
The Mailbox server runs Microsoft Exchange UM service, which listens on TCP ports 5062 and 5063. Similar to CAS servers, TCP port 5062 is used for unsecured SIP communications and 5063 is used for secured SIP communications. The Mailbox server also runs the UM worker process, which listens to TCP ports 5065 and 5067 when configured for unsecured SIP communications, and TCP ports 5066 and 5068 when configured for secured SIP communications.
The CAS servers are responsible for receiving all SIP client traffic and redirect the SIP client traffic to a Mailbox server where the user mailbox is active. The media channel, whether unsecured real-time transport protocol (RTP) or secure real-time transport protocol (SRTP), is established directly between the SIP client (VOIP Gateway, IP PBX, etc.) and the Mailbox server. For UM to function correctly, you must configure VOIP Gateway, IP PBX, and other SIP clients to use the CAS server as their entry point.
You only need to load balance TCP port 5060 and 5061 between SIP clients and CAS servers. Similar to other workloads, you don’t need to configure any session affinity for SIP traffic because all of the incoming SIP INVITEs are redirected to the appropriate Mailbox servers, and the SIP client establishes RPT or SRTP channels directly with the appropriate Mailbox server.
Configuring Windows Network Load Balancing (WNLB)
Windows NLB is network load-balancing software included with Windows Server, and it’s a common candidate for Exchange Server deployments. While WNLB is considered a free alternative to other load balancing solutions, it has several limitations.
One of the limitations briefly discussed earlier, is WNLB’s incompatibility with Windows Failover Clustering. When DAG is deployed and Exchange servers are multirole servers running both CAS and Mailbox roles, Failover Clustering is in use, which rules out deployment of WNLB on the same servers. To deploy WNLB, you must have separate servers running only CAS role and this increases overall cost of Exchange deployment.
WNLB isn’t service-aware. In case of service failures on a server that is part of the WNLB cluster, the client’s connections could be distributed to a server with failed services, impacting client connectivity and user experience.
WNLB deployments often result in port flooding, which overwhelms network switches with broadcast traffic. This is both highly undesirable and problematic, considering its impact, which isn’t limited to a server or a client, but to all traffic passing through the affected switch.
With all documented limitations in mind, it’s supported to deploy WNLB to load balance Exchange 2013.
When considering deployment of WNLB, one of the recommended configuration items is the management adapter. While not required, it’s highly recommended to configure a dedicated management adapter that isn’t shared with any client networks or the cluster adapter.
To create an NLB cluster and join the first host to it, you must first install the NLB features on the server. You can use the Add Roles and Features Wizard from the server manager, or use Add-WindowsFeature to add the NLB and NLB tools. The installation using the Add-Windows feature can be accomplished using the following cmdlet:
Add-WindowsFeature –Name NLB -IncludeManagementTools
After the feature is installed on the server, create a new NLB cluster using the NLB manager. Figure 2-26 shows the new cluster dialog box. Connect to the first host that will join the newly created NLB cluster, and then select the interface to be used for management. In the following example, the server isn’t configured with the dedicated management interface and uses a single available interface.
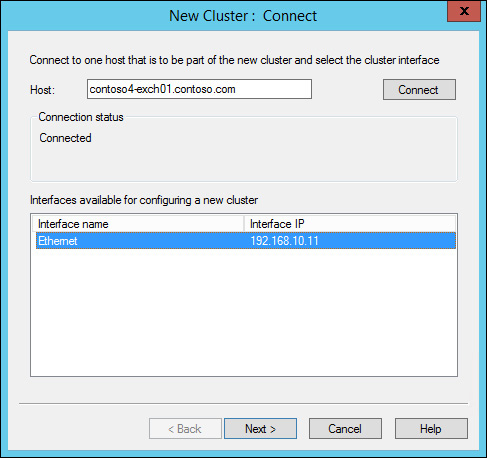
When you proceed to the next step, you’re provided with a host parameter configuration screen. Here, you can configure the priority, which must be unique for each host participating in the cluster. The assigned value can be between 1 and 32. You can configure other parameters, such as a dedicated IP address, in the initial host state when the server is restarted. In the next step, you’re required to provide a cluster shared IP address, which is the IP address clients connect to. You can assign multiple shared IP addresses, if needed. In this case, the first listed shared IP address is used for the cluster heartbeat.
In the cluster parameters screen, shown in Figure 2-27, you need to select each cluster shared IP created in the previous step and assign it the FQDN to be used by clients. You also need to configure the cluster operation mode. The default selection of the unicast mode is the recommended setting. Multicast changes the cluster mac address to the multicast address. Internet Group Management Protocol (IGMP) limits switch flooding by limiting the traffic to ports registered to NLB, instead of all switch ports, such as multicast. Careful planning is required if you plan to use multicast or IGMP multicast modes.
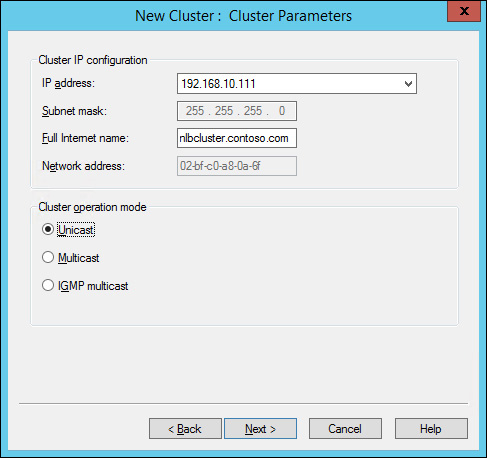
In the next step, port rules let you configure which ports and protocols the NLB cluster will respond to. If you configured multiple cluster IP addresses, you can configure the cluster IP address the port range belongs to. You can also configure the affinity that ensures the client to server pairing will be maintained. Figure 2-28 shows the Port Rules Configuration dialog box.
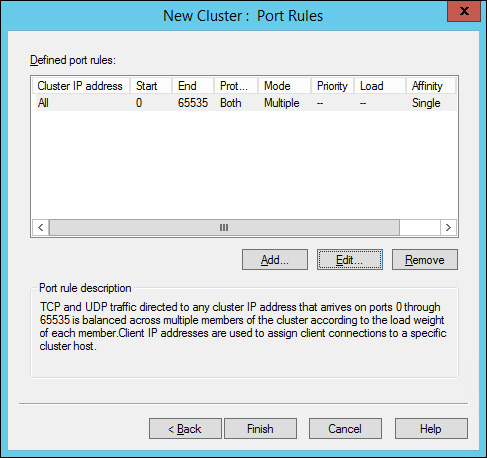
Upon completing the new Cluster Wizard, NLB parameters are saved, NLB is restarted, and parameters are reloaded. During the first host configuration this isn’t an issue, but be aware that this is a disruptive operation and it disconnects any connected clients. This is also why the recommendation is to complete the NLB configuration, add all the hosts, and after testing successful connectivity to the cluster IP, configure DNS to resolve the cluster name to the cluster IP and allow traffic to the hosts.
Also note that, while in this example, we only configured the server with a single adapter and a single IP address, in practice, this configuration could cause convergence issues. As the best practice, you should configure at least two adapters, with one adapter dedicated to management, as mentioned earlier.
![]() Thought experiment: Load balancing
Thought experiment: Load balancing
Objective summary
![]() Load balancing in Exchange 2013 has been greatly simplified due to new CAS architecture. Layer 4 load balancing provides the simplicity of configuration and cost/performance benefits.
Load balancing in Exchange 2013 has been greatly simplified due to new CAS architecture. Layer 4 load balancing provides the simplicity of configuration and cost/performance benefits.
![]() Layer 7 load-balancing configuration is still a valid choice and might be deployed. Both Layer 4 and Layer 7 deployments have their own pros and cons, and depending on environmental factors and design goals, one might be a better choice over the other.
Layer 7 load-balancing configuration is still a valid choice and might be deployed. Both Layer 4 and Layer 7 deployments have their own pros and cons, and depending on environmental factors and design goals, one might be a better choice over the other.
![]() Windows NLB is supported, but external load balancers are preferred. When multi-role servers are deployed with DAG, failover clustering can’t be combined with an NLB cluster.
Windows NLB is supported, but external load balancers are preferred. When multi-role servers are deployed with DAG, failover clustering can’t be combined with an NLB cluster.
![]() Load-balancing UM sessions with UM architecture changes means you only need to load- balance SIP ports to the UM Call router service on CAS servers. CAS servers act as a SIP redirector and redirect the client to the appropriate Mailbox server. The client then establishes media channels with the Mailbox server directly.
Load-balancing UM sessions with UM architecture changes means you only need to load- balance SIP ports to the UM Call router service on CAS servers. CAS servers act as a SIP redirector and redirect the client to the appropriate Mailbox server. The client then establishes media channels with the Mailbox server directly.
Objective review
Answer the following questions to test your knowledge of the information in this objective. You can find the answers to these questions and explanations of why each answer choice is correct or incorrect in the “Answers” section at the end of this chapter.
1. You’re deploying a load-balancing solution for a single namespace deployment. You need to determine the appropriate steps for Layer 4 configuration. All servers are located in a dedicated IP subnet or servers. The network policy states that core routing infrastructure must be used for routing any traffic that isn’t load balanced. Select the actions you must perform. Choose all that apply.
A. Configure the load balancer to pass the client traffic to CAS servers without decrypting and re-encrypting it on the load balancer.
B. Setup the load balancer in a two-arm configuration.
C. Install the same SSL certificate on all CAS servers.
D. Configure NAT on the load balancer.
2. You’re configuring load balancer for connections from IP PBX to Exchange 2013 UM. Which ports should you load balance? Select all that apply.
A. TCP port 5060 and 5061.
B. TCP port 5062 and 5063.
C. TCP port 5065 and 5067.
D. TCP port 5066 and 5068.
3. You’re configuring Windows NLB to load balance client traffic to CAS servers. OWA, Outlook, and ActiveSync clients are deployed. UM isn’t planned for the deployment. Which of the following actions must you take? Select all that apply.
A. Configure the TCP port 443 in the NLB port range.
B. Configure the TCP port 135 in the NLB port range.
C. Configure the TCP port 5060 and 5061 in the NLB port range.
D. Configure Network affinity in the NLB settings for the configured ports.
Objective 2.5: Troubleshoot client connectivity
Most of the time, when clients are unable to connect or users experience errors, basic troubleshooting methodology and available tools to test functionality become a great asset for the administrators.
This objective covers how to:
![]() Troubleshoot Outlook Anywhere connectivity
Troubleshoot Outlook Anywhere connectivity
![]() Troubleshoot POP/IMAP
Troubleshoot POP/IMAP
![]() Troubleshoot web services
Troubleshoot web services
![]() Troubleshoot mobile devices
Troubleshoot mobile devices
Troubleshooting Outlook Anywhere connectivity
When any of the Outlook clients connect to their mailboxes located on Exchange 2013 Mailbox servers, they use Outlook Anywhere as the only mechanism to connect because RPC no longer exists as a mechanism for client connectivity.
For the Exchange 2013 environment with no coexistence, the out-of-the box configuration uses the server FQDN as the internal hostname. As discussed in earlier sections, you need to assign the correct namespace to Outlook Anywhere, assign a trusted SSL certificate, and ensure the appropriate authentication method is configured.
After ensuring the internal clients are working as expected, the next step is to ensure that the external client access configuration is accurate. Microsoft provides a helpful test tool that helps not only with testing Outlook Anywhere, but also multiple other tests. The tool, Exchange Connectivity Analyzer (ExRCA), is a web-based tool that can be accessed at https://testconnectivity.microsoft.com/. Figure 2-29 shows the home screen of ExRCA. ExRCA provides the ability to test ActiveSync, EWS, and Outlook connectivity tests, including Autodiscover tests. It also provides the ability to test Inbound/Outbound SMTP email, POP, and IMAP email. ExRCA also provides other tests, such as Lync server and Office 365 connectivity tests. Note that this tool requires connectivity to configured external namespaces and must be able to resolve the domain name using public DNS servers. ExRCA doesn’t provide offline testing capability, or testing of private or internal URLs that aren’t resolvable on the Internet.
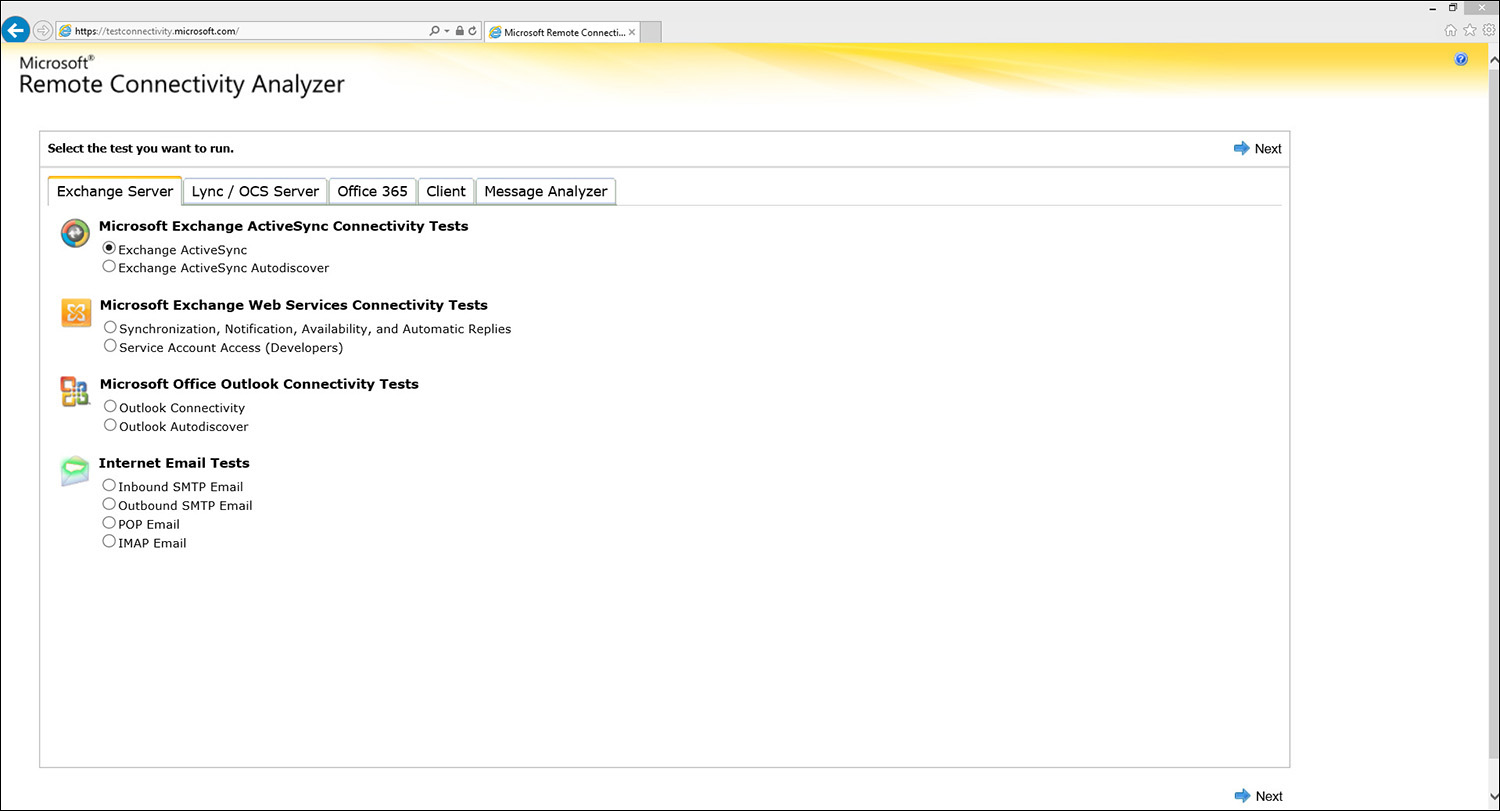
Let’s start with an example of the Autodiscover test. When you proceed to the next step after selecting the Outlook Autodiscover test, the screen you’re presented with is common for almost all the tests. This page presents you with fields required to carry out the test, such as your email address, login information, password, and verification. Figure 2-30 shows the screen.
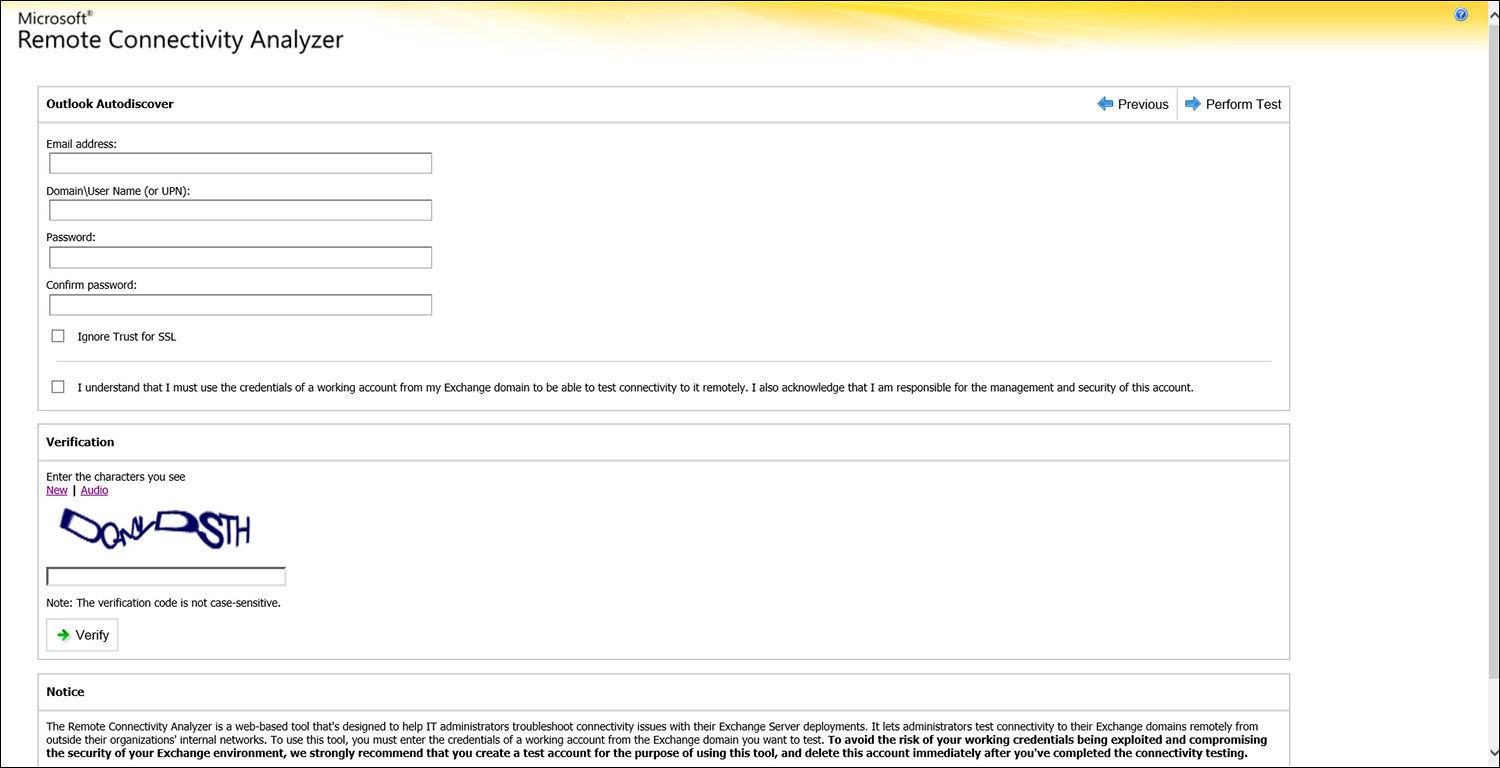
After providing the required information, when you proceed to perform the test, ExRCA tests the required steps and reports the findings. In case of an Autodiscover test, the tool attempts to walk through the Autodiscover process, as discussed earlier in Objective 2.2. Because the test is for an external client, you’ll notice in Figure 2-31 that it doesn’t try to find Autodiscover information using SCP. SCP discovery only applies to the internal domain-joined clients who are able to connect to the domain controllers containing SCP information. The external client tries to connect, using well-known URLs, as Figure 2-31 shows.

ExRCA flags all the errors and provides details that can help you determine the cause for the failure. For example, the first test that failed in the previous example, shows the failure to connect to contoso.com:443/autodiscover/autodiscover.xml. This is a common error in most deployments because the Autodiscover service isn’t co-located with the website for the given domain.
Also, note all of the steps ExRCA executes to determine if the test is successful and the details it provides for each step. The test for Autodiscover in this example tried the known URL autodiscover.contoso.com after failing the first step. Upon a successful name resolution, it then tried to connect to SSL port, verified the certificate trust, and took additional steps to ensure the responding server is configured properly and the tool receives the successful Autodiscover response.
When you test Outlook Anywhere using ExRCA, it first tests Autodiscover. This is because Autodiscover is the only method for ExRCA to discover which namespace it must use to connect to Outlook Anywhere. Once the Autodiscover response is successful, it connects to the namespace received from the Autodiscover response for MAPI/HTTP and RPC/HTTP. After ensuring the port and certificate checks succeed, ExRCA then checks for connectivity to the mailbox over /mapi and /rpc URLs.
Each of these tests would reflect if the servers are configured with external URLs, if the authentication is configured as required, and if the virtual directories that allow Outlook clients to connect to the mailbox and address book services are accessible and responding as expected.
Exchange 2013 also includes the Test-OutlookConnectivity cmdlet, which tests end-to-end Outlook client connectivity for both RPC/HTTP and MAPI/HTTP connections. The following example tests connectivity to the Contoso administrator’s mailbox:
Test-OutlookConnectivity -ProbeIdentity "OutlookRpcDeepTestProbe" -MailboxID
[email protected]
Note that no target server or credentials of a user are provided in this test. When credentials aren’t provided, the test is carried out using the system’s test credentials. If a user’s credentials are provided using the Credential parameter, not only is the connectivity to the mailbox tested, but also the provided credentials and ability to access the mailbox using the provided credentials. Similarly, if a target server is provided, the test is carried out against the provided server to ensure the server can successfully provide connectivity to a given mailbox.
The test provides the ability to test using multiple probes to choose from. Self-test probes only test ability to connect to the RPC/HTTP or MAPI/HTTP endpoint on the server. Self-test probes don’t log on to a given mailbox. Deep-test probe, like the one used in the previous example, tests connectivity to the endpoint and also tests logging on to the provided mailbox.
While the previous example provided a specific mailbox to test, this is optional. When you don’t provide a mailbox ID, the test is carried out against the test account.
When you’re in a coexistence environment with a previous version of Exchange servers, as discussed earlier in Objective 2.2, you must ensure Outlook Anywhere is enabled and the default authentication method on Exchange 2013 servers is changed from Negotiate to NTLM. This is because earlier versions of Exchange servers don’t support negotiate authentication for Outlook Anywhere.
To change the authentication methods assigned to Outlook Anywhere, use the Set-OutlookAnywhere cmdlet. Using this cmdlet, you can configure the authentication methods for internal clients, external clients, and which authentication methods IIS will use. The parameters to configure the authentication methods are InternalClientAuthenticationMethod, ExternalClientAuthenticationMethod, and IISAuthenticationMethods. Valid values for these parameters are Negotiate, NTLM, and Basic.
Exam Tip
Don’t use the IIS management console to change IIS authentication methods for Exchange server. Exchange processes read the configuration set by Exchange cmdlets and periodically overwrite the IIS configuration. If changes are made to IIS directly and they conflict with the settings configured using Exchange cmdlets, they’ll be overwritten.
When you use basic authentication for internal or external clients, logon information is sent by the client to the server in plaintext. Because of security implications, when you set client authentication to basic, you must also set SSL to required. The parameters you must use to set the SSL requirement are InternalClientsRequireSsl and ExternalClientsRequireSsl. Ensure that each is set to $True when basic authentication is configured.
Troubleshooting POP/IMAP
When it comes to POP3 and IMAP services, it’s important to note that the services aren’t enabled by default. This should always be the first step of troubleshooting when you work on POP3 and IMAP connectivity issues. The POP3 and IMAP services must be explicitly enabled on Exchange 2013 servers before users can connect to them.
To enable POP3 and IMAP services, you can use a services management console or Exchange cmdlets. The services you need to enable are msExchangePOP3, msExchangePOP3BE, msExchangeIMAP4, and msExchangeIMAP4BE. The services msExchangePOP3 and msExchangeIMAP4 are located on Client Access servers. The backend services msExchangePOP3BE and msExchangeIMAP4BE are located on Mailbox servers. On multirole servers, you’ll find both front-end and back-end services installed on the same server. The following set of cmdlets demonstrates how you can enable POP and IMAP services:
Enabling POP and IMAP services
#Set service startup type to automatic
Set-Service msExchangePOP3 -startuptype automatic
Set-Service msExchangePOP3BE -startuptype automatic
Set-Service msExchangeIMAP4 -startuptype automatic
Set-Service msExchangeIMAP4BE -startuptype automatic
#Start services
Start-Service msExchangePOP3
Start-Service msExchangePOP3BE
Start-Service msExchangeIMAP4
Start-Service msExchangeIMAP4BE
By default, POP and IMAP access is enabled for all users. You can verify a user’s POP and IMAP access status by running the Get-CASMailbox cmdlet and inspecting values of the PopEnabled and ImapEnabled parameters. Users who are allowed to use POP or IMAP features should have relevant values set to true. Or, you can also verify user properties from EAC, and enable or disable access to POP or IMAP features, as needed.
Exam Tip
When you enable or disable a user for POP or IMAP, you must also restart POP or IMAP front-end and back-end services for the change to take effect.
POP3 and IMAP clients behave differently from the Outlook client that connects using RPC/HTTP or MAPI/HTTP. When POP clients connect to the server and receive messages, the messages are downloaded to the client and are deleted from the server. This might sometime catch users by surprise as they might be expecting to access their messages using OWA. POP/IMAP clients can be configured to change this behavior, so that client downloads the message, but also leaves a copy on the server.
When users need to configure their POP or IMAP clients to connect to an Exchange server, it’s possible for the users to obtain the configuration values by logging into OWA and looking at the option, for POP and IMAP configuration information to be visible in the OWA options page, you must first configure it. For POP and IMAP, you must run the Set-PopSettings and Set-ImapSettings cmdlets. Both cmdlets offer the ExternalConnectionSettings parameter, which can be set with a value such as mail.contoso.com:995:SSL for a POP3 connection over SSL. Once configured, these settings are visible using account options in OWA, as Figure 2-32 shows.

When using POP and IMAP clients, the user must also set outgoing SMTP server in their client to be able to send messages through the Exchange server. For the SMTP server, configuration to be visible in the settings dialog box, shown in Figure 2-32, you must set the server FQDN that the user will use to connect and set the AdvertiseClientSettings to True on the client frontend receive connector on CAS servers. The following shows the relevant cmdlets.
Cmdlets to configure POP, IMAP, and SMTP settings so they're visible in OWA options
Set-PopSettings -ExternalConnectionSettings {mail.Contoso.com:995:SSL}
Set-ImapSettings -ExternalConnectionSettings {mail.Contoso.com:993:SSL}
Get-ReceiveConnector "*client frontend*" | Set-ReceiveConnector -Fqdn mail.contoso.com
-AdvertiseClientSettings $true
When enabling secure access to POP and IMAP, as shown in the previous examples, you must make sure that the trusted certificate is assigned to POP/IMAP services. A default self-signed certificate assigned to the services isn’t trusted by clients and results in connectivity issues.
For external POP/IMAP client access, you must also ensure that you can connect through firewalls or reverse proxy servers that might be protecting the servers by inspecting external traffic. You can ensure external access by using the ExRCA tool discussed earlier or using the telnet client to test connectivity to the server. If you use the telnet client, you can connect to the server FQDN on a configured port and ensure that you’re presented with an expected server banner. If you’re unable to establish a connection to the server, investigate end-to-end connectivity including firewall rules, as needed.
Another troubleshooting tool that you can use when the client is able to connect, but is experiencing issues with POP/IMAP services, is protocol logging. By default, protocol logging is disabled. You can enable protocol logs by running the Set-PopSettings and Set-ImapSettings cmdlets, and setting the ProtocolLoggingEnabled parameter to True. When enabled, client connections are logged and contain detailed logging of client interactions with the server, which can be used for troubleshooting client connectivity issues.
Troubleshooting web services
Exchange Web Services (EWS) provide the ability to access information from Exchange mailboxes. The Outlook client and other applications can use EWS to access information such as Out of Office (OOF) settings, availability information of meeting invitees, mailtips, inbox rules, and message tracking. All such functionality that’s dependent on EWS functionality must be able to access EWS services via the advertised EWS URL. By default, external URLs aren’t set. You must set external URLs, as discussed in Objective 2.2.
When troubleshooting EWS, the concepts discussed earlier in the Outlook Anywhere and POP/IMAP section apply. Ensure that the URLs are configured and accessible, the assigned certificate is trusted by clients and contains FQDN configured for EWS services, and the firewall configuration allows access to the EWS services.
Configuring authentication on the EWS virtual directory is different compared to Outlook Anywhere settings. To configure authentication on the EWS virtual directory, you need to use the Set-WebServicesVirtualDirectory cmdlet. The parameters for each authentication mechanism are unique and must be specified individually. By default, NTLM and WindowsIntegratedAuthentication are enabled. You can enable Basic authentication by setting the BasicAuthentication parameter to True. You can also use EAC to configure authentication settings on the EWS virtual directory.
Troubleshooting mobile devices
Mobile devices connecting to Exchange 2013 servers can come from many vendors, running different mobile operating systems, and various implementations of Exchange ActiveSync protocol. Objective 2.3 discussed many details of deploying and managing mobile devices.
When troubleshooting mobile device connectivity, you want to start by ensuring the basics covered earlier, such as an external URL for ActiveSync virtual directory, certificate configuration, and so on. You can also use ExRCA for testing these configuration requirements.
When a device is unable to connect to the Exchange server, despite verification of all requirements, either manually or using ExRCA, you should look at the device capabilities and policies configured on the Exchange servers. Many times, policies dictate certain parameters, such as encryption to be required for a device to connect to the Exchange environment. When a device doesn’t comply with such requirements, it can’t be provisioned and fails to connect.
Exchange provides the ability for you to create mailbox policies that allow you to override provisioning issues when a device is deemed appropriate for the environment, despite if it’s considered not compliant by another policy. You can create a separate mobile- device mailbox policy that has an AllowNonProvisionableDevices parameter set to True. When the policy is set to True, it allows mobile devices to connect to the Exchange servers, regardless of the device’s ability to enforce the settings required by policy.
Another potential avenue to investigate when users are unable to connect using mobile devices, is a user’s CAS mailbox settings. These can be set to disable ActiveSync devices for given users, or ABQ policies that could be putting the device in a blocked or quarantined state. Ensure that the user is enabled for ActiveSync by running the Set-CASMailbox cmdlet against the user mailbox and setting the ActiveSyncEnabled parameter to True. Also, verify quarantined devices and device access rules to ensure the device isn’t getting blocked based on ABQ settings.
Objective summary
![]() Troubleshooting client connectivity starts with a verification of the basics. Proper configuration of internal and external URLs, DNS servers, and certificates are paramount to a successful Exchange 2013 deployment.
Troubleshooting client connectivity starts with a verification of the basics. Proper configuration of internal and external URLs, DNS servers, and certificates are paramount to a successful Exchange 2013 deployment.
![]() Firewalls, reverse proxies, and load balancers can cause unforeseen issues if they’re configured to inspect Exchange traffic and filter hostnames and/or virtual directory paths.
Firewalls, reverse proxies, and load balancers can cause unforeseen issues if they’re configured to inspect Exchange traffic and filter hostnames and/or virtual directory paths.
![]() POP and IMAP services aren’t enabled by default and must be configured manually, if required. While POP/IMAP services don’t have specific URL configuration similar to HTTP workloads, you can configure POP and IMAP settings to include a URL to be used to make POP/IMAP access settings visible to the user using an OWA account options page.
POP and IMAP services aren’t enabled by default and must be configured manually, if required. While POP/IMAP services don’t have specific URL configuration similar to HTTP workloads, you can configure POP and IMAP settings to include a URL to be used to make POP/IMAP access settings visible to the user using an OWA account options page.
![]() Because of a large variety of ActiveSync devices, each deployment must plan for an appropriate policy and allow/block/quarantine requirements. Implementing such policies and required exceptions must be carefully planned and addressed to avoid unexpected connectivity issues.
Because of a large variety of ActiveSync devices, each deployment must plan for an appropriate policy and allow/block/quarantine requirements. Implementing such policies and required exceptions must be carefully planned and addressed to avoid unexpected connectivity issues.
![]() Exchange Web Services provide critical feature access to Outlook and other clients. The inability to access EWS URLs successfully results in the loss of functionality, such as OOF, MailTips, message tracking, and a lack of visibility into the availability of meeting invitees.
Exchange Web Services provide critical feature access to Outlook and other clients. The inability to access EWS URLs successfully results in the loss of functionality, such as OOF, MailTips, message tracking, and a lack of visibility into the availability of meeting invitees.
Objective review
Answer the following questions to test your knowledge of the information in this objective. You can find the answers to these questions and explanations of why each answer choice is correct or incorrect in the “Answers” section at the end of this chapter.
1. You are required to configure POP and IMAP access for the Exchange 2013 environment. You must ensure that users connect to the services securely. Which ports must you configure? Select all that apply.
A. TCP port 25.
B. TCP port 995.
C. TCP port 443.
D. TCP port 993.
2. You are configuring Exchange 2013 servers in an existing Exchange 2010 environment. Exchange 2010 environment didn’t provide external access. An Exchange 2013 environment is planned to provide external access to users. Which two actions must you take to ensure Exchange 2010 users can access their mailboxes using the Outlook client from external locations?
A. Enable Outlook Anywhere on all Exchange 2010 servers.
B. Enable NTLM authentication on Exchange 2013 servers.
C. Enable Basic authentication on Exchange 2013 servers.
D. Configure the DefaultAuthenticationMethod parameter on the Exchange 2013 server.
3. You’re an Exchange administrator for Contoso, Ltd. Users reported they’re unable to set OOF using their Outlook clients. The error message they receive states “Your automatic reply settings cannot be displayed because the server is currently unavailable. Try again later.” What must you do to resolve the error? Select all that apply.
A. Configure external and internal EWS URL.
B. Configure DNS to resolve the EWS URL to the appropriate load-balanced IP.
C. Obtain a trusted certificate that contains EWS FQDNs and assign it to IIS service on the Mailbox servers.
D. Obtain a trusted certificate that contains EWS FQDNs and assign it to IIS service on the Client Access servers.
Answers
This section contains the solutions to the Thought experiments and answers to the objective review questions in this chapter.
Objective 2.1: Thought experiment
1. Outlook clients are configured to connect to the Exchange 2007 servers using manually created profiles. When changing a primary namespace to Exchange 2013 servers located in HQ, all the Outlook clients configured to use a primary namespace will connect to Exchange 2013 servers. Because Autodiscover isn’t in use by Outlook clients, they won’t connect to legacy namespace. This won’t affect Outlook Anywhere connectivity because Exchange 2013 CAS servers proxy an Outlook Anywhere connection to the Exchange 2007 CAS servers. However, the OOF functionality that uses EWS is impacted because the EWS connectivity must exist from an Outlook client to the same version of the Exchange server where the mailbox resides. This won’t be possible if Outlook clients aren’t using Autodiscover. So, you must recommend changing Outlook clients to use Autodiscover before making the recommended changes to the primary namespace.
2. When ActiveSync clients are connected to Exchange 2007 CAS servers and the mailbox is moved to a different site, Exchange 2007 CAS servers issue 451 redirect. ActiveSync clients should connect to a new namespace provided by 451 redirect. The only requirement is the namespace can’t be removed until after ActiveSync clients successfully connect to a new namespace.
3. To reduce the namespaces in use, you must account for the Outlook client connectivity logic, including the requirement for EWS and ActiveSync requirements, as previously mentioned. Ensure you have configured legacy namespace for Exchange 2007, configured Outlook clients for Autodiscover, and ensured all the ActiveSync clients have updated to new namespace before removing the old namespace to avoid impact.
Objective 2.1: Review
1. Correct answers: A, B, and C
A. Correct: A legacy namespace is required for OWA, EWS, and ActiveSync during coexistence.
B. Correct: Exchange 2013 CAS servers proxy Outlook Anywhere connections for mailboxes hosted on Exchange 2007 servers. You must enable Outlook Anywhere on Exchange 2007 servers for proxy functionality to work.
C. Correct: You must associate the primary namespace with the Exchange 2013 servers, so users with mailboxes on Exchange 2013 can function correctly.
D. Incorrect: ExternalURL isn’t required for the given scenario where users don’t connect from the Internet.
2. Correct answer: A
A. Correct: Because the Exchange 2013 CAS server associated with the primary namespace is running Exchange 2013 CU1, it issues redirect without SSO. The SSO redirection login for OWA was introduced in CU2 of Exchange 2013.
B. Incorrect: Because the site where the user’s mailbox is located is associated with another namespace, Exchange 2013 CAS server won’t proxy the request. The request is proxied only if the other site doesn’t have a namespace or the URL is the same as the primary namespace.
C. Incorrect: Because the site where the user’s mailbox is located is associated with another namespace, Exchange 2013 CAS server won’t proxy the request. The request is proxied only if the other site doesn’t have a namespace or the URL is the same as the primary namespace.
D. Incorrect: SSO redirection logic for OWA was introduced in Exchange 2013 CU2. Servers associated with the primary namespace are running CU1.
3. Correct answers: A and D
A. Correct: The ForceWACViewingFirstOnPrivateComputers property is set to $false by default and must be set to $true to achieve the desired behavior.
B. Incorrect: The default value of WacViewingOnPrivateComputersEnabled is $true and doesn’t need to be changed.
C. Incorrect: The default value of WacViewingOnPublicComputersEnabled is $true and doesn’t need to be changed.
D. Correct: Office Web Apps server must trust the SSL certificate presented by Exchange 2013 CAS servers to successfully render the requested document. Exchange 2013 CAS servers, by default, have a self-signed certificate assigned to IIS and must be changed.
Objective 2.2: Thought experiment
1. A unified namespace solution is possible for a given environment. When considering proxy scenarios for users connecting to a datacenter that is different from the datacenter where their mailbox is currently active. This requires bandwidth planning between datacenters to accommodate additional client traffic due to increased proxy traffic between Exchange servers. Because the bandwidth between datacenters isn’t an issue, additional proxy traffic between datacenter isn’t a problem. You don’t need legacy namespace because the deployment doesn’t consist of Exchange 2007 servers.
2. Considering the previously mentioned unified namespace, if SRV records are used for Autodiscover, a single namespace can suffice. This is based on the assumption that split-brain DNS is in use and the internal namespace is the same as the external. If the internal domain is a private domain, or different from the external namespace, then you need additional namespace for the internal clients.
Objective 2.2: Review
1. Correct answers: A and C
A. Correct: A newly installed Exchange server creates SCP record in Active Directory using server’s FQDN. Domain joined internal clients use SCP to find Autodiscover service URL and can possibly use newly created SCP. Using Set-ClientAccessServer allows you to change the Autodiscover internal URL to the desired Autodiscover namespace.
B. Incorrect: Clients don’t use URLs set by Set-AutodiscoverVirtualDirectory cmdlet for discovery.
C. Correct: A default self-signed certificate assigned to IIS on a newly installed Exchange server isn’t trusted by clients. A certificate issued by a trusted CA must be assigned to IIS and it must include FQDN provided by Autodiscover.
D. Incorrect: Configuring an internal namespace to resolve to load-balanced IP address doesn’t address certificate trust issue.
2. Correct answers: A, C, and D
A. Correct: Because a unified namespace is used across all locations, selecting all CAS servers in the External Access Domain Wizard is the appropriate action.
B. Incorrect: With a unified single namespace you don’t need to run the External Access Domain Wizard for each location.
C. Correct: The External Access Domain Wizard doesn’t configure external URL for Outlook anywhere. It must be set separately.
D. Correct: An External Access Domain Wizard doesn’t configure the external URL for a MAPI virtual directory. It must be set separately.
3. Correct answer: C
A. Incorrect: A self-signed certificate isn’t trusted by clients and it causes connectivity issues.
B. Incorrect: A UC SAN certificate from an internal CA can be trusted, but it isn’t trusted by clients without an additional manual configuration.
C. Correct: A UC SAN certificate from an external CA doesn’t require an additional manual configuration on Outlook clients.
D. Incorrect: While a wildcard certificate issued by a trusted CA can be a valid choice for Exchange 2013 environments, when integrating with Lync, you must have a certificate with a subject name that isn’t a wildcard. A wildcard can be included in a subject alternative names (SAN) list on a UC SAN certificate.
Objective 2.3: Thought experiment
1. Contoso, Ltd. should consider whether it wants to allow any type of device, or whether it prefers to limit devices to a specific set of device families or types. In either case, the company should also decide what it wants to do with unsupported devices and devices that can’t be provisioned by ActiveSync. Contoso should also consider whether it wants to allow, require, or block the use of OWA for Devices.
2. Contoso can control devices using device access rules to allow or block devices, the default organization rule to allow, block, or quarantine devices that don’t match any rule, and EAS policies to control the length and strength of passwords required on devices. Depending on the device, the company might also be able to use other EAS policy settings, but this varies by device.
3. Users who are working remotely often have multiple devices. Many of them use OWA frequently alongside their mobile devices. Contoso might want to consider setting up OWA policies to control which users have which OWA features. Contoso should ensure that its administrators and users know how to remotely wipe lost or stolen devices.
Objective 2.3: Review
1. Correct answers: A, B, and D
A. Correct: This command can make the app available to all users in the organization, but it can’t be run until the app has been registered with New-App.
B. Correct: This cmdlet registers the app, but it doesn’t make it available to users. You can’t specify a UNC path for an app file, which is why the Get-Content cmdlet is required.
C. Incorrect: The Url flag to New-App requires an actual URL, not a UNC path.
D. Correct: This cmdlet is required to read the contents of the app manifest file and put it in a format that the New-App cmdlet can handle.
2. Correct answer: C
A. Incorrect: This solution can work, but it requires extra effort because you have to create a new device access rule to block each individual type of device you don’t want. You won’t know those devices have connected until you review the logs.
B. Incorrect: This solution can work, but it requires extra effort. You (or another administrator) have to manually review each quarantined device and decide whether to release it.
C. Correct: This is the simplest solution because you only need a single device-access rule for each device family. The default organizational rule blocks all other devices.
D. Incorrect: This solution can work, but it requires you to get the sync statistics for each user, and then touch each user mailbox with Set-CASMailbox. It also doesn’t prevent banned devices from syncing in the first place.
3. Correct answer: D
A. Incorrect: The Set-Mailbox cmdlet can’t be used to change ActiveSync settings for user mailboxes.
B. Incorrect: This cmdlet can change a limited range of EAS settings for all users of EAS on a specific virtual directory and server, not only for the selected users.
C. Incorrect: The Set-CASMailbox cmdlet is used to set EAS policy settings, but the specified parameter can only be used to change the OWA mailbox policy applied to a user.
D. Correct: This cmdlet lets you specify which EAS device policy you want to apply to a specific mailbox.
Objective 2.4: Thought experiment
The requirements state that the servers are running both CAS and Mailbox roles. The DAG is also deployed. Because of this configuration, WNLB can’t be used for load-balancing client access traffic. The requirements call for cost-efficient load-balancer deployment, which would require Layer 4 configuration. However, the conflicting requirement also states that server usage must be maximized during single workload failures. This requirement can be addressed with Layer 4 only if deploying multiple namespaces, but the requirements state a unified namespace design is selected, which rules out Layer 4 load balancing as an option. Layer 7 load balancing meets the requirements of achieving higher server efficiency during single workload failures when the server is operational.
Objective 2.4: Review
1. Correct answers: A, C, and D
A. Correct: Configuring SSL decryption and re-encryption on load balancer is a Layer 7 configuration.
B. Incorrect: Even though the servers are located on the dedicated subnet, two-arm configuration isn’t a requirement. Clients can still connect through load balancer configured with one-arm setup. The answer is only incorrect because you have to select what you must do.
C. Correct: You need to install the same certificate on all CAS servers, so the load balancer can distribute client connections without any affinity requirements.
D. Correct: NAT is required to meet the routing requirements. Without configuring NAT, the server must use load balancer as a default gateway, which wouldn’t meet stated requirements.
2. Correct answer: A
A. Correct: UM call router service on CAS servers listen to TCP ports 5060 and 5061.
B. Incorrect: Exchange UM service on the Mailbox server listens on TCP ports 5062 and 5063.
C. Incorrect: The UM worker service on the Mailbox server listens on TCP ports 5065 and 5067 when configured for unsecured SIP communications.
D. Incorrect: The UM worker service on the Mailbox server listens on TCP ports 5066 and 5068 when configured for secured SIP communications.
3. Correct answer: A
A. Correct: All the stated workloads are HTTP workloads that use TCP port 443 to connect to Exchange CAS servers.
B. Incorrect: TCP port 135 is an RPC endpoint mapper, which doesn’t need to be load balanced for client connections.
C. Incorrect: TCP ports 5060 and 5061 are UM ports. Requirements state UM isn’t planned for the deployment.
D. Incorrect: Affinity isn’t required for client connections to Exchange 2013 CAS servers. Setting affinity on WNLB to “Network” sends all clients from a subnet to one CAS server, which won’t achieve even client-connection distribution.
Objective 2.5: Thought experiment
Internally, if the client computers are domain joined, they can obtain Autodiscover information using SCP from domain controllers. Even if appropriate internal URLs aren’t configured explicitly, default internal URLs that are configured to use server FQDN allow clients to connect. The SSL warnings are an indication of either incorrect URL configuration, the use of a self-signed certificate, or both. Also possible is that a trusted certificate is installed, but it doesn’t contain appropriate FQDNs in the subject name or the subject alternate names, resulting in a certificate warning. Ensure internal URLs are configured to use the appropriate designed namespace. Also ensure that trusted certificate includes the appropriate namespaces and is assigned to IIS service on Exchange servers. This should resolve internal SSL certificate prompts.
External user connectivity issues indicate the possibility that no external URLs are configured. This is apparent in the problem statement because users are unable to configure their Outlook or Activesync clients. OWA works from outside, despite an SSL error that indicates that expected external URLs might be configured in DNS to resolve to Exchange servers. However, when Autodiscover fails to return the appropriate URLs, reported connectivity issues are expected. Configure appropriate external URLs for all workloads that need to be accessed externally. Also ensure that the appropriate certificate is obtained and assigned to IIS service on Exchange servers.
Objective 2.5: Review
1. Correct answers: B and D
A. Incorrect: TCP port 25 is used by SMTP, which isn’t required to secure the connection using SSL.
B. Correct: TCP port 995 is assigned to POP3 services for secure access.
C. Incorrect: TCP port 443 is used for secure web access.
D. Correct: TCP port 993 is assigned to IMAP4 services for secure access.
2. Correct answers: A and B
A. Correct: Outlook Anywhere must be enabled on all Exchange 2010 servers in a coexistence environment for Exchange 2013 servers to be able to proxy Outlook Anywhere connections successfully.
B. Correct: Negotiate is the default authentication method used by Exchange 2013, which isn’t supported by previous versions of Exchange servers. NTLM must be enabled for Outlook Anywhere to work with previous versions of Exchange servers.
C. Incorrect: While Basic authentication can be assigned to Outlook Anywhere on Exchange 2013 servers, it isn’t required for given requirements.
D. Incorrect: Configuring the DefaultAuthenticationMethod parameter on Exchange 2013 server is ambiguous. Without the required authentication method it isn’t addressing the requirements.
3. Correct answers: A, B, and D
A. Correct: The error indicates the Outlook client is unable to connect to EWS URL. Configuring the appropriate URLs is one of the valid steps to address the issue.
B. Correct: Configuring DNS to resolve EWS URLs to the appropriate IP address is a valid step to resolve the issue.
C. Incorrect: In Exchange 2013, Client Access servers front-end all client traffic and present the SSL certificate that must be trusted by the client. The certificate assigned to the Mailbox servers is used and trusted by Client Access servers, even if it’s self-signed.
D. Correct: In Exchange 2013, Client Access servers front-end all client traffic and present a SSL certificate that must be trusted by the client.