Chapter 5. Secure your Software-Defined Datacenter
Now that you have deployed a Software-Defined Datacenter, it’s time to focus on security. Securing the Software-Defined Datacenter is an important and often overlooked step in deployment. New features included in Windows Server and System Center 2016 can help ensure your Software-Defined Datacenter environment is secure and protected.
The new Guarded Fabric and Shielded VMs features of Windows Server 2016 help protect sensitive guest workloads by encrypting the VM data and protecting it from a compromised host. Your Software-Defined Datacenter can use the latest Trusted Computing features to protect the fabric and guest workloads from attackers. But securing the Software-Defined Datacenter does not rely solely on the new, sophisticated security features of Windows Server 2016. Good old-fashioned Role-Based Access Control policies and firewall rules are equally important in securing the fabric.
This exam focuses on implementing Shielded VMs on a Guarded Fabric using the new Host Guardian Service in Windows Server 2016. You will need a basic understanding of security hardware features like Trusted Platform Module (TPM) and the Unified Extensible Firmware Interface (UEFI) specification in order to implement a Guarded Fabric. Understanding common malware scenarios and basic attack vectors like Pass-the-Hash (PtH) will provide context for implementing advanced security features like Device Guard and Credential Guard. General knowledge of firewall rules is necessary to implement Access Control Lists (ACLs) on network objects. Navigating Public Key Infrastructure (PKI) is also helpful because many components rely on X.509 certificates.
RECOMMENDED READING Hyper-V Security
As a prerequisite to understanding how to secure the Software-Defined Datacenter, review Hyper-V security best practices defined here https://docs.microsoft.com/en-us/windows-server/virtualization/hyper-v/plan/plan-for-hyper-v-security-in-windows-server-2016.
Skills in this chapter:
![]() Skill 5.1: Secure the compute environment
Skill 5.1: Secure the compute environment
![]() Skill 5.2: Secure the network environment
Skill 5.2: Secure the network environment
Skill 5.1 Secure the compute environment
Attackers are constantly finding new ways to compromise workloads in the datacenter. Traditional virtualization technology operates on a “trust-the-fabric” model where tenants are inherently trusting fabric administrators with access to their VMs. Windows Server and System Center 2016 provide mechanisms that allow tenants to run workloads on a provider’s infrastructure, while protecting against inspection, theft and tampering from malware in the host fabric or rogue system administrators.
A Guarded Fabric uses specially configured hardware to ensure health of Hyper-V hosts allowing them run to encrypted virtual machines. By implementing Shielded VMs, the data inside the VM as well as the memory associated with the VMs process remain encrypted at rest and in flight ensuring even the most sensitive workloads can run in a cloud environment. Tenants can securely deploy virtual machines while maintaining secrets ensuring that sensitive data like local administrator passwords on VMs remain protected.
Windows Server 2016 takes advantage of the latest hardware security enhancements to protect both hosts and virtual machines from malware. Virtual Secure Mode leverages the virtualization extensions of CPU hardware to provide additional security protection to ensure that only trusted applications run on a host or guest OS and that secrets are protected in memory. Support for Secure Boot of both hosts and guests ensures that malware cannot be injected into the boot process of operating systems.
System Center 2016 provides role-based access control allowing administrators to configure the cloud environment using the principal of least privilege while ensuring tenant administrators and self-service users can manage infrastructure and workloads as needed. Credentials used by VMM to manage the fabric are also stored securely.
This skill covers how to:
![]() Determine the requirements for Host Guardian Service and implement
Determine the requirements for Host Guardian Service and implement
Host Guardian Service
![]() Implement Shielded VMs for new VMs using templates
Implement Shielded VMs for new VMs using templates
![]() Implement Shielded VMs for existing virtual machines
Implement Shielded VMs for existing virtual machines
![]() Implement Guarded Fabric solutions
Implement Guarded Fabric solutions
![]() Configure Run As accounts and User Roles
Configure Run As accounts and User Roles
![]() Implement Role Based Access Control (RBAC)
Implement Role Based Access Control (RBAC)
![]() Implement Code Integrity Solution
Implement Code Integrity Solution
![]() Implement secure boot for Windows and Linux guests
Implement secure boot for Windows and Linux guests
![]() Implement Credential Guard
Implement Credential Guard
Determine the requirements for Host Guardian Service and implement Host Guardian Service
The Host Guardian Service (HGS) in Windows Server 2016 provides attestation and key protection that ensures shielded VMs can run on authorized Hyper-V servers known as guarded hosts. Two attestation modes are support by HGS:
![]() Admin-trusted attestation This mode enables encryption supported VMs, which ensure the health of the guarded hosts, but does not block the administrator from managing the VM. This option is useful for compliance scenarios where virtual machines must be encrypted at rest and in-flight, but the fabric administrator is trusted.
Admin-trusted attestation This mode enables encryption supported VMs, which ensure the health of the guarded hosts, but does not block the administrator from managing the VM. This option is useful for compliance scenarios where virtual machines must be encrypted at rest and in-flight, but the fabric administrator is trusted.
![]() TPM-trusted attestation This mode enables shielded VMs, which ensure health of the guarded hosts, and protects virtual machines from malicious administrators. This option is recommended for multitenant hosting and secure enterprise environments. The hosts must have a hardware TPM version 2.0.
TPM-trusted attestation This mode enables shielded VMs, which ensure health of the guarded hosts, and protects virtual machines from malicious administrators. This option is recommended for multitenant hosting and secure enterprise environments. The hosts must have a hardware TPM version 2.0.
The HGS service can be deployed on physical servers or virtual machines and supports clustering for high availability. A server with eight cores and 4GB of RAM can support up to 1000 Hyper-V hosts.
HGS uses an internal Active Directory for management and the server should not be joined to the same forest as the Hyper-V hosts or fabric management tools. If using admin-trusted attestation mode, you must create a one-way trust between this domain and the fabric domain.
The HGS uses certificates to authorize hosts to run shielded VMs. The certificates represent key pairs for encryption and signing. The key pairs should be stored in a hardware security module when possible.
![]() Exam Tip
Exam Tip
The SSL certificates used by HGS should be obtained from a trusted certificate authority. In a hosted environment, these should be obtained from a well-known, public CA. Hosters can also enable “bring your own key” scenarios by allowing tenants to upload certificates out-of-band.
While the HGS can be installed using the UI and PowerShell, it is recommended to deploy HGS on Server Core. To deploy the HGS using PowerShell, follow these instructions:
1. Deploy a Windows 2016 VM or Physical Server that is not domain-joined.
2. Install the HGS server role.
Install-WindowsFeature -Name HostGuardianServiceRole -IncludeManagementTools
-Restart
3. Install HGS in a new forest.
$password = ConvertTo-SecureString -AsPlainText “<password>” -Force
Install-HgsServer -HgsDomainName “secure.contoso.int” -
SafeModeAdministratorPassword $password -Restart
4. Initialize the HGS cluster using a suitable DNS name, attestation mode and certificates.
$certpass1 = ConvertTo-SecureString -AsPlainText “<password>” -Force
$certpass2 = ConvertTo-SecureString -AsPlainText “<password>” -Force
Initialize-HgsServer -HgsServiceName “hgs” -SigningCertificatePath
“.signingCert.pfx” -SigningCertificatePassword $certpass1
-EncryptionCertificatePath “.encryptCert.pfx” -EncryptionCertificatePassword
$certpass2 -TrustTpm
5. Verify the HGS configuration.
Get-HgsTrace -RunDiagnostics
NEED MORE REVIEW? Host Guardian Service
To read more about deploying the host guardian service, see https://docs.microsoft.com/en-us/windows-server/virtualization/guarded-fabric-shielded-vm/guarded-fabric-prepare-for-hgs.
Implement Shielded VMs for new VMs using templates
Shielded VMs can be deployed from properly configured VMM templates. A Shielded VM template references a specially signed VHDX template disk that has been prepared using the Template Disk Wizard. This wizard enables Bitlocker on the VHDX and creates a hash to ensure the disk has not been tampered with when it is deployed. The disk is signed using a 2048-bit certificate using RSA encryption.
A Shielding Data File is prepared by the tenant administrator that contains customization information for the VM template. The file uses a specially crafted answer file created by the New-ShieldingDataAnswerFile cmdlet, a Volume Signature Catalog provided by the template creator, and a guardian metadata file provided by the HGS. Additionally, the tenant administrator provides an owner guardian in the form of encryption and signing certificates that protect the VM.
Lastly, a Shielding Helper VHDX enables deployment of shielded VMs from the Shielded VM template. This VHDX file contains a specially configured installation of Windows Server 2016 that allows VMM to inject settings from the Shielding Data File into the VM at creation time.
A Shielded VM template has fewer OS configuration options than a standard VMM template. Settings like domain join information, custom scripts, and networking configuration are defined by the tenant administrator in the Shielding Data File.
1. Create a Shielded Template VHDX.
A. Create a Gen2 VM with Secure Boot enabled and install Windows Server 2016 on the VHDX using standard VM creation procedures.
B. Obtain a signing certificate for the VHDX (RSA Encryption, 2048 bits). See Figure 5-1 for a sample certificate.
C. Install Shielded VM Tools if necessary using Server Manager or PowerShell:
Install-WindowsFeature RSAT-Shielded-VM-Tools
D. Start Template Disk Wizard.
TemplateDiskWizard.exe
E. Select the certificate that will be used to sign the template disk.

F. Choose the un-prepared VHDX template disk.
G. Give the disk a friendly name and a version number in 1.0.0.0 format.
H. Review the settings and click Generate to create the Shielded VHDX (Figure 5-2).

2. Copy the Shielded VHDX to the VMM library and refresh the VMM library server.
3. Create a Shielded VM template using the prepared VHDX.
A. In Library > Library Servers, browse to the Shielded VHDX. Right-click and select Create VM Template.
B. Follow the wizard to create the VM template as outlined in Chapter 4, “Implement DataCenter Compute Solutions with Virtual Machine Manager (VMM).” Create a shielding data file.
C. Use the New-ShieldingDataAnswerFile PowerShell cmdlet to generate an answer file for creating Shielded VMs
$password = ConvertTo-SecureString “<password>” -AsPlainText -Force
New-ShieldingDataAnswerFile -AdminPassword $password
D. Get the volume signature catalog file of the prepared VHDX from VMM using PowerShell.
$disk = Get-SCVirtualHardDisk -Name “TMPL_16_G2_CORE_SHIELDED.vhdx”
$vsc = Get-SCVolumeSignatureCatalog -VirtualHardDisk $disk
$vsc.WriteToFile(“.TMPL_16_G2_CORE_SHIELDED.vhdx”)
E. Obtain the guardian metadata file from the HGS using PowerShell.
Invoke-WebRequest “http://hgs.secure.contoso.int/KeyProtection/service/metadata/
2014-07/metadata.xml” -OutFile “C:adminshieldedContosoHGS.xml”
F. Start the Shielding Data File Wizard.
ShieldingDataFileWizard.exe
G. Select the option to create new shielding data file and specify a location. Click Next.
H. Import the HGS guardian metadata file: Click Manage Local Guardians, then click Import. Select the HGS guardian metadata file, assign a name and click OK.

I. Create an owner guardian. Click Manage Local Guardians, then click Create. Specify a name for the guardian and select the option to create a self-signed guardian. Click Next and Create.
J. Select the owner guardian from the drop down and select the HGS guardian for the shielding data file. Click Next.

K. Click Add and select the Volume Signature Catalog file of the prepared VHDX. Click OK.
L. Click Browse and select the unattend.xml answer file you created using the
New-ShieldingDataAnswerFile cmdlet. Click Next.
M. Review the settings and click Generate to create the Shielding Data File.
4. Create a VM from the Shielded VM Template using the Shielding Data File in VMM.
A. In Library > Templates > VM Templates select the shielded VM template and click Create Virtual Machine.
B. On the Select Shielding Data File tab, Browse and import the Shielding Data File you created using the wizard.
C. Complete the wizard to deploy the VM as outlined in Chapter 4.
NEED MORE REVIEW? Shielded Vm Templates
To read more about creating a shielded VM template, see https://docs.microsoft.com/en-us/system-center/vmm/guarded-deploy-template.
Implement Shielded VMs for existing virtual machines
Existing VMs can be shielded by applying a Shielding Data File to the VM. This kind of Shielding Data File does not include an answer file and will shield the VM using the configured owner and host guardians. The Shielding Helper VHDX is used to protect the existing VM.
The existing VM must meet the following conditions:
![]() Must be a Generation 2 VM
Must be a Generation 2 VM
![]() Must have Secure Boot enabled
Must have Secure Boot enabled
![]() Operating System must be Windows 8/Windows Server 2012 or higher
Operating System must be Windows 8/Windows Server 2012 or higher
![]() The OS disk must use a GUID partition table
The OS disk must use a GUID partition table
To shield an existing VM:
1. Prepare a Shielding Data File for the VM.
A. Install Shielded VM Tools if necessary using Server Manager or PowerShell:
Install-WindowsFeature RSAT-Shielded-VM-Tools
B. Start the Shielding Data File Wizard.
ShieldingDataFileWizard.exe
C. Select the option to create a new shielding data file for an existing VM and specify a location. Click Next.
D. Select the owner guardian and host guardians.
E. Review the settings and click Generate.
2. Shield the existing VM using the Shielding Data File in VMM.
A. Ensure that the VM has been migrated to a Guarded Host.
B. In VMs and Services > All Hosts, right-click the VM and click Shield.
C. Click Import and select the Shielding Data File.
D. Click OK to being the shielding process.
NEED MORE REVIEW? Shielded Vms
To read more about provisioning shielded VMs in the VMM fabric, see https://docs.microsoft.com/en-us/system-center/vmm/guarded-deploy-vm.
Implement Guarded Fabric solutions
Guarded Hosts are Hyper-V servers that have been successfully authorized by the Host Guardian Service (HGS). To facilitate this, a host using TPM attestation that has secure boot enabled sends its TPM endorsement key (EKpub), a log of the processes that loaded during the most recent boot sequence, and the Code Integrity (CI) Policy that was applied to the HGS. The HGS compares the TPM endorsement key against its list of known hosts and the boot log and CI Policy against validated configurations. If the HGS affirms the host then a health attestation certificate is provided. This certificate is used to authorize the Key Protection Service (KPS), which provides decryption keys needed to load shielded VMs (see Figure 5-5).
To boot a shielded VM, the host requests the VM key from the KPS by providing its health certificate and the VMs Key Protector–an encrypted secret known only to the KPS. After confirming the health attestation certificate, the KPS decrypts the VM Key Protector and securely returns it to the host allowing it to boot the virtual machine. The decrypted VM Key Protector is protected on the Guarded Host using Virtualization-based Security (VBS) that prevents operating system administrators from accessing the key.
Guarded Hosts must meet hardware requirements and be registered with the HGS prior to applying a CI Policy in VMM. A Guarded Host must meet the following requirements:
![]() Support IOMMU and Second Level Address Translation (SLAT)
Support IOMMU and Second Level Address Translation (SLAT)
![]() Have a hardware TPM module v2.0
Have a hardware TPM module v2.0
![]() Support UEFI 2.3.1c or later
Support UEFI 2.3.1c or later
![]() Configured to boot using UEFI
Configured to boot using UEFI
![]() Have Secure Boot Enabled
Have Secure Boot Enabled
![]() Run Windows Server 2016 Datacenter edition
Run Windows Server 2016 Datacenter edition
![]() Exam Tip
Exam Tip
Attestation happens when the host starts, and subsequently every 8 hours.

What are the core components of Guarded Fabric?
![]() Quick check answer
Quick check answer
The core components that make up Guarded Fabric are the Attestation Service and Key Protection Service that run as part of the Host Guardian Service and Guarded Hyper-V hosts that run encrypted Shielded VMs.
Follow these steps to implement Guarded Hosts using PowerShell:
1. Confirm the hosts meet the minimum requirements
2. Confirm the hardware TPM is initialized and retrieve the public TPM Endorsement Key from the Guarded Hosts:
(Get-PlatformIdentifier -Name “HV01”).InnerXml | Out-File C:HV01.xml -Encoding
UTF8
3. Create a Code Integrity (CI) Policy from a reference host:
A. Generate the CI policy and convert it to binary format on the reference host
New-CIPolicy -Level Publisher -Fallback Hash -FilePath “C:HW1CodeIntegrity.xml”
-UserPEsConvertFrom-CIPolicy -XmlFilePath “C:HW1CodeIntegrity.xml” -
BinaryFilePath “C:HW1CodeIntegrity.p7b”
B. Apply the CI policy to a reference host in audit mode:
Copy-Item -Path “C:HW1CodeIntegrity.p7b” -Destination
“C:WindowsSystem32CodeIntegritySIPolicy.p7b”
Restart-Computer
C. Test the policy by confirming applications and management tools continue to work as expected:
D. Change the policy to enforced mode on the reference host:
Set-RuleOption -FilePath “C:HW1CodeIntegrity.xml” -Option 3 -Delete
ConvertFrom-CIPolicy -XmlFilePath “C:HW1CodeIntegrity.xml” -BinaryFilePath
“C:HW1CodeIntegrity.p7b”
Copy-Item -Path “C:HW1CodeIntegrity.p7b” -Destination
“C:WindowsSystem32CodeIntegritySIPolicy.p7b”
Restart-Computer
4. Capture the TPM baseline from the reference host:
Get-HgsAttestationBaselinePolicy -Path “C:HW1Config.tcglog”
5. Register the Guarded Hosts with HGS:
Add-HgsAttestationTpmHost -Path “C:HV01.xml” -Name “HV01.contoso.int” -Force
6. Create a Shielding Helper VHDX:
A. Create a Gen2 VM in Hyper-V with a blank VHDX and install Windows Server 2016 Core on it using the Windows Server ISO media.
B. Start the VM, complete setup tasks, log into the desktop, and run windows update. Once the VM is in a working state, shutdown down the VM.
C. Configure the VHDX to become a Shielding Helper VHDX:
Initialize-VMShieldingHelperVHD -Path “C:Virtual MachinesShieldingHelper.VHDX”
D. Copy the VHDX to the VMM library
E. Delete the VM from Hyper-V
![]() Exam Tip
Exam Tip
Do not use an existing template for the Shielding Helper VHDX because can cause a GPT disk signature collision during the shielding process.
7. Configure the Host Guardian Service in VMM:
A. Copy Code Integrity Policy to VMM library.
B. In Settings > General > Host Guardian Service Settings click Properties.
C. Configure the Attestation and Key Protection URLs, add Code Integrity Policies stored on the VMM library server, and select the Shielding Helper VM.

8. Provision the Guarded Hosts in VMM.
A. In Fabric > Servers right-click a node in the cluster and select Start Maintenance Mode.
B. Once the job has completed and the host is in Maintenance Mode, right-click the node and select Properties.
C. In the Host Guardian Service tab, enable the check box to use the Host Guardian Service settings from VMM and apply the appropriate Code Integrity Policy to the host.

NEED MORE REVIEW? Guarded Hosts
To read more about provisioning guarded hosts in VMM, see https://docs.microsoft.com/en-us/system-center/vmm/guarded-deploy-host.
Configure Run As accounts and User Roles
VMM uses Run As accounts to store credentials for VMM tasks and processes and User Roles to grant management permissions to users. Credentials for Run As accounts are stored and accessed securely using the Windows Data Protection API (DPAPI), which protects passwords using 3DES encryption. Encryption keys can be securely stored in Active Directory during installation of VMM. Run As accounts can be used for the following tasks:
![]() Host Accounts These are used to interact with fabric virtualization hosts.
Host Accounts These are used to interact with fabric virtualization hosts.
![]() BMC Accounts These are used to communicate with host BMC for out-of-band management.
BMC Accounts These are used to communicate with host BMC for out-of-band management.
![]() External Accounts These are used to connect to external applications like SCOM.
External Accounts These are used to connect to external applications like SCOM.
![]() Network Device Accounts These are used to communicate with network devices, like the network controller, load balancers and gateways in SDN.
Network Device Accounts These are used to communicate with network devices, like the network controller, load balancers and gateways in SDN.
![]() Profile Accounts These are used by VMM templates for deploying services or creating guest OS profiles.
Profile Accounts These are used by VMM templates for deploying services or creating guest OS profiles.
User Roles control the permissions and scope of management tasks for users. A User Role consists of a profile that defines the set of permissions, a scope which defines the list of objects the permissions apply to, and a membership list referencing the Active Directory objects that are assigned to the role. The scope can contain host groups, clouds, VM networks, library servers, and library resources. VMM supports the following user role profiles:
![]() Administrator Members of this role can perform all administrative actions including adding WSUS servers and enabling updates of VMM fabric.
Administrator Members of this role can perform all administrative actions including adding WSUS servers and enabling updates of VMM fabric.
![]() Fabric Administrator Members of this role can perform all administrative tasks within their assigned host groups, clouds and library servers.
Fabric Administrator Members of this role can perform all administrative tasks within their assigned host groups, clouds and library servers.
![]() Read-Only Administrator Members of this role can view properties, status and jobs within their assigned scope, but cannot modify objects.
Read-Only Administrator Members of this role can view properties, status and jobs within their assigned scope, but cannot modify objects.
![]() Tenant Administrator Members of this role can create, deploy and manage their own virtual machines, services, VM networks, quotas and self-service user permissions on objects in their scope.
Tenant Administrator Members of this role can create, deploy and manage their own virtual machines, services, VM networks, quotas and self-service user permissions on objects in their scope.
![]() Application Administrator Members of this role can create, deploy and manage their own virtual machines and services.
Application Administrator Members of this role can create, deploy and manage their own virtual machines and services.
NEED MORE REVIEW? Roles And Accounts
To read more about roles and accounts in VMM, see https://docs.microsoft.com/en-us/system-center/vmm/manage-account.
Implement Role Based Access Control (RBAC)
VMM supports Role Based Access Control (RBAC) via User Roles. Specific actions for the User Role can be configured for all objects in scope, or for specific clouds. The following permissions can be enabled:
![]() Author Create and manage virtual machine and service templates.
Author Create and manage virtual machine and service templates.
![]() Author VMNetwork Create and manage tenant VM networks.
Author VMNetwork Create and manage tenant VM networks.
![]() Checkpoint Create and manage virtual machine checkpoints.
Checkpoint Create and manage virtual machine checkpoints.
![]() Checkpoint (Restore Only) Restore to, but cannot create virtual machine checkpoints
Checkpoint (Restore Only) Restore to, but cannot create virtual machine checkpoints
![]() Deploy Create virtual machines and services from VHDs or templates
Deploy Create virtual machines and services from VHDs or templates
![]() Deploy (From template only) Create virtual machines and services from templates only
Deploy (From template only) Create virtual machines and services from templates only
![]() Deploy Shielded Create shielded virtual machines
Deploy Shielded Create shielded virtual machines
![]() Local Administrator Grants local administrator rights on virtual machines (required for Deploy From Template Only permission)
Local Administrator Grants local administrator rights on virtual machines (required for Deploy From Template Only permission)
![]() Pause and resume Pause and resume virtual machines and services
Pause and resume Pause and resume virtual machines and services
![]() Receive Receive resources from other self-service users
Receive Receive resources from other self-service users
![]() Remote connection Remotely connect to virtual machines
Remote connection Remotely connect to virtual machines
![]() Remove Delete virtual machines and services
Remove Delete virtual machines and services
![]() Save Put virtual machines and services in a saved state
Save Put virtual machines and services in a saved state
![]() Share Share resources with other self-services users
Share Share resources with other self-services users
![]() Shut down Shut down the guest OS of virtual machines
Shut down Shut down the guest OS of virtual machines
![]() Start Power on virtual machines and services
Start Power on virtual machines and services
![]() Stop Power off virtual machines and services
Stop Power off virtual machines and services
![]() Store and re-deploy Store virtual machines in the library, and re-deploy those virtual machines
Store and re-deploy Store virtual machines in the library, and re-deploy those virtual machines
![]() Quick check
Quick check
You are creating a user role to allow the NOC to manage virtual machines. Which permissions should you enable for them?
![]() Quick check answer
Quick check answer
You should assign the following permissions: Checkpoint, Local Administrator, Remote connection, Pause and Resume, Shut down, Save, Start, Stop. Operations users need permissions to be able to connect and manage virtual machines, but do not require the ability to deploy virtual machines or network components.
To create a user role, follow these steps.
1. In Settings > User Roles, click Create User Role.
2. Specify a name and description for the role and click Next.
3. Choose the appropriate role profile for the user role and click Next.

4. Click the Add button to add Active Directory users and groups to the role.
NEED MORE REVIEW? User Roles
To read more about setting up user roles in VMM, see https://docs.microsoft.com/en-us/system-center/vmm/self-service.
Implement Code Integrity Solution
Device Guard is a new feature in Windows Server 2016 that creates an environment where only software that is trusted can execute. Code Integrity (CI) Policies contain lists of trusted applications that are allowed to run in an environment. These applications have digital signatures that verify the authenticity of the application.
CI Policies contain policy rules that control how Device Guard implements the CI Policy. These can control whether the policy is simply in audit more or if it’s enforced as well as whether the policy should apply to both kernel and user mode binaries. Additional file level rules control which applications can run. They can be based on variety of properties from a hash of signed files by a trusted Certificate Authority. Rules can also be combined via multiple policies.
To create a CI Policy, deploy a reference server on common hardware and install all drivers and software necessary. You can then generate the CI Policy using the New-CIPolicy cmdlet. When creating a policy, you define both a primary file rule level and a failback file rule level. If a binary cannot be trusted based on the primary mechanism, the failback method will be used. For example, a policy configured with a primary file level of Publisher and a failback of Hash, trusts binaries signed by a major CA or subordinate certificate while failing back to a file hash for discovered binaries that are not signed by a trusted CA.
By default, the newly created CI Policy is in audit mode which allows testing of the policy. You must convert the generated CI Policy to binary format to apply it to a host. Once the policy has been confirmed, you can convert it to an enforced CI Policy and apply it to production hosts.
Use PowerShell to create and apply a CI Policy:
#Create a CI Policy in audit mode
New-CIPolicy -Level Publisher -Fallback Hash -FilePath “C:HW1CodeIntegrity.xml”
-UserPEsConvertFrom-CIPolicy -XmlFilePath “C:HW1CodeIntegrity.xml” -BinaryFilePath
“C:HW1CodeIntegrity.p7b”
#Apply the CI Policy in audit mode
Copy-Item -Path “C:HW1CodeIntegrity.p7b” -Destination
“C:WindowsSystem32CodeIntegritySIPolicy.p7b”
Restart-Computer
#Set the policy to enforced mode and re-apply
Set-RuleOption -FilePath “C:HW1CodeIntegrity.xml” -Option 3 -Delete
ConvertFrom-CIPolicy -XmlFilePath “C:HW1CodeIntegrity.xml” -BinaryFilePath
“C:HW1CodeIntegrity.p7b”
Copy-Item -Path “C:HW1CodeIntegrity.p7b” -Destination
“C:WindowsSystem32CodeIntegritySIPolicy.p7b”
Restart-Computer
![]() Exam Tip
Exam Tip
For Server Core, use a primary level of FilePublisher with a failback of Hash. For Server Desktop Experience, use a primary level of Publisher with a failback of Hash.
Implementing a CI Policy requires that Secure Boot be enabled and that an enforced CI Policy binary file named SIPolicy.p7b be placed in the C:WindowsSystem32CodeIntegrity folder of the server. CI Policies are validated during the pre-boot sequence using Secure Boot once the computer is restarted.
NEED MORE REVIEW? Device Guard
To read more about Device Guard in Windows Server 2016, see: https://docs.microsoft.com/en-us/windows/device-security/device-guard/introduction-to-device-guard-virtualization-based-security-and-code-integrity-policies.
Implement secure boot for Windows and Linux guests
Secure Boot is a UEFI feature that prevents unauthorized software from running at boot time. Guarded Hosts use Secure Boot and CI Policies to ensure that only approved components are allowed to run. Similarly, Hyper-V guests can use Secure Boot to ensure the OS has not be tampered with.
Hyper-V enables Secure Boot by providing a Private Key (PK) and Key Exchange Key (KEK) signature database as part of the Hypervisor. In order to Secure Boot a guest, the OS boot loader must be digitally signed and the signature must be listed in the Hyper-V’s UEFI database. Windows Server 2016 provides two templates to be used for Secure Boot:
![]() Microsoft Windows Use this to secure boot a Windows VM.
Microsoft Windows Use this to secure boot a Windows VM.
![]() Microsoft UEFI Certificate Authority Use this to secure boot a supported Linux distribution. For a list of supported Linux distributions, see: https://docs.microsoft.com/en-us/windows-server/virtualization/hyper-v/Supported-Linux-and-FreeBSD-virtual-machines-for-Hyper-V-on-Windows.
Microsoft UEFI Certificate Authority Use this to secure boot a supported Linux distribution. For a list of supported Linux distributions, see: https://docs.microsoft.com/en-us/windows-server/virtualization/hyper-v/Supported-Linux-and-FreeBSD-virtual-machines-for-Hyper-V-on-Windows.
Secure Boot can be configured when deploying a virtual machine in VMM by modifying the Secure Boot setting in the Firmware configuration.
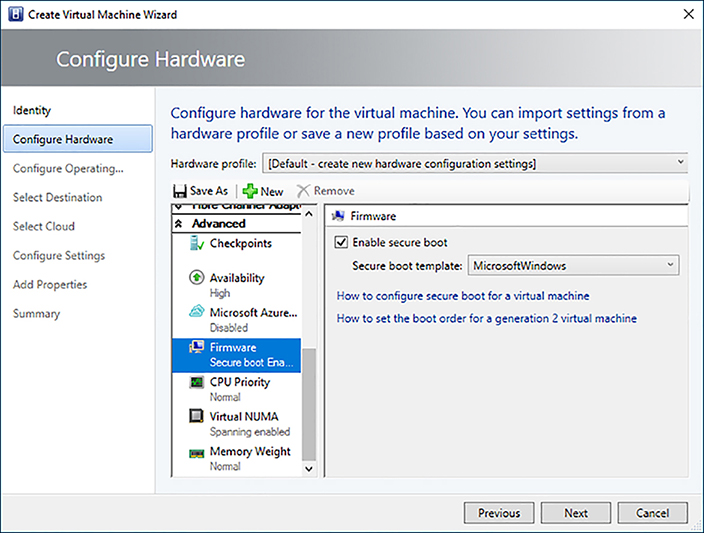
To read more about secure boot in Hyper-V, see: https://docs.microsoft.com/en-us/windows-server/virtualization/hyper-v/learn-more/generation-2-virtual-machine-security-settings-for-hyper-v.
Implement Credential Guard
Credential Guard uses the new Virtualization-based Security (VBS) feature of Windows Server 2016 to protect secrets so only system processes can access them. This helps protect against Pass-the-Hash (PtH) attacks by protecting NTLM password hashes and Kerberos tickets. Without Credential Guard enabled, these secrets are stored in the Local Security Authority (LSA) process memory. Once Credential Guard is enabled, these secrets are protected using VBS, making them inaccessible to the rest of the operating system.
To enable Credential Guard a system must meet the following requirements:
![]() Support IOMMU and Second Level Address Translation (SLAT)
Support IOMMU and Second Level Address Translation (SLAT)
![]() Have a TPM module v2.0
Have a TPM module v2.0
![]() Support UEFI 2.3.1c or later (UEFI 2.6 is required for VBS No-Execute protection)
Support UEFI 2.3.1c or later (UEFI 2.6 is required for VBS No-Execute protection)
![]() Be configured to boot using UEFI
Be configured to boot using UEFI
![]() Have Secure Boot enabled
Have Secure Boot enabled
After enabling Credential Guard, applications that use NTLMv1 authentication, Kerberos DES encryption, unconstrained delegation, and Kerberos TGT ticket extraction will fail. Credentials can be exposed if applications use digest authentication, credential delegation or MS-CHAPv2, even if Credential Guard is enabled.
You can enable Credential Guard using Group Policy, modifying the registry or you can use PowerShell via the Device Guard and Credential Guard hardware readiness tool.
![]() Group Policy You can enable Credential Guard from the Group Policy Management Console under Computer Configuration > Administrative Templates > System > Device Guard. Turn on VBS and set the Platform Security Level to Secure Boot and the Credential Guard Configuration to Enabled with UEFI lock. Group Policy will automatically install the necessary Windows features to support Credential Guard.
Group Policy You can enable Credential Guard from the Group Policy Management Console under Computer Configuration > Administrative Templates > System > Device Guard. Turn on VBS and set the Platform Security Level to Secure Boot and the Credential Guard Configuration to Enabled with UEFI lock. Group Policy will automatically install the necessary Windows features to support Credential Guard.
![]() Registry To enable Credential Guard from the registry, under HKLMSystemCurrentControlSetControlDeviceGuard add a DWORD value named EnableVirtualization-BasedSecurity set to 1, and a DWORD value named RequirePlatformSecurityFeatures set to 1. Under HKLMSystemCurrentControlSetControlLSA add a DWORD value named LsaCfgFlags set to 1.
Registry To enable Credential Guard from the registry, under HKLMSystemCurrentControlSetControlDeviceGuard add a DWORD value named EnableVirtualization-BasedSecurity set to 1, and a DWORD value named RequirePlatformSecurityFeatures set to 1. Under HKLMSystemCurrentControlSetControlLSA add a DWORD value named LsaCfgFlags set to 1.
![]() PowerShell Download the Device Guard and Credential Guard Readiness Tool from https://www.microsoft.com/download/details.aspx?id=53337 and enable it with this command:
PowerShell Download the Device Guard and Credential Guard Readiness Tool from https://www.microsoft.com/download/details.aspx?id=53337 and enable it with this command:
.DG_Readiness_Tool_v3.2.ps1 -Enable -AutoReboot
You can confirm Credential Guard is activated by viewing the System Information using msinfo32.exe. In the System Summary section, confirm that Credential Guard is listed in the Device Guard Security Services Running value. You can also use PowerShell:
.DG_Readiness_Tool_v3.2.ps1 -Ready
![]() Quick check
Quick check
What security feature of Server 2016 can prevent untrusted applications from executing?
![]() Quick check answer
Quick check answer
Device Guard is the feature that leverages Code Integrity policies that can enforce rules that allow only trusted applications to execute.
NEED MORE REVIEW? Credential Guard
To read more about Credential Guard in Windows Server 2016, see https://docs.microsoft.com/en-us/windows/access-protection/credential-guard/credential-guard.
Skill 5.2 Secure the network environment
The network is typically the most vulnerable component of any virtualized infrastructure, and is the first component attackers target. Windows Server and System Center 2016 provide a number of security configuration settings that help secure the network to prevent unauthorized access and attacks.
Access Control Lists (ACLs) can be applied to various network objects to help control the flow of network traffic on tenant networks. These work with the new Software-Defined Networking stack as well as other network isolation technologies in VMM. Properly configured firewall rules are paramount to a secure network environment.
Additionally, Hyper-V provides security functions that can applied in the virtual switch to help prevent more advanced network attacks. Features like DHCP Guard, Router Guard and MAC Spoofing prevention ensure that VMs only respond to traffic for which they are authorized. Third-party network security appliances can further increase security by providing additional network functions like packet inspection and user-defined routing capabilities.
Securing the management network fabric is equally important to help mitigate any attacks on the host fabric. Configuring firewall rules in Windows Firewall and network firewall appliances will ensure that hosts, management services and network devices communicate only using ports necessary to provide a secure cloud infrastructure.
The skill covers how to:
![]() Implement DHCP Guard
Implement DHCP Guard
![]() Create and use port ACLs with VM networks, VM subnets and virtual NICs
Create and use port ACLs with VM networks, VM subnets and virtual NICs
![]() Create and use global settings for all VMs
Create and use global settings for all VMs
![]() Implement Datacenter Firewall solutions using VMM
Implement Datacenter Firewall solutions using VMM
![]() Create ACL Rules using Datacenter Firewall
Create ACL Rules using Datacenter Firewall
![]() Configure and apply Network Controller network policies
Configure and apply Network Controller network policies
![]() Secure the tenant networks
Secure the tenant networks
![]() Plan for integration of security appliances into tenant network infrastructure
Plan for integration of security appliances into tenant network infrastructure
![]() Secure VMM network fabric
Secure VMM network fabric
Implement DHCP Guard
DHCP Guard is a feature of Hyper-V that prevents rogue DHCP servers from responding to DHCP clients by dropping any DHCP reply packets in the virtual switch. This ensures that VMs running unauthorized DHCP servers do not provide IP address information that can be used to intercept packets. It is especially important to enable this feature on multi-tenant networks to ensure that only the provider’s DHCP server responds to client requests.
You can enable DHCP Guard in the advanced settings of the Network Adapter attached to a VM in Hyper-V Manager, or by enabling it in the Security Settings of a virtual network adapter port profile as outline in Chapter 2, “Implement Software-Defined Networking (SDN).”
Create and use port ACLs with VM networks, VM subnets and virtual NICs
The Software-Defined Network in Windows Server and System Center 2016 that is part of the distributed datacenter firewall supports 5-tuple Access Control Lists (ACLs) that can be applied to VM networks, VM subnets and network adapters. One or more rules can be assigned to the ACL that controls the traffic flow. These rules are applied at the vSwitch port allowing policies to manage traffic outside of the guest operating system.
Port ACLs work with the new SDN stack in Windows Server and System Center 2016 as well as HNVv1 and VLAN-based virtual networks. When using Port ACLs in SDN, the Network Control manages distribution of the rules and notifying objects of updates. For other scenarios, you must manually re-apply the Port ACL to objects after a change.
In VMM, Port ACLs are managed using PowerShell:
1. Create a port ACL using the New-SCPortACL cmdlet. Used the ManagedByNC flag for SDN deployments.
$acl = New-SCPortACL -Name “TENANT_A_VNET1_ACL” -Description “ACL for TENANT A
VNET1” -ManagedByNC
2. Create one or more rules for the ACL.
New-SCPortACLRule -PortACL $acl -Name “AllowRDPAccess” -Description “Enable RDP
Access to VMs” -Type Inbound -Action Allow -Priority 1001 -LocalPortRange 3389
3. Attach the ACL to a VM network, VM subnet or virtual NIC.
Get-SCVMNetwork -Name “TENANT_A_VNET1” | Set-SCVMNetwork -PortAcl $acl
Get-SCVMSubnet -Name “TENANT_A_SUBNET1” | Set-SCVMSubnet -PortAcl $acl
Get-SCVirtualMachine -Name “VM1” | Get-SCVirtualNetworkAdapter | Set-
SCVirtualNetworkAdapter -PortAcl $acl
NEED MORE REVIEW? Port Acls
To read more about port ACLs in VMM, see https://docs.microsoft.com/en-us/system-center/vmm/hyper-v-acls.
Create and use global settings for all VMs
Port ACLs can also be attached globally so they apply to all VMs managed by VMM. A Global Settings port ACL is applied to all VM virtual network adapters in the infrastructure.
1. Attach the ACL to a VMM server using PowerShell.
Set-SCVMMServer -VMMServer “VMM.contoso.int” -PortAcl $acl
Implement Datacenter Firewall solutions using VMM
The Datacenter Firewall included in Microsoft SDN can be managed using VMM via the Network Controller. After the Network Controller has been added as a Network Service to VMM, the ManagedByNC flag on the Port ACL PowerShell cmdlets will direct VMM to manage rules via the REST API of the Network Controller rather than configuring them directly on the Hyper-V hosts. You cannot apply Port ACLs to objects managed by the Network Controller if the ManagedByNC flag is set to $false. Additionally, the priority range for SDN port ACLs is limited to 100-65400 as the Network Controller does not support priority below 100. Only a single Port ACL is supported per network object.
When using SDN, Port ACLs can only be applied to virtual subnets and virtual network adapters. A Port ACL applied to a virtual subnet will apply to any network interface connected to that subnet. A Port ACL applied to a network interface will apply to all traffic on that interface. All rules associated with the Port ACL will be enforced anywhere the Port ACL is applied.
Port ACLs are exposed only through PowerShell cmdlets in VMM and cannot be configured in the VMM console.
Create ACL Rules using Datacenter Firewall
ACL Rules are firewall policies attached to a Port ACL that control traffic flow. Rules are processed sequentially using a priority setting between 100 and 65400. Once a rule is matched, no additional rules are processed. A rule can be applied to inbound or outbound traffic and can allow or deny that traffic based on a 5-tuple policy consisting of: LocalAddressPrefix, LocalPortRange, RemoteAddressPrefix, RemotePortRange and Protocol. VMM supports ACL rules with TCP or UDP protocol only.
The Datacenter Firewall included in the SDN stack of Windows Server and System Center 2016 also supports specific tags that can be used for addresses: VIRTUALNETWORK, INTERNET, and AZURELOADBALANCER. Review Chapter 2 for additional information on ACL rules in SDN.
A Port ACL can have many rules. In VMM, use PowerShell to add a rule to a Port ACL:
New-SCPortACLRule -PortACL $acl -Name “AllowRDPAccess” -Description “Enable RDP Access to VMs” -Type Inbound -Action Allow -Priority 1001 -LocalPortRange 3389
Configure and apply Network Controller network policies
ACLs can also be configured directly on the Network Controller by interacting with the REST API. The Network Controller supports applying Access Control Lists to virtual subnets and network interface IP configurations. Use PowerShell to create an ACL, an ACL rule and apply it to a virtual subnet:
$rules = @()
$rule = New-Object Microsoft.Windows.NetworkController.AclRule
$rule.ResourceId = “Tenant1_Rule1”
$rule.properties = New-Object Microsoft.Windows.NetworkController.AclRuleProperties
$rule.properties.Protocol = “TCP”
$rule.properties.SourcePortRange = “0-65535”
$rule.properties.DestinationPortRange = “3389”
$rule.properties.Action = “Allow”
$rule.properties.SourceAddressPrefix = “*”
$rule.properties.DestinationAddressPrefix = “192.168.1.101”
$rule.properties.Priority = “1001”
$rule.properties.Type = “Inbound”
$rule.properties.Logging = “Enabled”
$rules += $rule
$aclprops = New-Object Microsoft.Windows.NetworkController.AccessControlListProperties
$aclprops.AclRules = $rules
New-NetworkControllerAccessControlList -ConnectionUri $uri -ResourceId
“Tenant1_Subnet1_ACL” -Properties $aclprops
$acl = Get-NetworkControllerAccessControlList -ConnectionUri $uri -ResourceId
“Tenant1_Subnet1_ACL”
$subnet = Get-NetworkControllerVirtualSubnet -ConnectionUri $uri -ResourceId
“Tenant1_Subnet1” -VirtualNetworkId “Tenant1_VNet1”
$subnet.properites.AccessControList = $acl
New-NetworkControllerVirtualSubnet -ConnectionUri $uri -ResourceId “Tenant1_Subnet1”
-VirtualNetworkId “Tenant1_VNet1” -Properties $($subnet.properties)
NEED MORE REVIEW? Datacenter Acls
To read more about using ACLs to manage datacenter network traffic flow, see https://docs.microsoft.com/en-us/windows-server/networking/sdn/manage/use-acls-for-traffic-flow.
Secure the tenant networks
Properly securing tenant networks requires enabling several networking security features and creating appropriate firewall rules. Follow these best practices for securing tenant networks:
![]() Segregate tenant networks using SDN, network virtualization, or VLAN-based isolation.
Segregate tenant networks using SDN, network virtualization, or VLAN-based isolation.
![]() Do not allow MAC spoofing unless required for clusters or network appliances. Ensure that tenant virtual network adapter port profiles do not have this option enabled.
Do not allow MAC spoofing unless required for clusters or network appliances. Ensure that tenant virtual network adapter port profiles do not have this option enabled.
![]() Enable DHCP Guard on tenant virtual network adapter port profiles to prevent unauthorized VMs from responding to DHCP requests.
Enable DHCP Guard on tenant virtual network adapter port profiles to prevent unauthorized VMs from responding to DHCP requests.
![]() Enable Router Guard on tenant virtual network adapter port profiles to prevent unauthorized VMs from providing certain types of ICMP packets for redirection and advertisement.
Enable Router Guard on tenant virtual network adapter port profiles to prevent unauthorized VMs from providing certain types of ICMP packets for redirection and advertisement.
![]() Configure default firewall rules for VMM globally and the Datacenter Firewall that block traffic by default.
Configure default firewall rules for VMM globally and the Datacenter Firewall that block traffic by default.
![]() Configure firewall rules that allow a VM to communicate only using its assigned IP address.
Configure firewall rules that allow a VM to communicate only using its assigned IP address.
![]() Enable logging on ACL rules.
Enable logging on ACL rules.
![]() Use VMM to manage the Network Controller.
Use VMM to manage the Network Controller.
![]() Quick check
Quick check
What feature of Software-Defined Networking in VMM 2016 can you use to secure tenant network traffic?
![]() Quick check answer
Quick check answer
Port ACLs are sets of rules that filter traffic. ACL rules are 5-tuple policies that can be applied to virtual subnets and virtual network adapters.
Plan for integration of security appliances into tenant network infrastructure
Network security appliances can be integrated into the tenant network infrastructure to provide more advanced security features like Intrusion Detection, Web Application Firewall, and Unified Threat Management. Microsoft SDN supports integrating third-party virtual appliances into the vSwitch using Service Insertion Rules or User-Defined Routing. These rules can duplicate traffic for monitoring or can modify the native routing capabilities of the vSwitch to help prevent or mitigate attacks. The only requirement to use a virtual appliance is that it must run as a virtual machine on Hyper-V.
Appliances can be integrated and managed with VMM via plugins that are registered as a Network Service. These plugins can manage physical and virtual network appliances based on the logical network layout defined by VMM. For appliances that do not integrate directly with VMM, route tables and service insertion rules can be added to the Network Controller to direct traffic to the appliance.
The default virtual network functions included with Microsoft SDN will still continue to function when using a virtual appliance. As such, it’s important to ensure that Port ACLs in the environment do not conflict with firewall rules on a virtual appliance. As a best practice, use either Port ACLs or the virtual appliance to control the traffic flow.
Review Chapter 2 for detailed information on implementing port-mirroring via service insertion rules and user-defined routing on the Network Controller.
NEED MORE REVIEW? Virtual Appliances
To read more about using network virtual appliances on a virtual network, see https://docs.microsoft.com/en-us/windows-server/networking/sdn/manage/use-network-virtual-appliances-on-a-vn.
Secure VMM network fabric
Securing the management network fabric is an important part of the security strategy for VMM. Use the Windows Firewall or firewall appliances to allow only necessary traffic between Active Directory, System Center, Hyper-V Hosts, the Network Controller and other fabric entities.
VMM uses BITS (443) and WinRM (5985,5986) to perform most management functions. The ports used by WinRM are configurable during installation. Additionally, the VMM server needs to access Active Directory (DNS, LDAP, Kerberos, NetBIOS, SMB), the Network Controller (HTTPS) and the database server (SQL). If using the VMM console remotely, the client connects on ports 8100-8102 to the VMM server.
Hyper-V hosts also need to communicate directly for Live Migration (SMB) and cluster heartbeat (ICMO, WMI, SMB, DCOM). Windows Firewall will automatically configure the necessary ports when the failover clustering feature is installed, but rules may need to be configured manually on firewall appliances.
Because the Network Controller plays such a vital role in managing SDN, it can be the target of an attack so ensuring it is appropriately secured is important. As a best practice, use certificates signed by trusted enterprise PKI infrastructure. When deployed with VMM, SDN uses Kerberos authentication and authorization based on Active Directory groups.
The Network Controller communicates using REST API’s which rely on the WCF protocol. Ensure firewall rules allow management systems to communicate with the Network Controller northbound API via HTTPS. Southbound communication by the Network Controller uses certificates for authentication across a number of protocols such as WCF, OVSDB, and WinRM. Ensure rules permit the following traffic:
![]() HTTPS The Northbound API uses HTTPS on port 443.
HTTPS The Northbound API uses HTTPS on port 443.
![]() WCF The software load balancer and virtual networking components use WCF on port 49001.
WCF The software load balancer and virtual networking components use WCF on port 49001.
![]() OVSDB Firewall, virtual networking and user defined routing components use OVSDB to communicate on port 6640.
OVSDB Firewall, virtual networking and user defined routing components use OVSDB to communicate on port 6640.
![]() WinRM The gateway components exchange messages using WinRM on ports 5985 and 5986.
WinRM The gateway components exchange messages using WinRM on ports 5985 and 5986.
![]() TCP The software load balancer components communicate using TCP on ports 8570 and 8571.
TCP The software load balancer components communicate using TCP on ports 8570 and 8571.
NEED MORE REVIEW? Vmm Ports And Protocols
For a full list of the ports and protocols that VMM uses, see https://docs.microsoft.com/en-us/system-center/vmm/plan-ports-protocols.
To read more about Network Controller Security, see https://docs.microsoft.com/en-us/windows-server/networking/sdn/security/nc-security.
Thought experiment
In this thought experiment, demonstrate your skills and knowledge of the topics covered in this chapter. You can find the answer to this thought experiment in the next section.
You are a senior security architect for Contoso, Ltd, a service provider who specializes in providing hosted cloud infrastructure for financial and healthcare customers. You are tasked with helping design an Infrastructure as a Service offer that will provide a secure environment for tenant workloads with the following requirements:
![]() The environment must meet compliance framework requirements for PCI and HIPAA.
The environment must meet compliance framework requirements for PCI and HIPAA.
![]() Financial services and healthcare customers will host sensitive information. All data must be encrypted at rest and in-flight and fabric administrators must be prevented from accessing the workloads.
Financial services and healthcare customers will host sensitive information. All data must be encrypted at rest and in-flight and fabric administrators must be prevented from accessing the workloads.
![]() Some tenants will need to use third-party virtual network appliances.
Some tenants will need to use third-party virtual network appliances.
Thought experiment answers
This section provides the solutions for the tasks included in the thought experiment.
![]() You should implement a Guarded Fabric that can host Shielded VMs. Guarded Fabric relies on hardware security features to ensure that Hyper-V hosts remain secure, and Shielded VMs protect workloads by encrypting data at rest and in-flight. Fabric Administrators cannot access Shielded VMs.
You should implement a Guarded Fabric that can host Shielded VMs. Guarded Fabric relies on hardware security features to ensure that Hyper-V hosts remain secure, and Shielded VMs protect workloads by encrypting data at rest and in-flight. Fabric Administrators cannot access Shielded VMs.
![]() You should implement Device Guard and Credential Guard. Compliance frameworks rely on trusted computing to protect systems from malware and malicious users. Device Guard ensures that only trusted applications run in the environment, while Credential Guard protects secrets to help mitigate attacks.
You should implement Device Guard and Credential Guard. Compliance frameworks rely on trusted computing to protect systems from malware and malicious users. Device Guard ensures that only trusted applications run in the environment, while Credential Guard protects secrets to help mitigate attacks.
![]() To protect both the host fabric and guest workloads, you should implement Secure Boot. The UEFI specification enables scenarios that protect systems from malware that attempts to inject itself into the boot process. Secure Boot prevents booting of operating systems that have been tampered with.
To protect both the host fabric and guest workloads, you should implement Secure Boot. The UEFI specification enables scenarios that protect systems from malware that attempts to inject itself into the boot process. Secure Boot prevents booting of operating systems that have been tampered with.
![]() You should implement Port ACLs with logging to protect network traffic. Security best-practices dictate that firewall rules be implemented to reduce attack footprints on the network. Properly applied Access Control Lists ensure that systems communicate using only necessary ports. By enabling logging, you will be able to review network access if a breach is later detected.
You should implement Port ACLs with logging to protect network traffic. Security best-practices dictate that firewall rules be implemented to reduce attack footprints on the network. Properly applied Access Control Lists ensure that systems communicate using only necessary ports. By enabling logging, you will be able to review network access if a breach is later detected.
![]() You should deploy Microsoft SDN and use Service Insertion Rules and User-defined Routing to support third party virtual appliances. Service Insertion Rules allow for mirroring of port traffic for monitoring purposes, and User-defined Routing tables allow you to manipulate traffic flows to direct packets to security appliances.
You should deploy Microsoft SDN and use Service Insertion Rules and User-defined Routing to support third party virtual appliances. Service Insertion Rules allow for mirroring of port traffic for monitoring purposes, and User-defined Routing tables allow you to manipulate traffic flows to direct packets to security appliances.
![]() You should implement VMM User Roles and role-based access control to provide only necessary permissions for tenants. Using the principal of least privilege will help minimize an intrusion if a user’s credentials are compromised.
You should implement VMM User Roles and role-based access control to provide only necessary permissions for tenants. Using the principal of least privilege will help minimize an intrusion if a user’s credentials are compromised.
![]() You should configure DHCP Guard, Router Guard, and MAC Spoofing prevention on virtual network adapter port profiles in VMM. These network security features will help mitigate attacks on tenant virtual networks.
You should configure DHCP Guard, Router Guard, and MAC Spoofing prevention on virtual network adapter port profiles in VMM. These network security features will help mitigate attacks on tenant virtual networks.
Chapter summary
![]() Secure Boot is a security standard defined by UEFI 2.3.1c that enables the system to confirm the signature of boot software. Secure Boot can be enabled on both hosts and guests. In Hyper-V, you must select the appropriate template that matches the guest operating system.
Secure Boot is a security standard defined by UEFI 2.3.1c that enables the system to confirm the signature of boot software. Secure Boot can be enabled on both hosts and guests. In Hyper-V, you must select the appropriate template that matches the guest operating system.
![]() Virtualization-based Security is a class of technology that leverages virtualization extensions of CPU hardware to provide added security of memory. This enables Virtual Secure Mode which protects critical processes and their memory from malicious attacks.
Virtualization-based Security is a class of technology that leverages virtualization extensions of CPU hardware to provide added security of memory. This enables Virtual Secure Mode which protects critical processes and their memory from malicious attacks.
![]() Device Guard uses Code Integrity Policies to allow only trusted binaries to execute in the environment. Policies can be in audit or enforced modes and can be chained together. Device Guard relies on Virtualization-based Security to enforce policies.
Device Guard uses Code Integrity Policies to allow only trusted binaries to execute in the environment. Policies can be in audit or enforced modes and can be chained together. Device Guard relies on Virtualization-based Security to enforce policies.
![]() Credential Guard isolates secrets so only privileged system software can access them. This helps prevent credential theft attacks like Pass-the-Hash or Pass-the-Ticket. Credential Guard relies on Virtualization-based Security to protect secrets. Use PowerShell to determine system compatibility and to enable Credential Guard.
Credential Guard isolates secrets so only privileged system software can access them. This helps prevent credential theft attacks like Pass-the-Hash or Pass-the-Ticket. Credential Guard relies on Virtualization-based Security to protect secrets. Use PowerShell to determine system compatibility and to enable Credential Guard.
![]() The Host Guardian Service is a clustered service that uses a bastion forest to provide host attestation and key protection. Host TPM baselines and Code Integrity Policies are registered with the Host Guardian Service that allow it to verify Hyper-V host health. Two types of certificates are used to protect VM secrets: a signing certificate and an encryption certificate.
The Host Guardian Service is a clustered service that uses a bastion forest to provide host attestation and key protection. Host TPM baselines and Code Integrity Policies are registered with the Host Guardian Service that allow it to verify Hyper-V host health. Two types of certificates are used to protect VM secrets: a signing certificate and an encryption certificate.
![]() Guarded Fabric is a new feature of Windows Server 2016 that provides host attestation by ensuring that hosts runs only trusted software before booting a protected virtual machine. Hyper-V hosts provide boot logs to the Host Guardian Service to receive a health attestation certificate. This allows Guarded Hosts to boot Shielded or Encryption Support VMs by requesting necessary secrets from the Key Protection Service. Attestation can use a hardware TPM v2.0 or Active Directory group membership.
Guarded Fabric is a new feature of Windows Server 2016 that provides host attestation by ensuring that hosts runs only trusted software before booting a protected virtual machine. Hyper-V hosts provide boot logs to the Host Guardian Service to receive a health attestation certificate. This allows Guarded Hosts to boot Shielded or Encryption Support VMs by requesting necessary secrets from the Key Protection Service. Attestation can use a hardware TPM v2.0 or Active Directory group membership.
![]() A Shielded VM is a protected Generation 2 virtual machine running Windows or Linux that uses Secure Boot and runs on a Guarded Host. The data for a shielded VM is encrypted at rest and while running on a Guarded Host. A fabric administrator cannot access the VM console or memory associated with the VM worker process. Fabric administrators can create shielded templates that can be deployed using tenant provided Shielding Data Files. Existing VMs can also be shielded using the Shielding Helper VHDX.
A Shielded VM is a protected Generation 2 virtual machine running Windows or Linux that uses Secure Boot and runs on a Guarded Host. The data for a shielded VM is encrypted at rest and while running on a Guarded Host. A fabric administrator cannot access the VM console or memory associated with the VM worker process. Fabric administrators can create shielded templates that can be deployed using tenant provided Shielding Data Files. Existing VMs can also be shielded using the Shielding Helper VHDX.
![]() VMM supports role-based access control with granular tenant permissions. Credentials for management tasks are stored securely in Run As accounts.
VMM supports role-based access control with granular tenant permissions. Credentials for management tasks are stored securely in Run As accounts.
![]() Access Control Lists can be configured to control network traffic. In VMM, these can only be managed in PowerShell. They can be applied globally, to a virtual network, to a virtual subnet or to a network adapter. The Microsoft SDN includes a Datacenter Firewall that can deploy ACLs to virtual subnets or network interfaces. An object can have only a single Port ACL, while the ACL can have many rules.
Access Control Lists can be configured to control network traffic. In VMM, these can only be managed in PowerShell. They can be applied globally, to a virtual network, to a virtual subnet or to a network adapter. The Microsoft SDN includes a Datacenter Firewall that can deploy ACLs to virtual subnets or network interfaces. An object can have only a single Port ACL, while the ACL can have many rules.
![]() VMM and Microsoft SDN support the use of third party appliances via plug-ins, Service Insertion Rules, and User-defined Routing. Network traffic can be mirrored for monitoring purposes or traffic can be redirected to flow through a virtual security appliance using custom route tables.
VMM and Microsoft SDN support the use of third party appliances via plug-ins, Service Insertion Rules, and User-defined Routing. Network traffic can be mirrored for monitoring purposes or traffic can be redirected to flow through a virtual security appliance using custom route tables.
![]() DHCP Guard, Router Guard, and MAC Spoofing are Hyper-V network security features that can be enabled on virtual network adapters to protect tenant networks from unauthorized network devices.
DHCP Guard, Router Guard, and MAC Spoofing are Hyper-V network security features that can be enabled on virtual network adapters to protect tenant networks from unauthorized network devices.