Chapter 1
Manage identity and access
An important step when securing workloads is determining what traffic you’ll allow and what traffic you’ll block. In the past, you might use the network location and traffic type to make this determination. For example, you might allow traffic that came from a particular IP address and on a particular port and deny that traffic if it didn’t meet those specific conditions. Over time, clever attackers have learned to spoof IP address information, allowing them to bypass these traditional barriers. Today, you will hear security practitioners utter the aphorism “identity is the new control plane.” What the phrase means is that when the network location or traffic properties are not a great signifier of whether a host or traffic is trustworthy, the identity that is used to interact with the resource you are trying to protect might be a better guide; this is especially true if those identities are hardened with technologies such as multifactor authentication. In this chapter, you’ll learn about managing identities in the cloud, securing access to resources and applications in the cloud, and managing access control to cloud administrative tools.
Skills in this chapter:
Skill 1.1: Manage Azure Active Directory identities
This objective deals with identities within Azure Active Directory. In Azure Active Directory, identities are represented as users, service principals, managed identities, or groups. Azure Active Directory allows you to use a variety of authentication methods including one-time passwords and multifactor authentication to secure these identities. This section covers the following topics:
Configure security for service principals
You configure security for a service principal when you want to control what access an application has to resources within Azure. When you register an Azure Active Directory application, the following objects will be created in your Azure Active Directory tenancy:
An application object Application objects are stored within the Azure AD instance and define the application. The schema for an application object’s properties is defined by the Microsoft Graph application entity resource type. Application objects are a global representation of an application across all Azure AD tenancies. The application object functions as a template from which common and default properties are determined when Azure AD creates the corresponding service principal object. Application objects have a one-to-one relationship with the software application and a one-to-many relationship with corresponding service principal objects.
A service principal object A user principal in Azure AD is an object that represents a user. A service principal is an Azure AD object that represents an application. The
ServicePrincipalobject allows you to specify the access policy and permissions for the application and the user of that application within your organization’s Azure AD tenant. A service principal is required for each tenancy where the application is used. A single-tenant application will only have one service principal, and a multitenant application will have a service principal for each tenancy where a user from that tenancy has consented to the application’s use. The Microsoft Graph service principal entity defines the schema used for aServicePrincipalobject’s properties. The service principal is the representation of the application in a specific Azure AD tenancy.
Registering an application with Azure AD allows you to leverage the Microsoft identity platform’s secure sign-in and authorization features for use with that application. Registering an application with Azure AD requires that you provide information including the URL where the application can be accessed, the URL to forward replies after authentication occurs, and the URI that identifies your application. You will learn more about registering applications with Azure AD later in this chapter.
Service principals are analogous to an on-premises Active Directory service account in that both allow an application to have an identity and security context. Service principals in Azure AD can include the following:
A reference to an application object through the application ID property
Local user and group application-role assignment properties
Local user and admin application permissions
Local policy data, including information about conditional access policies
Data about alternate local application settings, including
Claims transformation rules
Attribute mappings (user provisioning)
Directory-specific app roles (when the application supports custom roles)
Directory-specific name or logo
Creating a service principal
As you have already learned, Azure AD will create a service principal when you register an application with an Azure AD instance. This is the way most Azure AD service principals will be created. It is possible to create a service principal with the New-AzADServicePrincipal cmdlet from an Azure PowerShell session. The simplest way to run Azure PowerShell is through a Cloud Shell session. For example, to create a new service principal named ExampleServiceprincipal, run the following command from an Azure PowerShell session.
$servicePrincipal = New-AzADServicePrincipal -DisplayName "ExampleServiceprincipal"
Service principals can use two different types of authentication: password-based authentication and certificate-based authentication. If you don’t specify a type of sign-in authentication when creating a service principal, password-based authentication will be used, and a random password will be assigned to the service principal account.
To view a list of service principals associated with an Azure AD instance, run the following command from an Azure PowerShell session:
Get-AzAdServicePrincipal | format-table
Assigning permissions to service principals through roles
To provide access within a subscription to an application, you assign a set of permissions to the service principal associated with the application. The most straightforward way to accomplish this goal is to assign a particular role to the application. For example, if you want to give an application read access to resources within a particular resource group, you could assign the Reader role to the service principal associated with the application.
To assign a role to an application that is already registered with an Azure AD instance, perform the following steps:
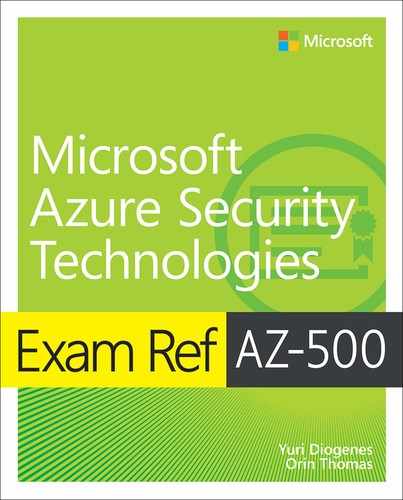
In the Azure portal, select the subscription that the application is associated with and then from the Subscriptions page, select the Access Control (IAM) node, as shown in Figure 1-1.
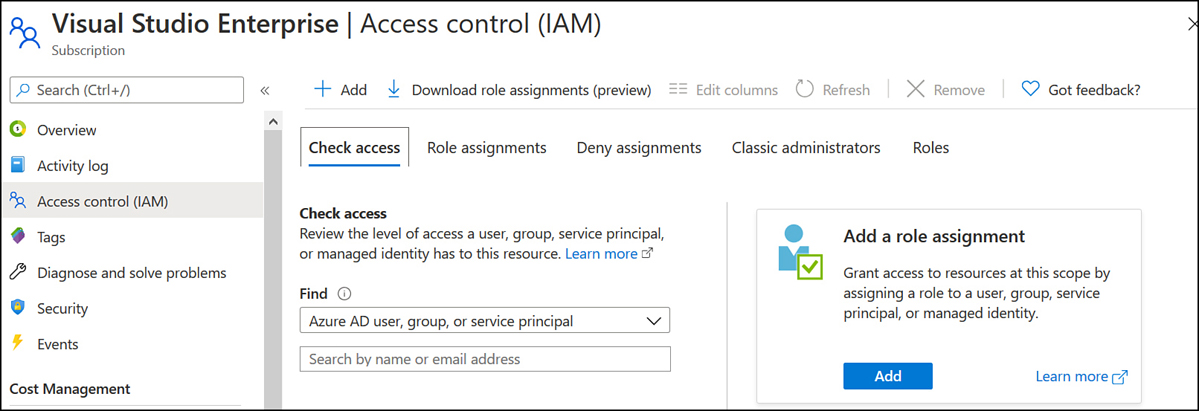
Figure 1-1 Access control (IAM) for a subscription
On the Access Control (IAM) page, select Add A Role Assignment, choose the role that you want to assign to the application, and choose Azure AD User, Group, Or Service Principal from the Assign Access To drop-down menu, as shown in Figure 1-2, and then in the Select text box, specify the name of the application.

Figure 1-2 Assign a role to an application
Click Save to assign the role to the service principal.
Just as you can assign permissions through a role through the Access Control (IAM) node at the subscription level, you can use the Access Control (IAM) node at the resource group or the resource level to assign a role to a service principal. When assigning permissions to a service principal, you should assign those permissions in the most restrictive way possible. This means that you should only assign roles at the appropriate scope level and only assign the role needed by the application. If the application only requires reader access to a resource group, don’t assign the Contributor role at the subscription level to the application’s service principal.
You can use the New-AzRoleAssignment PowerShell cmdlet to assign a role to a service principal. For example, to create a new service principal and assign reader permissions at the subscription level to the service principal, enact the following PowerShell commands:
$servicePrincipal = New-AzADServicePrincipal -DisplayName "ExampleServiceprincipal"
New-AzRoleAssignment -RoleDefinitionName "Reader" -ApplicationId $servicePrincipal.
ApplicationId
Working with service principals in command-line environments requires you to use application IDs rather than the display name of the service principal. This is why the ApplicationId is specified in the second command in the previous example, which assigns the role to the service principal created in the first command.
You can determine what roles have been assigned to a service principal at the subscription, resource group, or resource levels by performing the following steps:
In the Azure portal, select the subscription, resource group, or resource to which the application is associated and then from the Subscriptions page, select the Access Control (IAM) node.
Select the Role Assignments section. This page lists all roles assigned at this scope. In the Type column, service principals are listed with the App type, as shown in Figure 1-3.
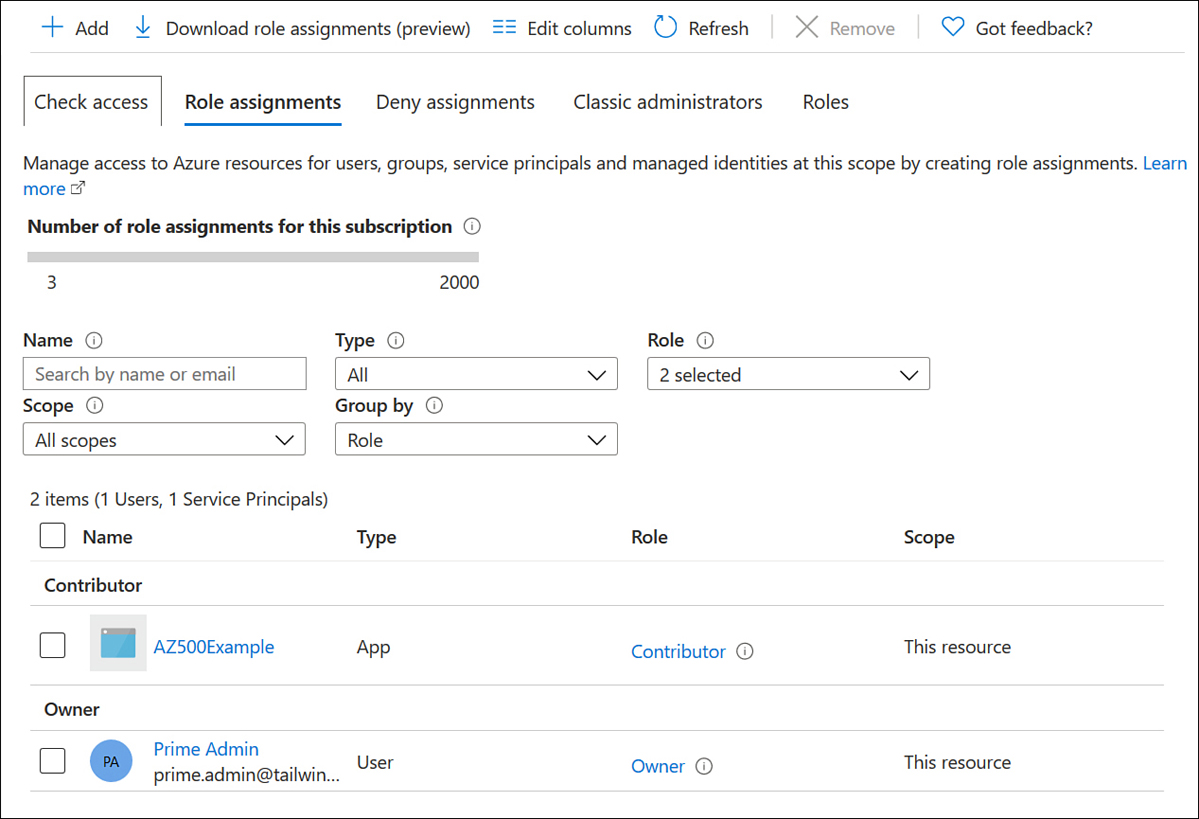
Figure 1-3 Checking Role assignments for service principals
Manage Azure AD directory groups
Groups allow you to group users and then assign them privileges and access to workloads or services. Rather than directly assigning privileges and access to workloads or services to users, you can assign these rights to a group and then indirectly assign them to users by adding the user accounts to the appropriate group. Using groups allows you to assign access and rights by adding and removing users from a group. While it’s possible to assign access and rights on a per-user basis, this is administratively cumbersome and makes it challenging to determine which users have a specific right. Determining rights can be much easier to do if rights are only delegated to groups. If you only assign rights to group, if you need to determine rights, you just have to check the group membership.
You can use the Azure AD administrative console in the Azure portal to manage groups. You can access the Azure Active Directory admin center at https://aad.portal.azure.com or through the Azure portal Azure AD blade. Azure AD supports two group types: security groups and Office 365 groups. Figure 1-4 shows how to select the group type when creating the group. Office 365 groups are used for collaboration between users where organizations use services such as Microsoft 365 or Office 365. Users in groups can be internal or external to the organization.

Figure 1-4 Create Azure AD Group
Group membership for security groups must be assigned and is not dynamic. When a group’s membership is assigned, members are added and removed manually by administrators or other users who have the appropriate rights.
Office 365 group types can be configured as assigned or dynamic. When the dynamic option is selected, group membership is determined based on the results of a query against user or device attributes. For example, with Office 365 groups, you can have group membership determined by user attributes such as location or manager. Figure 1-5 shows an Office 365 group with dynamic membership, where users who have the department attribute set to Marketing will automatically be assigned membership of the group.
Figure 1-5 Office 365 dynamic group membership
You can use the following PowerShell commands from the Azure AD PowerShell module to manage Azure AD Groups:
Get-AzureADGroup Provides information about Azure AD Groups.
New-AzureADGroup Creates a new Azure AD Group.
Set-AzureADGroup Configures the properties of an Azure AD Group.
Remove-AzureADGroup Removes an Azure AD Group.
Add-AzureADGroupMember Adds a user to an Azure AD Group.
Remove-AzureADGroupMember Removes a user from an Azure AD Group.
Add-AzureADGroupOwner Adds a user as an owner of an Azure AD Group. Gives the user limited group management privileges.
Remove-AzureADGroupOwner Removes a user as owner of an Azure AD Group.
Creating groups
To create an Azure AD group, perform the following steps:
In the Azure portal, select the Azure Active Directory menu blade.
Under Manage in the Azure Active Directory menu blade, select Groups, as shown in Figure 1-6.
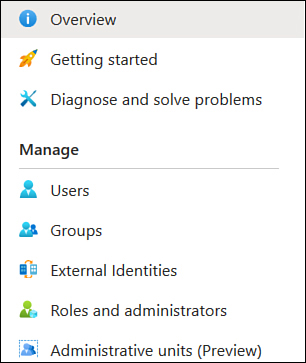
Figure 1-6 Azure Active Directory menu blade
On the Groups page control bar, click New Group.
On the New Group page shown in Figure 1-7, provide the following information and select Create:
Group Type Choose between Security and Office 365.
Group Name Provide a name for the group. It is often a good idea to come up with a system for naming groups, rather than naming the group based on whatever comes to mind when filling out the form. Use this system for all groups in the subscription. One strategy is to name groups in a way that indicates how they collect accounts, such as
Research Usersfor user accounts related to research. Group names need to be unique within an Azure Active Directory instance.Group Description Provide a meaningful description for the group. This description should be meaningful enough that if you won the lottery and retired to Tahiti, the person who replaced you could understand the purpose of the group.
Membership Type If you choose a Security group, group members must be added manually. If you choose the Office 365 group type, you will have the following options:
Owners Users designated as group owners can modify the membership of the group.
Members Allows you to specify group membership. Can include users, groups, service principals, and managed identities.

Figure 1-7 New Group page
You can create Azure Groups from a Cloud Shell session using the az ad group create command. For example, to create a group named Accounting Users, use the following command:
Az ad group create --display-name "Accounting Users" --mail-nickname "accounting.users"
Adding and removing group members
You can add members to an Azure AD group from a Cloud Shell session using the az ad group member add command. The challenge when using this command is that you must specify the member using the object ID of the member, rather than the member name. For example, to add the user with the object ID ac5ebbfb-22c7-4381-b91d-12aeb3093413 to the group Accounting Users, use the following command from an Azure PowerShell session:
az ad group member add --group "Accounting Users" --member-id ac5ebbfb-22c7-4381-b91d-
12aeb3093413
You can determine the object ID of a user by using the az ad user show command and specifying the user’s user principal name with the ID parameter. For example, to determine the object ID of the user [email protected], run the following command in Cloud Shell:
az ad user show --id [email protected]
Nested groups
Azure AD allows you to add a security group as a member of another security group, which is known as a nested group. When you do this, the member group will inherit the attributes and properties of the parent group. Nesting groups allows you to further simplify management of large numbers of users. For example, you might have groups for the managers in Melbourne, Sydney, and Adelaide. You could add these three groups to an Australian Managers group and then assign top-level group rights and permissions to Australian Managers, rather than assigning those rights to each city-level Managers group. This also provides you with flexibility should you add additional city-level managers groups, such as Brisbane and Perth, at some point in the future because you’d just add these groups to the Australian Managers group to assign the same permissions.
At the time of writing, Azure AD does not support the following nesting scenarios:
Adding an Azure AD group to a group synchronized from on-premises Active Directory
Adding Azure AD security groups to Office 365 groups
Adding Office 365 to groups other than other Office 365 groups
Assigning apps to nested groups
Assigning licenses to nested groups
Nesting distribution groups
To nest groups using the Azure portal, perform the following steps:
On the Groups – All Groups page of the Azure Active Directory blade of the Azure portal, click the group that you want to nest. This will open the group’s properties, as shown in Figure 1-8. In this example, the
Melbournegroup will be added to theAustraliagroup.
Figure 1-8 List of Azure AD groups
Click the Group Memberships item in the Manage section of the group’s properties, as shown in Figure 1-9.

Figure 1-9 Group memberships listed in the Groups menu
On the Group Memberships page, click Add Memberships.
On the Select Groups page, select the group that you want to nest the group within. In this case, we will select the
Australiagroup, as shown in Figure 1-10. Click Select to nest the group. A group can be nested within multiple groups.

Figure 1-10 Selecting a group to nest
To remove a group from another group, open the parent group’s group membership page and then remove the nested group by selecting that group and clicking Remove Memberships.
Manage Azure AD users
You can use the Azure AD Admin Center in the Azure portal, Azure PowerShell, or the Microsoft 365 admin center to manage Azure AD user accounts. The Azure AD admin center gives you a greater set of options for managing the properties of user accounts than does the Microsoft 365 admin center because you can edit extended user properties, as shown in Figure 1-11.
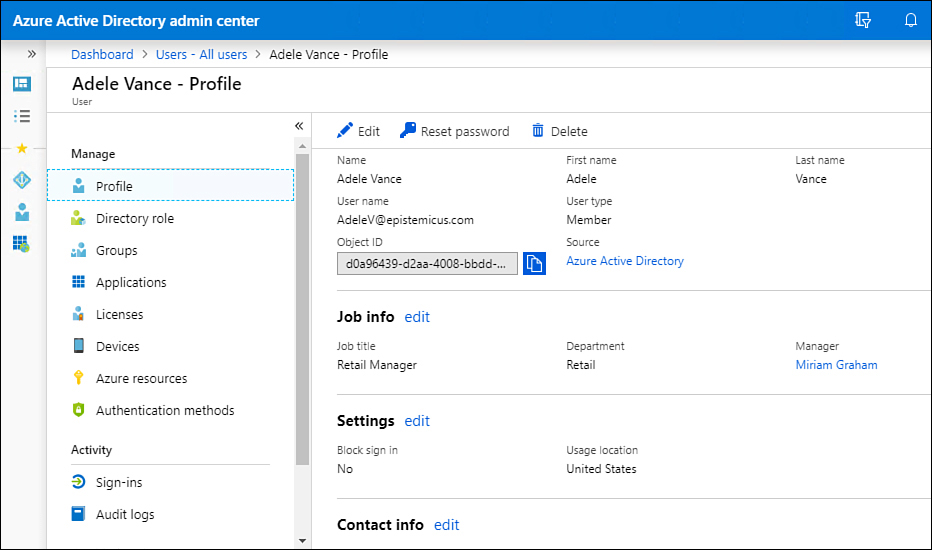
Figure 1-11 User properties page
To create a new Azure AD User, perform the following steps:
In the Azure AD console, select Users–All Users and then click New User.
On the New User blade shown in Figure 1-12, provide the following information:
Name The user’s actual name.
User Name The user’s sign-in name in UPN format.
Profile The user’s first name, last name, job title and department.
Properties This specifies the source of authority for the user. By default, if you are creating the user using the Azure AD admin center or the Microsoft 365 admin center, the source of authority will be Azure Active Directory.
Groups This defines which groups the user should be a member of.
Directory Role Choose whether the account has User, Global Administrator, or a Limited Administrator role.
Password This as the automatically generated password. With the Show Password option, you can transmit the password to the user through a secure channel.
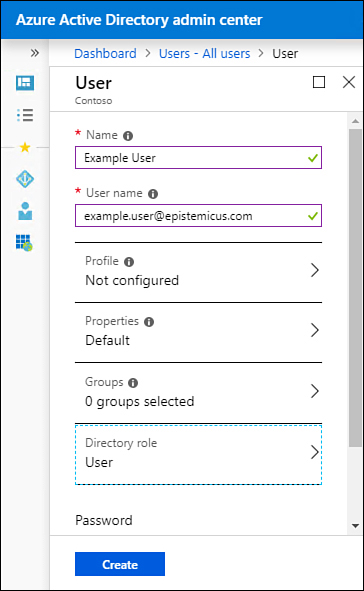
Figure 1-12 New User properties page
You can also use the Azure AD admin center to perform the following user administration tasks:
Update profile information
Assign directory roles
Manage group membership
Manage licenses
Manage devices
Manage access to Azure resources
Manage authentication methods
When you delete a user from Azure AD, the account remains in the Azure Active Directory Recycle Bin for 30 days. This means that you can recover the account online should it be necessary to do so. If you delete a user from your on-premises Active Directory environment but have enabled the on-premises Active Directory Recycle Bin, recovering the user from the on-premises Active Directory Recycle Bin will recover the user account in Microsoft 365. If you don’t have the Active Directory Recycle Bin enabled, you will need to create another account with a new GUID.
Configure password writeback
Password writeback occurs when a user uses self-service password (SSPR) functionality to update his or her password in Azure and that updated password is then written to an on-premises Active Directory Domain Services instance. Azure AD also supports SSPR on Azure AD native accounts where no writeback to an on-premises instance is necessary. To implement SSPR for organizations with on-premises Active Directory Domain Services, you need to first install Azure AD Connect to synchronize on-premises identities to Azure.
Install and configure Azure AD Connect
Azure AD Connect allows you to connect your on-premises Active Directory accounts with an Azure AD instance. This is useful not only for applications running in Azure, but it allows you to implement single sign-on if your organization is using Microsoft 365 or Office 365. Single sign-on allows you to use one identity to access on-premises and cloud resources. In many scenarios, the user won’t even be required to reauthenticate.
Azure AD Connect is software that you install on a computer that manages the process of synchronizing objects between the on-premises Active Directory and the Azure Active Directory instance. You can install Azure AD Connect on computers running the Windows Server 2012 or later operating systems:
Azure AD Connect has the following requirements:
It must be installed on a Windows Server instance that has the GUI version of the operating system installed. You cannot install Azure AD connect on a computer running the Server Core operating system.
You can deploy Azure AD Connect on a computer that is either a domain controller or a member server. If you use the custom options, a standalone server can be used.
The server hosting Azure AD Connect requires .NET Framework 4.5.1 or later.
The server hosting Azure AD Connect requires Microsoft PowerShell 3.0 or later.
The server hosting Azure AD Connect must not have PowerShell Transcription enabled through Group Policy.
If you are deploying Azure AD Connect with Active Directory Federation Services, you must use Windows Server 2012 R2 or later for the Web Application Proxy, and Windows remote management must be enabled on the servers that will host AD FS roles.
If global administrators will have multifactor authentication enabled (MFA), then the URL https://secure.aadcdn.microsoftonline-p.com must be configured as a trusted site.
Connectivity requirements
The computer with Azure AD Connect installed must be a member of a domain in the forest that you want to synchronize, and it must have connectivity to a writable domain controller in each domain of the forest you want to synchronize on the following ports:
DNS TCP/UDP port 53
Kerberos TCP/UDP port 88
RPC TCP port 135
LDAP TCP/UDP port 389
TLS/SSL TCP port 443
SMB TCP port 445
The computer with Azure AD Connect installed must be able to establish communication with the Microsoft Azure servers on the Internet over TCP port 443. The computer with Azure AD Connect installed can be located on an internal network as long as it can initiate communication on TCP port 443. The computer hosting Azure AD Connect does not need a publicly routable IP address. The computer hosting Azure AD Connect always initiates synchronization communication to Microsoft Azure. Microsoft Azure Active Directory does not initiate synchronization communication to the computer hosting Azure AD Connect on the on-premises network.
Because the Azure AD Connect instance requires access to the Internet, you should not install Azure AD Connect on a domain controller. If you are going to be replicating more than 50,000 objects, Microsoft recommends that you deploy SQL Server on a computer that is separate from the computer that will host Azure AD Connect. If you plan to host the SQL Server instance on a separate computer, ensure that communication is possible between the computer hosting Azure AD Connect and the computer hosting the SQL Instance on TCP port 1433.
If you are going to use a separate SQL Server instance, ensure that the account used to install and configure Azure AD Connect has systems administrator rights on the SQL instance and that the service account used for Azure AD Connect has public permissions on the Azure AD Connect database.
SQL Server requirements
When you deploy Azure AD connect, you have the option of having Azure AD Connect install an SQL Server Express instance, or you can choose to have Azure AD Connect leverage a full instance of SQL Server. SQL Server Express is limited to a maximum database size of 10 GB. In terms of Azure AD Connect, this means that Azure AD Connect is only able to manage 100,000 objects. This is likely to be adequate for all but the largest environments.
For environments that require Azure AD Connect to manage more than 100,000 objects, you’ll need to have Azure AD Connect leverage a full instance of SQL Server. Azure AD Connect can use all versions of Microsoft SQL Server, from Microsoft SQL Server 2012 with the most recent service pack to SQL Server 2019. It is important to note that SQL Azure is not supported as a database for Azure AD Connect. If you are deploying a full instance of SQL Server to support Azure AD Connect, ensure that the following prerequisites are met:
Use a case-insensitive SQL collation Case insensitive collations have the
_CI_identifier included in their names. Case sensitive collations (those that use the_CS_designation) are not supported for use with Azure AD Connect.You can only use one sync engine per SQL instance If you have an additional Azure AD Connect sync engine or if you are using Microsoft Identity Manager in your environment, each sync engine requires its own separate SQL instance.
Requirements for deployment accounts
You use two accounts when configuring Azure AD Connect. One account must have specific Azure AD permissions; the other account must have specific on-premises Active Directory permissions. The accounts that you use to install and configure Azure AD Connect have the following requirements:
The account used to configure Azure AD Connect must have Global Administrator privileges in the Azure AD tenancy. You should create a separate account for this task and configure the account with a complex password that does not expire. This account is used for the synchronization process between on-premises AD and Azure AD.
The account used to install and configure Azure AD Connect must have Enterprise Administrator permissions within the on-premises Active Directory forest if you will be using Express installation settings. This account is only required during installation and configuration. Once Azure AD Connect is installed and configured, this account no longer needs Enterprise Administrator permissions. The best practice is to create a separate account for Azure AD Connect installation and configuration and to temporarily add this account to the Enterprise Admins group during the installation and configuration process. Once Azure AD Connect is installed and configured, this account can be removed from the Enterprise Admins group. You should not attempt to change the account used after Azure AD Connect is set up and configured because Azure AD Connect always attempts to run using the original account.
The account used to install and configure Azure AD Connect must be a member of the local Administrators group on the computer on which Azure AD Connect is installed.
Installing Azure AD Connect
Installing Azure AD Connect with Express settings is appropriate if your organization has a single Active Directory forest and you want to use password synchronization for authentication. The Azure AD Connect Express settings are appropriate for most organizations. You can download the Azure AD Connect installation files from Microsoft’s download center website.
To install Azure AD Connect with Express settings, perform the following steps:
Double click the
AzureADConnect.msifile that you’ve downloaded from the Microsoft download center. You will be prompted with a security warning. After clicking Run, Azure AD Connect will be installed on your computer. When the installation is complete, you will be presented with a splash screen detailing the license terms and displaying a privacy notice. You’ll need to agree to these terms before clicking Continue.If your organization has an internal nonroutable domain, it will be necessary for you to use custom settings. The best practice is to use domain synchronization when your on-premises Active Directory instance and your Azure Active Directory instance use the same routable domain name. Click Continue.
On the Install Required Components page, shown in Figure 1-13, choose between the following options:
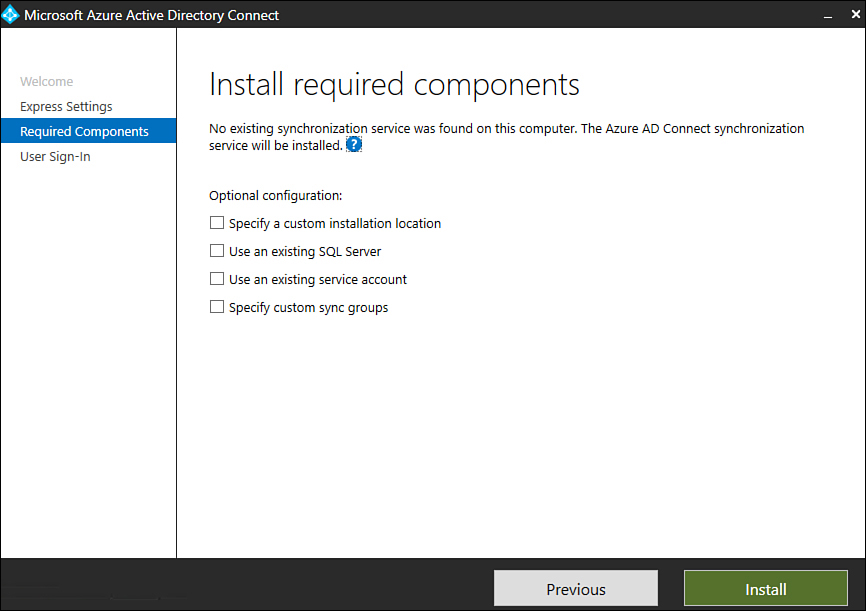
Figure 1-13 Install Required Components page
Specify A Custom Installation Location Choose this option if you want to install Azure AD Connect in a separate location, such as on another volume.
Specify An Existing SQL Server Choose this option if you want to specify an alternate SQL server instance. By default, Azure AD Connect will install an SQL Server Express instance.
Use An Existing Service Account You can configure Azure AD Connect to use an existing service account. By default, Azure AD Connect will create a service account. You can configure Azure AD Connect to use a Group Managed Service account. You’ll need to use an existing service account if you are using Azure AD Connect with a remote SQL Server instance or if communication with Azure will occur through a proxy server that requires authentication.
Specify Custom Sync Groups When you deploy Azure AD Connect, it will create four local groups on the server that hosts the Azure AD Connect Instance. These groups are the Administrators group, Operators group, Password Reset group, and the Browse group. If you want to use your own set of groups, you can specify them here. These groups must be local to the host server and not a member of the domain.
Once you have specified which custom options you require—and you aren’t required to choose any—click Install.
On the User Sign-In page shown in Figure 1-14, specify what type of sign in you want to allow. You can choose between the following options, the details of which were covered earlier in this chapter:
Password Synchronization
Pass-Through Authentication
Federation With AD FS
Federation With PingFederate
Do Not Configure
Enable Single Sign-On

Figure 1-14 User Sign-In options page
Most organizations will choose Password Synchronization because this is the most straightforward option.
On the Connect To Azure AD page, provide the credentials of an account with Global Administrator privileges in Azure AD. Microsoft recommends you use an account in the default
onmicrosoft.comdomain associated with the Azure AD instance to which you will be connecting. If you choose the Federation With AD FS option, ensure that you do not sign in using an account in a domain that you will enable for federation. Figure 1-15 shows a sign-in with a Password Synchronization scenario.
Figure 1-15 Connect to Azure AD page
Once Azure AD Connect has connected to Azure AD, you will be able to specify the directory type to synchronize, as well as the forest. Click Add Directory to add a specific forest. When you add a forest by clicking Add Directory, you will need to specify the credentials of an account that will perform periodic synchronization. Unless you are certain that you have applied the minimum necessary privileges to an account, you should provide Enterprise Administrator credentials and allow Azure AD Connect to create the account, as shown in Figure 1-16. This will ensure that the account is only assigned the privileges necessary to perform synchronization tasks.

Figure 1-16 AD Forest Account page
Once the credentials have been verified, as shown in Figure 1-17, click Next.

Figure 1-17 Connect Your Directories page
On the Azure AD Sign-In Configuration page, shown in Figure 1-18, review the UPN suffix and then inspect the on-premises attribute to use as the Azure AD username. You’ll need to ensure that accounts use a routable Azure AD username.
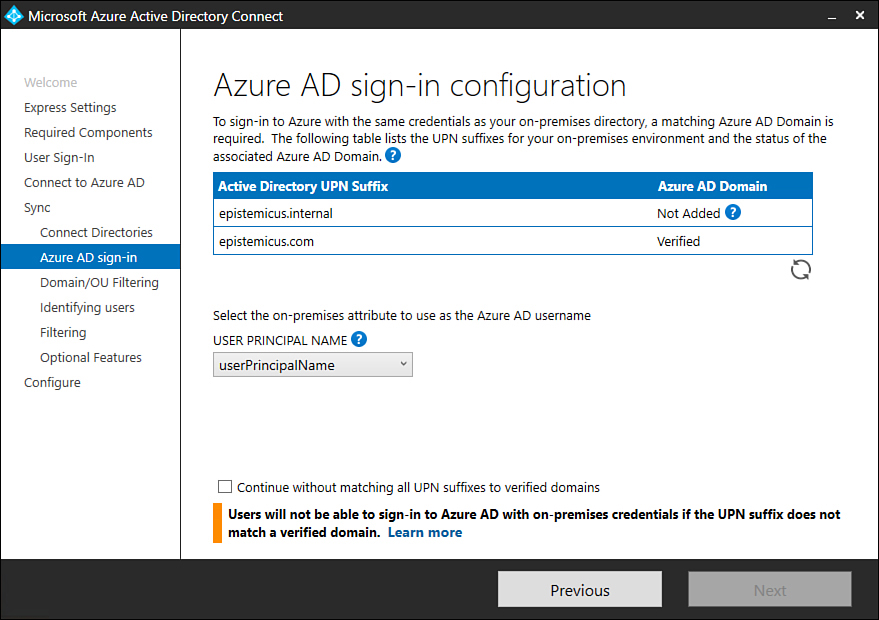
Figure 1-18 Azure AD Sign-In Configuration page
On the Domain And OU Filtering page, select whether you want to sync all objects or just objects in specific domains and OUs.
On the Uniquely Identifying Users page shown in Figure 1-19, specify how users are to be identified. By default, users should only have one representation across all directories. If users exist in multiple directories, you can have matches identified by a specific active directory attribute, with the default being the Mail Attribute.
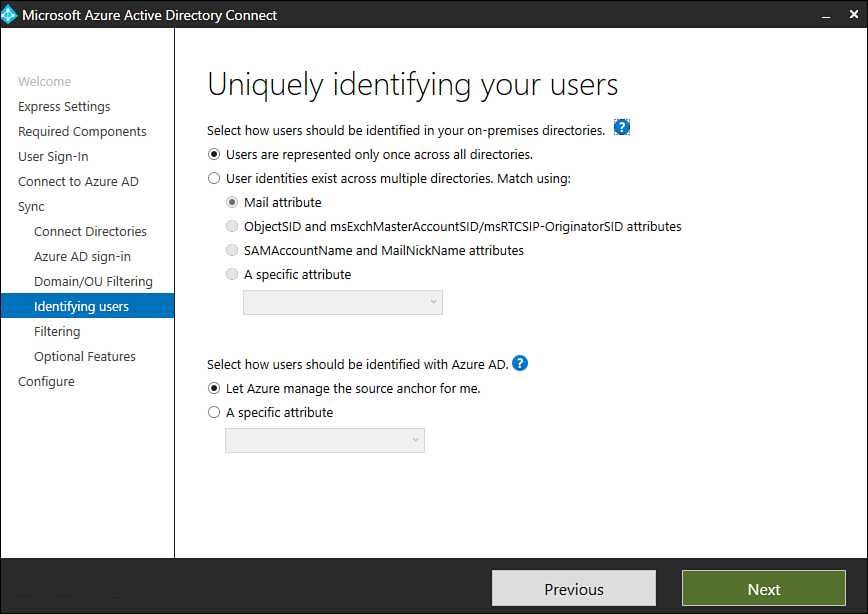
Figure 1-19 Uniquely Identifying Your Users page
On the Filter Users And Devices page, specify whether you want to synchronize all users and devices or only members of a specific group. Figure 1-20 shows members of the Microsoft 365-Pilot-Users group being configured so that their accounts will be synchronized with Azure.
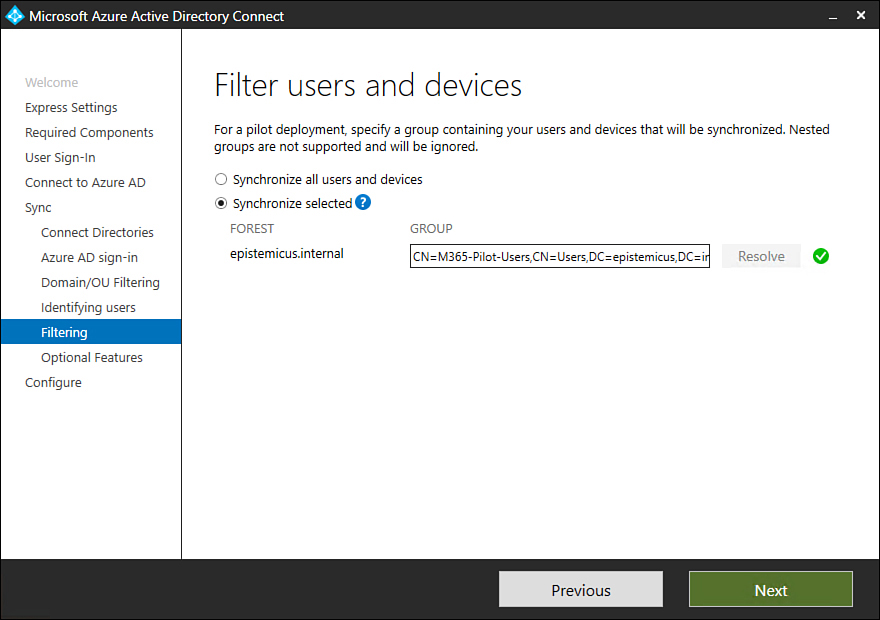
Figure 1-20 Filter Users And Devices page
On the Optional Features page shown in Figure 1-21, select any optional features that you want to configure. These features include the following:
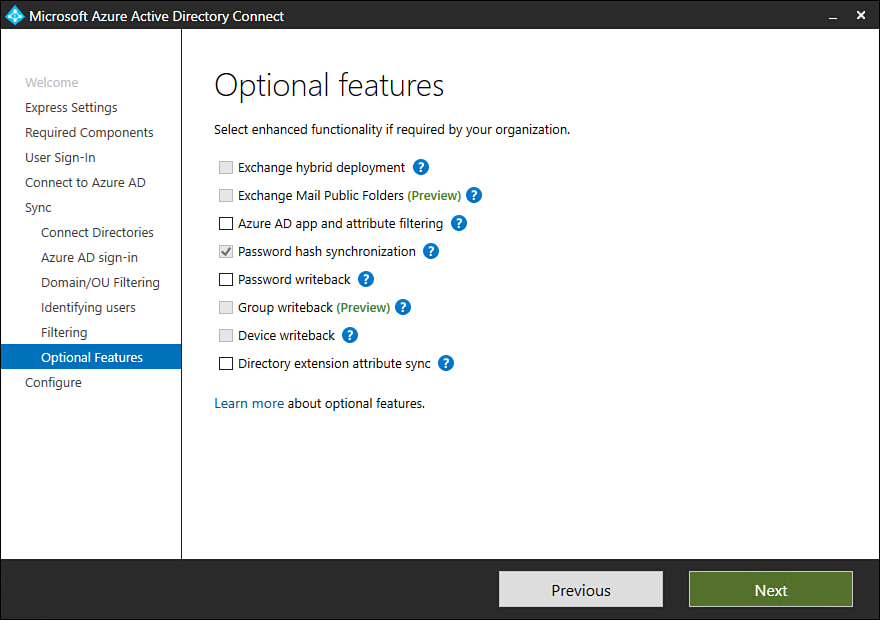
Figure 1-21 Optional Features page
Exchange Hybrid Deployment This option is suitable for organizations that have an Office 365 deployment and where there are mailboxes hosted both on-premises and in the cloud.
Exchange Mail Public Folders This feature allows organizations to synchronize mail-enabled public folder objects from an on-premises Active Directory environment to Microsoft 365.
Azure AD App And Attribute Filtering Selecting this option gives you the ability to be more selective about which attributes are synchronized between the on-premises environment and Azure AD.
Password Synchronization Synchronizes a hash of the user’s on-premises password Azure AD. When the user authenticates to Azure AD, the submitted password is hashed using the same process, and if the hashes match, the user is authenticated. Each time a user updates his or her password on-premises, the updated password hash synchronizes to Azure AD.
Password Writeback Password writeback allows users to change their passwords in the cloud and have the changed password written back to the on-premises Active Directory instance.
Group Writeback Changes made to groups in Azure AD are written back to the on-premises AD instance.
Device Writeback Information about devices registered by the user in Azure AD is written back to the on-premises AD instance.
Directory Extension Attribute Sync Allows you to extend Azure AD schema based on extensions made to your organization’s on-premises Active Directory instance.
On the Ready To Configure page, you can choose to start synchronization or enable staging mode. When you configure staging mode, Azure AD Connect will prepare the synchronization process, but it will not synchronize any data with Azure AD.
Using UPN suffixes and nonroutable domains
Prior to performing synchronization between an on-premises Active Directory environment and an Azure Active Directory instance, you must ensure that all user account objects in the on-premises Active Directory environment are configured with a value for the UPN suffix that can function for both the on-premises environment and any application that you want to use it with in the cloud. This is not a problem when an organization’s internal Active Directory domain suffix is a publicly routable domain. For example, a domain name, such as contoso.com oradatum.com, which is resolvable by public DNS servers, will suffice. Things become more complicated when the organization’s internal Active Directory domain suffix is not publicly routable.
If a domain is nonroutable, the default Azure AD instance domain, such as adatum2020.onmicrosoft.com, should be used for the UPN suffix. This requires modifying the UPN suffix of accounts stored in the on-premises Active Directory instance. Modification of UPN after initial synchronization has occurred is not supported. So, you need to ensure that on-premises Active Directory UPNs are properly configured prior to performing initial synchronization using Azure AD Connect. Perform the following steps to add a UPN suffix to the on-premises Active Directory if the Active Directory domain uses a nonroutable namespace:
Open the Active Directory Domains And Trust console and select Active Directory Domains And Trusts.
On the Action menu, click Properties.
On the UPN Suffixes tab, enter the UPN suffix to be used with Azure Active Directory. Figure 1-22 shows the UPN suffix of
epistemicus.com.
Figure 1-22 Configuring the UPN suffix for a routable domain
Once the UPN suffix has been added in the Active Directory Domains And Trusts dialog box, you can assign the UPN suffix to user accounts. You can do this manually, as shown in Figure 1-23, by using the Account tab of the user’s Properties dialog box.

Figure 1-23 Configure UPN
You can also use Microsoft PowerShell scripts to reset the UPNs of multiple user accounts. For example, the following script resets UPN suffixes of all user accounts in the
epistemicus.internaldomain toepistemicus.onmicrosoft.com.Get-ADUser -Filter {UserPrincipalName -like "*@epistemicus.internal"} -SearchBase "DC=epistemicus,DC=internal" | ForEach-Object { $UPN = $_.UserPrincipalName.Replace("epistemicus.internal","epistemicus.onmicrosoft.com") Set-ADUser $_ -UserPrincipalName $UPN }
Sign-in options
Azure AD Connect supports a variety of sign-in options. You configure which one you want to use when setting up Azure AD Connect. The default method, Password Synchronization, is appropriate for most organizations that will use Azure AD Connect to synchronize identities to the cloud.
Password synchronization
Hashes of on-premises Active Directory user passwords synchronize to Azure AD, and changed passwords immediately synchronize to Azure AD. Actual passwords are never sent to Azure AD and are not stored in Azure AD. This allows for a seamless single sign-on for users of computers that are joined to an Active Directory domain that synchronizes to Azure AD. Also, password synchronization allows you to enable password write-back for self-service password reset functionality through Azure AD.
Pass-through authentication
When authenticating to Azure AD, the user’s password is validated against an on-premises Active Directory domain controller. Passwords and password hashes are not present in Azure AD. Pass-through authentication allows for on-premises password policies to apply. Pass-through authentication requires that Azure AD Connect have an agent on a computer joined to the domain that hosts the Active Directory instance that contains the relevant user accounts. Pass-through authentication also allows seamless single sign-on for users of domain joined machines.
With pass-through authentication, the user’s password is validated against the on-premises Active Directory controller. The password doesn’t need to be present in Azure AD in any form. This allows for on-premises policies, such as sign-in hour restrictions, to be evaluated during authentication to cloud services.
Pass-through authentication uses a simple agent on a Windows Server 2012 R2, Windows Server 2016, or Windows Server 2019 domain-joined machine in the on-premises environment. This agent listens for password validation requests. It doesn’t require any inbound ports to be open to the Internet.
In addition, you can also enable single sign-on for users on domain-joined machines that are on the corporate network. With single sign-on, enabled users only need to enter a username to help them securely access cloud resources.
Active Directory Federation
This allows users to authenticate to Azure AD resources using on-premises credentials. When you choose the Federation with AD FS option, Active Directory Federation Services is installed and configured; also, a Web Application Proxy server to facilitate communication between the on-premises AD FS deployment and Microsoft Azure Active Directory is installed. This is the most complicated identity synchronization configuration, and it is only likely to be implemented in environments with complicated identity configurations.
Implement and manage Azure AD self-service password reset
Something that is challenging to deploy in an on-premises environment but which is relatively straightforward to deploy in an environment that uses Azure AD as a source of identity authority is self-service password reset. A self-service password reset allows users to reset their own passwords when they forget them, rather than having to contact the service desk and have a member of the IT staff perform the task for them. To enable self-service password reset, perform the following steps:
Open the Azure Active Directory portal at https://aad.portal.azure.com with an account that has tenant administrator permissions.
In the Azure Active Directory admin center, click the Users node, which will open the Users blade, as shown in Figure 1-24.

Figure 1-24 Azure Active Directory Admin Center
On the Users blade of the Azure Active Directory admin center, click Password Reset.
On the Password Reset – Properties page, click All, as shown in Figure 1-25, to enable the self-service password reset for all Microsoft 365 users.

Figure 1-25 Enable Self-Service Password Reset
Once enabled, users will be prompted for additional information the next time that they sign in. This information will be used to verify their identities if they use the self-service password reset tool. Users can reset their passwords by navigating to the website
https://passwordreset.microsoftonline.com shown in Figure 1-26 and completing the form.

Figure 1-26 Reset Password
Configure authentication methods including password hash and Pass Through Authentication (PTA), OATH, and passwordless authentication
Another important aspect around designing authentication is deciding which authentication methods will be supported for accounts in your organization’s Azure AD instance. For example, you must decide whether you want to support self-service password reset or Azure multifactor authentication, as shown in Figure 1-27.
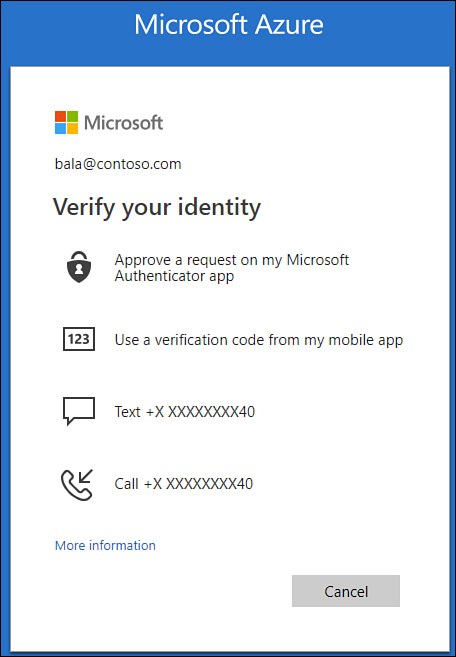
Figure 1-27 Multiple methods of verifying identity during authentication
You can use the authentication methods listed in Table 1-1 with accounts hosted in Azure Active Directory.
Table 1-1 Authentication methods and usage
Authentication method |
Where it can be used |
Password |
Multifactor authentication and self-service password reset |
Security questions |
Self-service password reset only |
Email address |
Self-service password reset only |
Microsoft Authenticator app |
Multifactor authentication and self-service password reset |
OATH hardware tokens |
Multifactor authentication and self-service password reset |
SMS |
Multifactor authentication and self-service password reset |
Voice call |
Multifactor authentication and self-service password reset |
App passwords |
Multifactor authentication in some cases |
These authentication methods have the following properties:
Password The password assigned to an Azure AD account is an authentication method. While you can perform password-less authentication, you cannot disable the password as an authentication method.
Security questions These are only available to Azure AD Self-Service Password Reset and can only be used with accounts that have not been assigned administrative roles. Questions are stored on the user object within Azure AD and cannot be read or modified by an administrator. They should be used in conjunction with another method. Azure AD includes the following predefined questions, and it is possible to create custom questions:
In what city did you meet your first spouse/partner?
In what city did your parents meet?
In what city does your nearest sibling live?
In what city was your father born?
In what city was your first job?
In what city was your mother born?
What city were you in on New Year’s 2000?
What is the last name of your favorite teacher in high school?
What is the name of a college you applied to but didn’t attend?
What is the name of the place in which you held your first wedding reception?
What is your father’s middle name?
What is your favorite food?
What is your maternal grandmother’s first and last name?
What is your mother’s middle name?
What is your oldest sibling’s birthday month and year? (for example, November 1985)
What is your oldest sibling’s middle name?
What is your paternal grandfather’s first and last name?
What is your youngest sibling’s middle name?
What school did you attend for sixth grade?
What was the first and last name of your childhood best friend?
What was the first and last name of your first significant other?
What was the last name of your favorite grade school teacher?
What was the make and model of your first car or motorcycle?
What was the name of the first school you attended?
What was the name of the hospital in which you were born?
What was the name of the street of your first childhood home?
What was the name of your childhood hero?
What was the name of your favorite stuffed animal?
What was the name of your first pet?
What was your childhood nickname?
What was your favorite sport in high school?
What was your first job?
What were the last four digits of your childhood telephone number?
When you were young, what did you want to be when you grew up?
Who is the most famous person you have ever met?
Email address This is only used for Azure AD self-service password resets and should be separate from the user’s Microsoft 365 Exchange Online email address.
Microsoft Authenticator app Is available for Android and iOS. Either involves the user being notified through the mobile app and being asked to select the same number on the mobile app as is displayed on the log in prompt, or it involves the user entering a set of periodically changing numbers displayed on the mobile app.
OATH hardware tokens Azure AD supports the use of OATH-TOTP SHA-1 tokens of both the 30- and 60-second variety. Secret keys can have a maximum of 128 characters. Once a token is acquired, it must be uploaded in comma-separated format including UPN, serial number, secret key, time interval, manufacturer, and model. Note that OATH is different from OAuth. OATH is a reference architecture for authentication; OAuth is a standard related to authorization.
Mobile phone Can be used either to send a code through text message that must be entered into a dialog box to complete authentication or where a phone call is made to the user who then needs to provide a personal authentication PIN. Phone numbers must include the country code.
App passwords A number of nonbrowser apps do not support multifactor authentication. An app password allows these users to continue to authenticate using these apps when multifactor authentication is not supported. An app password can be generated for each app, allowing each app password to be individually revoked.
Certificate-based authentication
Certificate-based authentication allows you to eliminate the need for a username and password combination. Certificate-based authentication is supported on Windows, Android, and iOS devices, and has the following requirements:
Is only supported for Federated environments for browser applications or where native clients use modern authentication through the Active Directory Authentication Library (ADAL). Exchange Active Sync (EAS) for Exchange Online (EXO) is exempt from the federation requirement and can be used with both federated and managed accounts.
The organization’s root certificate authority (CA) and any intermediate CAs must be integrated with Azure AD.
Each organizational CA must publish a Certificate Revocation List (CRL) in a location that is accessible to the Internet.
The Windows, Android, or iOS device must have access to an organizational CA that is configured to issue client certificates.
The Windows, Android, or iOS device must have a valid certificate installed.
Exchange ActiveSync clients require that the client certificate have the user’s routable email address included in the Subject Alternative Name field.
To add an organizational CA that is trusted by Azure Active Directory, you need to ensure that the CA is configured with a CRL publication location that is accessible on the Internet and to then export the CA certificate. Once you have the CA certificate exported, which will include the Internet-accessible location where the CRL is published, use the New-AzureADTrustedCertificateAuthority PowerShell cmdlet to add the organizational CA’s certificate to Azure Active Directory. You can view a list of trusted CAs for your organization’s Azure AD instance using the Get-AzureADTrustedCertificateAuthority cmdlet.
Passwordless authentication
Passwordless authentication allows you to replace authentication using a password with authentication requiring “something you have” and “something you know.” An example of this might be a biometric such as your face or fingerprint combined with a code generated by an authenticator device.
Microsoft currently offers three passwordless authentication options. These are
Windows Hello for Business This method uses biometric authentication technologies included with Windows computers, such as Windows Hello–compatible cameras for facial recognition or Windows Hello–compatible fingerprint readers. Most appropriate for users that are the only people that interact with a specific Windows computer on a regular basis.
Security key sign in Allows access via FIDO2 Security keys. This method is appropriate for users who sign in to shared machines such as those in a call center. Because it requires the physical FIDO2 security key, this is also an excellent method of protecting privileged identities because this key can in turn be secured in a safe that another person has the access code for.
Phone sign in through Microsoft Authenticator app The Microsoft Authenticator app runs on iOS and Android phones and supports identity verification via biometrics or PIN-based authentication. When using this method, a user will be prompted on the screen to select a specific number displayed among a list of options on the Microsoft Authenticator app as well as to perform identity verification via biometrics or a PIN.
Deploying passwordless authentication requires the following administrative roles:
Global administrator Role that allows the implementation of the combined registration experience in the directory.
Authentication administrator Role that can implement and manage authentication methods for individual user accounts.
User Although not an administrative role, this account is necessary to be able to configure an authenticator app on a device or enroll security device for their specific accounts once passwordless authentication is enabled for their accounts.
To enable passwordless phone sign-in authentication, perform the following steps:
In the Azure Active Directory admin portal, click Security.
On the Security page shown in Figure 1-28, click Authentication Methods.
Figure 1-28 Authentication methods section of the Security page
On the Authentication Methods page shown in Figure 1-29, select the authentication method that you want to enable, toggle the slider to On, and then choose whether you want to enable the authentication method for some or all Azure AD users by choosing All Users or Select Users.

Figure 1-29 Enable passwordless authentication method
Transfer Azure subscriptions between Azure AD tenants
Each Azure subscription is associated with and can trust only a specific Azure AD tenancy. Multiple subscriptions can be associated with a specific tenancy. This allows different parts of an organization to use a single set of user accounts across multiple subscriptions. For example, your organization might have a production subscription for production resources, a development subscription for development environment resources, and individual subscriptions for individual developers. A single subscription cannot be associated with multiple Azure AD tenancies. However, it is possible to transfer the Azure AD tenancy with which a subscription is associated.
Reasons that you might need to transfer Azure subscriptions include
Your organization acquires another organization. You want to move their existing Azure subscriptions under a central tenancy. For example, Contoso acquires Fabrikam, which has 3 existing Azure subscriptions, while Contoso has 10. Contoso wants to move the 3 existing Fabrikam Azure subscriptions in the Contoso Azure AD tenancy.
Your organization is going to spin off a subsidiary, and you want to move one or more subscriptions to a new directory.
A subscription has expired, and you have lost access to the resources associated with that subscription. You can associate another subscription with that original subscription’s Azure AD tenancy and transfer the existing resources to the new subscription.
When you change a subscription’s Azure AD association, any users that have been assigned roles through role-based access control, which you will learn more about later in this chapter, will also lose access. In addition, transferring a subscription to a different Azure AD tenancy removes Policy assignments.
Prior to transferring a subscription to a new Azure AD tenancy, you must have an account that has the Owner role assignment for the subscription. This account must exist in the current directory as well as the new directory. You can add an account from one Azure AD tenancy to another one with B2B collaboration users.
To transfer an existing subscription from one Azure AD tenant to another, perform the following steps:
On the Subscriptions page of the Azure portal, select Change Directory. This will only be possible if the account used to perform this operation has the requisite permissions to perform this action.
On the Change The Directory dialog box shown in Figure 1-30, select the Azure AD tenancy you want to associate the subscription with and select Change, which will change the tenancy.
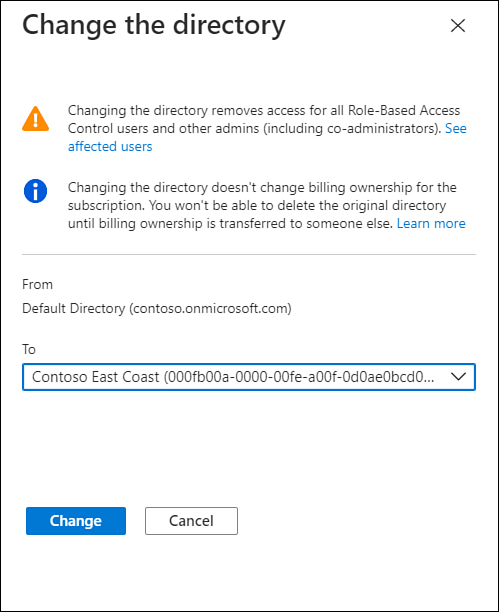
Figure 1-30 Change The Directory dialog box
Skill 1.2: Configure secure access by using Azure AD
Azure AD Privileged Identity Management (PIM) allows you to assign Azure AD and Azure Role Based Access Control (RBAC) roles to users on a temporary rather than a permanent basis. Roles can be granted upon request or subject to conditions such as the requestor performing multifactor authentication (MFA) or having their request reviewed and approved by another user. Role activation requests are logged, which provides organizations with an ability to audit the use of administrative privileges in Azure subscription. This objective deals with monitoring privileged access, configuring access reviews, and the process of activating PIM.
Monitor privileged access for Azure AD Privileged Identity Management (PIM)
Privileged Identity Management (PIM) allows you to implement time-based and approval-based activation of administrative roles. For example, you could configure PIM so that a help desk support staff member only has the right to change a user’s password for a maximum of 60 minutes once the request for that right has been approved by a specific authorized user. PIM differs from earlier administrative models where the help desk might always be able to change Azure AD user passwords. PIM allows you to do the following:
Configure just-in-time privileged access to Azure AD and Azure resources. Just-in-time access is access limited to an amount of time, rather than providing permanent access to those resources.
Assign time-bound access to resources using start and end dates.
Require approval from another user when activating privileged roles.
Require multifactor authentication to occur before role activation.
Require users to provide recorded written justification of why they need to perform activation. This allows auditors at a later stage to correlate the administrative activity that occurs with the stated reason for providing privileged access.
Provide notifications, such as email alerts sent to a distribution list, when privileged roles are activated.
Perform access reviews to determine how often privileges are used and whether specific users still require roles.
Export an audit history that can be examined by internal or external auditors.
To view all activity associated with Azure AD roles, you need to view the resource audit history. To view resource audit history, perform the following steps:
In the Azure AD admin center blade of the Azure portal, select Identity Governance in the Manage area, as shown in Figure 1-31.
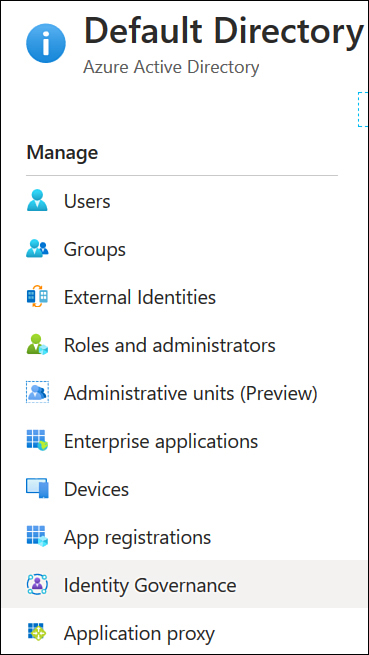
Figure 1-31 Identity Governance
On the Identity Governance blade, select Azure AD Roles under Privileged Identity Management.
Click Resource Audit and then use the filters to view the appropriate information, as shown in Figure 1-32.
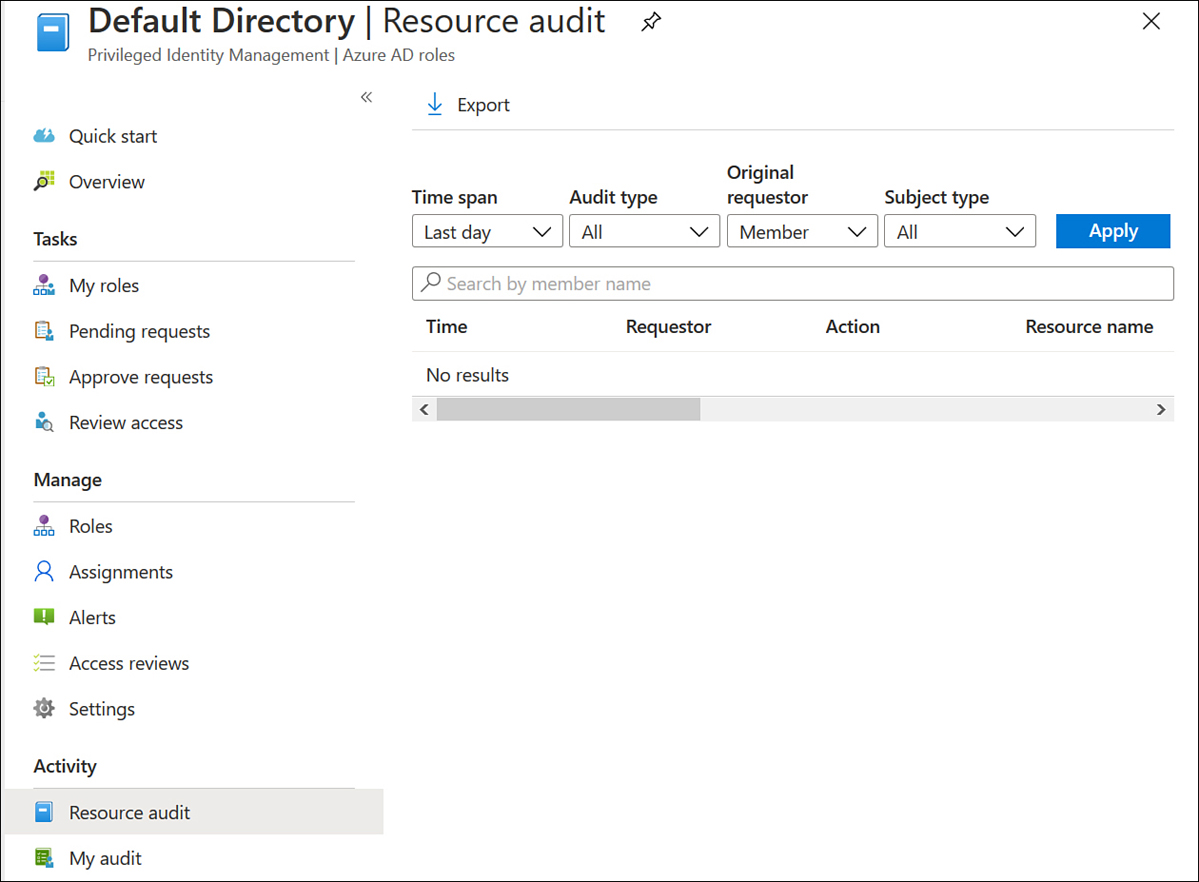
Figure 1-32 Resource Audit
Configure access reviews
Many security incidents have occurred because an attacker has gained access through a forgotten account with administrative privileges. Access reviews allow you to determine whether existing PIM role assignments are still relevant and which role assignments can be removed because they are no longer being actively used.
There are two types of access review: access reviews of Azure resource PIM roles and access reviews of Azure AD PIM roles. To perform an access review of an Azure resource PIM role, perform the following steps:
In the Azure AD admin center blade of the Azure portal, select Identity Governance in the Manage area and then select Privileged Identity Management.
On the Privileged Identity Management blade, click Azure Resources, as shown in Figure 1-33.

Figure 1-33 Azure resources
Existing access reviews will be displayed on the report shown in Figure 1-34.

Figure 1-34 Azure Resource access review report
Click New to create a new access review. Provide the following information:
Access Review Name A name for the access review.
Start Date Date when the review is scheduled to start.
Frequency How often the review should occur. You can choose a frequency of one time, weekly, monthly, quarterly, annually, or semiannually.
Duration Specify the number of days the access review will occur over. A longer duration will give you a better idea of how often privileged roles are used.
End Specify how to end recurring access reviews. You can specify an end date or configure the review to end after a specific number of cycles.
Users Specify the roles that you are reviewing the membership of.
Reviewers Specify which people will review all the users.
Upon Completion As shown in Figure 1-35, configure how you want the results of the access review implemented. If you want to automatically remove access for users, set Auto Apply Results To Resources to Enable. If you want to manually apply results once the review is complete, set this to Disable.
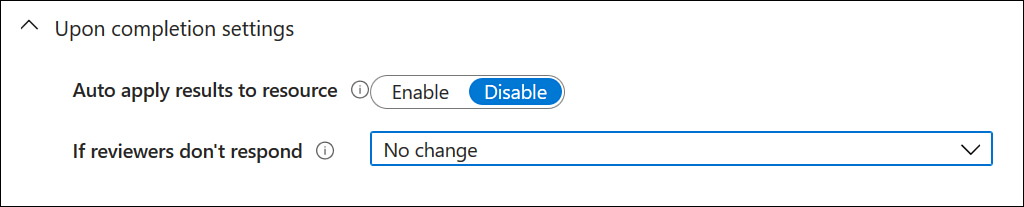
Figure 1-35 Upon Completion Settings
Should Reviewer Not Respond In this drop-down menu, you have the following options:
No Change This will ensure that no changes are made to current PIM settings.
Remove Access This will remove access of users where access is no longer found to be necessary.
Approve Access Approve user access.
Take Recommendations Use the system’s recommendation when it comes to removing or approving continued access.
The steps for configuring an access review of an Azure AD PIM role are similar to those that you perform when configuring a review to Azure resources, except that you select Azure AD Roles instead of Azure Resources on the Manage menu of the Privileged Identity Management blade of the Azure AD admin center.
Activate and configure PIM
Azure AD Privileged Identity Management (PIM) allows you to make role assignment temporary and contingent on approval, rather than making the role assignment permanent, as is the case when you manually add a member to the role. PIM requires Azure AD P2, which must be enabled before you can configure it. To configure an Azure AD administrative role for use with PIM, perform the following steps:
In the Azure AD admin center, select Roles And Administrators.
Select the role to which you want to add a user. This will open the role’s properties page.
On the Role Properties page, click Manage In PIM. The role will open, and any members assigned permanently to the role will be listed with the status of Permanent, as shown in Figure 1-36.
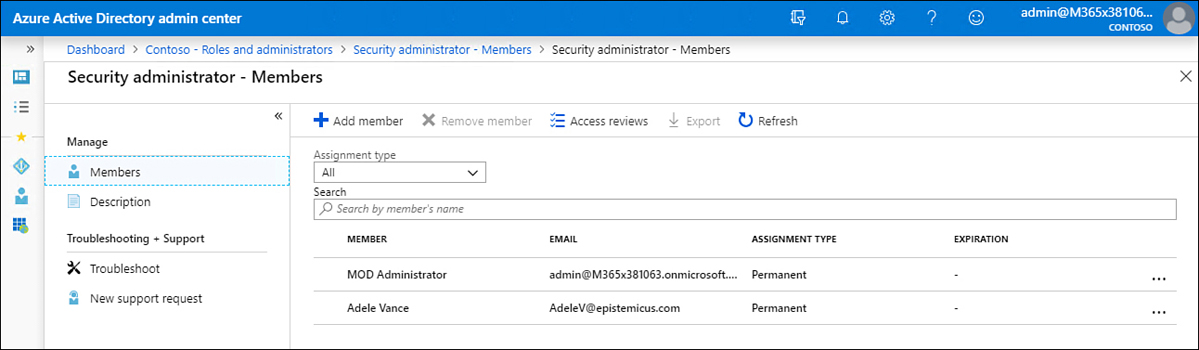
Figure 1-36 Members of the Password Administrators role
Select the user who you want to convert from Permanent to Eligible. An eligible user can request access to the role, but that user will not have its associated rights and privileges until that access is granted. On the user’s properties page, click Make Eligible.
You can edit the conditions under which an eligible user can be granted by performing the following steps:
On the Privileged Identity Management blade, click Azure AD Roles.
Under Manage, as shown in Figure 1-37, click Settings.
Figure 1-37 Manage PIM
Click Roles and then select the role that you want to configure. Figure 1-38 shows the PIM settings for the Security Administrator role, where role activation can occur for an hour at most but where MFA and an approval are not required.
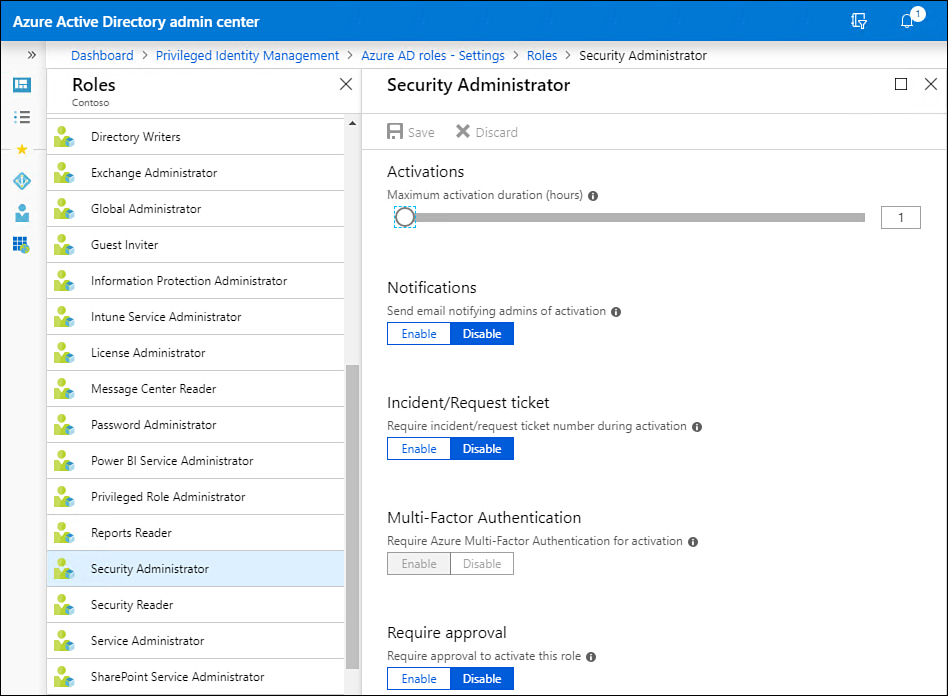
Figure 1-38 Manage PIM settings for a role
Users can activate roles that they are eligible for from the Privileged Identity Management area of the Azure AD Administrative console. Administrators with the appropriate permissions can also use the Privileged Identity Management area of the Azure AD Administrative console to approve requests that require approval and review role activations.
PIM requires that you configure Azure AD users with appropriate licenses. PIM requires one of the following license categories to be assigned to users who will perform PIM-related tasks:
Azure AD Premium P2
Enterprise Mobility + Security (EMS) E5
Microsoft 365 M5
The PIM-related tasks that require a license are as follows:
Any user who is eligible for an Azure AD role that is managed using PIM
Any user who can approve or reject PIM activation requests
Users assigned to Azure resource roles with just-in-time or time-based assignments
Any user who is able to perform an access review
Any user who is assigned to an access review
You cannot use PIM to manage the following classic subscription administrator roles:
Account Administrator
Service Administrator
Co-Administrator
The first person to activate PIM will be assigned the Security Administrator and Privileged Administrator roles for the tenancy.
Implement conditional access policies including multifactor authentication
Conditional Access policies allow you to require additional steps to be taken when a certain set of circumstances occur. For example, you could configure a conditional access policy to require MFA to occur if a user attempts to access a specific resource in Azure or if a user is accessing Azure from an unusual location. Conditional access policies can also be used to completely block access to Azure resources when certain conditions are met, such as when someone attempts to access an application from a region from which IP address ranges have been blocked.
Conditional access policies
Conditional access policies will only be enforced after the first-factor authentication has been completed. Conditional access policies require an Azure AD P2 or equivalent subscription. Commonly used conditional access policies include
Require MFA for all users with administrative roles
Require MFA prior to performing Azure management tasks
Block sign-ins for legacy authentication protocols
Require trusted location when registering for Azure MFA
Block access from specific locations
Require organization-managed devices for certain applications
Conditional access policies can be applied based on user circumstances that include but not limited to the following:
IP address location An administrator can designate certain IP address ranges as trusted, such as the public IP addresses associated with the organization’s Internet gateway devices. Administrators can also specify regional IP address ranges as being blocked from access, such as those belonging to people trying to access resources from Tasmania.
Device Whether the user is attempting to access Azure AD resources from a trusted device or from a new untrusted device.
Application Whether the user is attempting to access a specific Azure AD application.
Group membership Whether the user is a member of a specific group.
In addition to the simple option to block access, conditional access policies can be configured to
Require multifactor authentication
Require a device to be marked as compliant
Require the device to be Hybrid Azure AD–joined
Require an approved client app
Require an app protection policy
To create a conditional access policy, perform the following steps:
In the Azure Active Directory area of the Azure portal, select Security and then select Conditional Access, as shown in Figure 1-39.
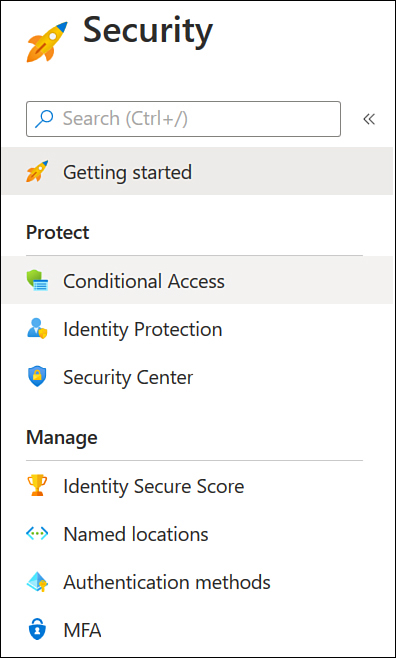
Figure 1-39 Security page with Conditional Access highlighted
On the Conditional Access | Policies page shown in Figure 1-40, select New Policy.

Figure 1-40 Conditional Access policies
On the New Conditional Access Policy page shown in Figure 1-41, provide the following information:
Name A name for the conditional access policy.
Users And Groups Users and groups that the policy applies to.
Cloud Apps Or Actions Which cloud apps or user actions the policy applies to. Policies can apply to some or all cloud apps. You can also specify specific user actions that will trigger the conditional access policy, such as attempting to access a specific Azure resource, such as a virtual machine.
Conditions The conditions associated with the policy. These include User risk, sign-in risk, device platforms, locations, client apps and device state.
Access Controls Select which additional controls are required to grant access. This gives you the option of requiring MFA, a compliant device, an Hybrid Azure AD–joined device, an approved client app, an app protection policy, or that the user perform a password change.
Session Allows you to specify the behavior of specific cloud applications. Options include Conditional Access App Control, Sign-In Frequency, and Persistent Browser Session.
Enable Policy Can be set to Report Only, which you should use to determine how the policy will function prior to enforcing it, enabling the policy, or disabling the policy.

Figure 1-41 New Conditional Access policy
Click Create to create the policy.
Implementing MFA
When implementing MFA, you need to make decisions about which MFA capabilities will be available to the users associated with your organization’s Azure AD tenancy. MFA requires that more than one authentication method be used when signing in to a resource. Usually, this involves the user providing their username and password credentials, and then providing one of the following:
A code generated by an authenticator app This can be the Microsoft Authenticator app or a third-party authenticator app, such as the Google authenticator app.
A response provided to the Microsoft authenticator app When this method is used, Azure AD provides an on-screen code to the user authenticating that must also be selected on an application that is registered with Azure AD.
A phone call to a number registered with Azure AD The user needs to provide a preconfigured pin that they will be instructed to enter by the automated service that performs the phone call. Microsoft provides a default greeting during authentication phone calls, so you don’t have to record one for your own organization.
An SMS message sent to a mobile phone number registered with Azure AD The user provides the code sent in the message as a second factor during authentication.
When designing your solution, you’ll need to have a way of ensuring that users have access to the appropriate MFA technology. This might require you to come up with a method of ensuring that all users in your organization already have the Microsoft Authenticator app installed on their mobile devices before you enable MFA on their accounts.
MFA is not enabled by default on Azure AD tenancies. Before you can configure accounts to use MFA, you’ll need to enable MFA on the tenancy. To enable MFA on an Azure AD tenancy and configure MFA for specific users, perform the following steps:
In Azure Active Directory admin center, navigate to Users and then click All Users.
Click More, and then click Multi-Factor Authentication, as shown in Figure 1-42.
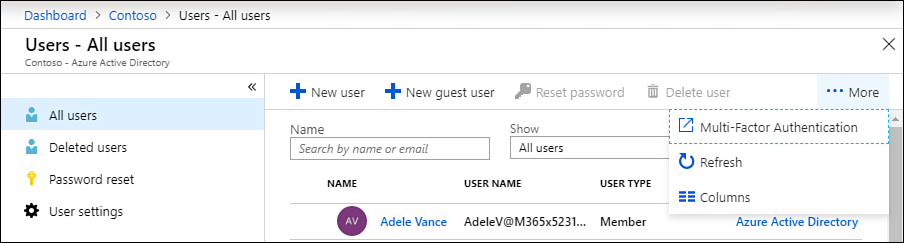
Figure 1-42 Set up Azure MFA
After selecting this option, MFA will be enabled for the tenancy, and you’ll be provided with a list of users that is similar to that shown in Figure 1-43.
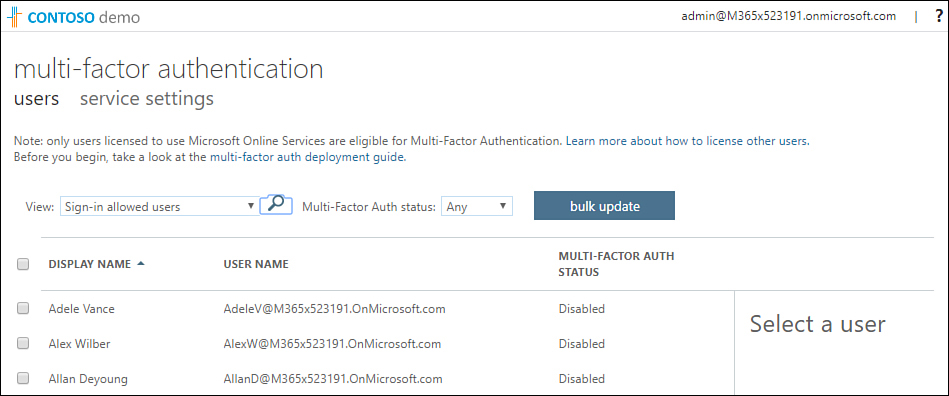
Figure 1-43 Set up users for Azure MFA
Select the users who you want to set up for MFA, as shown in Figure 1-44, and then click Enable.
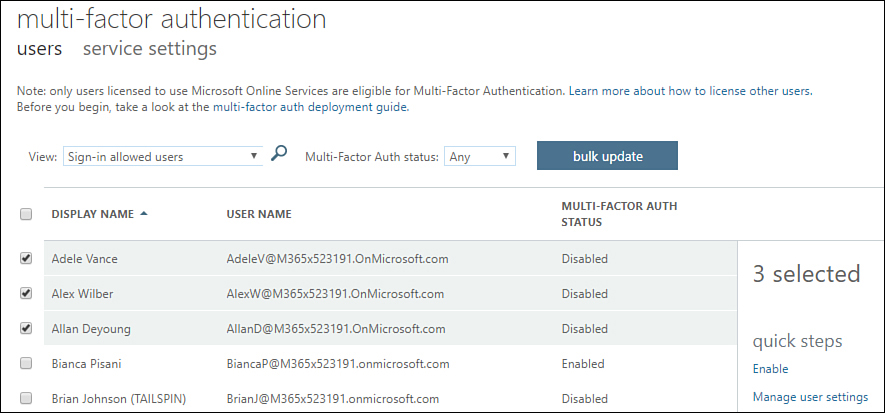
Figure 1-44 Enable Azure MFA
On the About Enabling Multi-Factor Auth dialog box shown in Figure 1-45, click Enable Multi-Factor Auth.
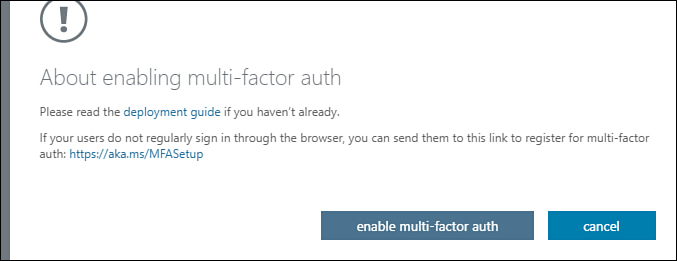
Figure 1-45 Enabling multifactor authorization
The next time that users sign on, they will be prompted to enroll in multifactor authentication and will be presented with a dialog box similar to that shown in Figure 1-46, asking them to provide additional information.
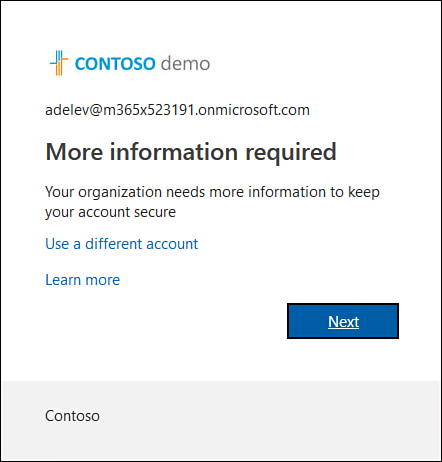
Figure 1-46 More information required
And then choose between providing a mobile phone number or an office phone number or configuring a mobile app, as shown in Figure 1-47.
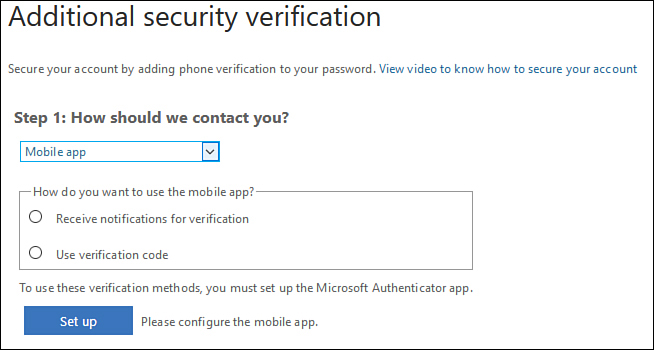
Figure 1-47 Contact preferences
When you specify one of these options, you are presented with a QR code. Within the app, you can add a new account by scanning the QR code. Once you have configured the application, you will be required to confirm that configuration has completed successfully by approving a sign in through the app, as shown in Figure 1-48.
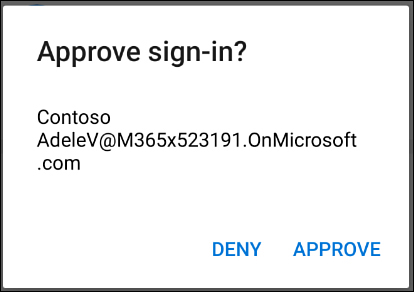
Figure 1-48 Verify the app
Once this is done, you’ll be prompted to provide additional security information in the form of a phone number, as shown in Figure 1-49.
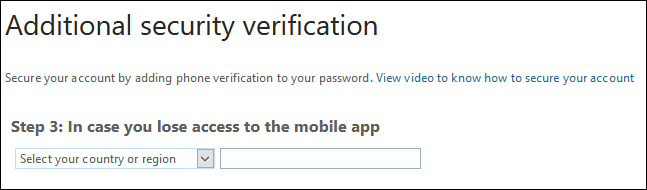
Figure 1-49 Provide additional security information
You can configure the following multifactor authentication service settings, as shown in Figure 1-50.
App Passwords Allow or disallow users from using app passwords for nonbrowser apps that do not support multifactor authentication.
Trusted IP Addresses Configure a list of trusted IP addresses where MFA will be skipped when federation is configured between the on-premises environment and the Microsoft 365 Azure AD tenancy.
Verification Options Specify which verification options are available to users, including phone call, text message, app-based verification, or hardware token.
Remember Multi-Factor Authentication Decide whether to allow users to have MFA authentication remembered for a specific period of time on a device, so that MFA does not need to be performed each time the user signs on. The default is 14 days.
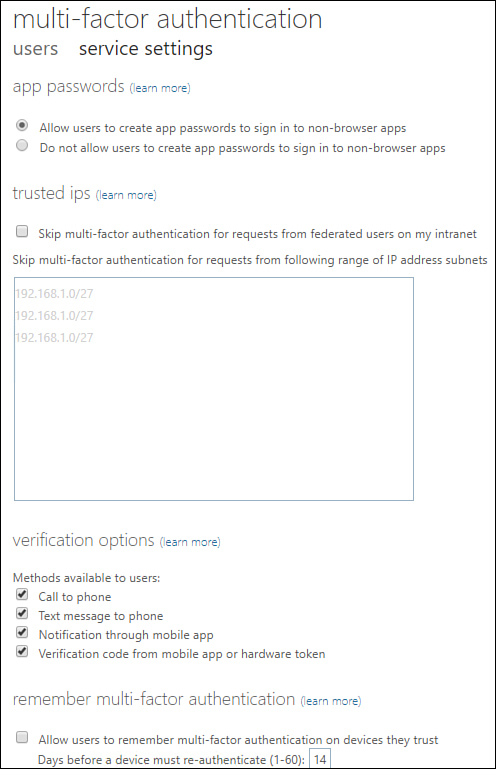
Figure 1-50 MFA service settings
Administer MFA users
Once MFA is configured for users, there might be certain times when you want to force users to provide updated contact methods, you might want to revoke all app passwords, or you might want to restore MFA on all remembered devices. You can do this by performing the following steps:
With an account that has been assigned the Global Admin role, open the Azure AD admin center and select the All Users node, as shown in Figure 1-51. Select the user to manage MFA.
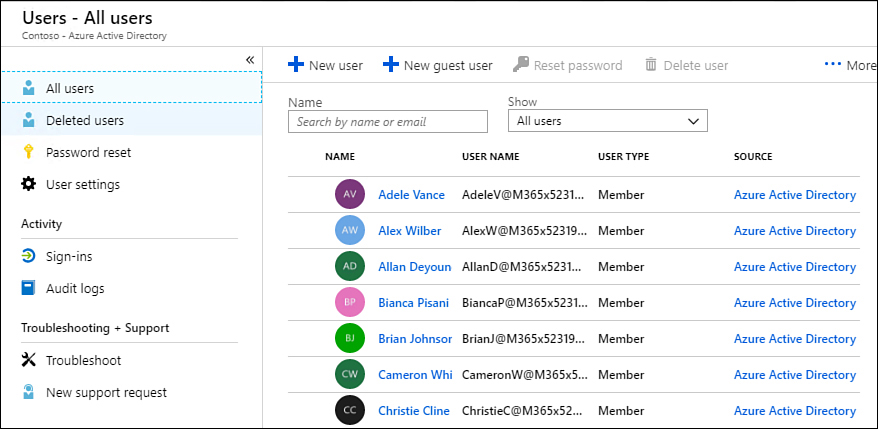
Figure 1-51 Select the user to manage MFA
On the user’s properties page, select Authentication Methods.
On the Authentication Methods page shown in Figure 1-52, select which action to perform.
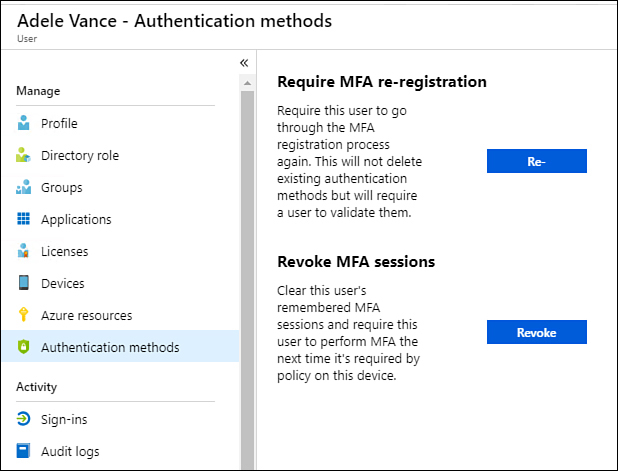
Figure 1-52 Authentication methods
If you want to perform a bulk reset for multiple users, use the following steps:
From the All User’s page shown in Figure 1-53, click Multi-Factor Authentication.
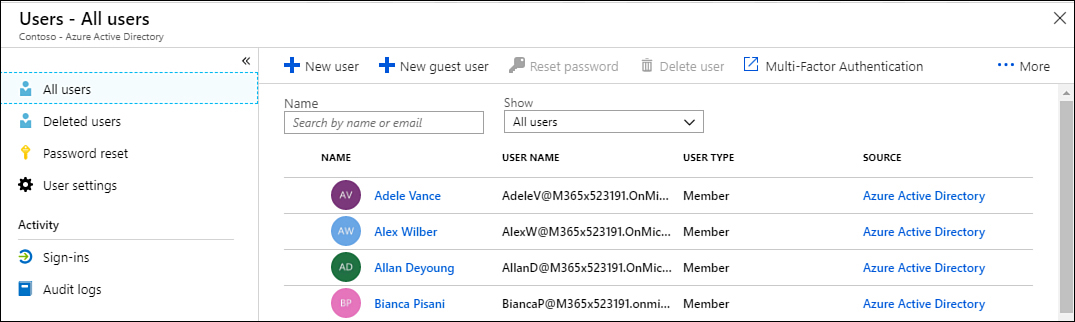
Figure 1-53 List of users
On the Multi-factor Authentication users page shown in Figure 1-54, select the users for whom you want to reset MFA settings and click Manage User Settings.

Figure 1-54 Select users for MFA reset
On the Manage User Settings page shown in Figure 1-55, select which tasks you want to perform, such as requiring users to provide contact methods again, deleting all existing app passwords, and restoring MFA on remembered devices. After making the selection, click Save.
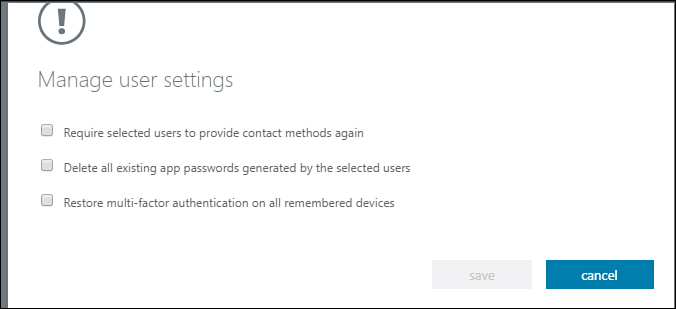
Figure 1-55 Managing user settings
Account lockout
Account Lockout settings for MFA, shown in Figure 1-56, allow you to configure the conditions under which MFA lockout will occur. On this page, you can configure the number of MFA denials that will trigger the account lockout process, how long before the account lockout counter is reset, and the number of minutes until the account will be unblocked. For example, if the account lockout counter is reset after 10 minutes, and the number of MFA denials to trigger account lockout is set to 5, then 5 denials in 10 minutes will trigger a lockout, but 5 denials over a course of 30 minutes would not because the account lockout counter would reset during that period.

Figure 1-56 Account lockout settings
Block/unblock users
The blocked user setting shown in Figure 1-57 allows you to block specific users of an on-premises MFA server from being able to receive an MFA request. Any requests sent to a user on the blocked users list will automatically be denied. Users on this list remain blocked for 90 days, after which they are removed from the blocked users list. To unblock a blocked user, click Unblock.
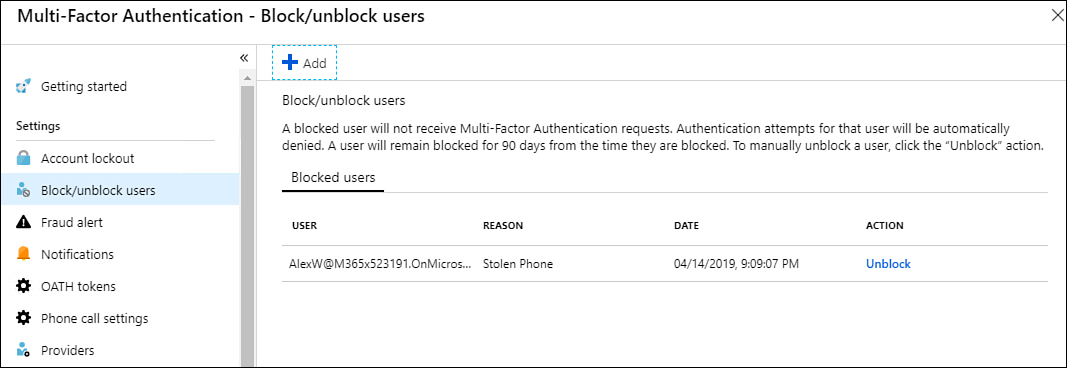
Figure 1-57 Block/Unblock Users page
Fraud alert settings
Fraud alert settings, shown in Figure 1-58, allow you to configure whether users can report fraudulent verification requests. A fraudulent verification request might occur when an attacker has access to a user’s password but does not have access to an alternative MFA method. A user becomes aware of this by receiving an MFA prompt, either through his or her app, an SMS, or a phone call when they haven’t attempted to authenticate against a Microsoft 365 workload. When a user reports fraud, you can choose an option to have his or her account automatically blocked for 90 days, which indicates that the password is likely to be compromised.
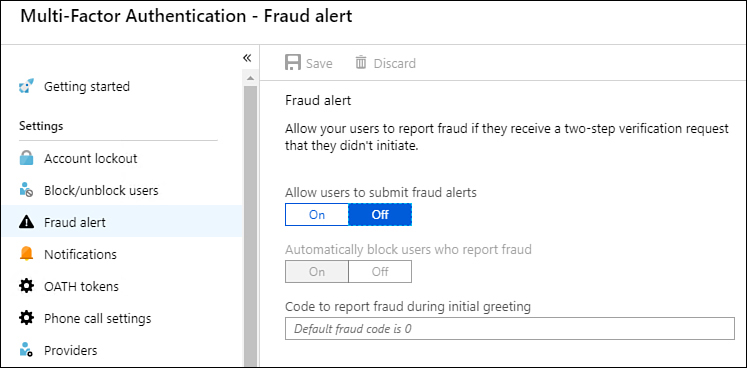
Figure 1-58 Fraud alert page
OATH tokens
The OATH tokens page shown in Figure 1-59 allows you to upload a specially formatted CSV file that contains the details and keys of the OATH tokens that you want to use for multifactor authentication. The specially formatted CSV file should include a header row that is formatted as shown here with the UPN (user principal name), serial number, secret key, time interval, manufacturer, and model. Each file is associated with a specific user. If a user has multiple OATH tokens, these should be included in the file associated with his or her account.

Figure 1-59 OATH tokens page
Phone call settings
Phone call settings allow you to configure the caller ID number that is displayed when the user is contacted for MFA authentication. This number must be a United States number. You can also use the phone call settings page shown in Figure 1-60 to configure custom voice messages. The voice messages must be in .wav or .mp3 format, must be no larger than 5 MB, and should be shorter than 20 seconds.

Figure 1-60 Phone Call Settings page
Report MFA utilization
Azure MFA provides a number of reports that you can use to understand how MFA is being used in your organization, including
Blocked User History Provides a history of requests to block or unblock users.
Usage And Fraud Alerts Provides information on a history of fraud alerts submitted by users. Also provides information on overall MFA usage
Usage For On-Premises Components Provides information of utilization of MFA through the Network Policy Server extension, Active Directory Federation Services, and on-premises MFA server
Bypassed User History Provides information on requests to bypass MFA by a specific user
Server Status Provides status data of MFA servers associated with your organization’s Azure AD tenancy
Configure Azure AD Identity Protection
Azure AD Identity Protection allows you to automate the detection and remediation of identity-based risks, including the following:
Atypical travel When a user’s account sign-in indicates he or she has performed unusual shifts in location. This could include a user signing in from Sydney and then Los Angeles in a two-hour period, when the flight between the two cities takes about seven times that amount of time.
Anonymous IP address When a user signs in from an anonymous IP address. While a user might be using an anonymizing VPN to access organizational resources, attackers also use tools such as TOR nodes when launching compromise attempts.
Unfamiliar sign-in properties When a user’s sign-in properties differ substantially from those that have been observed in the past.
Malware-linked IP address When the IP address the user is signing in from is known to be part of a malware botnet or has exhibited other malicious network activity in the past.
Leaked credentials That the user’s credentials have been discovered in a data breach, such as those recorded on haveIbeenpwned.com.
Azure AD treat intelligence That the sign-in behavior correlates with a known attack pattern identified by Microsoft’s internal or external threat intelligence sources.
Enabling Azure AD Identity protection requires an Azure AD P2 license.
Azure AD Identity Protection allows you to configure two types of risk policy: a sign-in risk policy and a user-risk policy:
Sign-in risk These policies analyze signals from each sign-in and determine how likely it is that the sign-in was not performed by the person associated with the user account. If a sign-in is determined to be risky, administrators can specify whether to block access or allow access but require multifactor authentication.
User-risk These policies are based on identifying deviations from the user’s normal behavior. For example, the user signs in from an unusual location at a time that substantially differs from when they usually sign in. User risk policies allow administrators to block access, allow access, or allow access but require a password change when the policy is triggered.
To enable user risk and sign-in risk policies, perform the following steps:
In the Azure Active Directory admin center, select Security in the Manage area and then select Identity Protection.
In the Protect section of the Identity Protection blade, which is shown in Figure 1-61, select User Risk Policy.

Figure 1-61 Identity Protection blade
Click User Risk Policy. On the User Risk Policy blade, which is shown in Figure 1-62, configure the following settings.

Figure 1-62 User Risk Remediation Policy
Click Sign-In Risk Policy. On the Sign-In Risk Remediation Policy blade, which is shown in Figure 1-63, configure the following settings and click Save:
Assignments: Users Determine which users the user risk remediation policy applies to.
Assignments: Conditions Allows you to determine at which risk level the policy applies. You can choose between Low And Above, Medium And Above, or High.
Controls: Access For a user risk policy, you can choose between Block, Allow, and Allow And Require Multi-Factor Authentication.
Enforce policy The policy can be switched On or Off.

Figure 1-63 Sign-In Risk Remediation Policy
Skill 1.3: Manage application access
This objective deals with the steps that can be taken to configure and manage application access. This includes understanding application registration with an Azure AD tenancy, managing access to applications themselves, configuring application permissions scopes, application permission consent, and API access to Azure subscriptions and resources.
Create app registrations
As you learned earlier in the chapter, registering an application with Azure Active Directory allows you to use Azure Active Directory’s functionality, such as user identity and permissions, with the application. To register an application with Azure Active Directory using the Azure portal, perform the following steps:
In the Azure portal, open the Azure Active Directory blade.
In the Manage section shown in Figure 1-64, click App Registrations.
Figure 1-64 App Registrations section of the Azure Active Directory blade
On the App Registrations blade of the Azure Active Directory section of the Azure portal, click New Registration. Figure 1-65 shows the New Registration item.

Figure 1-65 App Registrations blade with the New Registration option
On the Register An Application page, shown in Figure 1-66, choose which users can use this application or access this API. You can choose among the following options:
Accounts In This Organizational Directory Only Appropriate for single-tenant scenarios where the only people who will use the application have accounts that reside within the Azure AD instance. You can switch to the multitenant option and back to the single-tenant option after registration is complete using the Authentication page in the Azure portal.
Accounts In Any Organizational Directory Choose this option when you want to make the application available to users in your own and other Azure AD tenancies. This is also known as the multitenant option. You can switch between this option and the single-tenant option using the Authentication page in the Azure portal.
Accounts In Any Organizational Directory And Personal Microsoft Accounts This option allows not only users who have accounts in Azure AD tenancies but also personal Microsoft accounts, such as Hotmail.com and outlook.com accounts. You can’t presently switch from this mode to multitenant or single-tenant in the Azure portal, but you can make this change if you use the application manifest editor.

Figure 1-66 Supported account types for app registration
The Redirect URI (Optional) section, shown in Figure 1-67, allows you to specify the type of app that is being registered, with the options being Web or Public Client (Mobile & Desktop). If you are registering a web app, you need to specify the base URL of the app (for example, https://newapp.tailwindtraders.net:31544). If you choose the Public Client option, you instead need to provide the Uniform Resource Identifier (URI) that Azure AD will use to return token responses that is specific to the application that you are registering.

Figure 1-67 Redirect URI
After providing this information, click Register.
Once the app registration process is complete, the app will be assigned a unique application or client ID and it will be listed on the App Registrations page in the Azure portal, as shown in Figure 1-68.

Figure 1-68 App Registrations
Managing access to apps
How you assign access to applications depends on the edition of Azure AD that your organization has licensed. If your organization only has a free edition of Azure AD, you’ll only be able to assign access to applications on a per-user basis. If your organization licenses a paid edition of Azure AD, then you’ll be able to perform a group-based assignment. When you perform a group-based assignment, whether a user is able to access an application will depend on whether the user is a member of the group at the time he or she attempts to access the application.
Any form of Azure AD group can be used to assign access to applications, including attribute-based dynamic groups, on-premises Active Directory groups, or self-service managed groups. Nested group membership are not presently supported when it comes to assigning access to applications through Azure AD.
Assigning users access to an application
To assign access to an application to a user or group, perform the following steps:
In the Azure AD admin center, select Azure Active Directory and in the Manage section, click Enterprise Applications, as shown in Figure 1-69.
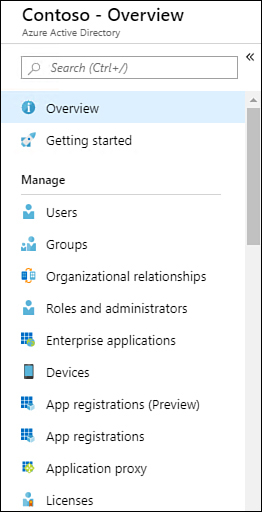
Figure 1-69 Azure AD Manage section
On the Enterprise Applications blade, ensure that All Applications is selected, as shown in Figure 1-70, and then select the application to which you want to enable user access.
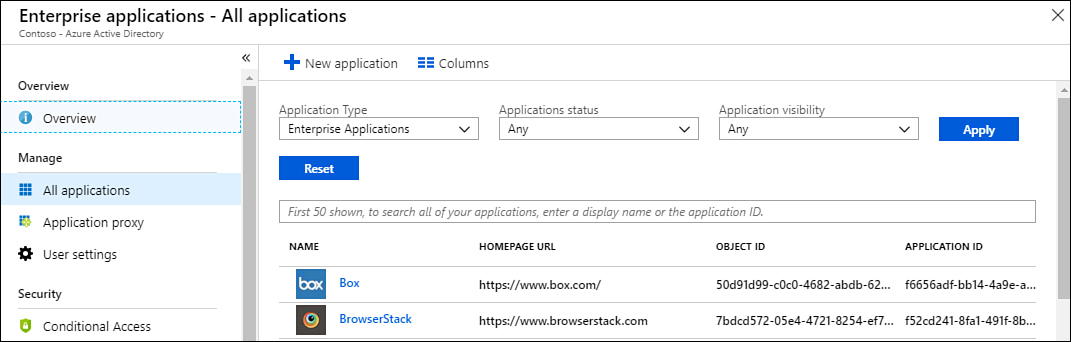
Figure 1-70 All Applications
Once the application opens, click Users And Groups from the application’s navigation pane, which is shown in Figure 1-71.
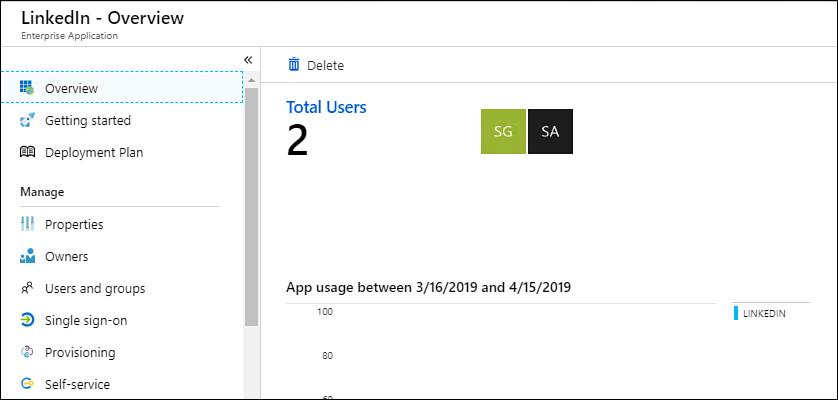
Figure 1-71 Application overview
On the application’s Users And Groups page, shown in Figure 1-72, click Add User. Note that you use the Add User button to also add a group assignment if Azure AD is licensed at the appropriate level.

Figure 1-72 Users And Groups
On the Add Assignment page shown in Figure 1-73, search for the user or group to which you want to grant application access.
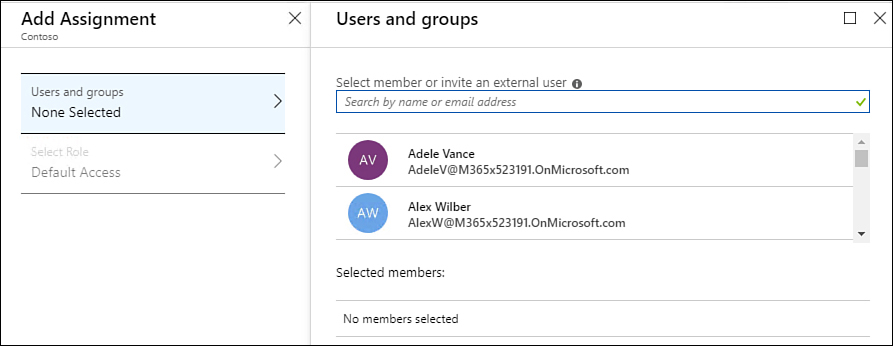
Figure 1-73 Add Assignment for Users And Groups
Select a user or group and then click Select, as shown in Figure 1-74.
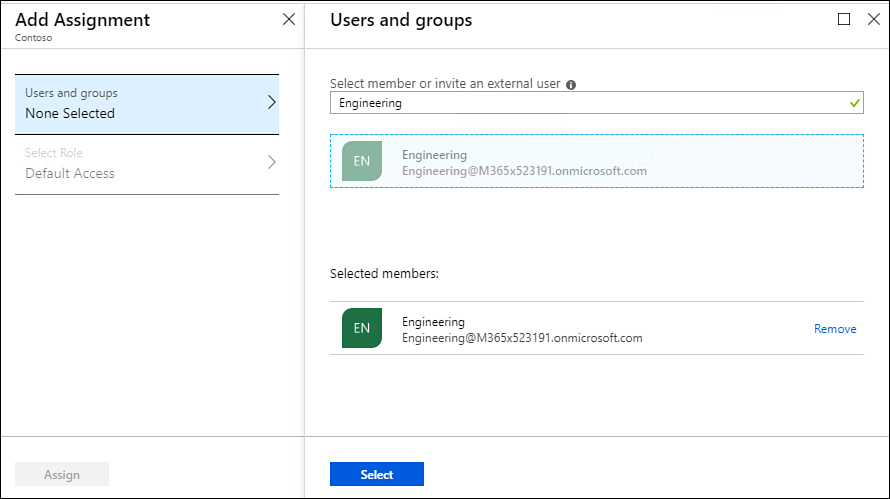
Figure 1-74 Selecting the group assignment
Once the user or group is selected, click Assign. Verify that the assignment has occurred by reviewing the newly updated list of users and groups, as shown in Figure 1-75.
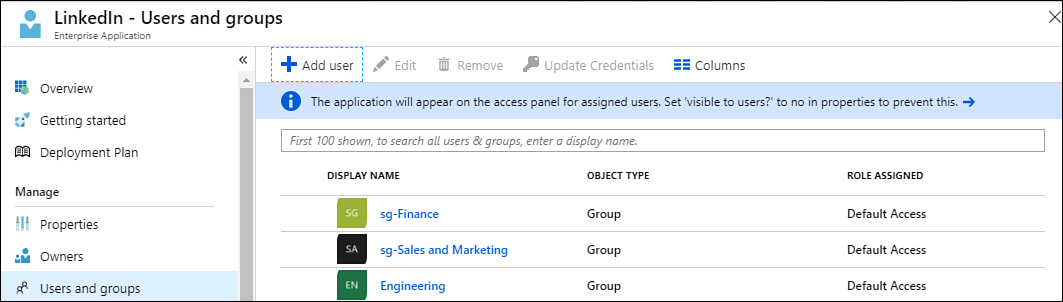
Figure 1-75 Users And Groups
Configure app registration permission scopes
Configuring application registration permission scopes controls what information an application has access to. The Microsoft identity platform’s way of implementing OpenID Connect uses several scopes that correspond to the Microsoft Graph. When configuring app registration, you can use the following permission scopes to determine what information the application can access:
OpenID Use this scope if an application performs a sign-in using OpenID Connect. This permission grants an app a unique identifier for the user in the form of a subclaim and also gives the app access to the
UserInfoendpoint. This scope is used when interacting with the Microsoft identity platform to acquire ID tokens, which can then be used by the application for authentication.Email The email scope gives the app access to a user’s email address in the form of an email address associated with a user account.
Profile The profile scope can be used to provide the application with information about the user. This may include a user’s given name, surname, preferred username, and object ID.
Offline_accessThe offline_access scope will provide an app access to resources on behalf of the user for an extended period. If a user consents to theoffline_accessscope, the app can receive a long-lived refresh token, which can be updated as older tokens expire.
Manage app registration permission consent
App registration permission consent allows users and administrators to control how and what data can be accessed by applications. The Microsoft identity platform supports the following types of permissions:
Delegated permissions These permissions are used by apps that are leveraged by a signed-in user. The user or an administrator consents to the permissions required by the app. The app then uses a delegated permission to function as the signed-in user when attempting to access the target resource.
Application permissions These permissions are used by apps that execute without a signed-in user. These might be long-running background applications. Application permissions can only be consented to by an administrator.
Effective permissions are the least-privileged set of permissions calculated when comparing the permissions that the application has been granted directly and the permissions of the signed-in user. To configure a list of statically requested permissions for an application, perform the following steps:
On the App Registrations blade of the Azure Active Directory console, select the registered application or which you want to configure static permissions.
Under Manage, click API Permissions, as shown in Figure 1-76.
Figure 1-76 API Permissions on the Manage menu of a registered app
On the API Permissions blade shown in Figure 1-77, configure which permissions you would like the application to have. You can use this page to add permissions or to grant admin consent. Admin consent allows you to grant the application permissions to a specific Azure AD tenancy.

Figure 1-77 Manage API Permissions
Manage API access to Azure subscriptions and resources
API management policies allow you to control the behavior of an API. An API management policy is a collection of statements that apply sequentially to requests to or responses from the API. For example, these policies include format conversion from XML to JSON or call rate limiting. Call rate limiting can be a useful way of ensuring that an API hosted in Azure doesn’t get flooded by requests, which can lead to unusually high subscription charges. API management policies are XML documents that are divided into inbound, outbound, back end, and on-error sections.
API management policies are evaluated depending on the scope at which they apply. Policy scopes are evaluated in the following order:
Global scope
Product scope
API scope
Operation scope
You can view all policies that apply in the current scope by clicking Recalculate Effective Policy For Selected Scope in the API management policy editor.
To set or edit an Azure API management policy, perform the following steps:
In the Azure portal, select the APIM instance. On the APIs tab, select the imported API.
On the Design tab select the operation against which you want to apply the policy. You also have the option of applying the policy to all operations.
Click the </> (code editor) icon in the Inbound Processing or Outbound Processing sections.
Enter the desired policy code into the appropriate section of code.
Skill 1.4: Manage access control
Access control is another term for assigning permissions to resources. In this section, you’ll learn how to secure resources within an Azure subscription through the assignment of permissions, which is most easily done through assigning users to roles. To master this objective, you’ll need to understand subscription and resource permissions, resource group permissions, custom RBAC roles, the principal of least privilege, how to interpret permissions, and how to check access.
Configure subscription and resource permissions
Azure Role Based Access Control (RBAC) allows you to configure fine-grained access management to Azure resources. Using RBAC, you can control what a security principal can do and where the security principal can do it. You do this with a combination of security principals, roles, and scopes.
As you recall from earlier in the chapter, security principals are Azure objects that represent individuals, collections of individuals, applications, or services. Security principals include
Individual people These are represented as Azure AD users or user objects that are references within Azure AD from other tenancies.
Collections of individuals These are represented as Azure AD groups.
Applications and services These are represented as service principals or managed identities.
An RBAC role is a collection of permissions. Permissions can be thought of as a set of operations—such as read, write, and delete—that can be performed against the Azure object to which the role is assigned.
The scope is the boundary to which the permissions defined in the role apply. You can configure the scope for a role assignment to occur at the management group, subscription, resource group, or individual Azure resource level. Scope assignments function in a parent-child relationship, which means the assignment of permissions that occurs at the parent scope level is inherited at the child scope level. For example, if you configure the scope for a role assignment to be at the resource group level, all the resources within that group will have that role assignment.
Assigning permissions to Azure subscriptions and resources requires combining security principals that represent who you want to assign the permission to, the role definition that defines the permissions, and scope that defines where the permissions are assigned.
Manage admin roles
Azure Active Directory includes many roles that provide a variety of permissions to different aspects of Azure AD and Microsoft 365 workloads. These roles and the permissions they grant are listed in Table 1-2:
Table 1-2 Azure AD Roles
Role |
Description |
Application Administrator |
Can administer enterprise applications, application registrations, and application proxy settings. |
Application Developer |
Can create application registrations. |
Authentication Administrator |
Can view current authentication method settings. Can set or reset nonpassword credentials. Can force MFA on the next sign in. |
Billing Administrator |
Can purchase and manage subscriptions. Can manage support tickets and monitor service health. |
Cloud Application Administrator |
Can manage all aspects of enterprise applications and registrations but cannot manage the application proxy. |
Cloud Device Administrator |
Can enable, disable, and remove devices in Azure AD. Can view Windows 10 BitLocker Drive Encryption Keys through the Azure portal. |
Compliance Administrator |
Manage features in the Microsoft 365 compliance center, Microsoft 365 admin center, Azure, and Microsoft 365 Security and Compliance Center. |
Conditional Access Administrator |
Administrative rights over Azure AD conditional access configuration. |
Customer Lockbox access approver |
Manages Customer Lockbox requests. Can also enable and disable the Customer Lockbox feature. |
Device Administrators |
Users assigned this role will become local administrators on all computers running Windows 10 that are joined to Azure AD. |
Directory Readers |
Role for applications that do not support consent framework. Should not be assigned to users. |
Directory Synchronization Accounts |
Assigned to the Azure AD Connect service and not used for user accounts. |
Directory Writers |
A legacy role assigned to applications that do not support the consent framework. Should only be assigned to applications, not user accounts. |
Dynamics 365 Administrator/ CRM Administrator |
Administrative access to Dynamics 365 Online. |
Exchange Administrator |
Administrative access to Exchange Online. |
Global Administrator / Company Administrator |
Administrative access to all Azure AD features. This includes administrative access to services that use Azure AD Identities including Microsoft 365 security center, Microsoft 365 compliance center, Exchange Online, SharePoint Online, and Skype for Business Online. The account used to sign up for the tenancy becomes the global administrator. Global administrators can reset the passwords of any user, including other global administrators. |
Guest Inviter |
Can manage Azure AD B2B guest user invitations. |
Information Protection Administrator |
Can manage all aspects of Azure Information Protection, including configuring labels, managing protection templates, and activating protection. |
Intune Administrator |
Has full administrative rights to Microsoft Intune. |
License Administrator |
Can manage license assignments on users and groups. Cannot purchase or manage subscriptions. |
Message Center Reader |
Can monitor notification and Microsoft advisories in the Microsoft 365 Message Center. |
Password Administrator / Helpdesk Administrator |
Can perform the following tasks for all users except those who have administrative roles:
|
Power BI Administrator |
Has administrator permissions over Power BI. |
Privileged Role Administrator |
Can manage all aspects of Azure AD Privileged Identity Management. Can manage role assignments in Azure AD. |
Reports Reader |
Can view reporting data in the Microsoft 365 reports dashboard. |
Security Administrator |
Has administrator-level access to manage security features in the Microsoft 365 security center, Azure AD Identity Protection, Azure Information Protection, and Microsoft 365 Security and Compliance Center. |
Security Reader |
Has read-only access to security Microsoft 365–related security features. |
Service Support Administrator |
Can open and view support requests with Microsoft for Microsoft 365–related services. |
SharePoint Administrator |
Has global administrator permissions for SharePoint Online workloads. |
Skype for Business / Lync Administrator |
Has global administrator permissions for Skype for Business workloads. |
Teams Administrator |
Can administer all elements of Microsoft Teams. |
Teams Communications Administrator |
Can manage Teams workloads related to voice and telephony, including telephone number assignment and voice and meeting policies. |
Teams Communications Support Engineer |
Can troubleshoot communication issues within Teams and Skype for Business. Can view details of call records for all participants in a conversation. |
Teams Communications Support Specialist |
Can troubleshoot communication issues within Teams and Skype for Business. Can only view user details in the call for a specific user. |
User Account Administrator |
Can create and manage user accounts. Can create and manage groups. Can manage user views and support tickets and can monitor service health. |
Configure RBAC within Azure AD
Azure RBAC (Role Based Access Control) allows you to configure fine-grained access control to Azure resources, such as virtual machines and storage accounts. When you configure RBAC, you assign a role and a scope, with the scope being the resource you want to have managed. Azure RBAC includes more than 70 roles. Providing the details of all 70 is beyond the scope of this text, but there are 4 fundamental roles that people who are responsible for managing Microsoft 365 should be aware of. These roles can be assigned to specific Azure subscriptions, resource groups, or resources:
Owner Users who hold this role have full access to all resources within the scope of the assignment and can delegate access to others.
Contributor Users who hold this role can create and manage resources within the scope of the assignment but cannot grant access to others.
Reader Users who hold this role can view resources within the scope of the assignment but can’t perform other tasks and cannot grant access to others.
User Access Administrator Users who hold this role can manage user access to Azure resources within the scope of the assignment.
Delegate admin rights
To view which users are assigned a specific role, perform the following steps:
In the Azure AD admin center, select Roles And Administrators, as shown in Figure 1-78.

Figure 1-78 Roles And Administrators
To see the membership information of a role, click the role you want. Figure 1-79 shows members of the Password Administrators role.
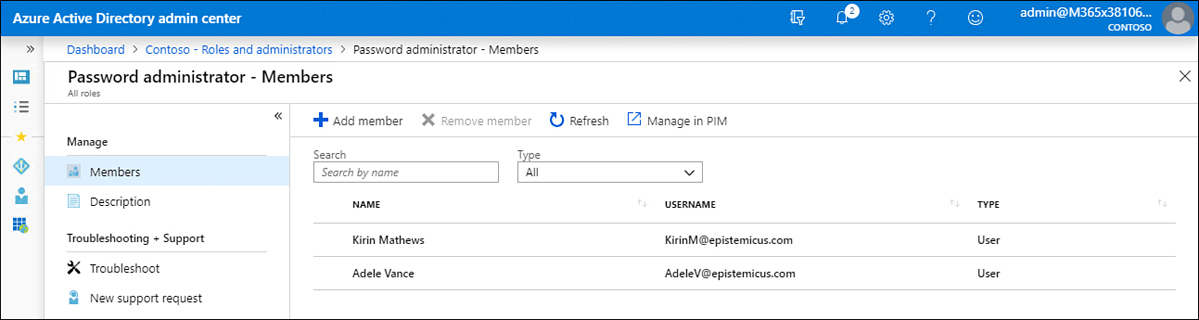
Figure 1-79 Members of the Password Administrators role
You can use the following Azure PowerShell cmdlets to view roles and role membership:
Get-AzureADDirectoryRole View a list of Azure AD Directory roles
Get-AzureADDirectoryRoleMember View the users assigned membership in an Azure AD Directory role
Manage role allocations by using Azure AD
To assign a user to a specific role within Azure AD, perform the following steps:
In the Azure AD admin center, select Roles And Administrators.
Select the role to which you want to add a user. This will open the role’s properties page.
On the Role Properties page, click Add Member. Figure 1-80 shows adding the user Adele Vance to the Security Administrator role.

Figure 1-80 Members of the Security Administrators role
You can use the following Azure PowerShell cmdlets to manage role memberships:
Add-AzureADDirectoryRoleMember Adds a user to an Azure AD Directory role
Remove-AzureADDirectoryRoleMember Removes a user from an Azure AD Directory role
Configure resource group permissions
Any permission assigned at the resource group level will apply to all resources stored within that resource group. For example, if you assign the virtual machine administrator role at the resource group level to a group of users, those users will have that role for all virtual machines stored within the resource group. To assign permissions at the resource group level, assign a specific role to a user, group, service principal, or managed identity. To assign a role at the resource group level, perform the following steps:
On the Resource Groups blade in the Azure portal, select the resource group for which you want to configure the permission, as shown in Figure 1-81.
Figure 1-81 Assigning roles at the resource group level
On the Resource Groups blade, click Access Control (IAM).
On the Access control (IAM) page, choose Add > Role Assignment.
On the Add Role Assignment page, which is shown in Figure 1-82, select the role that you want to assign, specify which user, group, service principal, or system managed identity you want the role to apply to, and then specify the identity of that security principal.
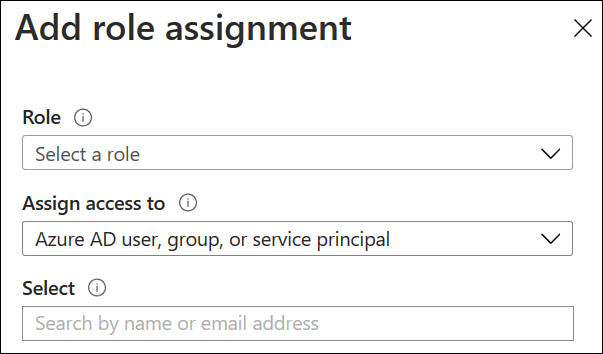
Figure 1-82 Add Role Assignment
Identify the appropriate role
There are a large number of preexisting roles available within Azure, and it is likely that an existing role will meet your needs, so you likely will not need to configure a custom role. First, you should specify exactly what actions a security principle should and should not be able to perform. Once you have generated this list, you should review the existing roles and determine if one of the existing roles meets your needs or if you need to create a custom role.
Apply the principle of least privilege
When configuring Azure RBAC, make sure that you follow the principal of least privilege. This means that you should only grant the access required to perform specific tasks. Doing so reduces the chance of unauthorized or accidental actions being performed. For example, if a group only requires the ability to view the configuration of an Azure resource, you only need to assign a role that has the Read permission to that resource. If a group only requires Azure portal access to one virtual machine in a resource group (even though the resource group hosts multiple virtual machines), set the scope of the role assignment to the virtual machine rather than the resource group when assigning the role to that group.
Configure custom RBAC roles
If one of the many existing RBAC roles doesn’t meet your organization’s requirements, you can create a custom RBAC role. For example, there are three RBAC roles related to virtual machines: Virtual Machine Administrator Login, Virtual Machine Contributor, and Virtual Machine Users Login. If you want to allow a user to restart a VM but not log in to the VM or delete the VM, you could create a custom RBAC role that allows that specific permission. As with existing Azure RBAC roles, you can assign custom roles to users, groups, service principals, and managed identities at the management group, subscription, resource group, and individual resource levels.
You can create a custom role through the Azure portal, Azure PowerShell, Azure CLI, or Azure REST API, or you can create an ARM Template. In general, creating a custom role involves following these basic steps:
Determine which method you will use to create the custom role. Determine what permissions the role requires. You can learn what operations are available to define your permission by viewing the Azure Resource Manager resource provider operations. For management operations, these will be
ActionsorNotActions. For data operations, these will beDataActionsorNotDataActions.Create the role. You can do this by cloning an existing role and then making modifications or by creating a new role from scratch. The most straightforward method of doing this is through the Azure portal.
Test the custom role. Make sure that you test the role thoroughly to determine that it only allows what you want it to allow and doesn’t have some unexpected permissions, such as allowing Wally the VM operator to type something in Cloud Shell that locks out every other user in the Azure AD tenancy.
When creating a custom RBAC role, remember to only add the fewest necessary privileges to the role. When you create a custom role, it will appear in the Azure portal with an orange—rather than blue—resource icon. Custom RBAC roles are available between subscriptions that are associated with the same Azure AD tenancy. Each Azure AD tenancy supports up to 5,000 custom roles.
To clone and then modify a role in the Azure portal, perform the following steps:
In the Azure portal, open the Access Control (IAM) blade at the subscription level or resource group level where you want the custom role to be assignable.
Select the Roles tab to see the list of all available built-in and custom roles.
Select the role that you want to clone and then modify. Figure 1-83 shows the Virtual Machine Contributor role being selected for cloning.

Figure 1-83 Select a role to clone
On the Basics tab of the Create A Custom Role page shown in Figure 1-84, provide a Custom Role Name.

Figure 1-84 Create A Custom Role wizard with the Basics tab selected
On the Permissions tab shown in Figure 1-85, you can delete existing permissions or add new permissions.

Figure 1-85 Create A Custom Role wizard with the Permissions tab selected
On the Assignable Scopes tab, you can specify where the role can be assigned. You can select subscriptions associated with the Azure AD tenancy, as well as resource groups that are contained within those subscriptions.
On the JSON tab, you can view the custom role formatted in JSON. This tab gives you the opportunity to edit the role in JSON. If you want to add a wildcard permission, you do so on this tab because this is not possible at other points during the creation of a custom role.
Once you have reviewed the JSON code, click Review And Create to create the custom role.
Interpret permissions
The key to understanding what can be done with permissions is that there are permissions related to management operations and permissions related to data operations. For management plane operations, the permissions determine actions that can be taken against objects in the Azure management plane, which includes the Azure portal, Azure CLI, Azure PowerShell, and Azure REST API. These are defined as Actions and NotActions. At the data operations level, there are actions that can be taken against data, such as data stored within a storage account. These are defined as DataActions and NotDataActions.To list the permissions within a role, use the Get-AzRoleDefinition PowerShell cmdlet. For example, to view the permissions associated with the Contributor role, run the following command:
Get-AzRoleDefinition "Contributor" | FL Actions, NotActions
Permissions are cumulative. If a user is granted Actions or DataActions across multiple roles and scopes, all permissions will apply. When multiple roles apply to a security principal, any NotActions or NotDataActions that apply will override any Actions or DataActions that apply.
Check access
To view the access that a user has to a specific resource, perform the following steps:
In the Azure portal, select the specific resource for which you want to check access.
Select Access control (IAM) to open the Access Control (IAM) blade.
Click the Check Access tab.
In the Check Access section, use the Find drop-down menu to select the Azure AD user, group, or service principal option and type the name of the user whose access you want to check, as shown in Figure 1-86. Select the user.
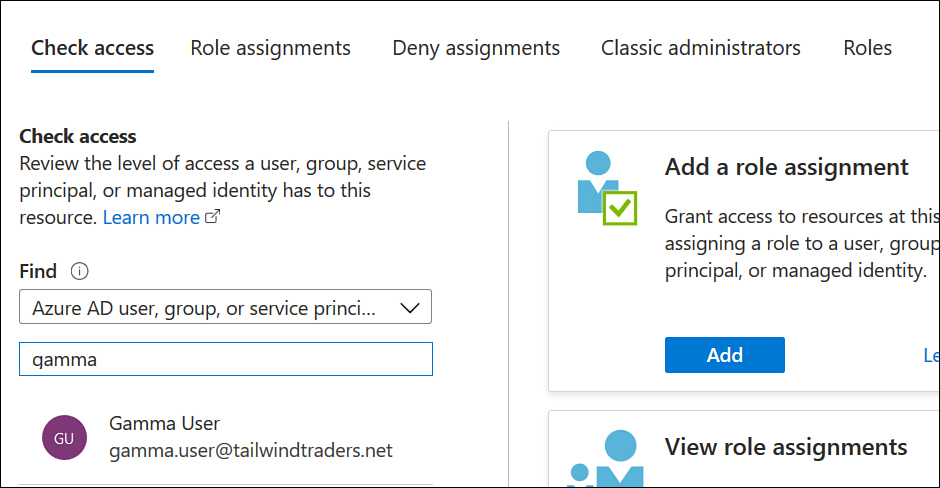
Figure 1-86 The Check Access tab
On the Assignments tab shown in Figure 1-87, review the user’s role assignments and deny assignments to the resource.

Figure 1-87 The Role assignments tab
Thought experiment answers
This section contains the solution to the thought experiment. Each answer explains why the answer choice is correct.
1. You can assign roles to the new application by assigning roles to the service principal created when the application was registered. By assigning the custom RBAC role to the service principal, you assign that role to the application.
2. You should configure an access review to determine which users that have been configured as eligible for PIM roles aren’t actually using those roles.
3. You can configure a conditional access policy to force users to perform MFA when they are in an untrusted location, such as any network location outside the trusted networks identified as belonging to Tailwind Traders.
Chapter summary
Security principals are created automatically when you register an application with Azure AD.
You can assign RBAC roles to security principals as a way of assigning permissions to applications.
Azure AD groups allow you to collect Azure security principals including users, service principals, and other groups.
Azure AD users represent individuals within Azure AD. They can be cloud only accounts or can be replicated from an on-premises Active Directory Domain Services environment.
Password writeback allows passwords changed within Azure AD to be written back to an Active Directory Domain Services environment.
Privileged Identity Management allows just-in-time administration and just-in-time access to Azure resources.
Conditional Access Policies allow you to implement more stringent authentication requirements if certain conditions are met.
Application registration permission scopes allow you to control what resources and data an application can access.
Custom RBAC roles can be configured if an existing RBAC role does not have permissions that are appropriate to your organization’s needs.