Chapter 2
Describe core Azure services
In Chapter 1, “Describe cloud concepts,” you learned about the cloud and how you can benefit from using cloud services. Microsoft Azure was mentioned, but not in much detail.
In this chapter, we dive into the many services and solutions that Azure offers. You’ll gain an understanding of the key concepts in Azure’s architecture, which apply to all Azure services. We cover Azure datacenters and ways that Microsoft implements fault tolerance and disaster recovery by spreading Azure infrastructure across the globe. You’ll also learn about availability zones, which are Microsoft’s solution for ensuring your services aren’t affected when a particular Azure datacenter experiences a problem.
You’ll also discover how to manage and track your Azure resources, and how you can work with resources as a group using Azure resource groups. You’ll learn how to use resource groups to plan and manage Azure resources, and you’ll learn how resource groups can help you categorize your operational expenses in Azure.
In order to really understand resource groups and how Azure works under the hood, it’s important to understand Azure Resource Manager (ARM), the underlying system that Azure uses to manage your resources. You’ll learn about the benefits that ARM provides, and you’ll see how ARM opens up some powerful possibilities for quickly and easily deploying real-world solutions to Azure.
Once you have the foundational understanding of Azure, you’ll dig into some of the core workload products that Microsoft provides, such as Azure virtual machines, Azure App Service, services that make it easy to work with containers and networking, and storage and database services. You’ll also learn about the Azure Marketplace and how it enables the creation and deployment of complex solutions with minimal work on your part, and because of the “under the hood” knowledge you’ll have from earlier in the chapter, the Azure Marketplace won’t seem like black magic.
If you think that’s a lot to cover, you’re right! It’s important for you to have an understanding of all these topics in order to pass the AZ-900 exam. With the foundational knowledge of the cloud from Chapter 1, “Describe cloud concepts,” you’ll find that understanding Azure-specific concepts will be easier than you think.
Skills covered in this chapter:
Skill 2.1: Describe the core Azure architectural components
If you were to ask any CEO to list the five most important assets of their company, it is likely that the company’s data would be near the top of the list. The world we live in revolves around data. Just look at companies like Facebook and Google. These companies offer services to us that we like. Everyone likes looking at pictures from friends and family on Facebook (mixed in with things we don’t like so much), and who doesn’t use Google to look for things on the Internet? Facebook and Google don’t offer those services because they want to be nice to us. They offer those services because it’s a way for them to collect a large amount of data on their customers, and that data is their most valuable asset.
Facebook and Google aren’t alone. Most companies have vast amounts of data that is key to their business and keeping that data safe is at the cornerstone of business decisions. That’s why many companies are hesitant to move to the cloud. They’re afraid of losing control of their data. Not only are they afraid that someone else might gain access to sensitive data, but they’re also concerned about losing data that would be difficult (or even impossible) to re-create.
Microsoft is keenly aware of those fears, and Azure has been designed from the ground up to instill confidence in this area. Let’s look at some core architectural components that help Microsoft deliver on the cloud promise.
Azure regions
The term “cloud” tends to make people think of Azure as a nebulous entity that you can’t clearly see, but that would be a mistake. While there certainly are logical constructs to Azure, there are also physical components to it. After all, at the end of the day, we’re talking about computers!
In order to provide Azure services to people around the world, Microsoft has created boundaries called geographies. A geography boundary is oftentimes the border of a country, and there’s good reason for that. There are often regulations for data handling that apply to an entire country, and having a geography defined for a country allows Microsoft to ensure that data-handling regulations are in place. Many companies (especially ones that deal with sensitive data) are also much more comfortable if their data is contained within the confines of the country in which they operate.
There are numerous geographies in Azure. For example, there’s a United States geography, a Canada geography, a UK geography, and so on. Each geography is broken out into two or more regions, each of which is typically hundreds of miles apart. As an example, within the United States geography, there are many regions, including the Central US region in Iowa, the East US region in Virginia, the West US region in California, and the South Central US region in Texas. Microsoft also operates isolated regions that are completely dedicated to government data because of the additional regulations that governmental data requires.
Within each geography, Microsoft has created another logical boundary called a regional pair. Each regional pair contains two regions within the geography. When Microsoft has to perform updates to the Azure platform, they perform those updates on one region in the regional pair. Once those updates are complete, they move to the next region in the regional pair. This ensures that your services operating within a regional pair aren’t impacted by updates.
At each region, Microsoft has built datacenters (physical buildings) that contain the physical hardware that Azure uses. These datacenters contain climate-controlled buildings that house the server racks containing physical computer hardware. Each region also operates on its own network infrastructure, and Microsoft has designed the networks for low latency. Therefore, any Azure services you have in a particular region will have reliable and fast network connectivity with each other.
Each datacenter has an isolated power supply and power generators in case of a power outage. All the network traffic entering and exiting the datacenter goes over Microsoft’s own fiber-optic network on fiber owned or leased by Microsoft. Even data that flows between regions across oceans travels over Microsoft’s fiber-optic cables that traverse the oceans.
To ensure that data in Azure is safe from disasters and failures caused by possible problems in a particular region, customers are encouraged to replicate data in multiple regions. For example, if the South Central US region is hit by a devastating tornado (not out of the question in Texas), data that is also replicated to the North Central US region in Illinois is still safe and available. In order to ensure that applications are still performing as quickly as possible, Microsoft guarantees round-trip network performance of 2 milliseconds or less between regions.
Availability zones
The fact that regions are physically separated by hundreds of miles protects Azure users from data loss and application outages caused by disasters at a particular region. However, it’s also important that data and applications maintain availability when a problem occurs at a particular datacenter within a region. For that reason, Microsoft developed availability zones.
There are at least three availability zones within each enabled region, and because each availability zone exists within its own datacenter in that region, each has a water supply, cooling system, network, and power supply that is isolated from other zones. By deploying an Azure service in two or more availability zones, you can achieve high availability in a situation where there is a problem in one zone.
Because Availability zones are designed to offer enhanced availability for infrastructure, not all services support availability zones. For example, Azure has a service called App Service Certificates that allows you to purchase and manage an SSL certificate through Azure. It wouldn’t make any sense to host a certificate in App Service Certificates within an availability zone because it’s not an infrastructure component.
Currently, availability zones are supported with the following Azure services.
Windows virtual machines
Linux virtual machines
Virtual Machine Scale Sets
Azure Kubernetes Service
Managed disks
Zone-redundant storage
Standard Load Balancer
Standard IP address
VPN Gateway
ExpressRoute Gateway
Application Gateway V2
Azure Firewall
Azure Data Explorer
Azure SQL Database
Azure Cache for Redis
Azure Cosmos DB
Event Hubs
Service Bus (Premium tier)
Event Grid
Azure AD Domain Services
App Service Environments ILB
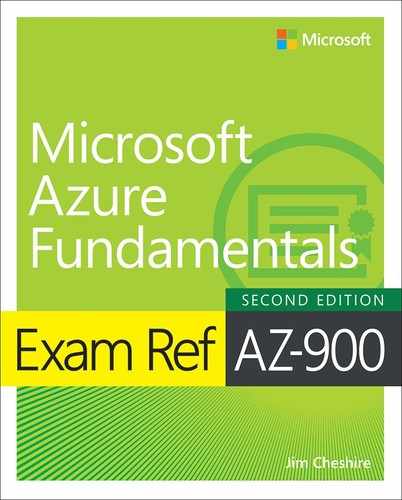
By deploying your service to two or more availability zones, you ensure the maximum availability for that resource. In fact, Microsoft guarantees an SLA of 99.99 percent uptime for Azure virtual machines only if two or more VMs are deployed into two or more zones. Figure 2-1 illustrates the benefit of running in multiple zones. As you can see, even though availability zone 3 has gone offline for some reason, zones 1 and 2 are still operational.
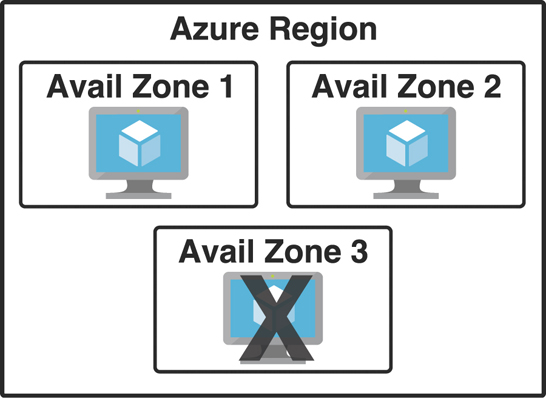
FIGURE 2-1 Azure virtual machine inside of three availability zones
There are two categories of services that support availability zones: zonal services and zone redundant services. Zonal services are services such as virtual machines, managed disks used in a virtual machine, and public IP addresses used in virtual machines. In order to achieve high availability, you must explicitly deploy zonal services into two or more zones.
Zone redundant services are services such as zone redundant storage and SQL Databases. To use availability zones with these services, you specify the option to make them zone redundant when you create them. (For storage, the feature is called ZRS or zone redundant storage. For SQL Database, there is an option to make the database zone redundant.) Azure takes care of the rest for you by replicating data automatically to multiple availability zones.
Resource groups
You should now be realizing that moving to the cloud might not be as simple as it first seemed. Creating a single resource in Azure is pretty simple, but when you’re dealing with enterprise-level applications, you’re usually dealing with a complex array of services. Not only that, but you might be dealing with multiple applications that use multiple services, and they might be spread across multiple Azure regions. Things can certainly get chaotic quickly.
Fortunately, Azure provides a feature that helps you deal with this kind of problem: the resource group. A resource group is a logical container for Azure services. By creating all Azure services associated with a particular application in a single resource group, you can then deploy and manage all of those services as a single entity.
Organizing Azure resources in a resource group has many advantages. You can easily set up deployments using a feature known as an ARM template. ARM template deployments are typically for a single resource group. You can deploy to multiple resource groups but doing so requires you to set up a complicated chain of ARM templates.
Another advantage to resource groups is that you can name a resource group with an easily recognizable name so that you can see all Azure resources used in a particular application at a glance. This might not seem so important until you actually start deploying Azure resources and realize that you have many more resources than you first thought. For example, when you create an Azure virtual machine, Azure creates not only a virtual machine, but it also creates a disk resource, network interface, public IP resource, and network security group. If you’re looking at all your Azure resources, it can be hard to differentiate which resources go with which app. Resource groups solve that problem.
In Figure 2-2, you can see a lot of Azure services. Some of these were automatically created by Azure in order to support other services, and in many cases, Azure gives the resource an unrecognizable name.
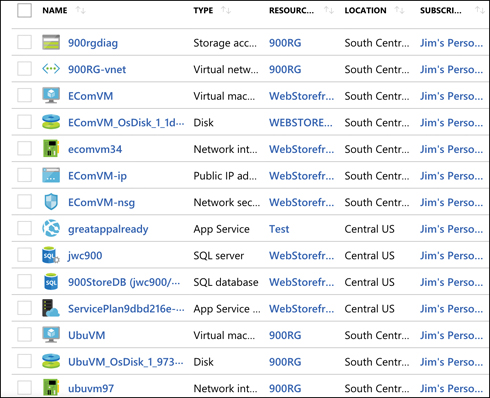
FIGURE 2-2 All my Azure resources
In Figure 2-3, you can see resources that are in the WebStorefront resource group. These are the Azure resources used in the e-commerce storefront.

FIGURE 2-3 An Azure resource group
It’s convenient to see all the resources associated with a particular app, but you aren’t locked into that paradigm. This is a useful example, because it’s a common use of resource groups; however, you can organize your resource groups any way you choose. Notice in Figure 2-3 that you see resources in several different Azure regions (Regions are in the Location column). If you have access to multiple Azure subscriptions, you can also have resources from multiple subscriptions in a single resource group.
If you look at the left side of Figure 2-3, you’ll see a menu of operations that you can perform on your resource group. We won’t go into all of these because it’s out of scope for the AZ-900 exam, but there are a few that clarify the benefit of resource groups.
If you click Resource Costs, you can see the cost of all the resources in this resource group. Having that information at your fingertips is especially helpful in situations where you want to make sure certain departments in your company are charged correctly for their used resources. In fact, some companies will create resource groups for each department rather than creating resource groups scoped to applications. Having a Sales and Marketing resource group or an IT Support resource group, for instance, can help you immensely when reporting and controlling costs.
You can also click Automation Script and Azure will generate an ARM template that you can use to deploy all these Azure resources. This is useful in a situation where you want to deploy these resources later or when you want to deploy them to another Azure subscription.
When you delete a resource group, all the resources in that resource group are automatically deleted. This makes it easy to delete multiple Azure resources in one easy step. Suppose you are testing a scenario and you need to create a couple of virtual machines, a database, a web app, and more. By placing all these resources in one resource group, you can easily delete that resource group after your testing and Azure will automatically delete all the resources in it for you. This is a great way to avoid unexpected costs associated with resources you are no longer using.
Azure subscriptions
You get an Azure subscription automatically when you sign up for Azure and all the resources you create are created inside that subscription. You can, however, create additional subscriptions that are tied to your Azure account. Additional subscriptions are useful in cases where you want to have some logical groupings for Azure resources or if you want to be able to report on resources used by specific groups of people.
Each Azure subscription has limits (sometimes called quotas) assigned to it. For example, you can have up to 250 Azure Storage accounts per region in a subscription, up to 25,000 virtual machines per region, and up to 980 resource groups per subscription across all regions.
Figure 2-4 shows an Azure subscription in the Azure portal.
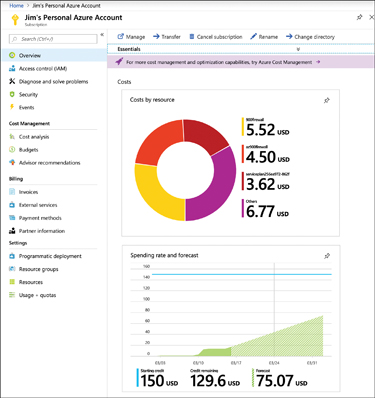
FIGURE 2-4 Azure subscription in the Azure portal
On the Overview blade, you can see a cost breakdown for each of the resources. You can also see the spending rate for the subscription, along with a forecasted cost by the end of the current month. If you click the Costs By Resource tile, you can see a further breakdown of the Azure expenses, as shown in Figure 2-5. In this view, you see costs by Service Name, Location (Azure region), and Resource Group, along with a graph of the costs for the month.

FIGURE 2-5 Azure subscription cost analysis
Azure invoices are also available for the subscription from within the Azure portal. You can see all the past invoices by clicking Invoices in the menu for the subscription, as shown in Figure 2-6.
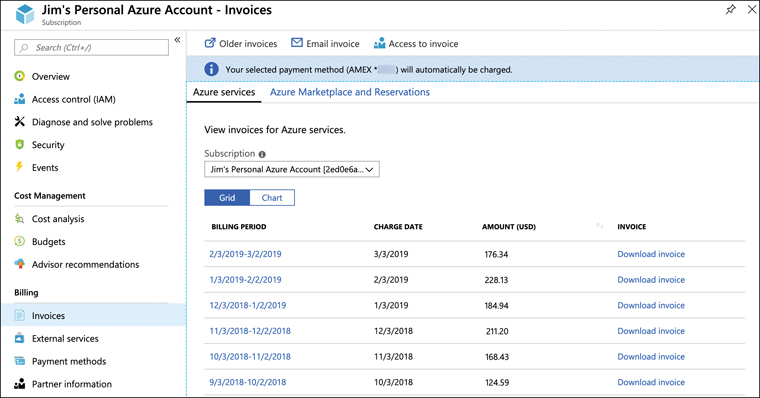
FIGURE 2-6 Azure invoices
You can create additional Azure subscriptions in your Azure account. This is useful in cases where you want to separate costs or if you are approaching a subscription limit on a resource. To create a new Azure subscription, type subscription in the search box and click Subscriptions as shown in Figure 2-7.
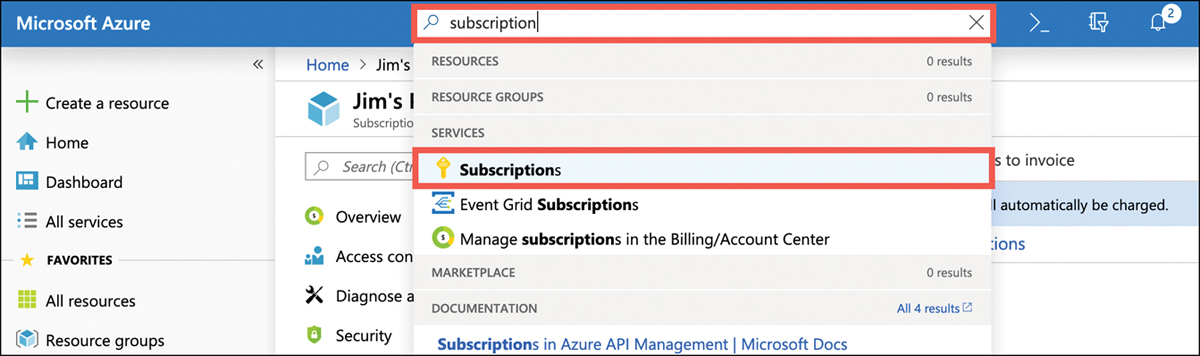
FIGURE 2-7 Azure subscriptions
To create a new subscription, click Add in the Subscriptions blade, as shown in Figure 2-8.
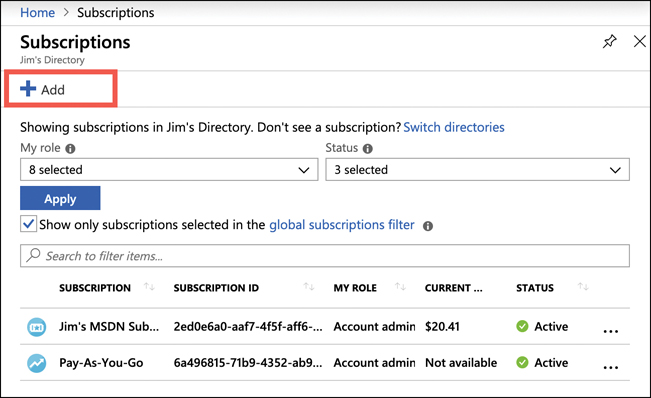
FIGURE 2-8 Creating a new subscription
After you click Add, you need to choose which type of subscription you want to create. There are several types of Azure subscriptions.
Free Trial Provides free access to Azure resources for a limited time. Only one free trial subscription is available per account, and you cannot create a new free trial if a previous one has expired.
Pay-As-You-Go You pay only for those resources you use in Azure. There’s no up-front cost, and you can cancel the subscription at any time.
Pay-As-You-Go Dev/Test A special subscription for subscribers to Visual Studio that can be used for development and testing. This subscription offers discounted rates on VMs, but you cannot use this for production applications.
You now have an understanding of Azure subscriptions and how you can create additional subscriptions if needed. Once you’ve created additional subscriptions and resources in those subscriptions, you might find that managing all your resources becomes more cumbersome. To help with that, Microsoft has developed a feature called management groups.
Management groups
Management groups are a convenient way to apply policies and access control to your Azure resources. Much like a resource group, a management group is a container for organizing your resources. However, management groups can contain only Azure subscriptions or other management groups.
In Figure 2-9, three management groups have been created for a company. The Sales Dept. management group contains subscriptions for the sales department. The IT Dept. management group contains a subscription and another management group, and two additional subscriptions are within that management group. The Training Dept. management group contains two subscriptions for the training department.
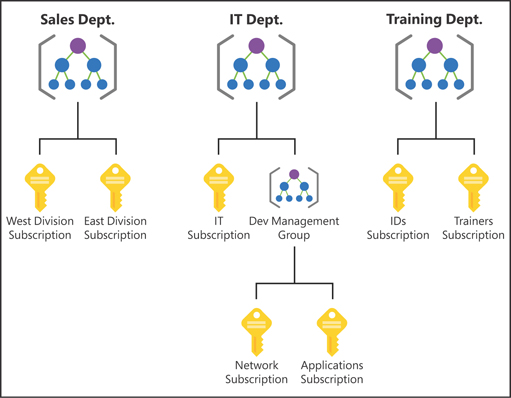
FIGURE 2-9 Management groups organizing subscriptions and other management groups
By organizing the subscriptions using management groups, you can have more precise control over who has access to which resources. You can also control the configuration of resources created within those subscriptions.
After you create a management group, you can move any of your subscriptions into that management group. You can also move a management group into another management group. There are, however, a few limitations:
You’re limited to a total of 10,000 management groups.
A management group hierarchy can only support up to six levels.
You cannot have multiple parents for a single management group or subscription.
Azure Resource Manager (ARM)
Almost all systems that are moved to the cloud consist of more than one Azure service. For example, you might have an Azure virtual machine for one part of your app; your data might be in an Azure SQL Database; you might have some sensitive data stored in Azure Key Vault; and you might have a web-based portion of your app hosted in Azure App Service.
If you must manage all these different Azure services separately, it can be quite a headache, and if you have multiple applications in the cloud, it can be even worse. Not only would it be confusing to keep track of which services are related to which applications, but when you add in the complexity of deploying updates to your application, things can really become disorganized.
In order to make it easier to deploy and manage Azure services, Microsoft developed Azure Resource Manager, or ARM. ARM is a service that runs in Azure, and it’s responsible for all interaction with Azure services. When you create a new Azure service, ARM authenticates you to make sure you have the right access to create that resource, and then it talks to a resource provider for the service you’re creating. For example, if you’re creating a new web app in Azure App Service, ARM will pass your request on to the Microsoft.Web resource provider because it knows all about web apps and how to create them.
In Chapter 3, you’ll learn about using the Azure portal to create and manage Azure services. You’ll also learn about how you can use command-line tools to do the same thing. Both the portal and the command-line tools work by using ARM, and they interact with ARM using the ARM application programming interface, or API. The ARM API is the same whether you’re using the portal or command-line tools, and that means you get a consistent result. It also means that you can create an Azure resource with the portal and then make changes to it using command-line tools, allowing you the flexibility that cloud consumers need.
The flow of a typical ARM request to create or manage a resource is straightforward. Tools such as the Azure portal, command-line tools, or Visual Studio make a request to the ARM API. The API passes that request to ARM where the user is authenticated and authorized to perform the action. ARM then passes the request to a resource provider, and the resource provider creates the new resource or modifies an existing resource. Figure 2-10 illustrates this flow and features a small sampling of the many Azure services that are available.
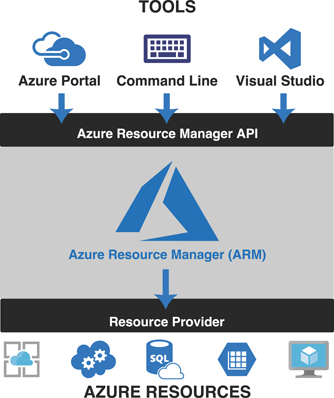
FIGURE 2-10 Azure Resource Manager
The request that is made to ARM isn’t a complicated, code-based request. Instead, ARM uses declarative syntax. That means that, as a consumer of Azure, you tell ARM what you want to do, and ARM does it for you. You don’t have to tell ARM how to do what you want. You simply have to tell it what you want. To do that, ARM uses files that are encoded in JavaScript Object Notation (or JSON) called ARM templates.
In the most basic sense, an ARM template contains a list of resources that you want to either create or modify. Each resource is accompanied by properties such as the name of the resource and properties that are specific to that resource. For example, if you were using an ARM template to deploy a web app in App Service, your ARM template would specify the region you want your app to be created in, the name of the app, the pricing plan for your app, any domain names you want your app to use, and so forth. You don’t have to know how to set all those properties. You simply tell ARM to do it (you declare your intent to ARM), and ARM takes care of it for you.
There’s one more important aspect to ARM template deployment. When you’re deploying multiple resources (which, as pointed out, is a typical real-world scenario), you often have service dependencies. In other words, you are deploying one or more services that rely on other services already being created.
For example, think of a situation where you’re deploying a certificate to be used with a web app. One of the properties you need to set on the web app is the certificate that you want to use, but if that certificate hasn’t been deployed yet, your deployment will fail. ARM allows you to specify dependencies so you can avoid issues like this. You simply tell ARM that the web app depends on the certificate and ARM will ensure the certificate’s deployment is completed before it deploys the web app.
As you can see, ARM has many benefits, and you should be aware of these for your exam:
ARM allows you to easily deploy multiple Azure resources at once.
ARM makes it possible to reproduce any deployment with consistent results at any point in the future.
ARM allows you to create declarative templates for deployment instead of requiring you to write and maintain complex deployment scripts.
ARM makes it possible to set up dependencies so that your resources are deployed in the right order every time.
Throughout this skill section, you’ve learned about some of the benefits of using Azure. Because Azure regions are spread out across the world in different geographies, you can be assured that your data and apps are hosted where you need them to be and that any regulations or data requirements are complied with. You learned that there are multiple datacenters in each region, and by deploying your applications in availability zones, you can avoid effects from a failure in a particular datacenter.
You also learned about using resource groups to organize your Azure resources and how to use Azure subscriptions. Finally, you learned about management groups and Azure Resource Manager, or ARM. In the next skill section, you’ll learn details about some of the core workload products in Azure.
Skill 2.2: Describe core workload products available in Azure
As we went over the core Azure architectural components, you noticed some references to some of the products available in Azure. In this skill section, we’ll talk about some of the core workload products available in Azure.
Azure virtual machines
A virtual machine (VM) is a software-based computer that runs on a physical computer. The physical computer is considered the host, and it provides the underlying physical components such as disk space, memory, CPU power, and so on. The host computer runs software called a hypervisor that can create and manage one or more VMs, and those VMs are commonly referred to as guests.
The operating system on a guest doesn’t have to be the same operating system that the host is running. If your host is running Windows 10, you can run a guest that uses Windows Server 2016, Linux, or many other operating systems. This flexibility makes VMs extremely popular. However, because the VMs running on a host use the physical systems on that host, if you have a need for a powerful VM, you’ll need a powerful physical computer to host it.
By using Azure virtual machines, you can take advantage of powerful host computers that Microsoft makes available when you need computing power, and when you no longer need that power, you no longer have to pay for it.
To create an Azure virtual machine, log in to the Azure portal using your Azure account and then follow these steps, as shown in Figures 2-11 through 2-13.
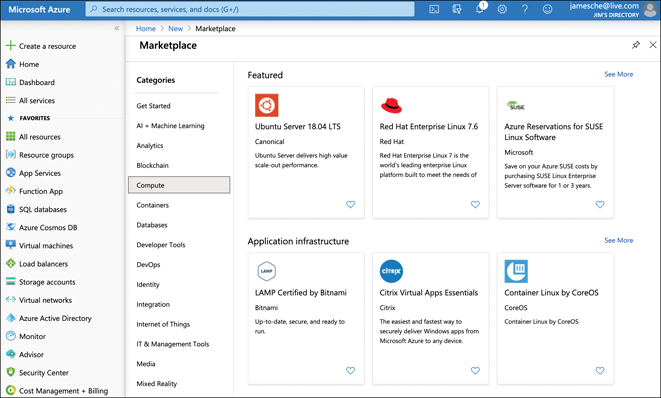
FIGURE 2-11 Creating a virtual machine
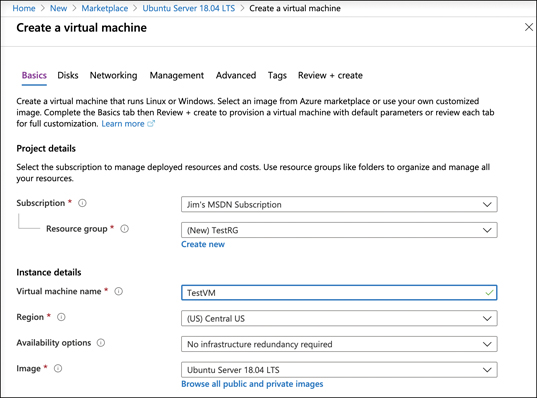
FIGURE 2-12 Virtual machine settings
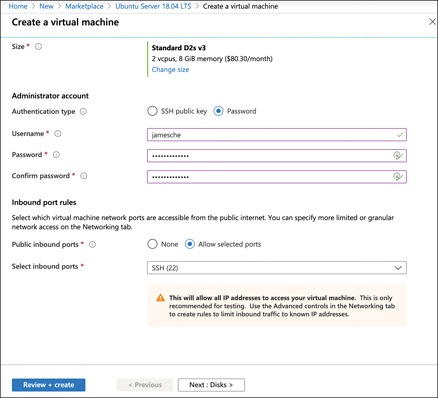
FIGURE 2-13 Virtual machine settings
Click Create A Resource.
Click Compute.
Click the See All link.
Click Ubuntu Server.
Click the Create button.
Next to Resource Group, click Create New to create a new resource group.
Enter TestRG as the resource group name and click OK.
Enter TestVM as your VM name.
Scroll down and select Password for the authentication type.
Enter a username for your administrator account.
Enter a password you’d like to use for your administrator account.
Confirm the password.
Leave all the other settings as they are and click the Next button three times to move to the Management screen.
In the Monitoring section, set Boot Diagnostics to Off.
Click Review + Create to create your VM.
After you click Review + Create, Azure will validate your settings to make sure you haven’t left anything out. Once your validation has passed, you will see a Create button. Click the Create button to start the deployment of your new VM.

FIGURE 2-14 Virtual machine management settings
As your VM is being deployed, you’ll see the status displayed in the Azure portal as shown in Figure 2-15. You can see the Azure resources that are created to support your VM. You can see the resource name, the resource type (which starts with the resource provider), and the status of each resource.
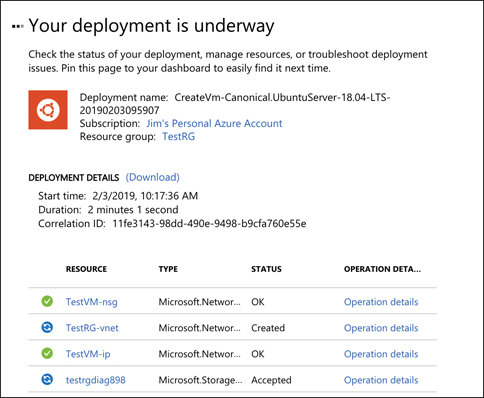
FIGURE 2-15 Virtual machine deployment
Once all the resources required for your VM are created, your VM will be considered fully deployed. You’ll then be able to click the Go To Resource button to see the management interface for your VM in the Azure portal, as shown in Figure 2-16.
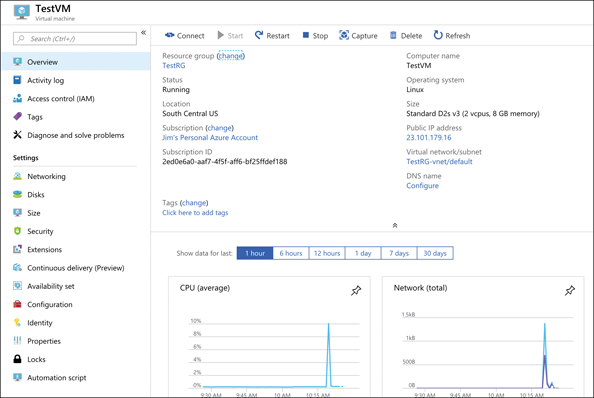
FIGURE 2-16 Viewing a virtual machine
Our new VM is a guest on a physical computer in an Azure datacenter. In that datacenter is a physical rack of computer servers, and our VM is hosted on one of those servers. The host computer is managed by Microsoft, but the VM is managed by you because this is an IaaS offering in Azure.
As of right now, this VM is susceptible to downtime due to three types of events: planned maintenance, unplanned maintenance, and unexpected downtime.
Planned maintenance refers to planned updates that Microsoft makes to the host computer. This includes things like operating system updates, driver updates, and so on. In many cases, updates won’t affect your VM, but if Microsoft installs an update that requires a reboot of the host computer, your VM will be down during that reboot.
Azure has underlying systems that constantly monitor the health of computer components. If one of these underlying systems detects that a component within the host computer might fail soon, Azure will flag the computer for unplanned maintenance. In an unplanned maintenance event, Azure will attempt to move your VM to a healthy host computer. When it does this, it preserves the state of the VM, including what’s in memory and any files that are open. It only takes Azure a short time to move the VM, during which time it’s in a paused state. In a case where the move operation fails, the VM will experience unexpected downtime.
In order to ensure reliability when a failure occurs in a rack within the Azure datacenter, you can (and you should) take advantage of a feature called availability sets. Availability sets protect you from maintenance events and downtime caused by hardware failures. To do that, Azure creates some underlying entities in an availability set called update domains and fault domains. (In order to protect yourself in the event of maintenance events or downtime, you must deploy at least two VMs into your availability set.)
Fault domains are a logical representation of the physical rack in which a host computer is installed. By default, Azure assigns two fault domains to an availability set. If a problem occurs in one fault domain (one computer rack), the VMs in that fault domain will be affected, but VMs in the second fault domain will not. This protects you from unplanned maintenance events and unexpected downtime.
Update domains are designed to protect you from a situation where the host computer is being rebooted. When you create an availability set, Azure creates five update domains by default. These update domains are spread across the fault domains in the availability set. If a reboot is required on computers in the availability set (whether host computers or VMs within the availability set), Azure will only reboot computers in one update domain at a time and it will wait 30 minutes for computers to recover from the reboot before it moves on to the next update domain. Update domains protect you from planned maintenance events.
Figure 2-17 shows the diagram that Microsoft uses to represent an availability set. In this diagram, the fault domains FD0, FD1, and FD2 encompass three physical racks of computers. UD0, UD1, and UD2 are update domains within the fault domains. You will see this same representation of an availability set within other Azure training as well, but it’s a bit misleading because update domains are not tied to a particular fault domain.
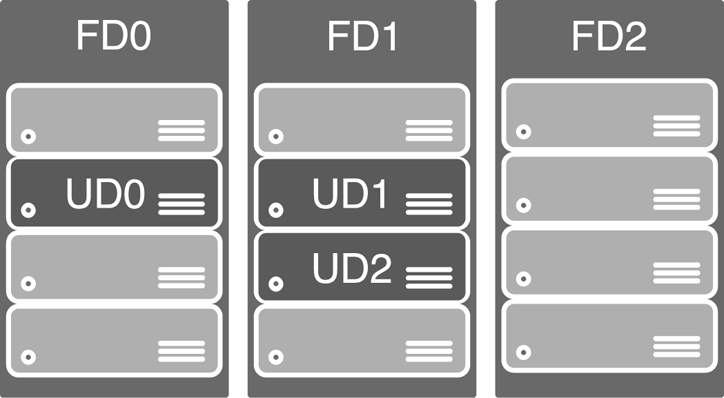
FIGURE 2-17 Microsoft documentation representation of an availability set
Figure 2-18 shows a better representation of an availability set, with five VMs in the availability set. There are two fault domains and three update domains. When VMs were created in this availability set, they were assigned as follows:
The first VM is assigned Fault Domain 0 and Update Domain 0.
The second VM is assigned Fault Domain 1 and Update Domain 1.
The third VM is assigned Fault Domain 0 and Update Domain 2.
The fourth VM is assigned Fault Domain 1 and Update Domain 0.
The fifth VM is assigned Fault Domain 0 and Update Domain 1.
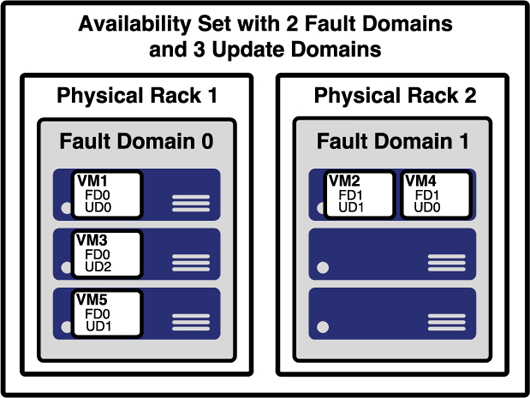
FIGURE 2-18 A better representation of an availability set
You can verify the placement of fault domains and update domains by creating five VMs in an availability set with two fault domains and three update domains. If you then look at the availability set created in the Azure portal, as shown in Figure 2-19, you can see the same configuration depicted in Figure 2-18.
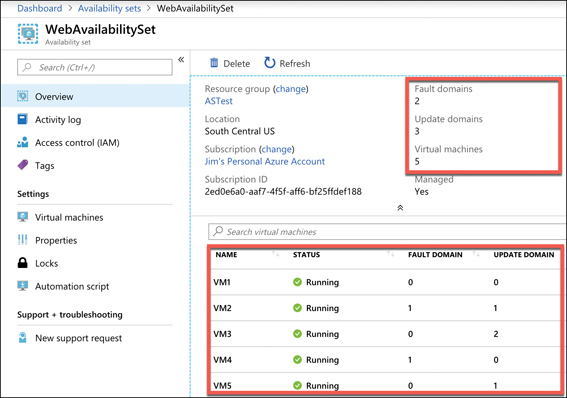
FIGURE 2-19 An availability set in the Azure portal showing fault domains and update domains
Notice in Figure 2-19 that the availability set is named WebAvailabilitySet. In this availability set, we run five VMs that are all running a web server and host the website for an application. Suppose you need a database for this application, and you want to host that database on VMs as well. In that situation, you would want to separate the database VMs into their own availability set. As a best practice, you should always separate your workloads into separate availability sets.
Availability sets certainly provide a benefit in protecting from downtime in certain situations, but they also have some disadvantages. First of all, every machine in an availability set has to be explicitly created. While you can use an ARM template to deploy multiple virtual machines in one deployment, you still have to configure those machines with the software and configuration necessary to support your application.
An availability set also requires that you configure something in front of your VMs that will handle the distribution of traffic to those VMs. For example, if your availability set is servicing a website hosted on the VMs, you’ll need to configure a load balancer that will handle the job of routing users of your website to the VMs that are running it.
Another disadvantage to availability sets relates to cost. In a situation where your VM needs to be changed often based on things like load on the application, you might find yourself paying for many more VMs than you need.
Azure offers another feature for VMs called scale sets that solves these problems nicely. When you create a scale set, you tell Azure what operating system you want to run and then you tell Azure how many VMs you want in your scale set. You have many other options such as creating a load balancer or gateway and so forth. Azure will create as many VMs as you specify (up to 1,000) in one easy step.
Scale sets are deployed in availability sets automatically, so you automatically benefit from multiple fault domains and update domains. Unlike VMs in an availability set, however, VMs in a scale set are also compatible with availability zones, so you are protected from problems in an Azure datacenter.
As you might imagine, you can also scale a scale set in a situation where you need more or fewer VMs. You might start with only one VM in a scale set, but as load on that VM increases, you might want to automatically add additional VMs. Scale sets provide that functionality by using Azure’s auto-scale feature. You define scaling rules that use metrics like CPU, disk usage, network usage, and so forth. You can configure when Azure should add additional instances and when it should scale back and deallocate instances. This is a great way to ensure availability while reducing costs by taking advantage of the elasticity that auto-scale provides.
Microsoft guarantees an SLA of 99.95 percent when you use a multi-VM deployment scenario, and for most production scenarios, a multi-VM deployment is preferred. However, if you use a single-instance VM, and you use premium storage, Microsoft guarantees a 99.9 percent SLA. Premium storage uses solid-state drives (SSDs) that are located on the same physical server that is hosting the VM for enhanced performance and uptime.
Azure App Service
As mentioned in Chapter 1, Azure App Service is a PaaS offering in Azure for hosting websites. In addition to basic web hosting services, App Service also offers many additional features that you can easily add to your web app, often with the flip of a switch within the Azure portal.
When you create a web app in Azure App Service, your app runs on an Azure virtual machine that is preconfigured specifically for App Service. Depending on the tier of service you use when you create your app, it will either run on a VM that is shared among many users or a VM that is dedicated to you.
Figure 2-20 shows a diagram of the basic App Service architecture. This diagram is simplified, but it illustrates the basics of how App Service works. Azure Load Balancer distributes traffic to a special VM within App Service called a front end. The front end is running special software that allows it to effectively distribute traffic to the VMs that are actually running your web app. These VMs run inside of an App Service plan, a logical container for one or more VMs that are running your web app.
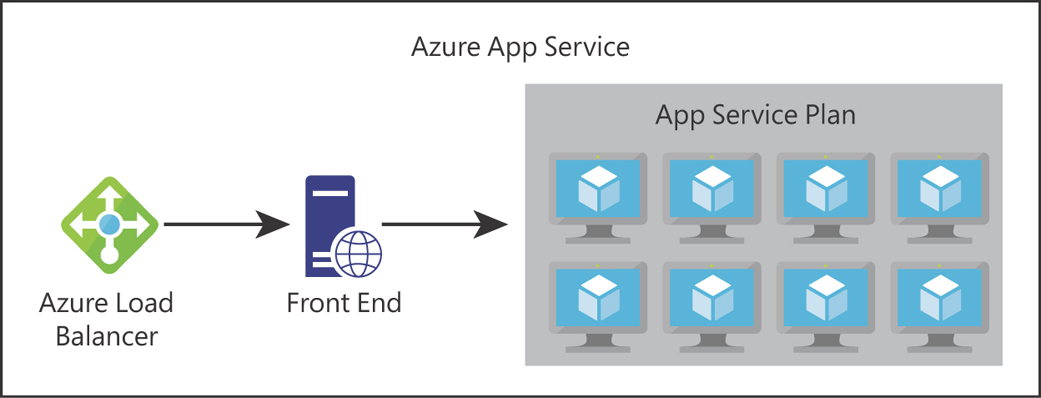
FIGURE 2-20 A high-level representation of Azure App Service
App Service plans
Every web app you create in App Service runs inside of an App Service plan. An App Service plan is created within a specific Azure region, and it specifies how many VMs your app runs on and the properties of those VMs.
In Figure 2-21, an App Service plan named AZ900-Plan is being created in the Central US region. The VMs in this App Service plan will run Windows and will be created in the Standard S1 App Service pricing tier. You can click Change Size to change the pricing tier before the App Service plan is created, and you can also scale the App Service plan at any point to change the size.
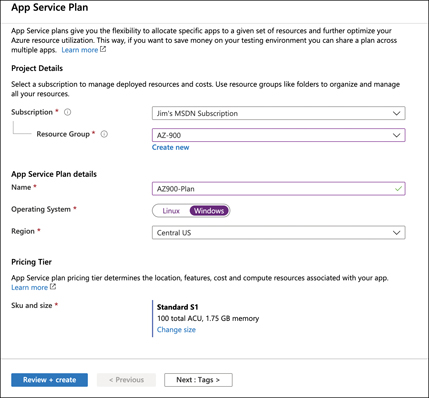
FIGURE 2-21 Creating an App Service plan in the Central US region
The following pricing tiers are available in App Service:
Free A no-cost tier for testing only that runs on VMs shared with other App Service customers.
Shared A low-cost tier for testing only with some additional features not offered in the Free tier. Runs on VMs shared with other App Service customers.
Basic, Standard, Premium, and PremiumV2 Higher-cost tiers that offer many additional features. Runs on dedicated VMs that are not shared with other customers.
When you move from a lower pricing tier to a higher pricing tier, you are scaling up. You can also scale down at any time by moving to a lower pricing tier. If you are running in the Basic, Standard, Premium, or PremiumV2 tier, you can also scale out to multiple VMs. The Basic tier allows you to scale to a maximum of 3 VMs (or instances), the Standard tier allows for 10 instances, and the Premium and PremiumV2 tiers allow for up to 20 instances.
Web apps
When you create a new web app, you can create it in an existing App Service plan, or you can create a new App Service plan for the app. All apps in an App Service plan run on the same VMs, so if you are already stressing the resources of an existing App Service plan, your best choice might be to create a new App Service plan for your new web app.
App Service allows you to choose between a VM preconfigured with a runtime stack (such as Java, .NET, PHP, and so forth) to run your app or a Docker container. If you choose to run a preconfigured runtime stack, you can choose between multiple versions that App Service provides.
Figure 2-22 shows a web app being created in the AZ900-Plan App Service plan. This new web app will run on a VM that is configured to run .NET Core 3.0 apps on a Windows VM.
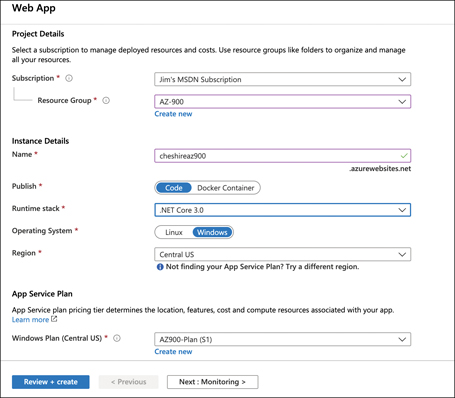
FIGURE 2-22 Creating a web app to run a .NET Core 3.0 website
Configuring and managing your web app is extremely easy. Because App Service is a PaaS service, you are only responsible for your code. Microsoft manages the features available to you. In Figure 2-23, you can see many of the features available in App Service, including the ability to quickly and easily scale out when needed.
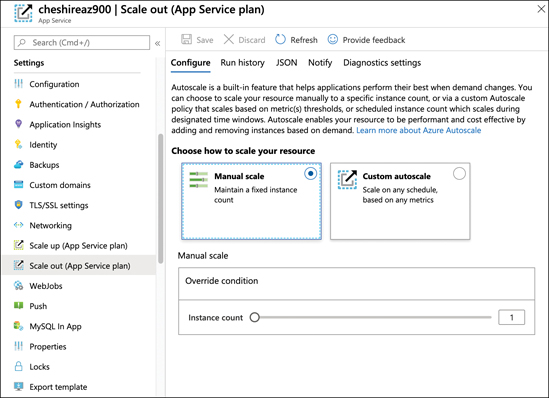
FIGURE 2-23 Settings for a web app make it easy to add features and scale your app
Azure Container Instances (ACI)
Azure Container Instances (ACI) is a PaaS service that offers the ability to run a containerized application easily. In order to understand how ACI works, it’s necessary to have a basic understanding of containers.
Containers
It’s becoming pretty commonplace for companies to move applications between “environments,” and this type of thing is even more prevalent when it comes to the cloud. In fact, one of the most complicated aspects of moving to the cloud is dealing with the complexities of moving to a new environment. To help with this problem and to make it easier to shift applications into new environments, the concept of containers was invented.
A container is created using a zipped version of an application called an image, and it includes everything the application needs to run. That might include a database engine, a web server, and so on. The image can be deployed to any environment that supports the use of containers. Once there, the image is used to start a container the application runs in.
In order to run an application in a container, a computer needs to have a container runtime installed on it. The most popular container runtime is Docker, a runtime developed and maintained by Docker Inc. Docker not only knows how to run applications in containers, but it also enforces certain conditions to ensure a secure environment.
Each container typically operates within an isolated environment. It has its own network, its own storage, and so on. Other containers running on the same machine cannot access the data and systems used by another container unless the developer of the image takes explicit steps to allow it. This makes containerized applications an ideal solution when security is a concern.
Running containers in ACI
ACI makes it easy to start a container with minimal configuration. You simply tell ACI where to find the image (using either a Docker tag or a URL to the image) and some basic configuration for the VM you want the container to run on.
Azure creates server resources as needed to run your container, but you’re not paying for an underlying VM. Instead, you pay for the memory and CPU that your container uses. That translates into extremely low costs in most cases. For example, if your ACI app is running on a machine with 1 CPU and 1 GB of memory and you use the app for 5 minutes a day, your cost would be less than 5 cents at the end of the month!
ACI is designed to work with simple applications. You can define a container group and run multiple containers within an ACI instance, but ACI isn’t a good choice for you if you have an application that is used heavily by many people and that might need to take advantage of scaling. Instead, Azure Kubernetes Service (AKS) would be a better choice.
When you create a container instance in ACI, you specify a name for the container, the image you want to use, and the size of the VM you want to run your container. If you don’t have an image handy, Microsoft provides multiple sample images you can use. In Figure 2-24, an ACI instance named jimsaciapp is being created in the East US region using one of the sample Quickstart images.
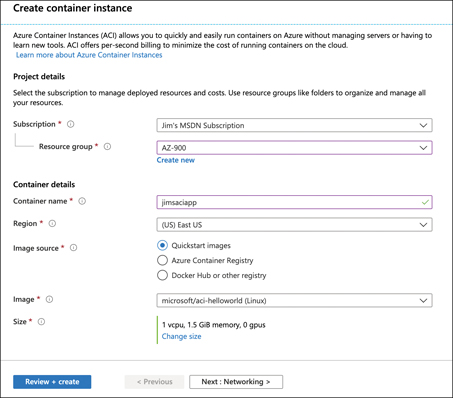
FIGURE 2-24 Creating an ACI instance with a Quickstart image
In order to make this instance accessible on the Internet, you’ll need to set the DNS name label for the instance. This setting is accessible by clicking Next: Networking at the bottom of the screen, as shown in Figure 2-24. In Figure 2-25, the DNS Name Label for this instance is set to jimsaciapp. After the instance is created, it can be accessed by browsing to http://jimsaciapp.eastus.azurecontainer.io.

FIGURE 2-25 Setting a DNS Name Label so the instance can be reached using a URL
Azure Kubernetes Service (AKS)
Kubernetes is a container orchestration service. This means that it’s responsible for monitoring containers and ensuring that they’re always running. It can also scale to add additional containers when the needs require it to, and it can then scale back when the needs are reduced.
Kubernetes creates containers in a pod. A pod is a group of related containers, and containers within a pod can share resources. This is one of the advantages to using Kubernetes because it releases you from the resource-sharing restriction typically imposed in a multi-container environment. However, a container in one pod is not able to share resources with a container in another pod.
The computer that Kubernetes pods are running on is called a node or a worker. This computer must have a container runtime such as Docker running on it. In addition to pods, the node also runs several services that are required for Kubernetes to manage the pods and so on. There will typically be multiple nodes within a Kubernetes instance, and they are all controlled by a master node called the Kubernetes master. The entire environment of the master and all its nodes is called a Kubernetes cluster.
A Kubernetes master contains all of the configuration and services necessary to manage the orchestration of pods and other Kubernetes entities. Configuring a master can be complex, and it is by far the most laborious task of using Kubernetes. For that reason, services such as Azure Kubernetes Service (AKS) are becoming more popular.
AKS offloads the burden of dealing with the Kubernetes master to Microsoft. When you create a Kubernetes cluster in AKS, Azure creates the master and the nodes for you. All you have to do is deploy your containers and you’re up and running with a managed Kubernetes cluster.
AKS simplifies the creation of a Kubernetes cluster, but it also makes it extremely easy to manage a cluster (see Figure 2-26). Operations such as upgrading a cluster or scaling a cluster are simple using the Azure portal menu options. You can also get detailed information on your cluster, including each node that’s running in the cluster.
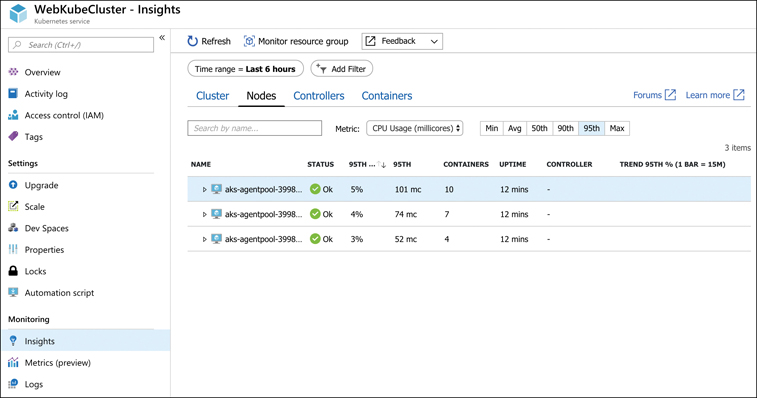
FIGURE 2-26 An AKS cluster in the Azure portal
While AKS makes adopting and managing Kubernetes easier, it doesn’t completely obfuscate Kubernetes. In order to deploy your applications, you still need to understand how to use Kubernetes, and in some cases, you’ll need to use the Kubernetes command line. Azure, however, makes it far easier than doing all the legwork and maintenance yourself. Even better, AKS in Azure is free. You only pay for the Azure compute resources you use within your cluster.
Windows Virtual Desktop
Most businesses have applications that all their employees need to use. For example, employees might need access to Microsoft Word, Microsoft Excel, Microsoft Outlook, and so on. In many situations, businesses fill this need by purchasing a Microsoft Office license for all employees and installing Office apps on each computer.
This classic model of each employee using one computer with applications installed on it is not only inefficient for businesses, but it’s also insecure. First off, it requires that the business purchase operating system and application licenses for each employee. It also requires that the IT department be available to troubleshoot any operating system or application issues. Users of local applications also have data that is stored on the local hard drive, and this represents a security risk if an unwanted person gets access to the machine.
For these reasons and many others, many businesses take advantage of desktop virtualization. In a desktop virtualization model, a business installs an operating system and applications on one central server. The desktop virtualization infrastructure makes it possible for employees to access the operating system and applications from virtually any device, provided it has access to the network. The OS and applications aren’t downloaded to the employee’s device. Instead, the employee uses the applications in a virtualized environment that makes it feel like the applications are running locally.
Desktop virtualization might sound like the perfect solution for many businesses, but in fact, it’s quite complex to configure, and it requires many components in order to ensure a secure environment. For that reason, Microsoft developed a service in Azure called Windows Virtual Desktop.
Windows Virtual Desktop is a PaaS offering in Azure that provides desktop virtualization that is managed by Microsoft. It requires a bit of advanced configuration, but once you have it configured, the infrastructure is entirely managed by Microsoft.
To use Windows Virtual Desktop (WVD), you first create a WVD tenant. A tenant is a collection of one or more host pools, and a host pool consists of both session hosts and one or more app groups that represent the applications and OS desktops users should be able to access. These session hosts are simply Azure VMs that you’ve configured for WVD.
Once you’ve set up the tenant, you can add users from your Azure Active Directory so that they can access the OSes and apps in your tenant and assign permissions to them. Those users can then access WVD using the following methods.
Using the WVD client app for Windows
Using the WVD client app for MacOS
Using the WVD client for iOS
Using the WVD client for Android
Using the web-based client from any web browser
The end user accessing WVD sees a list of OSes and applications they can use. When they click an OS, they can interact with that OS just as though they were running it on their local machine. When they click an app, the app launches in a virtual session, but it looks exactly as if it’s running locally. Better yet, through the use of technology Microsoft acquired called FSLogix, WVD provides for a local profile while the user is using apps. This capability even allows for users to use files in Microsoft OneDrive along with WVD.
Virtual networks
An Azure virtual network (often called a VNet) allows Azure services to communicate with each other and with the Internet. You can even use a VNet to communicate between your on-premises resources and your Azure resources. When you create a virtual machine in Azure, Azure creates a VNet for you. Without that VNet, you wouldn’t be able to remote into the VM or use the VM for any of your applications. However, you can also create your own VNet and configure it any way you choose.
An Azure VNet is just like any other computer network. It’s comprised of a network interface card (a NIC), IP addresses, and so on. You can break up your VNet into multiple subnets and set up a portion of your network’s IP address space for those subnets. You can then configure rules that control the connectivity between those subnets.
Figure 2-27 illustrates an Azure VNet that we might use for a multi-tier application. The VNet uses IP addresses in the 10.0.0.0 address range, and each subnet has its own range of addresses. IP address ranges in VNets are specified using classless inter-domain routing (CIDR) notation, and a discussion of that is far outside the scope of this exam. However, with the configuration shown in Figure 2-27, we have 65,536 IP addresses available in our VNet, and each subnet has 256 IP addresses allocated to it. (The first four IP addresses and the last IP address in the range are reserved for Azure’s use, so you really only have 251 addresses to use in each subnet.) This is a typical design because you still have many addresses available in your network for later expansion into additional subnets.
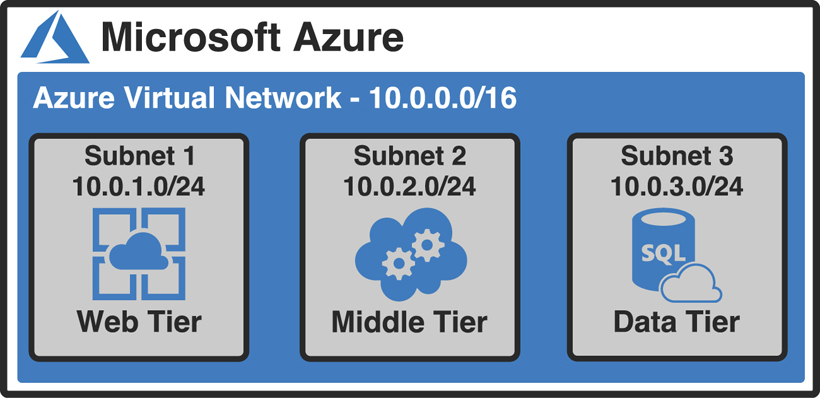
FIGURE 2-27 A multi-tier application in an Azure Virtual Network
In most cases, you create VNets before you create the resources that use them. As I said earlier, when you create a VM in Azure, a VNet is created automatically. Azure does that because you can’t use a VM unless there’s a network associated with it. While you can connect a VM you are creating to an existing VNet, you can’t connect a VM to a VNet after it’s been created. For that reason, if you wanted to use your own VNet instead of the one Azure creates automatically, you would create your VNet before you create your VM.
The web tier shown previously in Figure 2-27, on the other hand, is running in Azure App Service, a PaaS offering. This is running on a VM that Microsoft manages, so Microsoft creates and manages the VM and its network. In order to use that tier with the VNet, App Service offers a feature called VNet Integration that allows you to integrate a web app in App Service with an existing VNet.
The IP addresses within the VNet at this point are all private IP addresses. They allow resources within the VNet to talk to each other, but you can’t use a private IP address on the Internet. You need a public IP address in order to give the Internet access to your web tier.
Because the web tier is running on Azure App Service (a PaaS service), Microsoft manages the public-facing network for us. You get Internet access on that tier without needing to do anything. If you want to run the web tier on an IaaS VM instead, configure the public IP address for the web tier. In those situations, Azure allows you to create a Public IP Address resource and assign it to a virtual network.
ExpressRoute
Azure virtual networks offer the ability to connect to your on-premises networks using a virtual private network (VPN) connection, and many customers use this method to connect on-premises resources to Azure. However, there are some aspects of using a VPN that might not meet the requirements of some customers. For example, a VPN is limited to a maximum of 1.25 Gbps in network speed. If a customer needs more speed than that, VPN isn’t a good choice.
For this reason, Azure offers a service called ExpressRoute that can offer speeds up to 10 Gbps over dedicated fiber-optic connections. When you use ExpressRoute, you connect from your on-premises network to a Microsoft Enterprise Edge router (MSEE), and that MSEE router then connects you to Azure. The MSEE router sits on the edge of Microsoft’s network, and in most cases, your connection will also be from a router in your on-premises network that is on the edge of your network.
In most situations, customers connect to the MSEE router using a third-party service provider. The service provider is a major network service provider, often an Internet service provider. The service provider has network connections directly into the MSEE router, and those connections have dedicated bandwidth. Figure 2-28 shows a typical ExpressRoute configuration.
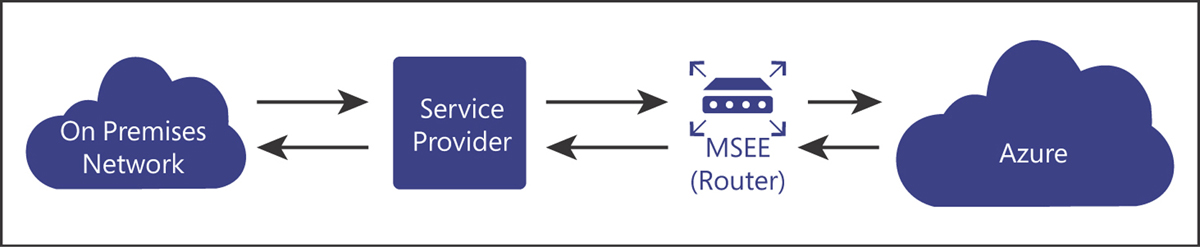
FIGURE 2-28 A typical ExpressRoute configuration
Because data in ExpressRoute doesn’t traverse the public Internet, bandwidth is much more reliable. However, the ExpressRoute configuration you see in Figure 2-28 does require that you trust the service provider with the data flowing through the circuit. If you want to remove the service provider from the picture, you can use an offering called ExpressRoute Direct that allows you to connect directly to a physical port on the MSEE router.
Container (blob) storage
Azure Blob Storage is designed for storing unstructured data, which has no defined structure. That includes text files, images, videos, documents, and much more. An entity stored in Blob Storage is referred to as a blob. There are three types of blobs in Azure Storage.
Block blobs Used to store files used by an application.
Append blobs They are like block blobs, but append blobs are specialized for append operations. For that reason, they are often used to store constantly updated data like diagnostic logs.
Page blobs They are used to store virtual hard disk (.vhd) files that are used in Azure virtual machines. We’ll cover these in Azure Disk Storage later in this chapter.
Blobs are stored in storage containers. A container is used as a means of organizing blobs, so you might have a container for video files, another container for image files, and so on. The choice, however, is entirely up to you.
If you’re planning on moving data from on-premises into Azure Storage, there are many options available to you. You can use Azure Storage Explorer, a free tool available from Microsoft, to upload data. You can also use command line tools that Microsoft provides for uploading to Azure Storage.
If you want to move a large amount of data, Microsoft offers a service called Data Box. Data Box has an online service called Data Box Edge that makes copying data to Azure Storage as easy as copying it to a hard drive on your system. For even larger amounts of data, Microsoft offers a Data Box offline service where they will ship you hard drives. You simply copy your data to the hard drives, encrypt the drives with BitLocker, and then ship them back to Microsoft. Microsoft even offers Data Box Heavy, a service where they’ll ship you a rugged device on wheels that can hold up to 1 petabyte of data!
Disk storage
Disk storage in Azure refers to disks that are used in virtual machines. Azure creates a disk that is automatically designated for temporary storage when you create a VM. This means data on that disk will be lost if there’s a maintenance event on the VM. If you need to store data for a longer period of time that will persist between VM deployments and maintenance events, you can create a disk using an image stored in Azure Storage.
Azure disks are available as both traditional hard disks (HDD) and solid-state drives (SSD). HDD disks are cheaper and designed for noncritical data. SSD disks are available in a Standard tier for light use and as Azure Premium Disk for heavy use.
Azure disks are available as either managed disks or unmanaged disks. All Azure disks are backed by page blobs in Azure Storage. When you use unmanaged disks, they use an Azure Storage account in your Azure subscription, and you must manage that account. This is particularly troublesome because there are limitations in Azure Storage, and if you have heavy disk usage, you might end up experiencing downtime because of throttling.
When you move to managed disks, Microsoft handles the storage account, and all storage limitations are removed. All you need to worry about is your disk. You can leave the storage account in Microsoft’s hands.
Perhaps an even more important reason to use managed disks is that by doing so, you avoid a possible single point of failure in your VM. When you use unmanaged disks, there is a possibility that the Azure Storage accounts backing up your disks might exist within the same storage scale unit. If a failure occurs in that scale unit, you will lose all your disks. By ensuring that each managed disk is in a separate scale unit, you avoid the situation of a single point of failure.
Azure Files
Azure disks are a good option for adding a disk to a virtual machine, but if you just need disk space in the cloud, it doesn’t make sense to take on the burden of managing a virtual machine and its operating system. In those situations, Azure Files is the perfect solution.
Azure Files is a completely managed file share that you can mount just like any SMB file share. That means existing applications that use network attached storage (NAS) devices or SMB file shares can use Azure Files without any special tooling, and if you have multiple applications that need to access the same share, that will work with Azure Files, too.
One possible problem with using Azure Files is the remote location of files. If your users or applications are using a file share mapped to Azure Files, they might experience longer-than-usual file transfer times because the files are in Azure. To solve that problem, Microsoft introduced Azure File Sync.
Install Azure File Sync on one or more servers in your local network and it will keep your files in Azure Files synchronized with your on-premises server. When users or applications need to access those files, they can access the local copy quickly. Any changes you make to the centralized Azure Files share are synchronized to servers running Azure File Sync.
Storage tiers
Microsoft offers numerous storage tiers for Blob Storage that are priced according to how often the data is accessed, how long you intend to store the data, and so on. The Hot storage tier is for data you need to access often. It has the highest cost of storage, but the cost for accessing the data is low. The Cool storage tier is for data that you intend to store for a longer period and not access quite as often. It has a lower storage cost than the Hot tier, but the access costs are higher. You’re also required to keep data in storage for at least 30 days.
Microsoft also offers an Archive storage tier for long-term data storage. Data stored in the Archive tier enjoys the lowest storage costs available, but the access costs are the highest. You must keep data in storage for a minimum of 180 days in the Archive tier or you can be subjected to an early deletion charge. Because data in the Archive tier isn’t designed for quick and frequent access, it can take a very long time to retrieve it. In fact, while the Hot and Cool access tiers guarantee access to the first byte of data within milliseconds, the Archive tier only guarantees access to the first byte within 15 hours.
Cosmos DB
Many database systems use relational data. A relational database contains tables of data that are related to each other. Part of the database design defines the relationship between tables, and when new data is added to the database, it must conform to the schema (the way the database is set up).
Some database systems, known as NoSQL databases, are not relational. In a NoSQL database system, you’re not locked into a schema for your data. For example, in a relational system, if you’re storing information about some customers and you want to add customer birthdays to your data, you have to edit the schema of your database to allow for the birthday to be added. However, in a NoSQL system, you simply add the birthday to your data and add it to the database. The database doesn’t care about the type of data or fields it contains.
There are four types of NoSQL database systems: key-value, column, document, and graph. Table 2-1 lists each of these types and provides some information about each.
TABLE 2-1 NoSQL database systems
System |
Description |
Common Use |
|---|---|---|
Key-value |
Stores data that is tied to a unique key. Pass in the key and the database returns the data. |
Because the value can be just about anything, key-value databases have many uses. |
Column |
NoSQL databases are called keyspaces, and a keyspace contains column families. A column contains rows and columns like a relational table, but each row can have its own set of columns. You aren’t locked into a schema. |
Storing user-profile data for a website. Also, because column databases scale well and are extremely fast, they are well-suited to storing large amounts of data. |
Document |
Data is stored as a structured string of text called a document. This can be HTML, JSON, and so forth. This is similar to a key-value database, except that the document is a structured value. |
Same as key-value, but document databases have advantages. They scale well horizontally, and they allow you to query against the value and return portions of the value. A key-value database query returns the entire value associated with the key. |
Graph |
Stores data and the relationships between each piece of data. Data is stored in nodes, and relationships are drawn between nodes. |
Many systems use graph databases because they are extremely fast. A social network might use a graph database because it would be easy to store relationships between people, things those people like, and so forth. |
There are many different NoSQL database systems, and most of them are geared toward a particular database model. Microsoft offers a hosted NoSQL database system in Azure called Cosmos DB, which supports all the NoSQL database types. Microsoft has built some custom code around Cosmos DB so that developers can use their existing skills with other database systems with a Cosmos DB database. This makes it easy for existing applications to begin taking advantage of Cosmos DB without engineers having to write new code.
When you create a Cosmos DB database, you choose the API you want to use, which determines the database type for your database. The database API types are:
Core (SQL) Creates a document database that you can query using SQL syntax that you might be familiar with from using relational databases.
Azure Cosmos DB for MongoDB API Used for migrating a MongoDB database to Cosmos DB. MongoDB databases are document databases.
Cassandra Used for migrating a Cassandra database to Cosmos DB. Cassandra databases are column databases.
Azure Table Used for migrating data stored in Azure Table Storage to Cosmos DB. This creates a key-value database.
Gremlin Used for migrating Gremlin databases to Cosmos DB. Gremlin databases are graph databases.
Microsoft calls these APIs because they are just that: APIs. They are application programming interfaces that allow developers who are already using an existing NoSQL database technology to migrate to Cosmos DB without having to change their code.
Another huge advantage to Cosmos DB is a feature known as turnkey global distribution. This feature takes advantage of the horizontal scalability of NoSQL databases and allows you to replicate your data globally with a few clicks. In the Azure portal, you can simply click the region(s) where you want data replicated, as shown in Figure 2-29. Once you click Save, Cosmos DB will begin to replicate data, which will be available in the selected regions. This makes it easy to ensure that users have the fastest experience possible with an application.
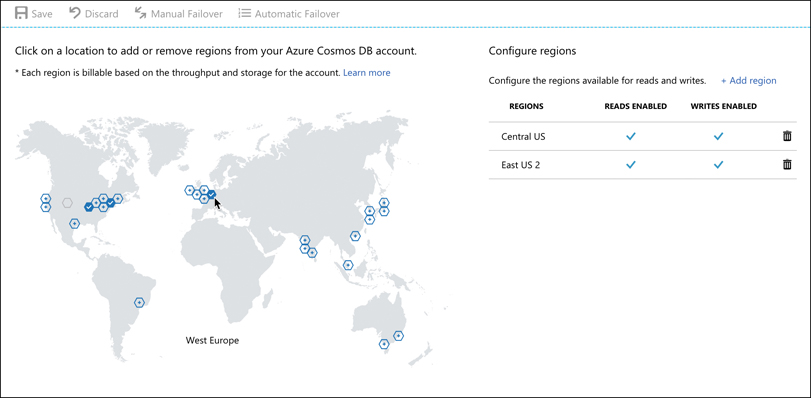
FIGURE 2-29 Easy replication across the globe with Cosmos DB
Azure SQL Database
Azure SQL Database is a PaaS offering for SQL Server database hosting. Microsoft manages the platform, so all you must worry about is your database and the data in it.
SQL Server databases are relational databases made up of tables of data, and each table has a schema that defines what the data should look like. For example, the schema might define that your data contains an ID number, a first name, a last name, and a date. Any data that you add to the table must follow the schema, so data you add must not have fields that are not defined in the schema.
A database will contain many tables of data that are related to each other, and by using specialized queries, developers can return data that is a result of joining related data from multiple tables. For example, you might have a Customers table and an Orders table, each with a field that identifies a customer. By querying and joining the data from both tables, you can provide a user with an invoice showing all their orders. This relationship between the tables is how relational databases got their name, as shown in Figure 2-30.
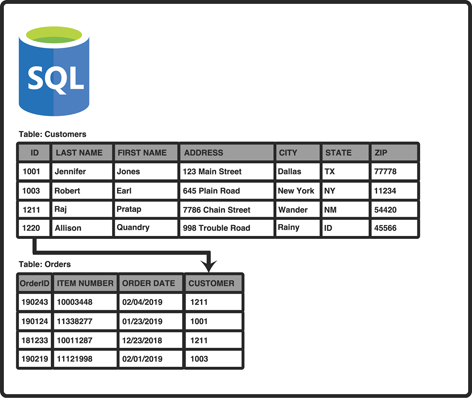
FIGURE 2-30 Two tables in a relational database
Azure offers three different deployment options for Azure SQL Database: single database, elastic pool, and managed instance.
A single database is simply a database running in a hosted SQL Server instance running in Azure. Microsoft manages the database server, so all you have to worry about is the database itself. Microsoft provides two different purchase models for single databases: Database Transaction Unit (DTU) and virtual core (vCore).
A DTU represents a collection of CPU, memory, and data reads and writes. There are three tiers in the DTU model: Basic, Standard, and Premium. Each tier offers a higher level of CPU, memory, and data transfer.
The vCore model uses a virtual CPU, and it makes it easy to configure the exact hardware configuration you need. It offers a General Purpose tier and a Business Critical tier. You can choose between a provisioned tier (where you choose the CPU, memory, and other resources that are always available) and a serverless tier where you choose a range of resource needs so you can control costs more effectively.
Table 2-2 shows these models and how they differ.
TABLE 2-2 Single database purchase models
DTU Model |
vCore Model |
|---|---|
Good choice for users who don’t need a high degree of flexibility with configuration and who want fixed pricing. |
Good choice if you need a high level of visibility and control of individual resources (such as memory, storage, and CPU power) your database uses. |
Pre-configured limits for transactions against the database, and pre-configured storage, CPU, and memory configurations. |
Flexibility in CPU power, memory, and storage, with storage charged on a usage basis. |
Basic and Standard offerings, along with a Premium tier for production databases with a large number of transactions. |
General Purpose and Business Critical offerings to provide lower costs when desired and high-performance and availability when required. |
Ability to scale to a higher tier when needed. |
Ability and flexibility to scale CPU, memory, and storage as needed. |
Backup storage and long-term retention of data provided for an additional charge. |
Backup storage and long-term retention of data provided for an additional charge. |
An elastic pool consists of more than one database (and often many databases) all managed by the same SQL Database server. This solution is geared toward SaaS offerings where you might want to have multiple users (or maybe even each user) to be assigned their own database. You can easily move databases in and out of an elastic pool, making it ideal for SaaS.
In some cases, being able to scale a single database to add additional power is sufficient. However, if your application has wide variations in usage and you find it hard to predict usage (such as with a SaaS service), the ability to add more databases to a pool is much more desirable. In an elastic pool, you are charged for the resource usage of the pool versus individual databases, and you have full control over how individual databases use those resources. This makes it possible to not only control costs, but you can also ensure that each database has the resources it needs while still being able to maintain predictability in expenses. What’s more, you can easily transition a single database into an elastic pool by simply moving the database into a pool.
A managed instance is explicitly designed for customers who want an easy migration path from on-premises or another non-Azure environment to Azure. Managed instances are fully compatible with SQL Server on-premises, and because your database server is integrated with an isolated VNet and has a private IP address, your database server can sit within your private Azure VNet. The features are designed for users who want to lift and shift an on-premises database to Azure without a lot of configuration changes or hassle. Both the General Purpose and Business Critical service tiers are available.
Microsoft developed the Azure Database Migration Service (DMS) to make it easier for customers to easily move on-premises databases or databases hosted elsewhere in the cloud to a managed instance. The DMS works by walking you through a wizard experience to tell Azure which database(s) and table(s) you want to migrate from your source database to Azure SQL Database. It will then use the Azure VNet that comes with the managed instance to migrate the data. Once the data has been migrated, DMS sets up synchronization between the source database and Azure SQL Database. This means that as long as the source database remains online, any changes made to it will be synchronized with the managed instance in Azure SQL Database.
Azure Database for MySQL
Like SQL Server databases, MySQL databases are relational databases. However, MySQL is an open-source system. In fact, MySQL is the most popular open-source database system in the world.
Azure Database for MySQL is a fully managed cloud offering of the Community Edition of MySQL. With Azure Database for MySQL, you don’t have to worry about managing the database server, dealing with security concerns, or performing complex tasks such as performance tuning. Microsoft takes care of all that for you.
Azure Database for MySQL offers several pricing plans based on your specific needs. The Basic plan is best for users who have light usage; the General Purpose plan is more suitable for business use; and the Memory Optimized plan is for high-performance requirements. As you move up in pricing plans, you get more CPU cores and more memory, and each pricing plan offers multiple tiers so that you can plan for specifically what your needs require.
Because Azure Database for MySQL is based on the MySQL Community Edition, you can easily move your on-premises MySQL databases to the cloud without worrying about compatibility.
Azure Database for PostgreSQL
PostgreSQL is another relational, open-source database system. While PostgreSQL was initially designed to run on Unix or Linux, it’s now available for MacOS, Linux, OpenBSD, FreeBSD, and Windows.
PostgreSQL was designed with the enterprise in mind, and it supports a large number of users performing complex operations. Azure Database for PostgreSQL is a managed version of PostgreSQL in Azure. Like Azure Database for MySQL and Azure SQL Database, Azure Database for PostgreSQL allows you to utilize a powerful database system without having to manage the server, database security, performance, and other administrative tasks.
Pricing for Azure Database for PostgreSQL is similar to Azure Database for MySQL. Basic, General Purpose, and Memory Optimized plans are available, and prices increase as you add additional database resources like CPU and memory.
The Azure Marketplace and its usage scenarios
You’ve learned about many of the products and services available in Azure, but there are many available products outside of what we’ve discussed. Not only does Microsoft offer many additional services, but third-party vendors also provide a wide array of resources you can use in Azure. All these resources are available in a single repository called the Azure Marketplace.
To access the Azure Marketplace, click Create A Resource in the Azure portal as shown in Figure 2-31. This will display a list of categories you can choose from. It will also show a list of popular offerings from all categories. You can click a category to see all templates in that category, and you can click a template in the list of popular templates, enter a search term, or even click See All to see all templates that are available.

FIGURE 2-31 The Azure Marketplace
If you click See All, you’ll be taken to the full Marketplace experience where you can filter based on pricing, operating systems, and publisher as shown in Figure 2-32.
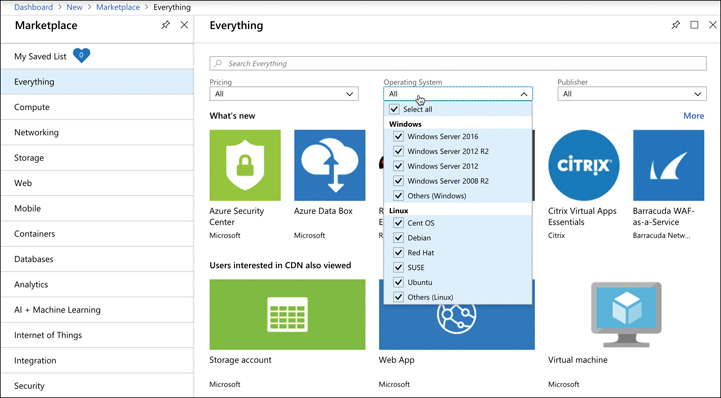
FIGURE 2-32 Filtering the Azure Marketplace
Some of the templates in the Marketplace deploy a single resource. For example, if you click the Web App template, it will create a web app running in Azure App Service. Other templates create many resources that combine to make an entire solution. For example, you can create a DataStax Enterprise database cluster and the template will create between 1 and 40 DataStax Enterprise nodes.
You are billed for each Marketplace offering on your Azure invoice, so if you create a DataStax Enterprise cluster with 40 nodes, you won’t see separate billing for 40 VMs, VNETs, and so on. Instead, you’ll see a bill for a DataStax Enterprise cluster. This makes billing much easier to understand.
As shown in Figure 2-33, many Marketplace templates provide links to documentation and other information to help you get the most out of the template. If you decide that you don’t want to immediately create the resources, you can click Save For Later and the template will be added to your saved list that you can access by clicking My Saved List, as previously shown in the upper-left corner in Figure 2-32.

FIGURE 2-33 Marketplace links and Saved List
Thought experiment
Now that you’ve learned about core Azure services, let’s apply that knowledge. You can find the answers to this thought experiment in the section that follows.
ContosoPharm has contacted you for assistance in setting up some Azure virtual machines for hosting their Azure services. They want to ensure that their services experience high availability and are protected against disasters that might occur in a datacenter at a particular Azure region. In addition to that, they want to ensure that a power outage at a particular datacenter doesn’t affect their service in that region.
ContosoPharm plans on having a large number of VMs, but they’re only going to be hosting three different services in the cloud. Each of these services will have other Azure services associated with them in addition to the VMs. They’re very interested in having a way to easily view all the Azure resources associated with a particular service inside the Azure portal.
Two of the services they plan on deploying belong to the marketing department. The other service belongs to the development division. They need a way to report on each of these departments, so they’d like a way to logically group these services.
Along those same lines, the CTO wants to ensure that they can control who has access to the services in each department. He also wants to have control over how those services are configured.
ContosoPharm’s VMs will also be using specific configurations for virtual networks, and they want to ensure that they can easily deploy these resources into new Azure regions, if necessary later. It’s critical to them that the later deployments have the exact same configuration as all other deployments because any differences can cause application incompatibilities.
The CTO is also worried about VMs in particular from experiencing availability problems due to possible hardware failures. He’s also heard that some cloud customers experience issues when the cloud provider must reboot the underlying host computer for some reason. This kind of thing cannot happen in ContosoPharm’s case, so you will need to make a recommendation to prevent that.
During some periods of time, ContosoPharm has noticed that their applications can cause extreme CPU spikes. They’d like a system that will account for that and possibly add additional VMs during these peak times, but they want to control costs and don’t want to pay for these additional VMs when they aren’t experiencing a usage spike. Any advice you can offer for that would be a bonus.
One of ContosoPharm’s services has a web portal that was written using PHP. They’ll need to move this web portal to the cloud, but they don’t want to have to hassle with a lot of configuration. They need it to be available for users reliably and they need to be able to update the code if necessary, but they don’t want to worry about anything else. They’re looking to you to suggest the best Azure solution for that, and keep in mind that they need to be able to scale this web portal easily when usage increases during busy times of the month.
Another portion of one of their services exists as a Docker image. They want to run this in Azure as well, but the CTO is concerned about costs. This part of their service is only needed for specific operations, so it runs only for a few minutes every month. Even so, it’s a critical component, so they need it to be reliable. The CTO wants you to suggest an option that will be the most cost-efficient option in Azure.
One of their other services is also containerized, but it’s quite a bit more complex. Usage of this service is all over the place. Sometimes they require a lot of computing resources for it, and other times, they don’t require much at all. However, when it’s needed, they need to ensure that it’s always running.
Sales managers in the ContosoPharm sales department need access to Office applications reliably, but the CIO is greatly concerned about sensitive sales data being stored on laptop hard drives. He’d like for you to recommend a way for these employees to access the applications they need while keeping data secure. Being able to access these applications from any device (or even a web browser) would be a real game-changer.
Much of the infrastructure ContosoPharm is moving to the cloud is made up of multi-tiered applications, and each of these tiers needs to be able to communicate with each other and with the Internet. The on-premises network engineers at ContosoPharm completely understand the on-premises network and how it’s configured, but they have no idea how to translate that to the cloud. They’ll need you to provide some recommendations in that area as well.
ContosoPharm also has an on-premises system that cannot be migrated to the cloud, so it will remain on-premises. This system uses 3D animations of cell structures and how different drugs interact with them. The file sizes are very large, and ContosoPharm is concerned that transferring these large files from the cloud is going to make their application slow. They’re also concerned over privacy implications and would prefer to keep these files from being transferred over the Internet if possible.
ContosoPharm is required to keep a copy of each order invoice from their customers. These invoices are uploaded to the website as a PDF, and they want to keep them in the cloud. They don’t need to be able to run any kind of reporting on these invoices, but they do need them in case regulators ask for them in the future.
They also need to persist data that’s stored on any of their VMs, even if a maintenance event happens in Azure or they are moved to another VM for some reason. It’s critical data, so they want to ensure they choose the right solution.
Another part of their application also needs to persist data, but they need to be able to access the data from an on-premises server running Windows Server 2016. They don’t want to have to install anything special on the server to be able to access these files that are in the cloud.
All ContosoPharm’s chemicals and pharmaceuticals are kept in a large research facility. They’d like to integrate a database in that facility with their Azure services, and they need that connection to be encrypted and secure. The developers of the current system used the Community Edition of MySQL to develop the database, and ContosoPharm is interested in the easiest solution to have this hosted in the cloud without them having to keep up with configuration and maintenance.
Provide a recommendation to ContosoPharm that meets all their requirements. You don’t need to give them specific technical details on how to implement everything, but you should point them in the right direction if you don’t have specifics.
Thought experiment answers
In this section, we’ll go over the answers to the thought experiment.
To ensure that their VMs are protected against disasters at a datacenter within a particular Azure region, you should recommend that ContosoPharm use availability zones. By deploying VMs in availability zones, they can ensure that VMs are distributed into different physical buildings within the same Azure region. Each building will have separate power, water, cooling system, and network.
To easily view Azure resources associated with a particular service, ContosoPharm can create separate resource groups and create the resources for each service within its own resource group. To logically group their services for the marketing and development divisions so they can report on them, they can create separate Azure subscriptions for each division.
To resolve the CTO’s concern over who has access to services and how those services are configured, you can recommend the use of management groups. Since you’ve already recommended that each division have their own subscription, management groups are a logical choice because each subscription can be moved into a separate management group.
In order to ensure consistent deployments now and in the future, ContosoPharm can create an ARM template for their deployment. By using an ARM template, they can ensure that every deployment of their resources will be identical.
To protect their application when a VM has a hardware problem or must be rebooted, they should use an availability set. An availability set would provide them with multiple fault domains and update domains so that if a VM must be rebooted, they’d still have an operational VM in another update domain.
To ensure that they always have enough VMs to handle load when CPU spikes, they should use scale sets. They can then configure auto-scale rules to scale out when load requires it and scale back in to control costs.
The best option for hosting their PHP web portal in the cloud is Azure App Service. Because it’s a PaaS service, ContosoPharm won’t have to worry about a lot of configuration, and because App Service offers scaling capabilities, that meets the requirement of needing to react to increases in usage.
The best option for hosting their Docker image in the cloud is Azure Container Instances. There are other options in Azure for this, but because the CTO is concerned with costs and this component only runs for a very small amount of time each month, ACI is clearly the cheapest alternative.
The second containerized component would benefit better from Azure Kubernetes Service. The fact that it’s more complex and sometimes requires a lot of computing resources makes it an ideal candidate for AKS, especially because Kubernetes can ensure that the container is always running and available.
To provide sales managers with access to Office applications without having to worry about the security aspects of storing files on their laptops, you should recommend Windows Virtual Desktop. They would then be able to access these applications from any device or a web browser.
Your recommendation to the network engineers should be to configure an Azure virtual network. They can easily configure subnets within that network exactly like they have on-premises, and all the networking features they’re used to will be available to them.
The 3D animation system ContosoPharm uses sounds like it needs a lot of bandwidth. In that scenario, ExpressRoute is likely a good choice, especially because they would also like to keep files from being transferred over the Internet. With ExpressRoute, data transfers over a private connection, and they can adjust their bandwidth based on the needs of the app, up to a max of 10 Gbps.
To store their invoices in the cloud, ContosoPharm can use Azure Blob Storage. They could store them in a database as binary blobs, but since they don’t need to run any kind of reporting or queries against them, Azure Blob Storage will be cheaper.
To persist the data on their VMs between reboots or VM moves, they should use Disk Storage. You should probably also recommend that they use managed disks for ease of use and reliability. For the part of the app that needs to persist data that’s available by a Windows Server 2016 on-premises server, you should recommend Azure Files. They can then use SMB to access the files, and existing systems on-premises can map to the files without having to install anything extra.
For their database needs, the best choice by far is Azure Database for MySQL. Because it’s a managed service, ContosoPharm won’t have to worry about maintenance or configuration, and because it’s based on the Community Edition of MySQL, they should be able to simply transfer the database directly to the cloud and be done with it.
Chapter summary
This chapter covered a lot of ground! Not only did you learn some of the basics of Azure related to regions and resource groups, but you learned about a lot of the core workload services Azure provides.
Here’s a summary of what this chapter covered.
An Azure region is an area within a specific geographical boundary, and each region is typically hundreds of miles apart.
A geography is usually a country, and each geography contains at least two regions.
A datacenter is a physical building within a region, and each datacenter has its own power, cooling supply, water supply, generators, and network.
Round-trip latency between two regions must be no greater than 2ms, and this is why regions are sometimes defined as a “latency boundary.”
Customers should deploy Azure resources to multiple regions to ensure availability.
Availability zones ensure that your resources are deployed into separate datacenters in a region. There are at least three availability zones in every region.
Resource groups allow you to separate Azure resources in a logical way, and you can tag resources for easier management.
All your Azure resources are created within an Azure subscription, and you can create additional subscriptions if you need to group or report on resources more easily.
Azure subscriptions have limits associated with them.
Management groups allow you to assign policies and access control to Azure resources.
Only subscriptions or other management groups can be added to a management group.
Azure Resource Manager (ARM) is how Azure management tools create and manage Azure resources.
ARM uses resource providers to create and manage resources.
An ARM template allows you to ensure consistency of large Azure deployments.
Azure virtual machines are an IaaS offering where you manage the operating system and configuration.
Availability sets protect your VMs with fault domains and update domains. Fault domains protect your VM from a hardware failure in a hardware rack. You are protected from VM reboots by update domains.
Scale sets allow you to set up auto-scale rules to scale horizontally when needed.
Azure App Service makes it easy to host web apps in the cloud because it’s a PaaS service that removes the management burden from the user.
App Service apps run inside of an App Service plan that specifies the number of VMs and the configuration of those VMs.
Containers allow you to create an image of an application and everything needed to run it.
Azure Container Instances (ACI) allow you to run containers for very little cost.
Azure Kubernetes Service (AKS) is a managed service that makes it easy to host Kubernetes clusters in the cloud.
Windows Virtual Desktop makes applications and OSes easily available to multiple users from almost any device.
An Azure virtual network (VNet) allows Azure services to communicate with each other and the Internet.
You can add a public IP address to a VNet for inbound Internet connectivity. This is useful if a website is running in your VNET and you want to allow people to access it.
Azure Load Balancer can distribute traffic from the Internet across multiple VMs in your VNet.
ExpressRoute allows you to have a high-bandwidth connection to Azure of up to 10 Gbps by connecting to a Microsoft Enterprise Edge (MSEE) router.
Traffic over ExpressRoute does not travel over the Internet.
Azure Blob Storage is a good storage option for unstructured data such as binary files.
If you need to move a large amount of data to Blob Storage, Azure Data Box is a good option. You can have hard drives of numerous sizes shipped to you. Add your data to them and ship them back to Microsoft where they’ll be added to your storage account.
Azure Disk Storage is virtual disk storage for Azure VMs. Managed disks allow you to remove the management burden of disks.
Azure Files allows you to have disk space in the cloud that you can map to a drive on-premises.
Azure Blob Storage offers Hot, Cool, and Archive storage tiers that are based on how long you intend to store the data, how often the data is accessed, and so on.
Azure Cosmos DB is a NoSQL database in the cloud for unstructured data.
Azure SQL Database is a relational database system in the cloud that is completely managed by Microsoft.
Azure Database for MySQL is based on the Community Edition of the open-source MySQL database system. It’s a managed service that removes the burden of management from the user.
Azure Database for PostgreSQL is a managed service for hosting PostgreSQL databases.
The Azure Marketplace is a source of templates for creating Azure resources. Some are provided by Microsoft and some are provided by third parties.