Chapter 5
Describe identity, governance, privacy, and compliance features
We’ve talked a lot about security, but when it comes to moving to the cloud, security isn’t the only major concern companies have. They also want to have control over how resources are used, and they want to ensure that data is kept private after it’s in the cloud provider’s ecosystem. Also, many businesses are required to comply with regulations and standards, and by moving to the cloud, they’re offloading some of that responsibility to the cloud provider. Therefore, they want to ensure a high level of confidence that the cloud provider is keeping them compliant.
Microsoft takes all these concerns seriously, and they provide powerful tools in Azure to meet their customers’ needs. In this chapter, we’ll talk about those tools and how to use them.
Skills covered in this chapter:
Skill 5.1: Describe core Azure identity services
Security isn’t only about controlling network traffic. In order to provide a secure environment, you must have some means of identifying who’s accessing your application. Once you know the identity of a user, you need to ensure that they aren’t allowed access to data or other resources they shouldn’t access.
Authentication and authorization
In most business applications, not all users have the same privileges. For example, a website might allow a small number of users to add and revise content. Another smaller group of users might have the ability to decide who can add content. The vast majority of users, however, are just consumers of the content. They can’t modify the content in any way, and they also can’t grant other people the ability to access the content.
In order to implement this kind of control, you need to know who is using the application so you can determine what their level of privileges should be. To determine who is using the application, you would require that users log in, often with a username and password. Assuming the user provides the right credentials, that user is authenticated to the application.
Once a user is authenticated and begins interacting with an application, additional checks might take place to confirm which actions the user is and isn’t allowed to perform. That process is called authorization, and authorization checks are performed against a user who is already authenticated.
This kind of authentication and authorization scenario isn’t limited to a website scenario. When you log into the Azure portal, you are being authenticated. As you interact with Azure resources, you are also being authorized to perform the actions you’re taking. Based on your level of privilege, you are only allowed to do certain things. For example, you might be authorized to create Azure resources but not authorized to give other people access to the Azure subscription you’re using.
Azure uses a service called Azure Active Directory to enforce authentication and authorization in Azure, but it has many capabilities beyond simply authentication and authorization.
Azure Active Directory
If you have any experience with on-premises Windows Active Directory, you might find understanding Azure Active Directory (Azure AD) to be a challenge. That’s because Azure AD isn’t the cloud equivalent of Windows Active Directory. It’s entirely different.
Azure AD is a cloud-based identity service in Azure that can help you authenticate and authorize users. You can use Azure AD to give users access to Azure resources. You can also give users access to third party resources used by your company and on-premises resources, all using the same username and password.
The core of Azure AD is a directory of users. Each user has an identity that’s comprised of a user ID, a password, and other properties. Users also have one or more directory roles assigned to them. The user ID and password are used to authenticate the user, and the roles are used for authorization to perform certain activities in Azure AD.
When you sign up for an Azure subscription, an Azure AD resource is automatically created for you, and it’s used to control access to Azure resources you create under your subscription. Figure 5-1 shows Azure AD in the Azure portal.
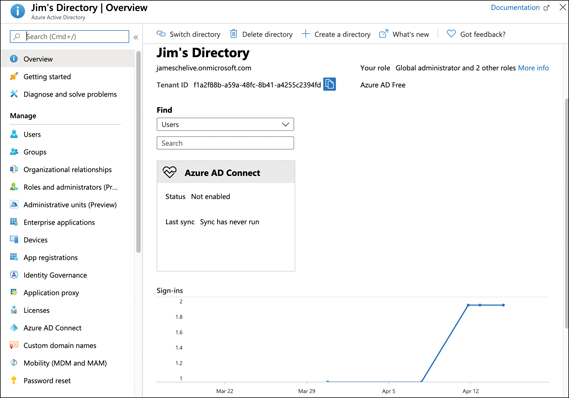
FIGURE 5-1 Azure AD in the Azure portal
To view or manage users in Azure AD, click Users in the menu on the left side of the page. This opens the All Users blade shown in Figure 5-2.

FIGURE 5-2 The All Users blade in the Azure portal
The Azure AD shown in Figure 5-2 contains two users. The first user’s source is Azure Active Directory, and this user was manually added to the directory. The other user is using a Microsoft Account to log in to the directory.
To add a new user from your company to your Azure AD, click New User to display the blade shown in Figure 5-3.
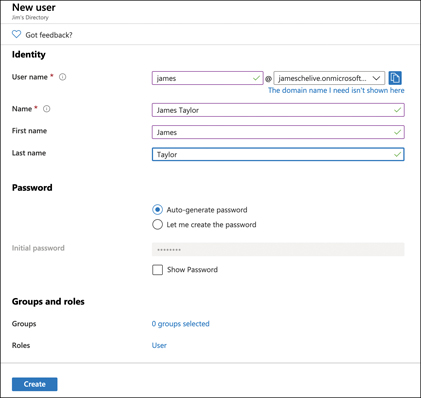
FIGURE 5-3 Adding a new Azure AD user
The specified username is used to log in to Azure AD. The domain name you use must be one that you own and that is associated with your Azure AD. You can also assign the new user to a group or a role. Groups make it easier to manage a larger number of similar users.
Azure AD offers a feature called Azure AD B2B (business-to-business) collaboration that allows you to add users who don’t belong to your company. So, you can invite other users from outside of your company to be members of your Azure AD. Those users can then be given access to your resources. Users who are not part of your company are called guest users. To add a guest user, click New Guest User, as shown in Figure 5-2. This will open the New Guest User blade, as shown in Figure 5-4.
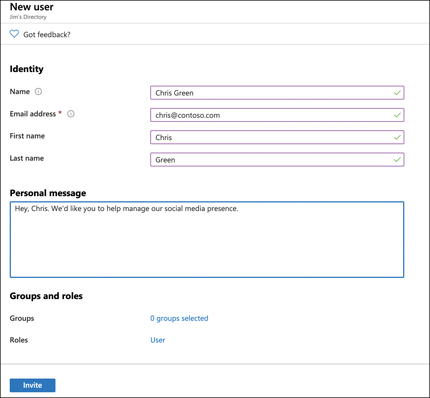
FIGURE 5-4 Adding a new guest user
When you invite a guest user, an invitation to join your Azure AD is sent to the email address you specify. In order to accept the invite, the user’s email address must be associated with a Microsoft Account. If the user doesn’t have a Microsoft Account, the user will be given the option to create one in order to join your Azure AD.
The user in Figure 5-4 can be given access to the corporate social media accounts by adding those applications to Azure AD. Thousands of applications can be added, including social media apps such as Facebook and Twitter. To add an application, open Azure AD in the Azure portal, click Enterprise Applications (shown previously in Figure 5-1) and click New Application, as shown in Figure 5-5.
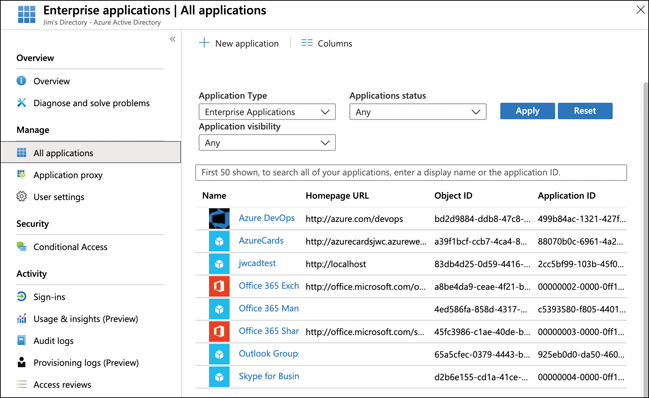
FIGURE 5-5 Enterprise applications in Azure AD
After you click New Application, you can choose from popular cloud providers, as shown in Figure 5-6. You can search for an application from here by entering an application name in the search box. You can also filter the view using the filtering buttons to the right of the search box.

FIGURE 5-6 Cloud providers in the enterprise application gallery
If you scroll down, you’ll see a list of many other applications you can add, as shown in Figure 5-7.

FIGURE 5-7 Enterprise application gallery apps
You can also add your own application, add an application that exists in your on-premises environment, or integrate any other application. The application that you add needs to expose a log in page to which you can point Azure AD in order to integrate it.
After you add an application, you can configure Azure AD so that users with access to that application can authenticate to it using the same credentials they use to log in to Azure AD. This kind of authentication is known as single sign-on (or SSO), and it’s one of the key benefits to using Azure AD.
Another important benefit to using Azure AD for managing user access to other applications is that you can easily revoke that access from a single interface. For example, if you give a user the username and password of your social media account so he or she can post to your account, you’d have to change the username and password on your social media account when you no longer want that user to have access. If you grant access using Azure AD with SSO configured, you can remove that access easily within the Azure portal. The user never has to know the username and password you use for the social media account.
All the Azure AD features we’ve covered so far are included in the free version of Azure AD that everyone with an Azure subscription gets. Azure AD has three other pricing tiers that aren’t free: Office 365 apps, Premium P1, and Premium P2. If you upgrade to one of the Premium plans, you can enable multifactor authentication for your users.
Conditional Access and multifactor authentication (MFA)
In the simplest sense, administrators of Azure AD can decide if a user has access to a particular resource by requiring that the user be authenticated with a username and password and has the authorization to access that resource. However, most administrators want much more control than that in order to keep resources secure.
Suppose you have given a user named Christine access to your Microsoft 365 account using Azure AD. Because all your sensitive documents are stored in Microsoft 365, you need to be confident that someone can’t hack Christine’s password and gain access to your data. Azure Conditional Access and multifactor authentication (MFA) can help make Christine’s account much more secure. Let’s start by looking at Conditional Access.
Conditional Access
Azure Conditional Access allows you to create policies that are applied against users. These policies use assignments and access controls to configure access to your resources.
Assignments define who a policy applies to. It can apply to users, groups of users, roles in your Azure AD, or to guest users. You can also specify that a policy only applies to specific applications, such as Microsoft 365 in our example above.
Assignments can also define conditions that must be met (such as requiring a certain platform such as iOS, Android, Windows, and so on), specific locations by IP address, and more.
Access controls determine how a Conditional Access policy is enforced. The most restrictive access control is block access, but you can also use access controls to require that a user use a device that meets certain conditions, that they’re using an approved application to access your resources, that they are using MFA, and so on.
To create a Conditional Access policy, search for Azure AD Conditional Access in the Azure portal. You can then click the New Policy button to create a new policy, as shown in Figure 5-8.

FIGURE 5-8 The Conditional Access policies blade in the Azure portal
Multifactor authentication (MFA)
By default, users can log in to your Azure AD using only a username and password. Even if you require your users to use strong passwords, allowing access to your resources with only a username and password is risky. If a hacker obtains the password by using software that guesses passwords or by stealing if through phishing or some other means, your resources are no longer secure.
Multifactor authentication solves this problem. The concept behind multifactor authentication is that you must authenticate using a combination of:
Something you know, such as a username and password
Something you have, such as a phone or mobile device
Something you are, such as facial recognition or a fingerprint
If multifactor authentication requires all three of these, it’s referred to as three-factor authentication, or sometimes 3FA. If only the first two are required, it’s referred to as two- factor authentication, or sometimes 2FA. (Microsoft actually calls this two-step verification.) Azure multifactor authentication is two-factor authentication.
To enable multifactor authentication for one or more users of your Azure AD, open the All Users blade, click the three dots at the top of the page, and click Multi-Factor Authentication, as shown in Figure 5-9. (If you have a large monitor, the Multi-Factor Authentication button might be visible by default.)
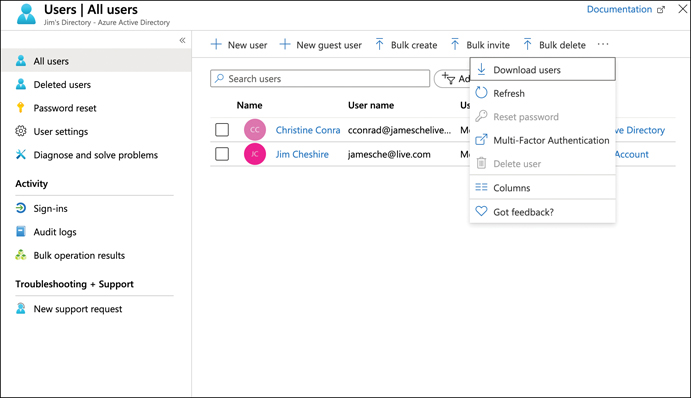
FIGURE 5-9 Enabling multifactor authentication
When you click Multi-Factor Authentication, a new browser window opens and displays the Azure AD user management site. Select one or more users for whom you want to enable multifactor authentication and click Enable, as shown in Figure 5-10.

FIGURE 5-10 Enabling Multi-Factor Authentication
Once a user is required to use MFA, he or she needs to take a second step when logging in to the Azure portal. This can be a prompt from the Microsoft Authenticator app (available for iOS and Android), an SMS message with an access number, a phone call requiring you to enter an access code, or an OAUTH hardware token.
Role-based access control (RBAC)
Role-based access control (RBAC) is a generic term that refers to the concept of authorizing users to a system that is based on defined roles to which the user belongs. Azure implements RBAC across all Azure resources, so you can control how users and applications can interact with your Azure resources.
You might want to allow users who administer your databases to have access to databases in a particular resource group, but you don’t want to allow those people to create new databases or delete existing databases. You might also want some web developers to be able to deploy new code to your web applications, but you don’t want them to be able to scale the app to a higher-priced plan. These are just two examples of what you can do with RBAC in Azure.
There are four elements to RBAC:
Security principal The security principal represents an identity. It can be a user, a group, an application (which is called a service principal), or a special AAD entity called a managed identity. A managed identity is how you authorize another Azure service to access your Azure resource.
Role A role (sometimes called a role definition) is what defines how the security principal can interact with an Azure resource. For example, a role might define that a security principal can read the properties of a resource but cannot create new resources or delete existing resources.
Scope The scope defines the level at which the role is applied, and it specifies how much control the security principal has. For example, if the scope is a resource group, the role defines activities that can be performed on all resources in the resource group.
Role assignments Roles are assigned to a security principal at a particular scope, and that’s what ultimately defines the level of access for the security principal.
RBAC includes many built-in roles. Three of these built-in roles apply to all Azure resources.
Owner Members of this role have full access to the resources.
Contributor Members of this role can create resources and manage resources, but they cannot delegate that right to anyone else.
Reader Members of this role can see Azure resources, but they cannot create, delete, or manage those resources.
All the other built-in roles are specific to certain types of Azure resources.
To give someone access to a resource using RBAC, open the resource to which you you want to give access in the Azure portal. Click Access Control (IAM) in the portal to configure RBAC. In Figure 5-11, RBAC is being configured for a web app hosted in Azure App Service. Clicking Add in the Add A Role Assignment box allows you to add a role.
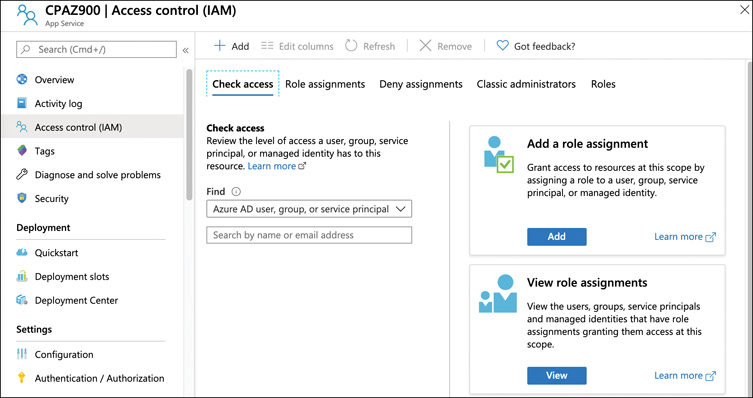
FIGURE 5-11 Configuring RBAC for a web app
After clicking Add, choose the role you want to assign. The list of roles will differ depending on what type of resource this is. Choose who or what you want to assign the role to, and then click Save, as shown in Figure 5-12.

FIGURE 5-12 Adding a role assignment
Figure 5-12 shows a list of users in the AAD because the Assign Access To drop-down menu is set to AAD objects. You can see a list of other types of objects by selecting a different type. For example, in Figure 5-13, we are selecting a built-in managed identity type called Virtual Machine, and this will allow us to select from a list of VMs to assign to the role.
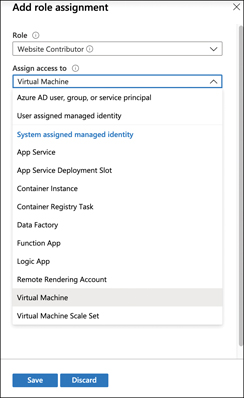
FIGURE 5-13 Using a managed identity to assign a role
RBAC is enforced by Azure Resource Manager (ARM). When you attempt to interact with an Azure resource, whether in the Azure portal or by using a command line tool, you are authenticated by ARM and a token is generated for you. That token is a representation of your identity and all your role assignments, and it’s included with all operations you perform on the resource. ARM can determine if the action you are performing is allowed by the roles to which you are assigned. If it is, the call succeeds; if not, you are denied access.
You can ensure that someone has the rights you desire by checking access in the Azure portal. After opening the resource and clicking Access Control (IAM), use the drop-down menu and search box shown in Figure 5-11 to search for a user or object and then click the user or object to see the access level, as shown in Figure 5-14.
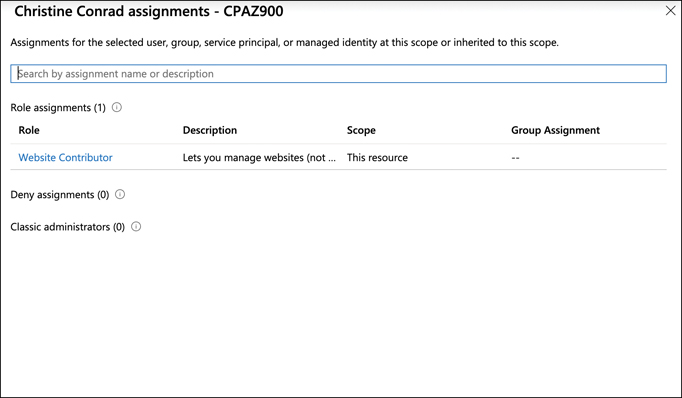
FIGURE 5-14 Showing RBAC assignments for a user
For a greater level of detail on what exact operations are and aren’t allowed, click the role that’s displayed. This will allow you to see a detailed list of operations and the combination of read, write, delete, and other actions that a security principal can perform.
Skill 5.2: Describe Azure governance features
As your cloud presence grows, you’ll likely end up with a large number of Azure resources that span many different Azure services. Unless you have some control over how those resources are created and managed, costs can spiral out of control. In addition to cost control, you might have other restrictions you’d like in place as well, such as which regions certain resources should be created in, how certain resources are tagged, and so on.
The traditional way of handling such governance issues would be to send out a memo to everyone explaining what the requirements are, and then crossing your fingers that people adhere to them. Fortunately, Azure Policy can ensure your requirements and policies are adhered to.
Azure Policy
Azure Policy allows you to define rules that are applied when Azure resources are created and managed. For example, you can create a policy that specifies that only a certain size VM can be created and that the VMs must be created in the South-Central US region. Azure will take care of enforcing this policy so that you remain in accordance with your corporate policies.
To access Azure Policy, type policy in the search box in the Azure portal and click Policy. Alternatively, you can click All Services and search for policy in the list. This will display the Policy blade, as shown in Figure 5-15.

FIGURE 5-15 Azure Policy in the Azure portal
By default, Azure Policy shows your compliance with policies defined on an Azure subscription. If you want to, you can scope this view to a different subscription or to a resource group by clicking the ellipsis (...) button next to Scope and selecting the new scope. See Figure 5-16.

FIGURE 5-16 Changing the scope of the Policy blade in the portal
The non-compliance shown in Figure 5-15 is based on policies implemented by Azure Security Center. By clicking the non-compliant item, you can see the full details of what is and isn’t within policy, as shown in Figure 5-17.

FIGURE 5-17 Details on compliance
Notice that the title of this item is ASC Default followed by a subscription ID. ASC Default is actually a collection of multiple policies that are defined by Azure Security Center. Azure Policy makes it easy to impose a full suite of policies by combining them into a group called an initiative. By defining an initiative, you can easily define complex rules that ensure governance of your company’s policies.
You can assign a new policy either by selecting a policy from a list of included policies or by creating your own policy. To assign a policy from the list of included policies, click Assignments > Assign Policy, as shown in Figure 5-18.

FIGURE 5-18 Assigning a policy
To select a policy, click the ellipses (…) next to Policy Definition, as shown in Figure 5-19.
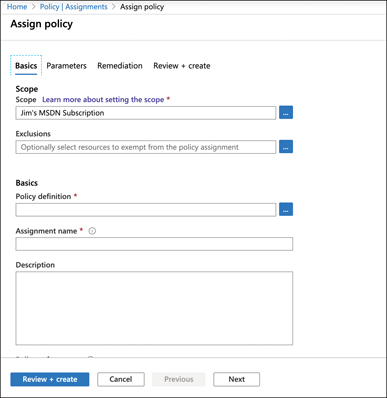
FIGURE 5-19 Selecting a policy definition
In this case, you apply a policy that will flag any App Service app that is not configured to use a virtual network service endpoint. You can do that by entering app service in the Search box and selecting the built-in policy that applies to that policy, as shown in Figure 5-20.

FIGURE 5-20 Adding a built-in policy definition
After clicking Select (shown in Figure 5-20), the details of this particular policy are shown. If you click the Parameters tab, you can see the effect of the policy. As you can see in Figure 5-21, the effect of this policy is AuditIfNotExists.
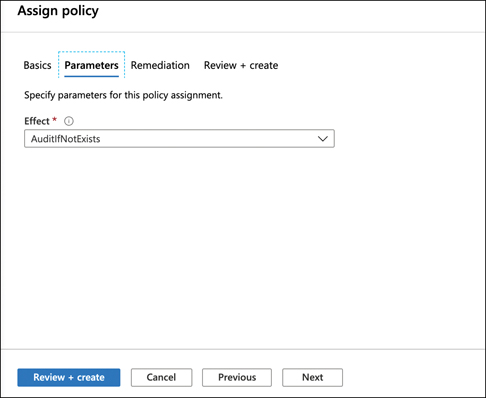
FIGURE 5-21 Completing the assignment
Six effects are supported in Azure Policy. However, not all effects are available for built-in policies. The effects are:
Append Adds additional properties to a resource. It can be used to add a tag with a specific value to resources.
Audit Logs a warning if the policy is not complied with.
AuditIfNotExists Allows you to specify an additional resource type that must exist along with the resource being created or updated. If that resource type does not exist, a warning is logged.
Deny Denies the create or update operation.
DeployIfNotExists Allows you to specify an additional resource type you want deployed with the resource being created or updated. If that resource type is not included, it is automatically deployed.
Disabled The policy is not in effect.
In addition to using the built-in policies, you can also define your own policies by creating a custom policy definition. Custom policy definitions are ARM templates that define the policy. For more information on creating a custom policy definition, see: https://bit.ly/az900-custompolicy.
Resource locks
RBAC is a great way to control access to an Azure resource, but in cases where you just want to prevent changes to a resource, or prevent that resource from being deleted, resource locks (or locks) are a simpler solution. Unlike RBAC, locks apply to everyone with access to the resource.
Locks can be applied at the resource level, the resource group level, or at the subscription level. To apply a lock to a resource, open the resource in the Azure portal and click Locks in the Settings section of the menu on the left, as shown in Figure 5-22.
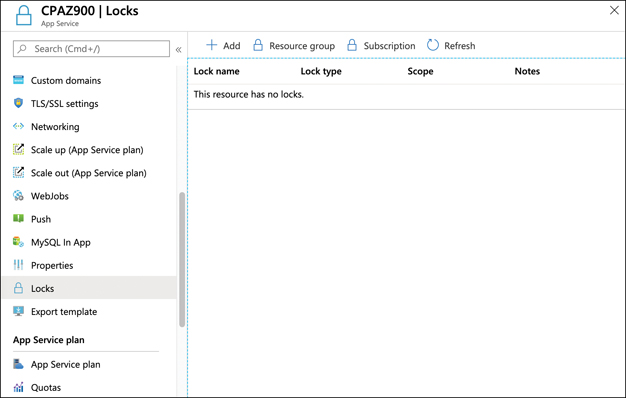
FIGURE 5-22 Locking a resource
To add a lock to the resource, click Add. (You can also review and add Locks to the resource group by clicking on Resource Group, or to the subscription by clicking Subscription.) In the Lock Name box, provide a name for the lock; set the Lock Type, and add an optional note, as shown in Figure 5-23.

FIGURE 5-23 Adding a read-only lock
A read-only lock is the most restrictive lock. It prevents changing properties of the resource or deleting the resource. A delete lock prevents the resource from being deleted, but properties can still be changed. The result of a read-only lock is often unpredictable because of the way locks are handled by Azure.
Locks only apply to operations that are handled by ARM, and some operations specific to a resource are handled internally by the resource instead of being handled by ARM. For example, if you set a read-only lock on an instance of Azure Key Vault, it will prevent a user from changing access policies on the vault, but users can still add and delete keys, secrets, and certificates because those operations are handled internally by Key Vault.
There are other situations where a read-only lock can prevent operations that occur unexpectedly. For example, if you place a read-only lock on a storage account, it will prevent all users from listing the access keys for the storage account because the operation to list keys makes the keys available for write access.
If a lock is applied to a resource group, all resources in that resource group inherit the lock. Similarly, if a lock is applied at the subscription level, all resources in the subscription inherit the lock. It is possible to nest locks, and in such situations, the most restrictive lock is the effective lock. For example, if you have a read-only lock on a resource group and a delete lock on a resource in that resource group, the resource will actually have a read-only lock applied to it because a read-only lock is more restrictive. The explicit delete lock will be ineffective.
When an operation is attempted in the portal and denied because of a lock, an error will display, as shown in Figure 5-24.

FIGURE 5-24 Denied by a lock
You can edit or delete a lock by clicking Locks and clicking either Edit or Delete in the portal, as shown in Figure 5-25. In most cases, you will need to scroll to the right to see the Edit and Delete buttons.

FIGURE 5-25 Editing or deleting a lock
Tags
Another feature in Azure that makes it easy to organize resources is tags. A tag consists of a name and a value. For example, suppose a company is participating in two trade events: one in Texas and one in New York. You have also created a lot of Azure resources to support those events. You want to view all the Azure resources for a specific event, but they’re spread out across multiple resource groups. By adding a tag to each resource group that identifies the event it’s associated with, you can solve this problem.
In Figure 5-26, you can see the tags associated with a WebStorefront resource group. This resource group has been assigned a tag named EventName, and the value of that tag is ContosoTexas. By clicking the cube icon to the right of the tag, you can view all resources that have that tag.
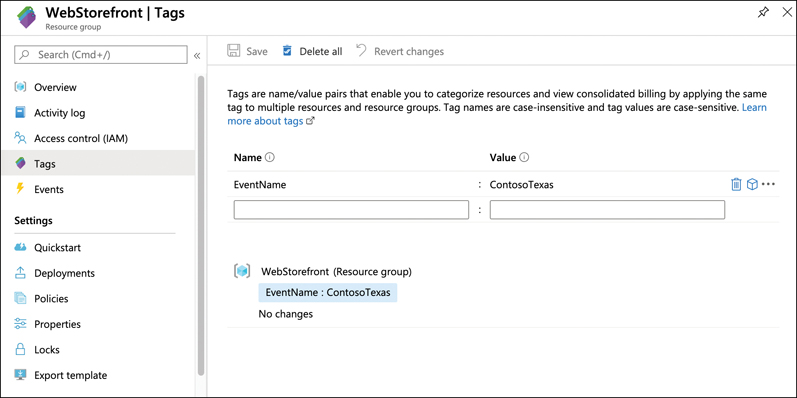
FIGURE 5-26 Tagging a resource group
You can apply a tag to most Azure resources, not just resource groups. It’s also important to understand that by adding a tag to a resource group, you are not adding that tag to the resources within the resource group. If you have a web app in the WebStorefront resource group, that web app does not inherit the tag that is applied to the resource group. This means tags add an additional layer of flexibility and power when viewing your Azure resources.
Azure Blueprints
When a company decides to create a cloud application, it doesn’t start by creating a resource in the portal. Instead, a lot of planning happens before a single Azure resource is created. This planning includes a plan for making sure the entire architecture of the cloud app complies with the necessary standards. It also involves concepts like detailed planning of virtual network topologies and rights assignments for users of the app. Also, best practices are likely a part of this planning.
There’s a lot of risk involved if a company fails to plan carefully, and for that reason, many companies will hire someone with deep technical knowledge of the cloud to help in that planning. Hiring that kind of resource can add a lot of additional expense, and it can also add a lot of time to a project.
Azure Blueprints is a service that can make the process of deploying to the cloud easier. Blueprints allows you configure an environment just as you need it to be, along with all the policies and other governance aspects in place. That configuration can then be saved so it can be duplicated at any time in other deployments.
Items that you add to a blueprint are called artifacts. An artifact can be a resource group, an ARM template, a policy assignment, or a role assignment. Once you’ve created a blueprint, you can either save it in a subscription or in a management group. A blueprint that’s saved in a management group can then be used by any subscription within that management group’s hierarchy.
To create a blueprint, search for blueprints in the Azure portal to open the Blueprints | Getting Started page, as shown in Figure 5-27.
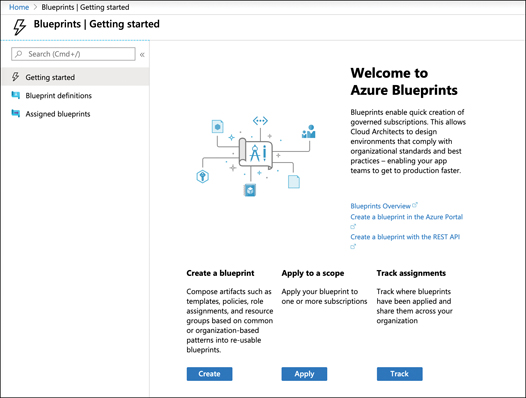
FIGURE 5-27 Azure Blueprints Getting Started page
From the Getting Started page, click Create to start the process of creating a blueprint. As shown in Figure 5-28, Microsoft provides many sample templates that you can use as a foundation for your blueprint, but you can also start with a blank blueprint.
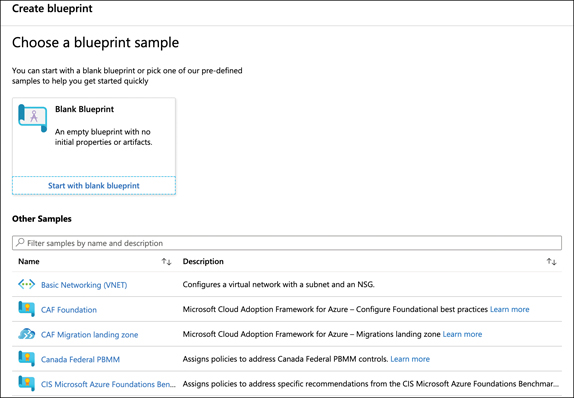
FIGURE 5-28 Creating a blueprint
Click the link to start with a blank blueprint. Enter a name for your blueprint, a description, and set the place where your blueprint definition will be saved. This is either a subscription or a management group. In Figure 5-29, a blueprint is being created that will be saved to a subscription.
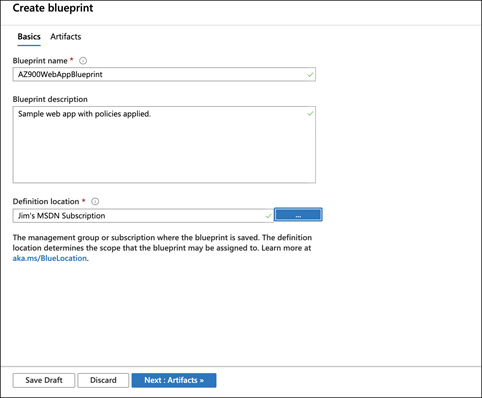
FIGURE 5-29 Specifying a blueprint’s basic settings
To add artifacts to your blueprint, click Next: Artifacts, as shown in Figure 5-29. Click Add Artifact to add your first artifact. Select the Artifact Type and enter the necessary information to add the artifact. In Figure 5-30, a resource group artifact is being added.
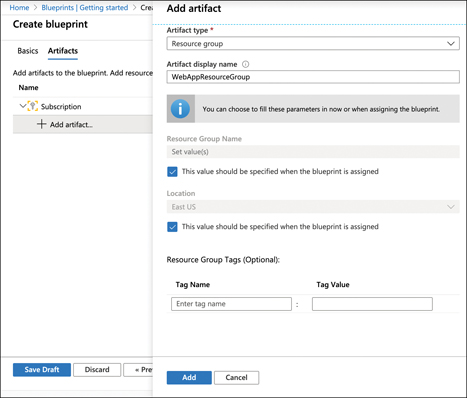
FIGURE 5-30 Adding an artifact
In order for this blueprint to remain more generic at this point, you can specify that the resource group name and the location are supplied when the blueprint is assigned by clicking the This Value Should Be Specified When The Blueprint Is Assigned checkbox next to the Resource Group Name and/or Location. (We’ll cover blueprint assignment later in this section.) Clicking Add will add this artifact to the blueprint.
When you’re finished adding artifacts, click Save Draft (shown in Figure 5-30) to save a draft of the blueprint. While in draft mode, the blueprint can be edited and updated. When you’re ready to make the blueprint available, you can publish it.
To publish a blueprint, click Blueprint Definitions and click the blueprint, as shown in Figure 5-31.
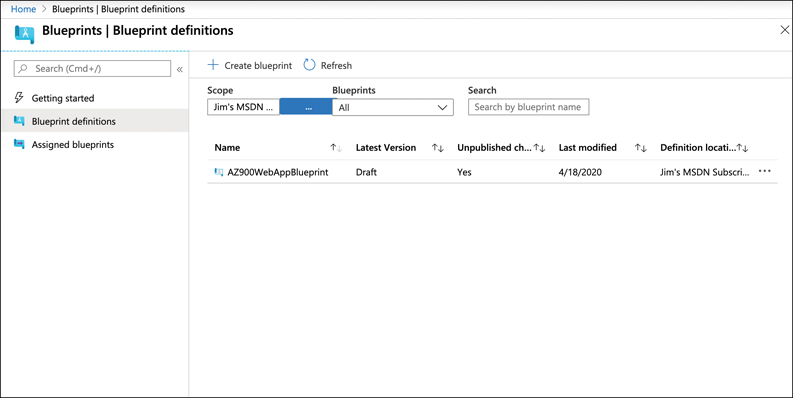
FIGURE 5-31 Viewing blueprint definitions
Click the Publish Blueprint button, as shown in Figure 5-32, to publish the blueprint.

FIGURE 5-32 A blueprint ready to be published
When you publish a blueprint, you need to provide the version number. It’s advisable to also add change notes. In Figure 5-33, our new blueprint is being published as Version 1.0. Clicking the Publish button completes the process.

FIGURE 5-33 Publishing a blueprint
Once a blueprint has been published, it’s available to assign to a subscription. Click the blueprint and click Assign Blueprint to assign it, as shown in Figure 5-34.
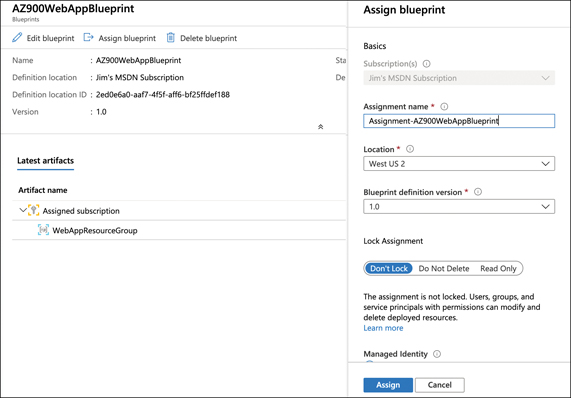
FIGURE 5-34 Assigning a blueprint
To assign the blueprint, enter an assignment name, select a location, and select the blueprint definition version. (You can also accept the defaults for all these settings.) You can also specify a lock assignment for the resources the blueprint creates by clicking the desired lock assignment setting.
Clicking Assign completes the blueprint assignment.
When the blueprint is assigned to a subscription, resources defined by the blueprint are created in that subscription.
Skill 5.3: Describe privacy and compliance resources
As you move to the cloud, you offload some of the responsibility for your services and data to your cloud provider. This includes some of the responsibility for compliance with data protection standards. Even though the cloud provider takes care of some of that burden for you, it’s still vital that you have confidence in the cloud provider and that you trust them to maintain compliance.
There are many standards with which businesses must comply. For example, in 2016, the European Union passed the General Data Protection Regulation (GDPR). The GDPR regulates the way personal data is handled for individuals within the EU, but it also controls any personal data that is exported from the EU. Companies doing business in EU countries are legally required to abide by the GDPR.
One way that organizations can ensure they are abiding by the GDPR and other regulations that regulate data, is to maintain compliance with industry-wide standards focused on helping organizations keep information secure. One of those standards is the International Organization of Standards (ISO) 27001 standard. Companies that comply with the ISO 27001 standard can be confident that they are maintaining the best practices necessary to keep information secure. In fact, many companies won’t do business with a cloud provider unless they can prove ISO 27001 compliance.
Systems that deal with governmental data must maintain compliance with standards that are maintained by the National Institute of Standards and Technology, or NIST. The NIST SP 800-53 is a publication by NIST that outlines all the requirements for information systems dealing with government data. In order for any government agency to use a service, it must first prove compliance with NIST SP 800-53.
Microsoft addresses these compliance requirements across its infrastructure in many different ways.
Microsoft privacy statement
The Microsoft privacy statement is a comprehensive statement from Microsoft that outlines the following as it relates to handling data and your personal information.
Personal data Microsoft collects
How Microsoft uses personal data
Reasons Microsoft shares personal data
How to access and control your personal data collected by Microsoft
How Microsoft uses cookies and similar technologies
What organizations providing Microsoft software to you can do with your data
What data is shared when you use a Microsoft Account with a third party
Specifics about how Microsoft secures data, where it’s processed, and retention policies
Microsoft links to the privacy statement in all official communications, and you can access the privacy statement online at https://aka.ms/privacystatement.
Cloud Adoption Framework for Azure
As you’ve learned, moving to the cloud isn’t as simple as clicking a few buttons in the Azure portal. There’s considerable planning that must take place, but before any of that planning even starts, it’s important to become educated on how to move to the cloud successfully. You need to learn about things such as best practices, how your cloud apps should be architected, the proper way to migrate resources, setting up governance and policies, and so forth.
As you might expect, Microsoft has this kind of knowledge spread out across its Azure teams. Not only has Microsoft learned from the many customers they’ve worked with, but Microsoft itself is a huge consumer of Azure, and they’re skilled in how to plan, organize, deploy, and govern Azure resources.
In an effort to share their vast knowledge with customers, Microsoft created the Cloud Adoption Framework for Azure. The Cloud Adoption Framework brings together all the best practices from Microsoft employees, Microsoft partners, and lessons learned from Microsoft customers. All this information is made available in a comprehensive website. All the information from the framework is neatly organized, and you can even download assets such as an infographic to help you visualize the Cloud Adoption Framework.
You can access the Cloud Adoption Framework by browsing to https://aka.ms/cloudadoptionframework.
Trust Center
The Trust Center is a web portal where you can learn all about Microsoft’s approach to security, privacy, and compliance. You can access Trust Center by browsing to https://aka.ms/microsofttrustcenter.
The Trust Center provides information on security solutions, security products, how Microsoft handles privacy and data management, and so on. It also provide white papers and checklists as tools for you to ensure you are secure and compliant.
As the cloud environment evolves and threats change, Microsoft updates the Trust Center with relevant information, so make sure you visit often.
Service Trust Portal
The Service Trust Portal (STP) is a portal that provides access to various compliance tools Microsoft provides for you to track compliance in your applications running on Microsoft’s various platforms. You can access the STP by browsing to https://aka.ms/STP. Figure 5-35 shows the STP home page.

FIGURE 5-35 Service Trust Portal
The STP is a launching point for Compliance Manager, which is a tool for managing your regulatory compliance in the cloud. Compliance Manager makes it easy to visualize your compliance with industry standards. It also provides details on how you can improve compliance, and for those areas where compliance is Microsoft’s responsibility, it provides full details on how Microsoft maintains compliance.
To access Compliance Manager, click Compliance Manager at the top of the STP page. Compliance Manager allows you to track your compliance with related applications by aggregating them into groups that you can give a name of your choice. Each group you create is represented by a tile in Compliance Manager, and you can see at a glance how far you’ve progressed at compliance in each group, as shown in Figure 5-36.
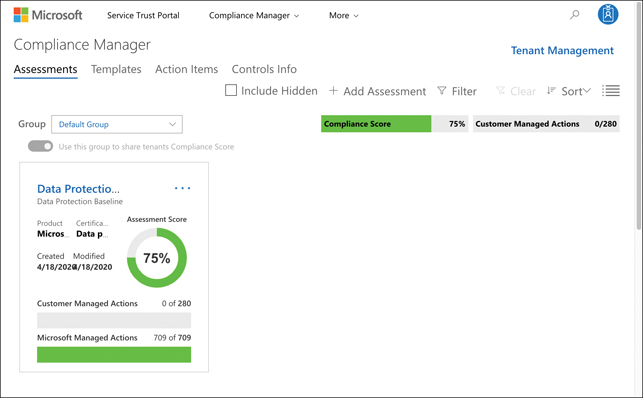
FIGURE 5-36 Compliance Manager
Clicking Data Protection Baseline takes you to a screen where you can review details on your assessment. As shown in Figure 5-37, there are plenty of actions Microsoft recommends that you take in order to protect your data.

FIGURE 5-37 Action items for data protection compliance
Clicking Review on any action takes you to a pane where you can review the status of that action. You can then record the implementation status, assign the action to a specific person, and so forth. You can also enter a date for the implementation plan so you can track the results and a date for testing the implementation as shown in Figure 5-38.
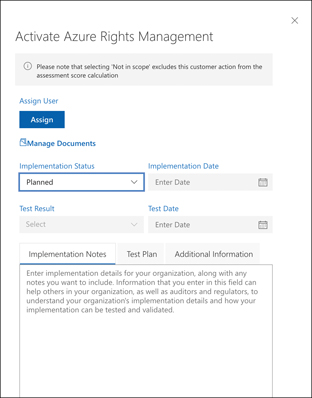
FIGURE 5-38 Details on an action item
Azure sovereign regions
Some compliance requirements can’t be met by simply applying policies in Azure. For example, some US government compliance scenarios require that data stays within the United States of America and that only citizens of the United States have any access to systems used to store that data. You can’t meet this requirement with policies. In fact, you can’t meet that requirement at all in the public cloud. To address this type of issue, Microsoft developed completely isolated Azure data centers that make up the Azure Government cloud.
Azure Government data centers are separate from public data centers. All employees working in Azure Government are screened and are citizens of the US. Even Microsoft employees who provide technical support to Azure Government customers are required to be US citizens.
Because Microsoft also wanted to allow for compliant communication between the Azure Government cloud and on-premises government systems, they also developed dedicated Microsoft ExpressRoute locations that are completely isolated from other Azure networks and that use their own dedicated fiber-optic components.
Azure Government isn’t only for federal government agencies. Cities and municipalities also take advantage of Azure Government for compliance. When a customer signs up for Azure Government, Microsoft vets that user to ensure they are representative of a government agency. Only then are they given a subscription to Azure Government.
The Azure Government cloud has all the same features and services as the public cloud, but there are small differences. For example, the portal for Azure Government is located at https://portal.azure.us instead of https://portal.azure.com. URLs for Azure services also use the .us top-level domain, so if you create an App Service web app in Azure Government, your default domain name is https://webapp.azurewebsites.us. However, outside of that difference, everything else is the same, so developers who have a skill set in cloud development in Azure will find that their skills transfer directly to Azure Government.
The United States Department of Defense has additional compliance requirements called DoD Impact Level 5 Provisional Authorization. Compliance with this relates to controlled unclassified information that requires additional levels of protection. These additional DoD requirements are met by a subset of data centers within Azure Government that are approved for DoD usage.
Microsoft also understands that the strict requirements in the EU need a unique approach, so they developed another cloud called Azure Germany. Much like Azure Government, Azure Germany is a distinct cloud system that’s designed to meet specific compliance needs. Azure Germany is available to customers doing business in the EU, the European Free Trade Association, and the UK.
Azure Germany datacenters are physically located in Germany and are operated under strict security measures by a local company named T-Systems International (a subsidiary of Deutsche Telekom) that operates as a data trustee. The data trustee has full control over all data stored in Azure Germany and all the infrastructure used to house that data. Microsoft is involved in managing only those systems that have no access at all to customer data.
Another region where Azure has specific requirements is China. Microsoft operates another separate cloud in China called Microsoft Azure China. Azure China is operated by Shanghai Blue Cloud Technology Co., Ltd. (frequently referred to as simply BlueCloud). BlueCloud is owned by Beijing 21Vianet Broadband Data Center Co., Ltd. (often called 21Vianet), an Internet and data center service provider in China. Because of this relationship, you may see Azure China referred to as “Microsoft Azure operated by 21Vianet” or simply “Azure 21Vianet.”
Azure China doesn’t offer the full set of features offered in other Azure clouds, but Microsoft is working hard to add additional features and services. For all the details on what is and isn’t offered in Azure China, browse to https://bit.ly/az900-azurechina.
Thought experiment
You’ve learned a lot about identity, governance, privacy, and compliance in this chapter. Let’s test that knowledge with another thought experiment.
The answers to this thought experiment are in the section that follows.
Your old buddies over at ContosoPharm have gotten back in touch with you to help them with some more of their cloud work. This time around, they have a few new challenges. First, they are creating a new customer portal that they want to integrate with their social media accounts. They need an outside contractor to help with the social media accounts by posting to their followers and answering any customer questions. The IT director is concerned about providing the usernames and passwords of their social media accounts to a third party. He’d like some way to allow the contractor to access their social media accounts without having their password, and he’d like to be assured that when the contract is over, the contractor can easily be removed from the social media accounts.
They also have a few Azure resources the contractor will need to access, but the IT director is worried about security there as well. To keep things secure, he wants to ensure that no one can access ContosoPharm’s systems if someone finds out the contractor’s username and password. He also wants to make sure that one specific resource is only accessible if the contractor is logging in from a Windows computer. He doesn’t want it accessible from mobile devices.
He also needs to make sure the contractor can view a couple of the Azure resources in the Azure portal in case something goes wrong, but he doesn’t want the contractor to be able to change any settings.
As developers work on this solution, they’ll be creating some Azure VMs. These VMs need to be in the Central US region so they’re geographically close to a caching component that also runs in the Central US region. The IT director has sent out a memo to all developers telling them to only create VMs in Central US, but he’s concerned that someone will forget and poor caching performance will impact their testing metrics. Also, if someone deletes the caching component, it will completely break the application, so they need to ensure no one is able to delete it.
Some of the VMs created for this application are being billed out to the IT department for development purposes, but the majority of VMs are billed to the sales department. The CEO wants to be able to see a breakdown of expenses for both departments after she gets the Azure invoice.
ContosoPharm has one other huge problem they need help with. They’re planning another deployment to the cloud soon, and it’s going to be a complex application. They’ve spent a long time planning the implementation. They know exactly how the network needs to be configured, and they have a record of all the resources that need to be created, along with the ARM template that will do the work of deploying. The network configuration they’ve devised for the Azure VNets is specific to their needs and enables them to integrate with on-premises systems, and it’s a very complicated setup. They would like a way that they can easily recreate this setup in Azure when they need to deploy other applications that use the same network topology.
Thought experiment answers
This section details the answers to the thought experiment.
To give the contractor access to social media accounts without providing the username and password to the social media accounts, they can add the contractor to their Azure Active Directory as a guest user. They can then add enterprise applications for the desired social media platforms and give the user access to them using Azure AD business-to-business, or B2B. When the contractor’s contract ends, they can simply remove him or her from Azure AD and that will revoke all future access to the social media accounts.
To ensure that no one can access the systems if the contractor’s username and password are compromised, they can use multifactor authentication. Because the contractor is a guest user in Azure AD, they’ll need to use a Conditional Access policy, but that will also solve the problem of not allowing access to a resource unless the contractor is using Windows by defining a condition based on the device.
To ensure the contractor can view some of their Azure resources without being able to change any settings, they can use the Reader role in RBAC for the resources. This will allow the contractor to see the resources, but not delete or change any settings.
To ensure that developers only create VMs in the Central US region, they can use Azure policies. To make sure that no one deletes the caching component, they can place a ReadOnly or a Delete lock on the component.
To ensure that the CEO can see a breakdown of VM usage for the IT department and the sales department separately, they can use tags on the VMs. Tags are displayed in the Azure invoice, and because the invoice can be exported to a format that can be opened in Microsoft Excel, they can easily filter on them.
To translate their hard work in planning and to ensure the complicated network configuration is easy to reproduce in future deployments, they can use Azure Blueprints. By creating a blueprint that adds artifacts for the necessary policies, resource groups, ARM templates, and so forth, they can easily make sure to get everything configured correctly.
Chapter summary
This chapter covered a ton of topics related to identity and governance. We ended with details on privacy and compliance and the tools Microsoft provides to help with those areas.
Here’s a summary of what we covered in this chapter.
Authentication is the act of determining who is accessing a resource.
Authorization is the act of enforcing what the authenticated user can and cannot do.
Azure Active Directory is a cloud-based identity service in Azure.
At the core of Azure AD is a directory of users.
Other users can be invited to join your Azure AD.
Guest users are typically outside of your organization and are invited to your Azure AD.
Enterprise applications allow integration of Azure AD with other services and cloud platforms.
Conditional Access policies are applied against users using assignments and access controls.
Multi factor authentication is two-factor authentication that requires you to enter a code in addition to entering your username and password.
Role-based access control (RBAC) allows you to control how users and applications can interact with your Azure resources.
Azure Policy allows you to define rules that are applied when Azure resources are created and managed.
Resource locks allow you to prevent changes to a resource and to prevent resources from being deleted.
Tags allow you to easily organize your resources by assigning a name and value that can be seen in the Azure portal and on your Azure invoice.
Azure Blueprints allows you to save configurations and resources in a blueprint that can be easily deployed in the future.
Items added to a blueprint are called artifacts. An artifact can be a resource group, an ARM template, a policy assignment, or a role assignment.
The Microsoft privacy statement is a comprehensive statement from Microsoft that outlines how Microsoft uses, handles, and protects your data and personal information.
The Cloud Adoption Framework for Azure brings together best practices and information from Microsoft employees, partners, and customers to help you adopt the cloud more easily.
The Trust Center outlines Microsoft’s approach to security, privacy, and compliance.
The Service Trust Portal provides access to various compliance tools Microsoft provides.
The Service Trust Portal is the launching point for Compliance Manager, a tool for managing your regulatory compliance in the cloud.
Azure Government is a private cloud for governments that is only accessible by US citizens. It has its own datacenters that are completely separate from the public cloud.
A subset of Azure Government datacenters is approved for Department of Defense usage because they have additional compliance related to DoD Impact Level 5 Provisional Authorization.
Azure Germany datacenters are in a private cloud designed to comply with EU regulations.
Azure China is a separate cloud in China that doesn’t currently offer all Azure services.