Chapter 1
Implement and manage identity and access
Microsoft 365 identity and access topics are at the core of everything you’ll review in this book as you prepare for taking the MS-500 exam. Before any monitoring, reports, policies, compliance, governance, and so on can be optimally effective, an organization must have a firm grasp on how their users are set up in Azure AD, what authentication methods and scenarios are allowed, and which tools at their disposal will be used to enhance their security, such as Azure AD Privileged Identity Management (PIM). In this chapter, we’ll cover all these topics in the order of the exam’s skills listed below.
Skills in this chapter:
Skill 1.1: Secure Microsoft 365 hybrid environments
Securing your Microsoft 365 hybrid environments involves understanding and implementing the appropriate Azure AD authentication and synchronization options for your specific scenario, as well as knowing how to monitor and troubleshoot Azure AD Connect events.
Plan Azure AD authentication options
One of the first decisions you’ll be making when configuring a Microsoft 365 hybrid environment is which Azure AD authentication method you’ll utilize. You have three options to consider:
Password hash synchronization (PHS)
Pass-through authentication (PTA)
Federation (AD FS)
PHS and PTA provide the benefit of seamless single sign-on (SSO) for employees connecting from a corporate or domain-joined device on your network, whereas AD FS cannot.
Method |
Distinctions |
Password hash synchronization (PHS) |
|
Pass-through authentication (PTA) |
|
Federation (AD FS) |
|
You might end up deploying more than one method, such as PTA with PHS, to be able to benefit from some of the AAD premium features that require PHS.
Plan Azure AD synchronization options
Syncing data between Azure AD and your on-premises Active Directory is handled by the on-premises component Azure AD Connect Sync (or sync engine) working with the service component in Azure AD called Azure AD Connect Sync Service.
When you install Azure AD Connect, you can stick with the default Express settings, which include the following capabilities for single-AD forest setups:
Configure sync of identities in the current AD forest
Configure PHS from on-premises AD to Azure AD
Start initial synchronization upon completion
Synchronize all attributes
Enable Auto Upgrade
You’ll then navigate through the installation wizard. You’ll be prompted to sign in to Azure AD as a Global Administrator, and then you’ll sign in to your on-premises Active Directory Domain Services (AD DS) Enterprise Administrator account.
If you choose to customize the settings instead of using the Express settings, you can choose to change the sign-in method from PHS to PTA, Federation with AD FS, Federation with PingFederate, or None. You can also enable or disable Single Sign-On for corporate device users. Read the documentation on these options at https://docs.microsoft.com/en-us/azure/active-directory/hybrid/how-to-connect-install-custom#user-sign-in.
Other customizations you can consider include user and attribute filtering to keep certain identities and data from syncing, and allowing password, group, and/or device writeback for Azure AD–created or modified assets that are syncing back down to your on-premises directory.
Monitor and troubleshoot Azure AD Connect events
In the Azure portal (https://portal.azure.com), you can find Azure Active Directory Connect Health with some settings to help make monitoring and troubleshooting Azure AD Connect events simpler. For example, email notifications are enabled by default, but you can add additional recipients.
Azure AD Connect Health helps you identify and manage:
Email notifications
Failed sign-ins
ADFS system issues
Quick agent installation
Auto upgrades
Top application usage
Network locations and TCP connections
For example, you might receive an “Unhealthy Identity Synchronization” email notification. This is usually the result of the server on which you’ve installed Azure AD Connect being offline or that your credentials are invalid. Check the server connectivity status to make sure it can access the Azure AD service and be sure your subscription’s license for AAD is valid with the credentials you’ve used to configure it.
You can explore all that’s possible using Azure Active Directory Connect Health by reviewing the official documentation located at https://docs.microsoft.com/en-us/azure/active-directory/hybrid/whatis-azure-ad-connect#what-is-azure-ad-connect-health.
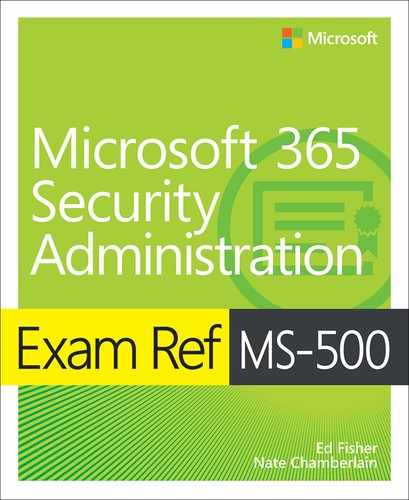
You can also monitor and troubleshoot Azure AD Connect sync events by using the Event Viewer app’s application event log on the server on which you’ve installed Azure AD Connect sync. Azure AD Connect events are logged and found by navigating to Event Viewer > Windows Logs > Application, as shown in Figure 1-1.
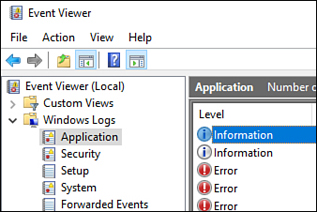
Figure 1-1 Using the Event Viewer navigation pane to access Application logs
You may also use the Azure AD Connect Health Sync errors page to help troubleshoot and resolve specific sync errors. Sync errors can be found directly at https://portal.azure.com/#blade/Microsoft_Azure_ADHybridHealth/AadHealthMenuBlade/SyncErrors or by searching for connect health from the Azure portal and selecting Sync Errors, as shown in Figure 1-2.
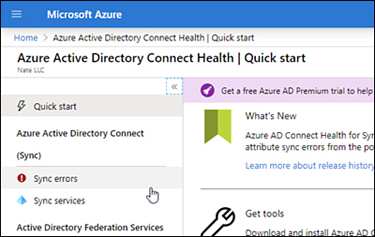
Figure 1-2 The Azure AD Connect Health navigation pane in the Azure portal
In many cases, you can run the Azure AD Connect installation wizard again to see if any error messages come up, such as discovering a sync is being attempted. To stop a sync so that you can make configuration changes, you can open the Synchronization Service Manager and manually stop the sync in progress. Then you can run the wizard again to make changes.
There are many more potential errors that could occur during synchronization than will be covered in the exam or this book, but you can read more about possibilities with suggested resolutions at https://docs.microsoft.com/en-us/azure/active-directory/hybrid/tshoot-connect-sync-errors.
Skill 1.2: Secure identities
This skill will cover the configuration and management of identity topics around group memberships and the administration that goes into keeping them current and their members secure.
Implement Azure AD group membership
Groups in Azure Active Directory can be created as static (assigned) membership groups where someone must manually add new members, or they can be created as automatic (dynamic) groups in which membership is granted based on user or device properties. For example, you could have a human resources dynamic group that automatically includes anybody whose department name includes “human resources.”
To create a group, navigate to Azure AD (https://portal.azure.com) and then choose Active Directory > Groups > New Group.
You can create one of two group types:
Security. Can be used to grant permissions to shared resources in Office 365 and to apply policies to members.
Office 365. Can be used to grant access to shared collaboration resources, such as Teams, SharePoint sites, shared mailboxes, and the like. This group type also requires that you create an email alias for the group.
Membership for the group can be one of two Office 365 group types:
Assigned. You (or a group owner or other admin) manually declare who is part of the group.
Dynamic User. You define the parameters of user properties for accounts that will be included automatically.
Security groups have an additional option for membership type:
Dynamic Device. Define the parameters of device properties for devices that will be included automatically.
For Dynamic groups, you’ll add expressions that define the properties of accounts to be included. See Figure 1-3 for an example of rules being configured.
Figure 1-3 Rules being configured for dynamic membership in an Azure AD group
Implement password management
Allowing users to reset their passwords saves time for the IT administrative staff and gets users back to work quickly, no matter where or when they’re working. Azure AD has self-service password reset (SSPR) you can deploy to all users or only to a specific security group of users.
To enable SSPR, select Password Reset from the Azure AD navigation menu, and then choose to whom the SSPR ability should be granted:
All. Everyone in your organization is granted SSPR.
Selected. Specify a single security group.
None. No one is granted SSPR.
This setting only applies to your organization’s users because admins always have SSPR and use two factors to reset their passwords when required.
Configure and manage identity governance
Identity governance in Azure AD involves regularly analyzing and confirming or cleaning up group memberships. You can use access reviews to have users confirm their own continued need for their group memberships, or you can assign Access Reviews to individuals responsible for the group memberships. Either way, the user or group reviewer will receive an email with a link that takes him or her to a review page where continued membership can be confirmed or denied (for themselves or for those they’re reviewing).
To get started, you must have Azure AD Premium P2 licensing. Then go to Azure AD and select Identity Governance from the navigation menu and then select Access Reviews > New Access Review.
There are several things you must configure when setting up a new access review, as you can see in the example shown in Figure 1-4, including:
Review Name. The name of the review.
Description. A description of the review.
Start Date. This will be used to determine recurring schedules as well.
Frequency. You can set this to occur one time or to occur on a regular basis, such as monthly or annually.
Duration. This determines how long each review should have to be completed.
End. When the recurrence should end, if ever. You can choose Never, End By, or Occurrences. If you choose Occurrences, you can enter a number of times it should be run in the Number Of Times field.
Users.
Users To Review. The users can either be group members or those assigned to an application.
Scope. The review can be open to guests only or everyone in the group.
Group. Click the > icon to select a group.
Reviewers. From the drop-down menu, you can select Members For Self-Review, Selected Users, or the Group Owners.
Programs. You can choose the default program available; additional programs can be created by choosing Identity Governance > Programs.
Upon Completion Settings.
Auto Apply Results To Resource. You can enable or disable the automatic application of review decisions.
If Reviewers Don’t Respond. You can choose No Change, Remove Access, Approve Access, or Take Recommendations, which are auto-suggested actions based on user activity.
Advanced Settings.
Show Recommendations. These recommendations are based on user activity.
Require Reason On Approval.
Mail Notifications. These notifications let people know they need to review a membership and notify admins when these reviews are complete.
Reminders.

Figure 1-4 A new access review being set up
Skill 1.3: Implement authentication methods
You have several tools with which to provide secure authentication options for your users. This skill will cover several of these tools, including multifactor authentication (MFA) with push notifications via the Authenticator app, as well as biometric authentication with Windows Hello.
Plan sign-in security
With so many different methods of authentication and the ever-evolving landscape of cybersecurity, Microsoft’s Security Defaults feature helps simplify some basic security policies, which can be enabled by opening Azure AD and navigating to Properties > Manage Security Defaults. When you are done, the following policies will be activated:
All users must register for Azure MFA.
Admins must use MFA.
Legacy authentication protocols are blocked.
Users are required to perform MFA when necessary.
Privileges such as access to the Azure portal have been restricted.
You can learn more about the specifics of each of these settings on the official documentation page for Security Defaults at https://docs.microsoft.com/en-us/azure/active-directory/fundamentals/concept-fundamentals-security-defaults.
Aside from deciding if you want to utilize Security Defaults or custom conditional policies (possibly including policies matching all the security defaults anyway), your sign-in security strategy should consider questions such as:
Should we have restrictions based on location?
Do we require MFA for all or some users, and should it also be conditionally required?
Should certain device characteristics be considered non-compliant?
In the following sections, we cover ways to respond to these questions and more.
Implement multifactor authentication (MFA)
Multifactor authentication (MFA) simply means we’re asking users to provide an additional form of identification in order to sign in to access our organization’s apps and data. Typically, MFA would involve your standard password combined with something like a biometric sign or a code sent to a separate device.
To enable MFA, you’ll need an Azure AD Premium license. You can then use the Security Defaults mentioned in the last section or conditional access policies that require MFA as part of their execution. Conditional access policies are the recommended way of enforcing MFA.
Manage and monitor MFA
MFA sign-ins are reported like any other sign-in and are available in Azure AD’s Sign-Ins report. To access this report, go to the Azure portal at https://portal.azure.com and select Azure Active Directory > Users > Sign-Ins.
On the Sign-Ins report, there’s a Conditional Access column that shows whether a policy was triggered at the sign-in. You can select a sign-in event to see authentication details to find which policy was triggered, which MFA options were used, and the sign-in status (successful/failure).
Plan and implement device authentication methods like Windows Hello
Windows Hello for Business incorporates additional authentication methods such as biometrics (such as facial recognition or fingerprint) and device-specific pins and is exclusive to Windows 10 devices. In order to implement Windows Hello for SSO, devices must first be joined to Azure AD and Intune-enrolled.
Because planning and implementation will look differently for organizations based on their requirements and environment, Microsoft has a planning worksheet that can help determine Windows Hello planning needs. You can download this at https://go.microsoft.com/fwlink/?linkid=852514 and follow the guide to complete it at https://docs.microsoft.com/en-us/windows/security/identity-protection/hello-for-business/hello-planning-guide#planning-a-deployment. See Figure 1-5 for the fields that appear on the blank worksheet.

Figure 1-5 A blank Windows Hello for Business planning worksheet
For example, a completed worksheet for a cloud-only deployment of Windows Hello might include the following information:
Deployment
Deployment. Cloud only
Trust Type. Key trust
Device Registration. Azure
Key Registration. Azure
Directory Synchronization. N/A
Multifactor Authentication. Azure MFA
Management
Domain Joined. N/A
Non-Domain Joined. Modern management
Client
Domain Joined. N/A
Non-Domain Joined. 1511 or later
Active Directory
Schema. Windows Server 2016
Domain Functional Level. Windows Server 2008 R2 or later
Forest Functional Level. Windows Server 2008 R2 or later
Domain Controller. Windows Server 2016
Public Key Infrastructure
Certificate Authority. N/A
Registration Authority. N/A
Certificate Templates. N/A
Cloud
Azure Account. Yes
Cloud Directory. Yes
Azure AD Premium. Yes
Configure and manage Azure AD user authentication options
There are several ways a user can authenticate into Azure AD. The most common method is via a traditional username and password. Users could also download and use the Microsoft Authenticator App’s passwordless sign-in; an OATH hardware token or FIDO2 security key; or an SMS-based passwordless sign-in.
In addition to these four primary options, users can have a secondary option to use when MFA is enabled. For example, after successfully passing authentication with a primary method, a user might then be prompted to use:
OATH software tokens
Voice call for code verification
App passwords
One of the unused primary methods as secondary (except for a traditional password)
For SSPR, users could also be prompted for:
Security questions
Email address, text message (SMS), or a voice call for code verification
Microsoft Authenticator App approval
To enable passwordless authentication methods such as usage of the Microsoft Authenticator App, you must sign into the Azure portal at https://portal.azure.com and then select Azure Active Directory > Security > Authentication Methods > Authentication Method Policy (Preview).
Now select either FIDO2 Security Key, Microsoft Authenticator Passwordless Sign-In, or Text Message. Each of the passwordless options has an Enable/Disable switch and can be enabled for all or specific users.
Skill 1.4: Implement conditional access
Conditional access allows you to specify conditions under which users and devices can access your organization’s data in Office 365. In this skill, we’ll cover the planning, configuration, and management of conditional access and compliance topics in Azure AD.
Plan for compliance and conditional access policies
Conditional access policies can be configured in Azure AD (with a premium license) and Intune (with an Intune or Enterprise Mobility + Security license). The conditional access options from either location point to the same resource, but an Intune license adds mobile device and mobile application management options to what’s included with just Azure AD, including device compliance policies.
Compliance policies are configured separately from conditional access policies, but they can be used within conditional access policies. For example, you can create a compliance policy for Intune-enrolled devices that states any Android device on a specific, older OS is out of compliance. Then, to prevent those unsupported devices from accessing company resources, you could create a conditional access policy like the one in Figure 1-6 that prevents access to non-compliant devices based on a device compliance policy.

Figure 1-6 A conditional access policy based on device compliance
When planning for compliance and conditional access policies, you’ll want to be thinking of questions such as:
What characteristics determine compliant devices? (These could include OS version and build and mobile passcode requirements.)
What policies exist in your organization that need to be incorporated into the compliance and conditional access policies somehow?
What sign-in activity would be risky for users in your organization (such as foreign location sign-ins when users typically don’t travel outside the country)?
Configure and manage device compliance for endpoint security
Access device compliance policies via the Microsoft Endpoint Manager admin center at https://endpoint.microsoft.com. Once logged in, select Devices > Compliance Policies > Create Policy to create a new device compliance policy.
For each policy you create, you’ll first select the Device platform for which the policy applies:
Android device administrator
Android Enterprise
iOS/iPadOS
macOS
Windows 10 and later
Windows 8.1 and later
Windows Phone 8.1
You’ll then name and describe the policy and configure compliance settings specific to that platform, such as:
Device Health. BitLocker, Secure Boot, and whether code integrity is required
Device Properties. Min and max OS versions and builds
Configuration Manager Compliance. Compliant with Configuration Manager
System Security. Mobile passwords, data encryption, firewall, antivirus, antimalware, and so on
Microsoft Defender ATP. At or below a specific risk score
Next, you define what should happen if a device is considered noncompliant based on your compliance settings configuration. You have up to four different actions you can take at different times when a device is identified as noncompliant:
Mark Device Noncompliant
Send Email To End User
Remotely Lock The Noncompliant Device
Retire The Noncompliant Device
See Figure 1-7 for how these actions look when being configured in the policy creation wizard.

Figure 1-7 The Actions for noncompliance screen of a new compliance policy being configured
Next, you’ll choose the security group(s) to which the policy applies and the group(s) that should be excluded from the policy.
The last step of the wizard is a review of everything you’ve configured in the policy. When you are satisfied, clicking Create completes the process.
Aside from compliance policies you create, you can also configure general compliance settings in the Microsoft Endpoint Manager admin center by choosing Devices > Compliance Policies > Compliance Policy Settings. These include:
Mark Devices With No Compliance Policy Assigned As. Choose Compliant or Not Compliant to choose how to classify devices without an assigned compliance policy.
Enhanced Jailbreak Detection. Use device’s Location Services to have device check in with Intune more frequently.
Compliance Status Validity Period (Days). Days without status report until a device is automatically considered noncompliant.
Also, you might have also noticed the Message Template option when creating a policy that includes the noncompliance action Send Email To End User. Message templates can be created via the Notifications node in the Compliance Policies section.
Another node to notice is the Locations node of the Compliance Policies section. This is where you can create locations that can be used in multiple compliance policies to determine device compliance (only for certain platforms).
Implement and manage conditional access
Conditional access policies are created in a similar fashion to how we configured the compliance policy in the previous section. Access conditional access policies via the Microsoft Endpoint Manager admin center at https://endpoint.microsoft.com. Once logged in, select Endpoint Security > Conditional Access > New Policy to create a new conditional access policy.
For each policy, you can configure the following:
Name.
Assignments.
Users And Groups. To whom the policy should apply, or who should be excluded.
Cloud Apps Or Actions.
Cloud Apps. Include or exclude None, All, or Selected.
User Actions. Register security information.
Conditions. Identify which criteria the policy will allow or deny access?
Sign-In Risk
Device Platforms
Locations
Client apps
Device state
Access Controls
Grant. Grant Access or Block Access and set the granted requirements.
Session. Conditional access app control, sign-in frequency time period, and persistent browser sessions.
Figure 1-8 shows a simple conditional access policy that applies to all cloud apps for selected users/groups. It’s a common policy that is just requiring MFA to access the cloud apps.

Figure 1-8 The Grant pane of access controls showing what can be required of users who are attempting to access
Lastly, you can choose to enable the policy or leave it off for now. The default option is Report-Only, which is good for testing the effect the policy will have on users and for glimpsing the actual scope of its configuration compared to your expectations.
One scenario you might run across when working with conditional access policies is the need to restrict access to VPN connectivity for non-compliant devices. This works similarly to what we’ve covered—combining a compliance policy with a conditional access policy—but you’ll also create a VPN certificate in the Azure portal and deploy it to your VPN server. In your conditional access policy, your cloud app would then be VPN server. See a full write-up on this process at https://docs.microsoft.com/en-us/windows-server/remote/remote-access/vpn/ad-ca-vpn-connectivity-windows10.
Skill 1.5: Implement role-based access control (RBAC)
Azure role-based access control (RBAC) allows you the ability to divide responsibility by role for and access to management of various machines, networks, resource groups, and so on. These roles and their assignments will be covered in this skill.
Plan for roles
RBAC roles can be Allow or Deny assignments and are additive in nature, meaning that multiple allow assignments result in the sum of their allowances for the user they’re applied to. A Deny assignment overrides any Allow assignments and can remove access to certain areas for specific users as well.
Each assignment consists of three components:
Security principal. Object requesting access.
User. Azure AD user.
Group. Azure AD group.
Service principal. Security identity for specific resource access.
Managed identity. Auto-managed identity in Azure AD.
Role definition. Also known as a “role” and encompasses all its specific permissions.
Scope. Resources to which the assignment applies.
Scopes are structured hierarchically, meaning a role assigned to a parent level applies to its children as well. The scope resource hierarchy is as follows:
Management group
Subscription
Resource group
Resource
Configure roles
Role assignments can be created in the Azure portal (https://portal.azure.com). Once in the portal, click Subscriptions, select a subscription for which you’ll make RBAC assignments, and then select Access Control (IAM), as shown in Figure 1-9.
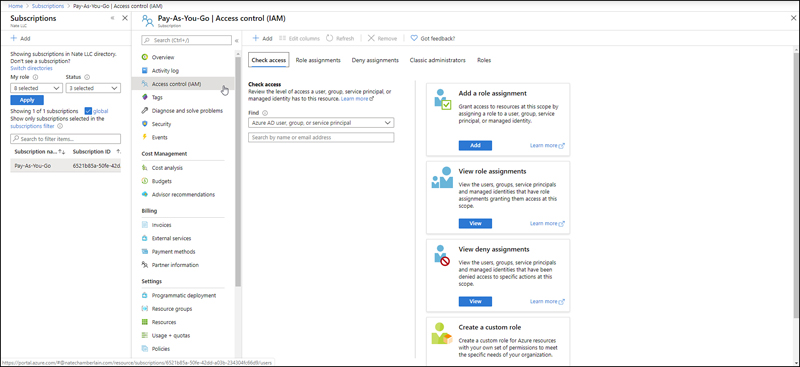
Figure 1-9 Access control (IAM) link in the Azure Portal Subscription details screen
From Access control (IAM), you can:
Add a role assignment (Owner, Contributor, Reader, and dozens of specific roles)
View role assignments
View deny assignments
Create a custom role (when one of the many default options doesn’t quite fit)
You can also use PowerShell to assign roles, using the New-AzRoleAssignment cmdlet, and remove them with the Remove-AzRoleAssignment cmdlet. Specifically, for assigning at the resource group scope level (second-lowest level of scope hierarchy), you’d also need to declare -SignInName, -RoleDefinitionName, and -ResourceGroupName properties, as shown in this example:
New-AzRoleAssignment -SignInName [email protected] -RoleDefinitionName “Virtual
   Machine Contributor” -ResourceGroupName comp-sales
You can find additional documentation on using PowerShell for RBAC assignments at https://docs.microsoft.com/en-us/azure/role-based-access-control/role-assignments-powershell.
Audit roles
The Azure Activity Log, located on the details screen for a subscription right above Access Control (IAM), lets you easily audit role configuration changes in that subscription’s RBAC including:
New assignments
Deleted assignments
Created or modified custom roles
Deleted custom roles
You can also access the Activity Log by searching for it in the Azure portal and then filtering to the subscription(s) for which you’re interested in auditing RBAC.
The results can be exported to a CSV file.
Skill 1.6: Implement Azure AD Privileged Identity Management (PIM)
Privileged Identity Management (PIM) enables your organization to protect important resources across Azure, Azure AD, Intune, and Office 365 apps and services by managing and auditing access to them. This skill covers the planning and implementation of PIM in an environment.
Plan for Azure PIM
PIM enhances the security of an organization by allowing for features such as just-in-time (JIT) access requests for temporary role elevation, requiring of approvals and MFA for elevation, and audit PIM activities at a detail appropriate for rigorous audit needs. In order to use PIM, you must have an Azure AD Premium P2, Microsoft 365 M5, or Enterprise Mobility + Security (EMS) E5 license.
When planning for PIM, you should consider things such as:
Should granting privileged roles be subject to approval?
How could JIT access requests improve current practices?
Which roles should be re-evaluated and possibly put under an access review?
Implement and configure Azure PIM roles
Once you’re properly licensed to begin using PIM, you can configure Azure AD and Azure roles to begin using it. Start by going to the Azure portal and searching for Azure AD Privileged Identity Management; click the result once it appears and then select Azure AD Roles > Settings.
Next, select a role for which you’ll modify role settings. In Figure 1-10, you can see settings for the Teams Service Administrator role as an example. These settings, such as how long a role can be activated for, are an important part of your governance strategy.
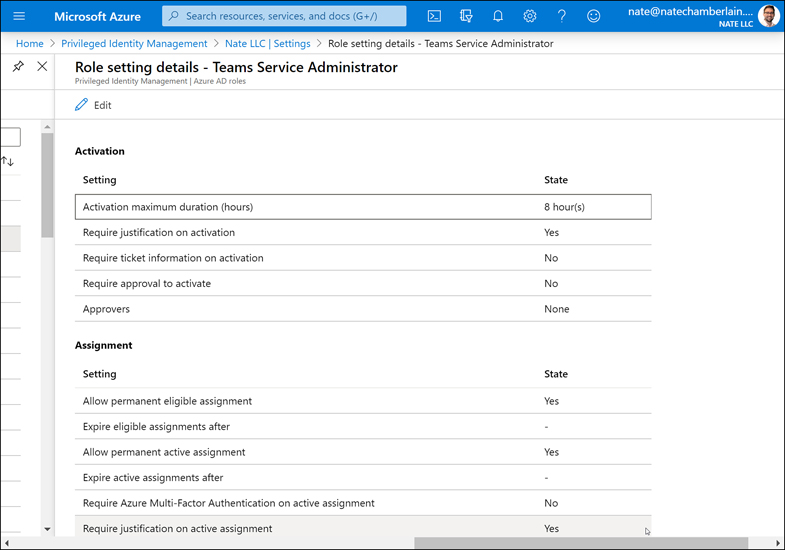
Figure 1-10 Azure PIM role settings for the Teams Service Administrator role
The distinction between assigning roles in Azure AD versus PIM is that with PIM, you can still assign permanent admin roles but gain the additional ability to make somebody eligible for a role that they can request activation of in a JIT scenario.
To assign someone as eligible for a role, you’d select the Assignments node in the PIM screen, click Add Assignments, and select the role and member(s) to whom you’re assigning it. Then choose whether they’re Eligible or Active and whether that status is Permanent or Temporary (for dates you would provide).
Manage Azure PIM role assignments
To manage existing assignments, you can use the Assignments node of PIM to search for members and see their roles separated in tabs for Eligible Roles, Active Roles, and Expired Roles, just as you could for your own on the My Roles node.
For each role listed, you can Remove, Update, or Extend the assignment.
If you are an approver and have requests for activation or extension, you can work through those in the Approve Requests node.
Lastly, if your organization has implemented Access Reviews, those can be created and monitored on the Access Reviews menu node. These are created much in the same way as normal Access Reviews, such as for O365 group membership; however, target privileged roles as opposed to groups. They can still be assigned to the role assignee or someone else.
Skill 1.7: Implement Azure AD Identity Protection
Azure AD Identity Protection is an Azure AD Premium P2 feature that includes user risk and sign-in risk policies and alerts that help you stay on top of mitigating the potential of data loss risk. This skill will go over the implementation of both policy types, configuration of Identity Protection alerts, and managing risk events.
Implement user risk policy
The first of two available Identity Protection policies we cover is the user risk policy. This policy helps identify and respond to user account behavior or activities that seem suspicious and indicate the account might have been compromised.
The policy will catch detections of the following types:
Leaked credentials (checked against the known leaks database)
Azure AD threat intelligence (atypical behavior or consistent with known attack patterns)
To access and implement the User Risk Policy, navigate to the Azure portal and then click Azure Active Directory > Security > Identity Protection > User Risk Policy.
To set up the policy, you’ll need to make decisions for each of the following:
Assignments
Users. (Include or exclude all users or specific users and groups)
Conditions (User Risk Threshold)
Controls
Access. Allow or Block with an option to Require Password Reset if allowed
If users are flagged for risk, we can enable self-remediation of risk flags as long as users are registered for SSPR.
Implement sign-in risk policy
The second policy is the sign-in risk policy. This policy helps identify and respond to risky or unusual account sign-in behavior that might indicate the account has been compromised.
The policy will catch detections of the following types:
Anonymous IP address
Atypical travel
Malware-linked IP address
Unfamiliar sign-in properties
Admin-confirmed user compromised
Malicious IP address
Suspicious inbox manipulation rules
Impossible travel
To access and implement the sign-in risk policy, navigate to the Azure portal and then click Azure Active Directory > Security > Identity Protection > Sign-In Risk Policy.
To set up the policy, you’ll need to make decisions for each of the following:
Assignments
Users. Include or exclude all users or specific users and groups
Conditions. Sign-In Risk level
Controls
Access. Allow or Block with the option to Require Password Reset if allowed
If users are flagged for risk, we can enable self-remediation of risk flags as long as users are registered for Azure MFA.
Configure Identity Protection alerts
Configuring alerts in Azure Identity Protection involves just a few steps. First, you’ll navigate to alerts via the Azure portal and then click Azure Active Directory > Security > Identity Protection > Users At Risk Detected Alerts.
For the alert, you can choose:
Risk level on which to alert (Low, Medium, or High)
Which users are notified
Additional emails to include on alerts (recipient must have Azure Identity Protection portal access)
Review and respond to risk events
Risk events are separated into risky users, risky sign-ins, and risk detections in Azure AD Identity Protection. To access these reports, you can go to the Azure portal and then select Azure Active Directory > Security > Identity Protection and look along the left-hand navigation for the three nodes under Report.
For each risky user who appears, you can:
Investigate that user’s sign-ins and risk detections
View specific information about each event
Reset password
Confirm user compromised
Dismiss user risk
Block user
Investigate with Azure ATP (if licensed)
Thought Experiment Answers
Following are answers to the questions posed in the “Thought Experiments” section of this chapter.