Chapter 3
Implement and manage information protection
Information protection in Microsoft 365 involves several features and tools we’ll cover in this chapter. Microsoft’s offerings, such as comprehensive data loss prevention (DLP) tools and Cloud App Security, provide your organization with a robust and diverse array of protection and administrative options. These options can track file activity down to matching keywords in contents to apply appropriate protection or to tracking and governing your organization’s third-party app usage and activity, such as for Dropbox Business.
Skills in this chapter:
Skill 3.1: Secure data access within Office 365
This module will cover what administrators need to know about managing Customer Lockbox for support issues, working with Office 365 apps and services to limit the risk of data loss, and setting up sharing with other organizations using B2B abilities. Knowing these three components of securing an environment protects your organization in external support, as well as internal and external collaboration scenarios.
Implement and manage Customer Lockbox
Customer Lockbox empowers administrators to limit the amount of time Microsoft support engineers can have access to your organization’s data and provide formal approval prior to allowing access. Support engineers’ work in your environment is always logged for auditing purposes, but Customer Lockbox provides an additional layer of security and peace of mind. Customer Lockbox is included in Office 365 and Microsoft 365 E5 plans, but it can also be purchased as an add-on feature to other plans.
To implement Customer Lockbox, an administrator should follow these steps:
Go to the Microsoft 365 admin center at https://admin.microsoft.com.
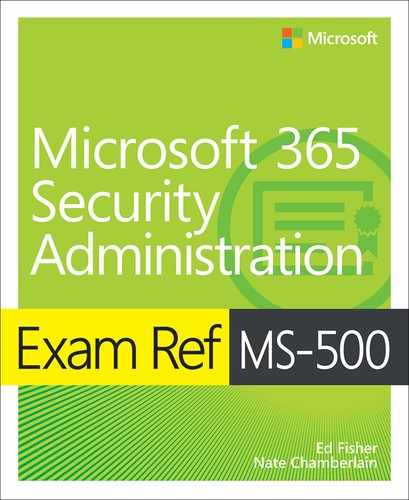
Select Settings > Org Settings > Security & Privacy > Customer Lockbox (as shown in Figure 3-1).
Check the Require Approval For All Data Access Requests box and click Save Changes.
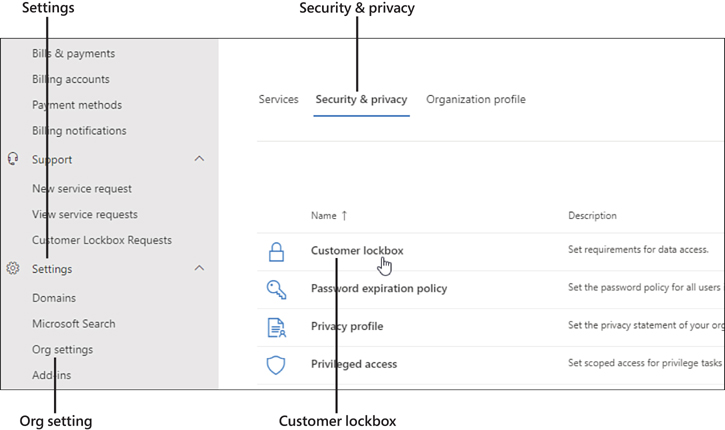
Figure 3-1 The steps required to access Customer Lockbox settings from the Microsoft 365 admin center
Once enabled, you’ll be able to monitor and manage Custom Lockbox requests from the Microsoft 365 admin center’s Support node. Users must be a Global Administrator or have the Customer Lockbox Access Approver role assigned to them in order to manage the requests that will come through.
If you need to audit previous Customer Lockbox activity, you can use the Security & Compliance center’s Audit Log Search. To do this, you would run a new search with nothing configured other than the date range for which you’re auditing. Follow these steps once the results are loaded:
Filter the Activity column by the text Set-AccessToCustomerDataRequest to find approval activities.
Filter the User column to Microsoft Operator to find Microsoft engineer activities.
Configure data access in Office 365 collaboration workloads
Each Office 365 app and service has its own settings that can be configured to protect data access within that app and service. There are also global settings, many of which we’re covering throughout this book. This section focuses on a few global tasks you can do for all apps and services as well as at the Office 365 workload or app level to protect data access for your users and devices.
First, Microsoft recommends that when you grant an administrator role, that user should be assigned to a separate user account that is to be used exclusively for administration, instead of allowing one user to have the ability to do both administration and end user functions from the same account. Administrator roles should be protected by MFA and conditional access policies. It’s also a good idea to have administrators consistently use one device for administrative work.
Second, consider creating emergency access accounts in the event administrative access is lost under unforeseen circumstances. You can read tips and guidance for accomplishing this at https://docs.microsoft.com/en-us/azure/active-directory/users-groups-roles/directory-emergency-access.
There are several Azure AD features and capabilities you can enable to better configure data access in Office 365 collaboration workloads. Some of these we’ve already covered and include the following:
Self-service password reset (SSPR)
Multifactor authentication (MFA)
Conditional access
Azure AD groups
Device registration
Azure AD Identity Protection
Keep in mind that Intune can be used for both device and app management, securing your users collaborating on the go via the Office 365 mobile apps.
Typically, your protection configuration for Microsoft 365 will fall into Microsoft’s Baseline Protection, Sensitive Protection, or Highly Confidential Protection tiers. Most organizations will do well with Baseline Protection, which includes standard permissions barriers and basic security configurations. Sensitive Protection is useful for organizations that need to more strictly secure a subset of data in their environments, and it’s probably useful for users who are accessing that sensitive data at an elevated level. Highly Confidential Protection is a small customer base that requires advanced protection options including encryption, Bring-Your-Own-Key (BYOK) scenarios, disabled external sharing, and more. You can find documentation and more info on each of the tiers at https://docs.microsoft.com/en-us/office365/enterprise/microsoft-cloud-it-architecture-resources#identity-and-device-protection-for-office-365.
In the following sub-sections, we cover specific data access topics in SharePoint, Teams, and Yammer.
SharePoint data access
Typically, the SharePoint Administrator role is granted to those who will be responsible for overseeing and managing the day-to-day operation and development of SharePoint site collections and the data governance they require.
Based on the protection tier your organization is aspiring to operate within, your SharePoint sites can be more or less restrictive than those from other organizations, or you might even use a combination of tier characteristics for different tenants or collections. For example:
Baseline. This tier is for public and private team sites with external sharing enabled. Internal sharing is permitted, including site membership.
Sensitive. This tier is only for private team sites that use warnings when sharing content externally. Internal sharing is permitted, but site membership other than built-in access requests are not permitted.
Highly Confidential. This tier is only for private team sites with external sharing disabled/blocked and that has its files encrypted. Internal sharing is restricted, and access requests are disabled.
Your organization-wide sharing settings for SharePoint also apply to OneDrive. Any settings made at the tenant level cannot be overwritten to be less restrictive at individual site levels, but they could be made more restrictive should the owner want to do that. Microsoft suggests leaving the default sharing policy in place, which allows all sharing, including anonymous. Outlook and SharePoint will work together to give you better control over shares, as opposed to users circumventing security configurations and sharing in less-secure ways. You can set anonymous links to have an expiration date, and you can adjust the default share link type to be internal only so that external shares are only done intentionally.
As for device access, you can restrict unmanaged devices from certain activities in SharePoint, including downloading, syncing, and printing files. This can be done through the SharePoint admin center; choose Policies > Access Control > Unmanaged Devices. From here, your options are Allow Full Access From Desk Apps, Mobile Apps, And The Web; Allow Limited, Web-Only Access; and Block Access. (See Figure 3-2.)
Consider publishing retention for users to use in SharePoint as well. These labels can be applied to whole document libraries. Also, these labels can be applied individually to documents by their owners, or you can have labels automatically apply based on criteria you specify. Retention labels can be used in data loss prevention (DLP) policies, too. You can read specific steps in using retention policies and DLP in SharePoint at https://docs.microsoft.com/en-us/microsoft-365/compliance/protect-sharepoint-online-files-with-office-365-labels-and-dlp.

Figure 3-2 The Unmanaged Devices settings in the SharePoint admin center
Teams data access
Teams works together with other Office 365 apps and services so that the data that is being accessed in Teams is already protected by other security configurations. For example, Teams documents are stored in SharePoint document libraries and will be subject to any policies and configurations in place on that site.
Because Teams’ content is spread across other apps, conditional access policies might not work as expected. This means a user can still access a SharePoint file directly or can access an Exchange calendar that’s associated to the Team’s group, even if a conditional access policy prevents Teams sign-ins. Because users can go directly to content without signing in to Teams through which to view it, they won’t be restricted as intended.
Yammer data access
Yammer allows administrators to restrict data access to internal users only or even to those accessing via VPN (like SharePoint) or directly through the company network.
Also, you can create a Yammer-specific password policy if you are handling Yammer authentication separately from Office 365, or you can opt to manage identity through Office 365 so that users won’t have multiple passwords and accounts. You can read more about enforcing Office 365 identity in Yammer at https://docs.microsoft.com/en-us/Yammer/configure-your-yammer-network/enforce-office-365-identity.
Configure B2B sharing for external users
Business-to-business (B2B) collaboration in Azure AD is what can allow users from other organizations (with Azure AD accounts) to securely access your apps and services. If a user doesn’t have an Azure AD account, he or she can sign up for an account as an individual at https://aka.ms/aip-signup, or an account will be created when the user accepts a sharing invitation.
As an administrator, you can:
Disable external invitations
Restrict invitations to admins and users with the Guest Inviter role
Restrict invitations to admins, users with the Guest Inviter role, and current members
Allow all users, including guests, to invite others (default)
To make your choice, go to the Azure portal (https://portal.azure.com) and navigate to Azure Active Directory > External Identities > External Collaboration Settings. You can configure the options there to create the appropriate restrictions and allowances for your organization. In Figure 3-3, the following settings have been enabled: Guest Users Permissions Are Limited; Admins And Users In The Guest Inviter Role Can Invite; Members Can Invite; and Guests Can Invite. The Collaboration Restrictions option has been set to Allow Invitations To Be Sent To Any Domain (Most Inclusive).

Figure 3-3 The External Collaboration Settings in Azure AD
Skill 3.2: Manage Azure Information Protection (AIP)
Azure Information Protection (AIP) is Microsoft’s cloud solution that allows content encryption, device client deployment, policy implementation, automation of Sensitivity Label application, and more. In this skill, we’ll cover AIP labels, policies, tenant keys, and integration with Office 365 Services.
Plan an AIP solution
AIP Sensitivity Labels are useful in helping to make sure proper safeguards and policies are applied to content when appropriate. Sensitivity Labels can be applied to content either automatically by policy or manually by users. If the AIP client is deployed to devices in your company, users can also get the added benefit of in-app-context recommendations via tooltips for an appropriate Sensitivity Label to apply.
For example, a document being created in the Microsoft Word desktop application containing credit card numbers might provide a tooltip upon recognition suggesting the document be labeled Highly Sensitive or PCI (Payment Card Industry). This makes it easy to be compliant and monitor organizational compliance with these kinds of sensitive data types. Something as simple as applying a label can automate the proper handling and access for specific data types.
Users know their own content best, and when properly trained to do so, they will do a good job of classifying their own content when appropriate. We use automation to catch the documents and content that fall through the cracks. We can create policies that search for known sensitive data types, such as Social Security and driver’s license numbers, and then label the document accordingly.
To begin using AIP, you’ll need to make sure you’ve already set up users and groups in Azure AD so that you can use them in policies and permissions. You’ll also need to have licenses available to assign to all users who will be using AIP labels to classify their data.
Creating the AIP solution then entails configuring Sensitivity Labels and policies and deploying AIP clients, which we’ll cover in this skill.
You might also want to install the AIPService PowerShell module for administration options by PowerShell. Formerly, the AIPService PowerShell module was called AADRM. If you still have AADRM, you’ll need to remove it and install AIPService instead.
Configure Sensitivity Labels and policies
AIP includes several labels ready to use out-of-the-box. These can be customized or replaced as you see fit. The default labels are found in the AIP portal (https://portal.azure.com). Once there, search for Azure Information Protection and select it when it appears. Finally, click Labels to see the default labels available, including:
Personal. Non-business data that is not typically important to more than a single user.
Public. Business data intended for public consumption.
General. Not intended for public consumption but may be shared with partners or specific external collaborators. Might include organization charts, directories, procedures, or internal communication.
Confidential. Business data that could harm the business if shared outside appropriate parties, such as contracts, forecasts, sales data, and so on.
Highly Confidential. Very sensitive information including passwords, personnel data, code, and client data.
From a user experience standpoint, you’ll want to limit the number of additional labels you create and deploy in the organization. Also, you’ll want to use easily understood company terminology to ensure the best chance of successful adoption and understanding. If the labels are intuitive, you have a better chance of ensuring that content will be better protected because classifying it appropriately was easy for your users.
Notice in Figure 3-4 how labels can be used in Policy, Marking (for purposes such as reporting), and Protection. The following default labels are available: Personal, Public, General, Confidential, and Highly Confidential. Confidential and Highly Confidential have sublabels for Recipients Only, All Employees, and Anyone (Not Protected).
Labels each have the following configuration options:
Policy. Will show the name of the policy (if any) in which the label is deployed to users and groups. A label can only be used in one policy at a time.
Marking. Will have visual indicators as users work with the content, such as headers or footers.
Protection. Includes some specified method of protecting content, such as Do Not Forward automatically applied for emails. Normally a user would have to manually choose Do Not Forward from a new message’s Options > Encrypt ribbon menu option. Automating this conditionally when paired with a label takes the guesswork out of when it’s appropriate and makes sure you’re protecting specific data types whether a user knows to or not.
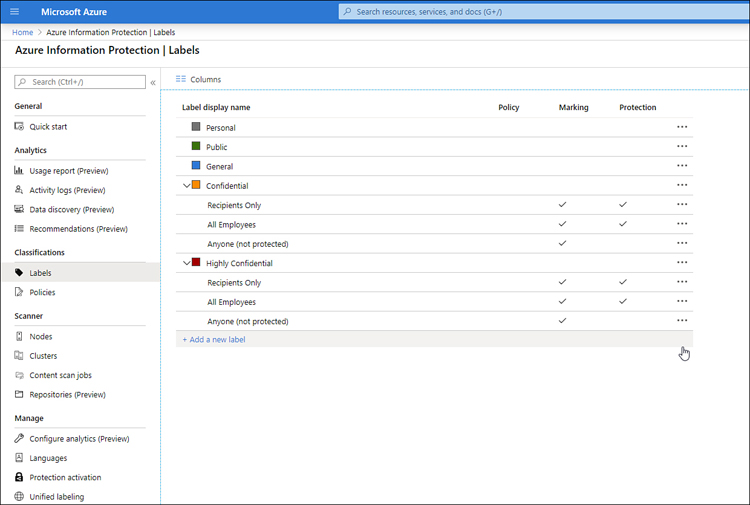
Figure 3-4 The default labels available in Azure Information Protection
To create a custom label beyond the default options, such as for protecting data related to a specific project, go to the AIP portal at https://portal.azure.com and search for Azure Information Protection. Once Azure Information Protection appears, click it and select Labels > Add A New Label. You then must configure the following settings for your custom label:
Enabled (On or Off). You can leave the label Off until you’re ready to activate it at a later time, or you can temporarily enable a custom label.
Name and Description.
Color. Use the default options or use custom colors by HEX code.
Protection.
Not Configured. Do nothing additional.
Protect. Add protection from the following options:
Azure (Cloud Key)
Set Permissions. Add users.
Set User-Defined Permissions. Apply Do Not Forward and/or prompt user for permissions.
Select a predefined template.
HYOK (AD RMS)
Remove Protection. Remove any existing protection.
Visual Marking. Configure formatting and appearance for any labels added to content.
Header. Add a header to documents with this label.
Footer. Add a footer to documents with this label.
Watermark. Watermark documents with this label.
Conditions. For automatic application or recommendation.
Standard sensitive information types (such as license or passport numbers, credit card numbers, and so on).
Custom Phrase or Regular Expression.
Application Automatic or Recommended.
Policy Tip Customization. Use for explaining Automatic or Recommended labels.
Policies are also created in the AIP portal at https://portal.azure.com. Search for Azure Information Protection, and once Azure Information Protection appears, click it and then choose Policies > Add A New Policy. New policies have the following settings you can configure:
Name and description.
Users and email-enabled groups to whom the policy applies (who can use the label).
Label(s) to include/publish in the policy for selected users.
Default label, which is a label to provide as a default option for users to whom this policy applies.
Send logging data to Azure Information Protection analytics. See what sort of data is made available on this dashboard at https://docs.microsoft.com/en-us/azure/information-protection/reports-aip.
All documents and emails must have a label (On or Off).
Users must provide justification to remove or lessen a label (On or Off).
For emails, apply label of attachment with the highest classification to the email itself (Off, Automatic, or Recommended).
Display the Information Protection Bar in Office Apps (On or Off).
Add the Do Not Forward Button to Outlook (On or Off).
Make the custom permissions options available to users (On or Off).
Optional URL for Tell Me More link for user tips and info when working with AIP.
Once created, both policies and labels can be rearranged to alter the order in which they appear and/or apply for users.
Deploy the RMS connector
Azure Rights Management Service (Azure RMS) is a cloud-based solution capable of working with the on-premises IRM functionality by deploying an RMS connector. RMS connectors can be installed on virtual machines or physical, on-premises servers if they’re running Windows 2008 R2 or later. For example, you could install it on Exchange or SharePoint servers if you like, though you would want to install it on at least two machines for high availability. Follow these steps to deploy an RMS connector:
Download and install the RMS connector (available at https://go.microsoft.com/fwlink/?LinkId=314106).
Enter your credentials.
Authorize servers you’ll configure in step 5 that may use the RMS connector.
Configure load balancing and the high availability of the connector across at least two servers.
Configure servers (such as Exchange, SharePoint, and File Resource Manager servers) that will use the RMS connector.
Manage tenant keys
A tenant key is like an umbrella encompassing these subkeys:
User keys
Computer keys
Document encryption keys
By default, Microsoft automatically generates and manages your tenant key. This default arrangement is the most cost-effective and fastest method of getting started with utilizing AIP. It requires minimal administrative effort and is often the best option for smaller organizations.
Some organizations, especially those with strict compliance requirements, might be required to manage their own tenant keys via Bring-Your-Own-Key (BYOK). BYOK keys can be created in the Azure Key Vault or an on-premises HSM, which requires Azure Key Vault Premium where the key would be imported.
Deploy the AIP client
There are two AIP clients that can be deployed in your environment:
Azure Information Protection client (classic)
Azure Information Protection unified labeling client
The classic AIP client downloads labels and information from Azure. The unified labeling client is the more recent and recommended option that combines labels and information from each of the following locations:
Microsoft 365 Security Center (https://security.microsoft.com)
Microsoft 365 Compliance Center (https://compliance.microsoft.com)
Office 365 Security & Compliance Center (https://protection.office.com)
By deploying AIP clients to machines in your organization, you’re essentially expanding coverage of the AIP solution and more conveniently providing protection and guidance to users on their machines and in-context in applications when working. This increases the likelihood that users will effectively adopt labeling and data classification as part of their collaboration routines. AIP clients on machines enable in-product label recommendations, such as tooltips and headers in Outlook, Word, and so on, which appear as users create and work with content.
The classic client might be the preferred pick if you require advanced features such as Hold-Your-Own-Key (HYOK) on-premises or if your labels have yet to be migrated to the unified labeling client.
Generally, the unified labeling client would be a good choice ensuring you’d be receiving product updates going forward. It also supports macOS, iOS, and Android devices while the classic client doesn’t.
Integrate AIP with Office 365 Services
AIP for Office 365 is included in Office 365 E3 and E5 licenses. An additional AIP P1 or P2 license is required to use classification and labeling. AIP integrates with Exchange Online (automatically enabled in new tenants), SharePoint, and OneDrive for Business.
To configure SharePoint and OneDrive IRM (because they’re not automatic like Exchange), a global or SharePoint administrator will need to go to the SharePoint admin center and then choose Settings > Classic Settings Page. Scroll down and select Use The IRM Service Specified In Your Configuration. Finally, choose Refresh IRM Settings, as shown in Figure 3-5.

Figure 3-5 The IRM settings for both SharePoint and OneDrive found in the SharePoint admin center
Skill 3.3: Manage Data Loss Prevention (DLP)
Data Loss Prevention (DLP) in Office 365 makes it easier for organizations to adhere to compliance regulations and protect data and users by monitoring the movement of sensitive data within and outside of the company. This skill will focus on planning a DLP solution, working with DLP policies, using sensitive information types, and monitoring DLP topics of interest.
Plan a DLP solution
Your DLP solution will include a combination of DLP policies you configure, as well as custom and standard sensitive information types you integrate with those policies. Those policies are capable of monitoring and reporting on specific activities and data in your organization and/or taking action based on that monitoring.
Multiple policies can be assigned to the same users and groups, and these policies might overlap in detection of certain data types. For example, you can have a policy that will detect HIPAA-protected data and a separate policy that also detects PII identifiers (which is included in the default HIPAA policy template). This means multiple actions could be taken for the same activity, depending on policy configuration.
In the following sections, we cover the configuration of policies, sensitive information types, reports, and notifications to help build a comprehensive DLP solution in your organization.
Create and manage DLP policies
DLP policies are what power the active monitoring of your environment for potential data loss. Through these policies, you decide what to watch for and how to respond to risky or dangerous data movement.
DLP policies can include and/or exclude locations in
Exchange email
SharePoint sites
OneDrive accounts
Teams chat and channel messages
DLP policies typically contain
Locations to which the policy applies (SharePoint, Exchange, and the like)
Rules (including conditions and actions)
To create a new DLP policy, go to the Office 365 Security & Compliance Center at https://protection.office.com, and choose Data Loss Prevention > Policy > Create A Policy.
First, you’ll select a template using predefined Financial, Medical And Health, or Privacy data types, or you can choose to create a Custom policy with the data types selected and combined a la carte. If you’ve created custom sensitive information types, chances are you’d be creating a custom policy to utilize it. See Figure 3-6 for the DLP policy wizard’s Choose The Information To Protect screen in which you select a template. For demonstration, we’ll proceed with creating a HIPAA policy.

Figure 3-6 Creating a new DLP policy and choosing a template
Once a template has been selected, click Next.
Name and describe the policy and click Next.
Choose locations in which you’d like to protect content with this policy. Your options are:
Protect Content In Exchange Email, Teams Chats And Channel Messages And OneDrive And SharePoint Documents.
Let Me Choose Specific Locations. Customize which locations and sublocations, such as specific sites to include or exclude from the policy.
Click Next.
Customize the content types to include. In this step, you’ll see the data types pre-selected with the template you chose. Click Next.
If you chose a template, you can edit the pre-selected data types and you can choose whether to detect when content is shared outside or only within the organization.
Alternatively, you can choose to ignore the pre-selected data types at this point and choose Use Advanced Settings instead.
Choose actions to take when sensitive info is detected. Click Next.
You can enable policy tips, which warn and educate users when content will be protected by the DLP policy.
Choose whether to send incident reports via email to specific recipients.
You can also restrict access to or encrypt the detected content.
Choose a start option from the following:
Yes, Turn It On Right Away
I’d Like To Test It Out First (with an additional option to Show Policy Tips While In Test Mode)
No, Keep It Off. I’ll Turn It On Later
Click Next.
Review the policy settings and click Create.
All the DLP policies you’ve created will appear in the Data Loss Prevention > Policy node of the Office 365 Security & Compliance Center. Each will be listed with its current status (On, Off, or Testing) and can be reordered to change the manner in which they’re applied if more than one applies to specific content.
The top of this page (Policy node) also shows two graphic representations of DLP policy matches over time and false positives and overrides over time.
Create and manage sensitive information types
DLP policies you create can include checks for sensitive information types you create. For example, you might add a sensitive information type for a specific confidential project in your organization.
Default sensitive information types that are already available for usage (such as credit card numbers, Social Security numbers, license numbers, and so on) aren’t just numeric patterns but are identified using a combination of keywords, internal functions, evaluation of regular expressions (regex), and other content examination to guarantee the highest likelihood of a match and to reduce false positives.
To create a new, custom DLP sensitive information type, open the Office 365 Security & Compliance Center at https://protection.office.com, and choose Classification > Sensitive Info Types > Create.
Name and describe the sensitive info type. Click Next.
Click Add Element. Add elements you’d like to include in the definition of the sensitive info type. You’ll choose matching content (primary element) and optional supporting elements. For each sensitive information type, you’ll configure the following options:
Matching Element. From one or a combination of the following content match options, define the primary identifying characteristics of the sensitive information type being created:
i. Detect Content Containing
Keywords
Regular Expression
Dictionary (Large Keywords)
Supporting Elements. This is optional and is used to increase the accuracy of matches and reduce false positives. Choose from or combine the following options to define supporting elements for this sensitive information type:
ii. Contains This Regular Expression
iii. Contains This Keyword List
iv. Contains This Dictionary (Large Keywords)
Confidence Level. Use this setting to match the confidence percentage of the pattern.
Character Proximity. This sets the proximity of the supporting elements to the primary matching content.
Click Next.
Review and then click Finish.
Monitor DLP reports
There are three DLP reports in the Office 365 Security & Compliance Center that you can utilize to monitor DLP policy performance:
DLP Policy Matches. Instances when a DLP policy found specified data and executed a policy’s actions. This report focuses on rule match counts.
DLP False Positives And Overrides. Instances in which detections were reported false or users chose to override policy actions.
DLP Incidents. Like the DLP policy match report, this focuses on DLP policy executions, but it reports content match counts as opposed to rule matches.
To access these reports, go to the Office 365 Security & Compliance Center at https://protection.office.com, choose Reports > Dashboard, and look for the cards for each of the reports listed. You can select any of the report cards to view a larger, more-detailed version of the chart.
Manage DLP notifications
DLP notifications include both email notifications as well as policy tips that appear as users are working in-context on content that a DLP policy will apply to.
Emails are straightforward and can be sent to specific people or to the people who last worked on the content.
Policy tips present themselves when a user is working in a document that contains sensitive information that is protected by a policy. For example, if a user is editing a list of customers and their Social Security numbers, they’ll see a yellow banner across the top of the relevant Office app, which lets them know a message/tip you’ve written for that particular policy’s notification.
Configuration of both DLP notification options is done as part of the policy configuration. To get started, go to the Office 365 Security & Compliance Center at https://protection.office.com and choose Data Loss Prevention > Policy. Lastly, either choose an existing policy or create a new one.
When you get to the policy settings screen, you’ll find an area for user notifications. Figure 3.7 shows where you configure the type and content of notifications.
Figure 3-7 The user notifications screen of a DLP policy
Skill 3.4: Implement and manage Microsoft Cloud App Security
Cloud App Security (CAS) allows administrators to monitor and manage connected cloud apps (such as G Suite), lessen the likelihood of data loss by tracking anomalous activity, and deploy conditional access policies that restrict access to these third-party organization apps (similar to how you’ve already configured Office 365 conditional access policies).
Plan Cloud App Security implementation
Microsoft Cloud App Security (CAS) is included with the Microsoft 365 E5 subscription bundles, the Enterprise Mobility + Security E5 subscription, or as a standalone add-on; CAS is licensed per-user.
It’s important to note that Microsoft Cloud App Security (with more than 16,000 apps) is not the same as Office 365 Cloud App Security (with only about 750 apps). Microsoft CAS includes Office 365 CAS and does not require an Office 365 subscription. Office 365 CAS is specific to Office 365 environments and is a subset of Microsoft CAS.
Once an adequate subscription including Microsoft CAS exists, a Global Administrator or Security Administrator can configure Microsoft Cloud App Security.
Configure Microsoft Cloud App Security
To begin setting up Microsoft CAS, go to the CAS portal at https://portal.cloudappsecurity.com and then click the settings gear from the upper-right corner and select Settings.
As seen in Figure 3-8, this is where you’ll configure your organization details such as Organization Display Name (appears on webpages and emails to employees); Environment Name (helps differentiate when you have multiple environments in the same organization); your logo; and the domains you manage.
The domains you choose to list in Managed Domains are important for determining who appears as an external user in reports. Because external user activity isn’t monitored like your internal users, you’ll want to be sure all domains you manage are included for the most accurate insight into your CAS environment.

Figure 3-8 The Organization details screen of Microsoft CAS settings
Lastly, check out the official network requirements documentation at https://docs.microsoft.com/en-us/cloud-app-security/network-requirements for IP addresses and DNS names you’ll need to whitelist based on your environment.
Manage cloud app discovery
Cloud discovery enables you to have a window through which to monitor data flow outside your organization. Within cloud app discovery, you can create two types of reports:
Snapshot. These reports are generated from manually uploaded logs.
Continuous. These use machine learning to analyze continuous network log uploads or connections for anomalous activity.
To create a snapshot report, go to the Microsoft CAS portal and choose Discover > Create Snapshot Report.
To configure continuous reports, go to the settings gear in the upper-right corner and select Log Collectors. From there, you can configure the data sources and/or log collectors that will serve as the continuous source of traffic data to be analyzed.
Manage entries in the Cloud app catalog
To add a custom app to the Cloud app catalog, first go to the Cloud Discovery Dashboard by opening the Microsoft CAS portal and choosing Discover > Cloud Discovery Dashboard from the left-hand navigation menu.
To add custom apps, follow these instructions:
Click the three dots (ellipsis) in the upper-right corner and select Add New Custom App.
Add the details for the app including:
Name and Description
Category
Domains (unique domains used to access this app)
IPv4 Addresses and/or IPv6 Addresses
Hosting Platform (such as Azure)
Business Unit (optional)
Score (risk score)
Click Create.
To manage existing entries, simply search the Cloud App catalog for the apps you want to manage. See the next section for more details.
Manage apps in Cloud App Security
Once you’ve connected to apps in Cloud App Security, you can manage them (and connect to additional apps) by going to the CAS portal and choosing Investigate > Connected Apps.
Depending on the app, you might have different options for each app, such as editing the instance name, the connection properties, and so on. The options are chosen by clicking the three dots (ellipsis) menu that appears to the right of the app’s name.
If you select a connected app, you’ll be able to see data such as:
Status
Connection date/time
Last health check date/time
Who connected the app
Protected accounts
Last activity log
Last DLP scan file count
Real-time scan status
Manage Microsoft Cloud App Security
Cloud App Security involves policies that allow you to better manage user activity and behavior in the cloud as well as respond to risks and threats.
CAS policies can be of the following types:
Access Policy. Real-time user login monitoring and reporting.
Activity Policy. Monitor and enforce policies via provider APIs.
Anomaly Detection Policy. Find unusual activity in your organization for an app or user.
App Discovery Policy. Be alerted when new apps are detected in your environment.
Cloud Discovery Anomaly Detection Policy. Unusual activity for a user or app detected in Cloud Discovery app logs.
File Policy. Find specific data types and apply governance actions.
Session Policy. Real-time monitoring and control over user activity, such as printing or downloading from web apps.
Your CAS management will employ policies like these to watch for security vulnerabilities in threats related to:
Privileged identities
Sharing control
DLP
Cloud discovery
Compliance
Configuration control (unauthorized changes)
With policies like these adjusted to suit your needs and environment, you’re able to automatically respond to and reduce risk in your organization as users work across multiple apps to execute routine business processes.
Configure Cloud App Security connectors and OAuth apps
To configure connectors, go to the CAS portal and choose Investigate > Connected Apps (to connect directly to apps like Office 365, G Suite, Dropbox, and so on) or OAuth apps (to monitor OAuth requests for access to your environment).
To add a new connector, choose Connected Apps, click the + (plus sign), and then click the app to which you’d like to connect CAS (such as Office 365 or Dropbox). Each connector/app will request different information to authenticate to the app and securely utilize its APIs.
Because Office 365 is likely to be a common connector being added in many organizations, the specific steps for making that connection are as follows:
Go to the CAS portal and choose Investigate > Connected Apps. Then click the + (plus sign) and choose Office 365.
Choose which components to monitor:
Azure AD Users And Groups
Azure AD Management Events
Azure AD Sign-In Events
Azure AD Apps
Office 365 Activities
Office 365 Files (requires enabling file monitoring by choosing Settings > Files)
Click Connect.
To add a new OAuth app, choose OAuth apps > New Policy From Search. For each OAuth policy, configure the following settings:
Policy Name.
Description.
Policy Severity. Choose Low, Medium, or High.
Category. Choose from the following options:
Access Control
Cloud Discovery
Compliance
Configuration Control
DLP
Privileged Accounts
Sharing Control
Threat Detection
App To Which It Applies. Such as Office 365 for when third-party calendar apps might request Office 365 calendar access.
Filters. Such as permission level requested and community use pattern.
Alerts. Send the alert as an email, text message, or send to Power Automate to be used in a flow.
Configure Cloud App Security policies and templates
You can create policies from scratch or from templates, which is similar to how we created DLP policies. To do either, go to the CAS portal, choose Control, and select either Policies (to create from scratch) or Templates (to use a template).
To create a new policy:
Go to the CAS portal and choose Control > Policies > Create Policy.
Select the type of policy to create:
Access Policy. (Monitor login activity across cloud apps.)
Activity Policy. (Monitor specific activities performed by users or large volumes of the same activity such as bulk downloads.)
App Discovery Policy. (Receive a notification when new apps are found in your company.)
Cloud Discovery Anomaly Detection Policy. (Configure risk factors and then get alerts for abnormal activity.)
File Policy. (Apply governance actions based on scans of cloud apps for risky sharing activity or the presence of sensitive data.)
OAuth App Policy. (Get notifications when OAuth apps meet specific criteria such as when apps require a high permission level and have been authorized by more than a specific number of users.)
Session Policy. (Monitor and respond to user activity in real-time.)
Based on the policy you’re creating, you’ll have different fields to configure. Make selections for the template, severity, category, filters, alerts/notifications, and governance actions where appropriate, and then click Create. See Figure 3-9 for an idea of some of the fields for configuration when creating an Activity policy.
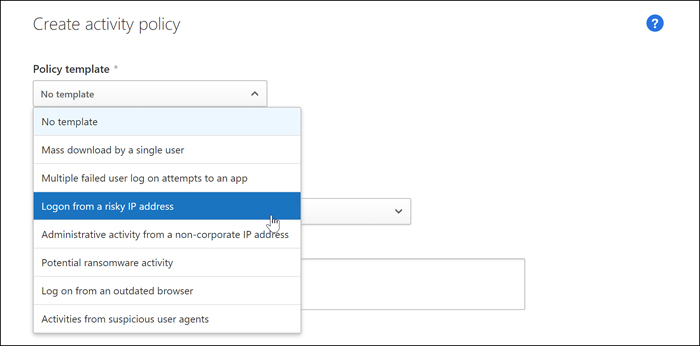
Figure 3-9 The Policy Template being chosen from the CAS Activity Policy
To create a policy from a template:
Go to the CAS portal, select Control > Templates and choose the plus sign (+) next to the template you’d like to use. These include templates such as the following:
File Shared With Unauthorized Domain
Mass Download By A Single User
Multiple Failed User Log On Attempts To An App
New Popular App
New High-Volume App
The policy will be partially created for you based on the selected template. Figure 3-10 shows a Cloud Discovery Anomaly Detection Policy created using a template.
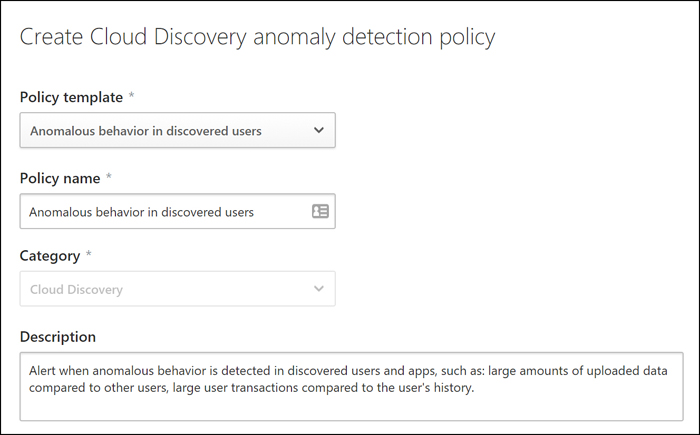
Figure 3-10 Anomalous Behavior In Discovered Users chosen from the Policy Template drop-down menu
To monitor your policies, go to the CAS Portal and choose Control > Policies. From there, you can filter policies by the same characteristics we covered in creation of CAS policies:
Name (Search). Name of the policy you’d like to review.
Type. Drop-down menu to choose the type of policy to filter to, such as Access Policy, Activity Policy, Anomaly Detection, and the like.
Status. Choose Active or Disabled.
Severity. Choose Low, Medium, or High.
Risk Category. The type of risk the policy helps reduce, such as Access Control, Cloud Discovery, Compliance, DLP, and so on.
For each listed policy, there is a vertical ellipsis (three dots) menu, from which you have several options per policy. By clicking the ellipsis, you can Edit Policy, View All Matches, View All Alerts, Disable, or Delete. The ellipses appearing after the Disable and Delete options are there to signify that you’ll be asked to confirm your choice before it’s final. This is helpful in case you accidentally select one of these options (or choose the wrong option).
By monitoring matches and alerts, you’ll be better able to fine-tune policies to catch helpful and relevant information and find fewer false positives. You might also discover the need for additional policies based on user behavior or activity trends.
Review, interpret, and respond to Cloud App Security alerts, reports, dashboards, and logs
There are several ways to analyze and respond to data from Cloud App Security. In this skill, we’ll cover the review, interpretation, and response options for each of them, including:
CAS alerts
CAS dashboards and reports
CAS logs
CAS alerts
Before you will receive CAS alerts, you must have policies that are set up to create alerts as part of their risk mitigation and response.
Once you have policies creating CAS alerts, they can be accessed by choosing Alerts from the CAS portal.
In the policy itself, you can choose to also send alerts by email, text message, and Power Automate. The CAS portal then serves as a dashboard for reporting and analysis while your immediate alert notifications are sent via your preferred method to relevant parties.
For alerts on the dashboard, you can do the following:
Dismiss the alert if it is irrelevant or a non-issue. When you Dismiss alerts, you have the option to provide a Comment about why you’re dismissing it (for internal tracking) and/or Send Us Feedback About This Alert to help Microsoft improve matches in the future.
Resolve.
Mark as unread to handle later.
Adjust the policy to improve future matches.
Optionally, you can enter a resolution comment and/or alert match feedback.
CAS dashboards and reports
There are three data management reports to help in analyzing your environment. You can view and export these reports from the CAS by choosing Investigate > Files node:
Data Sharing Overview. All files stored in all apps.
Outbound Sharing By Domain. Domains to which files are shared.
Owners Of Shared Files. Owners of externally shared files.
To access these reports, go to the CAS portal, click Investigate, choose the Files node, and select the three dots (ellipsis) menu from the upper-right corner.
Based on the data in these reports, you may choose to design new policies or adjust existing policies to mitigate identified risks.
CAS logs
The CAS log might be useful if you need to determine or review which users modified files in another user’s OneDrive or which users downloaded files from a SharePoint site. While these are very specific examples, the CAS logs can encompass all sorts of activities (both simple and complex) across all apps to which you’ve connected CAS.
To access the CAS logs, choose Investigate > Activity Log, and then use the filters to drill down to the data you’re interested in analyzing. You can filter the CAS activity log using the following filters:
Queries. You can choose Admin Activities, Download Activities, Failed Log In, File and Folder Activities, and the like.
App. You can restrict the log to items including activities only in specific apps, such as Microsoft CAS, Office 365, SharePoint, Exchange, and so on.
User Name. You can filter and find activities from specific users involved in the activity that is logged.
Raw IP Address. This text field allows you to limit the log to specific IP addresses from where the activity took place.
Activity Type. You can filter countless activities including or involving access requests, policy activities, downloads, content changes, views, and the like.
Location. You can filter the CAS log to a specific country of access.
Similar to the filters available along the top of the CAS log, you can review the list (filtered or not) with these fields available for review:
Activity. Access requests, policy activity, downloads, content changes, views, and the like.
User. User involved in the activity that was logged, or N/A if not applicable.
App. Microsoft CAS, Office 365, SharePoint, Exchange, and so on.
IP Address. IP address where the activity took place, also indicating whether the IP address is from a cloud provider.
Location. Country of access and also indicates whether the location is a data center.
Device. Device type, operating system, and browser used to perform the activity.
Date. Date/time of the specific activity.
Thought Experiment Answers
This section contains the solutions to the thought experiments and answers to the skill review questions in this chapter.