
Chapter 9. Public Folder Management
Introduction
Public folder management seems very simple on its face: you create a public folder and people post to it, then Exchange automatically replicates the folder data from point to point. However, there’s an awful lot of hidden complexity lurking beneath the simple exterior. It’s not uncommon for medium- and large-sized organizations to have thousands of folders with items in them, often with folders that by themselves take up gigabytes of space in the information store. As the number and size of public folders in use increases, so does the likelihood that you’ll actually have to maintain and manage your public folders instead of just leaving them alone.
Public Folders Versus Mailboxes
Exchange separates public folders from mailbox folders using a simple design: public folders live in their own separate databases. These databases are very similar in structure and behavior to mailbox databases, but there are some important differences.
Individual public folders may be replicated to one or more servers. All replicas are treated equally; there’s no master copy of a given folder. When someone changes a public folder item in one replica, that change is passed to the other replicas, and Exchange will make an attempt to resolve conflicting changes on its own when possible by comparing modification times and update sequence numbers to find the newest change.
Every Exchange server has access to a copy of the public folder hierarchy, a structure that defines the organization and nesting of folders. An individual server may have replicas of zero or more folders, but it will always have the hierarchy; one common cause of public folder access problems is out-of-date hierarchy information on one server.
Like mailboxes, public folders have access control lists (ACLs) that define who can and cannot access data. However, the ACLs themselves are different because public folders support a number of individual roles (including contributor, reviewer, and editor) that mailboxes do not. Accordingly, setting permissions on public folders can be more complicated than doing so for mailboxes.
Public folders, by default, support access for any authenticated Exchange user, whereas mailboxes are by default only accessible to the associated Active Directory user object.
Individual items in public folders, and the folders themselves, carry ACLs that control who can and cannot manipulate them. Unlike standard mailbox items, public folder ACLs can be set by role. These roles (which include Author, Editor, Contributor, and Reviewer) combine various permission to read, change, and create or delete items, whereas mailbox folders have a more limited set of potential permissions.
Another quirk of public folders is that there can be more than one hierarchy on a server. The default MAPI top-level hierarchy (TLH) is the only set of public folders that MAPI clients can see. However, Exchange 2000 and Exchange Server 2003 let you create additional non-MAPI TLHs. Folders in these additional TLHs are available through OWA and WebDAV, so they are commonly used to host public folder-based applications.
Public Folder Replication
The public folder hierarchy is always replicated, but each server maintains its own replica list indicating what folders it hosts locally and which updates it’s seen for a given server. Replication is a fairly complicated process; Appendix E of the Exchange 2003 Administration Guide (http://www.microsoft.com/technet/prodtechnol/exchange/2003/library/admingde.mspx) provides a very detailed 25-page explanation that we won’t attempt to reproduce here. Instead, we’ll summarize how the process works; for more detail, download the guide.
A user makes a change to a public folder. This change can be almost anything: adding or removing a public folder item, editing an existing item, or modifying the item’s properties all qualify. Note that when a public folder item is replicated, the entire item is replicated; there’s no mechanism for replicating only the field or attribute that was changed. That means that making a one-byte change to a 400 KB message will result in the entire message being replicated.
The information store on the public folder server creates a change number for the update. This change number is nothing more than a version indicator that other public folder servers can use to check whether they already have a particular update.
The IS batches multiple changes into a replication message (the size of which you can control).
The replication message is sent to all other public folders servers that host replicas of the affected folder; it finds replicas by looking at the organization’s public folder hierarchy object. The message itself is just an ordinary-looking mail message, except that it’s packed with indecipherable binary junk. Exchange treats these replication messages as system messages, since they’re addressed to a system mailbox.
When the replication schedule indicates that it’s time for an update, the store sends all accumulated replication messages out to other servers. As the Administration Guide points out, the Exchange transport engine is responsible for getting those messages to their destination; the #1 cause of public folder replication problems is mail-flow failure between the selected servers.
The receiving server accepts the replication message and extracts the list of change numbers in it.
The list of change numbers is compared to the existing items’ change numbers. As a result of this comparison, the store ends up with a list of updates (from the replication message), which it then applies.
As each update is applied, the store updates the local folder to reflect the new changes.
If the change number list indicates that other replicas have a newer update than the one available on this server, the server requests a backfill.
The idea behind replication backfill is simple. Let’s say you have three servers with replicas of the same folders: A, B, and C. A and B are in your office; C is behind an ISDN line at your factory in Shenzhen. You make a change on the folder replica housed on A; let’s call that change number 1000. It’s replicated to B, where another user makes change 1001. The replication message from B gets to C first, so C can see change 1001 but not change 1000. It will send a request to either A or B for change 1000, then apply it when it arrives.
This backfill mechanism is also used to fill a newly created replica with content: when you add a replica, the new replica’s server essentially sends a backfill status message asking for all changes. The receiving store obediently assembles those changes into a series of replication messages and sends them back. However, Exchange only sends these backfill messages every 12 hours, so it’s possible for an update like this to take as long as 36 hours to complete.
The System Public Folders
Most users think of public folders as something created just for users, but there are several system-created public folders whose presence and proper handling are critical to getting complete Exchange functionality. These folders can exist on any Exchange server in the organization; you must have at least one replica of each. Adding multiple replicas provides redundancy, with some potential side effects that I’ll mention in a minute. The two most important special folders are:
The Schedule+ Free/Busy folder contains free/busy data for each user. This data is actually just a long string of bits, where each bit indicates whether the user is free or busy for the associated time period. This bit vector can be generated in one of two ways. For Outlook users, Outlook can publish it (as described in MS KB 196885), which it does at 15-minute intervals. For OWA, Entourage, IMAP, POP, or OMA users (e.g., everyone except Outlook MAPI users), the Exchange system attendant service uses CDO to retrieve the free/busy data and post it to the Schedule+ folder. If you don’t have any copies of this folder (i.e., if you accidentally delete the only one), you’ll find that users cannot see each other’s free/busy status. The easiest solution to this is to add more replicas, but then you have to be careful—depending on how often your users update their calendars, and what your replication schedule looks like, two users who are accessing two different replicas of the folder may see different data when they look up free/busy information for a third user.
The Offline Address Book (OAB) folders store the offline copy of the global address list (GAL). There are actually several versions of the OAB format, but Exchange automatically generates the appropriate OAB formats and stores them for you, so you can treat all of the OAB folders as identical. Exchange generates a full OAB and then a series of delta updates to it; Outlook will automatically download these updates every 24 hours, or when you force it to do so. The biggest issue most sites encounter with the OAB is the occasional need to rebuild it due to corruption, and the second biggest is the load imposed on highly consolidated servers when lots of clients try to download the OAB at once.
There are some other special folders that you may run across, too:
The OWAScratchPad folder (whose actual name includes a GUID) is created when a user adds an attachment to a public folder item. The attachment and post are stored in this folder until they’re completed, at which point, they’re actually posted to the target public folder.
The StoreEvents folders (whose names also include GUIDs) hold registrations for event sinks in public folders (although there are corresponding StoreEvents folders inside each mailbox store).
The Schema folder and its children are used for controlling the database schema used by the Exchange OLE database interface. Don’t mess with them.
The Internet Newsgroups folder is semi-special; it will be present by default in almost all Exchange organizations, but unless you’re using the NNTP service to post USENET articles to it, it will be empty and may safely be hidden (ESM won’t allow you to delete it). If you are using NNTP, you’ll also see an NNTP Control folder, which is where USENET control and cancellation messages are stored.
Some Useful Public Folder Tools
Exchange System Manager is where you’ll probably do most of your public folder foolery, but Microsoft has some other useful tools that are, regrettably, not as widely available as they should be. All of these tools are available for free if you call Microsoft PSS. Some of the recipes in this chapter will make use of them, so you might want to have them handy:
The command-line PFAdmin tool (PFAdmin.exe) can list or set ACLs, rehome folders, and list or set the contents of the replica list on the server. That makes it a very useful tool, although it only works on the MAPI TLH. It’s also available on the BackOffice Resource Kit (BORK) 4.5 CD.
The GUI-based PFInfo tool (PFInfo.exe) examines a server and generates a text report of its pubic folder permissions and replicas. This is great for change control and documentation; it’s also very useful when you use this output as input to PFAdmin to set permissions uniformly on multiple folders or across multiple servers.
Tip
PFInfo and PFAdmin are older tools that aren’t supported by Microsoft for use with Exchange Server 2003. PFDAVAdmin is a much more powerful (and reliable) tool, and you should use it whenever possible instead of the older tools. The only time to use PFInfo and PFAdmin is if you simply must have a command line to do the job, or if you’re working with an Exchange 5.5 server.
The Public Folder Migration Tool (PFMigrate.wsf) is a script that (as described in Recipe 9.1) can automatically move public folders from one server to another. It’s smart enough to do so even if the servers are in separate routing groups or sites. It’s available on the Exchange Servber 2003 product CD and as part of the Service Pack 1 (SP1) download.
The PFDAVAdmin tool (PFDAVAdmin.exe, currently at Version 2.3) is a GUI-based tool written with the .NET Framework (which has to be installed for the tool to run). Unlike PFInfo and PFAdmin, PFDAVAdmin uses WebDAV instead of MAPI, so it can work with any TLH, not just the MAPI one. It also does a lot of nifty stuff (which is why it has its own recipe). From its documentation, here’s what it can do:
Modify folder permissions on folders in the MAPI tree using an interface similar to ESM. This usually isn’t necessary, but it can come in handy since you can use this tool in places where you might not have ESM installed.
Propagate the addition, replacement, or removal of one or more ACEs down the public folder tree without overwriting the entire ACL.
Fix noncanonical or otherwise damaged discretionary ACLs on folders in bulk. For example, if you’ve fooled with public folder permissions by setting them using Windows Explorer on the M: drive, you can easily fix them with PFDAVAdmin. (Exchange Server 2003 hides the M: drive specifically to avoid this kind of problem.)
Export and import folder permissions on both public folders and mailboxes.
Export and import replica lists for a given server.
Propagate changes to the replica list down the tree without overwriting.
Check for and remove item-level permissions in bulk.
Check to see what event sinks are registered on a server.
Set public folder limits and quotas that are larger than the limits imposed by the ESM GUI.
Display and modify folder properties in bulk.
9.1. Using the Public Folder Migration Tool
Problem
You want to quickly move some or all of the public folders housed on one server to another server.
Solution
Using a command-line interface
Get the PFMigrate.wsf script. You can download it from the Microsoft tools center (http://www.microsoft.com/exchange/2003/updates), or get it from the SupportExDeploy folder on the Exchange Server 2003 CD.
Identify the source and target servers; any folder contained in the source server’s replica list will be added to the target server’s replica list. You will use these with the
/Sand/Toptions, respectively.Determine how many folders you want to move. The simplest way to do this is to run PFMigrate with the
/Roption, which tells it to produce a report. For example, this command line will generate a report for the server named tornado:> cscript PFMigrate.wsf /s:tornado /t:tornado /r
When you’re adding replicas to a server, PFMigrate requires a folder count; when you’re deleting replicas, it doesn’t. This allows you to easily split large migrations into multiple phases.
If you’re not running the script on an Exchange Server 2003 server, you’ll need to use the
/WMIoption to specify the name of an Exchange Server 2003 server, because PFMigrate uses WMI to get the folder data.Run PFMigrate from the command line. For example, to move the first 25 public folders from cyclone to hurricane while logging the results in c: emppfmigrate-add.log, you’d use this command line:
> cscript PFmigrate.wsf /S:cyclone /T:hurricane /n:25 /f:"c: emppfmigrate-add.log" /a
The
/aoption specifies that you want to add replicas from the source server to the target server.Wait for the folders to replicate (see Recipe 9.4).
Once the replicas you want are present on the new server, you can remove the original server’s replicas by rerunning PFMigrate with the
/doption. For example, if you wanted to remove the first 25 replicas from cyclone after using the command line shown in step 5, you’d do the following:> cscript PFMigrate.wsf /s:cyclone /n:25 /f:"c: emppfmigrate-del.log" /d
Discussion
PFMigrate offers a simple and straightforward way to migrate sets of public folders between servers. This is extremely common when migrating from Exchange 5.5 to Exchange Server 2003, but it’s also very useful when you want to consolidate public folders from wherever they are now to a central location. With that purpose in mind, the tool’s behavior makes more sense: it adds or removes folders to the target server’s replica list, then uses the normal replication mechanism to fill newly added folders with content.
Apart from PFMigrate’s add, delete, and report modes, there are some additional options you may find useful:
The
/SFoption tells the tool to migrate the system public folders described in the introduction.The
/NNTPoption specifies that you want the tool to skip subfolders of the Internet Newsgroups folder. This can greatly reduce the amount of time, and replication traffic, required to migrate public folder servers that are serving USENET, since you can just let the new server backfill via NNTP instead of through Exchange’s mechanism.The
/Yoption forces the script to run without prompting for confirmation of folder deletions; you’d normally use this with/dwhen you were scripting a migration across multiple servers.
Finally, there are some specific limitations on what PFMigrate can do:
You can only migrate folders in the MAPI TLH; because that’s all Exchange 5.5 servers have, and because PFMigrate is intended as a 5.5-to-2003 migration tool, it doesn’t support non-MAPI TLHs.
The source and target servers don’t have to be in the same routing group. The original version of PFMigrate required this; that’s because in mixed-mode Exchange organizations, moving mail-enabled public folders between routing groups can cause problems with email delivery. However, the version shipped with Exchange Server 2003 SP1 and later remove this limitation if you specify the
/scoption.You need Administrator permissions on the public folders you’re moving, plus Exchange Administrator permissions on the target Exchange Server 2003 computer and on the Exchange 5.5 site or Exchange 2000/2003 routing group that contains the source folders you’re moving.
See Also
Recipe 9.13 for working with system public folders, Recipe 9.4 for controlling folder replication, and MS KB 822895 (Overview of the Public Folder Migration Tool)
9.2. Rehoming Public Folders
Solution
Using a graphical user interface
Launch the Exchange System Manager (Exchange System Manager.msc).
In the left pane, expand the appropriate Administrative Groups container.
Expand the Folders and Public Folders nodes.
Right-click the folder you want to rehome and select Properties.
Switch to the Replication tab.
Click the Add button; when the Select a Public Store dialog box appears, select the server where you want the new replica to be housed, and click OK.
Click OK.
Wait for the public folder content to replicate. The GUI doesn’t show any information about replication progress, except that a synchronized folder will be shown as “In Sync” on the Replication tab of the public folder’s properties dialog box. Recipe Recipe 9.4 may help.
Verify that the folder replica has appeared in the folder list of the target server.
Optionally, if you want to remove the original replica, repeat steps 2-5, select the original replica, and click Delete.
Using a command-line interface
Get the PFAdmin tool and install it on a machine where you have a MAPI profile (either created by Outlook or by a profile tool like profgen). The account you use to log on must have Exchange Administrator privileges on the routing group that contains the source and target servers.
Use the
REHOMEoption with PFAdmin. You must specify the profile name, the folder name (or ALL if you want to rehome all folders), and the target server where you want the replica to end up. Here is an example:> pfadmin exAdmin REHOME "Book Suggestions" tornado
Discussion
Rehoming a public folder is simple: you’re just moving it from one location to another. To accomplish this, you merely add a replica on the desired server, wait for its contents to replicate, and remove the original. Recipe 9.1 describes a tool that can automate this process for multiple folders, but sometimes all you want is to move a single folder. The process works the same way whether you’re rehoming ordinary folders or one of the system folders described in the introduction.
You could easily write your own script to do this, using the code in Recipe 9.10 as a base. However, there are a few quirks. First, your script needs to wait for replication to finish before removing the original. One way to do this is to check and make sure that at least one other server has a replica of the target folder (and that it is a complete and up-to-date replica) before removing the source server’s replica. Another, more serious, problem: if you want to move public folders between sites/routing groups in a mixed-mode organization, you have a lot of work to do. In that situation, you’ll come out ahead if you rehome your public folders using the PFMigrate script described in Recipe 9.1. As an alternative, you can also use PFAdmin or PFDAVAdmin to do the rehoming for you. In any event, before you rehome any critical folders, it’s usually a good idea to make an extra backup, just in case.
See Also
Recipe 9.9 for finding replicas of a public folder, Recipe 9.10 for manipulating a server’s replica list, and MS KB 288150 (XADM: How to Rehome Public Folders in Exchange 2000)
9.3. Getting and Setting Public Folder Permissions
Problem
You want to see, and possibly change, the permissions currently in effect on a public folder.
Solution
Using a graphical user interface
To view or change permissions, do the following:
Launch the Exchange System Manager (Exchange System Manager.msc).
In the left pane, expand the appropriate Administrative Groups container.
Expand the Folders and Public Folders nodes.
Right-click the folder you want and select Properties.
Switch to the Permissions tab and use one of the following three buttons:
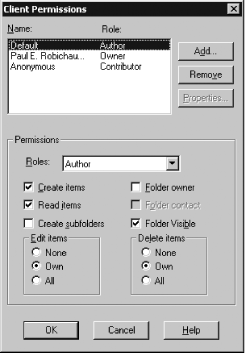
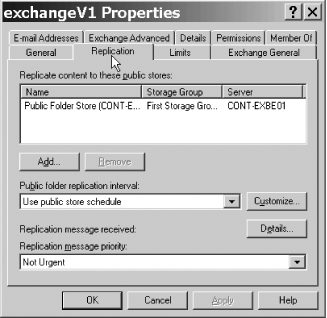
To control which users have permissions to create or modify items in the folder, and to assign roles to users, click the Client permissions button. You’ll get the dialog box shown in Figure 9-1, from which you can assign granular user-specific permissions.
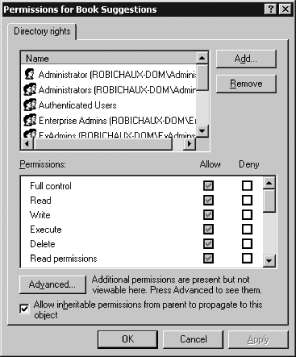
Figure 9-1. The Client Permissions dialog box lets you assign permissions for individual users on a public folderTo control permissions on the public folder object in Active Directory (AD), click the Directory rights button; this displays the standard Windows ACL editor (see Figure 9-2). You will seldom need to do this; although, in some rare cases, it might be necessary to reset the permissions granted to the Exchange Domain Servers and Exchange Enterprise Servers groups.
To control which users have administrative access to attributes of the public folder (like its ACL, replica list, and quota settings), click the Administrative Rights button. You’ll see the same dialog box pictured in Figure 9-2, but with different permissions.
Set the permissions you want. As with any other permission-related operation, it’s a really good idea to test the proposed permissions in a noncritical setting before making changes to your production network. When you’re done, click OK.
To export existing permissions, do the following:
Open PFDAVAdmin.
From the menu, select File→ Connect; when the connection dialog appears, enter the name of the server whose replica list you want to export (and credentials if necessary).
Select Tools→ Options from the menu and make sure that the Enable logging to file checkbox is set. Specify a log file path if necessary and click OK.
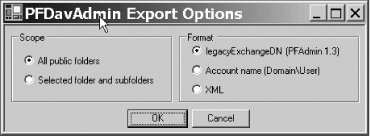
Select Tools→ Export Permissions from the menu. The PFDAVAdmin Export Options dialog box will appear as shown in Figure 9-3.
Select the scope of the export with the radio buttons in the Scope control group. The default is to export permissions for all public folders, but you can limit the export to a subscope if you prefer.
Choose a format for the exported permissions with the radio buttons in the Format group. You can export into three formats:
The default format expresses permissions with the user’s DN. This is the format that PFAdmin uses; when you export permissions using this setting, you can pipe the resulting output back to
PFAdminSETACL.The Account name (domainuser) radio button tells PFDAVAdmin to export the permissions using a more conventional (and readable!) format, with the domain and user name combined. PFAdmin can’t read this directly, but it’s still useful for maintaining records of permission changes.
The XML radio button tells PFDAVAdmin to export the permissions using a custom XML format. You can reimport these permissions using PFDAVAdmin; it’s also the best choice if you want to parse the permissions yourself, perhaps to generate reports or to analyze whether permissions meet your corporate standards. Note that PFDAVAdmin adds an informational header that may need to be removed before your tools will accept the file.
Click OK.
When the Save As dialog box appears, pick a name and location for your output file, and click OK.
Close the Export Permissions window.
Using a command-line interface
To dump public folder permissions, use
PFAdmin
with the LISTACL
option, which also requires the name of the profile
and the name of the folder (or ALL for all folders). You may optionally
specify the name of a file to write the permission settings to if
you want to replay them later with the O= option. Here’s an example:
> pfadmin exAdmin LISTACL ALL O="c: emppf-perms.txt"
To set public folder permissions, use
PFAdmin
with the SETACL
option, which also requires the name of the profile
and the name of the folder (or ALL for all folders), along with a list of
rights. Normally, you’ll use this command with a file generated by
the LISTACL option; if you want
to roll your own, you can run pfadmin ? SETACL to get a complete list of the
syntax elements used to specify ACLs from the command line. The
command:
> pfadmin exAdmin SETACL "Customer Complaints" johnp remove yes
will remove user johnp’s access to the Customer Complaints folder and all subfolders contained therein.
Using VBScript
The process for doing this is too long and unwieldy to include here. However, Outlook MVP Eric Legault has a script that does the trick, and it’s available from this book’s companion web site (http://www.exchangecookbook.com).
Discussion
Public folders have a very flexible permissioning scheme compared to mailboxes. Table 9-1 shows the roles that you can assign to users; you can assign these roles with Outlook or with ESM, as described above. Each role is a composite of several individual permissions, which themselves are listed in Table 9-2. Although you can assign these permissions individually, in most cases you won’t want to unless you need to assign unusually fine-grained permissions.
Role | Included permissions |
Owner | Create items, Read items, Create subfolders, Edit All, Folder owner, Folder Visible, Delete All |
Author | Create items, Read items, Edit Own, Delete Own, Folder Visible |
Publishing Author | Author permissions, plus Create subfolders |
Nonediting Author | Author permissions, minus Edit Own; this role can create new items, but not edit existing ones |
Editor | Create items, Read items, Edit All, Folder Visible, Delete All |
Publishing Editor | Editor permissions, plus Create subfolders |
Reviewer | Read items, Edit None, Folder Visible, Delete None |
Contributor | Create items, Folder Visible, Edit None, Delete None |
None | Folder Visible, Edit None, Delete None |
Permission | What it allows |
Create items | Holder may create messages in a folder, but not subfolders. |
Create subfolders | Holder may create subfolders in this folder. Newly created subfolders inherit permissions from the parent folder, and the user who creates them gets Owner permission on them. |
Delete items | Holder may remove items from the folder, according to the scope granted:
|
Edit items | Holder may edit items in the folder, according to the scope granted:
|
Folder contact | Holder receives notification about things that happen to the folder, including when the folder goes over its permitted maximum size or when there’s a replication or design conflict. |
Folder owner | Holder owns this folder and has full control over it. The name of the last owner is never removed from the folder’s ACL. |
Read items | Holder may read any item in the folder. Without this permission, a user can’t open the folder at all. |
Folder visible | Holder can see that the folder exists. |
When moving public folders from Exchange 5.5 to Exchange 2000 or 2003, the biggest issue you’re likely to run into concerns permissions. The implementation of public folder permissions varies significantly between Exchange 5.5 and Exchange 2000/2003—in fact, Microsoft has a very detailed white paper on the subject (see the “See Also” section of this recipe) that we won’t attempt to duplicate here. Exchange 5.5 stores folder permissions in a table inside the IS, while Exchange 2000 and later store them as properties of the folder. There’s a conversion process that maps the 5.5-style ACLs to the new format; that conversion may fail for a variety of reasons. If it does fail, permissions on the folder seem to disappear: Exchange 2000/2003 updates its copy of the ACL stored on the folder, and then replicates its changes back to Exchange 5.5! As a bonus, if the ACL contains an ACE listing an account that doesn’t exist in Active Directory (as when a user account isn’t replicated, or is deleted from Active Directory after replicating), the same problem will occur. To avoid this, Microsoft recommends using the DS/IS Consistency Adjuster (see MS KB 328287 and MS KB 836489) to groom your public folder ACLs before setting up any public folder connection agreements.
See Also
Public Folder Permissions in a Mixed-Mode Microsoft Exchange Organization white paper:
| http://www.microsoft.com/technet/prodtechnol/exchange/2000/deploy/pfpmmexo.mspx |
MS KB 328287 (How to Prevent Permission Problems When You Migrate Public Folders to Exchange 2000 Server or Exchange Server 2003), MS KB 296051 (XADM: Public Folders Lose ACEs After Exchange 2000 Is Introduced to an Existing Exchange Server 5.5 Organization), MS KB 836489 (An update is required for mixed-mode site consolidation with Exchange Server 5.5) and MS KB 270905 (XADM: Unable to Set Client Permissions on Public Folders Through Exchange System Manager)
9.4. Forcing Public Folder Replication
Solution
Using a graphical user interface
To force replication of a folder, do the following:
Launch the Exchange System Manager (Exchange System Manager.msc).
In the left pane, expand the appropriate Administrative Groups container; this should be the administrative group that contains the server that contains the replica whose contents you want to send. This will typically be the most up-to-date replica.
Expand the Folders and Public Folders nodes.
Right-click the folder you want and select Send Contents.
When the Send Contents dialog box appears, select the source and target servers and fill in the number of days for which you want changes sent.
Click OK.
When the confirmation dialog box appears, click Yes.
Using VBScript
' This code sends the contents of all public folders on the specified
' server to any other servers that have those folders in their replica list.
' ------ SCRIPT CONFIGURATION ------
 strComputerName = "<serverName>"
' ------ END CONFIGURATION ---------
  strE2K3WMIQuery = "winmgmts://" & strComputerName &_
    "/root/MicrosoftExchangeV2"

  Set folderList = GetObject(strE2K3WMIQuery).InstancesOf("Exchange_PublicFolder")

  ' Get the replica count. For any folder that has multiple replicas,
  ' force the replica *on this server* to request any changes that it
  ' knows of but hasn't gotten.
  For each Exchange_PublicFolder in folderList
      replicaCount = UBound(Exchange_PublicFolder.ReplicaList)+1
      WScript.Echo "Folder " & Exchange_PublicFolder.Name & " has " & _
       replicaCount & " replicas."
       If (replicaCount > 1) Then
           WScript.Echo "   Synchronizing " & Exchange_PublicFolder.Path
         Exchange_PublicFolder.Synchronize
      End If
      Next
     WScript.Echo "Done processing folders."
If you don’t want to force replication of all folders on a server, you can use the same method to replicate an individual folder:
' This code forces replication of the contents of a specified folder.
' ------ SCRIPT CONFIGURATION ------
 strComputerName = "<serverName>"
 strPubFolderPath = "<folderPath>"     ' e.g., "/Book Suggestions/"
' ------ END CONFIGURATION ---------
  strE2K3WMIQuery = "winmgmts://" & strComputerName &_
    "/root/MicrosoftExchangeV2"

  ' query for the specific folder we want
  Set wmiService = GetObject(strE2K3WMIQuery)
  query = "Select * From Exchange_PublicFolder" & " Where Path='" & _
     strPubFolderPath & "'"
  Set targetFolder = wmiService.ExecQuery(query)

  ' if we have multiple replicas, send changes from the first
  ' replica to all others
  For Each folder In targetFolder
      replicaCount = UBound(folder.ReplicaList)+1
    WScript.Echo "Folder " & folder.Name & " has " & replicaCount & _
        " replicas."
    If (replicaCount > 1) then
          WScript.Echo "   Sending changes from " & folder.Path _
        & " to " & folder.ReplicaList(0)
        folder.SendChanges 30, folder.ReplicaList
        Folder.Put_
    End If
   Next
  WScript.Echo "Done processing folders."
Discussion
In normal operation, Exchange will replicate public folder contents without any help or intervention from you. However, there may be times when replication isn’t working fast enough, in which case, you can force replicated updates to be sent or requested.
Using a graphical user interface
From ESM, you can send contents from a selected replica to one or more target replicas; any changes to the source in the time window you specify are packaged as replication messages and sent using the normal mechanism.
Using VBScript
The two scripts in this recipe show two different approaches.
The first one uses the Synchronize() method, which tells Exchange to request the actual
content for any update it doesn’t yet have. This works because the
folder may have a list of content updates (or, more precisely,
change numbers) for which it hasn’t actually gotten the changes.
Synchronize() just brings the two
into harmony by requesting content backfills for the change numbers
whose content isn’t present yet. The second script uses SendChanges() , which allows you to force updated content from one
replica to be sent to other, specified, replicas. In this case, the
script sends changes from the first replica of the “Book
Suggestions” folder to all other replicas. Because the ordering of
replicas may change between folders on different servers, this
script could be enhanced by having it check to see
which replicas the changed content is being
sent to.
See Also
Recipe 9.5 for
replicating the public folder hierarchy, Recipe 9.10 for working
with a server’s replica list, Recipe 9.13 for
controlling replication settings, and MSDN: WMI Exchange_PublicFolder class
9.5. Replicating the Public Folder Hierarchy
Problem
You’ve made changes to the public folder hierarchy and want to force them to be replicated throughout your network.
Solution
Using a graphical user interface
Launch the Exchange System Manager (Exchange System Manager.msc).
In the left pane, expand the appropriate Administrative Groups container.
Expand the Folders node.
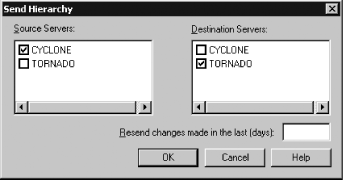
Right-click the Public Folders node and select Send Hierarchy. (This option also appears when you right-click an individual public folder database).
When the Send Hierarchy dialog box (see Figure 9-4) appears, select the server whose copy of the hierarchy you want sent from the Source Servers column, and select the destination servers.
Enter the number of days of updates you want sent into the Resend changes made in the last (days) field. ESM won’t allow you to leave this field blank.
Click OK. When the confirmation dialog appears, click Yes.
Discussion
A copy of the public folder hierarchy is stored in each public folder store within a particular TLH. For the MAPI TLH, that means that every public folder server will have a copy of the hierarchy. If an individual server doesn’t have an up-to-date copy, though, its replica list won’t be up to date, and users may find that folders randomly appear and disappear, depending on which server they’re connected to. To solve this problem, you can forcibly send a copy of the hierarchy to a server. However, after doing so, if the hierarchy change updates the server’s replica list, you’ll still have to wait for the actual folder contents to be replicated (or force replication; see Recipe 9.4) before users will see a consistent set of folders and items on all servers.
See Also
Recipe 9.4 for forcing folder replication and MS KB 823817 (Exchange Server 2003 Public Folder Administration Improvements)
9.6. Getting Properties of the Public Folder Tree
Solution
Using a graphical user interface
Launch the Exchange System Manager (Exchange System Manager.msc).
In the left pane, expand the appropriate Administrative Groups container.
Expand the Folders node.
Right-click the public folder TLH you’re interested in (the default MAPI TLH is named Public Folders).
Select Properties.
Using VBScript
' This code displays selected properties of TLHs on a server
' ------ SCRIPT CONFIGURATION ------
 strComputerName = "<serverName>"     ' e.g., "cyclone"
' ------ END CONFIGURATION ---------

  strE2K3WMIQuery = "winmgmts://" & strComputerName &_
    "/root/MicrosoftExchangeV2"

  Set wmiService = GetObject(strE2K3WMIQuery)
  Set treeList = wmiService.InstancesOf("Exchange_FolderTree")

  If (treeList.Count > 0) Then
   For Each tree In treeList
      wscript.echo " Tree '" & tree.name & "'"
      wscript.echo "  Created:       " & tree.CreationTime
      wscript.echo "  Admin note:    " & tree.AdministrativeNote
      wscript.echo "  Associated stores: " & _
                 UBound(tree.AssociatedPublicStores) & " total"
      For i = 0 To UBound(tree.AssociatedPublicStores)
        wscript.echo "     " & i & "==> " & _
        tree.AssociatedPublicStores(i)
      next
   next
  WScript.Echo "Done processing folders."

  End if
Discussion
There aren’t that many properties associated with public folder
TLHs, but the ones that do exist are pretty interesting. For example,
you can see a list of all the public folder stores associated with a
particular TLH, and you can easily get the creation and modification
times—very useful when you’re trying to determine which folders are
old and unused as part of a migration. The WMI Exchange_FolderTree class definition on MSDN
lists all the properties you can access. One useful attribute that WMI
doesn’t give you access to is the ACL on the TLH object; if you want
to see or adjust its properties, you’ll need to use the Security tab
of the tree properties dialog in ESM.
See Also
MSDN: Exchange_FolderTree
class
9.7. Creating and Deleting Public Folders
Solution
Using a graphical user interface
To create a folder, do the following:
Launch the Exchange System Manager (Exchange System Manager.msc).
In the left pane, expand the appropriate Administrative Groups container.
Expand the Folders node, then expand the container for the TLH where you want the new folder created.
Right-click the TLH container and select New→ Public Folder.
When the folder properties dialog appears, type a name into the Name field.
Optionally, switch to the Replication tab and use the Add and Remove buttons to control which servers have replicas of the newly created folders.
Click OK.
To delete a folder, do the following:
Launch the Exchange System Manager (Exchange System Manager.msc).
In the left pane, expand the appropriate Administrative Groups container.
Expand the Folders node, then expand the container for the TLH where you want the new folder created.
Find the folder you want to remove, right-click it, and select Delete.
Using VBScript
' This code creates a folder with the specified name at the top level
' of the MAPI TLH.
' ------ SCRIPT CONFIGURATION ------
 strFolderName = "<folderName>"     ' e.g., "Bad Jokes"
' ------ END CONFIGURATION ---------
' Get the default domain name. This is not necessarily
' the same as the AD domain name, which is why we have to
' get it from the recipient policy object
    Set objDefaultPolicy = GetObject( _
         "LDAP://<dcName>/cn=default policy,cn=recipient policies," &_
                  "cn=<orgName>,cn=microsoft exchange,cn=services," &_
                  "cn=configuration,dc=<domain>,dc=<TLD>")
     ' get all of the proxy addresses in the default recipient
     ' policy. Find the default SMTP policy and that'll tell us
     ' what the default Exchange domain is
    strProxies = objDefaultPolicy.Get("gatewayProxy")
    For Each proxyAddr In strProxies
        If (Left(proxyAddr, 5) = "SMTP:") Then
        strStorageName = Right(proxyAddr, Len(proxyAddr)-InStr(proxyAddr, "@"))
        End if
    Next

    ' Build the path to the storage object.
    strStorageName = "file://./backofficestorage/" + strStorageName + "/"
    ' Create the folder.object
    strFolderPath = strStorageName + "public folders/" + strFolderName
    Set theFolder = CreateObject("cdo.folder")

    ' Set the folder properties.
    With theFolder
        .Description = "Root folder for " + strFolderName
        .ContentClass = "urn:content-classes:folder"
        .fields("http://schemas.microsoft.com/exchange" &_
            "/outlook/outlookfolderclass") = _
            "IPF.Folder"
        .Fields.Update
        .DataSource.SaveTo strFolderPath
   End With
WScript.Echo "Done creating folders."
Discussion
If your account has appropriate permissions, you can also create and delete public folders directly from within Outlook; you do this using the same process you’d use for creating or deleting any other kind of folder with a few exceptions. First, you can only create and remove public folders while you’re online with the server. Even though cached Exchange mode has an option to automatically cache posted items in public folders on your favorites list, you can’t add or remove folders. Second, when you create a new folder, Outlook asks you to specify what kind of items (contacts, calendar items, notes, or messages) will go in the folder; ESM doesn’t care, so it doesn’t ask.
Using VBScript
The code creates a new folder by creating a CDO folder object and assigning it a path in the MAPI public folder tree. To do this, we have to find the correct default domain name for Exchange. This name may or may not be the same as the Active Directory domain name; the simplest way to check is to look at the primary SMTP proxy address on the default recipient policy, so that’s what the script does. Once the script has the correct name, it can specify the location of the folder and create it using CDO.
This will only work for accounts that have permission to create top-level public folders. There’s no good way to use the same interfaces to delete a public folder, since the data in the folder is only permanently deleted when you delete the last replica of that folder. If you try to use this method to create a folder that already exists, you’ll get error 0x80040e98, which isn’t well-documented on MSDN (or anywhere else). The associated error string will say that the requested object cannot be shared; what it should say is that the object exists already.
See Also
Recipe 9.3 for getting and setting permissions, Recipe 9.8 for mail-enabling or mail-disabling a folder, Recipe 9.11 for controlling who can create top-level public folders, and MSDN: CDO
9.8. Mail-Enabling or Mail-Disabling a Public Folder
Solution
Using a graphical user interface
Launch the Exchange System Manager (Exchange System Manager.msc).
In the left pane, expand the appropriate Administrative Groups container.
Expand the Folders node.
Right-click the target folder and select All Tasks and either Mail Enable or Mail Disable.
If you want the public folder to be able to receive mail sent from the Internet directly to its SMTP address, you have some additional work to do:
Right-click the target folder and select Properties.
Click the Permissions tab, then click the Client permissions button.
Verify that the Anonymous user has Contributor permission. If not, use the Add button to grant that permission. Click OK to dismiss the Client Permissions dialog.
Click OK to close the properties dialog.
Using VBScript
' This code toggles the mail-enabled status of the selected folder.
' ------ SCRIPT CONFIGURATION ------
 strComputerName = "<serverName>"     ' e.g., "cyclone"
 strPubFolderPath = "<folderPath>"     ' e.g., "/Some Folder/"

' ------ END CONFIGURATION ---------
  strE2K3WMIQuery = "winmgmts://" & strComputerName &_
    "/root/MicrosoftExchangeV2"

  ' query for the specific folder we want
  Set wmiService = GetObject(strE2K3WMIQuery)
  query = "Select * From Exchange_PublicFolder" & " Where Path='" & _
          strPubFolderPath & "'"
  Set targetFolder = wmiService.ExecQuery(query)

  ' report on the mail-enabled status, then toggle it
  For Each folder In targetFolder
      If folder.IsMailEnabled Then
          WScript.Echo folder.Name &_
         " was mail-enabled as " & folder.TargetAddress & "; disabling it"
          folder.IsMailEnabled = false
      Else
        WScript.Echo folder.Name &_
         " is not mail-enabled; enabling it"
          folder.IsMailEnabled = true
      End If
      Folder.Put_
  Next
 WScript.Echo "Done processing folders."
Discussion
When you mail-enable a public folder, users can send messages to it via SMTP in addition to posting messages to it. Mail-enabling a folder is a simple way to provide shared access to customer service questions, suggestions, or other material that comes from outside and needs to be accessible to multiple internal users. Toggling this state is simple in ESM or from a script; the one caveat is that you’re not supposed to use WMI to mail-disable a public folder in a mixed-mode organization because Exchange 5.5 assumes that every public folder is always mail-enabled. Unfortunately, there’s a bug in Exchange Server 2003 that allows you to do so, so your scripts should probably be careful enough to check.
Whether you mail-enable a folder manually or via a script, its initial SMTP address will be the folder name with spaces removed (because spaces aren’t valid in SMTP addresses). So “Junk Science” becomes [email protected]. You can add or remove this address, or other proxy addresses, using the E-mail Addresses tab of the folder properties dialog box. When you create a new mail-enabled folder, the Anonymous user token will automatically be granted Contributor permissions. This permission is required for SMTP mail sent from the Internet to be delivered to the folder. If you don’t want inbound SMTP mail to be delivered, remove this permission.
Using VBScript
The script for this recipe uses a WMI query to locate the
folder with the specified path; you can modify that path to select
multiple folders if you prefer. For each folder returned by the
query, the script toggles the IsMailEnabled property. This change isn’t
actually effective until the code uses the Put_ method to persist the change.
9.9. Finding All Replicas of a Public Folder
Solution
Using a graphical user interface
Launch the Exchange System Manager (Exchange System Manager.msc).
In the left pane, expand the appropriate Administrative Groups container.
Expand the Folders node; find the target folder, right-click it, and select Properties.
Switch to the Replication tab.
Review the list of replicas in the Replicate content to those in the public stores list.
Using a command-line interface
Use the LISTREPLICAS switch
for PFAdmin, which also
requires the name of the profile and the name of the folder (or
ALL for all folders). Here’s an
example (use pfadmin listreplicas ? for more detailed help):
> pfadmin exAdmin LISTREPLICAS "Book Suggestions"
Using VBScript
' This code retrieves the list of all replicas for a specified folder ' ------ SCRIPT CONFIGURATION ------ strComputerName = "<serverName>"'e.g., "cyclone" strPubFolderPath = "<folderPath>" 'e.g., "/Book Suggestions/" ' ------ END CONFIGURATION --------- strE2K3WMIQuery = "winmgmts://" & strComputerName &_ "/root/MicrosoftExchangeV2" ' query for the specific folder we want Set wmiService = GetObject(strE2K3WMIQuery) query = "Select * From Exchange_PublicFolder" & " Where Path='" & _ strPubFolderPath & "'" Set targetFolder = wmiService.ExecQuery(query) ' list all of its replicas For Each folder In targetFolder replicaCount = UBound(folder.ReplicaList)+1 WScript.Echo "Folder " & folder.Name & " has " & replicaCount & _ " replicas." For i = 0 To replicaCount-1 WScript.Echo " Replica " & i & "==> " & folder.ReplicaList(i) next Next WScript.Echo "Done processing folders."
Discussion
Each folder has a replica list associated with it; this list isn’t stored with the folder (as you might expect), but as part of the associated hierarchy data in the store. That’s good news, since it makes it simple to retrieve the replica list for a folder from any Exchange server in the organization. However, the replica list doesn’t include any information about the replication status of folders, so you can’t use it to tell whether a given replica is up to date.
Using VBScript
Every folder in the organization is listed in the public folder hierarchy, so finding all the replicas can be done in two ways: ask each server whether it contains a replica of the desired folder, or ask WMI to find the specified folder and then query its replica list. The second method is much simpler, and more efficient to boot. Accordingly, that’s what this script does; for each folder returned in the WMI query, the script displays the contents of the replica list for that folder.
See Also
Recipe 9.10 for changing individual servers’ replica lists
9.10. Working with a Specific Server’s Replica List
Problem
You want to manipulate the replica list on an individual server; this manipulation might include:
Adding replicas of existing folders to the server
Removing existing replicas from the server
Querying the server to find out what replicas it currently contains
Solution
Using a graphical user interface
To add or remove replicas, do the following:
Launch the Exchange System Manager (Exchange System Manager.msc).
In the left pane, expand the appropriate Administrative Groups container.
Expand the Folders and Public Folders nodes.
Right-click the target folder and select Properties.
Switch to the Replication tab.
Click the Add button; when the Select a Public Store dialog box appears, select the server where you want the new replica to be housed and click OK.
Click OK again.
Wait for the public folder content to replicate by checking the folder contents.
Verify that the folder replica has appeared in the folder list of the target server.
Optionally, if you want to remove the original replica, repeat steps 2-5, select the original replica, and click Delete.
To see which replicas a server contains, do the following:
Launch the Exchange System Manager (Exchange System Manager.msc).
In the left pane, expand the appropriate Administrative Groups container.
Expand the server’s node, then expand the storage group that contains the public folder store of interest.
Expand the target public folder store.
Select the Public Folder Instances node. The right ESM pane will display the replicas present on that server.
Optionally, right-click in the right ESM pane and select Export List to save the replica list as a tab-delimited text file.
To export the list of replicas from a server, do the following:
Open PFDAVAdmin (PFDAVAdmin.exe).
From the menu select File→ Connect; when the connection dialog appears, enter the name of the server whose replica list you want to export (and credentials if necessary).
Select the Tools→ Options from the menu and make sure that the Enable logging to file checkbox is set. Specify a log file path if necessary and click OK.
Select Tools→ Export Replica Lists from the menu. When the PFDAVAdmin Export Options dialog box appears, select the scope of the export (the default is to export replicas for all public folders, but you can limit the export to a subscope if you prefer). Click OK.
When the Save As dialog appears, pick a location and name for the export file, and click Save.
Using VBScript
' This code finds all replicas on a server.
' ------ SCRIPT CONFIGURATION ------
 strComputerName = "<serverName>" '     e.g., "cyclone"
' ------ END CONFIGURATION ---------
  strE2K3WMIQuery = "winmgmts://" & strComputerName &_
    "/root/MicrosoftExchangeV2"

  ' Get all the public folders in the MAPI TLH.
  ' For each folder, check to see if it has a local replica.
  Set folderList = GetObject(strE2K3WMIQuery).InstancesOf( _
                                     "Exchange_PublicFolder")

  WScript.Echo "Folders on server " & strComputerName
  folderCount = 0
  For each Exchange_PublicFolder in folderList
    if (true = Exchange_PublicFolder.HasLocalReplica) then
        WScript.Echo "   + " & Exchange_PublicFolder.Name
          folderCount = folderCount + 1
    end if
  Next
WScript.Echo "   " & folderCount & " folders total."
If you want to make a given server into a public folder server, this script will force the server to have replicas of all public folders in the MAPI TLH (provided the server already has a public folder database on it:
' This code creates local replicas for all folders in the MAPI TLH
' ------ SCRIPT CONFIGURATION ------
 strComputerName = "<serverName>"        'e.g., "CONT-EXBE01"
 strPubMDBPath = "<publicMDBURL>"
' ------ END CONFIGURATION ---------
  strE2K3WMIQuery = "winmgmts://" & strComputerName &_
    "/root/MicrosoftExchangeV2"

  ' Get all the public folders in the MAPI TLH.
  ' For each folder, check to see if it has a local replica.
  ' If not, create one using the defined path name
  Set folderList = GetObject(strE2K3WMIQuery).InstancesOf(_
                                          "Exchange_PublicFolder")

  WScript.Echo "Creating local replicas on server " & strComputerName
  For each Exchange_PublicFolder in folderList
  if (true = Exchange_PublicFolder.HasLocalReplica) Then
    WScript.Echo "   - " & Exchange_PublicFolder.Name & _
                 ": already local"
  else
    Exchange_PublicFolder.AddReplica(strPubMDBPath)
    WScript.Echo "   + " & Exchange_PublicFolder.Name
  end if
  Next
WScript.Echo "Done creating replicas in " & strPubMDBPath & "."
Discussion
Because every server has its own local copy of the hierarchy, it’s fairly straightforward to find out which folders exist; each store already knows what folders it contains, and that knowledge forms the basis of the replica list. This list is directly exposed in ESM, but to get or modify replica information from within a script, you have to either select the folders you want or iterate over all of them. There’s no “replica list” object per se.
Using VBScript
The two scripts in this recipe accomplish very different
tasks. The first queries for all Exchange_PublicFolder instances on the
local server, which is a simple way of getting a copy of the public
folder hierarchy. It then iterates over each folder in the
hierarchy, printing the names of those that have local replicas. The
second uses the same query to get the hierarchy, but then for any
folder that does not have a local replica, it
adds a local replica. This is a simple way to make a dedicated
public folder server, or to create a server that contains backup
copies of all your public folders.
See Also
Recipe 9.9 for finding all replicas of a specified folder
9.11. Controlling Who Can Create Top-Level Public Folders
Problem
You want to prevent random users from creating top-level public folders in your public folder hierarchy.
Solution
Using a graphical user interface
Launch the Exchange System Manager (Exchange System Manager.msc).
Right-click the Exchange organization object and select Properties.
Switch to the Security tab.
Find and select the Authenticated Users entry in the Group or user name list.
In the Permissions list, ensure that the Allow and Deny checkboxes for the Create top-level public folders permission are both cleared.
Repeat steps 4-5 for the Everyone and ANONYMOUS LOGON user tokens.
Click OK and click OK again.
Discussion
Exchange 5.5 and Exchange 2000 give all users the ability to create top-level public folders (e.g., folders that appear directly in the hierarchy, not as children of other folders). This was widely misused by people who thought it would be jolly good fun to create public folders for jokes, personal documents, and other miscellany; the resulting clutter turned many sites off to the benefits of public folders. Exchange Server 2003 limits top-level folder creation to administrators by default. However, Exchange 2000 installations don’t have this same default setting. When you run Exchange Server 2003 forestprep, setup removes the permission to create top-level folders from the Everyone and ANONYMOUS LOGON user tokens on the organization object; this protects you whether you’re doing a new installation or an upgrade. However, if you then install an Exchange 2000 server into the organization, Exchange 2000’s setup utility will merrily reinstate those permissions, which means you’ll need to go back and remove them again.
See Also
Recipe 2.4 for running Exchange forestprep, and MS KB 822576 (“Allow Create Top Level Public Folder” Access Control Entry for the Exchange Organization Container Unexpectedly Includes the Everyone and the Anonymous Logon Groups)
9.12. Recreating the Schedule+ Free/Busy Folder
Problem
Your users can’t see each other’s free/busy time, so you need to recreate the Schedule+ Free/Busy system public folder.
Solution
Using a graphical user interface
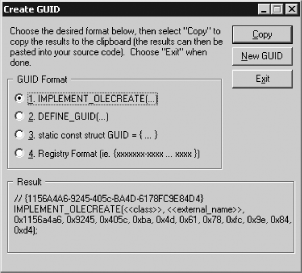
Download the guidgen tool from http://www.microsoft.com/exchange/tools/2003.asp.
Open guidgen.
Select Registry Format from the GUID Format control group and click Copy. (See Figure 9-5.)
Click Exit. The newly generated GUID is now on the Windows clipboard.
Open Notepad (or another text editor) and paste in the GUID. Then edit it to conform to the format ADSI Edit requires:
Remove all the brackets, dashes, and braces.
If you’re performing the restoration on a Windows 2000 machine, take each two-digit hexadecimal grouping and add
0xin front of it, then a space after it. For example,123456will become0x12 0x34 0x56.If you’re performing the restoration on a Windows Server 2003 machine, insert one space after each two-digit hexadecimal group. For example,
123456will become12 34 56.
Copy the reformatted GUID back to the clipboard.
To reset the folder GUID using ADSI Edit for Windows 2000, do the following:
Open ADSI Edit (adsiedit.msc).
Find the object for the administrative group in which you’re recreating the folder. The object you’re looking for will be tucked away under:
CN=
Administrative Groups,CN=Organization,CN=Microsoft Exchange,CN=Services,CN=Configuration,DC=Domain,DC=comRight-click the object for your administrative group and select Properties.
Click the Attributes tab.
In the Select which properties to view text box, select Optional.
In the Select a property to view text box, select SiteFolderGuid.
Paste the GUID you copied to the clipboard into the Edit Attribute text box.
Click Set and click OK.
Restart the Exchange-related services on all servers in the administrative group.
To reset the folder GUID using ADSI Edit for Windows Server 2003, do the following:
Open ADSI Edit (adsiedit.msc).
Find the msExchAdminGroup object for the administrative group in which you’re recreating the folder. The object you’re looking for will be tucked away under:
CN=
Administrative Groups,CN=Organization,CN=Microsoft Exchange,CN=Services,CN=Configuration,DC=Domain,DC=comRight-click the object for your administrative group and select Properties.
Click the Attribute Editor tab.
Under the Attributes column, click SiteFolderGuid.
Click Edit.
Click Hexadecimal in the Edit Value As text box.
Paste the expanded GUID you copied to the clipboard into the Value text box.
Click OK and click Apply.
Click OK.
Quit ADSI Edit.
Restart the Exchange-related services on all servers in the administrative group.
Discussion
If the Schedule+ Free/Busy folder is removed, your users’ Outlook clients won’t be able to publish their free/busy data to the server. The Exchange system attendant won’t be able to do so, either, and all clients that use it (including Outlook, OWA, and the Exchange auto-accept agent) will fail to find schedule information. The most common reason for losing this folder is simple: administrators delete it in the mistaken belief that they don’t need it. The second-most common cause is because the free/busy folder is always housed on the first Exchange server in your organization. If you started with Exchange 5.5, the first 5.5 server in the first 5.5 site you set up will have the folder. When you migrate away from 5.5, if you don’t correctly decommission the server according to the procedures in MS KB 152959, you’ll lose your only replica of this folder. Once the last replica is gone, you have to follow the steps in this recipe to get the folder back.
To recreate the folder, you must first obtain a new globally unique identifier (GUID), a hexadecimal code that (among other uses) uniquely identifies each public folder and mailbox in an Exchange organization. When you assign a new GUID to the site folders (as you did using ADSI Edit), that forces Exchange to recreate the Schedule+ Free/Busy and offline address book folders (as well as any other system folders housed on that server). The only replicas of these folders will be on the site folder server—the first server you installed in your Exchange organization will normally have this distinction. All other replicas of these folders will be destroyed, and you’ll have to create new ones manually.
After the folder is recreated, your users may still get the
dreaded “Unable to update public free/busy data” message. If this
happens, it’s because the site folder server attribute (SiteFolderServer) points to a server that
doesn’t have the actual folders on it. This usually is because you’ve
decommissioned or removed the former site folder server. To fix this
problem, follow the steps in Recipe 9.14, which also
describes how to find out which server is the site folder
server.
See Also
Recipe 9.14 for finding the site folder server, MS KB 822931 (How to remove the first Exchange Server 2003 computer from the administrative group), MS KB 152959 (XADM: How to Remove the First Exchange Server in a Site), MS KB 284200 (Schedule+ Free/Busy System Folder Is Missing), MS KB 275151 (XADM: How to Reset System Folders on an Exchange 2000 Server), and MS KB 822444 (How To Reset a Site Folder in Exchange Server 2003)
9.13. Controlling Public Folder Replication Settings
Solution
Using a graphical user interface
To control replication settings on an individual folder, do the following:
Launch the Exchange System Manager (Exchange System Manager.msc).
In the left pane, expand the appropriate Administrative Groups container.
Expand the Folders and Public Folders nodes.
Right-click the target folder and select Properties.
Switch to the Replication tab as shown in Figure 9-6.
To change the replication schedule for the folder, click the Customize button. When the Schedule dialog box appears, fill in the replication schedule that you want applied to this folder, and click OK.
To control the priority of replication messages for this folder, use the Replication message priority pulldown. The setting you apply here is used by the public folder store and the SMTP engine to determine the relative priority of replication messages for all folders.
Click OK.
Discussion
Each public folder store has its own replication settings. However, these settings may be overridden for individual folders. Note that the replicas can’t have their own individual settings; when you make changes to the replication interval or priority for a folder, it applies to all replicas. Folder-specific settings override the corresponding settings on the public folder store.
The Exchange_PublicFolder WMI
class allows you to specify custom replication settings by creating an
array of start/stop times, then
assigning them to the specific folder’s ReplicationSchedule property.
See Also
Chapter 3 of Working with the Exchange Server 2003 Store:
| http://www.microsoft.com/technet/prodtechnol/Exchange/guides/WorkingE2k3Store/cbdaaffd-750c-4a3d-8bb6-4d0474ef6eea.mspx |
Appendix E of the Exchange Server 2003 Administration Guide:
| http://www.microsoft.com/technet/prodtechnol/Exchange/guides/E2k3AdminGuide/e2bd3cd4-33be-4aa7-9042-886046c53cc7.mspx |
and MS KB 273479 (Understanding Public Folder Replication and Referrals)
9.14. Finding or Changing the Site Folder Server
Problem
You want to know which public folder server is holding the role of site folder server, or you need to change that role to fix a public folder replication problem.
Solution
Using a graphical user interface
To find out what server is the site folder server for an administrative group, do the following:
Open ADSI Edit (adsiedit.msc).
Find the msExchAdminGroup object for the administrative group whose site folder server you want to check. The object you’re looking for will be tucked away under:
CN=
Administrative Groups,CN=Organization,CN=Microsoft Exchange,CN=Services,CN=Configuration,DC=Domain,DC=comRight-click the object for your administrative group and select Properties.
Click the Attribute Editor tab.
Under the Attributes column, click SiteFolderServer.
Click Edit. The distinguished name in the Value field is the full path to the server that currently holds the site folder server role.
To change the server designated as the site folder server for an administrative group, do the following:
Open ADSI Edit (adsiedit.msc).
Find the
msExchAdminGroupobject for the administrative group whose site folder server you want to change.Expand the administrative group object and its child
CN=Serversobject.Locate the server that you want to act as the site public folder server. Expand its object and the
CN=InformationStoreobject it contains, then expand whichever storage group object has the public folder store.Right-click the public folder store object and select Properties.
Click the Attribute Editor tab.
Under the Attributes column, click distinguishedName, then click Edit.
Copy the distinguished name to the clipboard, then close the String Attribute Editor dialog and the public store object properties dialog.
Right-click the object for the administrative group and select Properties.
Click the Attribute Editor tab.
Under the Attributes column, click SiteFolderServer.
Click Edit, then paste (or type) the distinguished name you copied in step 8. Click OK.
Stop and restart the information store service on all servers in the administrative group.
Discussion
The site folder server is normally the first server installed in an administrative group. If you remove or rename that server without following the procedures in MS KB 822931, the other servers in that administrative group will still be using the old value for the site folder server. This will result in unreliable public folder replication; it also breaks the ability of Outlook and OWA clients to check free/busy times, since (as you learned in Recipe 9.12) that free/busy data is stored in a system public folder.
See Also
Recipe 9.12 for recreating the Schedule+ Free/Busy folder, MS KB 822931 (How to remove the first Exchange Server 2003 computer from the administrative group), and MS KB 822444 (How To Reset a Site Folder in Exchange Server 2003)