
![]()
There once was a young man from Lyme
Who couldn’t get his limericks to rhyme
When asked “Why not?”
It was said that he thought
They were probably too long and badly structured and not at all very funny.
Anonymous
This chapter and the next are mostly concerned with PHP topics. Generally, this chapter covers structural issues: the interface between MySQL and PHP, how HTML pages and the PHP programs that produce them should be organized, and how to maintain sessions so that otherwise independent PHP programs can form an application. The next chapter goes into more detailed subjects.
As you know, my purpose isn’t to go through all the ins and outs of PHP programming, much of which I assume you already know or can easily find in the numerous books on PHP that are available. Rather, I’ll try to spend your time on matters that are rarely, if ever, discussed in any book.
I cover the topics in this chapter in the following order:
- How you access MySQL from PHP with the PDO interface.
- How PHP interacts with forms and how to connect form fields to database columns.
- PHP sessions, which allow application pages to form an application.
- A framework that you can use to code standardized pages.
- How to handle one-to-many and many-to-many relationships with forms.
Accessing MySQL from PHP
There have been a few attempts to merge database access into programming languages as a first-class citizen, but that’s not how you use SQL with PHP. The interface is with conventional function calls. You pass SQL to the database driver in the form of a string, and, if there’s a result set coming back, you receive it in the form of a PHP array. This is an entirely satisfactory way to work, and I’ve never felt that the language needed to be cluttered up with additional syntax.
Occasionally you’ll execute SQL directly in a terminal session running the mysql command, in a MySQL Workbench query window, or some other way, but this chapter is exclusively concerned with using SQL from within a PHP program.
Connecting with PDO
PHP and MySQL have gone together for almost as long as they’ve been around, and over the years several application program interfaces (APIs) have been introduced. There was the original API, called simply mysql, the improved API, called mysqli, and most recently PDO (PHP Data Objects).
PDO is the one you want (except in rare cases where there’s some obscure MySQL feature that it doesn’t support) for three reasons.
- You can set a PDO::ERRMODE_EXCEPTION option to cause every error to throw an exception, as I did in the example of Listing 4-10 just after instantiating the PDO object. (An instantiation failure always throws an exception.) That means you won’t accidentally overlook an error, and you don’t have to check the return from every PDO function call.
- PDO provides convenient support for parameterized queries. The mysqli API supports them much less conveniently.
- PDO works with any database, not just MySQL, so, once you learn it, you’re set.
I’ve demonstrated a few uses of PDO already in Chapter 4, but none of them showed a result set (a virtual table) being returned to PHP. Listing 5-1, based on the test program from Listing 3-1, is one that does. In fact, it gets the whole result set all at once, in the form of a two-dimensional array. The first integer dimension is the row, and the second gives the column value, indexed by column name. The table isn’t processed, just dumped out, as shown in Figure 5-1.
Listing 5-1. Retrieving a Result Set as a PHP Array
define('DB_HOST', 'localhost'),
define('DB_PORT', '3306'),
define('DB_NAME', 'mydb'),
define('DB_USERNAME', 'root'),
define('DB_PASSWORD', '...'),
try {
    $dsn = 'mysql:host=' . DB_HOST . ';port=' . DB_PORT .
      ';dbname=' . DB_NAME;
    $pdo = new PDO($dsn, DB_USERNAME, DB_PASSWORD);
    $pdo->setAttribute(PDO::ATTR_ERRMODE,
      PDO::ERRMODE_EXCEPTION);
    $pdo->setAttribute(PDO::ATTR_DEFAULT_FETCH_MODE,
      PDO::FETCH_ASSOC);
    $pdo->exec('set session sql_mode = traditional'),
    $pdo->exec('set session innodb_strict_mode = on'),
    $stmt = $pdo->prepare('select * from department'),
    $stmt->execute();
    $result = $stmt->fetchAll();
    echo '<pre>';
    print_r($result);
    echo '</pre>';
}
catch (PDOException $e) {
    die(htmlspecialchars ($e->getMessage()));
}

Figure 5-1. Screen capture from running program in Listing 5-1
Another option I always enable besides PDO::ERRMODE_EXCEPTION, as you can see in Listing 5-1, is PDO::FETCH_ASSOC, so that any results returned in arrays are indexed just by column name. Otherwise, the default is to have a second set of elements indexed by column number, which is superfluous. I also set sql_mode to traditional and innodb_strict_mode to on, to force stricter checking of data values.
I call htmlspecial to replace special characters in an error message with HTML entities (in the catch block). It’s a convenience function that I defined as
function htmlspecial($s) {
    return htmlspecialchars($s, ENT_QUOTES, 'UTF-8'),
}
Rather than repeat the PDO setup code every time I access a database, I put it into a function that I can call when I need to, as shown in Listing 5-2. That function is in a DbAccess class which I’ll be adding to in the next few sections. Note that the definitions for the credentials (DB_HOST, etc.) are missing; I’ll tell you where they went shortly.
Listing 5-2. Common getPDO Function to Set Up PDO
class DbAccess {

function getPDO() {
    static $pdo;

    if (!isset($pdo)) {
        $dsn = 'mysql:host=' . DB_HOST . ';port=' . DB_PORT .
          ';dbname=' . DB_NAME;
        $pdo = new PDO($dsn, DB_USERNAME, DB_PASSWORD);
        $pdo->setAttribute(PDO::ATTR_ERRMODE,
          PDO::ERRMODE_EXCEPTION);
        $pdo->setAttribute(PDO::ATTR_DEFAULT_FETCH_MODE,
          PDO::FETCH_ASSOC);
        $pdo->exec('set session sql_mode = traditional'),
        $pdo->exec('set session innodb_strict_mode = on'),
    }
    return $pdo;
}

}
The function keeps the PDO object in a static variable in case it’s called multiple times in a PHP program. There’s no error checking in getPDO at all. An instantiation failure (new operator) always causes an exception, and, once the PDO::ERRMODE_EXCEPTION has been set, so do all other failed PDO calls.
I don’t usually want the whole result set at once, which is what the function PDO::fetchALL gives me. I almost always want to process the rows one at a time, as shown in Listing 5-3, which calls PDO::fetch instead. Note that it makes use of the DbAccess class and the getPDO method. It generates HTML to format the result, instead of just dumping it out, as shown in Figure 5-2.
Listing 5-3. Retrieving Result Set by Rows
try {
    $db = new DbAccess();
    $pdo = $db->getPDO();
    $stmt = $pdo->prepare('select * from department'),
    $stmt->execute();
    echo '<table border=1>';
    $first = true;
    while ($row = $stmt->fetch()) {
        if ($first) {
            echo '<tr>';
            foreach ($row as $attr => $val)
                echo "<th>$attr";
            $first = false;
        }
        echo '<tr>';
        foreach ($row as $attr => $val)
            echo "<td>$val";
    }
    echo '</table>';
}
catch (PDOException $e) {
    die(htmlspecialchars($e->getMessage()));
}
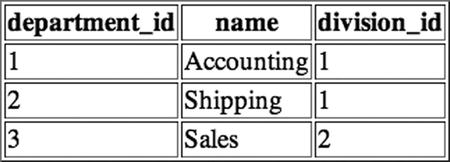
Figure 5-2. Retrieved result set formatted with HTML
A word about the HTML in Listing 5-3: I’ve skipped the surrounding HTML (<!doctype ...>, <html>, <head>, etc.). That’s sloppy, not something I’d do in production code, but I do it all the time in test code and in small examples. I also skipped closing tags for elements like <tr> and <th>, but that’s completely legal and saves the trouble of trying to get everything matched up correctly. I mostly omit the closing </p> from paragraphs, too, as they’re also optional. (Some HTML coders prefer to close paragraphs as a matter of style.) I also usually omit optional quotes around HTML attribute values (e.g., <table border=1>), as PHP programs tend to be overly cluttered with single and double quotes already.
Ask any web programmer about where database credentials should go, and you’ll be told never to put them in the same file as the database-access code that uses them. The reasons for this recommendation are pretty weak, though. Something about the web server accidentally serving up the PHP program as plain text, or someone having access to the source on the web site being able to see the username and password, or accidentally publishing them if you publish or otherwise distribute the source code.
Only the last point really makes sense to me. Since the credentials have to be someplace on the server, anyone with access to the server can get to all the files. Web servers don’t serve up PHP programs as text—they pass them to the PHP processor for execution. A broken web server might display text, but, once set up properly, web servers don’t just break.
Perhaps the best reason to put the database credentials in their own file and in a standard place is that then all the associated applications on the server can get to them. That’s what I do, although, as I said, the increased security that gives me is minimal.
The file should have a “.php” extension, in case somehow it is accessed directly. Using an extension like “.incl” is dangerous, because it will be served up as plain text if it’s in the server’s document tree. You can usually locate it outside that tree, but not always, as the hosting service may not give you access to any other directories.
Anyway, erring on the side of caution, I put the credentials in a file named credentials.php and put them outside the document tree when I can. (A better name might be something harder to guess, like X56-2345-QR77-J654.php, but that’s really going too far.)
Listing 5-4 shows the code I execute in front of the DbAccess class that looks for the credentials file in several places. If it doesn’t find them, it tries the environment, which is where Amazon’s Elastic Beanstalk puts them. If that doesn’t work, it defines them as bogus values, in case I want to test that path (with PHPUnit, for example).
Listing 5-4. Searching for the credentials.php File
foreach (array(
  "/.config/credentials.php",
  "{$_SERVER['DOCUMENT_ROOT']}/../.config/credentials.php",
  "{$_SERVER['DOCUMENT_ROOT']}/.config/credentials.php",
  "../.config/credentials.php",
  "../../.config/credentials.php"
  ) as $f)
    if (file_exists($f)) {
        require_once $f;
        break;
    }
if (!defined('DB_HOST')) {
    if (isset($_SERVER['RDS_HOSTNAME'])) {
        // Amazon Elastic Beanstalk
        define('DB_HOST', $_SERVER['RDS_HOSTNAME']);
        define('DB_PORT', $_SERVER['RDS_PORT']);
        define('DB_NAME', $_SERVER['RDS_DB_NAME']);
        define('DB_USERNAME', $_SERVER['RDS_USERNAME']);
        define('DB_PASSWORD', $_SERVER['RDS_PASSWORD']);
    }
    else { // force an error, mostly for PHPUnit
        define('DB_HOST', 'no host'),
        define('DB_PORT', 0);
        define('DB_NAME', 'no db'),
        define('DB_USERNAME', 'no user'),
        define('DB_PASSWORD', 'no password'),
    }
}
I put the code from Listing 5-4 along with other common code, such as the require_once statement for DbAccess, in a file named common.php that every one of my PHP application files includes. For this book, everything goes into the EPMADD namespace, so my PHP files start as follows:
namespace EPMADD;
require_once 'lib/common.php';
Not every file needs everything in common.php, but I don’t bother separating things out. You can if you think your own common.php file has grown too large and it’s starting to affect execution time.
To finish the story, my credentials.php file contains what you’d expect.
define('DB_HOST', 'localhost'),
define('DB_PORT', '3306'),
define('DB_NAME', 'mydb'),
define('DB_USERNAME', 'root'),
define('DB_PASSWORD', '...'),
Each server (development platform, Amazon EC2, A2 Hosting, etc.) has its own credentials.php file, and sometimes several of them if there are several applications.
One more thing: even if someone does get my MySQL password, they can’t access the database itself from anywhere other than right on the server, because only access from localhost is allowed. You get around this by connecting MySQL Workbench or a UNIX shell via SSH, but SSH is much more secure than MySQL, so that’s not a problem.
Executing SQL Statements with PDO
In Listing 4-17 when I was adding triggers, I showed the PDO::exec method for executing SQL statements that didn’t return a result set, like drop trigger. In this chapter, in Listings 5-1 and 5-3, I showed two more methods that are used together: PDO::prepare, to prepare an SQL statement, and PDOStatement::execute, to execute it. You can do both steps at once with PDO::query, which I haven’t shown yet.
To explain why there are three ways of doing the same thing, I’ll start with the two-step approach, and then get to the others.
PDO::prepare takes an SQL statement as an argument and processes it as much as it can without actually executing it. That means compiling it and analyzing it to come up with a plan for executing it, being as clever as it can. It might reorder the joins to make processing more efficient, rearrange parts of the where clause, make use of indexes, and whatever else it’s smart enough to figure out. With that much accomplished, it returns a PDO object called a PDOStatement, which is why in Listings 5-1 and 5-3 I assigned the return value to a variable called $stmt.
If you need to execute that statement many times, you can prepare it just once, and then call PDOStatement::execute to execute it. That saves time, but, in my experience, such occasions are pretty rare. It’s worth keeping in mind, though.
The real motivation for using prepare + execute is something else entirely: you can use parameterized queries, which is so important that it’s as close to an absolute rule as anything in this book. If any part of the SQL statement contains values supplied at runtime, always use parameterized queries. There are two reasons I do so:
- It makes handling strings much easier, as you don’t have to worry about quoting using the PDO::quote method. In fact, if you have PDO::quote anywhere in your code, you’re not following my rule.
- It prevents SQL injection.
SQL injection is a clever trick whereby users put SQL fragments into form fields in an attempt to alter the SQL passed to a database and thus do damage or compromise security. Authors of database programming books make a big deal of it, and most advise using PDO:quote or mysqli::real_escape_string, if you’re using that API. It’s awkward to use those functions and easy to forget to do so, so SQL injection is a problem.
It’s fun to make up examples of SQL injection. One common one is to put
'; drop person; --
in a name field, say. Suppose the PHP form is submitted and the value of that field ends up in the PHP variable $name, and that the programmer has coded
$pdo->query("update person set name = '$name'");
When PHP substitutes in the value of $name, the query ends up being
$pdo->query("update person set name = ''; drop person; --'");
You’re supposed to be scared because this malicious user has figured out how to drop the person table. It’s an interesting example, but it won’t work, because PDO::query only processes one statement, and the same is true of most other SQL APIs.
OK, so what about the following to check whether a password is valid:
$pdo->query("select userid from user where
  password = '$password'");
(I’ll leave aside for the moment that passwords should be hashed.) The user can type the following into the password field:
' or 'x' = 'x
which after variable substitution gives
$pdo->query("select userid from user where
  password = '' or 'x' = 'x'");
Bingo! The condition is true, the userid is retrieved, and the user has broken in.
You could argue that the user wouldn’t know the name of the table containing user information, wouldn’t know how the SQL internal to the program is written, and so on. However, lots of applications today are open source (e.g., WordPress, used for blogs), so in many cases the user does have that information. Making lots of attempts to come up with something that fits is also effective, and there are even cracking programs that do that automatically.
Well, I could go on and on, but you can 100% eliminate all possibility of SQL injection with one simple rule: never put any PHP variables containing data values in a string passed to any method that takes an SQL statement. (Those are PDO::exec, PDO::prepare, and PDO::query.)
To help you follow the rule, always put an SQL statement in single quotes. You can still trip yourself up with the concatenation operator (.), but that requires enough work so maybe you’ll recognize that you’re breaking the rule.
So, how do you handle building up an SQL statement dynamically, so it contains values entered by the user? With parameterized queries. Whenever you want a value substituted, put in an identifier preceded by a colon, without quotes, as follows:
$stmt = $pdo->prepare('select userid from user where
  password = :pw'),
Note that I used prepare, instead of query, because only prepare takes parameters. Also, note that I used single quotes.
You execute the statement with PDOStatement::execute:
$stmt->execute(array('pw’ => $password));
There must be exactly the same number of elements in the array as there are parameters, and all the names have to match.
What I’ve done is deprived PHP of the opportunity to do string substitution. The replacement of the parameter pw is performed by the PDO interface. If someone enters a password of
' or 'x' = 'x
well, you know, that’s actually a pretty good password. Which is all it will be—just data, not SQL.
My suggestion is that you don’t bother asking yourself whether an SQL statement is going to involve string substitution and therefore needs to be guarded against SQL injection. That’s just the sort of extra thinking that wastes time, saps brain energy, and leads to errors. Always put SQL statements in single quotes, never use a PHP variable in an SQL statement, and always use PDO::prepare followed by PDOStatement::execute. In time it will become second nature.
It turns out that I don’t actually call these PDO methods directly, as I have a method in my DbAccess class that does the work for me. I call it query, even though it works for all SQL statements, not just queries. It’s in Listing 5-5.
Listing 5-5. DbAccess::query Method
function query($sql, $input_parameters = null, &$insert_id = null) {
    $pdo = $this->getPDO();
    $insert_id = null;
    if (is_null($input_parameters))
        $stmt = $pdo->query($sql);
    else {
        $stmt = $pdo->prepare($sql);
        $stmt->execute($input_parameters);
    }
    if (stripos($sql, 'insert ') === 0)
        $insert_id = $pdo->lastInsertId();
    return $stmt;
}
The first argument, $sql, is the SQL statement that you provide, without, of course, any PHP variables in it. Then comes $input_parameters, which is the same array that will be passed to PDOStatement::execute. The third argument is an autoincrement value, which I explain in a moment.
The method calls DbAccess::getPDO for itself, every time, but recall from Listing 5-2 that the function is instantaneous if the database connection has already been made.
Since this method will be executed by a computer, I go ahead and call PDO::query if there are no input parameters, to save a bit of time. (Recall my recommendation that you don’t make that distinction if you’re coding PDO calls directly yourself.) Otherwise, I call prepare + execute.
If the SQL statement is an insert, there might be an autoincrement value if one of the columns, presumably a surrogate key, is autoincremented. If so, it’s returned through the third argument to the function, $insert_id, because the caller is likely to want to know what the primary key is, in case the newly inserted row needs to be referenced by some other SQL operation. (Note the comparison uses ===, not ==, since it returns false if there’s no match, which compares equal to zero when == is used.)
In my application code, I use DbAccess::query for 100% of my SQL statements. I never call PDO::exec, PDO::query, or PDO::prepare directly.
Here’s a call to DbAccess::query taken from an example that I present in the section “Page Framework Usage” (what it does isn’t important for now).
$stmt = $this->db->query('delete from member where
      member_id = :member_id',
      array('member_id' => $_REQUEST['pk']));
With all the protection that parameterized queries afford, I’m able to send the form data right from the $_ REQUEST array, where PHP puts them, directly to DbAccess::query, without horsing around with quoting. It’s clean, efficient, and perfectly safe.
Handling Database Inserts and Updates
Suppose you have a form like the one in Figure 5-3, taken from an example application that I show in section “Page Framework Usage.”
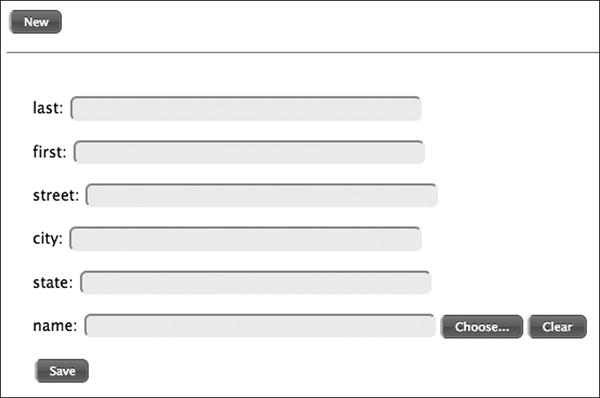
Figure 5-3. Example form
To enter a new record, the user clicks the New button to get an empty form. After filling it out, clicking the Save button inserts it into the database. To update a record, there’s a way (not shown in the figure) to get its data into the form, at which time the user changes some data and clicks Save. The point here is that Save might be inserting a new record or updating an existing one.
You can’t see it, but, when an existing record is retrieved, its primary key is put into a hidden field in the form. In the $_POST array where PHP places the form data when a submit button is clicked (the Save button, here), the presence of primary key data in the hidden field indicates that an update should be done, and the absence indicates an insert.
Therefore, it’s easy to write PHP code to insert or update, which are separate SQL statements. If the primary key is a surrogate key, which it often is in my applications, it’s convenient to find out what it is right after the insert, and that’s provided by DbAccess::query, as I showed in Listing 5-5. You might need that key if, for example, you want to insert a row into another table with which the first table has a relationship requiring that a foreign key (the primary key you just got) be referenced.
Instead of deciding whether you need an insert or an update, it’s tempting to use a statement that does what’s called an upsert. You supply the data, and the statement updates an existing row or, if there isn’t one, inserts a new row. MySQL provides an upsert feature with an on duplicate key clause appended to its insert statement, as follows, where person_id is the surrogate primary key:
insert into person (person_id, last, first)
values (1234, 'Smith', 'John')
on duplicate key update
last = 'Smith',  first = 'John'
Since the primary key, 1234, is known, this must have resulted from a form that was populated from an existing record. As there is already a row with that key, it’s a duplicate, and the update clause is executed.
If the form is initially empty, there is no preexisting primary key, so the upsert might look like the following:
insert into person (person_id, last, first)
values (NULL, 'Smith', 'John')
on duplicate key update
last = 'Smith',  first = 'John'
Here there’s no duplicate key, so the insert is performed.
It seems that MySQL’s upsert does what we want, but there’s a problem. Recall that in Chapter 4 I said that if you define a surrogate primary key when there’s already a natural candidate key, you should place a unique constraint on the candidate key to prevent duplicates. Suppose you’ve done that for the natural key (last, first). If the user attempts to insert a new record for John Smith when there is already a John Smith there, an update will be performed, even though you supplied no surrogate key. Why? Because the clause reads “no duplicate key,” not “no duplicate primary key.” Worse, if you attempt to get the surrogate key, because it was supposed to be a new row and you need the surrogate key, the method PDO::lastInsertId (which appeared in Listing 5-5) won’t give it to you, because there was no insert. Wait, there’s more: if the duplicate key was an accident, you won’t get an error from MySQL that the constraint was violated, so you won’t be able to warn the user. In short, the presence of any key other than the primary key can wreak havoc.
It would seem that the situation is better if the primary key is natural. I don’t think (last, first) is a very good natural key, because identical first and last names are so common. Be that as it may, if that is the natural key, inserting a row when the key is new and updating an existing row are the correct behaviors, and the upsert statement does it automatically.
There’s still a problem, however: if there’s a name change—John Smith got married and decided to take on his new husband’s name—it will be treated as an insertion, and now newly married John Doe has two records in the database. But this is really a problem with the poor choice of a natural key, not a problem with the upsert statement itself. It’s one reason why I usually prefer surrogate keys. With a surrogate key, any change to any (natural) column is straightforward.
So, I hope I’ve convinced you that the MySQL upsert statement is so full of special cases and weird side effects that it’s not worth using, other than where you have a simple, natural key. Instead, just use plain insert when the row is new, and update when you’re updating. Sounds simple, and it is, especially when compared with the half-dozen paragraphs it took me to explain the hazards of upserts.
As you might expect, I don’t code sequences of inserts and updates all over the place. I have a single method, DbAccess::update, to do the work for me. Unlike DbAccess::query, it doesn’t take an SQL statement but rather a specification that it uses to construct and execute the appropriate statement. Here’s its declaration.
DbAccess::update($table, $pkfield, $fields, $data,
  &$row_count = null)
The first argument is the name of the table to be updated, and the second is its primary key column, assuming it’s a single column, which it always is for me. Then comes an array of the columns to be inserted or updated, and then another array that contains the column values. Supplying $_POST, $_GET, or $_REQUEST for the $data argument is common, although you can also synthesize an array just for the call. The last, optional, argument is a count of how many rows were affected so you can verify that the insert or update worked by checking that its value is one. (If the primary key doesn’t match any record, an update won’t do anything, so it’s not an error that would throw an exception.)
Suppose you have a form for a member of a club that might contain data for a new member (it started out empty, with no primary key stored in a hidden field) or might contain updated data for an existing member. Then, when the submitted form is received (e.g., the Save button was clicked), you would execute this single statement.
$pk = $this->db->update('member', 'member_id',
  array('last', 'first', 'street', 'city', 'state',
  'specialty_id'), $_POST);
The table is member, the primary key is member_id, six fields are to be inserted or updated (not counting the surrogate key, member_id), and values for those fields might be in the $_POST array. I say “might be” because a value for member_id won’t be present if it wasn’t in the form. The method figures out whether an insert or update is needed, executes it, and then returns the value of the primary key if it was an insert and the primary key was a surrogate.
DbAccess::update might seem like a strange method, but it exactly reflects how I process the Save button, and I use it all the time.
Listing 5-6 shows the code for DbAccess::update.
Listing 5-6. DbAccess::update Method
function update($table, $pkfield, $fields, $data,
  &$row_count = null) {
    $input_parameters = array();
    $upd = '';
    foreach ($fields as $f) {
        if (!isset($data[$f]) || is_null($data[$f]))
            $v = 'NULL';
        else {
            $v = ":$f";
            $input_parameters[$f] = $data[$f];
        }
        $upd .= ", $f=$v";
    }
    $upd = substr($upd, 2);
    if (empty($data[$pkfield]))
        $sql = "insert $table set $upd";
    else {
        $input_parameters[$pkfield] = $data[$pkfield];
        $sql = "update $table set $upd
          where $pkfield = :$pkfield";
    }
    $stmt = $this->query($sql, $input_parameters, $insert_id);
    $row_count = $stmt->rowCount();
    return $insert_id;
}
The foreach loop builds up a list of assignments of parameters—not actual values!—to the columns in the $fields argument. That is, if the column last is listed, the assignment will be last=:last, if there is a non-null value in the $data array, and last=NULL otherwise. It also takes the value from $data and puts it into $input_parameters. This is required because the elements of $input_parameters have to match the named parameters in the SQL statement exactly. It’s possible, even common, for whatever is passed in for $data to have extra elements in it, especially if it was, for example, $_REQUEST. The function does more work, so using it is easier.
The way the list is built puts an extra comma and space at the front, so the call to substr lops them off.
Now comes the decision: if no primary key was specified in the $data array, the statement will be an insert; otherwise, an update. In the latter case, an element for the primary key is added to $input_parameters, because that parameter is referenced in the where clause of the update statement.
Note that I take advantage of the nonstandard MySQL insert statement that allows a list of assignments, just as update does. That saves a few lines of coding that would be required for the standard form of insert that takes a list of columns and then a values clause with a list of values.
The actual work of executing the parameterized statement is done by DbAccess::query. All that’s left is to set the row count and return whatever DbAccess::query provided in the way of an insert ID.
You may have noticed that the SQL strings contain PHP variable substitution, a seeming violation of my rule. However, the rule is about variables that contain data values. None of those PHP variables do: they’re table names, column names, and parameter names, none of which came from the user. The values themselves are quarantined in the $input_parameters array.
The two main methods of DbAccess, query and update, handle about 99% of all the MySQL interfacing in my applications. That’s a lot from two very small functions!
Now it’s time to look into how a PHP program, running on a server, interacts with a browser, running on the client. (In the case of a development system, where the server is local, it’s still useful to distinguish between server and client.) Much of what follows will be familiar to you, but listen to what I have to say anyway, even if it’s a review, because it will help to understand how the user interacts with the PHP application.
Here’s how HTTP works, basically: when you type a URL into your browser’s URL field, the browser connects to the server you specify by looking up its name (e.g., basepath.com) in a directory service called DNS (Domain Name Service) to find its IP address, and then connecting via a communication protocol called TCP/IP. Once the connection is made, browser and server can exchange messages. Initially, the server is listening—the browser is expected to go first.
Usually, the browser sends a GET message to the server. You can try this for yourself, without a browser, by opening up a telnet session to the server and typing the GET command yourself. On a *nix (UNIX-like) system, including Mac OS, from whatever terminal application you’re running, you use a command called telnet. On Windows, you may have to install it from the Control Panel applet Programs and Features; click “Turn Windows features on or off” and then check Telnet Client, as shown in Figure 5-4.

Figure 5-4. Installing Telnet on Windows
Here’s a PHP program that I put on basepath.com in the file dump.php.
<?php
print_r($_REQUEST);
?>
I executed it via telnet (on the client, of course) as shown in Listing 5-7; what I typed is in bold.
Listing 5-7. GET Request Entered via telnet
$ telnet basepath.com 80
Trying 75.98.162.194...
Connected to basepath.com .
Escape character is '^]'.
GET /dump.php?p1=mustard & p2=pepper HTTP/1.1
Host: basepath.com

HTTP/1.1 200 OK
Date: Fri, 17 May 2013 15:43:09 GMT
Server: Apache
X-Powered-By: PHP/5.3.8
Transfer-Encoding: chunked
Content-Type: text/html

31
Array
(
    [p1] => mustard
    [p2] => pepper
)

0

Connection closed by foreign host.
$
Note that I had to hit the Return/Enter key twice after typing the Host line. (You don’t see the two blank lines because of the page break.) The server came back with a response starting with HTTP/1.1 200 OK, followed by some lines that are called headers. The number 31 is a count of the characters in the first chunk, because the Transfer-Encoding header says the data will be in chunks. There’s only one chunk, and then a count of zero indicates that there are no more. You’ll recognize the first chunk as what the PHP program wrote. It’s just the output of the print_r function; I didn’t bother surrounding it with HTML.
Note that on the GET line I typed, I supplied two parameters, p1 and p2, and those were automatically placed by PHP into the global $_REQUEST array. Actually, they’re in the $_GET array, but $_REQUEST includes both $_GET and $_POST (which I’m about to explain).
As I showed, when the browser issues a GET, parameters go on the same line as the URL, which you’re familiar with, as you’ve seen such parameters many times in your browser’s URL field. That’s a disadvantage of placing parameters there: the user can see them. They also go into history and bookmarks.
For more privacy, the browser can use POST, instead of GET, and enter the parameters in the message sent to the server. Then they’re not visible in the browser URL field, in history, or in a bookmark. Listing 5-8 shows the same two parameters as before but entered with a POST request. This time PHP puts them into the $_POST array and also into the $_REQUEST array. For some reason, this time the response from the server isn’t chunked. Whatever, it’s not something you care about, since it’s the browser’s job to deal with what the server sends.
Listing 5-8. POST Request Entered via telnet
$ telnet basepath.com 80
Trying 75.98.162.194...
Connected to basepath.com .
Escape character is '^]'.
POST /dump.php HTTP/1.1
Host: basepath.com
Content-Type: application/x-www-form-urlencoded
Content-Length: 21

p1=mustard& p2=pepper
HTTP/1.1 200 OK
Date: Fri, 17 May 2013 15:40:48 GMT
Server: Apache
X-Powered-By: PHP/5.3.8
Content-Length: 50
Content-Type: text/html

Array
(
    [p1] => mustard
    [p2] => pepper
)
Connection closed by foreign host.
$
You should always have your forms use POST, and you’ll find it easiest if buttons not in forms and anchors (HTML <a ...> element) use GET. (It’s possible to get them to use POST, too.)
Aside from the example I just showed, you don’t interact with a web server via telnet. What happens is that the PHP program, or something else running on the server, maybe a static HTML page, puts some interactive element on the page that the browser is showing, and then, when the user clicks that element, a GET or POST is sent. That invokes the PHP program, the PHP program does some processing, and then sends some other HTML to the browser. And so on, and so on . . . that’s how applications work.
The most common interactive element is the form, which you’ve no doubt already used. For example, there’s one in Listing 5-9, shown on the screen in Figure 5-5 with some data entered by me. (Some CSS to lay out the form isn’t shown.)
Listing 5-9. A Simple Form
echo <<<EOT
    <form action=dump.php method=post accept-charset=UTF-8>
    <label for=p1>p1:</label>
    <input type=text size=50 name=p1 id=p1>
    <label for=p2>p2:</label>
    <input type=text size=50 name=p2 id=p2>
    <input type=submit name=button_name value='Click Me'>
    </form>
EOT;

Figure 5-5. Form with entered data
Note that the form’s action is set to dump.php, the same program that the telnet requests executed, which wrote what you’d expect to the browser.
Array ( [p1] => hotdog [p2] => pickle [button_name] => Click Me )
When I’m coding, I often dump out the $_REQUEST array to see what’s coming into the PHP program, and then use that as a guide to what parameters were sent and what their names are. Once I have the program pretty much running, I delete the dumping code, of course. In the present case, you can see that clicking the form’s submit button added an element to the $_REQUEST array, button_name, which means that that button was clicked; otherwise, the element wouldn’t be there. I don’t care about its value, just its name. In my coding, every button has a different name, and that’s what I use to determine what was clicked. An alternative is to use the value, but, as the value is seen by the user as the button’s label, it’s subject to modification as the user interface is tweaked, and even translation, if the application is localized. So, use the name.
It’s usually best to keep all of the interaction associated with one form together in the same PHP file, instead of having the form’s action be a completely different file, as in Listing 5-9. Keeping the processing code in the same file as the form increases cohesion; you end up with a bunch of largely independent mini-applications, each in its own file, and each talking only to the database. As I mentioned way back in Chapter 1, database centricity allows parallel development, reduces coupling between modules, and facilitates debugging and testing. (Cohesion good; coupling bad.)
So, most of your main PHP files (not including classes and other common code that are included) will have some code at the top to perform actions if any buttons are clicked and otherwise generate some output, if the file was invoked with no parameters. Frequently, that output is generated even if an action is taken. For example, if a form is submitted that causes a new row to be added to a table, it’s nice to display the form again in case the user wants to make some changes.
With this in mind, the form in Figure 5-5 could be handled by the mini-application shown in Listing 5-10, which is organized as I suggested: an action part, to process any button clicks, followed by a display part.
Listing 5-10. Action Processing Followed by Form Display
if (isset($_REQUEST['button_name'])) {
    echo <<<EOT
        Button was clicked.
        <br>p1: {$_REQUEST['p1']}
        <br>p2: {$_REQUEST['p2']}
EOT;
}
echo <<<EOT
    <form action="{$_SERVER['PHP_SELF']}" method=post
      accept-charset=UTF-8>
    <label for=p1>p1:</label>
    <input type=text size=50 name=p1 id=p1>
    <label for=p2>p2:</label>
    <input type=text size=50 name=p2 id=p2>
    <input type=submit name=button_name value='Click Me'>
    </form>
EOT;
Note that the form action is now $_SERVER['PHP_SELF'], which sends the submitted data right back to the same file. The code at the top intercepts a button click, does the processing—not much in this case—and redisplays the form. It’s blank, because I didn’t code any value attributes for the two form fields to prefill them with the submitted data. Figure 5-6 shows the output.

Figure 5-6. Output of action processing followed by blank form
The program so far is OK with only one button, but with more buttons the if statements at the top of the file start to pile up, and soon there’s a real mess. Figure 5-7 shows such a form.
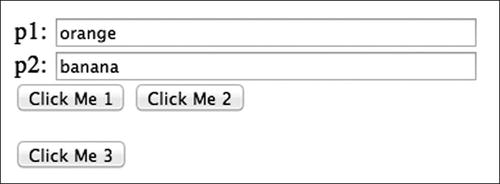
Figure 5-7. Form with three buttons
A clean way to handle several buttons is to adopt the convention that action buttons will have names starting with action_. Then the code at the top of the file can simply loop through the $_REQUEST array looking for names that begin with action_, and call a function by that name. That allows each button’s action to be put into its own function, a much cleaner arrangement than a series of if statements. It’s just a few lines.
foreach ($_REQUEST as $name => $value)
    if (strpos($name, 'action_') === 0)
        $name();
For example, if the name attribute of the Click Me 2 button is action_button2, its action code goes into a function by that name.
function action_button2() {
    echo <<<EOT
        <p>Button 2 was clicked.
        <p>{$_REQUEST['p1']} -- {$_REQUEST['p2']}
EOT;
}
Listing 5-11 shows the whole program. Note that the third button is freestanding, not in a form, so there’s no action attribute on a form element to indicate what file is supposed to be invoked, as there is for the first two buttons. Instead, JavaScript for the onclick event changes the browser’s window.location, which causes it to request the specified URL. As I said, in this case it’s easiest to put the parameters there as well, so they’ll get into the PHP program in the $_GET array, instead of the $_POST array. But, the program uses the $_REQUEST array, so it doesn’t care.
Listing 5-11. Program for a Form with Three Buttons
foreach ($_REQUEST as $name => $value)
    if (strpos($name, 'action_') === 0)
        $name();
echo <<<EOT
    <form action="{$_SERVER['PHP_SELF']}" method=post
      accept-charset=UTF-8>
    <label for=p1>p1:</label>
    <input type=text size=50 name=p1 id=p1>
    <label for=p2>p2:</label>
    <input type=text size=50 name=p2 id=p2>
    <br>
    <input type=submit name=action_button1 value='Click Me 1'>
    <input type=submit name=action_button2 value='Click Me 2'>
    </form>
    <button onclick='window.location="{$_SERVER['PHP_SELF']}
?action_button3=1&p3=cake"'>
Click Me 3
</button>
EOT;

function action_button1() {
    echo <<<EOT
        Button 1 was clicked.
        <br>{$_REQUEST['p1']} -- {$_REQUEST['p2']}
EOT;
}

function action_button2() {
    echo <<<EOT
        Button 2 was clicked.
        <br>{$_REQUEST['p1']} -- {$_REQUEST['p2']}
EOT;
}

function action_button3() {
    echo <<<EOT
        Button 3 was clicked.
        <br>
EOT;
    print_r($_REQUEST);
}
Figures 5-8 and 5-9 show the output from clicking the first and third buttons.

Figure 5-8. Output from clicking the first button

Figure 5-9. Output from clicking the third button
In case it wasn’t obvious, since the third button isn’t in the form, it has nothing to do with the form, and anything typed into the form wouldn’t go with it into the PHP program. That is, it’s not a submit button; it’s a freestanding one. Usually, buttons like this take the user to some other mini-application, say from the Members page to the Donations page.
Form text fields and buttons are only two of many possible interactive elements. There are standard ones like check boxes and select lists, and custom ones like date pickers. I’ll get into those in Chapter 6, as text fields and buttons are all we need for now. No sense in complicating matters prematurely.
Integrating Forms and Databases
Now’s a good time to integrate the two main topics I’ve covered in this chapter so far, database access and forms. I’ve relabeled the two form fields “last” and “first,” and they’ll hold the last and first names of a member table, whose surrogate primary key is member_id. Figure 5-10 shows the form.

Figure 5-10. Member form with Find, New, and Save buttons
I’ll start with a function to show that form, populated with data from an argument array $data. It’s in Listing 5-12.
Listing 5-12. Function to Show the Member Form
function show_form($data) {
    $member_id = empty($data['member_id']) ? '' :
      $data['member_id'];
    $last = empty($data['last']) ? '' :
      $data['last'];
    $first = empty($data['first']) ? '' :
      $data['first'];
    echo <<<EOT
        <form action='{$_SERVER['PHP_SELF']}' method=post
          accept-charset=UTF-8>
        <label for=last>Last:</label>
        <input type=text size=50 name=last id=last
          value='$last'>
        <label for=first>First:</label>
        <input type=text size=50 name=first id=first
          value='$first'>
        <input type=hidden name=member_id value='$member_id'
          hidden>
        <br>
        <input type=submit name=action_find value='Find'>
        <input type=submit name=action_new value='New'>
        <input type=submit name=action_save value='Save'>
        </form>
EOT;
}
There are two things to note about this function.
- The variables to hold the values from the passed-in array have to be set to an empty string if they don’t exist in the array, to avoid a PHP error message about referencing a nonexistent element.
- The member_id is passed through the form in a hidden field.
At the top of the file I include the common code, which brings in DbAccess. I don’t want this file to be in the EPMADD namespace because that interferes with calling the action functions dynamically. There’s a way around that, but I’m not going to bother with it because soon I’m going to show a completely different way of handling forms that will make the problem go away.
The code to call the appropriate action function is similar to what I’ve shown before, except this time I pass in a reference to the DbAccess instance and get the data array back, which gets passed into show_form. It’s in Listing 5-13.
Listing 5-13. Top of File, Showing Call to Action Function and show_form
require_once 'lib/common.php';
$db = new EPMADDDbAccess();
$data = array();

foreach ($_REQUEST as $name => $value)
    if (strpos($name, 'action_') === 0) {
        $data = $name($db);
        break;
    }
show_form($data);
Finally, Listing 5-14 shows the three action functions, with very little to do because of the DbAccess functions I showed earlier in this chapter. Function action_new is especially interesting.
Listing 5-14. Action Functions
function action_find($db) {
    $last = empty($_REQUEST['last']) ? '' : $_REQUEST['last'];
    $stmt = $db->query('select member_id, last, first from
      member where last like :pat',
      array('pat' => "$last%"));
    if ($row = $stmt->fetch()) {
        return $row;
    }
    echo "<p>Not found";
    return array();
}

function action_new($db) {
    return array();
}

function action_save($db) {
    $db->update('member', 'member_id',
      array('last', 'first'), $_REQUEST);
    echo "saved";
    return $_REQUEST;
}
If you’ve followed my presentation carefully, you might have noticed some serious defects.
- All errors throw exceptions, but I’m not handling them.
- The Find button doesn’t use the first-name field, which isn’t obvious to the user.
- If multiple rows are found, only the first is shown.
- The page’s appearance could be substantially improved. Some of this could be done with CSS, but note that I didn’t even bother to put in some of the required HTML (DOCTYPE, html, head, etc.).
I’m not going to fix any of these problems, because this whole program is just an example, to show the general structure of PHP applications that handle forms. I promise that by the end of this chapter I’ll show better code that’s robust enough to use in your own applications.
Choosing Between GET and POST
In the next chapter, when I discuss security in detail, I’m going to say that you should pass parameters to web pages with POST, not with GET. Using POST with forms is easy enough—you just specify POST on the form element—but it’s complicated to do with buttons and page transfers, for which PHP programmers generally use the header function, with parameters specified in the URL.
I go through all those complications in the next chapter, but for now, in this chapter, I’ll be using GET because that’s what you’re probably used to, even though that’s not the best approach. It’ll all be sorted out in the end.
PHP Sessions
Conceptually, a session is a related group of interactions between a user and some PHP programs invoked by the web server. What relates them is that they can share data, not only via the database (something any code with access to the database can do) but more directly, via a PHP array called $_SESSION that the programs in the session share. If one program sets an element of $_SESSION, any other program that’s a member of the session can also access that element.
The trick that makes sessions work is that PHP stores the contents of $_SESSION in a private file on the server that has a very-hard-to-guess name (e.g., 88734ab92a219031c4acd7ea6ee0ff83) called the session ID. Each session has a unique name. If a client running a web browser knows the name, it has access to the session, as does any PHP program running on the same server. In fact, since a program running on any server can mimic a web browser, just as I did with telnet earlier in this chapter, once the name is out, the session is blown. And, the name is the entire protection—there’s no password or anything else involved.
So, to limit sessions to only authorized clients, which means the actual person who started the session, it’s important to keep the session ID private. That’s done by PHP when the session is created by storing the ID in a cookie—a piece of named data—in the user’s browser. Unlike most other cookies, session cookies are kept in memory, so when the browser exits, the cookie and the record of the session ID is gone, too. The session ID has to be sent once from server to browser, and perhaps many times from browser to server as the session proceeds, so, to be really secure, the entire session should be encrypted, which means that the server should be set up for https access, rather than plain http. This is referred to as a Secure Sockets Layer (SSL) session.
A PHP application that wants to run as a session should name the session, so each application has a unique name. That way a user running the Front Range Butterfly Club application will be in a different session than the same user running Facebook. You don’t have to try to keep the session names secret, as the user will see them if he or she displays the list of cookies. In fact, it’s a good idea to make the name descriptive so the user will know which cookie it is. In my examples, I use the name EPMADD (from the title of this book).
Since a cookie goes with a browser execution, there’s one session per application (session name) and user. In database terms, you can think of the name and the user as a composite primary key, with the session ID being the data. If you leave your computer for a while and I sit down at it, I can access your cookie and get your session ID. But, from my own computer, your cookies are completely inaccessible. That’s true even if I can access your files because, as I said, session cookies are kept in memory. Figure 5-11 shows an actual cookie, displayed by my Chrome browser.
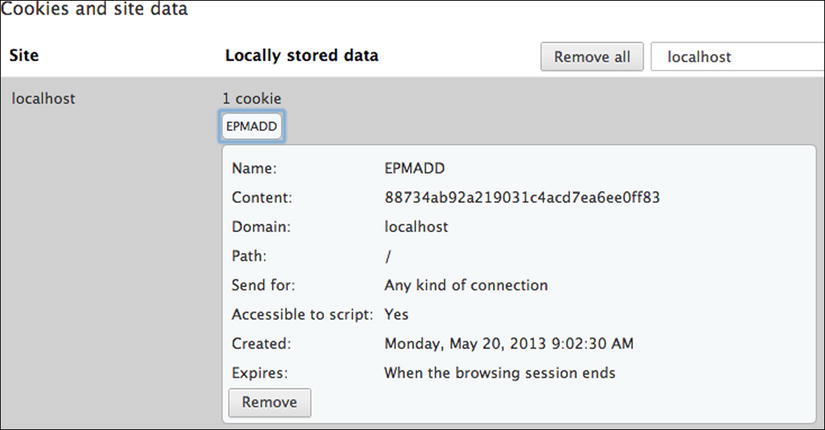
Figure 5-11. Cookie displayed by Chrome browser
Clearly, session IDs have to be both secret and accessible to the PHP programs that make up the application. Cookies and an SSL connection accomplish that. It’s also possible to run sessions without cookies at all, by including the session ID in every URL, but that makes it appear in your web browser’s URL field, so it’s a really bad idea. You might inadvertently e-mail that link to someone or post it to Facebook, which probably will cause no harm, but it’s a security leak nonetheless. In the code I’m about to show, I specifically prevent PHP from storing session IDs anywhere other than in cookies. If the user has disabled cookies, the application will refuse to run.
The session data itself are kept in a temporary file on the server. On my development system, I executed the following statement in my application:
$_SESSION['somedata'] = 'I am some data';
I then found the session file and viewed its contents (cat is the UNIX view-file command).
$ cat /Applications/MAMP/tmp/php/sess_88734ab92a219031c4acd7ea6ee0ff83
userid|s:4:"marc";somedata|s:14:"I am some data";
So you can see that there’s nothing very mysterious about sessions. (I put userid there too; I’ll explain why very shortly.)
Starting a PHP session is pretty simple. Two lines of code are all you need, but four lines are better.
ini_set('session.use_only_cookies', TRUE);
ini_set('session.use_trans_sid', FALSE);
session_name(SESSION_NAME);
session_start();
The first line forces only cookies to be used and, for good measure, the second prevents PHP from including the session ID in URLs. Then I set the session name, having previously defined the constant SESSION_NAME as EPMADD. Finally, session_start looks among the cookies sent from the browser for one named EPMADD. If it’s found, it has the session ID, and it uses that to set up $_SESSION from the session data file, whatever the application decided it wanted to share. If the cookie isn’t found, it’s assumed that a new session is to be created, and PHP sends a header along with whatever else the PHP program is going to send to the browser, to cause the cookie to be created. It’s then used the next time this sequence of statements is executed.
I put those four statements in a method of a Page class called start_session. (I’ll be adding a lot more to the Page class as we go.)
Ironically, it’s a lot more trouble to destroy a session than to create one, something you’ll want to do when, for example, the user logs out. You have to do three things: clobber the $_SESSION array, tell the browser to dispose of the cookie, and delete the temporary data file on the server. That’s in the method destroy_session.
private function destroy_session() {
    $_SESSION = array();
    if (ini_get("session.use_cookies")) {
        $params = session_get_cookie_params();
        setcookie(session_name(), '', time() - 42000,
          $params["path"], $params["domain"],
          $params["secure"], $params["httponly"]);
    }
    session_destroy();
}
To delete the cookie, it’s set to expire about 11 hours ago. What time you use doesn’t matter, but, as everyone knows, the best number is 42. (See The Hitchhiker’s Guide to the Galaxy by Douglas Adams (Pan Books, 1979) for more information; actually I copied this code from the official PHP documentation, written by people who presumably know how to destroy a session.)
Few of my applications store much in $_SESSION. I’d use it if I wanted to keep track of the user’s breadcrumbs (his or her navigation path), or recent searches, or things like that. There is one very important thing I do store there, though: the userid if the user is logged in. I want to display it at the bottom of each page (or the top—it’s up to you), but, more important, I want to see if it’s there. If it is, there is a $_SESSION array, which means there’s a session, and if the userid is there, the user successfully logged in. Such a user has the right to run the application, with whatever privileges I’ve chosen to give him or her.
I have a method in Page that tells me whether the user is logged in.
protected function is_logged_in() {
    return !empty($_SESSION['userid']);
}
Some pages, such as the login page itself, don’t run in a session. The Page class-variable $want_session indicates whether the page runs in a session. Every page thus executes this sequence before any application code.
if ($this->want_session && !$this->is_logged_in()) {
    $this->message("Not logged in.");
    echo '<div class=div-process></div>'; // to get spacing
    $this->bottom();
    exit();
}
The method bottom just outputs whatever the application wants to have at the bottom of the page (such as the userid).
I mentioned that the login page itself doesn’t run in a session. It verifies the user’s userid and password, and then starts the session if they’re OK. Otherwise, it reports an invalid login and gives the user another chance, still with no session. Any pages that contain marketing information and the like don’t have to run in a session, either. But the application itself does.
Just to complete the session-related methods in Page, here’s one to log in a user
protected function login($login) {
    $this->start_session();
    $_SESSION['userid'] = $login;
}
and one to log a user out
protected function logout() {
    $this->start_session();
    $this->destroy_session();
}
One more thing about page headers, one of which is set when a cookie needs to be created: they’re headers, so they have to precede any other output to the browser. If you attempt to set a header too late, you get that message you’ve probably seen a few times in your life.
Warning: Cannot modify header information - headers already sent
It’s only a warning, but it’s serious, because the header wasn’t sent. For this reason, you have to execute Page::start_session before any other code on the page. Looking at Page::login, you see that it has to be called before any output, too, because it calls Page::start_session. Ditto for Page::logout. These restrictions will affect how Page generates the output, as I’m about to show.
A Page Framework
All of an application’s HTML pages should have a consistent appearance and be processed in a uniform way to ensure that all required processing, such as making sure a user is properly logged in, is performed correctly. To that end, I always use a common page structure and drive my processing from the same page template. I’ll show a simple approach here, although it’s complete enough so that I’ve used it in real applications, and you can, too.
Page Structure
Every one of my application pages consists of the same five divisions, as shown in Figure 5-12.

Figure 5-12. Division of a page
The two outside divisions, div-top and div-bottom, contain standard items that appear on every page, such as a logo, a top-level menu, a copyright notice, the userid, and so on. There’s a message area, div-message, used only for messages that are generated during PHP processing for the page. I put these at the top so the user can easily spot them. Next comes what I call a request division, div-request, which is used for whatever the page displays initially. Often it’s a search form that’s used to request the data the user wants to work on. Finally, when the PHP behind the page performs a request, it displays the output, often another form, in the div-process division. How these last two divisions are used varies from page to page, and some pages only use one of them.
As the location and appearance of the divisions are controlled by CSS, you can change what they look like without tampering with the application code itself. In particular, you can use one layout for desktop and laptop computers and another one for mobile devices, which usually have much smaller screens.
Figure 5-13 shows the member page for the (fictitious) Front Range Butterfly Club. The logo, club name, and menu bar are in div-top, and the notice and link at the bottom are in div-bottom. There’s no message, so div-message is hidden. The form for finding a member’s record and the Find and New buttons are in div-request, and div-process is empty.
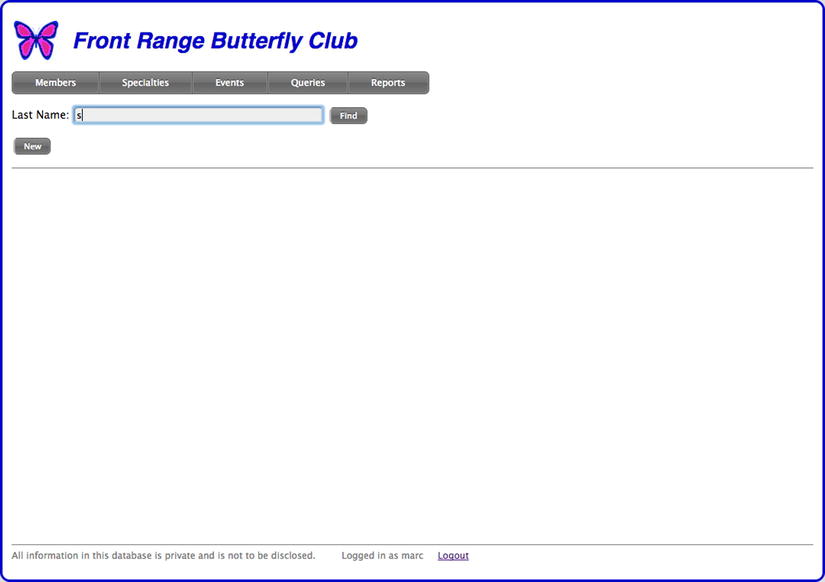
Figure 5-13. Initial member page
Clicking the Find button caused the application to retrieve all records for members whose last names begin with “s” and display a summary of them in the div-process division, as shown in Figure 5-14. From there, clicking a Detail link shows the data for that member in a form, again in the div-process area—and so on, as the member mini-application runs. At some point, the user might choose something else to do from the menu, and then that mini-application runs, with the same page structure.

Figure 5-14. Found members
This rigid page structure may sound restrictive, but as the contents, location, and appearance of the div-request and div-process divisions are entirely up to each application, it’s actually general enough for almost anything.
A class called Page, which handles the standard processing for each page, implements the uniform page structure. A subclass is what’s instantiated, different for each mini-application, and methods of that subclass are called as page processing proceeds. Most of those methods are the equivalent of the action functions I showed in Listing 5-11.
The file member.php, which is the member mini-application, has the structure in Listing 5-15. When executed with no URL parameters, processing begins with the request method. Then, as before, any button clicks result in calls to one of the action methods. The code to examine the $_REQUEST array to determine what action functions to call is in the base class Page, as is the code to output the overall HTML for the page, including the five standard divisions (div-top, etc.).
Listing 5-15. Structure of a Typical Page
class MyPage extends Page {

protected function request() {
    // ...
}

protected function action_find() {
    // ...
}


protected function action_new() {
    // ...
}

protected function action_detail() {
    // ...
}

protected function action_delete() {
    // ...
}

protected function action_save() {
    // ...
}

}

$page = new MyPage('Member'),
$page->go();
I’ll show the code that goes inside each of these methods, but if you’ve already studied Listing 5-14, what I’m doing will be familiar.
First, the request method, in Listing 5-16, that outputs the Find form. Note that the two buttons have names that start with action_ (in bold), which is how the base class knows what method to invoke when you click them.
Listing 5-16. request Method
protected function request() {
        echo <<<EOT
<form action="{$_SERVER['PHP_SELF']}"
  method=post accept-charset=UTF-8>
<label for=last>Last Name:</label>
<input type=text size=50 name=last id=last
  placeholder='Last Name'>
<input class=button type=submit name= action_find value='Find'>
<br>
<input class=button type=submit name= action_new value='New'>
</form>
EOT;
 }
Clicking the Find button causes you to execute member.php again, but this time you invoke the action_find method, as shown in Listing 5-17.
Listing 5-17. action_find Method
protected function action_find() {
$url = $_SERVER['PHP_SELF'];
$stmt = $this->db->query('select member_id, last, first
from member where last like :pat',
array('pat' => "{$_POST['last']}%"));
if ($stmt->rowCount() == 0)
$this->message('No records found', true);
else {
echo '<p>';
while ($row = $stmt->fetch()) {
$name = "{$row['last']}, {$row['first']}";
echo <<<EOT
<p class=find-choice>
<a href=$url?action_detail&pk=$pk>Detail</a>
<a href=$url?action_delete&pk=$pk>Delete</a>
$name
EOT;
}
}
}
The base class Page executes action_find, and all the other action functions, so that their output is in the div_process division. The only thing in action_find that I haven’t shown before is the base-class method Page::message, which displays a message in the div_message division. The HTML for that division has already been output before action_find executes, because div-message is at the top of the page. So, instead of outputting straight HTML to display the message, the method outputs JavaScript to modify the page’s content. This JavaScript is executed as soon as it gets to the browser, but it’s a good idea to delay the actual content modification until all of the page’s HTML has been processed by the browser. The way to do that is with the jQuery ready function. I’ll show Page::message later, but what it does is equivalent to outputting the following to the browser:
<script>
    $(document).ready(function () {
        $('#div-message').css('padding', '10px'),
        $('#message-error').html("No records found");
    });
</script>
The argument to ready is an anonymous function that, when executed, adds padding to div_message and then puts the message itself into a paragraph inside that division. The function is queued up; it’s executed when the browser has processed all the HTML for the page. You could just output the message directly, maybe as follows:
<p style='color:red;'>No records found
but then it would appear at some point on the page depending on what other HTML was being written, and the user might miss it. It’s better if all messages show up in the same place, which is what the JavaScript approach achieves. As I said, I’ll come back to messages later.
Seeing a list of found members, as shown in Figure 5-14, the user might click one of the Detail links, which executes the action_detail method, shown in Listing 5-18.
Listing 5-18. action_detail Method
protected function action_detail($pk = null) {
    if (is_null($pk))
        $pk = $_REQUEST['pk'];
    $stmt = $this->db->query('select * from member
      where member_id = :member_id',
      array('member_id' => $pk));
    if ($stmt->rowCount() == 0)
        $this->message('Failed to retrieve record.'),
    $row = $stmt->fetch();
    $this->show_form($row);
}
The argument $pk is used in case the function is called directly, not by the Page framework; I’ll show an example of that later. If the argument is omitted, the primary key comes from the $_REQUEST array; recall from Listing 5-17 that the Detail link in action_find supplied it as a URL parameter.
The function show_form, in Listing 5-19, shows a rather utilitarian form, using the column names as form labels, which is usually not what you’d want, but it will do for now.
Listing 5-19. show_form Function
protected function show_form($row) {
    echo "<form action='{$_SERVER['PHP_SELF']}'
      method=post accept-charset=UTF-8>";
    foreach (array('member_id', 'last', 'first', 'street',
      'city', 'state') as $col) {
        if ($col == 'member_id')
            $type = 'hidden';
        else {
            echo "<label for$col>$col:</label>";
            $type = 'text';
        }
        $v = is_null($row) ? '' : $row[$col];
        echo "<input type=$type id=$col size=50 name=$col
          value='" . htmlspecial($v) . "'>";
    }
    echo "<br><input class=button type=submit
      name=action_save value=Save></form>";
}
There are three things to note about show_form.
- The primary key has to be in the form so when the Save button is clicked the action_save method will have it, but it’s a hidden field.
- If the $row argument is null, the value of a field is the empty string. As we’ll see, this is what action_new uses to output an empty form.
- I called function htmlspecial (shown earlier in this chapter) for any values written to the page.
Replacing HTML special characters with their entities (e.g., < for <) is important in case there are any characters that could be interpreted as HTML. This is not only for appearance but also to guard against anyone trying to hijack the page by putting HTML or, especially, JavaScript, into a data field that would cause the page to do something other than what it was designed to do. The name for this kind of exploit is cross-site scripting (XSS), which I discuss in detail in Chapter 6.
Figure 5-15 shows this clumsy, but workable, form after the Detail button for Nina Stanton was clicked in Figure 5-14.
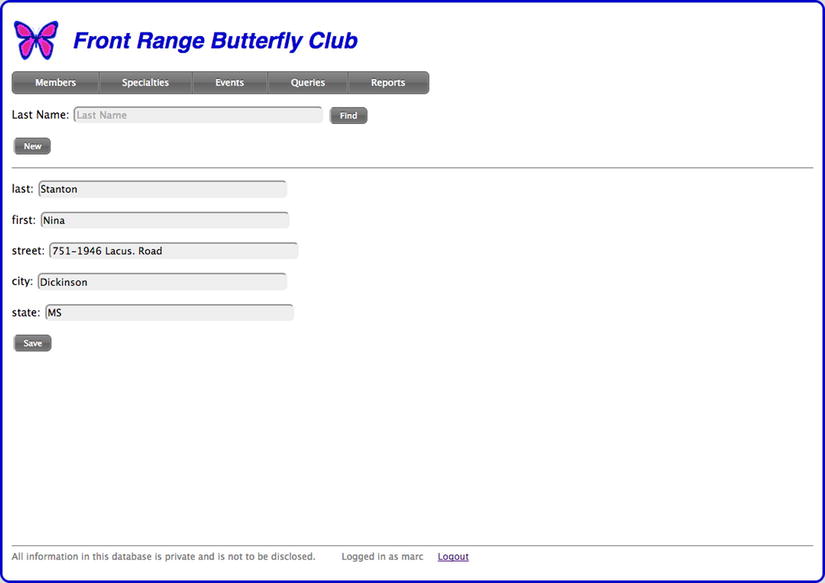
Figure 5-15. Form displayed by show_form method
If the New button is clicked, its action_new method takes advantage of show_form’s ability to output a blank form. In this case the member_id hidden field will be empty, which is how action_save, invoked by the Save button, knows that it’s a new record to be inserted. Listing 5-20 shows those methods.
Listing 5-20. action_new and action_save Methods
protected function action_new() {
    $this->show_form(null);
}

protected function action_save() {
    try {
        $pk = $this->db->update('member', 'member_id',
          array('member_id', 'last', 'first', 'street',
          'city', 'state'), $_POST);
    }
    catch (Exception $e) {
        $this->show_form($_POST);
        throw $e;
    }
    $this->action_detail($pk);
    $this->message('Saved OK', true);
}
The DbAccess::update method handles dealing with inserts versus updates automatically, so that’s not a problem. All the other code I’ve shown lets exceptions fall upward, to be handled by the Page base class, but here exceptions are caught so the form can be shown again in case there’s an error, giving the user an opportunity to fix the problem. (The error might have been caused by a constraint failure, as discussed in Chapter 4.)
If DbAccess::update works (no exception thrown), $pk holds the primary key if you inserted a new record, and, if you look again at Listing 5-18, you’ll see that action_detail retrieves that row. If you perform an update, $pk is null, so action_detail takes the primary key from $_REQUEST, where it was when action_save was called.
To say it another way, on an error the same form is displayed, and on success you retrieve the record again. There are other ways to code this, but this is the simplest way to ensure that the primary key is in the form after you insert a new record, because if the user then modifies what was just inserted, that needs to be an update, not another insertion. It’s not a lot of code, but it’s very carefully arranged.
By the way, that second argument to Page::message indicates that it’s a success message, rather than an error. You’ll see what it does when I show the code for Page::message, shortly.
The only method I haven’t talked about yet is action_delete, invoked when you click the Delete link, shown in Figure 5-14. It’s in Listing 5-21.
Listing 5-21. action_delete Method
protected function action_delete() {
    $stmt = $this->db->query('delete from member where
      member_id = :member_id',
      array('member_id' => $_REQUEST['pk']));
    if ($stmt->rowCount() == 1)
        $this->message('Deleted OK', true);
    else
        $this->message('Nothing deleted'),
}
If the Delete link is clicked, the row is deleted immediately, but it’s better to ask the user for confirmation. You could do this by having action_delete display a confirmation form and then making a button on that form invoke another action method that does the actual delete. But I prefer to ask for the confirmation with JavaScript, which can be done by changing the Delete link in Listing 5-17 to the following:
<a href='' onclick="DeleteConfirm('$name', '$pk'),">Delete</a>
The JavaScript function DeleteConfirm is
function DeleteConfirm(name, pk) {
    if (confirm('Delete ' + name + '?')) {
        event.preventDefault();
        window.location = document.URL +
          '?action_delete=1&pk=' + pk;
    }
}
Figure 5-16 shows an example. If the user approves, the browser’s URL is set to something like
member.php?action_delete=1&pk=117

Figure 5-16. Delete confirmation
(Actually, document.URL returns an absolute URL, but I’m showing just the file part.) Note the call to preventDefault() to prevent the anchor from going to its href location, which isn’t relevant.
As DeleteConfirm is independent of any application, it belongs together with other common JavaScript in a file named page.js, which the Page framework includes, as I’ll show shortly. There will be other JavaScript additions to that file later.
As the Page class has a lot of methods, you’ll find it easiest to follow along in the downloadable code for this book (www.apress.com) as you read the next section. If the code isn’t at hand, here’s the tree of files that the Page class refers to, along with three application pages (listed first) that are referred to in this chapter.
login.php
member.php
specialty.php

Directory incl:
    bottom.php
    logo.png
    page.css
    page.js
    top.php
    Directory menu_assets:
       ...

Directory lib:
    DbAccess.php
    Page.php
    Directory jquery:
        ...
In the code in this chapter and in this book generally, I don’t show some statements at the top of PHP files that set include paths, but you’ll see them in the downloadable code (www.apress.com).
Now that I’ve shown how sessions work and how the Page framework can be used to implement a trivial application, I’ll show its implementation, which is much simpler. Most of the code is in the Page::go method, and most of that I’ve already shown in one form or another.
First of all, Listing 5-22 shows the constructor, which just stores its arguments away for later use. The first is the title for the page, the second indicates whether this page should run in a session, and the third is a directory for included files, such as the contents of the div-top and div-bottom divisions.
Listing 5-22. Page Constructor
class Page {

protected $title, $want_session, $db, $incl_dir;

function __construct($title, $want_session = true,
  $incl_dir = 'incl') {
    $this->title = $title;
    $this->want_session = $want_session;
    $this->db = new DbAccess();
    $this->incl_dir = $incl_dir;
}

// ...

}
I’ve put code (as shown at the top of Listing 5-11) that calls an action method into a method by itself, in Listing 5-23, because it’s called both at the top, before any HTML is sent to the browser, and again inside the div-process division. Normal actions are prefixed with action_, as we’ve been doing; those to be executed before any other output start with pre_action_. The return value indicates whether an action method was called.
Listing 5-23. perform_action Method
private function perform_action($want_pre = false) {
    if ($want_pre)
        $pfx = 'pre_action_';
    else
        $pfx = 'action_';
    foreach ($_REQUEST as $k => $v)
        if (strpos($k, $pfx) === 0) {
            $this->$k();
            return true;
        }
    return false;
}
Now, as I said, Page::go does most of the work. It’s in Listing 5-24, and I’ll go through it part by part.
Listing 5-24. Page::go Method
public function go() {
    if ($this->want_session)
        $this->start_session();
    try {
        if ($this->perform_action(true))      // actions before output
            return;
        $this->top();
    }
    catch (Exception $e) {
        $this->top();
        echo '<p class=message-error>' .
          $e->getMessage() . '</p>';
        $this->bottom();
        return;
    }
    echo <<<EOT
<div class=div-message id=div-message>
<p class=message-error id=message-error></p>
<p class=message-ok id=message-ok></p>
</div>
EOT;
    if ($this->want_session && !$this->is_logged_in()) {
        $this->message("Not logged in.");
        echo '<div class=div-process></div>'; // to get spacing
        $this->bottom();
        exit();
    }
    try {
        echo '<div id=div-request class=div-request>';
        $this->request();
        echo '</div>';
        echo '<div class=div-process>';
        $this->perform_action();
        echo '</div>';
    }
    catch (Exception $e) {
        $this->message($e->getMessage());
    }
    $this->bottom();
}
As the first order of business, you join an existing session or start a new session, as I’ve already explained. Then, still before any output other than headers, you execute any pre_action_ methods. Most pages won’t have any, but, in particular, the login page does, as I’ll show when I get to it. Any errors are caught but, as you haven’t yet written div-message, they’re output directly to the page. This is OK, because any errors here are from internal processing, not because of anything the user did wrong.
Next the Page::top method is called to output whatever the application developer wants in the div-top division. Normally, Page::top is just
protected function top() {
    require_once "{$this->incl_dir}/top.php";
}
but a subclass of Page can override it.
Next comes the div-message division, with two paragraphs, one for errors and one for success messages. Having two paragraphs allows them to be styled differently with CSS. Initially, both paragraphs are empty and have padding and margins of zero, so the entire division takes up no space at all. As I showed, that will change if a message is displayed.
Next comes the session check that I showed in the section ”Session Transitions and Login Pages.” If the page is supposed to be run in a session but isn’t, a message is queued up and the page ends with a call to Page::bottom, which writes the contents of the div-bottom division:
protected function bottom() {
    require_once "{$this->incl_dir}/bottom.php";
}
Like Page::top, the subclass can override it.
Now, with all these preliminaries out of the way, it’s time for application code, which is pretty simple. Whatever the subclass has defined for Page::request is called in the div-request division; there’s a stub in the base class in case the application doesn’t define it. If there’s an action function to be called, it’s called in the div-process division. All this is in a try block, and the catching code displays the error message. Finally, Page::bottom is called.
All that’s left to show is Page::message, in Listing 5-25, the important part of which I already showed.
Listing 5-25. Page::message Method
protected function message($s, $ok = false) {
    if ($ok)
        $id = 'message-ok';
    else
        $id = 'message-error';
    $s = str_replace('"', "'", $s);
    $s = str_replace("
", '', $s);
    $s = str_replace("
", ' ', $s);
    $s = htmlspecial($s);
    echo <<<EOT
        <script>
        $(document).ready(function () {
            $('#div-message').css('padding', '10px'),
            $('#$id').html("$s");
        });
        </script>
EOT;
}
The text of the message passed in has to be substituted into JavaScript, so I replace double quotes with single ones and strip out carriage returns and newlines. (I could have used escaped double quotes, but I did it the easy way.)
That’s the whole Page framework. What I didn’t show is the included files that contain boilerplate HTML, principally top.php, shown in Listing 5-26. (Recall that it’s in the incl directory.)
Listing 5-26. HTML for Top of Page
echo <<<EOT
<!doctype html>
<html lang=en>
<head>
<meta charset=utf-8>
<title>{$this->title}</title>
<link rel=stylesheet type=text/css
 href="lib/jquery/css/dark-hive/jquery-ui-1.10.3.custom.min.css">
<link rel=stylesheet type=text/css
 href="incl/menu_assets/styles.css">
<link rel=stylesheet type=text/css href="incl/page.css" />
<script src="lib/jquery/js/jquery-1.9.1.js"></script>
<script src="lib/jquery/js/jquery-ui-1.10.3.custom.min.js"></script>
<script src="incl/page.js"></script>
</head>
<body>
<div class=page>
<div class=div-top>
<table border=0 width=100%><tr>
<td class=logo><img src=incl/logo.png>
<td class=company>Front Range Butterfly Club
</table>
</div>
EOT;
Note the variable substitution {$this->title} in the title HTML. Since this file is included and is PHP code, not just HTML, it can do things like that.
There are two CSS files: one for jQuery, which was downloaded from jqueryui.com/themeroller, where you can choose from stock themes or make your own, and one that contains the application’s CSS, for all the page elements (message-error, div_request, etc.).
There are three JavaScript files: two for jQuery, and one for the application, where functions like DeleteConfirm go, which I already showed. I’ll add more later. I like to download the jQuery files and put them on the server, which is what I’ve done here. That’s important for the development platform, since you want to be able to test without the Internet, but I do it for production as well, so I can control what JavaScript is being executed. You can also reference an external URL if you want.
<script
src=" //ajax.googleapis.com/ajax/libs/jquery/1.9.1/jquery.min.js ">
</script>
I’ve heard that using Google’s URL provides decreased latency, increased parallelism, and better caching, so you may want to do it that way.
In the body, the entire page is in a page division; it starts here, and ends in bottom.php. Next comes the div-top division, consisting of the logo and name of the site.
The file bottom.php, in Listing 5-27, is simpler.
Listing 5-27. HTML for Bottom of Page
echo <<<EOT
<div class=div-bottom>
<p class=bottom>
All information in this database is private and is not to be disclosed.
EOT;
if ($this->is_logged_in())
echo <<<EOT
Logged in as {$_SESSION['userid']}
<a href='login.php?pre_action_logout=1'>Logout</a>
EOT;
else
echo <<<EOT
(Not logged in)
<a href='login.php'>Login</a>
EOT;
echo <<<EOT
</div>
</div>
</body>
</html>
EOT;
Most of what’s there shows whether the user is logged in and, if so, what the userid is. There are also links to logout or login. I haven’t shown login.php yet, but you can imagine what it probably does. Note the extra </div>; it ends the page division that started in top.php.
That’s pretty much all the framework code. I’m not going to show the CSS, as it’s too detailed to show succinctly, and, besides, it’s beyond the scope of this book. It’s in the sample code that you can download if you want to see it.
One hunk of HTML and an associated CSS file handles the menu. I didn’t code it—I downloaded it from cssmenumaker.com. If you make a menu there, put the HTML code in the top.php file, and add a link to the CSS that drives the menu. (These sorts of menus are run entirely by CSS, not with JavaScript.)
To summarize where I’ve taken you: we have a Page framework, which will be used for all pages. It handles a lot of the common processing, and ensures that critical things like checking the session get done. I explained all about how sessions work, although not yet how to handle logging in. I showed the member page for the Front Range Butterfly Club, and I’m about to show some enhancements to it. However, I’ll keep using the Page framework mostly as it is. Since it really just makes calls into its subclass, and all the HTML, CSS, and JavaScript are in separate files, the framework is pretty general. How it handles sessions and the page structure never has to change.
Session Transitions and Login Pages
A login page is a bit different from ordinary pages like member.php because it’s what starts a session on behalf of an authorized user. Its counterpart is the logout page, which does the opposite, and the two can be combined into the same file, which in the example I present I call login.php.
The subclass in login.php is MyPage, as it was in member.php, and execution begins as follows (you might want to look back at Listing 5-15):
$page = new MyPage('Login', false);
$page->go();
The second argument to the constructor is false, indicating that no session is wanted, as that’s how a login page has to start out.
Page::go then calls MyPage::request, as shown in Listing 5-28. I’ll explain the part at the bottom dealing with the msg parameter in a bit.
Listing 5-28. MyPage::request Method
protected function request() {
        echo <<<EOT
<form action="{$_SERVER['PHP_SELF']}" method=post
  accept-charset=UTF-8>
<label for=userid>User ID:</label>
<input type=text size=50 name=userid id=userid
  placeholder='User ID'>
<label for=password>Password:</label>
<input type=password size=50 name=password id=password
  placeholder='Password'>
<br>
<input class=button type=submit name=pre_action_login value='Login'>
<input class=button type=submit name=action_forgot value='Forgot'>
</form>
EOT;
    if (isset($_REQUEST['msg']))
        $this->message($_REQUEST['msg']);
}
Figure 5-17 shows the form. It’s a pretty minimal page; usually the first page of a site has a lot more on it, such as news items, marketing information, details on how to get a login, and so forth. You can output whatever HTML you want in your request method.

Figure 5-17. Login form
There are two actions: Login and Forgot, the latter being just a stub for now.
protected function action_forgot() {
    $this->message('Not yet implemented'),
}
Chapter 6 treats the forgotten password problem in considerable detail.
If you look again at Listing 5-28, you’ll see that the action method for the Login button is pre_action_login, not action_login, so it’s executed by Page::go before any output is written (Listings 5-23 and 5-24). That’s important, because if all goes well it will want to start a session, which can only be done prior to any output, as PHP has to write a header to create the cookie. MyPage::pre_action_login is in Listing 5-29.
Listing 5-29. MyPage::pre_action_login Method
protected function pre_action_login() {
    // Somewhat naive!
    if ($_POST['password'] == 'cupcake') {
        $this->login($_POST['userid']);
        header('Location: member.php'),
    }
    else
        header('Location: login.php?msg=Wrong%20password'),
}
I’ll get into dealing with passwords properly in Chapter 6, so what you see here is just temporary code. (I promise!) However, what’s done if the password checks is real: a userid element is added to the session, which is what all of the in-session pages check. (The check is inside Page::go in Listing 5-24.) Then the browser is redirected to the member.php page so the user can start work.
If logging in fails, the page could be written right away so that an error message appears, but that makes the processing in Page::go too complicated. It’s easier to redirect the browser right back to the login page, only this time with a message to display, which is what the code at the bottom of Listing 5-28 was doing. (Usually you don’t say that the password was wrong, but something less specific, so as not to unnecessarily provide aid to a guesser by implying that the userid was valid.)
The key thing to get from what I’ve shown is that because so much processing involves writing headers, both for starting a session and for redirecting the page, processing has to take place before Page::go or any methods it calls write any HTML.
To log out, as I showed in Listing 5-27 with the HTML for the bottom of a page, login.php is executed with a pre_action_logout parameter, to get that method called. It’s in Listing 5-30.
Listing 5-30. MyPage::pre_action_logout Method
protected function pre_action_logout() {
    $this->logout();
    header('Location: login.php'),
}
For the same reason that MyPage::pre_action_login redirected the browser on an error, here the browser is redirected back to the login page once logout is completed. I showed Page::logout earlier, in the section “PHP Sessions.” It starts the session, since login.php always begins with no session. Then it calls Page:: destroy_session. An alternative is to put logging out in its own file, logout.php, say, that runs in a session, but I don’t think there’s much point in creating a separate file just to hold this little method.
If you have a cruddy relationship, I can’t help, but I can help with coding CRUD pages to handle relationships between entities.
The trickiest situation is when there’s a foreign key, as there would be on the “many” side of a one-to-many relationship. For example, suppose the member form is enhanced to include the specialty for each member, which can be brush-foots, gossamer-wings, metalmarks, sulphurs, swallowtails, or whites. (According to Wikipedia; I know even less about butterflies than I do about relationships.) Many members can have the same specialty, but a member can have only one, so it’s one-to-many, with the foreign key to the specialty table in the member table—the “many” side.
A foreign-key column is just a column, albeit with a constraint, so we could just put it on the form and let the user type a number into it, such as 4738 for swallowtails, if that’s what the surrogate key turned out to be. Obviously that’s a bad design. Better would be a drop-down list, which might be OK for butterfly specialties but wouldn’t work for very long lists.
If you could get away with a drop-down list, you could populate it dynamically, when the form is generated, by doing a select on the table to get, for each row, a descriptive string and its associated primary key. The strings go into the drop-down, and the primary keys are stored somewhere, perhaps in hidden fields. Then, when the user makes a choice and the form is submitted, the foreign key can be inserted into the referencing column.
If the foreign key references a longer table, the user may have to search that table to determine which row should be referenced. As that’s more complicated than a drop-down list, that’s the one I’ll show in detail. Then I’ll show how you can handle a many-to-many relationship.
Forms with Foreign Keys
In a form on the “many” side of a one-to-many relationship involving a surrogate key, the user should see some representation of the row, such as a name, but the actual foreign key should be hidden. When the database is updated, only the foreign-key column is involved. An example will make what’s going on much clearer.
Figure 5-18 shows the Butterfly Club member form with a new field, the member’s specialty (brush-foots, gossamer-wings, etc.), and two buttons: Choose and Clear. The enhanced show_form method in Listing 5-31 shows that field, and also a hidden field for the foreign key, specialty_id.
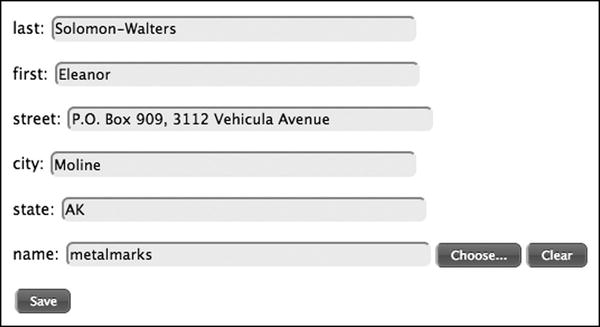
Figure 5-18. Enhanced member form
Listing 5-31. Enhanced show_form Method
protected function show_form($row) {
    echo "<form action='{$_SERVER['PHP_SELF']}'
      method=post accept-charset=UTF-8>";
    foreach (array('member_id', 'last', 'first', 'street',
      'city', 'state', 'specialty_id', 'name') as $col) {
        if ($col == 'name')
            $readonly = 'readonly';
        else
            $readonly = '';
        $id = $col == 'name' ? 'specialty_id_label' : $col;
        if ($col == 'member_id' || $col == 'specialty_id')
            $type = 'hidden';
        else {
            echo "<label for=$id>$col:</label>";
            $type = 'text';
        }
        $v = is_null($row) ? '' : $row[$col];
        echo "<input type=$type id=$id size=50 name=$col
          value='" . htmlspecial($v) .
          "' $readonly>";
        if ($col == 'name') {
            echo "<button class=button type=button
              onclick='ChooseSpecialty("specialty_id");'>
              Choose...</button>";
            echo "<button class=button type=button
              onclick='ClearField("specialty_id");'>
              Clear</button>";
        }
    }
    echo "<p class=label><input class=button type=submit
      name=action_save value=Save></form>";
}
The buttons are there because the field that the user sees, name, is read-only. (It should have a better label, but that’s another issue that I’ll get to in Chapter 6.) The Choose button executes the JavaScript function ChooseSpecialty, and the Clear button executes ClearField. Both get passed the id of the foreign-key field, which is specialty_id (the same as the column name). Also, the field that contains the visible field that’s paired with the foreign-key field has the same id, but with the suffix _label.
ClearField works with any form and is pretty simple:
function ClearField(id) {
    $('#' + id).val(''),
    $('#' + id + '_label').val(''),
}
Specialties have their own page, like members do, called specialty.php, and you get to it from the Specialties button on the menu at the top of the window. (You can see that button in Figure 5-19.) I’m not going to present the details of that page, because it’s so similar to the member form, but Figure 5-19 shows what it looks like. There’s only one field in addition to the surrogate key, specialty_id (which is hidden).
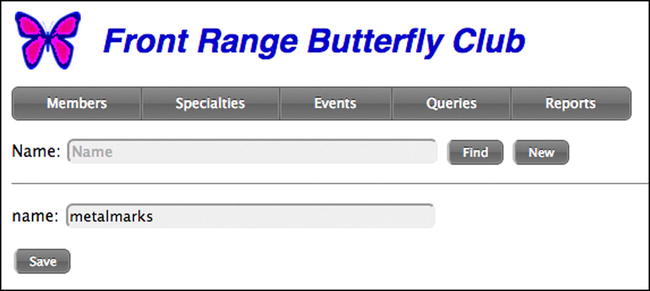
Figure 5-19. Specialties form
Back in Listing 5-31, the ChooseSpecialty function, invoked by the Choose button on the member form, opens a new window executing specialty.php and showing the Find form, to allow the user to find the specialty he or she wants to associate with the member. (If there were dozens or hundreds of records to choose from, the motivation for the Find form would be more obvious.) However, for this case specialty.php is given the parameter choose, which tells it that it’s being executed only to provide a choice, not for general CRUD operations.
First, here’s the ChooseSpecialty JavaScript function.
function ChooseSpecialty(id) {
    window.open("specialty.php?choose=yes&id=" + id, "_blank",
      "height=600, width=800, top=100, left=100, tab=no, " +
      "location=no, menubar=no, status=no, toolbar=no", false);
}
The details of the window aren’t important—you can set it up however you like. What counts are the two parameters passed to specialty.php: choose and the id of the hidden specialty_id field in window still showing the member form. Figure 5-20 shows these two windows after the Find button in the specialty window has been clicked to show all the specialties.
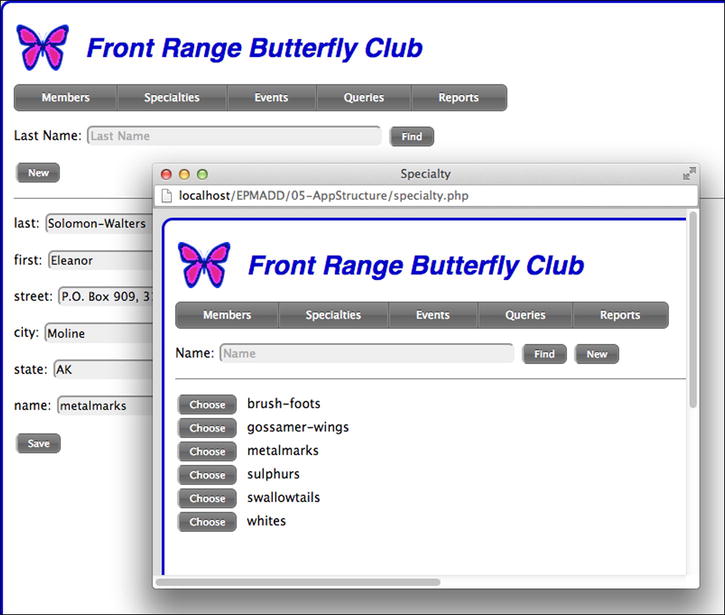
Figure 5-20. Member form with pop-up specialty form
Figure 5-21 shows what happens when you click the Choose button for metalmarks. The JavaScript function MadeChoice in the specialty window is called, with three arguments: the id of the hidden specialty_id field in the member window (shown with a dotted outline in the figure), the primary key of the chosen specialty, and the name (“metalmarks”) of that specialty. MadeChoice then calls the JavaScript function HaveChoice in the member window with the same three arguments, and HaveChoice inserts the specialty_id and name into the form. That’s how one window (specialty) can write into a form in another window (member). With this explanation, you should be able to follow the code as I present it.
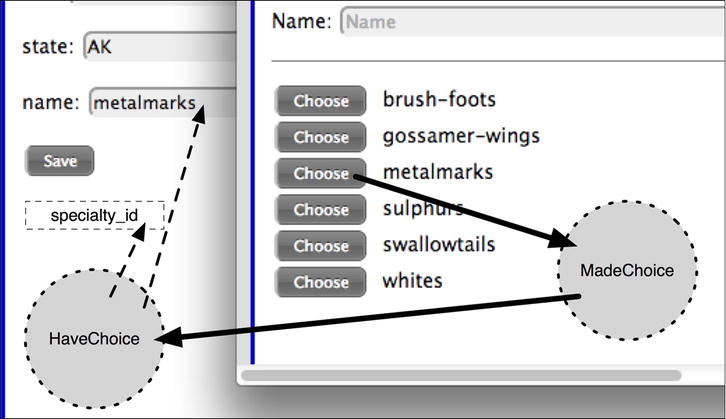
Figure 5-21. Specialty window modifying member window
Listing 5-32 shows the action_find method in specialty.php, which, except for the code to handle the choose parameter, looks a lot like the method in Listing 5-17 for the member form.
Listing 5-32. action_find in specialty.php
protected function action_find() {
$url = $_SERVER['PHP_SELF'];
$stmt = $this->db->query('select specialty_id, name
from specialty where name like :pat',
array('pat' => "{$_POST['name']}%"));
if ($stmt->rowCount() == 0)
$this->message('No records found', true);
else {
echo '<p>';
while ($row = $stmt->fetch()) {
$name = $row['name'];
$pk = $row['specialty_id'];
echo '<p class=find-choice>';
if (isset($_REQUEST["choose"]))
echo "<button class=button
onclick='MadeChoice("{$_REQUEST['id']}",
"$pk", "$name");'>Choose</button>";
else {
echo <<<EOT
<p class=find-choice>
<a href=$url?action_detail&specialty_id=$pk>Detail</a>
<a href=''
onclick="DeleteConfirm('$name', '$pk'),">Delete</a>
EOT;
}
echo " $name";
}
}
}
What it’s doing is showing a Choose button next to each specialty name (in bold), instead of the Detail and Delete links that it shows when executed from the menu bar. That’s what you see in Figure 5-20. Note that these are buttons instead of underlined links; I showed it both ways to illustrate both approaches. You’d probably want to use buttons in your own application, for consistency.
Anyway, when you click a Choose button, as depicted in Figure 5-21, the JavaScript function MadeChoice is executed with three arguments: the field id from the member form (in the member window), the primary key of the chosen specialty, and the name of the specialty. As I said, what this function needs to do is put the name into the visible field on the member form, and put the primary key into the hidden foreign-key field on the member form. Sounds easy, but those fields are in a different window. Fortunately, it’s as easy to do it as to say it.
function MadeChoice(id, result, label) { // executes in popup
    window.opener.HaveChoice(id, result, label);
    window.close();
}
It turns out that you can reference the window that opened this window, the one showing the member form, with window.opener. The function MadeChoice calls the function HaveChoice in that window. Then it closes the pop-up specialty window.
Back in the member window, here’s HaveChoice.
function HaveChoice(id, result, label) { // executes in main window
    $('#' + id).val(result);
    $('#' + id + '_label').val(label);
}
It uses jQuery code to put the primary key (result argument) into the foreign-key field (whose id was passed in), and the specialty name (label argument) into the visible field, whose id is the same, but with a _label suffix.
It’s a lot of going back and forth, with JavaScript calling a function in an entirely different window. I’ll review what happened, and you might want to read this section again and study Figure 5-21 now that you know how the story turned out.
- The Choose button next to the read-only name field was clicked in the member window.
- A specialty window popped up, allowing the user to find the specialty to be chosen. It was passed the id of the name field in the member window.
- In the specialty window, the Choose button next to a name was clicked, causing the id of the name field in the member window, specialty_id, and name to be passed to the MadeChoice function in the specialty window.
- The HaveChoice function in the member window was called, which put the name into the visible name field on the member form, and the foreign-key into the hidden field.
At this point the user can verify that the chosen specialty is the right one and click the Save button to update the member table.
In your own application you might want a slicker user interface, but you can still make use of this technique of passing data between forms.
Handling Many-to-Many Relationships
Many-to-many relationships are more straightforward than those where a form contains a foreign key, because you don’t need any fancy JavaScript like that in the MadeChoice and HaveChoice functions to copy data from one window to another. Sure, there is a table to effect the many-to-many relationship, but it doesn’t appear in any form and can be updated behind the scenes.
As an example, suppose the Butterfly Club wants to accommodate members with more than one specialty, making the relationship between the member and specialty tables many-to-many.
To implement this, I added a new table, member_specialty, with two columns, together forming the primary key: member_id and specialty_id. A row means that that member has that specialty. Multiple rows with the same member_id mean that that member has multiple specialties.
To show the specialties a member has, instead of a single field, I divided the window in half and showed his or her specialties in a list, along with two buttons, Delete Selected and Add, as shown in Figure 5-22, where Eleanor has two specialties.

Figure 5-22. Form showing specialties
To show the specialties, I changed the action_detail method to output an HTML table, with the main form, showing fields of the member table on the left and a new form on the right. I won’t show the code for the left half, as it’s similar to what I’ve already shown, but Listing 5-33 shows the method that displays the right half.
Listing 5-33. Method for Right Half of Form
protected function show_form_right($member) {
    $member_id = $member['member_id'];
    echo <<<EOT
        Specialties
        <form action='{$_SERVER['PHP_SELF']}'
          method=post accept-charset=UTF-8>
EOT;
    if (isset($member_id)) {
        $stmt = $this->db->query('select specialty_id, name
            from specialty
            join member_specialty using (specialty_id)
            where member_id = :member_id',
          array('member_id' => $member_id));
        echo '<select name=specialties size=10
          style="min-width:100px;">';
        while ($row = $stmt->fetch())
            echo "<option
            value={$row['specialty_id']}>{$row['name']}</option>";
        echo '</select>';
    }
    echo <<<EOT
    <br><input class=button type=submit
      name=action_delete_specialty value='Delete Selected'>
    <br><input class=button type=button
      value='Add'
      onclick='ChooseSpecialty($member_id);'>
    <input type=hidden name=member_id value=$member_id>
    </form>
EOT;
}
The argument is an array of column values, called $member here, instead of the usual $row, so as not to be confused with the results of the query that’s inside the function.
That query does a join between the specialty and member_specialty tables to find the specialties that this member has. Each of them becomes an option of a select field. The specialty name is what appears, so the user will see it, but the primary key, specialty_id, is the value.
The Delete Selected button causes the page to be invoked at the action_delete_specialty method, which is in Listing 5-34. It catches and rethrows an exception so that the form will be reshown if there’s an error. Note that the specialty_id (just one is allowed) to be deleted is the value of the select field, whose name is specialties (shown in bold).
Listing 5-34. action_delete_specialty Method
protected function action_delete_specialty() {
    try {
        if (isset($_POST['specialties'])) {
            $this->db->query('delete from member_specialty
              where member_id = :member_id and
              specialty_id = :specialty_id',
              array('member_id' => $_POST['member_id'],
              'specialty_id' => $_POST['specialties'] ));
        }
    }
    catch (Exception $e) {
        $exc = $e;
    }
    $this->action_detail();
    if (isset($exc))
        throw $exc;
}
The other button on the right side, Add, uses the identical ChooseSpecialty JavaScript function that I showed earlier, except this time the argument is the primary key, member_id, which will be a foreign key in the member_specialty table. As you’ll recall, ChooseSpecialty executes the specialty.php program with the parameters choose and id.
Since specialty.php has to update the member_specialty table, instead of just returning a specialty_id and name back to the member form as it did in the previous section, the processing in its action_find is different than what I showed in Listing 5-32. To make the code cleaner, it calls one of two other methods depending on whether you define the choose parameter.
protected function action_find() {
    if (isset($_REQUEST["choose"]))
        $this->action_find_choices();
    else
        $this->action_find_normal();
}
Method action_find_normal is for the normal CRUD case, when specialty.php is executed from the menu bar. It’s the other method we care about, which shows a list of unchosen specialties with check boxes, shown in Figure 5-23. The code is in Listing 5-35.
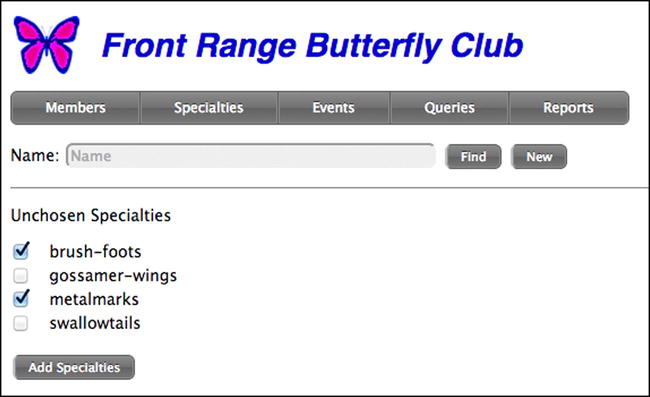
Figure 5-23. Form for choosing a specialty
Listing 5-35. action_find_choose to Select Specialties
protected function action_find_choices() {
$url = $_SERVER['PHP_SELF'];
$member_id = $_REQUEST['id'];
$stmt = $this->db->query('select specialty.specialty_id, name
from specialty
left join member_specialty on
specialty.specialty_id = member_specialty.specialty_id and
:member_id = member_specialty.member_id
where name like :pat and member_id is null',
array('pat' => "{$_POST['name']}%",
'member_id' => $member_id));
if ($stmt->rowCount() == 0)
$this->message('No unchosen specialties found', true);
else {
echo <<<EOT
<p>Unchosen Specialties
<form action=$url method=post>
EOT;
while ($row = $stmt->fetch()) {
$name = $row['name'];
$pk = $row['specialty_id'];
echo <<<EOT
<p class=find-choice>
<input type='checkbox' name=specialty[$pk]>
$name
EOT;
}
echo <<<EOT
<p>
<input type=hidden name=member_id value=$member_id>
<input class=button type=submit
name=action_add value='Add Specialties'>
</form>
EOT;
}
}
There are a few notable things in this method.
- To get those specialties not already chosen, I left join the specialty table with the member_specialty table and take the specialties that did not appear in the latter table. Note that member_id is in the join condition (in bold), but there’s a test for it being null in the where clause. (I could have used a subquery, but instead I thought of it as a “left unjoin.”)
- The attribute for the check boxes of name=specialty[$pk] causes PHP to make $_REQUEST['specialty'] an array, which I’ll show in Listing 5-36. I just want the primary keys of the chosen rows, and I’ll take them as array subscripts.
You can see how the array of specialty_id values is accessed in the action_add method in Listing 5-36 (in bold).
Listing 5-36. action_add Method for Specialties
protected function action_add() {
    if (isset($_REQUEST['specialty'])) {
        foreach ($_REQUEST['specialty'] as $specialty_id => $v )
            $this->db->query('insert into member_specialty
              (member_id, specialty_id)
              values (:member_id, :specialty_id)',
              array('member_id' => $_REQUEST['member_id'],
              'specialty_id' => $specialty_id));
        $this->message('Added OK. Window may be closed.',
          true);
    }
    else
        $this->message('No specialties were added.'),
}
In the loop, all that’s needed is to insert a new row for the member_id (passed as a hidden field in the form in Listing 5-35) and the specialty_id. That row is guaranteed not to already be present (which would violate a unique constraint on the primary key), because only specialties not already chosen were shown in the selection form.
I left one important thing undone: the member window doesn’t show anything new after specialties are added; you have to reload it manually. I leave it to you to add the necessary JavaScript to make specialty.php cause the member window to be updated. (Hint: Call a JavaScript function in the member window, referring to it via window.opener, as I did in the MadeChoice function in the section “Forms with Foreign Keys.”)
Admittedly, this is a lot of code for choosing one of just a half-dozen specialties and, as I said, a drop-down menu on the member form would work as well, if not better. But I wanted to show the harder case, because sometimes there are hundreds, or even thousands of choices, and the user will want to use all the power of a full-blown page to make the selections.
Between this and the previous section you’ll find all the coding tricks you’ll need to roll your own user interface for both the “many” side of one-to-many relationships and many-to-many relationships. Basically, the two choices are “communicating forms” and “updating an association table.”
Chapter Summary
- Use PDO to access MySQL from PHP, because it throws exceptions on errors, easily handles parameterized queries, and is database independent.
- Set sql_mode to traditional and innodb_strict_mode to on.
- Put database credentials in their own file.
- If any part of the SQL statement contains values supplied at runtime, always use parameterized queries. Never put any PHP variables containing data values in a string passed to any method that takes an SQL statement.
- Most MySQL interactions can be handled by two methods, DbAccess::query and DbAccess::update.
- A common page framework, in a Page class, ensures that all the required processing is performed on every page, and that pages have a consistent look.
- Code in the Page class causes action buttons to invoke an action method in the same page the buttons are in, thus improving cohesion.
- Application pages, other than the login page, should run in a session, and session IDs have to be kept secret.
- To be secure, applications should use SSL (URLs starting with https) for any pages that include a session cookie or sensitive data, such as a user ID or password. For most applications, that means all pages.
- Any user-supplied data written to a page should be processed by htmlspecialchars.
- A login page starts the session, if the user successfully logged in. A logout page (or a logout method in the login page) destroys the session.
- The “many” side of a one-to-many relationship can be handled by a pop-up window that modifies fields in the parent (window.opener) window (communicating forms).
- Many-to-many relationships can be handled by modifying an association table and then reflecting the results in a list on a form.