
10
Microsoft Office Word 2003
1. What do you know about MS Office? What are its various components?
Ans.: Microsoft Office (shortened as MS Office) is a commercial office suite of related applications, services, and servers for the Microsoft Windows and Mac OS X operating systems. It was first launched by Microsoft in 1989 and afterwards, several versions have been released. The current versions of MS Office are Office 2010 for Microsoft Windows and Office 2011 for Mac OS X. However, MS Office 2003 (that we are going to discuss in this chapter) is one of the commonly used productivity suite that was released by Microsoft on 21st October 2003.
The first version of MS Office contained only three components including Microsoft Word, Microsoft Excel, and Microsoft PowerPoint. However, over the years, a number of new components have been added to the suite. The components of MS Office 2003 include Word 2003, Excel 2003, PowerPoint 2003, Outlook 2003, Access 2003, Publisher 2003, InfoPath 2003, Project 2003, Visio 2003, FrontPage 2003, and OneNote 2003.
2. What is word processing?
Ans.: Word processing is the manipulation of characters, words, text, numbers, sentences, and paragraphs in the document so that it is error-free and looks attractive. Initially, the work of preparing and formatting document was done manually with the help of typewriter, which was time consuming and could not be modified or used again. These days, this task is performed with the help of computers, making it much easier.
Word processing involves not only typing, but also checking the spelling and grammar of the text and arranging it correctly on the page. A variety of different typefaces is also available for a variety of effects. It is possible to include pictures, graphs, charts, and many other things within the text of the document. It also allows for changes in margins, fonts, and colour.
3. Define word processor and explain its features.
Ans.: A word processor is an application program used to create, format, edit, and print electronic documents. It enables to develop and modify documents such as letters, reports, memos, etc.; store them electronically on a disk; display them on the screen; and print them on a printer. The use of a word processing program results in reduced retyping time for error-free hard copy, facilitation of document revision, change before committing to paper, faster output speed, reduced proofreading, and elimination of stationary wastage.
Features of Word Processor
Using the built-in features of the word processor, you can create letters, tables, newsletters, and academic papers that are easier to revise and much more aesthetically pleasing than the documents created using a typewriter. Some of the other features that make the word processor a powerful tool to create documents are as follows:
| Extensive built-in features: It can be used to make mail merge documents, envelopes and labels, etc. | |
| Easy to learn: To operate the word processor, no special skills are required. Most of the word processors are easy to learn and use. | |
| Foreign language features: It allows documents to be created in different languages other than English. This is helpful for users who do not know English or require work to be done in some other ‘specified’ language. | |
| Tables and graphics: The use of tables, charts, and graphics are also supported by the word processor. Thus, helps to increase the visual clarity of the text. | |
| Linking and embedding: It allows linking and embedding of objects such as a chart, a video clip, a picture, etc. in a document. This is possible by using Object Linking and Embedding (OLE) technology that can be used to share information between programs. | |
| Easy formatting: It helps in formatting style, font, and paragraph to increase the readability of the text and to enhance the visual appearance. | |
| Extensive help: It includes an extensive built-in help feature that can be used to ask queries. This means that the user can easily type in this built-feature to know how to perform an action or set of actions, etc. | |
| Spelling and grammar check: It helps to check and remove spelling and grammatical mistakes. Also, it helps in knowing synonym(s) or the meaning of a particular word. |
4. Name any two types of word processors.
Ans.: The first word processor was WordStar that was released by Micropro International Inc. in 1979. Since then, many word processing programs have evolved. Some of these are free/open-source software while others are commercial software. Table 10.1 lists some of the commonly used word processors along with their manufacturer.
Table 10.1 Word Processors
Type of Word Processor |
Word Processor |
Manufacturer |
Free/Open Source Software |
AbiWord |
SourceGear |
|
EZ Word |
IBM and Carnegie Mellon University |
|
KWord |
KDE |
|
LyX |
|
Commercial Software |
Lotus Word Pro |
IBM |
|
Microsoft Word |
Microsoft |
|
WordPerfect |
Corel |
|
StarOffice Writer |
Sun Microsystems |
5. What is MS Word? What are its advantages?
Ans.: Microsoft Word (shortened as MS Word) sold as a part of the MS Office suite is one of the most popular and widely used word processor that can be effectively used to produce professional documents quickly and efficiently. The first version of MS Word was introduced in 1989 that included only some basic features. Since then a number of versions have been released (the latest being Word 2010) and with each version, MS Word has grown substantially with many features such as common spell checker, data integration, etc. MS Word 2003 is one of the most widely used versions. It is a highly versatile tool, ideal for creating short documents like letters and memos with enough layout, and graphics-handling capabilities for a sophisticated publishing.
MS Word is a word processor that enables you more than creating and editing a document. It offers a wide variety of other functions and tools that allow you to format the document. Some of the advantages of MS Word are as follows:
| You can make changes to a document without retyping the entire document unlike conventional typewriter. | |
| Selected text or paragraphs can be moved or copied throughout the document. | |
| You can arrange the text in columnar style as seen in the newspaper. Textboxes can be added to the document. | |
| Page layout and margins can be adjusted as per the requirement. | |
| Word can provide the statistics of your document such as total number of characters, words, or lines in the document. | |
| Page numbers and header and footer can be included. | |
| You can merge multiple files or documents. |
6. Explain the different components of MS Word window.
Ans.: When MS Word is opened, the main screen of the program appears (Figure 10.1). This main window has different components. They are described as follows:
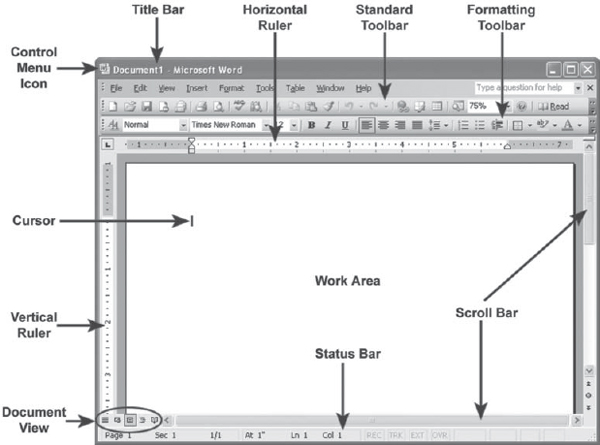
Figure 10.1 MS Word Window
| Title bar: It is located at the top of the Word window and displays the names of the application and active document. It also tells you which MS Word application is currently active. At the extreme upper left corner of the title bar, there is a small Word icon |
|
| Menu bar: It has many different menus, which control all options, functions, and commands for the entire MS Word application. Each menu can be activated by pressing Alt+ the underlined letter of the menu from the keyboard. By default, MS Word 2003 contains nine menus, which have an associated pull-down menu. For example, the File menu contains commands to open, create, and print a document. | |
| Toolbar: Generally, it is positioned just below the menu bar. It contains command buttons that provide single-click entry to carry out many text-processing tasks. Word 2003 has 21 toolbars each having its own functions. By default, only Standard and Formatting toolbars are displayed in the Word environment. Additional toolbars like Drawing and Picture toolbars can be added by right-clicking on the menu bar and selecting the desired toolbar(s) from the pop-up menu that appears. Alternatively, select Toolbars from the View menu, and then select the desired toolbar(s) from the pop-up menu. | |
| Ruler: MS Word has two rulers: horizontal and vertical. These rulers are used to change the format of a document by adjusting the indents, margins, tab stops, and table columns. You can hide or view rulers by clicking the Ruler option from the View menu. | |
| Status bar: It is located at the bottom of the Word window and it provides information related to current cursor location, current page number, total number of pages, and program status notes (like Spelling and Grammar status, overtype mode indicators, etc.). | |
| Work area: It is the area in the middle of the Word window that allows you to type text, insert images, tables, and performs many more such actions. Within this area, small blinking vertical line (known as cursor) appears, which marks the position where the next typed character will appear in the work area. | |
Document view: Word can display the documents with varying levels of details through different views. The main difference between these views is your personal preference as to how you wish to work with the document. MS Word provides the following views:
|
7. Explain File and Edit menu commands in MS Word.
Ans.: The File menu of MS Word provides commands to perform file management operations while the Edit menu provides commands to perform editing functions. Some of the commands have associated options also. The commands available in File menu are described as follows:
| New: To create a new document. | |
| Open: To open an existing document. | |
| Close: To close the current document without exiting the MS Word. | |
| Save: To save the active document. | |
| Save As: To save the active document with a different file name, location, or format. | |
| Save as Web Page: To save the active document as a web page in HTML format. | |
| File Search: To search for a file of specific type such as an Office file, an Outlook item, or a web page in the computer. Search criteria can also be specified. | |
| Permission: To specify access permission to a document to prevent its content from being forwarded or copied by unauthorized people. | |
| Versions: To save and manage multiple versions of a document in a single file. | |
| Web Page Preview: To display the active document as a web page in browser before publishing it. | |
| Page Setup: To specify the margins, paper size and orientation, and other layout options for the active document. | |
| Print Preview: To view the appearance of the printed document onscreen before printing the final output. | |
| Print: To print the document. | |
| Send To: To view the list of options where the active document can be sent. | |
| Properties: To display the property sheet for the active document. | |
| Exit: To close the MS Word application. |
In spite of these commands, the File menu also displays the list of documents that have been recently opened.
The commands available in Edit menu are described as follows:
| Undo: To undo the last change(s) made to the document. | |
| Repeat: To repeat the last command or action. | |
| Cut: To remove the selected text and place it on the clipboard. | |
| Copy: To copy the selected text and place it on the clipboard. | |
| Office Clipboard: To view the contents of the clipboard. | |
| Paste: To insert the contents of the clipboard at the insertion point in the document. | |
| Paste special: To paste, link, or embed the contents of the clipboard in the active document. | |
| Paste as Hyperlink: To insert the content of the clipboard as a hyperlink at the insertion point. | |
| Clear: To delete the selected text or object without using the clipboard. | |
| Select All: To select all the text and graphics in the active document. | |
| Find: To search for the specified text or formatting in the document. | |
| Replace: To search for and replace the specified text and formatting. | |
| Go To: To move the insertion point to a specific page number, comment, footnote, or other location. | |
| Links: To display or change information for each link used in the active document. | |
| Object: To activate the application in which the selected object was created to edit the placed object. |
8. Explain the steps involved in creating, saving, and closing a document.
Ans.:
Creating a New Document
Whenever you start Word, it opens a new untitled document window so that you can begin a new project. If Word is already running, and you want to create a new document, click on New Blank Document button ![]() on the Standard toolbar. A new document can also be opened by following the steps given below:
on the Standard toolbar. A new document can also be opened by following the steps given below:
- Select New from the File menu to display the New Document task pane (Figure 10.2).
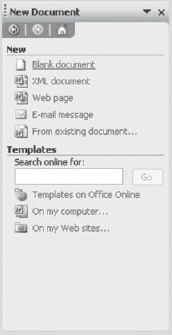
Figure 10.2 New Document Task Pane
- Select Blank Document under the New section. Word opens a new document, which is sequentially numbered like Document1, Document2, etc. Similarly, you can also create an XML document, a web page, an e-mail message, and a document from the existing document by selecting appropriate options.
Saving a New Document
Once a document is created, you must save it for future references. To save a newly created document, follow the steps given below:
- Select Save or Save As from the File menu. Alternatively, click the Save button
 on the Standard toolbar. This displays the Save As dialog box (Figure 10.3).

Figure 10.3 Save As Dialog Box
- Select the location where the new document is to be saved using the Save in drop-down box.
- Specify an appropriate name for the document in the File name box.
- Specify the file type of the document (whether to save it as a web page or in rich text format) in the Save as type box.
- Click the Save button.
Once you have saved the new document, clicking on the Save button or choosing Save from the File menu does not display any dialog box. However, whenever you choose Save As from the File menu, the Save As dialog box appears.
Closing a Document
After finishing all the Word processing activities, you may want to close the document. For this, follow any of the steps given below:
| Select Close from the File menu to close the active document. | |
| Click on the Close Window button at the upper right corner of the active document window. |
If you have made changes to the document to be closed and have not saved those changes, Word will ask whether to save the changes before closing the file.
9. Why do you need to select the text? How do you select the text?
Ans.: Before performing any operation on text such as moving, copying, formatting, etc., the text must be selected. Whenever you select the text, it gets highlighted. Depending on your requirement, you can select a word, a line, or multiple lines, etc. You can select a word, a line, or multiple lines, etc. using mouse as well as keyboard shortcuts as listed in Table 10.2.
Table 10.2 Selecting Text
To Select |
Mouse Action | Keyboard Shortcuts |
A word |
Double-click anywhere on the word. | Ctrl + Shift + Right-arrow or Ctrl + Shift + Left-arrow |
A line |
Click on the left margin next to the line. Note that the mouse cursor will change to arrow |
Shift + End or Shift + Home |
Multiple lines |
Click on the left margin and keep on dragging till the desired lines are selected. | Shift + Up-arrow or Shift + Down-arrow |
Paragraph |
Triple-click anywhere in the paragraph. | Ctrl + Shift + Up-arrow or Ctrl + Shift + Down-arrow |
Entire document |
Triple-click in the left margin. | Ctrl + A |
Rectangular area |
Press Alt key and then drag the mouse. | Ctrl + Shift + F8 and use arrow keys |
10. Explain formatting features in MS Word.
Ans.: Formatting refers to changing the appearance of a document to make it more presentable. Formatting features of MS Word include text formatting, paragraph formatting, page formatting, and column formatting.
Text Formatting
Changing the attributes of text is known as text formatting. As you enter and edit text, you can change its appearance to add emphasis and make the document easier to read. You can change the appearance of the text by setting the typeface (font), size, line spacing, and colour. Formatting can be done by using the Formatting toolbar or by using the Format menu. To format text using the Formatting toolbar, follow the steps given below:
- Select the text to be formatted.
- Use buttons on the Formatting toolbar to format the selected text. Some of the buttons used in formatting text are given in Table 10.3.
Table 10.3 Formatting Text
| Command | Button | Description |
| Font | It changes the font of the selected text. | |
| Font Size | It changes the font size of the selected text. | |
| Bold | It bolds the selected text. | |
| Italic | It italicizes the selected text. | |
| Underline | It underlines the selected text. | |
| Highlight | It highlights the selected text. | |
| Font Color | It changes the font colour of the selected text. |
Text can also be formatted using the Format menu. For this, follow the steps given below:
- Select the text to be formatted.
- Select Font from the Format menu to display the Font dialog box (Figure 10.4).
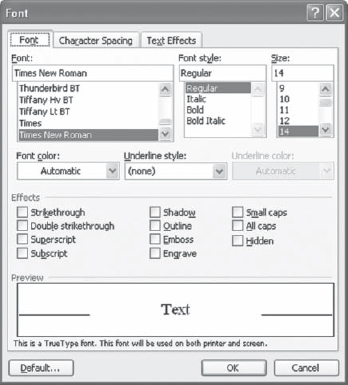
Figure 10.4 Font Dialog Box
- From this dialog box, the font, font style, and text size can be specified. This dialog box also allows you to apply underline, colour, and other effects to the selected text.
- Note that formatting is displayed in the Preview box at the bottom of the Font dialog box. Once formatting is done, click OK to apply the formatting changes to the selected text.
Paragraph Formatting
In addition to desired portions of text, you can also format the entire paragraph at once. Paragraph formatting includes alignment and indentation operations. These operations are performed to give a well-defined ‘structure’ to the document. This gives a professional look to the document. To align or indent a paragraph, follow the steps given below:
- Select the paragraph to be aligned or indented.
- Use buttons on the Formatting toolbar to align or indent the paragraph. Some of the buttons used in aligning or indenting paragraph are given in Table 10.4.
Table 10.4 Paragraph Formatting
| Command | Button | Description |
| Align Left | It left aligns the paragraph or selected text. | |
| Center | It centre aligns the paragraph or selected text. | |
| Align Right | It right aligns the paragraph or the selected text. | |
| Justify | It justifies the paragraph or selected text. | |
| Decrease Indent | It decreases the indent of the selected paragraph. | |
| Increase Indent | It increases the indent of the selected paragraph. |
A paragraph can also be formatted using the Paragraph dialog box. For this, follow the steps given below:
- Select the paragraph to be formatted.
- Select Paragraph from the Format menu to display the Paragraph dialog box (Figure 10.5).
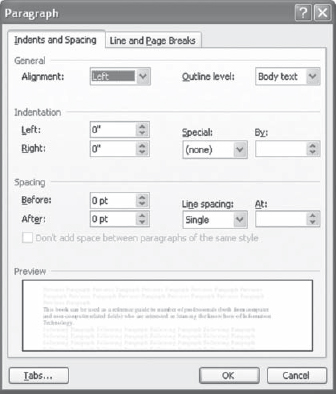
Figure 10.5 Paragraph Dialog Box
- Specify the desired alignment and indentation for selected paragraph.
- Note that formatting is displayed in the Preview box at the bottom of the Paragraph dialog box. Once formatting is completed, click OK to apply the formatting changes to the selected paragraph.
Page Formatting
Word provides some advanced formatting options that are used for page design and layout such as page breaks, page numbering, headers and footers, or margins.
Inserting Page Breaks
By default, Word automatically paginates the documents using margins and paper size settings. However, if required, you can add a page break manually also. A page break forces Word to end the current page and start a new one. This is useful when you need to start a new page and you have not typed down to the end of the current page. The manual insertion of a page break is called the hard page break whereas when Word automatically starts a new page, it is called the soft page break. To add a hard page break to the document, follow the steps given below:
- Place the cursor where the new page should be inserted.
- Select Break from the Insert menu to display the Break dialog box (Figure 10.6).
- From the dialog box, select the Page break option (by default selected) and click OK. A closely spaced dotted line appears at the specified location (only in Normal view) indicating that a user-defined page break has been added.
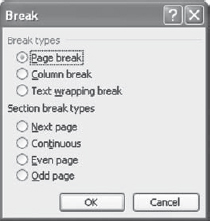
Figure 10.6 Break Dialog Box
Note that automatic page breaks are displayed as widely spaced dotted lines. The user may not delete these page breaks. On the other hand, manually inserted page breaks can be removed by selecting the line representing the page break and then pressing the Delete key.
Page Numbering
Word provides a useful feature of page numbering. You can add page number using either header and footer (discussed later in the chapter) or the Insert menu. To add page number using the Insert menu, follow the steps given below:
- Select Page Numbers from the Insert menu to display the Page Numbers dialog box(Figure 10.7).
- In the Position drop-down box, specify whether to add page numbers in the header at the top of the page or in the footer at the bottom of the page.
- In the Alignment drop-down box, choose the alignment for the page numbers: Left, Centre, Right, Inside, or Outside.
- If you do not want to add a page number on the first page, clear the Show number on first page checkbox.
- Click OK to add page numbers and close the Page Numbers dialog box. Pages in the document are numbered from one and can be viewed only in the Print Layout view.
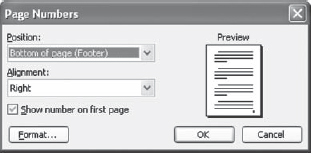
Figure 10.7 Page Numbers Dialog Box
Setting Page Margins and Page Orientation
Page margins determine the distance between the text and the edge of the paper. Usually, the pages in a Word document have a portrait orientation. However, to create a poster or to display a wide table, you can change the orientation to landscape. To specify the page margins and orientation in the document, follow the steps given below:
- Choose Page Setup from the File menu to display the Page Setup dialog box. As shown in Figure 10.8, MS Word 2003’s default margins are 1.25 inches on the left and right and 1 inch on the top and bottom.
- Specify the desired margins in the Top, Bottom, Left and Right boxes under the Margins section.
- To change the page orientation (whether to print the document in landscape or portrait mode), select the corresponding option from the Orientation section.
- If you want to print on both sides of the page, select the mirror margins option from the Multiple pages drop-down list under Pages sections so that the margins on facing pages mirror each other. The Preview box at the right of the Page Setup dialog box displays thumbnail-sized representation of a sample page in your document.
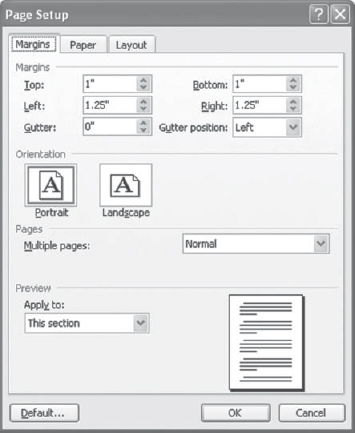
Figure 10.8 Page Setup Dialog Box
Changing Paper Size and Paper Source
Different sizes of papers such as letter, legal, or A4 are required for various purposes. In addition, it is also possible to instruct Word as to where the paper should be loaded from. For example, your printer may have two paper trays: the first page of a document may require letterhead paper that is stored in the top paper tray, while the rest of the document requires bond paper stored in the bottom tray. The Paper tab on the Page Setup dialog box allows you to choose the desired paper size and source. To change the paper size and source, follow the steps given below:
- Choose Page Setup from the File menu to display the Page Setup dialog box.
- Click the Paper tab (Figure 10.9).
- Choose the desired paper size from the pre-defined sizes such as A4, A5, etc. listed in the drop-down box under the Paper size section. You can also define a custom paper size by specifying a new width or height in the Width or Height box, respectively.
- Under the Paper source section, select the desired tray to be used for the first page in the First page list box and the tray to be used for all other pages of the document in the Other pages list box.
- Under Preview section, select the Whole document option from the Apply to drop-down list box if you want to apply the changes to the entire document. In case you want to apply changes from the current cursor position onwards, select This point forward option.
- Click OK to apply the changes and close the Page Setup dialog box.
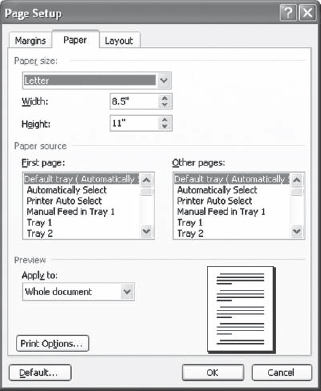
Figure 10.9 Paper Tab in Page Setup Dialog Box
Specifying Page Layouts
The page layout is used to control advanced layout settings for headers and footers, section breaks, vertical alignment, and line numbers. To change the page layout, follow the steps given below:
- Choose Page Setup from the File menu to display the Page Setup dialog box.
- Click the Layout tab. This tab contains various options (Figure 10.10).
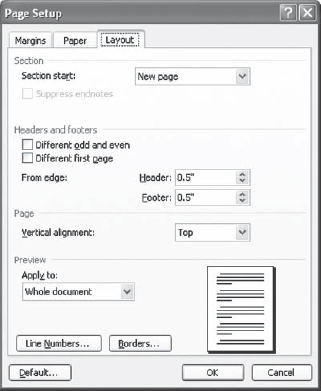
Figure 10.10 Layout Tab in Page Setup Dialog Box
- Section start: To select whether the current section should begin on a new, even or odd page, a new column, or should continue from the previous one.
- Headers and footers: To add different headers and footers to odd and even pages or to have a separate one for the first page.
- Vertical alignment: To determine whether the text on the page is to be vertically, centrally, or evenly justified between the top and bottom margins.
- Line numbers: To add or remove line numbers to a document, and simultaneously enable to specify whether the numbering should restart from each page, each section, or be continuous everywhere.
- Borders: To access the Borders and Shading dialog box that provides various options for adding borders and shading to the text and pages in a document.
- Apply to: To specify whether the entire document or the portion of the document from the current cursor position onwards should be affected by the settings within this dialog box.
- Specify the desired settings in the dialog box.
- Click OK to close the Page Setup dialog box and return to your document.
Column Formatting
You can format the text in newsletter-style columns flowing from one column to the next on the same page. To do this, follow the steps given below:
- Switch to Print Layout view.
- Select the text you want to format in columns. You can select the entire document or a part of the document.
- Choose Columns from the Format menu to display the Columns dialog box (Figure 10.11).
- Select the desired option under Presets section or specify a value in the Number of columns box indicating the number of columns you want to split the text.
- Select the Line between checkbox if you want the columns to be separated by lines.
- By default, all the columns are of equal width and have equal spacing in between. If you want the columns with different widths and spacing, clear the Equal column width checkbox and specify the desired values.
- Select the Whole document option from the Apply to drop-down list box if you want to apply the changes to the entire document. In case you want to apply changes from the current cursor position onwards, select This point forward option.
- Click OK to apply the changes and close the Columns dialog box.
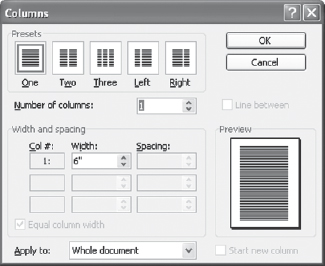
Figure 10.11 Columns Dialog Box
11. How can you change the case of characters from lowercase to uppercase in MS Word?
Ans.: To change the case of characters from lowercase to uppercase, follow the steps given below:
- Select the lowercase character you want to convert to uppercase.
- Press Shift + F3 key. The selected character is converted to uppercase.
12. What are text alignments in MS Word?
Ans.: Alignment signifies the style used to line up the text in a page. MS Word offers several types of alignment: left, centre, right, and justify. Note that in Word by default, the text is left-aligned. To align the text, follow the steps given below:
- Select the text you want to align.
- On the Formatting toolbar, click Align Left
 to left align the text, Center
  to centre align the text, Align Right
  to right align the text, or Justify
  to justify the text.
13. Write a short note on Format Painter.
Ans.: Format Painter is a handy feature for formatting text. It provides a quick way of copying formatting from one piece of text to another. For example, if you are formatting a paragraph heading with a certain font face, size, and style, and you want to format another heading the same way, you need not manually add each attribute to the new heading. Instead, you can use the Format Painter, which is a time saving feature for quickly copying the format of a block of text. This can be done by following the steps given below:
- Select the text containing the formatting you wish to copy.
- To copy formatting to a single location, click once on Format Painter button
 on the Standard toolbar. To copy it to multiple locations, double-click on Format Painter button. Notice that the mouse pointer changes to resemble a paintbrush
  .
. - Now click and drag the mouse to select the text you wish to format, and then release the mouse.
- If the format painter is copied by double-clicking, press the Esc key to come out of painter mode.
14. Describe Cut Paste and Copy Paste operation in MS Word.
Ans.: Cut and Paste: When you are working on a document, sometimes you may decide to move a certain portion of text (or even images) into some other area or in some other document. If text is to be moved within the same document or to another document, it should be first cut and then pasted. When you choose to cut the text, Word removes it from the current document and places it in the clipboard, a temporary storage area in computer memory. Now to place the text stored in the clipboard, you will have to perform the paste action.
Copy and Paste: Copy operation is used when you want the same text (or even images) to appear at other place(s) also. Copying the text is similar to the cut operation, except that copy retains the text at the original place, but in case of cut, the text is removed from the original location. To place the copied text (that is in the clipboard), you need to use the paste operation.
To perform the cut, copy, and paste operations, follow the steps given below:
- Select the text that is to be moved or copied.
- In case you want to move the text, choose Cut from the Edit menu or click the Cut button
 on the Standard toolbar. If you want to copy the text, choose Copy from the Edit menu or click the Copy button
  on the Standard toolbar.
 - Click the mouse at the place in the document where you want to insert the text.
- Choose Paste from the Edit menu or click the Paste button
 on the Standard toolbar. The text that you copied to the clipboard is pasted to the place where the mouse is clicked.
15. Explain Find and Replace in MS Word.
Ans.: Find and Replace option in MS Word is used to locate a particular word, phrase, or set of characters in a document, and replace it with something else. Although you could manually scan through the document for find and replace purposes, it takes time and there is always the possibility that you might miss the text in question on a first or second pass. MS Word's Find and Replace feature swiftly and unerringly locates anything you are looking for, and once the desired text is located, it can automatically be replaced by the new text. For example, if you have used ‘January 2004’ in the document and later want it to be replaced with ‘January 2005’, Word finds all instances of ‘January 2004’ and replaces it with ‘January 2005’. MS Word also finds and replaces all grammatically wrong word(s). For example, if you want to replace the word ‘narrow’ with the word ‘broad’ throughout a document, Word intelligently changes not only ‘narrow’ to ‘broad’, but also words like ‘narrower’ to ‘broader’.
To find and replace text within the document, follow the steps given below:
- Select Find from the Edit menu to display the Find and Replace dialog box (Figure 10.12).
- Click on the Find tab if you want to find the desired word in the document, or click Replace tab to find a word and replace it with new word.
- Type the text that you want to search in the Find what box.
- Click Find Next button to find the first occurrence of the text. If you want to replace the text then select the Replace tab and type the replacement text in the Replace with box.
- Select Replace button to replace each occurrence of the word individually or click Replace All to replace all occurrences of the word at once. Word will display a message when it has replaced all occurrences.
- Keep on pressing the Find Next and Replace button until you are finished with finding and replacing the text.
- Click the Cancel button or press the Esc key to close the Find and Replace dialog box.
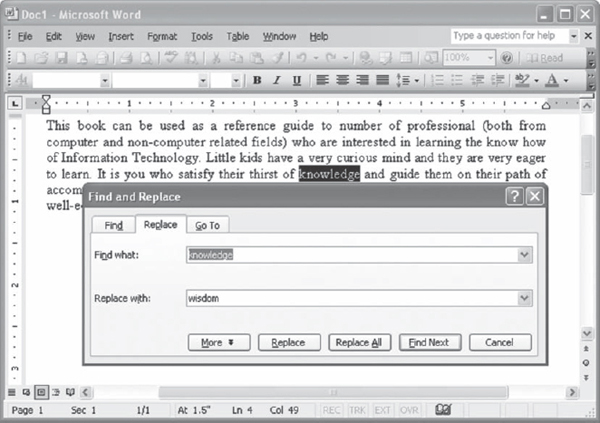
Figure 10.12 Find and Replace Dialog Box
16. What do you mean by headers and footers? Write the steps to insert headers and footers in a document.
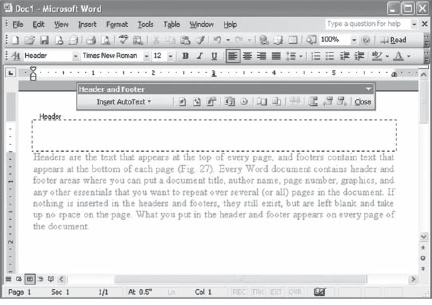
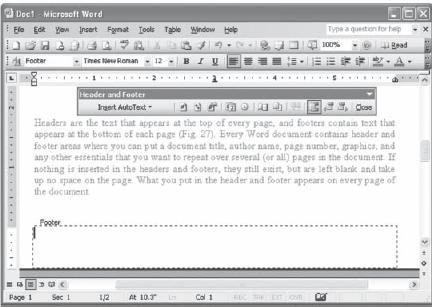
Ans.: Headers are text that appears at the top of every page, and footers contain text that appears at the bottom of each page. Every Word document contains header and footer areas where you can put a document title, author name, page number, graphics, and any other essentials that you want to repeat over several (or all) pages in the document. If nothing is inserted in the headers and footers, they still exist, but are left blank and take up no space on the page. What you put in the header or footer appears on every page of the document.
To insert header and footer in a document, follow the steps given below:
- Select Header and Footer from the View menu. This displays the Header and Footer toolbar with a dotted box for header at the top of the page and a dotted box for footer at the bottom of the page (Figure 10.13).
(a) Header
(b) Footer
Figure 10.13 Header and Footer
- Type the text in Header and/or Footer box. Note that headers and footers can be formatted (like changing font colour, size, etc.) just like any other text.
- If necessary, use appropriate options from the Header and Footer toolbar to add time, insert page number, date, etc., as listed in Table 10.5.
Table 10.5 Header and Footer Toolbar Options
Command Button Description Insert Page Number 
It inserts page numbers that automatically update when pages are added or deleted. Insert Number of Pages 
It prints the total number of pages in the active document. Format Page Number 
It formats the page numbers in the current section. Insert Date 
It inserts date that automatically updates so that the current date is displayed. Insert Time 
It inserts time that automatically updates so that the current time is displayed. Switch Between Header and Footer 
It switches the insertion point between the header and footer areas. or It moves the insertion point from header to footer area or vice versa. - After text or graphic has been entered, click Close button on the Header and Footer toolbar or double-click in the work area to return to work there.
17. What is the use of Bullets and Numbering? How to use them in your document?
Ans.: In many situations, you need to prepare a list of actions. For example, while writing an algorithm, it is always advisable to use bullets and numbering to list all the steps. If these steps are written in a paragraph form, separated only by colons or commas, it may become difficult to understand the text. MS Word 2003 supports list-makers with its Bullets and Numbering features. To use bullets and numbering, first select the text you want to format. Next, use the Bullets ![]() or Numbering
or Numbering ![]() button on the Formatting toolbar to apply bullets or numbering (Figure 10.14).
button on the Formatting toolbar to apply bullets or numbering (Figure 10.14).
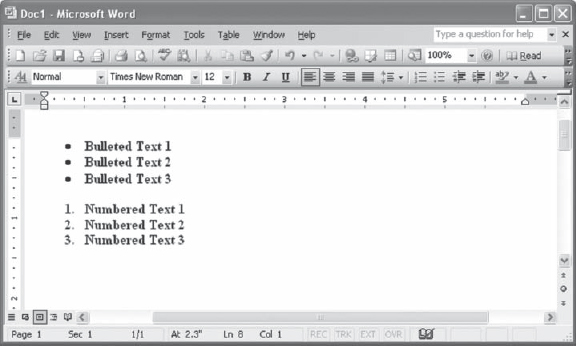
Figure 10.14 Bulleted and Numbered Text
Bullets and numbering can also be applied to text by selecting Bullets and Numbering from the Format menu. This will display the Bullets and Numbering dialog box (Figure 10.15). To apply bullets, use the Bulleted tab, and if a numbered list is to be made, use the Numbered tab. There are seven default bullet formats (and seven default numbering formats) available in the dialog box. You can modify any of these to create your own formats.
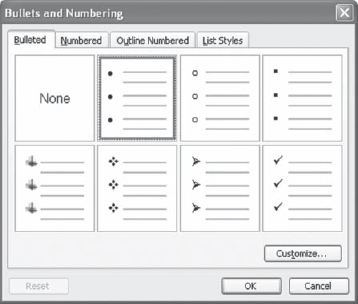
Figure 10.15 Bullets and Numbering Dialog Box
If you want to remove the bullets or numbering, select the text and click the Bullets or Numbering button on the Formatting toolbar.
18. What is a table? How it is created in MS Word? Explain with the help of an example.
Ans.: A table is one of the most powerful features of MS Word that provides a means of presenting information in an organized and attractive manner. It is used to display the information in a tabular form, that is, a grid of rows and columns of cells.
Creating a Table
In MS Word, creating a table is a simple task. You can create a table using the Table menu or Insert Table button ![]() on the Standard toolbar. You can also draw the table in the document.
on the Standard toolbar. You can also draw the table in the document.
To illustrate the table creation, consider the sample table shown below:
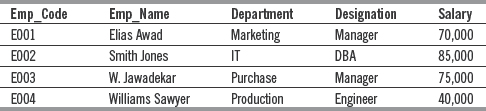
To create the given sample table using the Table menu, follow the steps given below:
- Choose Insert from the Table menu and then choose Table from the pop-up menu that appears. This displays the Insert Table dialog box (Figure 10.16).
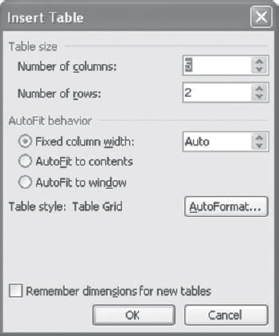
Figure 10.16 Insert Table Dialog Box
- Type the values 5 and 4 in the Number of columns and Number of rows boxes, respectively.
- Click OK. A blank table with four rows and five columns is inserted in the document.
- Click the mouse pointer in the first cell of the table and type ‘Emp_Code’.
- Press the Tab key to move to the next cell and type ‘Emp_Name’.
- Similarly, enter data in other cells of the table.
While entering the data, if you need to move to the previous cell, press Shift + Tab key. When you reach the last cell of the table you can press the Tab key again to create a new row in the table.
To create a table using the Insert Table button, follow the steps given below:
- Click the Insert Table button on the Standard toolbar.
- Drag the mouse along the grid, highlighting the number of rows and columns for the table (Figure 10.17).
- Release the mouse to insert the table. A blank table with specified number of rows and columns is inserted in the document.
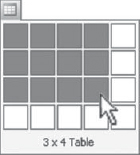
Figure 10.17 Inserting Table by Dragging
To draw a table in the document, follow the steps given below:
- Select Draw Table from the Table menu or click the Tables and Borders button
 on the Standard toolbar. The cursor changes to the image of a pencil
  and the Tables and Borders toolbar appears.
 - Draw the cells of the table with the mouse. Figure 10.18 displays an example of creating a table using the drawing method.
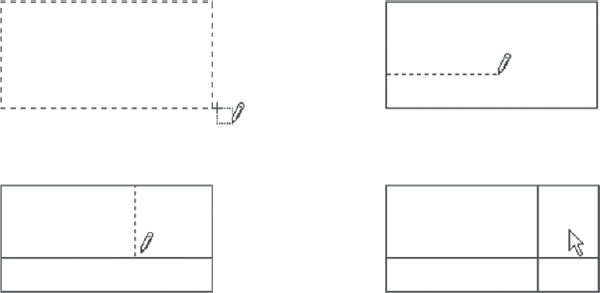
Figure 10.18 Drawing a Table
19. How to manage tables in MS Word?
Ans.: Once you have created a table, you can modify its structure by adding and deleting rows and columns, merging and splitting the cells, or resizing the rows and columns. You can delete the entire table also.
Adding and Deleting Rows and Columns
New rows can be added to an existing table. The simplest way to do this is to move the cursor to the last column of the last row and press the Tab key. You can also insert rows and columns using the Table menu. For this, follow the steps given below:
- Click inside the row or column beside which you want to add a new row or column, respectively.
- Click the Table menu and point to Insert. A submenu appears.
- Choose Rows Above or Rows Below from the submenu to insert the row above or below the specified row, respectively. Similarly, columns can be added by selecting the Columns to the Left or Columns to the Right.
For deleting rows and columns from the table, click inside the row or column that you wish to delete or select several rows or columns to delete. On the Table menu, point to Delete, and then click Rows or Columns.
Merging Cells
It allows you to combine one or more selected cells into a single cell. Note that you cannot merge cells if only one cell is selected. You can use this feature to remove the dividing borders of the cells and merge them into a single cell. Note that you cannot merge cells if only one cell is selected. To merge cells, follow the steps given below:
- Select the cells you want to merge.
- Now, follow any of the steps given below:
- Right-click on the selected cell and click Merge cells from the shortcut menu that appears.
- Choose Merge Cells from the Table menu.
- Click Merge Cells button
 on the Tables and Borders toolbar.
Splitting Cells
You can split the merged cells into a number of rows and columns. To split cells, follow the steps given below:
- Click in a cell or select multiple cells you want to split.
- Now, follow any of the steps given below:
- Right-click on the selected cells and click Split Cells from the shortcut menu that appears.
- Choose Split Cells from the Table menu.
- Click Split Cells button
 on the Tables and Borders toolbar.
- After you follow any of these steps, the Split Cells dialog box appears (Figure 10.19).
- Specify the number of rows and columns into which the cell is to be split.
- Click OK to split the cell and to close the Split Cells dialog box.

Figure 10.19 Split Cells Dialog Box
Resizing Rows and Columns
It means changing the height of row or the width of column in a table. A row and column can be resized using the Table Properties dialog box or with the mouse. To change the row height, follow the steps given below:
- Click in the row you want to resize or select several rows.
- Choose Table Properties from the Table menu to display the Table Properties dialog box (Figure 10.20).
- Click the Row tab.
- Select the Specify height checkbox under the Size section and specify the desired value for height in the box beside the checkbox.
- Click OK to apply the changes and close the Table Properties dialog box.
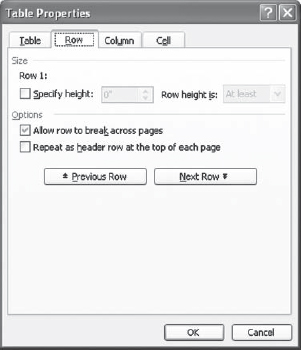
Figure 10.20 Table Properties Dialog Box
20. List the various options available in Table and Borders toolbar.
Ans.: The Tables and Borders toolbar allows you to add border styles, shading, text effects, alignment, and more options to your table (Figure 10.21).
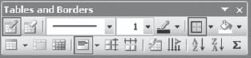
Figure 10.21 Tables and Borders Toolbar
Table 10.6 lists all the available buttons on the Tables and Borders toolbar.
Table 10.6 Tables and Borders Toolbar Options
| Command | Button | Description |
| Draw Table | It inserts a table by dragging onto the document. | |
| Eraser | It removes any line in the table. This is mainly used to merge cells by removing the dividers between them. | |
| Line Style | It defines the style and thickness of the table border. | |
| Line Weight | It defines the width for the table's border. | |
| Border Color | It defines the colour of the table's border. | |
| Outside Border | It applies line style, line weight, and border colour settings to the outside border of the cell with the insertion point or to any selected part of the table. | |
| Shading Color | It opens a palette of colours from where you can select a colour to apply it as a background shading to the cell containing the insertion point or to any selected part of the table. | |
| Insert Table | It displays the Insert Table dialog box. | |
| Merge Cells | It is only available if two or more cells are selected. Use it to remove the dividing borders of the cells and merge them into a single cell. | |
| Split Cells | It splits a cell into more than one cell. | |
| Align Top Left | It defines the horizontal and vertical alignments of the text within a cell. | |
| Distribute Rows Evenly | It makes the selected rows or cells to equal row height. | |
| Distribute Columns Evenly | It makes the selected columns or cells to equal column width. | |
| Table AutoFormat | It opens the Table AutoFormat dialog box from where you can choose from predetermined table styles. | |
| Change Text Direction | It toggles the direction of text in a cell between vertical and horizontal. | |
| Sort Ascending | It sorts the rows in a table in ascending order. | |
| Sort Descending | It sorts the rows in a table in descending order. | |
| AutoSum | It adds the content of a range of cells. |
21. Explain the Table AutoFormat feature.
Ans.: To make a table more presentable, MS Word provides Table AutoFormat feature that allows to apply different formats such as borders, shading, special fonts and colour, etc. to a table in a quick and easy manner. To apply an AutoFormat to a table, follow the steps given below:
- Place the cursor anywhere in the table.
- Select Table AutoFormat from the Table menu or click Table AutoFormat button on the Tables and Borders toolbar to display the Table AutoFormat dialog box (Figure 10.22).
- Click on the desired format from the Table styles section. Note that you can preview the selected format in the Preview box.
- To apply special formats, click the checkboxes under the Apply special formats to section. The options included in this section indicate where AutoFormat will place distinctive formatting for the headings or for the entire text in the table.
- Click Apply to apply the formatting and close the Table AutoFormat dialog box.
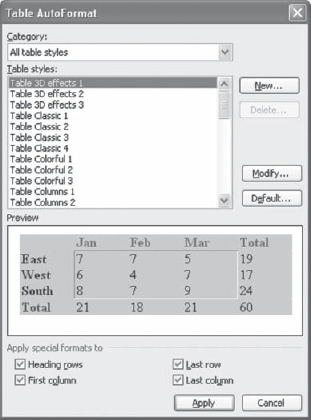
Figure 10.22 Table AutoFormat Dialog Box
22. List the steps to insert a picture from a file in a MS Word document.
Ans.: Pictures are used in the document to enhance its readability and understandability. These include bitmaps, scanned pictures, photographs, and clip art. Word allows you to insert pictures or scanned photographs from other programs and locations into the Word document. To add photographs or graphics from an existing file, follow the steps given below:
- Click on the desired location, where the picture is to be inserted.
- On the Insert menu, click Picture, and select From File. This opens the Insert Picture dialog box as shown in Figure 10.23.
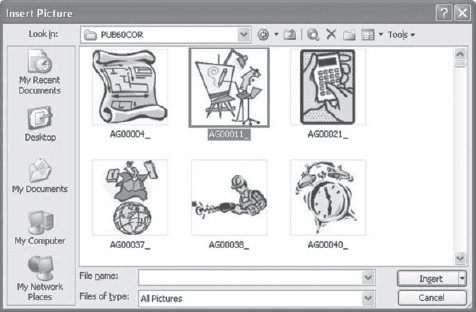
Figure 10.23 Insert Picture Dialog Box
- Use the Look in drop-down box to find the image to be inserted.
- Select the file name from the list and click the Insert button.
23. List the options available in Picture toolbar.
Ans.: Picture toolbar provides various options that allow you to change the image effects. Table 10.7 lists all the available buttons on the Picture toolbar.
Table 10.7 Picture Toolbar Options
| Command | Button | Description |
| Insert Picture | It displays the image selection window and allows user to change the image. | |
| Color | It allows making the image in greyscale, black and white, or watermark. | |
| More/Less Contrast | It modifies the contrast between the colours of the image. | |
| More/Less Brightness | It darkens or brightens the image. | |
| Rotate Left 90° | It rotates the picture 90° to the left. | |
| Crop | It deletes outer portions of the image. | |
| Line Style | It adds a variety of borders to the graphic. | |
| Compress Pictures | It reduces the picture's file size. | |
| Text Wrapping | It modifies the way the document text wraps around the graphic. | |
| Format Picture | It displays all the image properties in a separate window. | |
| Set Transparent Color | It sets transparent colour on the object. | |
| Reset Picture | It deletes all the modifications made to the image. |
24. What is Clip Art? Write the steps to add a clip art in a MS Word document.
Ans.: MS Word comes with its own set of pictures in the Clip Gallery. The Clip Gallery includes a wide variety of clip art that makes it easy for you to enhance your documents with professionally designed images. Most clip art images are in metafile format, which means you must ungroup an image and convert it to a drawing object in order to enhance it. To add a clip art from the Clip Gallery, follow the steps given below:
- Click on the desired location, where the clip image is to be inserted.
- On the Insert menu, click Picture, and select Clip Art to display the Clip Art task pane (Figure 10.24). You can also open Clip Art Gallery by clicking Insert Clip Art button
 on the Drawing toolbar.
 - To find an image, click in the box following Search for and enter keywords describing the image you want to use and click on Go button.
- Move the mouse on the image to be inserted and click drop-down arrow alongside the image. This opens the pop-up menu.
- Click Insert from the menu to insert the image. You can also drag a picture or other clip from the Clip Gallery to your document.
- To add multiple images, continue selecting images to be added to the document. When you are finished using the Clip Gallery, click the Close button on the Clip Gallery title bar to close Clip Art task pane.
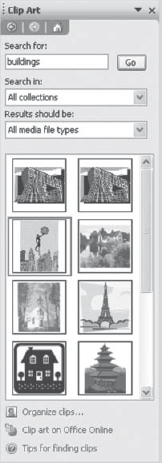
Figure 10.24 Insert Clip Art Task Pane
25. What is the role of the Drawing toolbar in MS Word?
Ans.: The Drawing toolbar is used to change and enhance the drawing objects with colours, patterns, borders, and other effects. The drawing toolbar includes the options listed in Table 10.8.
Table 10.8 Drawing Toolbar Options
| Command | Button | Description |
| Draw | It gives you options to group images, move items forward or back, move or rotate images, and set AutoShape defaults. | |
| Select Objects | It used to select objects in the document. To select a single object, click the object with the arrow. To select one or more objects, drag the arrow over the objects you want to select. | |
| AutoShapes | It displays the inbuilt shapes. | |
| Line | It draws a straight line where you click or drag in the document. | |
| Arrow | It draws an arrow headed line where you click or drag in the document. | |
| Rectangle | It draws a rectangle or a square where you click or drag in the document. | |
| Oval | It draws an oval or a circle where you click or drag in the document. | |
| Text Box | It draws a textbox where you click or drag in the document. | |
| Insert WordArt | It activates the WordArt Gallery using which you can insert WordArt objects. | |
| Insert Diagram or Organization Chart | It allows you to insert a diagram or organization chart from the Diagram Gallery. | |
| Insert Clip Art | It OPENS the Clip Art task pane using which you can insert desired clip art images. | |
| Insert Picture | It lets you select and insert the picture at the specified location. | |
| Fill Color | It adds, modifies, or removes the fill colour or fill effect from the selected object. | |
| Line Color | It adds, modifies, or removes the line colour from the selected object. | |
| Font Color | It adds, modifies, or removes the text colour from the selected text. | |
| Line Style | It lets you choose the thickness and style of the line. | |
| Dash Style | It lets you make various dashed line styles. | |
| Arrow Style | It determines the look and type of arrows. | |
| Shadow Style | It allows you to give images a shadow and format that shadow. | |
| 3-D Style | It allows you to give images a three-dimensional (3D) look and format it. |
26. Explain spelling checking operation in MS Word. Write the necessary steps to perform spell and grammar check in MS Word.
Ans.: MS Word automatically checks the spelling and grammar as you type the text and provides visual clues about the spelling and grammar unless this feature is turned off. Misspelled words are underlined in red, while sentences with grammatical flaws are underlined in green. Note that these lines are for viewing purposes only and will not be printed. Word can perform a spelling and grammar check in either the selected portion of text or the entire document.
Although spelling and grammatical errors can be corrected manually, Word provides an easy-to-use assistance when you right-click on the error, as shown in Figure 10.25. When you right-click on a spelling or grammatical error, Word displays a pop-up menu with suggestive corrections. Select the desired correction and Word will automatically make the correction.
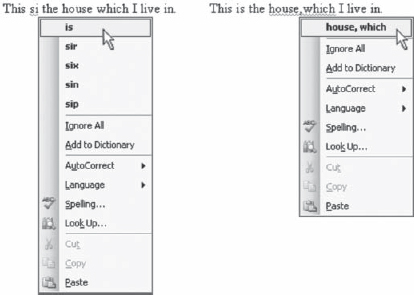
Figure 10.25 Auto Spell and Grammar Checking
To start the spell and grammar check process, perform the steps given below:
- Click the Spelling and Grammar button
 on the Standard toolbar or select Spelling and Grammar from the Tools menu to display the Spelling and Grammar dialog box. The Not in Dictionary section of the dialog box contains the first unrecognized word, which is shown in red with its accompanying sentence so you can see how you have used the word within the document. The Suggestions section contains suggestions for correcting the word (Figure 10.26).
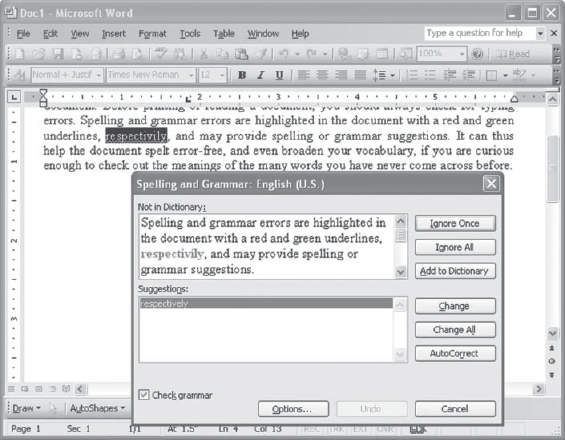
Figure 10.26 Spelling and Grammar Dialog Box
- If the word is spelt correctly, click the Ignore Once button to keep the word as it is. You can also click Ignore All button if the word in question appears multiple times in the document.
- If the word is spelt incorrectly and one of the suggestions given under the Suggestions section is correct, double-click on the correct spelling or highlight the word and click the Change button to correct its occurrence in the document. If you are afraid you misspelled a word more than once, click on the Change All button.
- If the correct spelling is not suggested, you can type the correct spelling yourself in the Not in Dictionary section and click the Change or Change All button. You can also add the correct word in the custom dictionary by clicking Add to Dictionary button. You can use the AutoCorrect button to add the word to the AutoCorrect list. In the future, when you misspell this word while typing, Word will automatically correct it, without you having to access the spell checker.
Note that Word continues to perform spelling and grammar check until it finds the next mistake or until there are no mistakes left in the document or in the selected text.
27. Define and distinguish between AutoCorrect and AutoText facilities available in MS Word.
Ans.:
AutoCorrect
This feature automatically detects common errors like misspelled words, grammatical errors, and incorrect capitalization, and replaces them with the correct text. For example, ‘grammer’ is rectified as ‘grammar’. You can also use AutoCorrect to quickly insert text, graphics, or symbols. For example, type (c) to insert ©, or type asap to insert as soon as possible. There are several words available in the AutoCorrect list; however, you can also enter a word that is commonly misspelled in the dictionary. For this, select AutoCorrect Options from the Tools menu to display the AutoCorrect dialog box. In this dialog box, type in the misspelling in the Replace textbox and the corrected spelling in the With textbox. After that click the Add button and then close the dialog box by clicking the OK button.
AutoText
The Cut and Copy options store information on the clipboard. Each time you store new information on the clipboard, the old information is lost. If you wish to store text, graphics, tables, fields, bookmarks, and other items that are used frequently in your document, use AutoText to store them permanently. For example, if you want to write letters to your relatives inviting them for your birthday party and want to add your name and address again and again, create an AutoText entry. To do this, follow the steps given below:
28. What do mean by a thesaurus? How is it used in MS Word?
Ans.: Sometimes, you may wish to replace a word with its synonym. MS Word has the thesaurus feature, which does just the same. To use this feature, follow the steps given below:
- Place the cursor on the word that is to be looked up.
- On the Tools menu, select Language and then select Thesaurus to display the Research task pane (Figure 10.27).
- A listing of similar words is provided under the Thesaurus: English (U.S.) section. To use a word from the list, point to it, click the down arrow and then click Insert or Copy. You can also view the similar words of any word in the list by clicking that word.
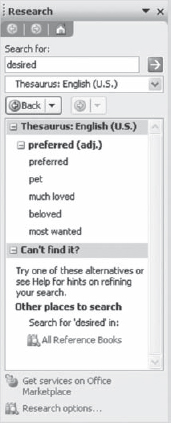
Figure 10.27 Research Task Pane
29. What does the Mail Merge feature of MS Word do? What are its different components?
Ans.: Mail Merge feature of MS Word allows you to merge generic information that is to be repeated in each letter, mailing label, envelope, etc., with varying information, like a list of names and addresses of employees. This allows having almost identical documents in which the content of the documents is the same for each employee, however, each of it can be customized for a particular individual in the list. For example, if one wants to send a form letter to five or five hundred different people, Word can be used to personalize each one and create envelopes or mailing labels.
The components of the Mail Merge are as follows:
- Main document: It comprises the generic information in the form of text and graphics. It also determines the format of the resultant merged document. The five types of main documents are as follows:
- Letters: To create letters that can be sent to a group of people.
- E-mail messages: To create e-mail messages that can be sent to a group of people.
- Envelopes: To create addressed envelopes for a group mailing.
- Labels: To create address for a group mailing.
- Directory: To create a directory containing a printed list of addresses or a catalog.
- Data source: It comprises varying information in which records representing individual items are stored. Each record consists of fields, for example, a record of an employee may consist of name and address, where name may consist of fields, FirstName and LastName and the address may contain fields HouseNo, City, and State. A data source contains multiple records, representing information for numerous employees.
- Merged document: It comprises the combination of generic text and variable information. In the main document, you can insert merge fields indicating the place where you want to place the variable information. When the information in the data source is merged with the main document, the merge fields are replaced with the variable information representing the data for each individual.
30. List the steps required to perform a mail merge. Explain with the help of an example.
Ans.: To understand how to perform mail merge, consider the sample invitation letter shown in Figure 10.28. Suppose you have to send this invitation to all your relatives and friends.
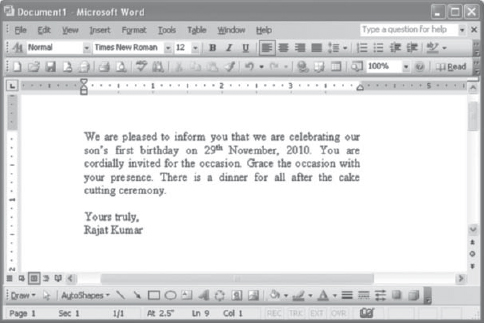
Figure 10.28 Sample Text
Now, to perform mail merge, follow the steps given below:
- Click New on the Standard toolbar to create a document and type the sample text shown in Figure 10.28. Save the document. Note that an existing file can also be used as the main document. If you already have a document containing the desired text, open it.
- Click the Tools menu, point to Letters and Mailings, and then click Mail Merge to display the Mail Merge task pane.
- Select the appropriate option under the Select document type section. For our example, select the option Letters (Figure 10.29).
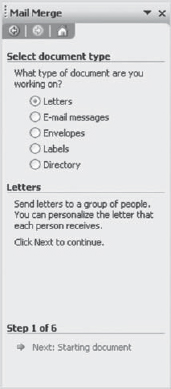
Figure 10.29 Step 1: Select Document Type
- Click Next: Starting document button to perform the next step of mail merge.
- Click Use the current document option under the Select starting document section to use the currently open document as the main document (Figure 10.30).
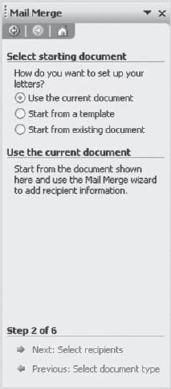
Figure 10.30 Step 2: Select Starting Document
- Click Next: Select recipients to perform next step of the mail merge. You can click Previous: Select document type to return to previous step and change the selection options (Figure 10.31).
- Select Type a new list under the Select recipients section to create the address list (Figure 10.32).
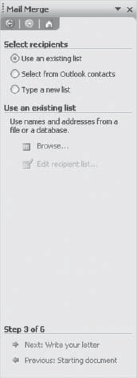
Figure 10.31 Step 3: Select Recipients
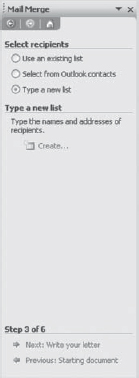
Figure 10.32 Step 3 with Type a new list Option Selected
- Click Create button to display the New Address List dialog box (Figure 10.33).
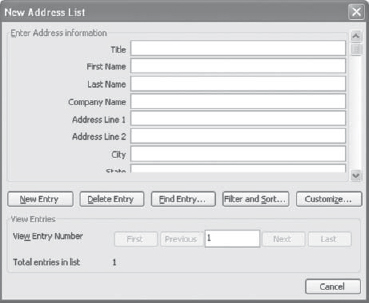
Figure 10.33 New Address List Dialog Box
- In the New Address List dialog box, type the appropriate information you want to include for the first entry in the boxes under Enter Address information section. Note that as you start entering the information, the Cancel button changes to Close button.
- Click New Entry button to complete the first entry and enter a new entry.
- Repeat steps 9 and 10 until you have added all the address entries and click the Close button to display the Save Address List dialog box (Figure 10.34).
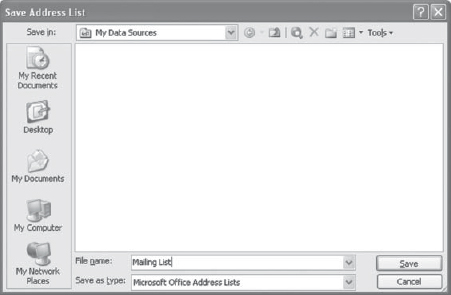
Figure 10.34 Save Address List Dialog Box
- Specify the name of the file, location of the file, and the file type.
- Click Save button to display the Mail Merge Recipients dialog box (Figure 10.35).
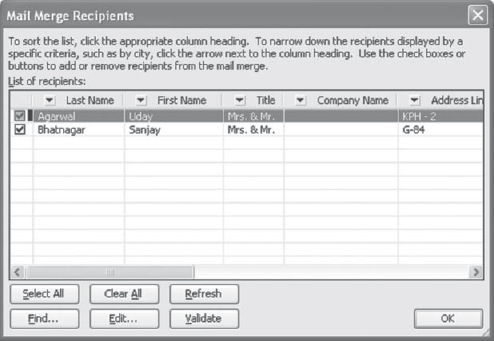
Figure 10.35 Mail Merge Recipients Dialog Box
- In the Mail Merge Recipients dialog box, click the heading of the column you want to use for sorting the list. You can also add or remove the recipients from the mail merge list by clicking the checkbox beside the name of the recipient. Click OK to close the Mail Merge Recipients dialog box and return to the Mail Merge task pane.
- Click Next: Write your letter to perform next step of the mail merge and to display the mail merge toolbar (Figure 10.36).
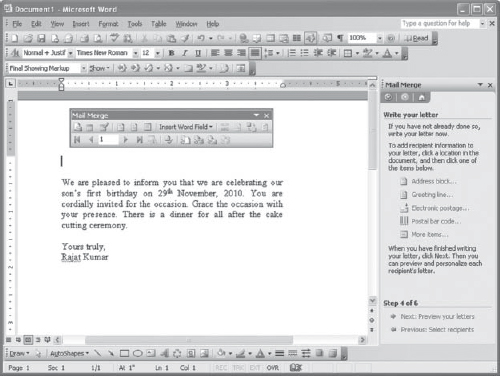
Figure 10.36 Step 4 of Mail Merge
- Place the cursor at the location in the main document where you want to insert the merge fields, that is, where you want to merge name, addresses etc. from the data source.
- Click the Address block under the Write your letter section to display the Insert Address Block dialog box (Figure 10.37).
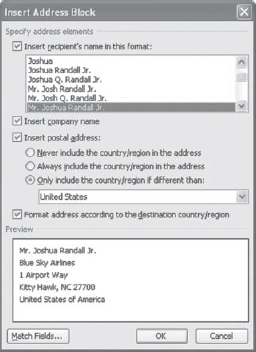
Figure 10.37 Insert Address Block Dialog Box
- Select the desired format and click OK button. A merge field for the address appears in the letter. This merge field will be replaced with an address from the address list (Figure 10.38).
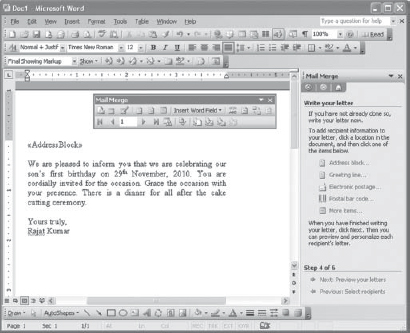
Figure 10.38 Merge Field for Address
- Similarly, you can add Greeting Line if you want to add a greeting in the letter.
- Click Next: Preview your letters to perform the next step of the mail merge (Figure 10.39).
- Click Next: Complete the merge to finish the mail merge (Figure 10.40).
- Click Edit individual letters under the Merge section to merge the main document with the information from the mailing list. The Merge to New Document dialog box appears (Figure 10.41).
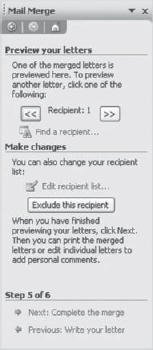
Figure 10.39 Step 5 of Mail Merge
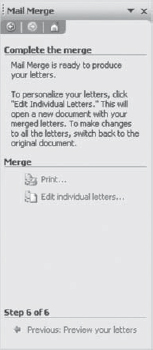
Figure 10.40 Step 6 of Mail Merge
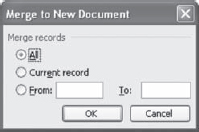
Figure 10.41 Merge to New Document Dialog Box
- Click the appropriate option to specify the records you want to merge.
- Click OK to create letters. Figure 10.42 shows the merged document.
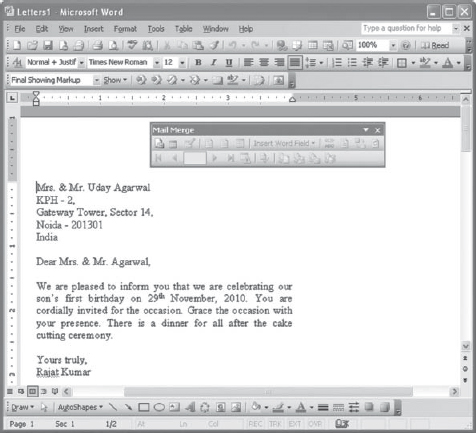
Figure 10.42 Merged Document
31. List the various options available in Mail Merge toolbar.
Ans.: Some of the tools available in Mail Merge toolbar are listed in Table 10.9.
Table 10.9 Mail Merge Toolbar Options
| Command | Button | Description |
| Main Document Setup | It creates a main document. | |
| Open Data Source | It opens the existing list from which recipients are selected. | |
| Mail Merge Recipients | It allows to add or remove the recipients from the mail merge list. | |
| Insert Address Block | It inserts a merge field for the address in the main document at the specified tlocation. This merge field will be replaced with an address from the mailing list. | |
| Insert Greeting Line | It inserts a merge field for the greeting line in the main document at the specified location. | |
| Insert Merge Fields | It inserts a merged field at the insertion point. | |
| Insert Word Field | It inserts a word field at the insertion point. | |
| View Merged Data | It switches between merge fields and the data that appears in them. | |
| Highlight Merge Fields | It highlights the merge fields. | |
| First Record | It shows the first record in the data store. | |
| Previous Record | It shows the previous record in the data store. | |
| Go to Record | It moves to the record specified in the box. | |
| Next Record | It shows the next record in the data store. | |
| Last Record | It shows the last record in the data store. | |
| Find Entry | It finds a specified entry. | |
| Check for Errors | It checks and reports errors. | |
| Merge to New Document | It merges the main document and data. | |
| Merge to Printer | It merges the document and prints it. |
32. What is a macro? Briefly discuss its utility. How do you record and execute a macro?
Ans.: MS Word allows you to automate frequently used tasks by creating macros. A macro is a series of commands and instructions that you can group together as a single command to perform a specific task automatically. You can use the macro recorder to record a sequence of actions.
Utility of Macros
Some of the uses for macros are given below:
| It speeds up routine editing and formatting. | |
| You can combine multiple commands and perform them as a single command. | |
| A complex series of tasks can be automated with the help of macros. | |
| It makes a specific option in a dialog box more accessible. |
Recording and Executing a Macro
For creating the macros, you need to record the series of actions/tasks using the keyboard and mouse and assign the recorded macro. Assigning the macro means specifying to the computer the way you prefer to execute the macro. You can assign a macro to an icon in a toolbar, to a button, to a keyboard shortcut, to a combination of keys, or any option in a menu. To understand how to use macros, suppose you want to insert the same table at many places in a document. To record a macro for this, follow the steps given below:
- Click the Tools menu, point to Macro and then choose Record New Macro from the submenu that appears. This displays the Record Macro dialog box (Figure 10.43).
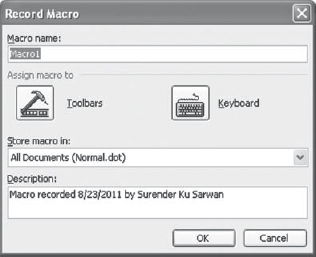
Figure 10.43 Record Macro Dialog Box
- Specify an appropriate name for the macro in Macro name textbox.
- Click the Keyboard button under the Assign macro to section to assign the macro to a keyboard shortcut. This displays the Customize Keyboard dialog box (Figure 10.44).
- In this dialog box, specify the shortcut key for the macro in the Press new shortcut key textbox. For example, we have specified Alt + B.
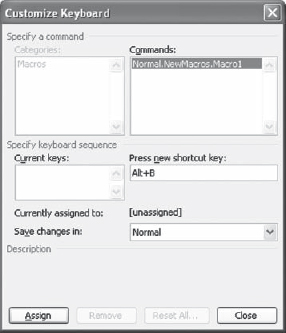
Figure 10.44 Customize Keyboard Dialog Box
- Click the Assign button to assign the macro to the combination of specified keys.
- Click the Close button to close the Customize Keyboard dialog box. A small macro box appears on the left side of your document. Now, you can start recording your macro.
- Click the Insert Table button on the Standard toolbar and specify the desired number of rows and columns. Release the mouse button to insert the table and enter the desired data in the table (Figure 10.45).
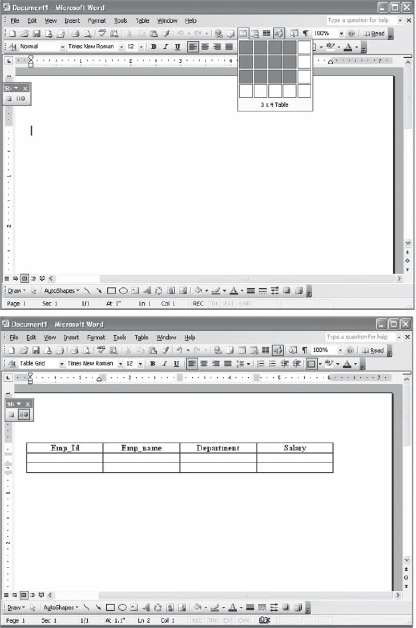
Figure 10.45 Recording a Macro
- Click the Stop Recording button
 in the macro box to stop recording the macro.
 - Now, press Alt + B to execute the macro. The same table appears again in the document as shown in Figure 10.46.
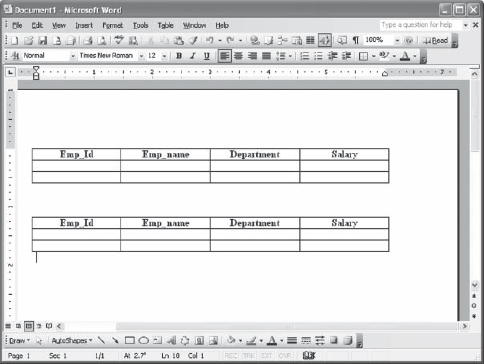
Figure 10.46 Executing the Macro
33. List the steps for setting password in a Word document.
Ans.: MS Word allows you to set a password in your document to secure your document from being accessed by others. You can specify a password for opening your document as well as for modifying the document in case your document is shared in the network. To set the password, follow the steps given below:
- Choose Options from the Tools menu to display the Options dialog box.
- Click the Security tab (Figure 10.47).
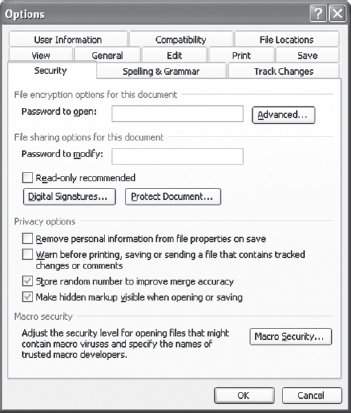
Figure 10.47 Options Dialog Box with Security Tab Active
- Type a password that you want to be entered before opening your document in Password to open textbox.
- Type a password that you want to be entered before modifying your document from any user in the network in Password to modify textbox.
- Click OK to set the password and close the Options dialog box.
34. Write a short note on Footnote and Endnote option in MS Word.
Ans.: Footnotes and endnotes are used in Word document to provide additional information about some text or word in the document. It may contain details about the location of the source or further explanation of the marked text or word that cannot be included in the main text. A footnote or an endnote consists of two parts: reference mark and associated note text. The reference mark can either be a number, a character, or some symbol. A footnote appears at the bottom of the page containing reference mark, whereas an endnote appears at the bottom of the last page of a document (i.e., end of the document). To insert a footnote or an endnote, follow the steps given below:
- Place the insertion point where you want to insert a note reference mark.
- Click the Insert menu, point to Reference and then select Footnote. The Footnote and Endnote dialog box appears (Figure 10.48).
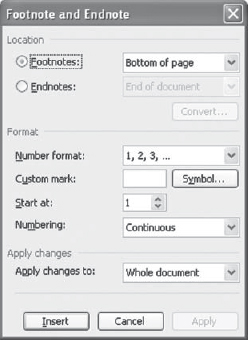
Figure 10.48 Footnote and Endnote Dialog Box
- Select the Footnotes or Endnotes option to insert a footnote or an endnote, respectively. Also select the location of the placement of footnote or endnote from the drop-down list box besides the Footnotes or Endnotes option.
- Select the number format from the Number format drop-down list box. You can also specify your own marker in Custom mark textbox or you can select symbol as the marker from the Symbol dialog box displayed by clicking on the Symbol button.
- Specify the number in Start at box to start the numbering from a particular number.
- Click the Insert button to insert the footnote or endnote. Word will insert the appropriate number at the insertion point and moves the insertion point next to the note number in the footnote or endnote.
- Type the text for the note in the footnote or endnote.
Note that the footnote or endnote can be deleted by deleting its note reference mark.
35. Write a short note on Print preview.
Ans.: Print preview is a way to view the appearance of the printed document onscreen before printing the final output. Previewing the document is a great way to catch formatting errors, such as incorrect margins, overlapped text, boldfaced text, and other text enhancements. This helps in saving costly printer paper, ink, and time. To view a document in print preview mode, choose Print Preview from File menu or click the Print Preview button ![]() on the Standard toolbar. In the print preview mode, the document appears as a reduced image in the Print Preview screen (Figure 10.49). To close the print preview and return to the document, click Close button.
on the Standard toolbar. In the print preview mode, the document appears as a reduced image in the Print Preview screen (Figure 10.49). To close the print preview and return to the document, click Close button.
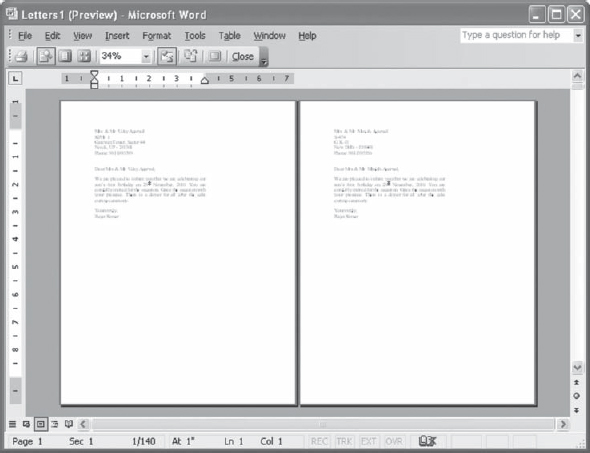
Figure 10.49 Print Preview Screen
36. Write the steps to print a document in MS Word.
Ans.: Once you are ready with all the formatting and editing, you can print the document. To print a document, follow the steps given below:
- Click the Print button
 on the Standard toolbar or select Print from the File menu to display the Print dialog box (Figure 10.50).
 - Specify the range of the document to print by choosing any of following options under Page range section:
- All: To print all the pages of the document.
- Current page: To print the current page in the document.
- Pages: To print certain number of pages.
- Selection: To print the selected portion of the document.
- Specify the number of copies you want to print in the Number of copies box under the Copies section.
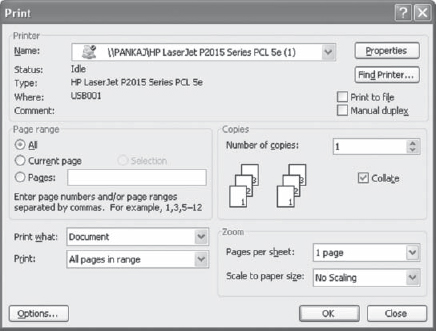
Figure 10.50 Print Dialog Box
- If you want to print multiple copies, select the Collate checkbox to print a complete copy of the document before the first page of the next copy is printed. Now, the copies will come out in the order page 1, 2, 3; page 1, 2, 3; etc.
- Select the number of pages in the document that you want to print on each sheet of paper in the Pages per sheet box under the Zoom section.
- Click OK. Word will begin printing the document.
37. Write the basic shortcuts used in MS Word.
Ans.: Some basic shortcuts used in MS Word are listed in Table 10.10.
Table 10.10 Keyboard Shortcuts in MS Word
| Action | Shortcut Key |
| Open a document | Ctrl + O |
| Create a new document | Ctrl + N |
| Close a document | Ctrl + W |
| Save as | F12 |
| Save | Ctrl + S |
| Help | F1 |
| Ctrl + P | |
| Close word application | Alt + F4 |
| Bold | Ctrl + B |
| Italic | Ctrl + I |
| Underline | Ctrl + U |
| Change case | Shift + F3 |
| Font dialog box | Ctrl + D |
| Left alignment | Ctrl + L |
| Center alignment | Ctrl + E |
| Right alignment | Ctrl + R |
| Justified alignment | Ctrl + J |
| Indent | Ctrl + M |
| Undo | Ctrl + Z |
| Redo | Ctrl + Y |
| Cut | Ctrl + X |
| Copy | Ctrl + C |
| Paste | Ctrl + V |
| Delete previous word | Ctrl + Backspace |
| Find | Ctrl + F |
| Replace | Ctrl + H |
| Go to | Ctrl + G |
Multiple-choice Questions
1. _________ provides information related to current cursor location, current page number, total number of pages, and program status.
(a) Status bar
(b) Standard toolbar
(c) Formatting tool bar
(d) None of these
2. Which option should be used from the following so as to see the document before printout is taken?
(a) Insert table
(b) Print Preview
(c) Paste
(d) Format painter
3. A user can use the _________ and _________ commands to locate a particular word, phrase, or set of characters in a document, and replace it with something else.
(a) Find and Replace
(b) Print and Print Preview
(c) Header and Footer
(d) Spelling and Grammar
4. Which of the following options is used to display information such as document title, author name, page number, and graphics in word?
(a) Insert Table
(b) Header and Footer
(c) AutoCorrect
(d) Thesaurus
5. Tables can be created in a number of ways, one of the most commonly used method is to create table by clicking on the _________ menu.
(a) Format
(b) Window
(c) Help
(d) Table
6. The _________ toolbar is used to change and enhance the drawing objects with colours, patterns, borders, and other effects.
(a) Drawing toolbar
(b) Picture toolbar
(c) AutoFormat
(d) Autocorrect
7. The feature which automatically detects common errors, that is, misspelled words, grammatical errors, and incorrect capitalization is called _________.
(a) Goto
(b) Thesaurus
(c) AutoCorrect
(d) Spelling and Grammar
8. In Word 2003, _________ feature is used to replace a word with its synonym.
(a) Thesaurus
(b) AutoCorrect
(c) Tab
(d) AutoText
9. _________ feature(s) of MS Word allows one to merge generic information which is to be repeated in each letter, mailing label, or, envelope.
(a) Macro
(b) Mail merge
(c) AutoSummarize
(d) All of these
10. A _________ is a series of commands and instructions that one can group together as a single command to perform a specific task automatically.
(a) Mail merge
(b) AutoCorrect
(c) Macro
(d) None of these
Answers
1. (a)
2. (b)
3. (a)
4. (b)
5. (d)
6. (a)
7. (c)
8. (a)
9. (b)
10.(c)