Life is like an onion; you peel it off one layer at a time, and sometimes you weep.
—Carl Sandburg
American poet, biographer, journalist, and editor with three Pulitzer Prizes
Kubernetes is like an onion. You peel it off one layer at a time, and sometimes you weep, check your YAML file, and read more documentation.
Kubernetes is a complex system. This first chapter will start with a short history of Kubernetes and how it has grown to a complex system. Although it already has many layers, it is also extensible with additional layers. This chapter will also discuss how to configure a Kubernetes system, its extension patterns, and points. At the end of this chapter, you will grasp the complexity of Kubernetes and its capabilities.
Let’s start with a short recap of Kubernetes history and its features.
Kubernetes Recap
Kubernetes is an open source system for managing containerized applications. The name originates from Greek with the meaning of helmsman . So, it is not wrong to say that Kubernetes is the tool to help you find Moby Dick in the stormy oceans of containers and microservices.
Google open-sourced Kubernetes in 2014, and it was the accumulated experience of running production workloads in containers over decades. In 2015, Google announced the Kubernetes project’s handover to the Cloud Native Computing Foundation (CNCF).1 CNCF has over 500 members,2 including the world’s most giant public cloud and enterprise software companies and over a hundred innovative startups. The foundation is a vendor-neutral home for many of the fastest-growing projects including Kubernetes, Prometheus, and Envoy.

Kubernetes repository
There is an enormous amount of open issues to resolve, and if you want to dive into the open source world to contribute, the community is also one of the most welcoming ones. Now let’s tackle one level more and check what we mean by a Kubernetes system.
Kubernetes is designed to run on the clusters. A Kubernetes cluster consists of nodes, and the containerized applications run on these nodes.

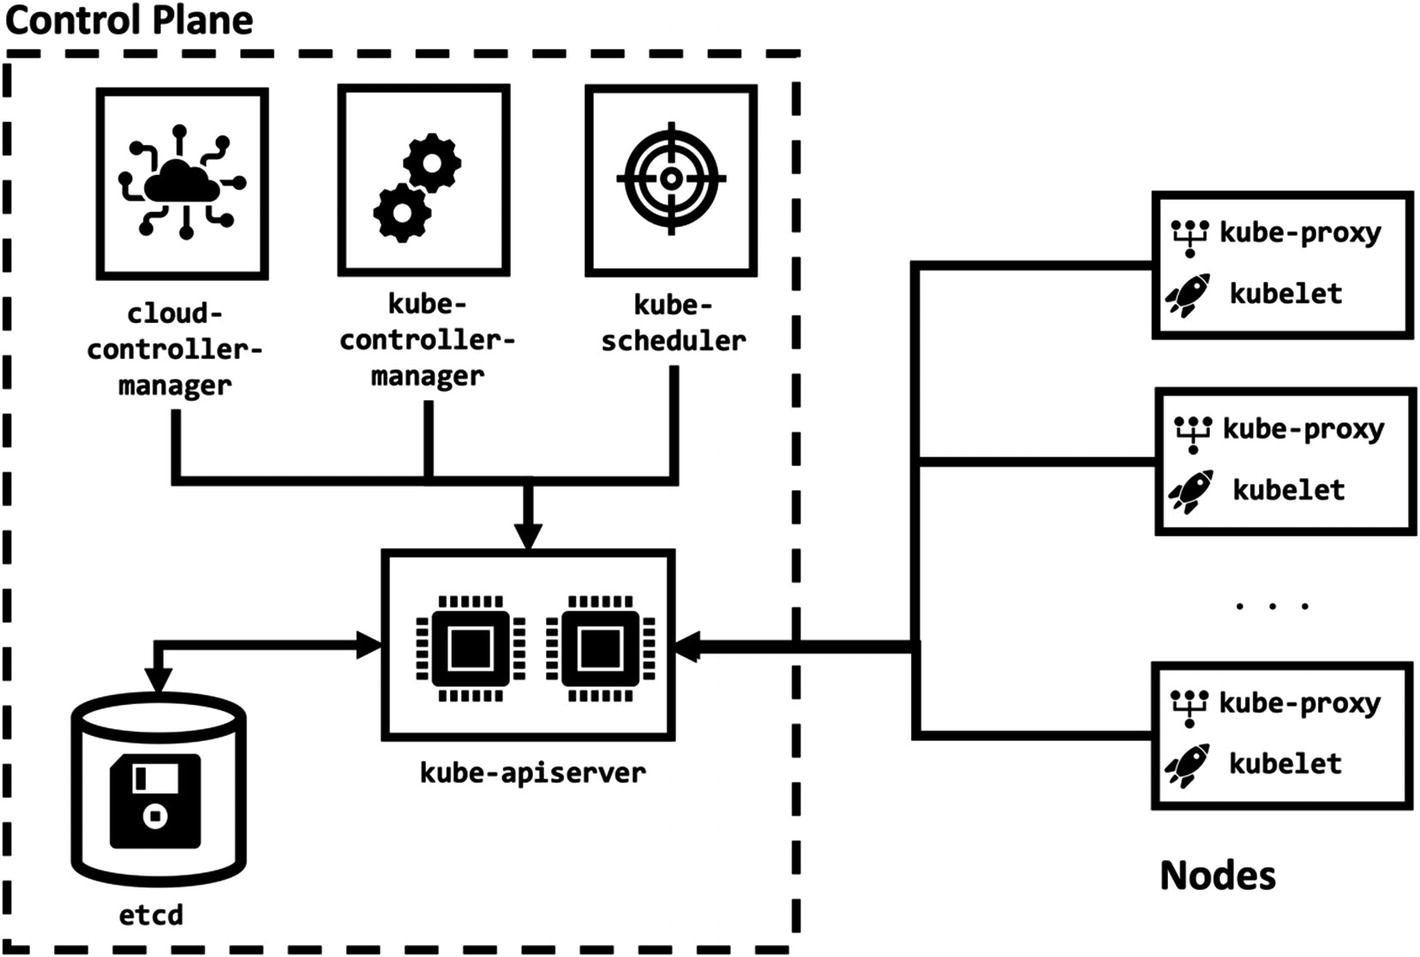
Kubernetes components
Control Plane Components
The control plane is the brain of a Kubernetes cluster to make decisions, detect events, and respond if required. For instance, the control plane is expected to give scheduling decisions of pods to worker nodes, identify failed nodes, and reschedule new pods to ensure scalability.
Control plane components can run on any node in the Kubernetes cluster; however, it is a typical approach to save some nodes for only control plane components. This approach separates the workloads from control plane components in a cluster and makes it easier to operate nodes for scaling up and down or maintenance.
Now, let’s review each control plane component and their importance to the cluster.
kube-apiserver
Kubernetes API is the front end of the control plane, and the kube-apiserver exposes it. kube-apiserver can scale horizontally by running multiple instances to create a highly available Kubernetes API.
etcd
etcd is an open source distributed key-value store, and Kubernetes stores all its data in it. The state of the cluster and changes are saved in etcd by only kube-apiserver, and it is possible to extend the etcd horizontally.
kube-scheduler
Kubernetes is a container orchestration system, and it needs to assign the containerized applications to nodes. kube-scheduler is responsible for scheduling decisions by taking into account resource requirements, available resources, hardware and policy constraints, affinity rules, and data locality.
kube-controller-manager
One of the key design concepts of Kubernetes is the controller. Controllers in Kubernetes are control loops for watching the state of the cluster and make changes when needed. Each controller interacts with Kubernetes API and tries to move the current cluster state to the desired shape. In this book, you will not only be familiar with the native Kubernetes controllers but also learn how to create new controllers to implement new capabilities. kube-controller-manager is a set of core controllers for a Kubernetes cluster.
cloud-controller-manager
Kubernetes is designed to be a platform-independent and portable system. Therefore, it needs to interact with cloud providers to create and manage the infrastructure such as nodes, routes, or load balancers. The cloud-controller-manager is the component to run controllers specific to the cloud provider.
Node Components
Node components are installed to every worker node in a Kubernetes cluster. Worker nodes are responsible for running the containerized applications. In Kubernetes, containers are grouped into a resource named as pod. kube-scheduler assigns pods to the nodes, and node components ensure they are up and running.
kubelet
kubelet is the agent running in each node. It fetches the specification of the pods that are assigned to the node. It then interacts with the container runtime to create, delete, and watch containers’ status in the pod.
kube-proxy
Containerized applications operate like running in a single network while running inside a Kubernetes cluster. kube-proxy runs on every node as a network proxy and connects applications. It also maintains network rules for inside and outside cluster network communication.
In a production environment, control plane components run over multiple nodes to provide fault tolerance and high availability. Similarly, the number of worker nodes scales with the workload and resource requirements. On the other hand, it is possible to create more portable Kubernetes systems running on a single node inside Docker containers or virtual machines for development and testing environments. Throughout the book, we will create both production-ready and single-node Kubernetes clusters and see them in action. In the following section, we will focus on configuring the Kubernetes system to understand its capabilities.
Configuring the Kubernetes Cluster
You can restrain or liberate a Kubernetes cluster by two broad approaches: configuration and extensions. In the configuration approach, you can change flags, configuration files, or API resources. This section will focus on configuring the Kubernetes, and then we will move our focus to extensions in the rest of the book.
kube-apiserver flags
kube-scheduler flags

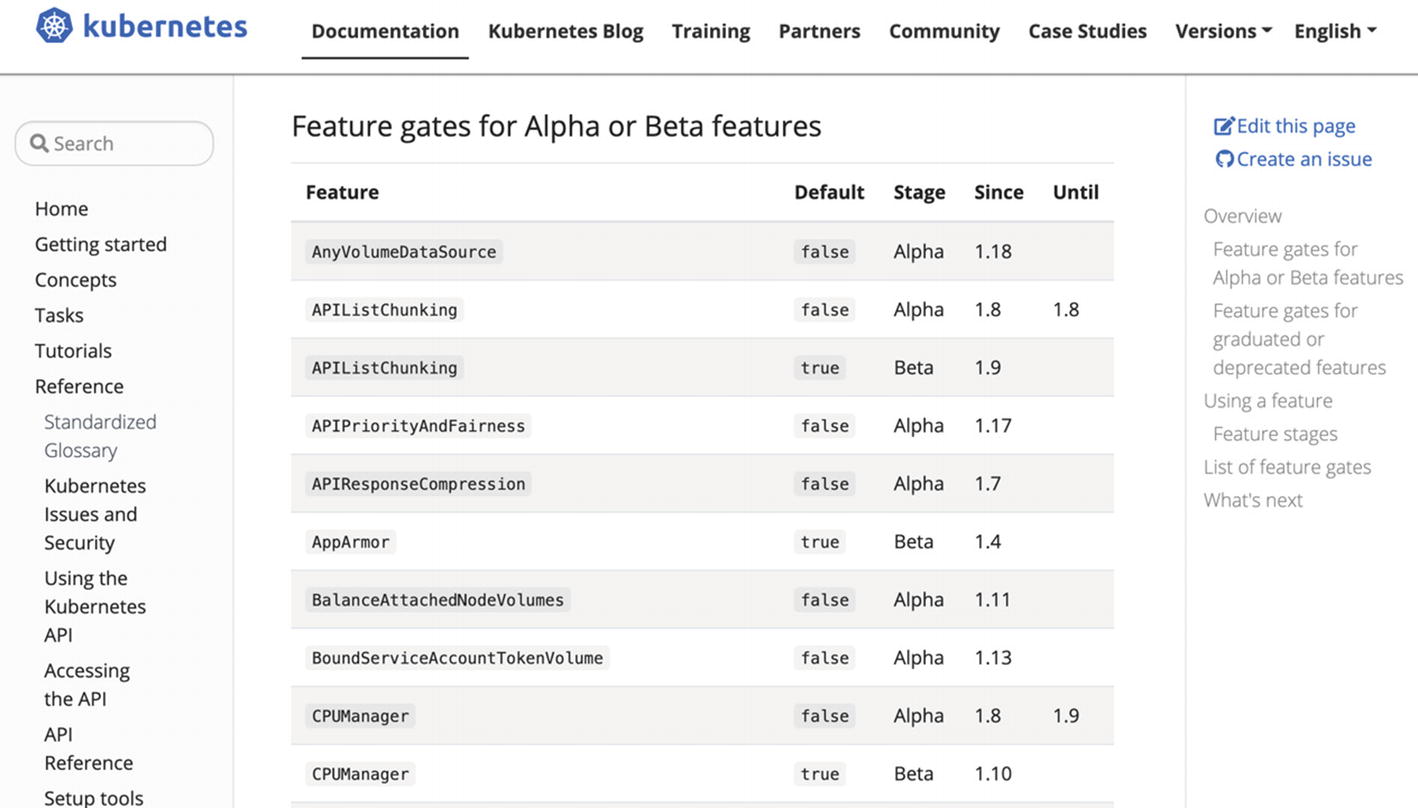
Feature gates
In managed Kubernetes systems such as Amazon Elastic Kubernetes Service (EKS) or Google Kubernetes Engine (GKE), it is impossible to edit the flags of control plane components. However, there are options to enable all alpha features in Google Kubernetes Engine6 with --enable-kubernetes-alpha flag similar to --feature-gates=AllAlpha=true. It is valuable to use alpha clusters for early testing and validation of new features.
The configuration of Kubernetes enables designing tailor-made clusters. Therefore, it is essential to grasp the configuration parameters of the control plane and node components. However, configuration parameters only allow you to tune what is already inside the Kubernetes. In the next section, we will expand the boundaries of Kubernetes with extensions.
Kubernetes Extension Patterns
Kubernetes design is centered on Kubernetes API. All Kubernetes components such as kube-scheduler and clients such as kubectl operate interacting with the Kubernetes API. Likewise, the extension patterns are designed to interact with the API. However, unlike the clients or Kubernetes components, extension patterns enrich the capabilities of Kubernetes. There are three well-accepted design patterns to extend the Kubernetes.
Controller
Controllers are loops for managing at least one Kubernetes resource type.

Controller pattern in Kubernetes
Example CronJob resource
The desired state is in the spec field, and there are two important sections: schedule and jobTemplate. schedule defines the interval, and it is every minute for example CronJob. The jobTemplate field has the Job definition with containers to execute.
CronJob controller
CronJob in action
The source code for the CronJob controller is available on GitHub: https://github.com/kubernetes/kubernetes/tree/master/pkg/controller/cronjob.
Controllers offer a robust extension pattern with the help of custom resources in Kubernetes. It is possible to extend the Kubernetes API by defining custom resources and manage them by controllers. In Chapter 4, we will both extend the Kubernetes API and write custom controllers to implement this design pattern.
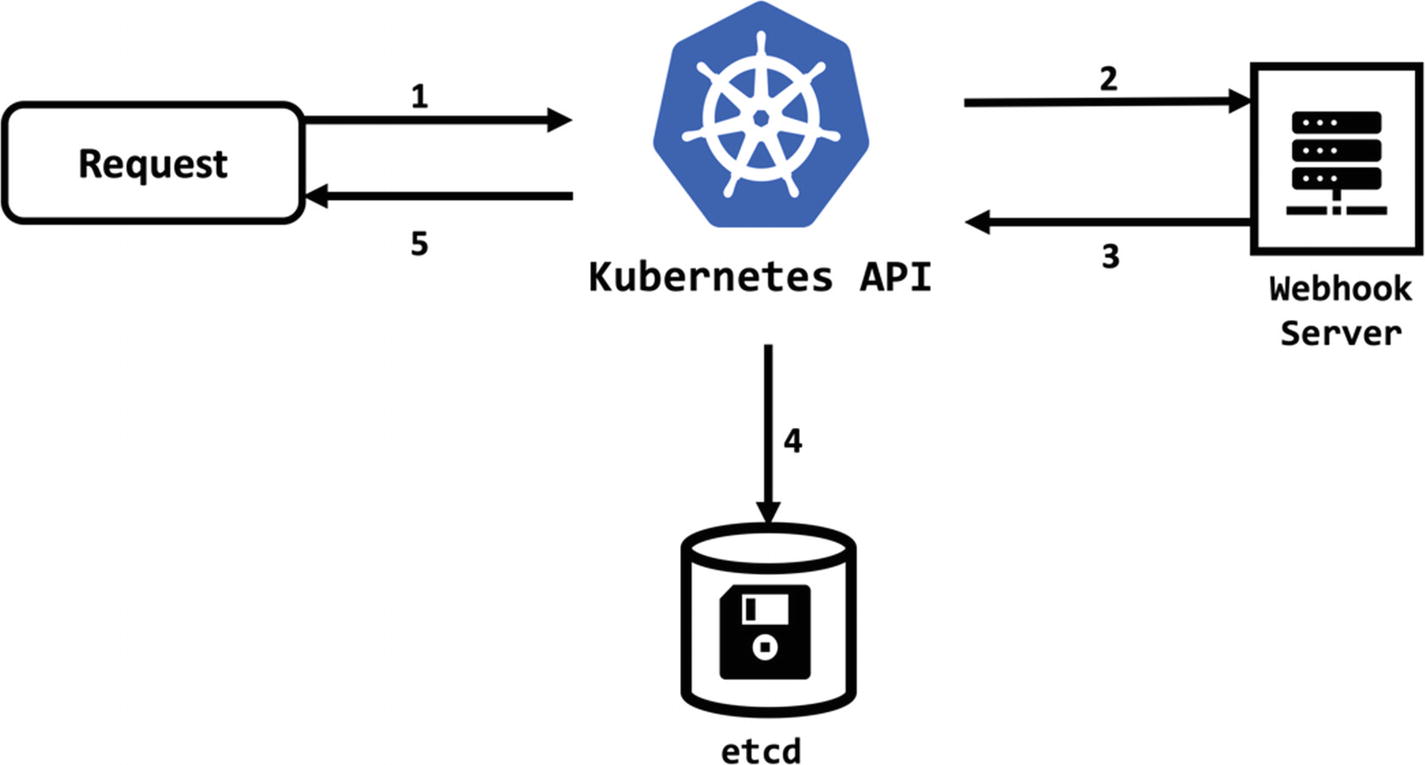
Webhook

Flow of request in Kubernetes
Authorization webhook response
Change webhook response
Webhook backend are easy to follow design patterns to extend software applications. However, webhooks add a point of failure to the system and need great attention during the development and operation.
Binary Plugin
kubectl binary plugin handling
The Go function Execute calls the external binary and captures its input and output to the command line. In the following chapters, you will create similar plugins and see binary plugin pattern in action.
Source code of the kubectl is available at GitHub: https://github.com/kubernetes/kubernetes/blob/master/pkg/kubectl/cmd/cmd.go.
As software engineering design patterns, extension patterns are accepted and repeatable solutions to common problems in Kubernetes. If you have similar obstacles, the patterns help implement solutions. However, it should be kept in mind that neither design patterns nor extension patterns are silver bullets. They should be treated as methods to extend the Kubernetes systems. With multiple components and API endpoints, Kubernetes has a broad set of open points to the extensions. In the following section, we will have a more technical overview of these extension points in Kubernetes.
Kubernetes Extension Points
kubectl Plugins: kubectl is the indispensable tool of the users interacting with the Kubernetes API. It is possible to extend kubectl by adding new commands to its CLI. The kubectl plugins implement the binary plugin extension pattern, and users need to install them in their local workspace.
API Flow Extensions: Each request to Kubernetes API passes through steps: authentication, authorization, and admission controls. Kubernetes offers an extension point to each of these steps with webhooks.
Kubernetes API Extensions: Kubernetes API has various native resources such as pods or nodes. You can add custom resources to the API and extend it to work for your new resources. Furthermore, Kubernetes has controllers for its native resources, and you can write and run your controllers for your custom resources.
Scheduler Extensions: Kubernetes has a control plane component, namely, kube-scheduler, to assign the workloads over the cluster nodes. Also, it is possible to develop custom schedulers and run next to the kube-scheduler. Most of the schedulers follow the controller extension pattern to watch the resources and take action.
Infrastructure Extensions: Node components interact with the infrastructure to create cluster networks or mount volumes to the containers. Kubernetes has the extension points for networking and storage by the designated Container Network Interface (CNI) and Container Storage Interface (CSI). The extension points in infrastructure follow the binary plugin extension pattern and require the executables installed on the nodes.
We have grouped the extension points based on their functionality and the implemented extension pattern. In the following chapters of the book, we will cover each group in depth. You will not only learn the extension points and their technical background but also create them and run in the clusters.
Key Takeaways
Kubernetes is a complex system.
You can logically divide a Kubernetes cluster into two: the control plane and node components.
Kubernetes components have a rich set of configuration options.
There are three extension patterns for extending the Kubernetes: controller, webhook, and binary plugin.
Kubernetes components and its design allow many open points for extension: kubectl, API flow, Kubernetes API, scheduler, and infrastructure.
In the following chapter, we will start with the first extension point: kubectl plugins. We will create new plugins for kubectl and use the custom commands to enrich its capabilities.
