4
Needle Arts
These easy projects will help you get started with knitting and crochet, but be careful—they can be habit-forming!

Just like other kinds of fabric and fiber art, knitting and crochet rely heavily on math and engineering. And they’re about more than just counting and measuring—needle arts can be used to demonstrate all kinds of interesting math concepts. For instance, sewing a tent involves taking a flat, two-dimensional piece of material and turning it into a three-dimensional structure with height and width and depth. With knitting and crochet, it’s almost like taking a one-dimensional line—a strand of yarn—and making it into a three-dimensional piece of clothing. In fact, some people even use knitting and crochet (and other kinds of needle arts, like embroidery and cross-stitching) to help explain how computers work. In computer programming, you input data, process it using a computer program, and end up with a result called the output. In knitting, you input the yarn, process it on your knitting needles following a pattern, and end up with a result called a sweater (or mittens, or a scarf).
Knitting is also binary like a computer, meaning there are only two conditions. Inside a computer, every piece of information is reduced to either 1 or 0, on or off. With basic knitting, every stitch is either a knit or its opposite, called a purl. (You’ll learn what those terms mean later in this chapter.)
A computer program is a special language, or code, with its own terms and way of saying things. Needle arts also have their own kind of code. Instead of writing out every instruction in sentences, patterns for experienced knitters are written using abbreviations. You can even save time with both computer code and knitting code by using repeated blocks of instructions to do the same series of steps over and over.
In this chapter, you’ll learn some of the code used in knitting and crochet patterns and the techniques for processing the input (also known as stitches). Once you understand it, you’ll be able to figure out how to make other designs using the same “language”—or even make some of your own!
Quick Crochet How-To
These are the basic techniques you’ll need to know to make the crochet projects in this chapter.
Slip Knot
The slip knot is used to start a new project. Make a loop in the yarn, about 10 inches (25 cm) from the end, with the working end of the yarn (the end closest to the skein) on top. Bring the working end up through the bottom of the loop, making another loop. Pull the first loop tight. Insert the hook into the second loop and pull one end of the yarn until the loop is secure on the hook but not too tight.

Figure 4-4: Make a loop in the yarn, with the working end of the yarn on top.
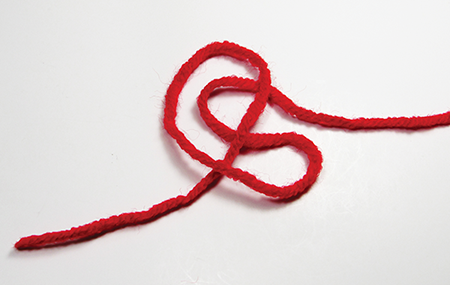
Figure 4-5: Bring the working end up through the bottom of the loop, making another loop.
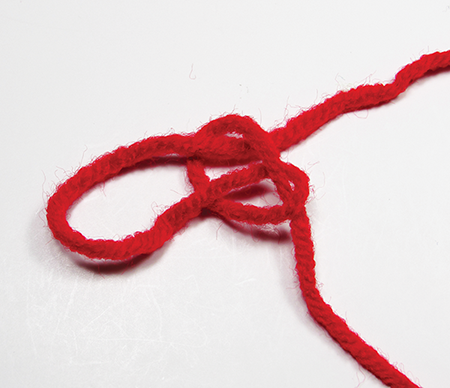
Figure 4-6: Pull the first loop tight.

Figure 4-7: Insert the hook into the second loop and pull it until it is secure but not too tight.
How to Hold the Yarn and Hook
Hold the yarn and the hook in whichever hand is comfortable for you. To control the tension of the yarn (how tight it is), wrap the working end of the yarn (closest to the skein) around the pinky and first finger of the hand without the hook. As you crochet, hold the piece between your thumb and second finger on that hand.
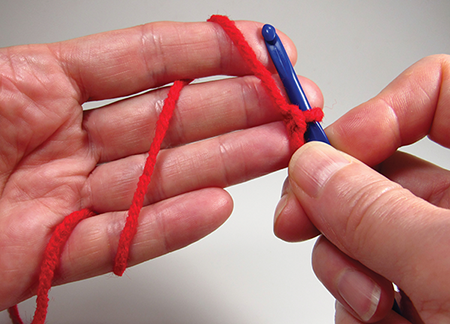
Figure 4-8: Wrap the working end of the yarn (closest to the skein) around the pinky and first finger of the hand without the hook.
Yarn over
Bring the hook behind the yarn and let the yarn slide into the working part of the hook.
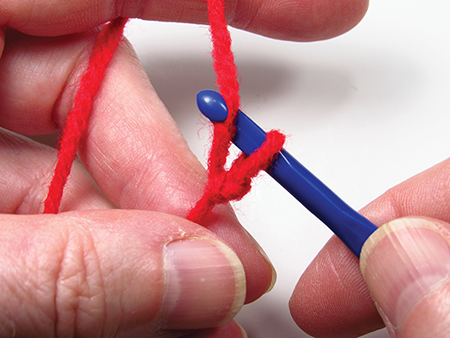
Figure 4-9: Performing a yarn over
Chain (ch)
A chain is the foundation for every new crochet project. Make a slip knot, then yarn over with the working end of the yarn, and pull the yarn through the loop on the hook. Continue making loops as many times as you need to. Each V-shape in a chain counts as one chain stitch.

Figure 4-10: Pull the yarn through the loop on the hook.
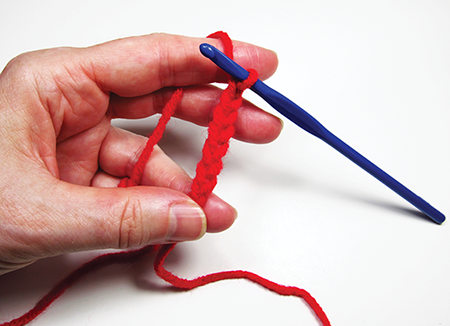
Figure 4-11: Continue making loops as many times as needed.
Single crochet (sc)
This is the basic crochet stitch. To begin, first make a chain. Skip the first V-shaped chain stitch next to the hook. Stick the hook into the middle of the second chain stitch. Yarn over and pull the loop of yarn back through to the top. You now have two loops on the hook. Yarn over again, and pull the new loop through both loops on the hook. That is one single crochet stitch. Repeat until you reach the last of the chain stitches. The top of the row should look like a row of chain stitches. Now make one chain stitch and turn the piece around for the next row. Skip the first stitch, then single crochet in the next stitch—except from now on, slide the hook under the V, instead of into the middle of it. When you get to the end of the row, be sure to make a stitch in the last V (it’s a little hard to see).

Figure 4-12: To single crochet, find the second V-shaped chain stitch.

Figure 4-13: Insert the hook into the middle of the second chain stitch.
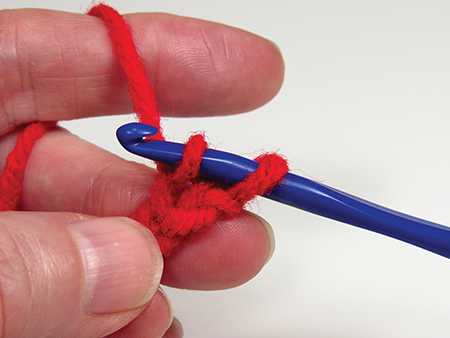
Figure 4-14: Yarn over and pull the loop of yarn back through so that you have two loops on the hook.

Figure 4-15: Yarn over again and pull the new loop through both loops on the hook.
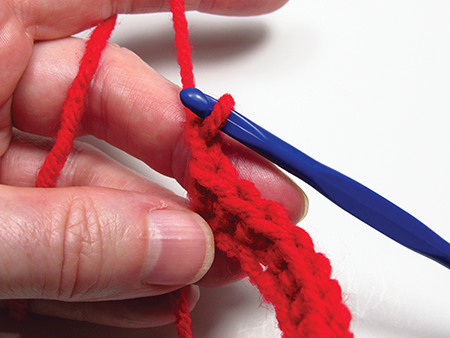
Figure 4-16: Chain 1 and turn the piece around.
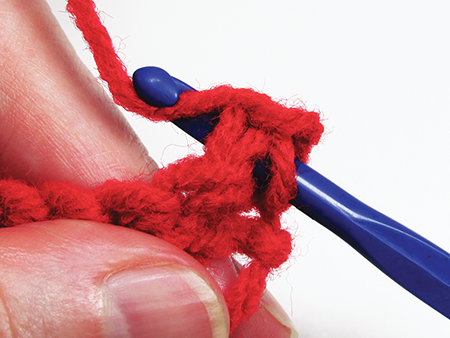
Figure 4-17: From the second row on, insert the hook under the V for each stitch.
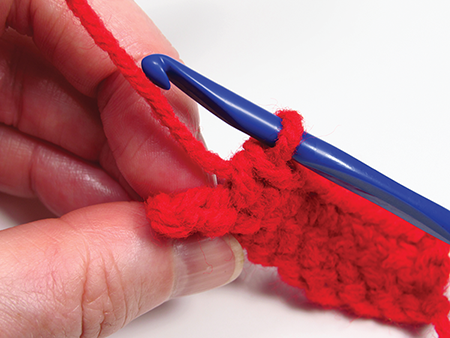
Figure 4-18: The last V in the row is hard to see.
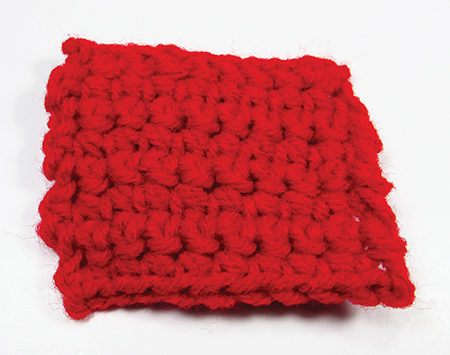
Figure 4-19: Swatch of single crochet
Increase (inc)
To add a stitch to a row without creating a bump on the side, make two single crochets in the same stitch somewhere in the middle of the row.
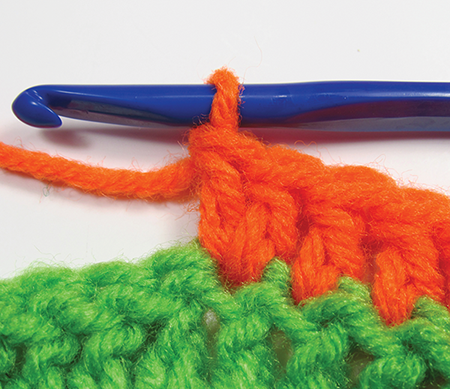
Figure 4-20: Increase by making an extra stitch.
Decrease (dec)
To shorten a row by one stitch, insert the hook into one stitch, yarn over, and pull back a loop. Do the same with the next stitch. You now have three loops on the hook. Yarn over and draw the yarn through all three loops.

Figure 4-21: Insert the hook through two stitches.
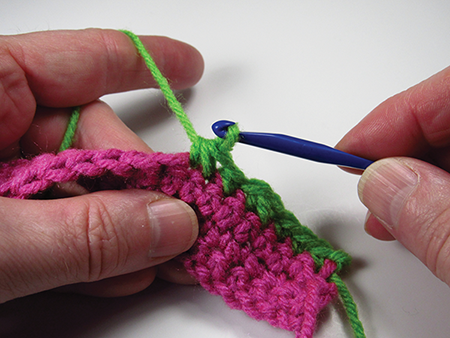
Figure 4-22: Draw the yarn through all three loops.
Slip stitch (sl st)
The slip stitch can be used to make very flat stitches along a row. Many patterns also use the slip stitch to join the ends of a chain or row to make a ring. To make a slip stitch along a row, insert the hook through a stitch, yarn over, and pull the yarn through both loops on the hook. You will end up with one loop on the hook.
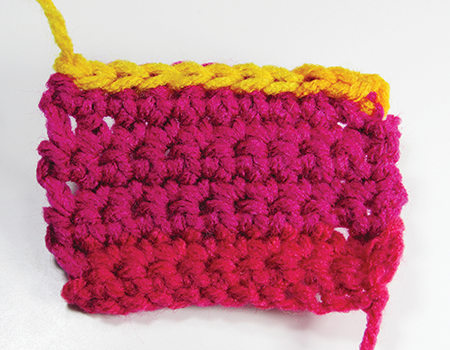
Figure 4-23: A swatch with a row of slip stitch on top of rows of single crochet
Change to a New Piece of Yarn
Use this technique to start a new piece of yarn if your skein runs out or you want to change colors. First, stop halfway through a stitch when you have two loops on the hook. Cut the old yarn, leaving a tail about 4 inches (10 cm) long. Take the new yarn, leaving the same length tail, and pull it through both loops. Continue as before.

Figure 4-24: End the old yarn when you have two loops on the hook.
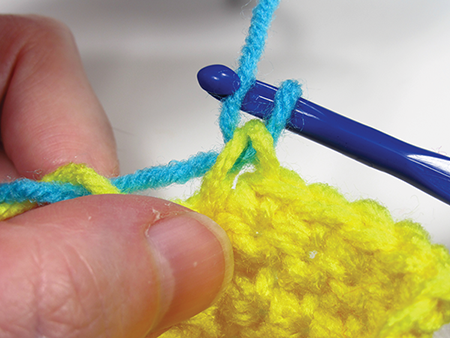
Figure 4-25: Pull the new yarn through both loops.
Fasten Off
To securely end a row of stitches, cut the yarn, leaving a tail. Hook the yarn through the last loop, pull the tail all the way through, and pull the loop tight.

Figure 4-26: Pull the tail through the last loop to fasten off.
Weave in the Ends
Thread the tail end of the yarn onto a yarn needle and weave it through a few stitches on the back side of your project. Clip off any excess yarn so the end doesn’t show. To hide a yarn tail in the middle of a piece, use the tail and the new yarn together for a few stitches.
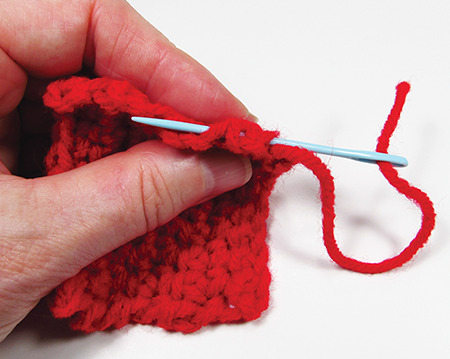
Figure 4-27: Weave the tail through a few stitches.
 Project:
Crochet Hot Cocoa Mug/Roll-Up Scarf
⦿ Materials
- Worsted weight yarn in three colors: warm medium brown (like chocolate milk), whipped creamy white, and any color for your mug (stiffer yarn and tighter stitches will help the pieces stand up and keep their shape)
⦿ Tools
- Crochet hook, size H
- Yarn needle
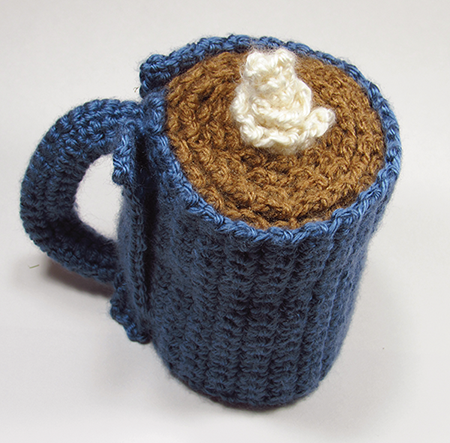
Figure 4-28: A scarf that rolls up to look like a mug of hot cocoa
Amigurumi are little crocheted dolls in the shape of characters or objects. They were invented in Japan in the 1950s, when the craze for all things cute (or kawaii) began and are still popular today with people who make and design crochet projects. Rebecca Angel Maxwell (facebook.com/rebeccaangelmusic), a creativity educator and tea lover, enjoyed making amigurumi tea cups until a friend asked her, “But what do you do with it?” Then one day, her son remarked that the brown and white scarf she was working on looked like a cinnamon bun when it was rolled up. Maxwell decided to start making amigurumi with a purpose. Today she makes scarves that roll up into all kinds of drinks and food, from cupcakes to sushi.

Figure 4-29: Unrolled scarf
The directions here are an adaptation of Maxwell’s design for a mug of hot chocolate that will keep your neck warm in chilly weather. Once you understand the process, you can use it to make any cylinder-shaped design you like!
- Start from the middle of the mug, with the whipped-cream-colored yarn. The first few pairs of rows get shorter and shorter along the top, like stairs going down, to create a pointy mound. Don’t forget to chain 1 and turn at the end of every row. Here are the directions in “crochet code” form:
- Chain (ch) 25
- Rows 1 and 2: Single crochet (sc) 24
- Rows 3 and 4: sc 23
- Rows 5 and 6: sc 22
- Rows 7 through 10: sc 21
- Rows 11 through 26 (or however many you need): sc 20
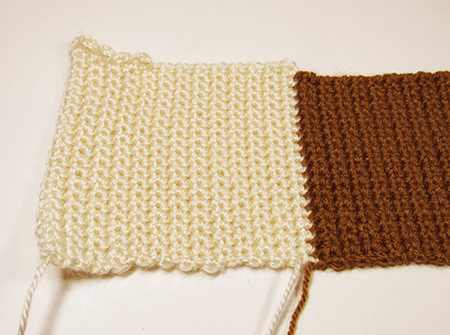
Figure 4-30: The Whipped Cream section starts tall and gets shorter.
When you get to the last stitch of the last row of whipped cream-colored yarn, you will switch to the cocoa-colored yarn. (See “Change to a New Piece of Yarn” in “Quick Crochet How-To.”)
- The top of the cocoa section is one stitch lower than the whipped cream. For each row, single crochet 19 stitches. Repeat for 160 rows or as long as you need to. Set aside.

Figure 4-31: The cocoa section is shorter than the whipped cream.

Figure 4-32: The whipped cream rolled up in the cocoa section.
- Now use the mug-colored yarn to make the handle separately. It’s too narrow to crochet easily as a tube, so make it flat and then sew it up. To begin, tie a slip knot, leaving a 10-inch (25-cm) tail, and chain 23. Measure the chain against the side of the mug to make sure the handle will be long enough to fit your hand through and adjust as needed. Then single crochet 22 stitches (or one less stitch than the length of the chain) for six rows. Fasten off, leaving a 10-inch (25-cm) tail hanging at the opposite end of the handle from the beginning tail. Fold the rectangle up the long way to make a squarish tube. Thread a separate piece of mug-colored yarn onto the yarn needle and sew the edges together. Stuff any excess sewing yarn into the tube. Add more stuffing if you like.

Figure 4-33: Crochet the handle flat.

Figure 4-34: Sew the handle into a tube.
- Now go back to the scarf and switch to the mug color in the last stitch of the cocoa section. Instead of making one chain stitch before you turn, make two—in crochet code, ch 2. This will make the lip of the mug stick up above the cocoa. Single crochet 20 stitches (one more stitch than the height of the cocoa) for 48 rows, or long enough for the mug color to wrap completely around the cocoa. Stop here for now, but don't cut the yarn just yet.

Figure 4-35: Make an extra chain stitch before you start the mug portion to make it taller than the cocoa portion.
- To attach the handle, place the top end of the “tube” against the mug, one row into the mug section from the cocoa section and one stitch below the lip of the mug. Use the yarn tail you left in Step 3 and the yarn needle to sew the top end to the mug. Fasten off and weave in the yarn tail. Repeat with the bottom end, making sure that the handle is straight.

Figure 4-36: Sew the handle onto the mug part of the scarf.

Figure 4-37: The finished handle
- Roll up the scarf to make sure the end of the mug section sits smoothly against the handle. Adjust the rows as needed. If you want the end of the scarf to be straight, fasten off. You can also make a tab that fits through the opening of the handle (where your hand goes) and hooks around the other side. The tab will hold the end of the scarf in place when it is rolled up. To make the tab, slip stitch 3. You should be even with one end of the handle opening when the scarf is rolled up. Single crochet one row. Stop when you reach the other end of the handle opening. Make two more single stitch rows so the tab is long enough to pass through the handle opening. Then single stitch one more row, but increase 1 stitch at the beginning and 1 stitch at the end of the row. The extra stitches at each end should hook around the other side of the handle and hold the tab in place. If everything fits, fasten off.
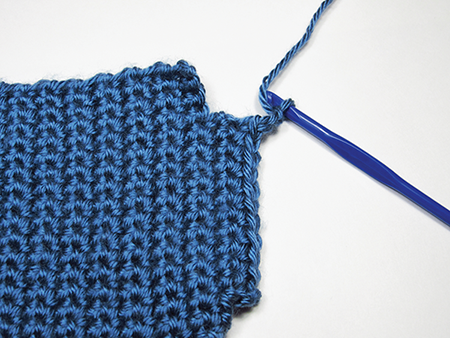
Figure 4-38: Make a tab to hold the mug end closed.
- Anchor and weave in any remaining loose ends. Display your scarf/mug on a shelf, or wear it by slipping the whipped cream end through the mug handle loop.

Figure 4-39: To wear, slip the whipped cream end of the scarf through the mug handle.
Quick Knitting How-To
There are endless variations on every knitting technique, but these basics will get you started:
Cast On
Before you knit, you have to attach the yarn to one of the needles. This is called casting on. The fastest method is the backward loop. Start with the needle in your right hand and the yarn on your left. (If you are left-handed, reverse directions for left and right if you are more comfortable that way.) Make a slip knot (see the “Quick Crochet How-To” earlier in the chapter) to anchor the yarn, leaving a tail. Take the working end of the yarn (the end still attached to the skein) and make a loop of yarn, with the working end of the yarn on top. (Optional: Stick your left thumb up and wrap the loop of yarn around it, as shown in Figure 4-41.) Insert the tip of the needle into the loop and slide the loop onto the needle. Pull the yarn so it is tight but not stretched. Continue to cast on as many stitches as you need and pull the yarn tight so they are touching. As you knit your first row, try to keep them tight. If you end up with excess yarn when you get back to the first loop, just pull it to tighten it.
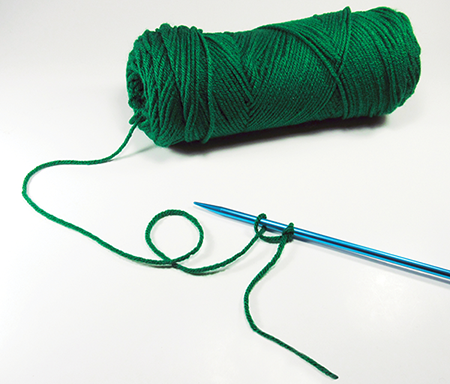
Figure 4-40: Cast on using the backward loop method
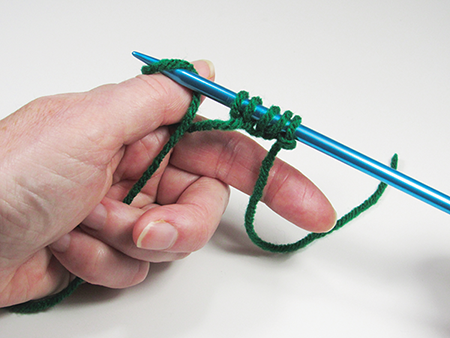
Figure 4-41: Wrap the yarn around your thumb to make the loops more quickly.
Knit
Knitting is the most basic stitch. Hold the needle with the stitches in your left hand and the yarn in the back. (If you are left-handed, reverse right and left hands if it is more comfortable.)
Insert the right needle under the left needle and through the “front leg” of first stitch (nearest the tip of the needle), from front to back. Loop the yarn over the tip of the right needle. Pull the needle back toward you, pointing it up so the tip is now over the left needle and the new stitch is on the right needle. Slide the stitch that you’ve just knitted into from the left needle onto the right needle. Continue with the remaining stitches. At the end of the row, turn the right needle around. It now becomes the left needle and you are ready for the next row.

Figure 4-42: To do a basic stitch, insert the needle through the first stitch from front to back.

Figure 4-43: Loop the yarn over the tip of the needle.
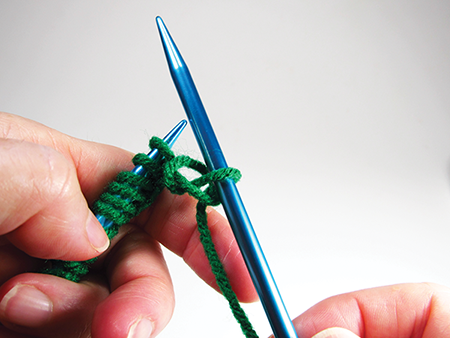
Figure 4-44: Pull the needle back toward you.
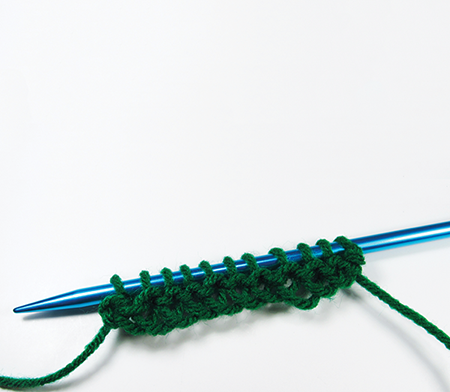
Figure 4-45: A row of knitting
Purl
The purl stitch is the opposite of the knit stitch. Hold the working yarn in front, and bring the right needle through the front leg of the first stitch from back to front. Loop the yarn over the right needle and pull the loop through the stitch, toward the back. Drop the stitch you just purled from the left needle. Repeat this to the end of the row.

Figure 4-46: To purl, insert the needle from back to front.
Turning
At the end of every row, all the stitches will be on the right needle. Turn the needle around so that it becomes the left needle. Take the empty needle in your right hand. You are now ready for the next row.
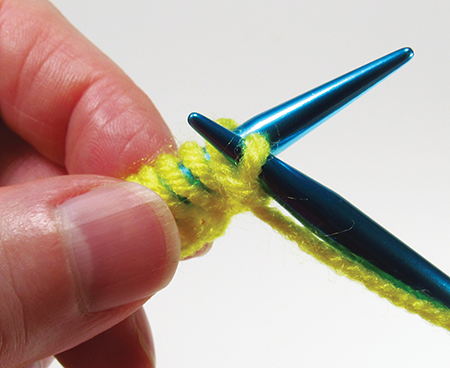
Figure 4-47: Pull the loop toward the back.
Garter Stitch
To do the garter stitch, you simply knit every row. This produces horizontal ribs that look the same on the right side and the wrong side of the piece. The edges of a piece done with the garter stitch lie flat.

Figure 4-48: A swatch done in garter stitch
Stockinette Stitch
The stockinette stitch is smooth on one side and bumpy on the other. To make it, you knit one row, then purl the next. A piece made with the stockinette stitch tends to curl at the edges. You can use the curled edges as part of your design, like the t-shirts fringes you curled up in Chapter 2.
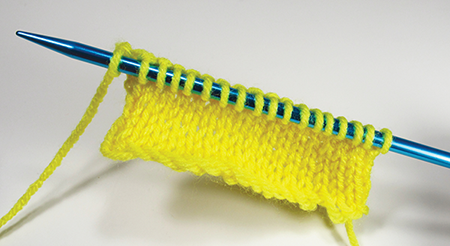
Figure 4-49: A swatch done in stockinette stitch
Ribbing
You can create vertical ribs by knitting one or more stitches, then purling one or more stitches, all along the row. In the next row, you reverse the knit and purl stitches, so the smooth and bumpy stitches line up in columns.

Figure 4-50: A swatch of ribbing
Cast Off
To finish a piece of knitting, knit two stitches onto the second needle. Then pull the first stitch over the second stitch, so only one stitch is left on the second needle. Knit another stitch onto the second needle, and repeat until the row is done. Then fasten off by cutting the yarn, leaving a tail of about 8 inches (20 cm), and pulling the tail through the last loop.

Figure 4-51: To cast off, start by knitting two stitches.

Figure 4-52: Pull the first stitch over the second stitch.

Figure 4-53: Fasten off the last stitch by pulling the tail through it.
Project:
Tiny Toothpick Knitting
⦿ Materials
- Thin, lightweight cotton yarn
- Round wooden toothpicks—cocktail toothpicks work best
- (Optional) small beads that fit snugly on the toothpicks
- White glue (or craft glue that dries clear)
- (Optional) safety pin or jewelry pin back, or small peel-and-stick magnet
⦿ Tools
- (Optional) wire cutter
- (Optional) sandpaper or nail file

Figure 4-54: A miniature ball of yarn makes the tiny piece of knitting look more real.
If you love miniatures, this tiny knitting project is for you! Wear it, hang it in your home, or give it as a gift to your favorite knitter.
- First, prepare the toothpick/knitting needles. Snip off the points with a wire cutter or scissors and smooth them with sandpaper or a nail file. If you want to make your needles shorter, clip the other ends with wire cutters or scissors and sand them smooth. To help keep your knitting from sliding off, glue beads to the ends, like the caps on real needles.
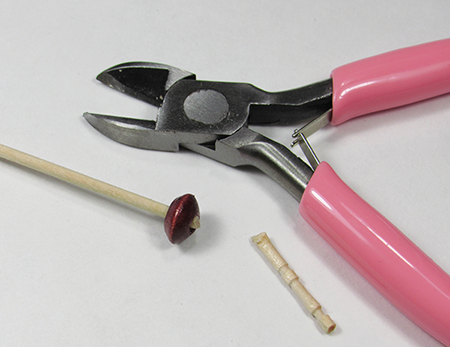
Figure 4-55: Make the toothpick “needles.”
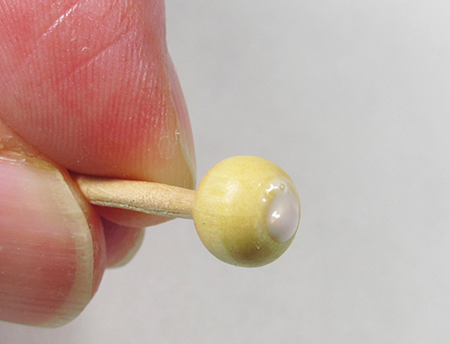
Figure 4-56: Glue a bead on the end.
- Cast on between 8 and 12 stitches, or as many as the toothpick can hold without the yarn slipping off the end.

Figure 4-57: Cast on.

Figure 4-58: Cast on a row.
- Stockinette stitch (knit a row, then purl a row) for as many rows as you choose. End in the middle of a row, leaving an equal number of stitches on each needle.
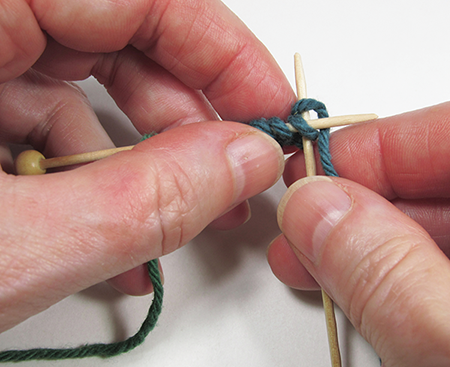
Figure 4-59: Knit as usual.
- Cut off the yarn, leaving about 4 feet (1.25 m) on the end. Roll the yarn neatly into a little ball, leaving a little loose yarn between the ball and the knitting. With the smooth side up, place the ball in the center of the knitting. Poke the needles through the back of the ball at an angle so they cross inside the ball and the points stick out the bottom. Try to catch the yarn in the needles so it doesn’t unravel. If you need to, dab a little glue on the ball to keep it in place. Let it dry.
- To wear your knitting like a pin, put a safety pin through the back of it and attach it to your shirt. To hang it on the refrigerator or message board, attach a peel-and-stick magnet to the back. (Add some drops of fabric glue if you need to.) You can also attach a loop of thread to the back and hang it in a window or as a tree ornament.

Figure 4-60: Roll the tail into a mini ball of yarn.

Figure 4-61: Poke the needles through the ball of yarn to hold them in place.
Project:
Spool Knitter
⦿ Materials
- Wooden spool, about 1½ inch (3.8 cm) across (or wider—found with other wood shapes in craft stores)
- 4 finishing nails, about 1 inch (2.5 cm) long (check to see that they are smooth with nothing sticking out to catch on the yarn)
- Short wooden dowel, 1/8 inch (3 mm) wide and 3½ inches (9 cm) long
- (Optional) Wooden bead, large enough to fit snugly onto dowel, and glue
- Yarn (thinner is better)
⦿ Tools
- Hammer
- Pencil sharpener
- Sandpaper
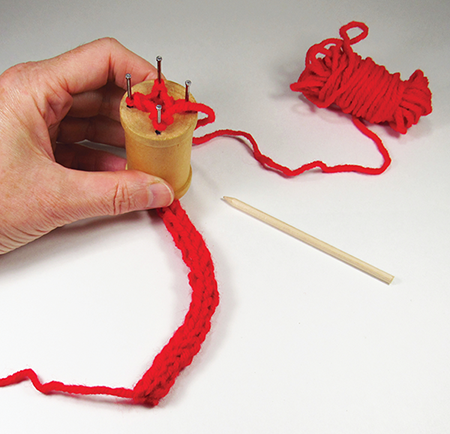
Figure 4-62: A spool knitter
Also called a French knitter or a knitting nancy, this little circular loom has been a favorite with beginning knitters for generations. The long knitted tube it creates is similar to a knitting staple called “I-cord,” and it has many uses. Plus it’s fun and relaxing to make!
- To make the loom, first make sure the spool is smooth, without any wood slivers that would catch on the yarn. If the hole in the center isn’t smooth, roll a piece of sandpaper into a tube and stick it into the hole. Rub it around until the hole is as smooth as possible.
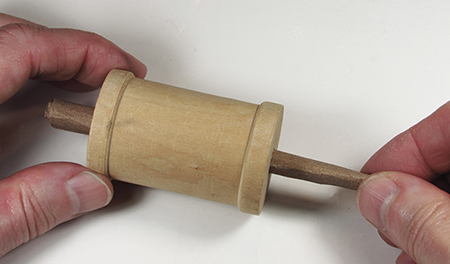
Figure 4-63: Smooth the hole with a rolled-up piece of sandpaper.
- Next, take the spool and mark four dots on it, spaced evenly around the hole. They should be far enough apart to fit your finger in between them easily. Hammer a nail into each dot. Make sure the nails are straight and hammered in deeply enough that they don’t move around. These are your pegs.

Figure 4-64: Hammer in the nails.
- The pick, which is like a short knitting needle, is used to move the yarn around. To make it, take the dowel and sharpen one end with the pencil sharpener. Stop before it gets too sharp. Use the sandpaper to smooth the tip to a rounded point. (Optional) Glue the bead on the other end of the dowel and let it dry.

Figure 4-65: Nails in the spool

Figure 4-66: Sharpen a dowel to make a rounded point on the pick.
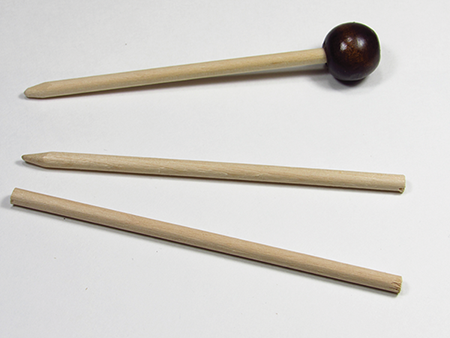
Figure 4-67: Glue a bead on the pick for a better grip.
- To use the loom, take the yarn and tie a knot in the end. Drop the knotted end into the hole in the center of the spool until it comes out the bottom.

Figure 4-68: Drop the yarn through the hole.
- Hold the tail fairly tight with your left thumb (or if you’re left-handed, with your right thumb). Wrap the yarn once around the nearest nail in a counterclockwise direction. Then bring the yarn around to the next nail going counterclockwise around the spool. Repeat, wrapping it around that nail in the same direction. Repeat with the remaining nails.

Figure 4-69: Wrap the yarn around the first nail.

Figure 4-70: Wrap the yarn around the second nail in the same direction.
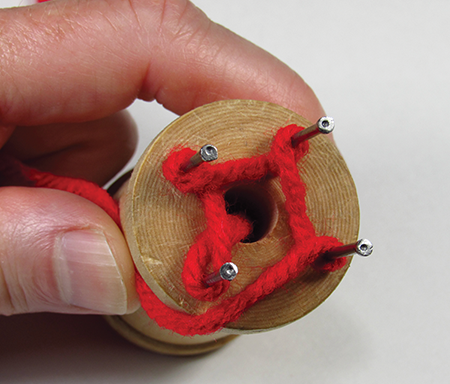
Figure 4-71: End the first round at the first nail.
- When you get back to the first nail, make a second round, but this time just circle all the nails with the yarn in one big loop, above the first round of little loops.

Figure 4-72: Second round of yarn
- Now you will make the first stitch. On the nail you started with, use the pick to lift the bottom loop over the straight yarn above it and right over the top of the nail. Repeat with the other nails. When you finish the round, tug on the tail of the yarn a little to pull the knitting into the hole.
- Repeat Steps 6 and 7 as many times as you like. The knitted tube you are making will start to come out of the hole at the bottom.

Figure 4-73: Lift the bottom loop with the pick.
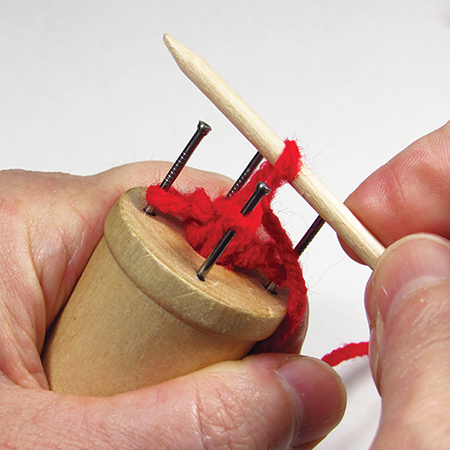
Figure 4-74: Bring the bottom loop over the top yarn on the nail.

Figure 4-75: The knitted cord comes out the bottom of the spool.
- To cast off, cut the yarn you are working with, leaving a long tail. Take a stitch as usual, but pull the tail of the yarn through the loop. Continue with the remaining stitches. To leave the end open, tie the yarn in a knot. To close it, pull the yarn tight before knotting it. Weave in the end.

Figure 4-76: Cast off by pulling the end of the yarn through the loop.

Figure 4-77: Pull the tail to close up the end.
Adaptations/Extensions:
- To make wider cord, use a cardboard toilet paper tube and tape craft sticks around it as pegs. Secure them with colorful duct tape. This version is good for younger kids.
- Finger knitting is done the same way as spool knitting, but it produces a thin flat piece instead of a tube. To cast on, hold the tail of the yarn against your palm with your thumb, and wind the yarn in and out of your fingers. Then go the other way. This is your first row of “loops.” Repeat to make a second row of loops. Lift the bottom loop over the top loop on each finger, just like with the spool knitter. For the next row, just bring the working yarn across the front of all your fingers instead of weaving it in and out. Continue for as many rows as you like. To cast off, stop when you have one loop on each finger. Bring the loop from your first finger over the loop on your second finger. Bring the bottom loop over the top loop as usual. Repeat with your other fingers until you have only one loop left. Cut the yarn and pull the tail through the remaining loop. Pull it tight to knot it.
- Use your Spool Knitter to make a stretch sensor out of conductive yarn! (See Chapter 5.)