Introduction
How to Be a Fabric and Fiber Inventor
The oldest sewing needles ever found date back more than 20,000 years. They were made of bone and were probably used to make animal skins into clothes. Since that time, fabric and fiber inventions have changed the world we live in.
Like our early ancestors, we still spin the hair from sheep, llamas, and rabbits (not to mention fibers from silkworm cocoons) into yarn. We use old-fashioned tools to weave plants like cotton and flax (for linen) into yards of material. But today, in the laboratory, we also create fabric from plastics like nylon, polyester, and acrylic that can stop bullets (Kevlar), keep rain off while letting our skin breathe (Gore-Tex), and hold our sneakers closed (Velcro).
Natural and human-made textiles are used to make every kind of wearable, from simple robes to the latest fashions, and from protective gear for firefighters to space suits used by astronauts. Very soon, you may be wearing clothing that generates enough electricity to power your phone from your movements or from the sun, or light-up jackets that trigger turn signals on your bicycle when you lean to the right or left.
Over thousands of years, we have gone from making heavy woolen tents to shelter us in the desert, and canvas sails to power ships across the sea, to lightweight fabrics to take camping that can fold up and fit in a pocket. And we use decorative fabric and fiber to make furnishings for the home and create spaces in which to live and work.
All these things are possible because of people who came up with new kinds of textiles and new ways to work with them. Whether you are an artist or designer trying to create something beautiful or interesting, or an engineer or scientist who wants to solve a problem or fill a need, the invention process is pretty much the same:
- Choose your challenge. Decide on your goal to begin to narrow down what you will work on.
- Brainstorm ideas. It doesn’t matter how crazy they are—wild ideas help you discover new angles to explore. Make sketches and write down notes. Then go through your ideas and pick one that looks promising.
- Do your research. What do you need to know about the challenge you’re taking on? What have other people done that you can learn from? Look up news articles, collect images, check out videos, and talk to experts to help focus your ideas.
- Create a prototype. The best way to find out if your idea is a good one is to create a prototype, a quick model that lets you see what your invention will be like in real life. Making a prototype gives you a taste of what’s involved in building your invention.
- Test your idea. Try out your invention to see if it does what you want it to do. Take notes, make measurements, and record your prototype in action. Get feedback from other people. Then go through the results to figure out what works and what doesn’t.
- Make improvements and keep testing. Engineers use the word iterate to mean going through the steps of building and testing until you’re happy with your creation.
- Share your invention. When you’re ready to introduce your creation to the world, there are many ways to do it. Look for contests or exhibitions (like Maker Faire) where artists and engineers are invited to show off their work. You can post it online on a site like Instructables or Maker Share, sell it on Etsy, or crowd-fund it on Kickstarter or Indiegogo. You may even want to make your invention open source by publishing the instructions. That way, other people can try it out and create their own versions of your design.
- Share your story. If you really want to get people interested in your invention, talk about how and why you made it. Everyone loves a good story! And who knows, you may inspire them to become inventors themselves.
In this book, you’ll learn the basic skills you need to make your own clothing, accessories, and household goods like baskets, blankets, and more. You’ll even get to create your own e-textiles—electronic circuits you build into clothing and toys. But most of all, you’ll discover the fun of using old and new techniques to turn your ideas into your own fabric and fiber inventions.
To help you get started, here’s an introduction to some of the basic skills and supplies you’ll need. You will find them helpful for a wide range of projects in this book, as well as projects you do on your own.
The Fabric and Fiber Supply Basket
Most of the supplies you need for the projects in this book are easy to find in the crafts, sewing, hardware, or office supply section of your favorite store or online retailer. Some places to find specialized items are also listed.
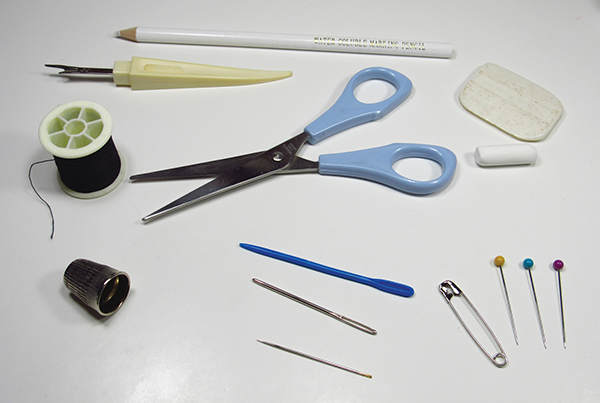
Figure I-2: Sewing equipment. Clockwise from left: thread, seam ripper, fabric pencil, fabric chalk, regular chalk, straight pins, safety pin, yarn needle (big and small), regular hand needle, thimble. Center: budget-priced sewing scissors.
Tools
Along with standard tools like pencils and rulers, you’ll need some items used mainly for sewing or fiber arts.
Scissors
You will need scissors for almost every project in this book. Although ordinary scissors will work for almost all purposes, a sharp, clean pair of scissors will make your work easier. Serious crafters save special scissors that they use only on fabric, yarn, or thread so they stay nice and sharp.
Fabric Marker and Masking Tape
For many projects you will need to make temporary marks and lines on fabric. You can use a regular pencil or chalk and rub it away when you’re done. Permanent marker will show up, but you can’t erase it. You can, however, buy specialized fabric markers, pencils, or tailor’s chalk that is made just for this purpose. For some projects, painter’s blue tape or masking tape is used to mark straight lines.
Straight Pins/Safety Pins
Pins are used to hold pieces of fabric together before you sew them. If you’re afraid of sticking yourself with a straight pin, safety pins are a good option (and recommended for quilting).
Needles
You may need needles for sewing thread, embroidery floss, and yarn, depending on the project. Sewing needles come in different lengths, and the hole for the thread (the eye) comes in different sizes. If you’re not sure what size you may need, get a variety pack. A yarn or tapestry needle is meant to hold thick yarn and go through stiff fabric. It has a rounded point and comes in metal or plastic.
Needle Threader
When you have to make a thick yarn fit through the small eye of a needle, a needle threader comes in handy. Wire versions are cheap but don’t usually last very long. A piece of thread or a narrow strip of paper will work just as well. To use a short piece of thread as a threader, just fold it into a loop. Holding the ends together, poke the loop through the eye of the needle. Insert the yarn through the loop. Then pull the ends of the thread back out through the eye, pulling the yarn with it.
To make a paper threader, take a short strip of paper that is narrow enough to fit through the hole of the needle. Fold it in half so the short ends meet. Poke the folded end through the hole of the needle, insert the yarn into the fold, and pull the threader and the yarn back through the eye of the needle, the same way you do with a piece of thread.

Figure I-3: To use a needle threader, push it through the eye of the needle. Then insert the yarn through the threader (left image). Pull the threader back out of the eye, bringing the yarn with it (right image).
Thimble
A thimble fits over your second finger to help you push a needle through a tough piece of material.
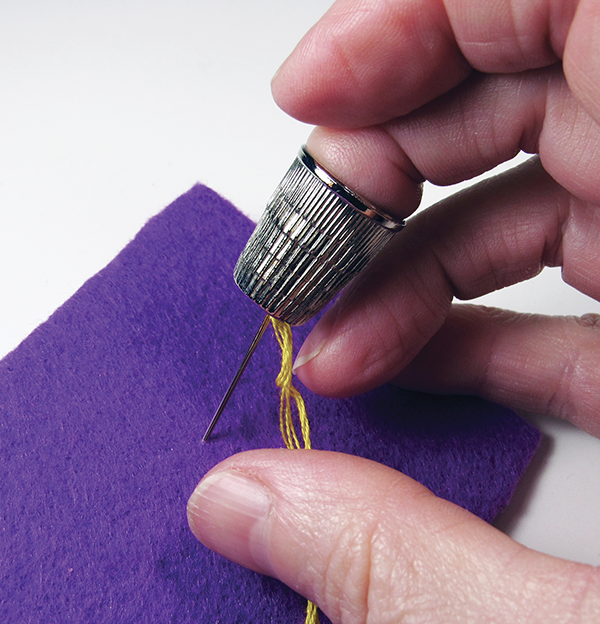
Figure I-4: A thimble protects your fingers when you are pushing needles through fabric.
Seam Ripper
A seam ripper is useful for undoing machine sewing mistakes without damaging the fabric.
Iron and Ironing Board
Use these for ironing out wrinkles, pressing creases where fabric gets folded, and layering fabric together with iron-on adhesive. Children should get adult help with using an iron.
Crochet Hook
The projects in this book were made with a US size H hook, which is equivalent to 5 mm.
Embroidery Hoop
Have on hand an inexpensive wood or plastic hoop in a medium to large size.
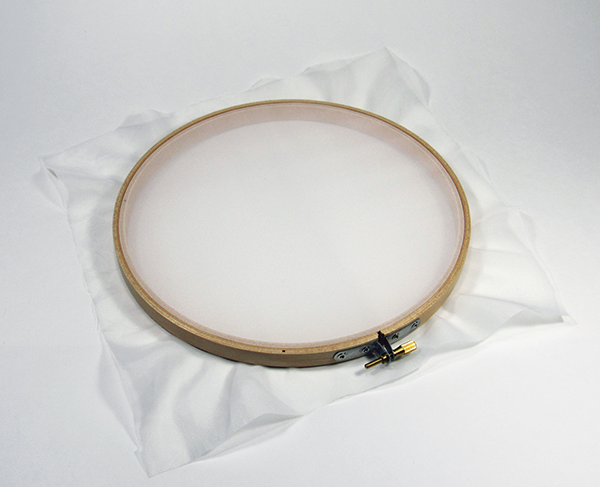
Figure I-5: Embroidery hoop holding fabric
Materials
This list includes suggestions for the best materials to use for the projects in this book, but in many cases you can get away with using scraps and leftovers. Check the remnant bin of your favorite fabric store for small quantities you can add to your collection.
Fabric
See project directions for what you’ll need. These are the kinds of fabric used in the projects in this book:
- White cotton muslin (good for printing, dyeing, and silkscreening)
- Sheer (loosely woven and see-through) curtain material
- Ripstop nylon
- Lightweight cotton for quilting, by the yard (meter) or precut in strips or rectangles
- Quilt roll—A bundle of precut strips 2.5 by 44 inches (roughly 6.4 by 112 cm) with colors or patterns that match
- Quilt fat quarter—A bundle of precut pieces that are 18 by 22 inches (roughly 46 by 56 cm)
- Felt sheets
- Stiffened felt sheets—Extra-thick pieces may come in shapes that are easy to cut to size
- Aida cloth—Stiff cotton canvas with a loose weave, used for cross-stitching
Thread
Standard cotton blend thread is fine.
Yarn
Any kind can be used, but check directions for recommended weight (thickness) and fiber type. The varieties you are most likely to find in craft and hobby shops include acrylic, which is the least expensive, doesn’t shrink if you wash it (because it’s made out of plastic), and comes in many different weights and textures; cotton, which is thin, lightweight, and soft; and wool, which is the best quality, but is higher priced and can be itchy.
Notions and Fasteners
These items are nice to have but are not required.
- Snaps
- Buttons
- Hooks
- Velcro
Adhesives
Adhesives will help you connect pieces of fabric together without sewing them, and they can also give material more stiffness. These are some common adhesives:
- Iron-on/fusible strips and sheets (you can use fusible interfacing, which only has adhesive on one side, to stiffen a single piece of fabric)
- Fabric glue
Paints
Acrylic paint can be used for the projects in this book. A product called textile medium can be added to the paint to make it less stiff when it dries. You can also buy inks made specifically for silkscreening on fabric.
Specialized E-Textile Tools and Supplies
You will probably need to order some of these items online. In addition to Amazon.com or eBay, check out hobby electronic retailers, such as these:
- www.sparkfun.com
- www.adafruit.com
- www.jameco.com
- https://lessemf.com

Figure I-6: Sewing an e-textile with conductive thread and LEDs
Here is a list of some specialized tools and supplies you might need:
- Conductive thread—Sold in small bobbins (little plastic spools that fit into sewing machines) as well as larger cones or spools
- Variable resistor steel polyester yarn (The Cat. #306 at LessEMF.com [https://lessemf.com] will work.)
- LEDs with long wire leads, in sizes 3 mm, 5 mm, or 10 mm (gumdrop)
- Magnet wire (#30 or thinner—look for colors other than copper so you can see the insulated coating to make stripping easier.)
- Wire stripper—This is the best choice for removing insulation from wires. Scissors work in a pinch if you avoid cutting through the wire. Don't strip wire with your teeth!

Figure I-7: A wire stripper
Other E-Textile Tools and Supplies
You can find these items with other crafts, sewing, and jewelry-making supplies:
- Pliers—needle-nosed and round
- Wire cutter—look for a cutter with a small mouth, sometimes called a flush cutter, diagonal cutter, or nippers
- Soft jewelry wire or floral wire
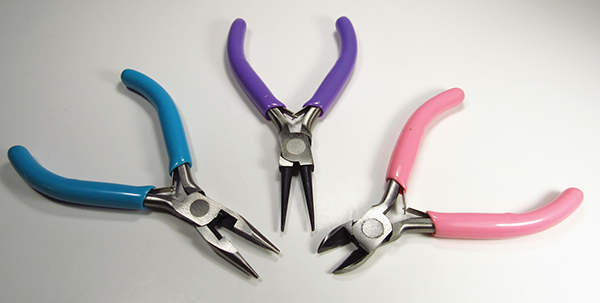
Figure I-8: From left: needle-nosed pliers, round pliers, and a wire cutter
Repurposed and Upcycled Materials
Thrift shops and garage sales (plus your own junk drawer or attic) are good places to find these items.
- Old wool sweaters
- Old sheer curtains
- T-shirts
- Musical greeting cards
It’s Sew Basic—Techniques to Know
You need to know only a few sewing techniques to do the projects in the book.
Basic Hand Stitches
The following guidelines apply to most of the stitches you will do:
- Cut a piece of thread (or whatever you are sewing with) that is as long as you can comfortably sew with—usually a little longer than the length from your shoulder to your fingers.
- When you thread the needle, pull enough through the eye to allow you to hold onto the doubled piece of thread as you sew. This will keep the thread from slipping out of the needle. When you get close to the end of the thread (just enough for two or three more stitches), stop sewing. You will need the extra at the end to knot or anchor it.
- At the beginning and end of a line of stitching, make a knot in the end of the thread. For some projects, you will need to leave a “tail” of thread or yarn hanging off the fabric.
- Begin the first stitch by bringing the needle up from the wrong side of the fabric (the inside or the back of the piece you’re working on). That way any knot or tail will be hidden from view.
- You may want to anchor the thread or yarn at the beginning or end of a line of stitching, or at a place where the stitching makes a sharp turn. This will hold your thread in place so it doesn’t slip out and help reinforce corners. To anchor the thread, make two or three stitches in the same place. You can either make them right on top of one another, or criss-cross them.
- When you’re sewing, make your stitches even. For beginning or young sewers, or when you’re working with yarn or embroidery floss instead of thread, between 1/8 and ¼ inch (3 to 6 mm) is a good length.
- As you sew, pull your thread or yarn tight enough so it doesn’t droop—but not tight enough that the fabric starts to pucker or bunch up.
To hide a tail of yarn or thread, you can sometimes weave it into your piece as you work. If it is still hanging loose when you’re done, thread the tail on a needle and weave it inside other stitches. Trim the end so it doesn’t show. Here are the stitches you need to know:
Running Stitch
The running stitch is a simple in-and-out stitch. Keep the stitches themselves as well as the spaces between them all the same length.
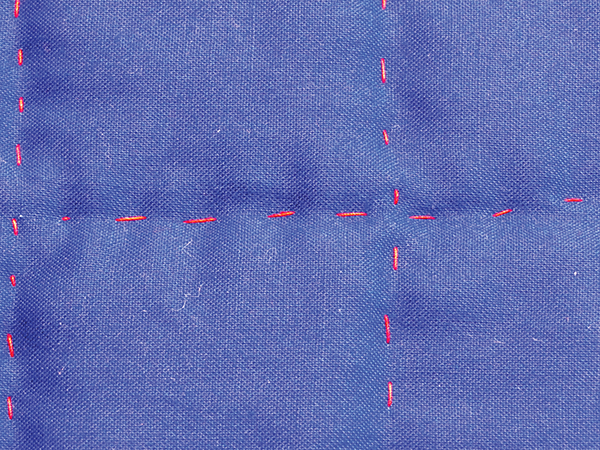
Figure I-9: A running stitch
Baste
When you baste fabric, the stitches go in and out like a running stitch, but they are longer and looser. Do not knot or anchor the ends. You will baste fabric when you want to pull the ends to gather the fabric into folds. You can also use it sometimes instead of pins to hold pieces of fabric together, or when you want to remove the stitches later.
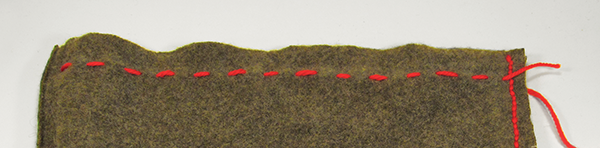
Figure I-10: Basting
Backstitch
The backstitch is a nice secure stitch used to hold seams together. From the right side, it looks like a row of regular-sized stitches with no spaces in between. From the wrong side, it looks like double-sized overlapping stitches. The instructions here assume your regular-sized stitches are ¼ inch (6mm) long. If your regular stitches are longer or shorter, adjust the size to match.

Figure I-11: The backstitch
- Start by anchoring the first stitch by going over it two or three times. End with the needle on the wrong side of the fabric.
- Then bring the needle through from the wrong side to the right side, about ¼ inch (6 mm) away from the anchor stitches. In other words, leave a gap one regular stitch long between the stitch you just made and where you bring the needle up through the fabric. Go back across the gap and insert the needle back down through to the wrong side. Come up again about ¼ inch (6 mm) or one stitch length ahead of the stitch you just made and continue for as long as you need to.
Whip Stitch (also called Overcast Stitch)

Figure I-12: Whip-stitch around a wire.
A whip stitch is often used to finish a raw edge so it doesn’t stretch or unravel. It is also good for holding trims or other materials, including wire, onto a piece of fabric.
Push the needle up from the wrong side to the right side of the fabric so that the tip pokes through next to the wire. Bring the needle over the wire and back down through the fabric. Make the next stitch the same way, close to the first stitch. Continue working along the rest of the wire the same way.
Slip Stitch (also called a Ladder Stitch or a Blind Stitch)
A slip stitch is a good way to join two pieces of fabric together from the right side of the project while also hiding the stitches. It’s useful for finishing projects like pillows or stuffed toys and for holding folds and hems closed invisibly.

Figure I-13: The slip stitch
To join two pieces of fabric together along their folded edges, start by pushing the needle through one piece of fabric from the wrong side (inside the fold) to the right side. The needle should come out facing the gap between the two pieces of fabric, as close to the fold as possible. Bring the needle straight across the gap and through the other piece of fabric, from right side to wrong side (inside the fold). Take a small stitch and then bring the needle back through the first piece of fabric, close to the stitch before. Continue going back and forth. As you work, pull the thread or yarn tight enough so that the two pieces of fabric are touching and the stitches are hard to see.
Satin Stitch
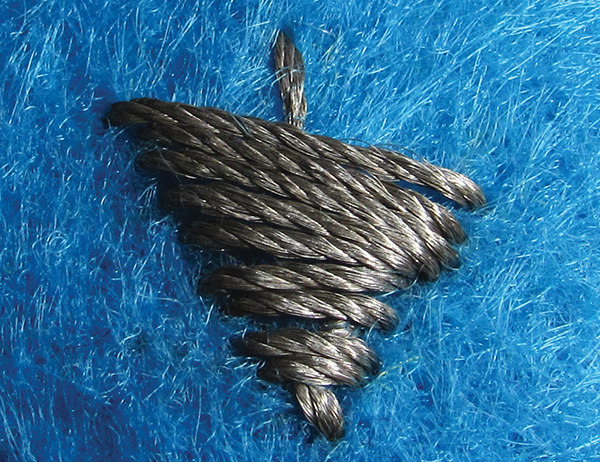
Figure I-14: The satin stitch
The satin stitch is similar to a whip stitch, but done flat on a piece of fabric to create a smooth patch of stitches.
To start, bring the needle up to the right side of the fabric and back down on the other side of the area you want to cover. For the next stitch, bring the needle up right next to where you started the stitch before. Continue until the whole area is covered.
Basic Knots
Here are two ways to connect two strands of thread or yarn that are attached to your fabric:
Square Knot
Take the loose ends of the strands and bring the right-hand strand over the left-hand strand and up through the loop you have made. Repeat, but this time bring the left-hand strand over the right-hand strand. Pull tight.

Figure I-15: The square knot is a double knot.
Overhand Knot
Take the ends of both strands and loop them around and over both strands. Then bring the ends up through the center of the loop. Pull tight until the loop closes.

Figure I-16: The overhand knot