
Final Cut Pro is a fully functional nonlinear digital video editing application. Unlike other software-only nonlinear editing applications, Final Cut Pro stands alone as the most feature-rich application on the market in its price range. With that functionality comes a degree of user responsibility. The user still has to configure the application correctly and organize it for optimal performance and safety. Final Cut Pro will function even if you configure it incorrectly. However, you will pay for such mistakes further down the road when you run across foul-ups that could have been easily avoided had you set up the application and project in an organized and safe fashion at the beginning.
What follows is a tried-and-true path for setting up Final Cut Pro with a Firewire-based camera or deck. It is an especially effective method for multiuser editing stations in which more than one project or editor is working concurrently. If you follow these steps, you will experience few nasty surprises, and the few surprises you do encounter will be much less disastrous than if you simply plug up and begin editing.
The process for setting up your Final Cut Pro preferences begins outside of Final Cut Pro. The first thing you need to do is to take a stroll through your Mac OS system settings and make sure they are optimized for Final Cut Pro. Although we witness only what we are doing at any given time, the Macintosh is constantly doing many things in the background, some of which can have a negative impact on Final Cut Pro’s performance. You can always revert the settings after you finish working.
The Control Panels
The Energy Saver Control Panel
STEP 1
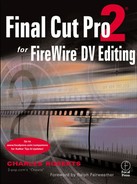
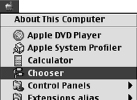
Go to the Apple Menu Items in the top left corner of the Desktop. In the Control Panels submenu, select Energy Saver (Figure 3-1). Hit the Show Details button to open the extra custom settings. Set the System and the Hard Disk to Never.
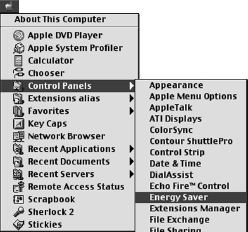
The Energy Saver (Figure 3-2) is a control panel that schedules your Macintosh to go into sleep mode if it is unattended for a predefined period of time. The default setting is for 30 minutes, but you can customize this for your own needs. With the Show Details button enabled, you will find that there are specific settings for System, Monitor, and Hard Disk Sleep. You will want to set the System and the Hard Disk to Never, which will prevent Energy Saver from putting your Mac to sleep at a clutch moment, such as during a long render. You can also set your monitor to Never, although having your monitor go to sleep will have no impact on Final Cut Pro and may be good for the monitor’s life span.
The Memory Control Panel
STEP 2
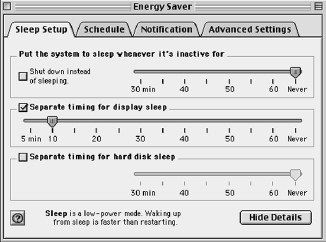
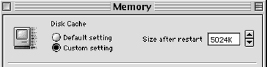
Go to the Apple menu items in the top left corner of the Desktop. In the Control Panels submenu, select the Memory Control Panel (Figure 3-3). Click Custom Settings on the disk cache, and then change the default value to between 3,000 K and 5,000 K. Make sure that Virtual Memory is disabled.
Disk Cache
At the top of the Memory Control Panel, you will see the Disk Cache setting. Disk Cache is a performance enhancement feature of the Mac OS that allows certain data that is normally accessed from the slower drive but must be accessed very frequently to be written into a protected area of the much faster RAM. The performance boost with Disk Cache enabled is enormous. I highly recommend a healthy amount of Disk Cache unless you have been specifically instructed by an equipment manufacturer to lower it.
The initial size that Disk Cache defaults to is actually determined by the Mac OS and is based on a percentage of your physical installed RAM. The more RAM you have installed, the larger the default setting in the Disk Cache will be. There has been a great deal of disagreement in the Macintosh community about the proper setting for Disk Cache. In the past, many analog capture cards required that Disk Cache be set to its lowest possible setting. This is not the case with Firewire and Final Cut Pro.
The performance gains of Disk Cache seem to roll off at around 5,000 K. If you have a great deal of RAM, Disk Cache may default to more than 8,000 K. Since RAM is more valuable to us allocated to Final Cut Pro than to Disk Cache, you can lower this value. Click Custom Settings, and then lower the default value to between 3,000 K and 5,000 K. You must reboot to free up this RAM, but wait until you have set up the rest of the Memory Control Panel to do so. If you aren’t sure, leave the Disk Cache set at its default value.
Virtual Memory
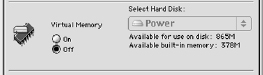
The next thing you need to check is for Virtual Memory (Figure 3-5). This is absolutely critical. Final Cut Pro will not function properly if Virtual Memory is enabled. As described in the last chapter, Virtual Memory uses the dramatically slower hard drive storage as a substitute for super-fast RAM, which has a massively negative effect on the system’s performance. Unfortunately, on initial installation the Mac OS defaults this setting to Virtual Memory enabled. Make sure that Virtual Memory is disabled, and remember to check this setting again if you ever reinstall or update your Mac OS. Once again, the Mac must be rebooted for this setting to take effect.
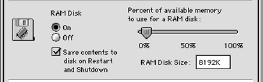
The RAM disk, the next option, is less critical (Figure 3-6). A RAM disk is simply a fake volatile-memory partition that consists of a portion of RAM, almost like Virtual Memory in reverse. If you have an enormous amount of RAM and you are working with small documents, you may notice that saving them to a RAM disk gives fantastic performance boosts. Remember that RAM data rates are in the neighborhood of 90 megabytes per second. Many people use a RAM disk for their internet browser’s cache because it speeds up page-loading times.
Although RAM is volatile and is wiped when you shut down, the RAM disk can be set to save its content to a physical hard drive on shutdown. This can be a little scary, though, if your Macintosh crashes and has to be rebooted without properly shutting it down. Whether or not you should use a RAM disk on a machine running Final Cut Pro is a tradeoff similar to Disk Cache. Although you may experience some performance boosts in certain areas of your Mac, the RAM you allocate to the RAM disk might be more effectively used when allocated to Final Cut Pro. Once again, changes to the RAM disk setting require a reboot to take effect.
If you have a RAM Disk enabled and you begin to experience problematic behavior with Final Cut Pro, you may want to disable the RAM Disk to see whether it is causing RAM allocation problems or any others.
The Startup Memory Tests
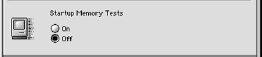
In addition, there is a hidden item in the Memory Control Panel. When starting up the Memory Control Panel, hold down the Option and Command keys, and you will be able to access a hidden setting at the bottom of the window called Startup Memory Tests (Figure 3-7). When the Mac boots up, it performs a memory test on all of your RAM chips prior to loading the System software. There is nothing wrong with this; it’s meant for your protection. However, RAM chip failures are pretty rare, and if you have 512+ megabytes of RAM installed, as many Final Cut Pro users do, this initial RAM test can seem interminable.
The Startup Memory Tests option allows you to disable this test. Since this is a hidden setting, the default setting is enabled. Setting it to OFF will dramatically speed up the boot process, particularly if you have a large amount of RAM installed. You can always re-enable the setting if you notice behavior that suggests defective RAM. The speed-up in booting your Mac will be noticeable.
The Chooser and AppleTalk
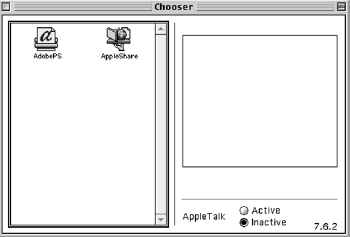
Go back to the Apple Menu and select the Chooser (Figure 3-8). Although not a Control Panel, the Chooser is an important system control application that you may need to adjust. Look to the bottom right corner of the Chooser window, and locate the AppleTalk Active/ Inactive switch (Figure 3-9). Here you can enable or disable AppleTalk, a protocol that the Macintosh uses to communicate with printers and networks through the Ethernet port and other connections. If your editing station has no printer and is not connected to a network, turn off AppleTalk. If you are linked to other machines through AppleTalk, you may want to disable it prior to capturing or printing video to tape.
You should generally disable AppleTalk whenever you are preparing to capture video or print it out to tape. Although it could conceivably never cause a problem, particularly if you are not connected to a network or printer, AppleTalk is capable of stealing the processor’s attention and degrading performance. AppleTalk connections are notorious for asserting control over the entire Macintosh when there is any activity on a network connection. Final Cut Pro is a very processor-intensive application and, if interrupted by such activity, it will exhibit unpredictable behavior.
Final Cut Pro memory allocation
Finally, the memory allocation for Final Cut Pro should be set. Although you may have plenty of extra RAM installed for Final Cut Pro, it will not access that RAM until you allocate it. To set any application’s RAM allocation, first determine the maximum amount of RAM you can give it without choking your system.
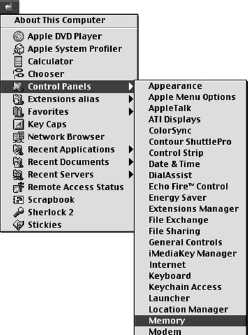
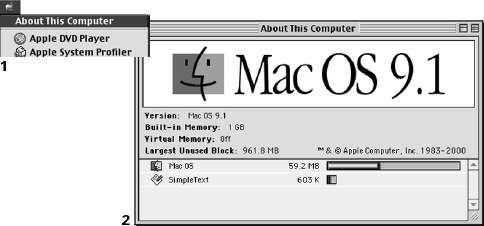
To determine the amount of RAM you can allocate to Final Cut Pro, take into account the actual amount of physical RAM you have installed in the Macintosh. This can be ascertained from either the Apple Menu>About This Computer (Figure 3-10) while in the Finder or the Apple Menu>Apple System Profiler.
STEP 5
Subtract about 80 megabytes from the amount of actual physical RAM, 80 megabytes being roughly the amount of RAM that a healthy System Folder will normally allocate for itself under extreme situations. The number you have left is the amount of RAM you can safely allocate directly to Final Cut Pro. For example, if you have 256 megabytes of RAM installed, subtracting 80 megabytes from this number will give 176 megabytes.
STEP 6
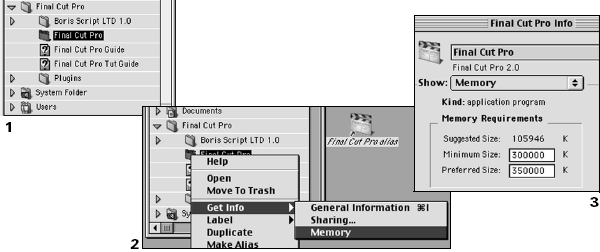
To assign this amount to Final Cut Pro, navigate to the Final Cut Pro application folder on your hard drive. Open the folder, hold the Control key, and single-click the Final Cut Pro icon. Do not double-click or you will actually start up the application, which is not our objective.
STEP 7
In the Contextual Menu that pops up, choose Get Info and then Memory (Figure 3-11). In the next window, change Minimum to 150,000 K and Preferred to 176,000 K. Close the window, and the RAM allocation is set.
The difference between Minimum and Preferred sizes is that Minimum will lock off exactly the amount of RAM you enter into the field, making it available only to the application it is assigned to. If the Preferred size is higher than the Minimum, the Mac OS will dynamically shift RAM so that the amount allocated to the application never goes below the Minimum, but can go higher if more RAM is available.
This makes it possible to open more applications than should be technically possible. We said that Final Cut Pro requires 106 megabytes of RAM to actually start. We also say that it works much better with 150 megabytes allocated to it and that it will actually use even more if allocated, improving its performance with each extra megabyte. If you set the Minimum at 150,000 K and the Preferred at 180,000 K, then the Mac OS will adjust the amount of RAM that Final Cut Pro is allocated on the fly as RAM is grabbed or freed up by other applications you may be running simultaneously. If nothing else is running, the RAM is available for Final Cut Pro.
The Mac OS has a peculiar way of dealing with RAM, and I generally keep my RAM allocations locked in at a level at which I know they can function well. The problem is that Mac OS 9.1 and earlier don’t have what is referred to as “protected memory.” Two different applications can try to claim the same RAM, causing a crash of the entire system, as is the case with Extension and Control Panel conflicts. If you allocate too much RAM to an application and don’t leave enough for the Mac OS itself, you could choke the system and possibly cause a crash. When your system gets down to only a couple of free megabytes, any large shift in the memory allocations for the system or the applications could cause unbelievably slow performance, a sudden crash, or an error message.
The best bet for the fastest, most reliable performance is to allocate to each RAM-hungry application like Final Cut Pro and Photoshop as much RAM as you can make available to it (assuming that the applications actually can make use of that much—some cannot) while leaving a healthy buffer of at least 75 to 80 megabytes for the system. Set your Minimum and Preferred allocation so that RAM is rarely shifted around by the system without your consent, and then do not open more applications than can be run, based on the amount of physical RAM you have installed.
If Final Cut Pro and Photoshop are allocated 256 megabytes of RAM, they will both run much faster and give much better performance. You may not have enough physical RAM to run them at the same time, so close one and open the other as you need it. You may find that the brief delay in restarting an application is a more than acceptable trade-off for being able to allocate it twice as much RAM, particularly with applications like Photoshop and Final Cut Pro that store Undo files in their RAM allocations.
Even though a minimum of 256 megabytes of installed RAM is highly recommended, Final Cut Pro 2.0 will actually run with a minimum memory allocation of 106 megabytes. Running at this minimum allocation may deliver very unpredictable performance (e.g., slowness, crashing, and memory errors). If you begin to receive Type 2 errors, it may be an indication that you are running low on RAM. Working safely and without interruption is much more likely with at least 256 megabytes of installed RAM and 150 megabytes or more allocated to Final Cut Pro. If you aren’t sure how much the system is using and think you are running too close to the edge, keep the Apple Menu>About This Computer running on your Desktop somewhere. It will dynamically update, showing you how much RAM each application and the system are using, as well as how much free RAM you have left as a buffer for the system to expand into without crashing. After a while, you’ll get an intuitive feel for how much RAM you can effectively give any application and how much the system typically needs, which can vary depending on which applications you are running.
Preferences and Audio/Video settings
Why the settings are required
Next in line is setting up the Final Cut Pro Preferences and the Audio/Video Settings. This step is an absolute necessity. Some other popular applications do not require the user to alter the default preferences at all. Many of the settings in Final Cut Pro, however, directly affect the way it functions and interacts with the Mac OS and your hardware, and as such they must be checked and set correctly.
Preferences are concerned with the toolset and functionality of Final Cut Pro and, generally speaking, won’t require changing until your working methods themselves change (the one important exception is that of Scratch Disk assignment). Preferences refine the workflow of Final Cut Pro and allow you to focus the way you approach editing. These settings are generally not application-critical inasmuch as changing them would not cause Final Cut Pro to malfunction.
The Audio/Video Settings (and the Scratch Disk preferences located in the Preferences), on the other hand, are directly related to how the Final Cut Pro application deals with your particular hardware and software situation. Remember that Final Cut Pro can function under numerous hardware and software environments, and the default Audio/ Video Settings when you install the application may not reflect your personal setup. These settings are critical to Final Cut Pro’s functioning correctly and you must define them.
Unlike the Mac OS System settings you completed in the last section that must be set or checked only initially or when you encounter system misbehavior, the Audio/Video Settings and the Scratch Disk Preferences should be checked and set properly whenever you work with Final Cut Pro. Setting the preferences is a very quick process, and Apple has instituted some great preset tools for streamlining the preferences process in the 2.0 version. However, you still need to check them every time, especially if you are not the sole user or there is more than one active Final Cut Pro project per machine.
The reason for this is that, unlike some professional digital nonlinear video editing applications, Final Cut Pro does not store or link your preference settings with your particular project file. Thus, when you start a Final Cut Pro project, the preferences you encounter will be whatever they were set to the last time Final Cut Pro was used. In a multiuser environment or on a system with multiple projects, this can have disastrous effects if it is allowed to get out of control.
Starting up Final Cut Pro
When you start Final Cut Pro, it usually launches the project that was open when Final Cut Pro was last run. This very well may not be your particular project. Since Final Cut Pro also allows the user to have more than one project open at a time, it is always a good procedure on launching the application to immediately close all open projects. It is not necessary to close an open project just to change the preferences, particularly if it is your own project that is open, but it is a good habit to get into to avoid accidentally altering another user’s hard work.
STEP 8
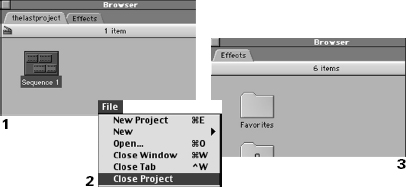
After starting the Final Cut Pro application, go to the File drop-down menu and select Close Project until all the open projects are gone and the Effects tab is the only thing left in the Browser window (Figure 3-12).
There is one exception to the rule that Final Cut Pro usually opens the last open project when started up. If you start Final Cut Pro up by double-clicking your project file rather than the Final Cut Pro application alias, it will start with only your project open (Figure 3-13). If you follow this method of starting Final Cut Pro, you can skip the process of closing all open projects.

STEP 9
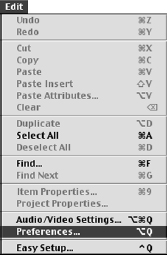
After closing any initially launched projects, go to the Edit drop-down menu and select Preferences (Figure 3-14). A dialog box with five tabs at the top will appear. Each of these tabs needs to be set up for your particular needs before you move on.
The General Preferences tab
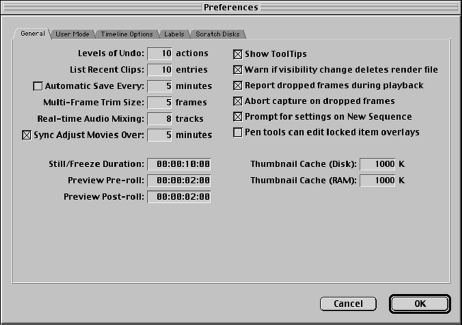
The first tab is General settings (Figure 3-15). Each item on this tab has important implications in the workflow of Final Cut Pro, as well as making sure the application warns you in the event of problematic behavior in the system. Be sure to go through each item and configure it according to your need.
Levels of Undo
The first item is the Levels of Undo. Levels of Undo are the number of actions that you can undo in sequential order should you make a mistake while editing. Having a certain number of actions available for Undoing is very handy if you want to try something in your editing that you’re not sure you will want. If you don’t like the results of any action, select Undo from Edit drop-down menu or simply hit Command-Z, the keyboard shortcut. Final Cut Pro will return your project back to the way it was prior to initiating the last action. You can go backwards in your actions as many times as you have specified in the Levels of Undo in the General tab of the Preferences.
The number of undoable actions can be set up to 99, although be warned that greater levels of undo require more RAM. As you perform actions, they are stored in Final Cut Pro’s RAM allocation for instant removal should you choose to undo them. The more actions you store away, the more RAM you burn up. There are more effective ways of returning to earlier versions of your project, and it is recommended that you leave Levels of Undo set to the default value of 10.
List Recent Clips
The List Recent Clips box allows you to specify how many recently used clips are displayed in a certain pop up menu of the Viewer window. This can be a handy way to access clips you want to work with without having to manually drag them across the Desktop. The default value here is 10, although you can set it for up to 20. However, 20 is really too many to choose from in most situations and will create a giant drop-down bar if set that high. Leave this set at the default of 10 unless you find that you need more in your process.
Automatic Save Every
Automatic Save Every, or Auto-save, actually has two parts; there is a check box for enabling it and a box for entering the frequency with which it occurs. The default for Automatic Save Every is to be checked on and Save set for every five minutes.
There are two important things to remember with the Auto-save function. First, Auto-save is an automatically timed function that does not wait until you have completed a task before beginning a timed save. It is enabled whether you are in the middle of a two-hour render or simply doing nothing. As such, it can be a very interruptive function, particularly since a highly complicated project file can take up to 30 seconds to completely save. If you are concentrating on your editing, having the whole application lock up every five minutes to save itself can ruin your concentration.
Second, there have been isolated reports that Auto-save is responsible for the corruption of project files. This has never been officially confirmed, so it is impossible to say for certain that the Auto-save function is the culprit. It is certainly conceivable that if a massive save operation began at a critical moment such as rendering or capturing, corrupt data could make its way into your project file.
The way Auto-save works is that every so often, at the predetermined intervals that you specified in the Preferences, the application saves a copy of your project file in the same folder as your project file. This Auto-save file carries your project file name plus the suffix “-auto,”—for example, “yourprojectfile-auto.” Auto-save never actually saves your original project file, and the “-auto” file remains and is continually updated. When you manually save your real project file, the Auto-save copy disappears.
Should your machine crash, you might not be able to save before rebooting. On your return to your project folder, you will see the original project file, which will still be in the state it was when you last manually saved it. You will also see the Auto-saved copy of the project file, which will be as recently updated as the last time the Auto-save was performed. If you open the original project file after a crash, a message box will ask if you wish to open the more recent version of the project (i.e., the Auto-saved version). You may take or pass on this option, because after that point, Final Cut Pro will treat the two files as completely separate projects.
Whether or not you choose to use Automatic Save Every should depend on how careful you are. Most people aren’t so diligent and have to learn the hard way that regular saving is a must. Although it is difficult at the time of this writing to say whether Auto-save is responsible for project file corruptions, it is the opinion of the author that the diligent Final Cut Pro editor actually has no need for the Auto-save function. Manually saving backups of your project file on a regular basis is far safer and more responsible behavior than simply running a background saving function all the time. And Auto-save does not allow you the ability to archive your project. In the next chapter, you will be shown a backup saving technique that will make the Auto-save function completely superfluous. Your project will be safer and more flexible, and you will sleep better at night.
Multiframe trim size
Multiframe trim size is a setting for a specialized editing tool with Final Cut Pro. Each editor has an opinion about how many frames should be available for quick trimming in the Trim Edit window, and until you have used it, leave this set for the default five frames. When you get to the editing stage and begin using the Trim window, you will find that this setting not only allows for a very precise adjustment of your edit but also helps you make very quick adjustments of the edit. This is not an application-critical setting, but one that must be set according to your editing style. You can always change it later as need be.
Real-time Audio Mixing
The Real-time Audio Mixing setting allows you to put a limit on the number of audio tracks on the Timeline that Final Cut Pro is able to play back without rendering. You can have up to 99 tracks of audio in any timeline, but your system hardware determines how many of these can be played back simultaneously without having to be mixed together in a rendering process.
Many factors enter into the equation of how many real-time tracks can be mixed and played back without rendering. Processor speed, the amount of RAM and the speed of your hard drives all have a bearing on whether or not your system can deliver the number of tracks you require without rendering. Also, any audio effects you apply to the audio clips will decrease the actual number of real-time mixed audio clips you can muster.
The default value of eight tracks is the maximum for Firewire configurations of Final Cut Pro, provided there are few or no audio filters applied and your hard drive is not overly fragmented. Eight tracks of real-time mixed audio should perform fine in a system that has the recommended amount of RAM and is using a hard drive configuration that isn’t below par or overly fragmented. If you use more than eight tracks of audio at a time, simply render them, which will allow them to be played back correctly. Audio rendering is incredibly fast, which may be a minor trade-off compared with having to purchase more hardware for your system.
Sync Adjust Movies Over
This setting is fraught with confusion in the community of Final Cut Pro users. To dispel that confusion, it is necessary to understand what this feature is supposed to address and how it works. The Sync Adjust Movies Over feature (in previous versions referred to as the Auto Sync Compensator) was designed to deal with the issue of standard sample rates in prosumer DV cameras and decks.
As we saw in Chapter 1 of this book, Digital Audio is audio that has been sampled. The quality of the digital audio file and the fidelity to the original source from which it was created depend on the number of times per second that the source audio was sampled. We refer to this as the digital audio sample rate. In DV cameras and decks, the two sample rates used are 32 KHz and 48 KHz. Unfortunately, none of these prosumer cameras and decks are sampling at the exact rate of either 32 KHz or 48 KHz. Although the margin of error may be only a few samples off from this number, most DV cameras and decks actually sample the audio at slightly different rates from what the specification states should be there. Thus an audio sample may be at 48,048 Hz instead of exactly 48,000 Hz.
In ordinary playback this isn’t an issue. The problem is that Final Cut Pro at the outset is unaware of the actual sample rate of the audio. In our settings to come, we will see that we can select only these two exact sample rates. Thus, when Final Cut Pro captures this audio, it is playing back the file at a slightly different speed than it was actually recorded at. This would be similar to shooting a film at a nonstandard rate of 30 frames per second, but then viewing it with a film projector that plays back only at the standard of 24 frames per second. The result would be barely perceptible, but it still would be slow motion footage, as the camera and film footage’s frame rate is slowed down to the frame of the projector.
Of course, the difference between 48,048 and 48,000 samples per second is very minor and nearly imperceptible. The problem is that the video and audio are recorded together. If the video is playing back at the correct rate, but the audio is playing back slightly too fast or slow, the result over a long period of time is that the two can go progressively out of sync with each other. This is noticeable only over extremely long stretches of footage, since it takes many seconds for those 10 out of 48,000 samples per second to generate a serious sync issue.
The Sync Adjust Movies feature causes Final Cut Pro to calculate the exact number of samples for the captured audio clip rather than assume that it is precisely 32 KHz or 48 KHz. This does not require any more processor or RAM resources and is actually a good feature to have enabled all the time. Certain cameras, such as the Canon XL-1, actually require this to be turned on because of the disparity between the assumed and the true sample rate.
If Sync Adjust Movies is such a great feature, why would Apple give you the option of turning it off? The answer lies in a serious chink in the Sync Adjust Movies armor. If footage is being captured and a timecode break or area of the tape that contains no video is encountered, an incorrect number of audio samples are registered inside the audio file’s data. Although this may not be overtly apparent, use of the Sync Adjust Movie feature in this instance can yield a complete lack of sync between video and audio.
Which setting is correct? Under normal circumstances, leaving this feature on and set for five minutes is completely acceptable and even recommended. If there is any aberration in the sample rates, it will be caught and recalculated automatically. Unfortunately, if there is the slightest likelihood of a timecode break on your tapes, it could result in a serious sync issue and the feature should be disabled.
The smartest choice would be for those capturing footage using Timecode and Device Control to leave the feature enabled and set for five minutes. If there is a timecode break in the tape, your capture will be terminated anyway, and you will be alerted to the problem. Those using an analog digital converter box or a pass-through device of some kind and who are therefore not using timecode for capture would be best advised to leave the feature disabled, since it is fairly easy to accidentally capture blank video footage. In addition, remember that if your clips are shorter than five minutes or so, the sample rate irregularities will be largely unnoticeable. Sometimes the best idea is just to keep your clips short and sweet.
Show ToolTips
Returning to the top, the ToolTips setting should be enabled, particularly for new users and those unfamiliar with the Macintosh platform’s keystroke conventions. When ToolTips is enabled, Final Cut will actually tell you the function of an on-screen item. Simply leave the mouse pointer over the item for a couple of seconds without clicking and a small text box will appear telling you what the item does. The bonus is that many ToolTips boxes include the keyboard shortcut for the item as well. As we will see, keyboard shortcuts are something all users of Final Cut Pro should master—your wrist will last only so long.
Warn If Visibility Change Deletes Render File
As with all “alarm” switches, this preference should be left enabled. It refers to a situation in Final Cut Pro in which Timeline media can become unrendered simply by turning off track visibility, a timeline feature that is discussed in a later chapter. This can eliminate hours and hours of rendering with the push of one button. This preset simply forces you to go through a dialog box before committing to that action. Leave it enabled.
Report Dropped Frames During Playback
This setting is an “alarm” switch to let you know if, for some reason, playback performance was impaired and Final Cut Pro was unable to play back at the required frame rate. Dropped Frames is a situation in which, for whatever reason, Final Cut Pro was not able to process the video and/or audio data quickly enough to provide the 29.97 or 25 frames per second demanded by NTSC or PAL. Many different things can cause Dropped Frames; this is the primary reason for doing your Preferences and Audio/Video settings! Sometimes they are hardware related (e.g., fragmented drives), but most often they are the result of not having your settings in order.
Dropped Frames are not acceptable. Final Cut Pro is fully capable of playing back NTSC and PAL video at the proper frame rate, given that your hardware and settings are in order. If you are receiving reports of Dropped Frames, go through your settings first and make sure that you haven’t missed something. You want to keep the Report Dropped Frames During Playback switch enabled so that you become aware the instant that Final Cut Pro is not performing properly. Disabling the Dropped Frame report is like taking the batteries out of a smoke alarm to stop a raging fire. If you receive a Dropped Frame warning while playing back, eliminate the problem, not the alarm.
Abort Capture on Dropped Frames
This alarm setting is similar to the one previously discussed in that Final Cut Pro will halt what it is doing if it encounters impaired performance and Dropped Frames. The only difference here is that it is occurring during the capture and not the playback process. That distinction is unimportant. Dropped Frames are unacceptable in either location. This setting should always be enabled. If you are not capturing and playing back at the full frame rate, then you are not exercising the true value and potential of the Final Cut Pro editing software.
At the time of the writing of this book, there were reports that erroneous Dropped Frame errors have been generated by Final Cut Pro during the capture process for some individuals. There may or may not be a software issue related to this situation, and the first conclusion of the new user should definitely not be to attribute the behavior to a “Final Cut Pro bug.” Of all problems encountered by new Final Cut Pro users, 99 percent are settings or drive related. Make sure that you fully troubleshoot such issues before screaming about software bugs.
If you receive Dropped Frame messages during the capture process, make sure that all of your settings are in order and that your hard drive configuration is not causing the problem. In particular, if you are receiving Dropped Frame messages when you play back clips as well as capture them, your settings or drives are the likely culprits.
Prompt for Sequence Settings on New Sequence
This preset is another setting that should be enabled for safety purposes. Whenever you create a new sequence in the timeline, Final Cut Pro will ask you for its specifics, ensuring that you choose the right ones instead of simply using whichever sequence settings have been previously invoked. Sequence settings are some of the most critical ones, so having Final Cut Pro put this reminder in front of you is a good way of making sure you never forget to do the settings correctly, even in mid-project.
Pen Tools Can Edit Locked Item Overlays
This setting is not application critical, and it’s probably not a good idea to use it if you aren’t sure why you’d even want to override a locked item on the Timeline. Under certain advanced editing circumstances it could be a useful feature, but for the moment it’s best to leave it disabled.
Still/Freeze Duration
This setting allows the user to determine the duration of the clip that results from importing a still image generated by another application such as Adobe Photoshop into Final Cut Pro. The default is 10 seconds. Although such a clip will have to be rendered to play back correctly, it will at least be of a serviceable length. This setting also applies to the length of a still frame generated by Final Cut Pro. Although you can easily change the lengths of either the imported image clip or the frozen frame, this setting allows you to specify its initial duration.
Preview Pre-Roll and Preview Post-Roll
These two settings are preferences that relate to the way the Canvas, Viewer, and Trim Edit windows allow the user to quickly check an edit within a user-defined range of time. That functionality is described later. For now, it’s best to leave this set at the default.
Thumbnail Cache, Disk, and RAM
These settings allow you flexibility in dedicating drive space and RAM for thumbnails of the clips you will be working with. Thumbnails are very small icons that represent your captured or imported clips in a project and contain a still image showing what footage is in the clip. If you will be using many clips, you may want to set this as high as 1,000 K each, although the default settings of 512 K and 256 K respectively should be sufficient for normal circumstances. You can always adjust this amount later if you notice sluggish performance in previewing thumbnail clips.
The User Mode tab: Cutting Station vs. Standard
The second tab in the Preferences is for the User Mode (Figure 3-16). This setting allows you to place limitations on the feature set available when working on a project. In the Standard Mode setting, all of Final Cut Pro’s functionality is enabled. In Cutting Station Mode, however, the editor is restricted to the following limitations in the editing process:
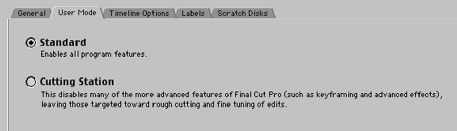
A sequence is limited to only two video tracks and four audio tracks, in contrast to the 99 video or audio tracks normally possible within a sequence. |
|
There is a limit of seven filters, or effects, per sequence. |
|
Transitions, or effects that occur in the overlap of two clips in a sequence, are limited to the following four types: Oval Iris, Edge Wipe, Page Peel, and Rectangle Iris. |
|
Motion Effects are disabled, except where they are applied to every instance of a clip’s use throughout the project, otherwise known as Global Use. |
|
Speed Settings are disabled. |
Although it might seem unrealistic to want to limit the options available to the editor, there are actually a few situations in which limiting the possible options might be a good idea.
The most practical situation would be where the finished project will be exported as an Edit Decision List (EDL). An EDL is simply a spreadsheet database file that allows you to carry the timecode information from a project to another editing station. Most digital nonlinear editing stations can accept EDLs from other editors, and Final Cut Pro is no exception. However, most EDL formats require that there be a limited number of tracks as well as transition types and effects. Since many editing stations have their own system for defining these things, only trouble can come from trying to include these things in a project that is destined to be exported to another system as an EDL. Cutting Station limits the editor’s ability to include such problematic information.
Cutting Station is also valuable for logging and rough-cut stages of an edit. At the earliest stages of editing a project, logging footage and constructing a roughly-cut sequence requires only the most basic tools. Limiting the clutter of the toolset can focus the editor’s concentration on the task at hand, which is to get the initial footage in the right order and with the right edit points.
As you begin your first projects with Final Cut Pro, leave the User Mode set for Standard Mode until you have worked with the application a while and are aware of what you are giving up by using the Cutting Station Mode. Further, keep in mind that changing between User Modes requires Final Cut Pro to be restarted to re-enable or disable any features affected by the change in mode.
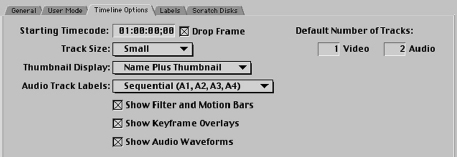
The third tab in the Preferences is used to set the Timeline Options (Figure 3-17). In general, you will set these once and not alter them again until your editing needs change, and although they are mostly noncritical, they deserve mention. Since Final Cut Pro contains many separate windows and Desktop real estate is at a premium, the way you set your Timeline Options can optimize your workflow, prioritizing the way you see things in the Timeline as well as its defaults. The Timeline is the only truly linear part of Final Cut Pro. It is a beginning-to-end cutting window that can be customized according to your needs. Each of the following settings should be determined by your needs and the editing style you develop as you become familiar with the application.
Starting Timecode
By default, the Starting Timecode of the Timeline is set to 01:00:00:00. This is the timecode number that the first frame of the sequence will begin counting from. If you set this number to 00:00:00:00, the sequence will begin counting from that timecode value instead. For most users, changing this number will not have much effect other than the ability to organize numbers more efficiently. But for some users, it will provide a very convenient option when outputting finished video to tape. With some serial deck control systems and expensive production decks, you can preset the timecode recorded to tape by using the timecode value of the sequence being output to tape.
Most DV users do not have the option of presetting the timecode their recording deck writes to tape as it records the incoming video. Even though the incoming Firewire DV data stream may contain timecode information, most DV decks are not capable of reading that data and writing it to tape. Some feature-rich DV decks do have the capability of recording user preset timecode values. If you own such a deck, you can preset the timecode number that is recorded to tape—for example, beginning your tape with 00:58:00;00 instead of 00:00:00;00.
This functionality can make a great deal of difference if you are preparing tapes for a production house or broadcast facility that requires a specific beginning timecode value on submitted tapes. Often such facilities demand that tapes start with color bars and a test tone before the beginning of the actual edited piece, although they require the first frame of the edited piece’s timecode to be at the top of the hour. Being able to make something like 00:58:00;00 as the timecode value of the first frame of recorded video can be an important option in professional production. Check the specifications of your DV deck to find out if it has this capability.
Unfortunately, the Starting Timecode information still cannot be used to preset the timecode recorded through Firewire onto DV tape. The ability to automatically preset the timecode value recorded to tape as you record out your video from Final Cut is available only with the use of serial deck control and with a deck that offers that feature. DV decks do not. If you need to produce such a tape with DV, you will have to use the Edit to Tape function described in the final chapter of this book.
Drop Frame Timecode Checkbox
Next to this setting is a checkbox labeled Drop Frame. This refers to whether Drop Frame or Non–Drop Frame Timecode numbers are used in the Timeline. NTSC DV Timecode is always Drop Frame whereas NTSC SMPTE Timecode, which uses the LTC and VITC analog systems, can be either Drop Frame or Non–Drop Frame. Although most Firewire users will never have to worry about the difference, those using the aforementioned DV converter box and a serial adapter for access to an analog deck’s timecode might have to. PAL users of course have no need for Drop Frame settings, since PAL frame rates are based on a whole number.
Track Size
The next setting is for Track Size. The default track size of a new sequence can be preset using this option. “Small,” the default setting, represents the most efficient trade-off between convenience and accessibility, although you can adjust this according to your needs and available workspace. Like many options in the Preferences, this setting affects only the default settings for new sequences. To change the appearance or features of an existing sequence, you will have to make the change in the Sequence Settings, which are addressed later on in this book. This Timeline option can also be adjusted directly from the Timeline.
Thumbnail Display
Thumbnail Display is an option that displays a thumbnail of the clip as it sits on the Timeline. This can be a very handy way of remembering which clip you are looking at on the Timeline. The options in this field are Name, which displays only the name of the clip; Name Plus Thumbnail, which displays the name of the clip plus one thumbnail image from the clip; and Filmstrip, which displays as many thumbnail images as can be fitted within the clip depending on the current time scale and range of the Timeline itself. The default is Name Plus Thumbnail.
Audio Track Labels defines how the audio tracks are named, and it should reflect your audio sources. The default setting, Sequential, simply names each new audio track with the next largest number in order from the last (i.e., 1, 2, 3, 4) without respect to the track’s association with any other track. Tracks are simply created in numerical order. Paired tracks, on the other hand, are labeled in pairs (i.e., 1A, 1B, 2A, 2B) to allow easy association between stereo audio tracks. Paired tracks may offer ease of organization if you use a lot of stereo audio tracks, but they can get confusing if you bring in a lot of monaural material. It does not affect the system’s performance at all and should merely reflect your own working style.
Show Filter and Motion Bars
Show Filter and Motion Bars slightly expands each track in the Timeline and includes a small area underneath the clip. If any Effects Filters or Motion Effects are applied to the clip, they will be identified with a colored bar. A green bar denotes that an Effects Filter has been applied to the clip. A blue bar denotes that a Motion Effect has been applied to the clip. After a clip has been rendered, it can sometimes be difficult to remember whether or not it has been manipulated. Enabling this preference can make it easier to recognize such manipulation and avoid accidentally unrendering clips. This Timeline option can also be turned on directly from the Timeline.
Show Keyframe Overlays
Show Keyframe Overlays enables a special tool for each clip on the Timeline. This functionality is commonly known as Rubberbanding. When Keyframe Overlays is enabled, you can adjust the opacity, or transparency, of a video clip or the volume level of an audio clip simply by grabbing the line that appears in the clip on the Timeline and dragging it. This is a very easy way to create fades or quickly control audio levels without having to go into a clip window to apply an effect.
The keyframing of these lines is also possible, allowing you to change the level of opacity or volume over time. The term rubberbanding comes from the fact that the straight line created from keyframe to keyframe when rubberbanding resembles a rubber band stretched from nail to nail on a flat surface. Keyframing is thoroughly covered later in the book. This Timeline option can also be turned on directly from the Timeline.
Show Audio Waveforms
When this preference is enabled, clips on the timeline will display their audio levels as a waveform. Audio level, or the clip’s loudness, is often displayed as a long continuous series of waves. The higher the peak and the lower the trough of each wave, the higher the level of audio. Since audio recording is not limited to the slow 29.97 or 25 frame rates of video, it’s possible to be more precise in editing the beginning or end of a sound based on its waves.
Sometimes, the easiest way of finding footage in a clip on the Timeline is to have the Timeline display the Audio Waveform and look for the waveform spike that identifies your footage. You’d be surprised how easy it is to see the relationship between volume and different types of footage. Audio Waveforms can also be a very convenient marker for finding footage or for re-syncing tracks that have accidentally been unlinked. Unlike other Timeline preferences, this setting cannot be enabled by a button on the Timeline itself, but can be turned on and off using the keyboard shortcut Command-Option-W.
One might wonder why such a useful tool should not be enabled all the time. The simple answer is that the Audio Waveform must draw many thousands of separate Audio Waveforms on the Timeline when enabled. Each time you make a change, it must redraw all of these thousands of waves. The delay caused by redraw can take forever, even using the latest and fastest processors of the Macintosh line. In general, you want to keep this feature disabled unless you have a specific need for it.
Default Number of Tracks
The final setting for the Timeline Options is for the Default Number of Tracks. This will determine how many new tracks of video and audio are created when you create a new sequence. The default is set at one video track and two audio tracks, although you can set either for up to 99. In general, you should leave the default setting. Creating new tracks on a Final Cut Pro Timeline is as easy as dropping a clip where you want the new track to be. There is no reason to start out with extra tracks; simply create extras as they become necessary.
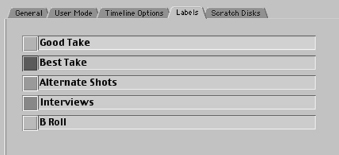
The Labels tab
The fourth tab in the General Preferences is called Labels (Figure 3-18). This tab allows you to customize the color-coding system available in Final Cut Pro. This is not a critical setting, but you may find it useful, especially for quickly organizing clips and sequences according to content.
Using the Label Preference Tab, you can change the color of the icon for clips and even sequences in the project Browser window. This color will also be displayed for the clip in the Timeline window if the Show Filter and Motion Bars box has been enabled for the Timeline. The only limitation of the Labels tab is that the five colors available for color coding cannot be changed, although you can change the text each color represents to anything you want. That text will be displayed in a special contextual menu for applying color coding to clips and sequences.
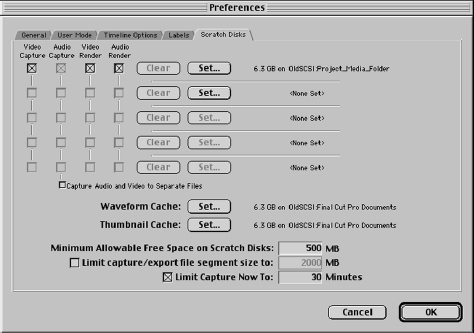
The Scratch Disk Preferences tab: the issues for scratch disk assignment
The fifth and final tab of the Preferences is perhaps the most critical setting in Final Cut Pro. It is called Scratch Disk Preferences, and its name does not belie its importance to Final Cut Pro’s healthy performance (Figure 3-19). It is in the Scratch Disk Preferences that you assign the location to which all the media you capture are written to. It is imperative that this location be properly set up and that it meet the standards we lay down for achieving acceptable performance. There is no getting around the need to visit this setting each time you work to make sure that you aren’t jeopardizing your work.
Before describing the proper procedure for setting up the Scratch Disk tab, it is important to take a moment and examine the physical issues at play here and make sure that you have arranged your system in the best possible configuration. From the first section of this book, we recall that the video footage on the DV tape is actually a digital video file rather than an analog signal. Since the footage is already digital, our capture process through Firewire will be simply a matter of copying the digital video file from the camera or deck to the hard drive of the Macintosh.
We should also remember that our footage is already compressed in the camera with the DV codec and that its data rate is just over 3.6 megabytes per second. For the data to be written to the drive correctly or played from the drive correctly after the capture process, the hardware configuration of our Macintosh will need to meet or exceed this 3.6 megabytes per second data rate.
In practice, this is relatively easy. The standard hard drives and buses on today’s Macintosh far exceed the 3.6 megabytes per second data rates required. There’s no need to spend lots of money on extremely fast drives to work with broadcast-quality video any more. However, the inexpensive drives we are talking about must be configured correctly, and you must access and assign them in Final Cut Pro appropriately if you expect them to deliver satisfactory performance. Like anything else, the devil is in the details, and if you pay attention to the details, you will find that you never run into data rate–related issues.
The first issue to be addressed is that it is highly recommended that you use at least two separate physical hard drives with Final Cut Pro. One of these hard drives is your startup drive. This is the drive that contains your System Folder, the Applications Folder, Final Cut Pro, and any other software you need to install on your system.
This hard drive is dedicated to software use only. Accordingly, there is no reason for this drive to be enormous. Large drives have no real inherent value over smaller ones other than the amount of data they can hold. For use as a startup drive, a 10-gigabyte hard drive will function just as well as a 40-gigabyte drive. For the purpose of efficiently organizing your drive resources, it is recommended that you choose the smallest drive on your system for this startup drive. If all of your drives are of equal capacity, simply use any of them for this dedicated startup drive.
The rest of the drives on your system will be dedicated as media drives. These media drives will be used only to capture and play back the digital files you bring in from the deck or the camera. You will also use these media drives for the render files, which are generated whenever you render an effect in Final Cut Pro.
Separating your drives into a startup drive and media drives will keep Final Cut Pro from fighting itself to maintain an acceptable data rate; consequently, it will play back your video files correctly. Although 3.6 megabytes per second is not an astonishingly high data rate, it does require that Final Cut Pro have unfettered access to the media files on the drive. That access can be compromised if a drive is busy accessing system files or application files at the same time it is trying to access your media files. Any interruption in the steady data rate of 3.6 megabytes per second can result in unacceptable performance and a break in capture or playback.
Another problem with using a startup drive as a media drive is that it may result in fragmentation of the drive and thus poor performance. A startup drive containing the System folder and applications contains thousands of small files that are used constantly by the system. As you work, you will also be saving files all the time that relate to your work. These files range in size from 1 kilobyte to a few megabytes or perhaps even 10 megabytes. Even though 10 megabytes seems large, in the scheme of things this is not an enormous file size. Since files are constantly being created, saved, thrown away, and so forth, the hard drive can quickly become littered with files scattered across a large relatively empty disk.
A frequent result of mixing a lot of these small files and large files on a single hard drive is that sometimes the larger files must be broken up into smaller pieces to fit on the drive. Although there is plenty of free space on the drive, it may not be contiguous (i.e., unbroken) space. For example, if you have 2 gigabytes of space left on a drive but that drive has a few small files written randomly around its area, you may have only a few much smaller contiguous spaces left on the drive. The space left may equal 2 gigabytes, but it is actually 1 gigabyte plus 250 megabytes plus 500 megabytes plus 250 megabytes.
In order to write or read at the highest level of efficiency, which is a good idea when you are trying to maintain high data rates like our 3.6 megabytes per second, you want to be able to write large files as contiguous files that are not broken up into smaller places to fit available drive space. In other words, you want to avoid fragmentation. Fragmentation is not merely a malady for startup drives. It occurs anytime you begin to reach the limits of capacity for a hard drive. Fragmentation can also occur on a dedicated media drive, even though there are few small files there. Whenever you are constantly writing and throwing away files, especially as you approach a drive’s capacity, you risk disk fragmentation.
Consider this analogy. You are a parking lot attendant, and you have a certain number of parking spaces to use. At the beginning of the day, there are a lot of free parking spaces for you to choose from to park the incoming cars. It takes you almost no time to find a place to park a car. But as the lot fills up, the empty spaces get further and further apart and harder to find until it takes you several minutes to find a free space to put the next car. And the cars leaving the lot do not leave in an orderly fashion, but just free up spaces based on where they were originally parked. As the cars back up waiting to be parked in your lot, your performance as an attendant decreases.
Essentially, this metaphor applies to drives as well. As the drive fills up from capturing, the free spaces get harder and harder to piece together to write large video files to. As the drive reaches full capacity, it takes longer and longer to write or read the file. As a result, our possible data rate dips down below the necessary 3.6 megabytes per second. Correct playback and capture become impossible, and you start to get Dropped Frames warning messages.
One method that some people use to try to wring more drive space from their Macintoshes is to partition their single hard drive. Partitioning involves creating two apparent logical drives from a single physical hard drive. The single physical hard drive is formatted into two distinct sections that are treated by the system as two completely different hard drives. If you had a 40-gigabyte startup drive, this might seem like a clever way to reclaim much of the wasted startup drive space for media purposes, since any given startup drive uses at the absolute most 10 gigabytes.
The problem is that this method does not really increase data rate performance, since you are still dealing with a single physical hard drive, however dissected. While you may eliminate fragmentation as an issue, you will encounter spotty performance as your startup partition and the media partition fight for dominance. Using two separate physical hard drives on the other hand ensures that if the system or application files need to be accessed while media files are in use, there will be no competition between the two and there will be a lower probability of fragmentation resulting from the mixture of system or application and media files. There’s nothing wrong with partitioning your startup drive or partitioning your media drive either, as long as you don’t use the same physical drive for your startup drive and for your Scratch Disk media drive.
Learning to manage your media drives through the Scratch Disk Preferences will keep this from happening to you. You must learn to organize your media and not simply blindly accept the default media locations that appear when you start up Final Cut Pro. Although you may not experience problems initially when you begin working or even after many edit sessions, the time will come when sloppiness in maintaining your media will come back to haunt you. Those situations can be easily avoided if you begin work with your media resources organized and under control.
If you do not have a second physical hard drive as you begin work, this does not mean that you cannot work. Indeed, Final Cut Pro will happily accept whatever Scratch Disk Preferences you give it. But be warned that you can expect problematic performance if you do not use a dedicated media drive and a dedicated startup/system drive. Although a few hundred dollars for a second drive may seem like a big expense, a dysfunctional system that does not live up to its potential can be more expensive, particularly if you are having a go at professional video production for pay.
To properly set your Scratch Disk Preferences, take a look at the top of the Scratch Disk Preferences tab. From the left of the tab you will see four check boxes, two buttons, and a bit of text. The four check boxes are labeled Video Capture, Audio Capture, Video Render, and Audio Render. The two buttons are labeled Clear and Set. The information to the right of these items is a number describing the amount of free space that currently exists on the drive, followed by the directory path to that drive. The default drive assignment when you install Final Cut Pro is the startup drive, and it should be changed before you begin work. You will see that there are a total of five lines of check boxes and buttons, which means that you can assign up to five different media drives or partitions.
When you capture or render media, the check boxes on the left send the designated media files to the drive location you specify when setting the Scratch Disk. If you are using Firewire and DV, you should always have all four enabled for each Scratch Disk location you assign. You should be using the same drive and folder for not only the video and audio files you capture through Firewire, but also the video and audio files that you generate when rendering footage in Final Cut Pro. If you assign more than one drive or folder for your media, make sure to enable each check box for each assigned location.
The Clear and Set buttons allow you to enter and change the media locations when necessary. Clicking Clear will remove the current media location from the right and replace it with the message <None Set>. The only exception to this is that there must always be at least one media location assigned, so if you have only one line assigned, the Clear button will be grayed out and unavailable.
Scratch disk assignment: Follow the next steps precisely
STEP 10
Click the Set button (Figure 3-20). You will be immediately be confronted by a dialog box asking you to select the appropriate drive or folder for designation as the Scratch Disk. Click on the Desktop button in the box to move your location to the Desktop level.
STEP 11
Once you are at the Desktop level in the dialog box, all the available drives and partitions should be listed. Find the drive you intend to use as your media drive and double-click the name.
STEP 12
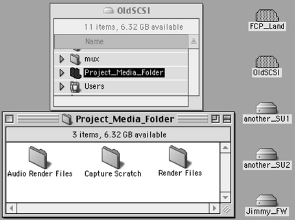
The location menu bar at the top of the dialog box should now show that you are inside the media drive. Now hit the New Folder button and name the folder “Project_Media_Folder” or something equally project specific and distinctive. Click the Create button.
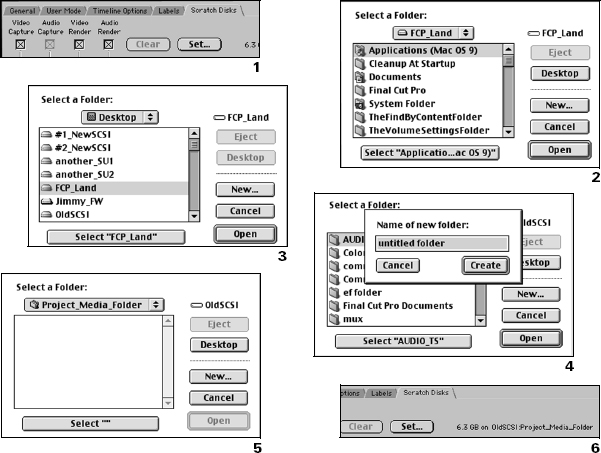
After clicking the Create button, you will find that the location bar has moved inside of the “Project_Media_Folder” which is, in turn, inside the media drive on the Desktop of your system. To see this graphically, click on the location bar drop-down menu at the top of the dialog box and you should see the directory order from Desktop all the way down to “Project_Media_Folder.”
STEP 14
From inside the “Project_Media_Folder,” hit the Select “ ” button at the bottom of the dialog box. Immediately after hitting this button, you will be returned to the Scratch Disk Preferences.
Take a look at the information next to the Set button, and you should see the amount of free space on your media drive displayed in gigabytes (GB), followed by the exact directory path to the place in which you saved the folder.
When you name your media drive and your project folder, make sure to give them distinctive names. Final Cut Pro can miss the difference between “Media1” and “Media2,” for example. A better system is to actually number the drives, using a number at the beginning of the drive’s name (e.g., “1Media” and “2Media”). If you have more than one type of drive on your system, such as both ATA and SCSI drives, you may want to include such information in the drive name (e.g., “1_SCSI_10GB”), where 1 is the drive name, SCSI is the drive type, and 10 gigabytes is the capacity. Then if something goes wrong or a drive is missing from the Desktop, you know right away which one you’re dealing with.
To rename a drive or partition, simply single click on its present name. When the name becomes highlighted, type in the new name, up to 31 characters. You cannot rename a drive or partition that is being shared. If the “single click and rename” method doesn’t work, go to the Apple Menu, select the Control Panels submenu and choose the File Sharing Control Panel. If File Sharing is enabled, disable it. This will allow you to rename any drives or partitions. It will also close any network connections to other machines on your network if you have one, which is probably a good idea if you plan to capture or print video to tape.
Similarly, you will want to be careful in naming the folder that is at the end of the directory chain. “Project_Media _Folder” may be a good idea for the folder you establish on your first media drive, but you will want to name the next one something distinctly different. Once again, the sequential numbering system is probably the wisest and easiest to keep under control. Thus your media folders might be named “1ProjectMedia,” “2ProjectMedia,” etc. “Fred,” “Sam,” and “Jim” might be even better choices if you can keep up with your system.
Each drive that you have dedicated as a media drive will have one such project media folder on it. It may seem a little strange to create a folder on the media drive, but understanding how Final Cut Pro organizes its captured media resources will demonstrate how quickly media can get out of control and clarify how important it is to have media folders set up uniformly and consistently.
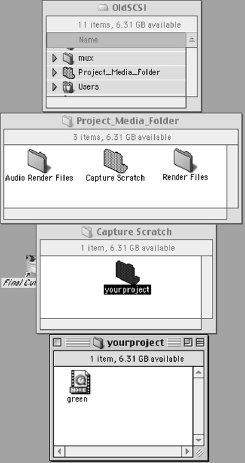
Take a look at the project media folders you just created on your media drive. When you assign a drive or folder as the Scratch Disk, Final Cut Pro creates three folders inside of it: a Capture folder (for Video and Audio, which Firewire captures together and considers as one file), a Render folder (for rendered video from the project), and an Audio Render folder (Figure 3-21). These Final Cut Pro–generated folders cannot be renamed without unlinking everything in your project.
When you go to capture video or audio, Final Cut Pro looks into the Scratch Disk folder or drive you assigned (or which has been left there by default if you did not set your preferences). If it does not find a folder whose name matches the name of the current project you are capturing media for, it creates a new folder for this purpose. Every time you capture media using a new project name, you will create a new media folder in the Capture folder in the disk or folder you have assigned as the Scratch Disk (Figure 3-22).
It is easy for this process to get out of hand, particularly if you are sharing your editing station with other users. The problem can be compounded by the fact that, when started up from the application alias, Final Cut Pro always opens the last project that was open. This means that unwary users can start up another person’s project, capture a lot of media to the wrong drive, and then walk away without realizing the damage they have done to both themselves and their colleague.
These issues highlight the care that must be taken in the proper setup and maintenance of media resources in a Final Cut Pro editing station. Setting up the Scratch Disk is not difficult, and if you follow the preceding method for setting it up, you may never have to find out why the process is so necessary.
After you have set up a Scratch Disk folder for each media drive you want to use, you can get to work. As you return to Final Cut Pro to continue editing your project, select the media folder you created the first time rather than setting up a new folder each time you edit. Make sure you do so, though. One of Final Cut Pro’s few serious flaws is that it cannot store individual project preferences (all those settings we just went through) within the project file. Any changes to the project preferences remain active until you change them back. This means that the previous editor’s Scratch Disk assignment is still active when you begin work. If you skip changing the preferences, you could accidentally fill the other editor’s Scratch Disk drive completely or accidentally assign the startup drive, creating a serious mess. Be diligent and avoid such problems altogether.
To wrap up the settings on the Scratch Disk tab, look underneath the Scratch Disk assignment columns. You will find six items that need to be addressed.
STEP 15
Capture Video and Audio to Separate Files
Disable the check box “Capture Audio and Video to Separate Files.” For Firewire DV capture, audio and video should never be separated on capture (Figure 3-23). Separating audio and video is necessary only for capture cards with much higher data rates than Firewire DV capture. Separating audio and video files also requires a high-performance ATA or SCSI RAID disk array system to function correctly. Checking this box while capturing and playing back through Firewire will only result in problems.
![]()
![]()
Waveform and Thumbnail Cache
Waveform and Thumbnail Cache locations may be set on this tab (Figure 3-24). Thumbnail and Waveform caches store thumbnail and waveform data for faster screen redraw performance. Final Cut Pro will function quite well with these caches defaulted to the startup drive, although choosing a fast media disk can dramatically improve the rubberbanding performance described earlier in the chapter. Some users have reported performance boosts through using high-speed disk solutions or RAM disks for these caches.
STEP 16
Minimum Allowable Free Space on Scratch Disks
Adjust the Minimum Allowable Free Space on Scratch Disks to 500 megabytes or 5 percent of your smallest media drive capacity, whichever is less. Minimum Allowable Free Space On Scratch Disks is a setting that helps to eliminate the problem of disk fragmentation mentioned earlier in the chapter (Figure 3-25). The field next to it allows you to enter an amount in megabytes. When a Scratch Disk fills up and has only the assigned value of remaining storage space, Final Cut Pro either switches to your next assigned Scratch Disk, or, if another Scratch Disk has not been assigned, aborts the capture. We can set a healthy buffer here to avoid reaching a situation in which an overcrowded drive might deliver compromised drive performance.
The default setting for this field is 10 megabytes, but this is far too low to provide any measure of security. There is much room for argument regarding the best Minimum Allowable setting, and it really depends on the size of the media drives in question. The best rule of thumb is that the Minimum Allowable should be set at either five percent of the drive’s capacity or 500 megabytes, whichever is smaller. This means a setting of 500 megabytes for any drive larger than 10 gigabytes. A buffer space of 500 megabytes is large enough to protect a drive from fragmentation but doesn’t waste more than about two minutes of drive space.
Limit Capture/Export File Segment Size To
This setting contains a couple of options, a couple of implications, and a bit of history. The options of the setting are to disable it completely or to enable it with a specified limitation to the size of the file either captured or exported using Final Cut Pro (Figure 3-25). If enabled, the default file size limitation is set for 2000 megabytes.

In the old days of pre–Mac OS 9 disk formatting, file sizes larger than 2 gigabytes were illegal and would result in a file error. In order for Final Cut Pro to capture DV clips that were longer than about ten minutes, the solution was to segment the capture files so that no individual file size reached this 2 gigabyte file size limit. The segments were linked together for correct playback in Final Cut Pro, but they were individual files on their own. This was not an issue only for Final Cut Pro; all video editing applications had to deal with the file size limit of 2 gigabytes in some proprietary way.
With the arrival Mac OS 9, the 2-gigabyte file size limitation was eliminated, allowing the capture or export of file sizes up to 2 terabytes. File segmentation is no longer necessary, and this option may be safely disabled, with an important rare exception: Files larger than 2 gigabytes, or >2 gig as they are sometimes referred to, require the drive to which they are written to be formatted with the Mac OS Extended Format. If you have a disk in your system that is formatted using the original Macintosh OS Standard Format, you cannot write files larger than 2 gigabytes to it. If you are receiving file errors whenever you capture or attempt to export DV-codec files longer than ten minutes, this may be the cause. Since the default disk format type in Erase Disk, Apple’s quick format option, is set to Standard, this can be an easy mistake to make.
If you are not sure about the type of format of a disk, select the disk at the Desktop level, go to the File drop-down menu and select Get Info, or hit Command-I for the shortcut. The General Information will describe the format type as either Standard or Extended. If the drive shows Standard, you will want to reformat it to Extended at your earliest convenience using Apple’s Drive Setup application or the Erase Disk command found in the Special drop-down menu in the Finder. Be aware that this reformatting will wipe the drive and irrevocably delete any data on it.
Limit Capture Now To
There are two basic ways to capture video and audio in a Final Cut Pro project. The preferred method, called Log and Capture, involves setting in and out points for the footage on the tape based on the Timecode. This is preferable because it limits what you capture to only the footage you actually need to work with. This confers a few benefits, not the least of which is the amount of disk space saved by not capturing minute after minute of footage you will not need.
There are times when logging clips before capture will be unnecessary or even impossible. If you only need to capture quick clips for instant use or you need entire tapes captured for multicamera syncing, logging tapes may not be the most efficient way to work. Those using A/D converter boxes that have no timecode in the DV data will find that they have no way of logging clips anyway, since such Firewire data streams contain no timecode information. Such users will want to opt for Capture Now. With Capture Now, Final Cut Pro begins capturing whatever is being fed to it from the Firewire input. Later on we will investigate that process thoroughly.
The setting Limit Capture Now To has bearing here (Figure 3-25). It can be disabled or set to limit the length of the capture to a specified number of minutes. You can use this setting to capture long clips without having to sit and watch your machine go through the process. Since there are issues with capturing clips that have timecode breaks, you can avoid the problem by starting a Capture Now process and setting a limit to the length of the capture such that the capture process ends before the footage on the tape does without your being present to stop it.
Another issue of relevance is that this avoids long hang-ups between the time you hit the Capture Now button and the time the capturing process actually begins. When Final Cut Pro captures a clip, it has to prepare a space for the clip on the Scratch Disk drive. If you are using the Log and Capture process, this is quick and simple. Final Cut Pro knows exactly how large a space will be necessary for the clip to be captured, since it knows both the data rate of the capture and the length of the capture.
If you are using Capture Now, Final Cut Pro has not been informed of the ultimate length of the capture and assumes that the resultant clip will use up all the available disk space on the Scratch Disk. It can take time to arrange this, which can lead to a rather long hang-up as you wait for Final Cut Pro to actually begin capturing. If you have very large Scratch Disks, you might have to wait for as long as 30 seconds, all the while watching your footage pass by with Final Cut Pro still not beginning the capture. Timing the beginning of the capture so that it begins where you want it to begin can be frustrating as well.
If you cannot log your clips and must rely on Capture Now, the Limit Capture Now To value can correct this problem. If you set it to, say, 5 minutes, Final Cut Pro will know that the captured clip will need only so much Scratch Disk space, and the capture process will begin almost instantly. The default time, if enabled, is 30 minutes, but you can choose a limit that suits your purposes.
The audio/video settings
Issues involved in the audio/video settings
Having completed the Preferences for the application, we now move on to the actual hardware/software configuration. Many of these settings are critical, and you should visit them at each edit session and make sure that they are appropriate for your situation. As with the Preferences, these settings are not stored in the project file and will simply be the same as the last time they were used.
Although the hardware on your Final Cut Pro station will not change much over time, you must inform Final Cut Pro correctly about such things as the type of data it will be receiving, whether or not timecode will be present, where you want Final Cut Pro to send the video to, and the like. The beauty of Final Cut Pro is that it is what we call hardware agnostic. This means that it will function more or less the same whether we have a $6000 capture card or are simply using the included Firewire ports for video capture. When you get ready to move to new hardware, Final Cut Pro is still there working for you.
The only catch is that we must accurately inform Final Cut Pro as to what hardware it is working with. Mistakes made here can have negative effects on system performance as well as cause impish problems that might not crop up until well into the editing process. Such late discoveries can mean tons of lost work, time, and frustration. An ounce of preventative medicine, good work habits, and respect for the process of setting up correctly can eliminate this altogether.
With the 2.0 version of the Final Cut Pro software, Apple has instituted a couple of new features that can streamline the process, assuming they are initially configured correctly. The most important inclusion is the development of the Easy Setup in the Audio/ Video Settings. Easy Setups are simply presets of all the Audio/Video Settings that are to be used at a given edit session. The Final Cut Pro software installs four presets that are a pretty good generic guess at the Audio/Video Settings for Firewire users.
Unfortunately, even within the closely standardized world of Final Cut Pro Firewire DV editing, there are subtle variations in the Audio/Video Settings that can have a major impact on the progress of your project. The presets that Final Cut Pro installs may not be accurate for your DV source footage, camera, deck or converter box, timeline needs, or video and audio monitoring situation. Clearly you need to correctly configure based on your specific needs. The rule of thumb is “what’s on your tape must match your capture settings, and your capture settings must match your sequence settings.”
Fortunately, this is an easy process. After configuring the Audio/Video Settings correctly, you will be able to create Easy Setups that reflect your configuration. At the initial configuration of the Audio/Video Settings, you will go through and customize for your machine. At the end of the process, you will take these customized settings and create a unique Easy Setup for future one-click configuration of your Final Cut Pro system.
You cannot inform Final Cut Pro about hardware that is not present. Upon launch, Final Cut Pro is able to detect video and audio hardware such as camera and decks at each of the Macintosh’s ports and buses. Before going through the process of setting up your Audio/Video Settings, make sure that your camera, deck, or converter is plugged in, turned on and connected to the Macintosh via Firewire. If you do this and still do not see the device as an option as you step through the settings, quit Final Cut Pro, reboot your Macintosh, and then restart Final Cut Pro. That should cause Final Cut Pro to recognize and initialize the device.
The Summary tab
STEP 17
To set up the initial configuration, first go to the Edit drop-down menu and choose Audio/ Video Settings (Option-Command-Q). A window will pop up with five tabs (Figure 3-26). The first tab in this window is simply a summary of all the present settings in the other four tabs. Each of these displayed settings is actually a template that you can configure on the following tabs as you cycle through them. Each section of the Summary tab is a dropdown bar that allows you to quickly select a preset from each of the tabs following the first. For the moment, skip the Summary tab until we have correctly set presets on the other four.
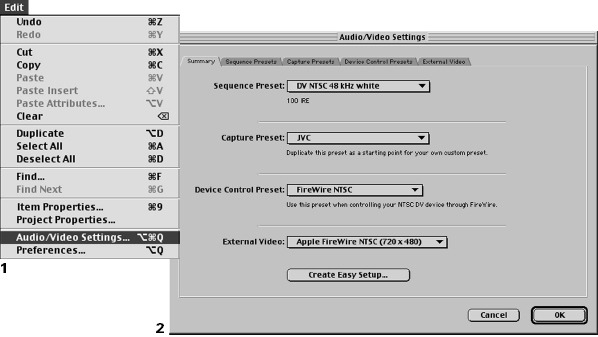
The Sequence Presets tab
Select the tab labeled Sequence Presets (Figure 3-27). Sequence is the term Final Cut Pro uses for individual editing timelines, as opposed to the Timeline window that sequences are used in. But in addition to being a linear timeline you edit items into, the sequence is also like a frame or window through which you watch what you have edited in the Canvas window. As you edit items onto the sequence Timeline, you’ll see them appear in the Canvas window and out the Firewire tube to the video monitor.
For Final Cut Pro, the preview of the sequence in the Canvas window is the video rectangle, or frame, of the medium the sequence is intended to be used in—the Web, a television, or even printed out to film and run through a projector. The size of the frame is defined by the width and height of the medium you are preparing it for, based on the number of pixels, as well as by the shape of those pixels.
The Sequence Presets tab lets you specify how Final Cut Pro treats the items in a sequence. In the Sequence Presets, we are defining what a Sequence is for Final Cut Pro. Any clips you later place in the sequence will be forced to fit into that definition. In order to be processed correctly, the dimensions of the media clip must match the Sequence dimensions you insert it in. If the dimensions do not match, there will be two problems. First, the clip will have to be rendered in order to play back correctly. Next, the clip will not fit the canvas correctly, being either too small or too large, depending on the mismatch between sequence and clip.
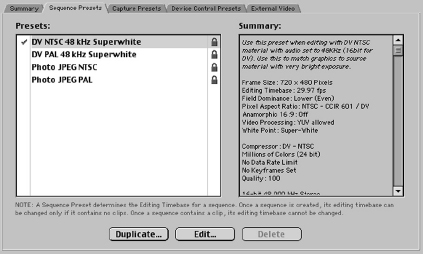
In addition to this, if the audio sample rates for your clip do not match those of the sequence or are just incorrectly assigned, you will experience crackling distortions, speed variations, and/or progressive audio/video sync issues. If you experience any of these problems while editing, you can bet that you made an error along the way in establishing the sample rate for the Sequence or Capture Settings. Unlike video settings, you will not receive a red render bar warning that your audio is set incorrectly.
Size and Sample Rate are not the only ways in which settings can be mismatched. There are many factors involved in proper playback of material in a Sequence. Information such as the codec being used, the frame rate, and letterbox settings have to be included here. Settings must match precisely to ensure trouble-free performance. If you are told you need to render after inserting a clip on the Timeline prior to having applied any effects to it, then you can be pretty sure that you got the settings wrong somewhere along the way.
Why are the Sequence Presets, which have to do with the Timeline, grouped in with what are obviously hardware settings? This is because the sequence is directly in line with what goes out through Firewire to the camera or deck. If the sequence is configured incorrectly, then the device at the other end of the Firewire chain will not be able to operate correctly, resulting in poor performance or failure.
That said, it is easy to set up the Sequence Presets correctly for Firewire. On the left of the tab, you will see a white window with four preset names: DV NTSC 48 K Superwhite, DV PAL 48 K Superwhite, Photo JPEG NTSC, and Photo JPEG PAL. These are the pre-installed presets. If you click on them one by one, you will see the summary information of the preset in the box on the right update to reflect the differences between the presets. The information in the box on the right is all the information contained in the preset you select on the left.
It is possible that you might never need a preset differing from either the DV NTSC 48 KHz Superwhite or DV PAL 48 KHz Superwhite settings. These are the most generic settings. Since most DV cameras record audio at a standard 48 K audio sample rate, chances are that you will never have to use another setting. But, as the rule of thumb states, our audio and video settings must match the source tape. We will step through the process and set up a sample preset that uses the exact same settings except for audio that was recorded at 32 KHz in the camera. We will make this a new preset that we can select if we ever encounter a situation in which we must work with 32 KHz audio instead of 48 KHz.
Using Duplicate for a settings preset
STEP 18
Select either the DV NTSC 48 KHz Superwhite or DV PAL 48 KHz Superwhite preset. At the bottom of the window, click on the Duplicate button. Instead of starting from scratch with a new preset, we will use a preset very similar to the one we need and change the few differing settings. Be careful to hit Duplicate rather than Edit. We want to create a new preset using the DV NTSC 48 KHz Superwhite or DV PAL 48 KHz Superwhite preset as a template, not change the existing preset.
STEP 19
After clicking the Duplicate button, a Sequence Preset Editor window will appear (Figure 3-28). This window will allow us to specify the unique settings that our new 32 KHz sequence demands. The first field will show that the Sequence Preset is currently named “DV NTSC 48 KHz Superwhite copy” or “DV PAL 48 KHz Superwhite copy,” depending on which video standard you have chosen. You will want to change this to “DV NTSC 32 KHz Superwhite” or “DV PAL 32 KHz Superwhite,” since in this example we will be setting up a preset for use with 32 KHz audio.
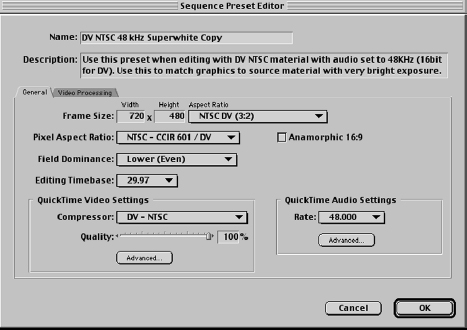
STEP 20
In the field immediately below this, type in a description of the preset. The description already present in the box outlines itself as “Use this preset when editing with DV (NTSC or PAL) material with audio set to 48 KHz (16bit for DV). Use this to match graphics to source material with very bright exposure.” Simply change the words “48 KHz (16bit for DV)” to “32 KHz (12bit for DV).” The description field doesn’t really affect anything in Final Cut Pro; it exists simply as a convenient description of the preset function.
Even though the rest of the information is set correctly with the exception of the audio sample rate, let’s step through all the settings and make sure they conform to our Firewire DV editing needs.
STEP 21
Frame Size
The Frame Size setting for Firewire DV should be 720 and 480 for NTSC or 720 and 576 for PAL for width and height and DV NTSC (3:2) or CCIR601/DV PAL (5:4). This is measured by width and height in pixels or by its aspect ratio. You will see that you can specify an exact size by entering numbers in the fields, or you can change the aspect ratio using a drop-down bar. You should always set the Frame Size by using the drop-down bar and setting the aspect ratio, rather than simply typing in the numbers, since these Frame Sizes are standard for NTSC or PAL.
Aspect Ratio and Pixel Aspect Ratio
The aspect ratio describes the shape of the screen based on the relative comparison of width to height in pixels. Aspect ratios are most commonly used to differentiate between the wider rectangle of the film screen and the tighter rectangle of video. They are also used to describe the actual shape of the pixels themselves, since, in the digital realm, pixels may be square or non-square, a subject we will explore later in this book. There are other common ratios for larger High Definition Television and smaller Web multimedia frame sizes, and you will find them all available in this drop-down bar.
Firewire DV always uses non-square pixels. For NTSC, this means that the Frame Size should be set for DV NTSC (3:2). For PAL, this should be set for CCIR601/DV PAL (5:4). The pixel dimensions will be set automatically when you choose the correct Aspect Ratio from its drop-down bar.
STEP 22
For Firewire DV, Pixel Aspect Ratio should be set to NTSC-CCIR 601/DV or PAL-CCIR, depending on the video standard you use. Pixel Aspect Ratio may seem a little redundant after having set the Frame Size, since we already told Final Cut Pro what the shape of the frame is which is based on the pixel’s shape. But we must also set this to determine the actual individual pixel shape as well. For Firewire DV, this should be set to NTSC-CCIR 601/DV or PAL-CCIR, depending on the video standard you use. Square should come into play only when the video is not to be sent out to Firewire video again.
STEP 23
Field Dominance
Anything using DV compression is always Lower Field Dominant. Field Dominance has to do with the way the lines are scanned in video. As we saw in the first section of this book, each frame of interlaced video is actually composed of two separate fields of video, each of which contains half of the lines of the complete video frame. The term Field Dominance refers to which of the two fields is scanned first. Although it would seem normal for the first field to always be scanned first, this is sometimes not the case. In fact, with Firewire DV systems and anywhere that the DV codec is used, the second field is actually scanned first. We call this Lower Field Dominant as opposed to Upper Field Dominant. This is also referred to as Second Field versus First Field and Even Field versus Odd Field. Either appellation is acceptable; different applications use differing nomenclature, but the implications are the same. For your Firewire DV setting, you always want to set this to Lower (Even).
STEP 24
Editing Timebase
For Firewire DV NTSC, the Editing Timebase will always be 29.97, and for Firewire DV PAL, it will always be 25. The Editing Timebase is the basic rate in frames per second that your sequences will be divided into. If you click on the drop-down menu, you will see choices from 15 FPS to 60 FPS. This must be set correctly. Final Cut Pro must know how many divisions of a second there are.
Because Final Cut Pro is not limited to any specific hardware configuration, it offers much flexibility in the specific frame rate. One can edit using 24 FPS, the native frame rate of film, just as easily as using 29.97 FPS, the native rate of NTSC video, or 25 FPS, the native rate of PAL video. Beyond this, your sequence can be divided up into lower rates for multimedia destinations or much higher ones for other specialized uses. The main thing to be aware of is that the frame rate must match the frame rate of the media in use. For Firewire DV NTSC, this will always be 29.97, and for Firewire DV PAL, this will always be 25.
STEP 25
Anamorphic 16x9 Checkbox
If you shot your footage in Anamorphic 16x9, you will want to enable this setting; if not, you will want to disable it. If at any point your footage appears to be uniformly stretched such that objects appear thinner than they actually are, you probably have set this incorrectly.
To the right of these settings is a check box for Anamorphic 16x9. Many cameras allow the shooter to use a different window size, referred to as widescreen. Although not exactly the same dimensions as widescreen cinema, Anamorphic 16x9 gives the feel of cinematic, letter-boxed framing, which many find aesthetically pleasing.
Unlike the idea of square and non-square pixels, Anamorphic 16x9 does not actually change the shape of the pixel to alter the screen shape. The footage is stretched in the camera, either through a lens or a digital process, and is then squeezed when brought into Final Cut Pro. The result is no change in the amount of information in the frame; the composition of the frame will be exactly the same whether16x9 is on or off. However, if the footage was shot in 16x9 and the sequence is not set to reflect this, the footage will appear stretched and distorted.
STEP 26
For Firewire DV media, the QuickTime Video Settings should be set for either DV-NTSC or DV-PAL, depending on the system in use. Quality should be set to 100 percent. This is where you define the codec to be used in a sequence. Hitting the Advanced button brings up the standard Compressor codec window (Figure 3-29).
With most codecs, the Compressor window is the location in which the settings for any particular codec can be tweaked for optimum efficiency. With the Apple DV codec, however, the compression is uniform, allowing no adjustments. Opening the Compressor window just shows us the same codec-choice drop-down bar and the quality slider. In a later chapter on exporting, we explore some of the other codecs and their settings, but for the Sequence and Capture Settings, we want to stick with the Apple DV codec.

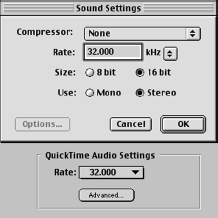
The QuickTime Audio Settings
Finally, the QuickTime Audio Settings must be addressed. This setting depends on the media you will be using in the sequence.
STEP 27
Since we are setting up a Sequence Preset for Firewire DV using 32 KHz sampled audio, change 48.000 to 32.000.
There are actually many more choices available than the three visible in the initial drop-down bar, which offers only the principal rates of 32 K, 44.1 K, and 48 K. The other rates are behind the Advanced button and allow many lower sample rates that can be useful when working with media destined for the Web or CD-ROM distribution (Figure 3-30). But remember that the sequence settings must match the media. If you want to work with lower sample rates for some reason, you will want to change the sample rate elsewhere, such as the Export function we will experiment with later. As long as you are working with Firewire DV, this sample rate should match the media.
Return to the Sequence Presets tab
STEP 28
After completing all the settings for the 32 K Sequence Preset copy, hit OK and go back to the original Sequence Preset window. Our new 32 K preset now appears in the presets window. Put the little gray check mark to the left of whichever preset you will need to use (Figure 3-31).
Remember that setting up the 32 KHz preset was only an exercise. If your audio on the DV tape was not recorded at 32 KHz, this would be the wrong preset. Only you can know which is appropriate based on what you have recorded on your tapes. If you aren’t sure, play the tapes back in your camera or deck and check before you capture them.

Now move on to the Capture Presets tab (Figure 3-32). Since the Capture is the link between the media on your tapes and the media being available for editing in the sequence, capture settings really determine whether the media works correctly once in your system. If they are not set correctly, the media in your projects will misbehave, causing you no end of grief.
The Capture Preset setup window procedure is very similar to the Sequence Preset window. There are initial presets for generic DV Firewire capture with a sample rate settings for 48 K for NTSC and PAL. In addition, there is a Generic Capture Template for setting up presets that vary from the pre-installed DV Firewire presets. We will use the Generic Capture Template for setting up a DV Firewire Capture Preset at 32 KHz.
STEP 29
Using Duplicate for a Template
Select the Generic Capture Template, and hit the Duplicate button at the bottom of the window. This will open up the Capture Preset editor window, where you will define every setting for the new DV Firewire 32 KHz Capture Preset (Figure 3-33).
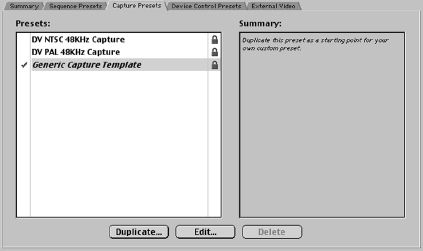
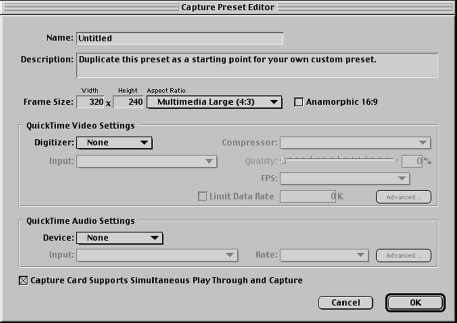
In the first field at the top of this window, name the preset “DV Firewire 32 KHz.” In the Description field, type in a description identifying this preset as the DV Firewire Capture Settings for DV using 32 KHz audio.
STEP 31
Frame Size and Aspect Ratio
The next field and drop-down bar are for the Frame Size and Aspect Ratio of the media to be captured. Since this will be standard DV Firewire, select “NTSC DV (3:2)” or “CCIR 601/PAL (5:4),” depending on your video standard.
Anamorphic 16x9 Checkbox
Next to the Frame Size and Aspect Ratio setting is a checkbox for the use of Anamorphic 16:9. There are two different situations for the Anamorphic 16x9 setting in the Capture Preset. If you shot your footage in a DV camera that had a widescreen mode, Final Cut Pro can automatically detect this based on data in the DV stream coming from the DV tape. You do not have to tell Final Cut Pro that this sort of footage is 16x9 in the Capture settings.
On the other hand, if your Anamorphic 16x9 footage was created using a special lens on the camera, an option that potentially offers higher resolution, you must have this box checked when capturing the footage. Since such an Anamorphic stretch would be a physical lens effect and not a digital one, Final Cut Pro cannot see that it is stretched, so you have to inform it of this in the Capture Preset. You may want to create yet another Capture Setting preset named DV Firewire Widescreen that has this checked for convenient use when using such lens-distorted footage. If you do not have Anamorphic 16x9 checked when using such footage, or if you have it checked when not using such footage, you will end up with distorted results on capture.
STEP 32
If your footage is not Anamorphic 16x9, disable the box. If your Anamorphic 16x9 footage was created using a special lens on the camera, you must have this box checked when capturing the footage. If you shot your widescreen 16x9 footage in a DV camera using a digital widescreen mode setting, you do not have to enable the Anamorphic 16x9 checkbox.
The QuickTime Video Settings
Next, you will see a group of settings named QuickTime Video Settings (Figure 3-34). This is where you will define what the video source, or Digitizer, will be for the Capture Setting preset.
STEP 33
Unless you have other hardware on your system, you will be able to choose only between None and DV Video. If your DV camera or deck is not turned on and connected to the Firewire port of the Macintosh, you will not be given the option of DV Video, because Final Cut Pro can configure only hardware that it can communicate with.
After you have selected DV Video, you will see that other boxes in the QuickTime Video Settings have become available. Final Cut Pro can identify the brand name of the device it will capture from, so underneath DV Video it will likely display the DV deck’s manufacturer (e.g., Sony DV or JVC DV).
To the right of these fields, you will find a Compressor area. You must identify for the Capture Setting Preset the codec you intend to use, as well as the quality setting and its frame rate. Since we are using DV Firewire capture, these settings are pretty easy.
STEP 34
The Compressor should be set for either DV NTSC or DV PAL, depending on the standard in use. The Frame Rate should be set for 29.97 or 25, depending on whether you are using NTSC or PAL. Quality should be set to 100 percent.
The Advanced button underneath the Compressor settings simply takes you to the standard codec settings dialog box we just visited in the Sequence Preset QuickTime Video Settings. In most cases, you will never have to use this Advanced box until you add additional capture hardware or software to your system. Such hardware or software may have additional settings that must be configured for proper use. Firewire DV, however, requires no more configuration than simply choosing it as your Compressor.
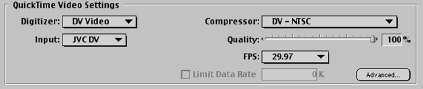
The QuickTime Audio Settings
Underneath the QuickTime Video Settings, you will find the QuickTime Audio Settings (Figure 3-35). As with video, the audio capture settings must be the same as the media that is being captured to avoid problems later. The Template we are using here defaults to None for audio, and we will have to change it.
Unlike the QuickTime Video Settings, if your Firewire device is not plugged in and turned on, you will still see options for capturing audio. If you click on the Source dropdown bar, you will see two other options for capturing audio—Built-in and Internal CD.
“Built-in” refers to the fact that your Macintosh has a high quality 16-bit audio card built in to the motherboard. Not only can the Macintosh send high quality audio out to speakers for your listening pleasure, it can also capture audio through a properly configured USB microphone connection. This can be handy for getting sounds into Final Cut Pro very quickly without resorting to recording to tape and then capturing. The highest sample rate that the built-in sound card can capture audio with is 44.1 K, which is quite good, although somewhat lower in quality than the standard DV camera and deck sample rate of 48 K. You should not mix sample rates when working in Final Cut Pro sequences, but you will be provided a method later in the book for safely changing the sample rate of a file you capture or otherwise introduce to the project at 44.1 KHz.
“Internal CD” refers to the CD- or DVD-ROM drive in the Macintosh. Since the Macintosh is aware that the CD-ROM is potentially a source of digital audio files, it includes this CD or DVD-ROM drive as an option anywhere that QuickTime Audio is addressed in the system. However, since Final Cut Pro captures audio in a strictly linear fashion similar to a tape recorder, the Internal CD is more or less useless for our purposes as a capture setting. We will see later that it is much easier and faster to manually import audio tracks from a CD than to capture them through the built-in audio card.
STEP 35
For our Firewire DV capture, we want the QuickTime Audio Settings to be DV Audio. Once DV Audio has been selected, the other panels become active in the QuickTime Audio Settings. Immediately beneath the Device drop-down menu, you may choose an input arrangement. The choices are First 2 Channels, Second 2 Channels, and Mix 4 Channels. This allows you to select the proper tracks to capture if you recorded the optional extra two tracks using 12-bit 32 KHz audio described in the first chapter in the section on digital audio. Select First 2 Channels if you are using 32 KHz but have not recorded extra tracks to the DV tape.

Next, you need to set the Rate, which refers to the audio sample rate of the material you will be capturing. You could easily set this at 32.000 and be done with it, but the Advanced button for the QuickTime Audio Settings actually deserves some examination. Since you can also set the sample rate in the Advanced settings, we will do so there.
STEP 36
Click on the Advanced button and you will be greeted by the QuickTime Audio dialog box. In the top left-hand corner, you will see a drop-down bar that reads either Sample or Source. Set it to Sample for the moment. When set to Sample, you have the option of setting the capture sample rate to 32.000, 44.100, or 48.000. Since we are creating a preset for 32 KHz audio, we will set this for 32.000.
Beware that because Final Cut Pro regards CDs as a digital audio source, 44.100 is selectable as a sample rate, even though most, if not all, DV cameras and decks limit the sample rates to 32 KHz or 48 KHz. It should be noted that some DV decks can in fact record audio using 44.100 sample rate, although this involves a nonstandard system of juggling the sample rate as the audio is played back, a process referred to as using unlocked audio. Under most circumstances, though, if the sample rate is set for 44.1 KHz and your media was not recorded at that sample rate, you will end up with video and audio synchronization problems.
Changing the drop-down bar from Sample to Source yields the same choices we had available in the Device drop-down bar in the QuickTime Audio Settings initially, so there is no reason to change them here. Looking to the right of the box in either Sample or Source, however, shows speaker settings (Figure 3-36). These settings control how QuickTime interacts with the Macintosh’s built-in audio and the speakers you have connected to the Macintosh.
Although it may seem strange, you will not be using the speakers that are connected directly to the Macintosh to monitor audio as you edit. When editing using Final Cut Pro and Firewire DV, the video and audio are both sent out through Firewire to the deck or camera simultaneously. You will be listening to the audio through whatever speaker arrangement you have attached to the deck or camera—an audio mixer, an amplifier, or simply the same television monitor you are sending the video to. Unless you disable sending video out to Firewire, you will always be sending audio out to Firewire.
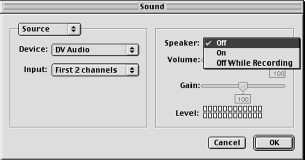
There is one exception to this rule. When you are actually capturing video and audio, it is possible to have the audio streaming to the Macintosh’s speakers as the video and audio plays in the Capture Window. In all likelihood, you may hear an echo effect caused by the fact that you hear the Macintosh speakers play the same thing the deck or camera just played, delayed by a few thousand samples or a fraction of a second. This occurs because it takes a short time for the audio to pass from the deck through the Firewire bus and get processed on the motherboard before playing through the speakers. This delay is referred to as latency. A more critical issue is that capturing audio with this speaker setting set to On has in the past resulted in crackling audio in some cases. In any event, there is no reason to have it enabled, and the Speaker setting should be set to Off.
Capture Card Supports Simultaneous Play Through and Capture
Finally, at the bottom of the Capture Settings Preset window, there is a checkbox labeled Capture Card Supports Simultaneous Play Through and Capture. This setting is irrelevant for users of Firewire DV, because we are not using a capture card. Some third-party capture cards are able to capture video into Final Cut Pro and send out another video signal to a monitor simultaneously. Firewire DV users can watch their video as it plays back on the deck or camera it is being captured from, making the setting irrelevant. Enabling or disabling the box will make no difference.
STEP 37
Return to the Capture Presets Tab
After entering all of these settings, hit OK and return to the Capture Setting Preset window (Figure 3-37). You should now see your newly created DV Firewire 32 KHz Preset. If you wish to use this new 32 KHz preset, make sure that the little gray checkmark is next to its name. Otherwise, place it next to the DV 48 KHz preset for NTSC or PAL, depending on the video standard you use.
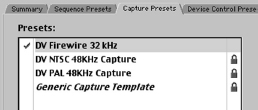
The next tab that you must set is for the Device Control Presets (Figure 3-38). This tab is concerned with Final Cut Pro’s ability to remotely control the deck or camera you are capturing from. As we saw earlier, DV Firewire carries timecode and Device Control data along with the video and audio. Correctly configuring the Device Control Presets allows you to take advantage of this feature, adding both security and convenience to your working process.
As with other Preset tabs, Final Cut Pro preinstalls several default settings that work with many generic editing setups. The preinstalled presets are Firewire NTSC, Firewire PAL, and Non-Controllable Device. The Firewire NTSC and Firewire PAL presets will work with nearly any DV camera or deck that is approved for use with Final Cut Pro, although some devices may need a little tweaking for perfect operation.
Non-Controllable Device
Non-Controllable Device is a preset for working with a DV device that does not generate timecode, or is used in situations in which timecode could hamper your capture operations. DV converter boxes convert analog video and audio into DV data that can be captured using the Firewire connection and Final Cut Pro. However, most do not generate DV timecode or Device Control data along with that DV data stream. Unless you tell it not to in the Device Control Presets tab, Final Cut Pro always looks for timecode and Device Control data in the Firewire data stream prior to a capture. In order to capture video through Firewire from a source that does not generate timecode and Device Control data, you must tell Final Cut Pro to stop looking for it.
Suppose you are working with a deck or camera that does generate timecode and Device Control data but has lots of timecode breaks on the tape. When there is a space between two recorded segments on a tape in which nothing is recorded, we say that there is a timecode break on the tape. This is easy to identify on most consumer and prosumer DV cameras and decks, because when the device begins recording on a tape where there is no timecode already present, the deck or camera sets the timecode of the first frame recorded to 00:00:00:00. If recording is begun where timecode already exists, the device will pick up the timecode number that is present and continue from that number, a process called regenerating timecode.
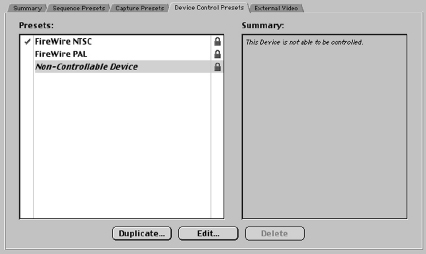
You can therefore easily determine whether your timecode is clean (i.e., has no breaks) by watching the numbers as the tape plays. As long as the displayed timecode number never resets to 00:00:00:00 (or skips a large number of frames), you can be reasonably sure that your tape has no timecode breaks. In the final chapter of this book you will be shown a nearly foolproof way to avoid such timecode breaks on your tapes completely.
If you have timecode breaks that keep you from being able to capture specific areas of your material, turning off Device Control may provide some flexibility in overcoming the problem. In general, though, the best medicine is always prevention. Avoid timecode breaks, and always work with Device Control enabled. Taking advantage of timecode will make your editing experience much safer and more efficient. Remember that capturing footage with timecode breaks can have a consequence with the audio sample rate and the Sync Adjust Movie feature of the Preferences. Timecode breaks are just no good.
Using Non-Controllable Device as a Template
We will create a special preset based on a few of these tweaks. We will use the Non-Controllable Device as a template, since it will start us with a clean slate.
Although the presets for Firewire NTSC and PAL should work quite well for most users of Firewire in most situations, there are a few tweaks that could eliminate rare problems. Instead of using the generic default presets, we will set a bullet-proof preset based on the defaults that Final Cut Pro preinstalls.
STEP 38
Select the Non-Controllable Device preset and click the Duplicate button to create a copy for our specialized preset (Figure 3-39). In the Name field, type in “My DV Device” as the name of your preset. If you have more than one camera or deck, you can make up a preset for each one—for example, a “Sony Camera” and a “JVC Deck.” In the Description field, type in a short description of which device the preset will be used with.
Protocol
The first choice you must make is Protocol. This drop-down bar contains a long list of Device Control Protocols that Final Cut Pro can access. Only the first two choices, Apple Firewire and Apple Firewire Basic, are Protocols that are accessed through Firewire. Although most DV decks and cameras are compatible with the Apple Firewire Protocol, some older cameras are more stable with the Apple Firewire Basic Protocol. Check the Apple Final Cut Pro Web site for details about which to use for your particular DV device.
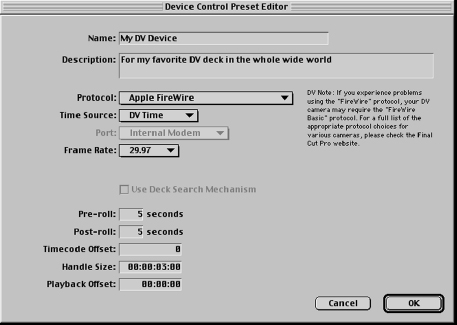
The remaining items on the drop-down bar are Device Control Protocols to control a deck through a serial connection. Before Firewire (and still, in many cases), nonlinear editors performed deck control by communicating with the device through a connection that is very similar to the way a computer connects with a phone modem or a printer. In fact, most expensive edit decks still require this sort of Protocol for deck control.
Although your Firewire DV device does not need a serial connection for Device Control, if you have other analog or digital equipment (e.g., Betacam or other professional formats that you want to use with your Final Cut Pro station), you may want to look into this option. If the deck has a serial connection and is controllable, a serial controller adapter could put that reliable, though Firewire-deficient, deck into action. To figure out which serial Protocol would be correct in such a situation, consult the user manual for the deck and serial adapter.
Time Source
The next drop-down bar you must configure is the Time Source. This refers to the type of timecode to be used by the Protocol you have selected. If you have chosen Apple Firewire or Apple Firewire Basic, your only choices will be Longitudinal Timecode (LTC) and DV Time. If your timecode was generated onto the tape by a DV camera or deck, select DV Time here.
If you chose Apple Firewire or Apple Firewire Basic for your Protocol, the Port dropdown menu should be grayed out. This is because the Port defines where the timecode data is to arrive in the Macintosh. Since Firewire Protocol works only with the Firewire ports, there is no optional port here. If you have selected one of the serial connection Protocols, you will see that there are two other ways that timecode and Device Control data can be communicated to the Macintosh: (1) the Internal Modem, which can be converted into a serial device connection, and (2) the optional Infrared Port.
Frame Rate
The next field is the Frame Rate. As we are working with timecode data as well as Device Control, it is imperative that this be set correctly. For NTSC, this should be set for 29.97. For PAL, it should be set for 25.
Pre-Roll and Post-Roll
The first two fields in the lower section of the Device Control Preset tab are the Pre-Roll and the Post-Roll. You can enter values in seconds in these fields. The default values are three seconds, but you will generally want to set these slightly longer. Pre-Roll and Post-Roll are required to make sure that the tape in the deck is crossing the tape head at the proper speed. This is referred to as locking the deck servo, because after a few moments of getting up to speed, the servo motors are locked in to the precise tape speed required for proper playback. We don’t have to tell it what that speed is, but we do have to allow it the time to get there.
Whenever we are dealing with tapes that have timecode, whether analog or digital, it is imperative that the tape crosses the playhead at the proper speed. A certain amount of Pre-Roll allows the deck to make sure that it is playing back at the proper speed before any capturing begins. Thus, all decks utilizing timecode require a certain amount of Pre-Roll to function correctly. Unfortunately, different decks require differing amounts of time to reach servo lock, so your deck may need more than the three seconds of Pre-Roll that are applied in the default Preset. A value of five seconds is generally acceptable for most decks. If you receive “unable to lock deck servo” error messages later on when capturing, chances are that your Pre-Roll was not set long enough. Post-Roll should generally match Pre-Roll settings, although the setting is less critical since it refers to how long the tape continues to roll after a capture.
One common problem that Pre-Roll presents some users is that the Pre-Roll amount determines how close to the beginning of a tape you can capture from. If the beginning of the tape has the timecode value of 00:00:00:00 and your Pre-Roll value is set to five seconds, the earliest footage you can capture with Device Control and timecode is 00:00:05:00. That means that the first five seconds of the tape are inaccessible, because there wouldn’t be enough time for a five-second Pre-Roll before capturing begins.
The problem can be further compounded by timecode breaks resulting from sloppy recording techniques. As we said earlier, timecode breaks reset the timecode clock such that a break in the footage on a tape gives the new footage a timecode value of 00:00:00:00. Important footage existing 30 minutes into your tape could end up as inaccessible as the first five seconds of your tape. The solution, as always, is preventative medicine. Always put a 5- to 10-second head and tail on the end of each and every shot to make sure that you always have a little buffer for your five seconds of Pre-Roll. Always be careful to begin recording on the tail of the last shot to avoid ending up with timecode breaks.
Timecode Offset is a very important though often ignored feature. If you care about the frame accuracy of your captures and edits, you should make sure that the Timecode Offset is set properly for your deck or camera. Although video and timecode data both stream into the Macintosh through the Firewire connection, there can be a slight difference between the times the video and the timecode data for a frame are passed through and written to disk. Although in many cases the difference is less than one frame, in some cases it could be off by several. This could result in the timecode numbers for clips that you want to capture actually being wrong even though you log them correctly.
Determining the Timecode Offset for your equipment is actually pretty easy, although it requires capturing a clip, which we have yet to do. After completing the lessons in this book, consult the Apple Final Cut Pro manual for a detailed description of the process. If, upon using the method described there, you determine that a Timecode Offset is necessary, simply return to your special Preset and enter one.
Handle Size
The next field, Handle Size, is actually a preference for having the system grab a little extra video during a capture than what you asked for when you logged timecode numbers for the clip. If you set a value for handles of 15 frames, Final Cut Pro will always capture 15 extra frames at the beginning and end of every clip you capture. Although it may seem like a waste of drive space, it is standard practice to capture digital video with at least 15-frame handles, and many editors use much higher settings of up to two or three seconds.
If you need a few extra frames once you have finished capturing and are starting to edit, you’ll be able to access them without having to go back to your tape and recapture. This happens far more frequently than most of us are willing to admit. Despite the fact that the extra footage is available for editing purposes, it remains hidden, and the clip in question will always show the in and out points we logged until we change them. In addition, a transition requires handles when being inserted between two clips. Adding valid handles when you capture can make your editing possibilities a lot more flexible when the time comes.
Playback Offset
The final field is the Playback Offset. When you are finished editing your piece, you will Firewire it back out to DV tape to record it. There are a few different ways to do this, one of which uses a Device Control function called Edit To Tape. Edit To Tape allows you to simultaneously play back your edited program from the Timeline and remotely begin recording on to DV tape. Since this requires Device Control, any inconsistency between Deck and Final Cut Pro must be addressed.
Similar to the Timecode Offset, Playback Offset compensates for the fact that sometimes there may be a slight difference in when the playback of your edited piece begins playing in Final Cut Pro and when the Device-Controlled deck or camera begins recording.
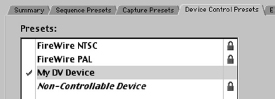
As with the Timecode Offset, you will need to determine whether you have an offset to compensate for and, if so, you will enter that value in this field.
Under some circumstances, Final Cut Pro can accidentally duplicate the first frame of video being sent out to Firewire during an Edit-to-Tape operation. At the completion of the lessons in this book, you will have tested Edit to Tape. If you detect this behavior, use the Playback Offset to negate the duplicated frames.
After you have entered these settings, hit OK and return to the Device Control Preset tab (Figure 3-40). If you have your new Preset selected on the left side of the tab, the box in the right side of the tab will show the settings you established for it. Make sure that you have clicked the gray checkmark for the new preset and move to the next tab.
External Video
The last tab in the Audio/Video Settings is the External Video tab (Figure 3-41). This tab lets you determine how you will view your video as you edit in Final Cut Pro. There are two drop-down bars for this tab: View During Playback Using and View During Recording Using.
View During Playback Using
When you are editing in Final Cut Pro, you have several preview options: you can watch your progress on the computer screen, watch it on a video monitor connected to your DV deck/camera, or watch on both computer screen and video monitor simultaneously. Many people find it easier to evaluate their edited work on a full-screen video monitor rather than on a small box on the computer screen. If you have your Firewire DV device connected to a video monitor, you can watch the results as you work there by selecting Apple Firewire NTSC or PAL.
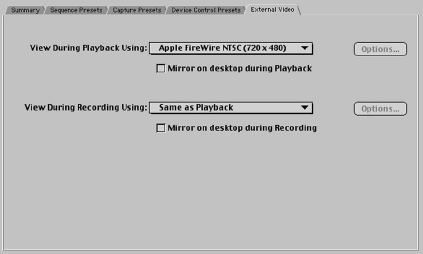
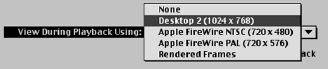
There are other available options in this drop-down bar. If you have no Firewire device connected to the Macintosh, you will want the View During Playback Using set to None. If you do not, Final Cut Pro will constantly search for the Firewire device that it is supposed to be previewing video out to. On not finding a DV device, it will ask you where the device is, which can be very disruptive. Setting the bar to None eliminates this behavior.
If you have a second computer monitor and video card connected to your Macintosh, you can also select Desktop 2 as the preview screen (Figure 3-42). Selecting Desktop 2 on the bar replaces the second computer monitor’s regular Desktop display with a low-resolution playback of the video being edited. This really pushes the processor hard, and the display has very low resolution, but it will work in a pinch.
Mirror Onto Desktop During Playback
Clicking on the checkbox labeled Mirror Onto Desktop During Playback has the system play back video on both computer monitor and out to Firewire simultaneously. Be aware that on some older and slower Macintosh models such as the Blue and White G3, you may take a performance hit by attempting to do this, resulting in a Dropped Frames error message. This is not the end of the world; it just means that your system cannot process and deliver video to both places simultaneously. Most new Macintoshes are powerful enough to deliver this performance though, and if you are receiving this message, you may need to review and make sure the rest of your system configuration and settings are optimized for best performance.
View During Recording Using
The View During Recording Using drop-down bar is very similar to the previous dropdown bar with the exception that it concerns where video is sent while outputting your Timeline to DV tape. If you have other hardware in your system such as a real-time card or a capture card, you can choose to send video to that while you are simultaneously recording your finished product to tape. The choices are Same as Playback (which simply uses the same setting as View During Playback Using), None, Apple Firewire NTSC, and PAL and Rendered Frames.
If you are using your DV deck or camera for editing and recording to tape purposes, you can simply leave this set for either Same as Playback or Apple Firewire NTSC or PAL. As with View During Playback Using, you may set the Mirror to Desktop during Recording to display on the computer screen as it records out to tape. Once again, be aware that on some systems performance may be compromised by Mirror to Desktop. Mirror to Desktop is somewhat gratuitous anyway when you are standing next to a full-size video monitor playing back the exact same thing.
Creating the Easy Setup: After this initial configuration
Return to the Summary tab
After completing the last tab, return to the Summary tab (Figure 3-43). Now that you have set each tab for a preset that you want to use, your selections should be reflected in each of the drop-down bars on the tab. If you have accidentally enabled a preset you don’t want to use, such as activating the DV 32 K Sequence Preset or Capture Preset that we created as an exercise, you can change it here quickly without having to go through the tabs again. Simply select the preset you want enabled by clicking on the drop-down bar for the preset type you need to change.
Create an Easy Setup
To make this even easier, we will now create an Easy Setup that automates the whole process so that when you start an editing session, you need choose only one drop-down bar item rather than going through the whole Audio/Video Settings list again. Although you still need to check your Scratch Disk Preferences each time you begin working, you will have to set only one menu bar item to get all the Audio/Video Settings in order.
In the Summary tab, make sure that you have selected the presets you want to use for your general working situation. You can make as many Easy Setups as you want, so go through one at a time and create new ones based on every variable you can think of—for example, using Sony camera, using a JVC DV deck, or using no DV device at all. When you go to edit, you’ll be able to easily switch between them.
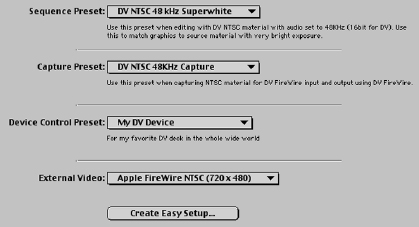

Look to the bottom of the Summary tab and locate the Create Easy Setup button. Click this button to bring up the Easy Setup dialog box (Figure 3-44). Type in a distinct name for the Easy Setup as well as a thorough description of it, including the particular hardware or software issues that make it necessary.
Click the Create button and you will be taken to a dialog box that requires you to save the Easy Setup (Figure 3-45). Make sure that this dialog box is set to save the Easy Setup file in the proper location, which is actually a folder inside the Final Cut Pro Data folder in the Preferences folder of the System Folder (Figure 3-46). If the file is not located in the proper folder, Final Cut Pro will not be able to find it when you wish to invoke it. Save the Easy Setup file using the same name you used in creating it and click Save.
To see your handiwork, go to the Edit drop-down menu and select Easy Setup or simply hit Control-Q for the shortcut (Figure 3-47). The dialog box that pops up will have a drop-down bar that includes your new custom Easy Setup. Changing your entire Audio/ Video Setting configuration is now as simple as one Control-Q keystroke and one dropdown bar choice. Continue creating Easy Setups until you have every possible configuration covered.

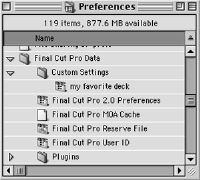
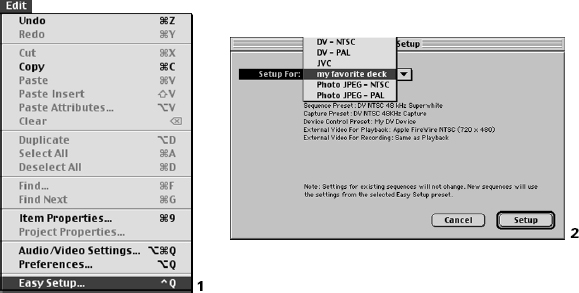
After the initial configuration—What you do and don’t have to do every time
After you have completed the initial configuration of all the Preferences and Audio/Video Settings, you needn’t go through the whole painstaking process again every time you begin editing, but obviously there are a few things you really need to revisit each time. What follows is a quick checklist to make sure that you get everything right before beginning work.
The checklist
STEP 1
When you begin an editing session, whenever possible start your project by double-clicking your project file rather than the application alias or icon. This keeps Final Cut Pro from potentially opening someone else’s project. If you do start from the application icon, be sure to close projects you don’t want to work with.
STEP 2
Go to the Preferences in the Edit drop-down menu. Glance through them to make sure that they are set the way you want them. Then take the time to set the Scratch Disk tab correctly, as described in this section.
STEP 3
Go to Easy Setup in the Edit drop-down menu and choose the Easy Setup that reflects your current working configuration; then move on to Project Setup.