
What is editing?
Now that you have media clips gathered in the project tab of your Browser window, what do you do with them? Edit, of course. But what is editing? Most good editors will tell you that it is telling a story with a series of images and sounds. This is certainly correct. Editing means being able to take isolated pieces of media and arrange them to communicate an idea. That is the gratifying and artistic part of the process.
But there is a technical aspect to editing that has more to do with the tools and less to do with your message. Video Editing is the process of modifying and arranging video and audio resources so that they play back in the linear order you desire. The flexibility and functionality of the tool you use to accomplish this really defines how easy it is to achieve that goal. And there are some fairly standard tools among nonlinear editors for accomplishing this.
Final Cut Pro is a very flexible editing application. It is open-ended enough to allow for many different editing styles. Your own working style will ultimately develop as you get used to the different tools available to you within the Final Cut Pro interface. Unlike the project setup process, which is very rigid and defined by the specific hardware and software configuration you work with, your editing style depends on how you feel most comfortable working and the type of projects you work on.
As we saw earlier, the various windows in Final Cut Pro are linked together based on the media passing through them. We load clips into the Viewer window to manipulate them prior to editing them into a sequence. The Canvas displays what is currently active in the Timeline. And the Timeline is the linear window, displaying the order of clips as they are played back. But this is only one way to view the usefulness of these windows.
The Timeline window is not only useful for arranging the horizontal linear order of clips, it can also be used to stack many vertical layers of video. We can thus control exactly which layer is seen and how much of each layer is seen, much as with the Photoshop layers discussed in the preceding chapter, but over time rather than as a still image. Clips can be loaded into the Viewer window for further manipulation directly from the sequence in the Timeline instead of being loaded from the project tab in the Browser window. You can trim or cut the length of a clip from directly where it sits in the sequence rather than trimming it in the Viewer. The Viewer can do more than simply load and manipulate clips from the project tab and the sequence. You can load up whole sequences as if they were individual clips and manipulate them as well. It will be up to the individual editor to become adept at fully utilizing the many possible methods of completing an edit. Let’s step through the process of building a first, simple edit.
Working in the Viewer window
The Viewer window
Editing is a process of arranging pieces of media so that they can be replayed in a particular order. To perform such an action, each media clip must be prepared based on two editing decisions: the clip duration (how short or long each clip will be in the sequence), and the edit type (how the incoming clip will meet the clip occurring before it and after it in the sequence).
Determining the duration of a clip is initially performed in the Viewer by setting In and Out points. When you originally captured the clip, you gave it In and Out points, but they were probably rough decisions. You will want to trim frames away and adjust the clip’s duration before you put it into the sequence. The beauty of a nonlinear editor is that such actions are very simple. Since we are dealing with a clip, we can put In and Out points wherever we want, or change them later on a whim if they don’t suit us.
STEP 1
Double-click one of your captured clips in the Project tab to load it into the Viewer. You will be happy to find that the playback controls of the Viewer utilize the exact same conventions as the Log and Capture window. The Viewer window, and all other windows in the Final Cut Pro interface, use the same keyboard navigation conventions (J-K-L, I, O, and Right and Left Arrow keys), even though they are playing back clips that exist on a hard drive rather than on an external tape.
As with the Log and Capture window, the top left timecode field displays the duration of the clip loaded into the Viewer. The top right-hand field displays the frame the playhead is currently parked on in the clip. Below the Viewer’s video window, you will see that there are no timecode fields for In and Out points, which have been replaced by a few buttons as described next.
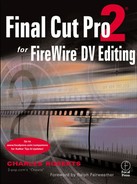
Match Frame button
The first button on the left is the Match Frame button (Figure 5-1). If a clip loaded into the Viewer window is already being used somewhere in a sequence, the Match Frame button will call up the sequence in the Canvas and Timeline windows, and it will place the sequence playhead on the same frame of the clip in the sequence that the playhead is parked on in the clip in the Viewer window. It is used for quickly finding the exact same frame that is being used elsewhere in a project. This is an invaluable tool if you want to make sure you are not accidentally reusing footage. You will find that there is also a similar Match Frame command for the sequence that allows you to call up a clip in the Viewer.
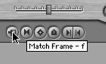
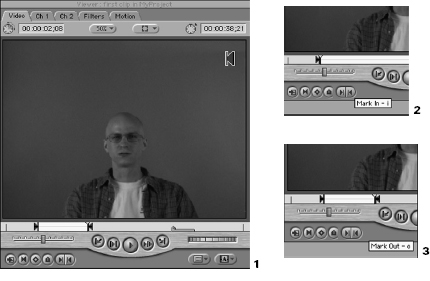
Mark Clip button
The next button, the Mark Clip button, is like a quick reset button for In and Out points in the clip (Figure 5-2). Clicking it immediately places In and Out points at the beginning and end of the clip. If you want to quickly clear the In and Out points you have already placed in the clip, or if you know that you want them to encompass the entire clip, click this button. You will see two sideways triangles appear in the clip’s timeline area defining the duration of the portion of the clip to be used in an edit.
Of course these points are totally malleable, and setting them is as temporary as you want it to be. You can grab the points themselves and move them manually, set them using the In and Out point commands to be described in a moment, or simply Mark Clip them back to the beginning and end limits of the media file associated with the clip.
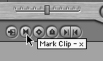
Add Keyframe button
Add Keyframe, the next button, allows you to quickly manipulate the clip’s physical attributes that are located in the Motion tab of the Viewer window (Figure 5-3). It’s simply a shortcut for defining a change in the way the clip’s video and audio is displayed or heard. Keyframing will be addressed in more detail in the chapter on Compositing and Special Effects.
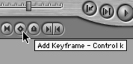
Add Marker button
Add a Marker applies a Marker to the frame on which the Viewer playhead is currently parked (Figure 5-4). Markers are very useful tools for editors. Although they do not affect playback at all and are visible only to the editor of the clip in the Viewer window, Markers allow you to insert detailed information about a frame or entire sections of your clip. Do not confuse the Markers with the Mark Clip button. Mark Clip addresses In and Out editing points for the clip, while Markers are just accessory information about the clip that is linked to a frame or range of frames.
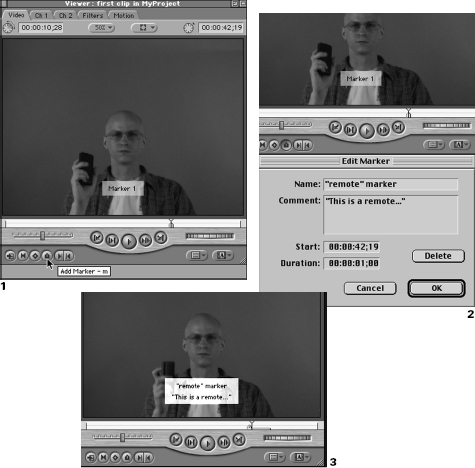
Click this button to add a Marker to the clip loaded in the Viewer window. Then, making sure that you see the word Marker 1 in the video window, press the M key (if you do not see the Marker 1 in the Viewer’s video window, move the playhead around the Marker point in the Viewer playhead timeline until you see it). This brings up the Edit Marker dialog box.
STEP 3
Here in the Edit Marker dialog box, you can rename the Marker anything you want, type a message about the area covered by the Marker, and give it a duration so that the details of the Marker can be clearly linked to more than one frame. All this information will be displayed in the Viewer window whenever the Viewer playhead is in the Markered area of the clip. Best of all, the Marker does not affect your edit at all. It only provides another means of adding information about the clip so that you can be better organized.
Adding Markers to clips is especially useful when two or more editors collaborate on a project. Since they may not be working at the same time, it’s often critical to leave notes about specific footage that cannot be missed as the editing process moves forward. Markers, it will be recalled from the last chapter, can also be set in the clip during the Log and Capture process. Those Markers will still exist within the clip after capture, being available to the editor long after the process of logging is completed. This is an excellent way for producers to communicate their desires for a clip’s manipulation to the editor, who may start working on a project long after the producer has become unavailable for questioning.
In and Out Point buttons
The remaining two buttons here are the In and Out points for the clips (Figure 5-5). The In and Out points will determine the first and last frame from this original, or Master clip, that will be used when the clip is edited into the sequence. The idea of Master clip and subclips is important here. The clip you load into the Viewer window from the Project tab is what is referred to as a Master clip. The Master clip is the original clip brought into the project that contains all the footage you choose your edits from. It likely contains far too much footage and must be whittled down using In and Out points before moving to the sequence.
A funny thing happens, though, once this Master clip is dragged from the Viewer window to the sequence. Instead of the Master clip itself appearing in the sequence, a subclip, or an edited and shortened version of the Master clip, is created in the sequence. This subclip is exactly like the Master clip in the Viewer it was created from, with one exception. When you load the Master clip into the Viewer window, you see all the frames of the clip, regardless of where the In and Out points are positioned. But the new subclip in the sequence uses the In and Out points you applied in the Viewer to determine the beginning and end of the clip on the sequence.
The Master clips and subclips used here should not be confused with the Final Cut Pro Subclip, which is a special command to be discussed later. The use of Master and subclip here is standard usage for describing the way that any nonlinear editing systems relate an initially captured clip to subsequently edited versions of that clip. The reason for belaboring the point is to make the reader aware that the clip edited into the sequence is not the same clip as the one in the Project tab or the Viewer, although they relate back to the same media file on the media drive. You can create as many subclips from a Master clip as you wish, and indeed you do so each time you drag a Master clip from the Viewer window into a sequence.
Remember that the Log and Capture keyboard conventions apply in the Viewer window as well, so use the I and O keys to set the clip’s In and Out points and the J-K-L keys to shuttle around the clip quickly. Hitting an In or Out point clears the previously selected In or Out point, so you can constantly reset them to your heart’s desire.
Drag and Drop to the Sequence: Insert and Overwrite
Once you have selected a new In and Out point for the Viewer window clip, it’s time to edit it into your sequence. There are a couple of ways to do this, and the best way really depends not only on how you like to edit but what sort of project you are working on. Once you master the two main methods, you’ll be able to judge which is best suited to any particular situation.
The first and most basic method is to simply drag the clip from the Viewer video window into the sequence in the Timeline window.
STEP 4
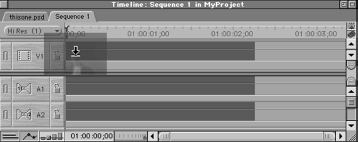
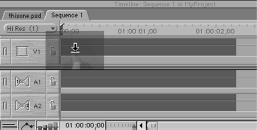
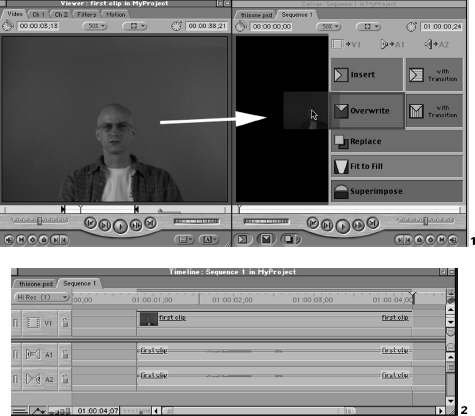
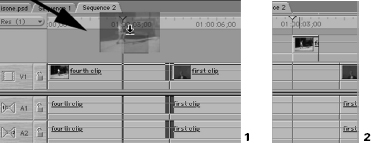
Click in the video window of the Viewer, and drag the clip down to the sequence without releasing the mouse button (Figure 5-6). Keep the mouse button pressed as you move it around the sequence, and watch the mouse pointer change shape as the sequence prepares to receive the clip.
As you drag the clip around the sequence Timeline, a ghost of each of the clip’s video and audio tracks appears there, showing you which sequence tracks the clip will be dropped into if you let go. Notice that the ghost clip may also appear to sit outside the visible tracks in the sequence. This is because Final Cut Pro will allow you to drop the clips where a new video or audio track should be, and then it will automatically create the new track to accommodate it.
STEP 5
Continue to hold the ghost clip so that it appears to sit in Video 1 and its audio tracks sit in Audio 1 and 2. Move the mouse pointer around the base line of the tracks in the sequence, and pay close attention as its shape changes (Figure 5-7).
Notice that depending on where in the sequence track you hold the ghost clip, the mouse pointer sometimes appears as a white arrow pointing either down or to the right and down. This indicates whether the edit you accomplish here will be an Overwrite or an Insert edit. Insert and Overwrite are the two most basic edit actions in a nonlinear system.
An Insert edit, represented by the “right and down arrow” mouse pointer, neatly slips your clip into a sequence. If the sequence already contains clips, Inserting will move all those occurring after the edit In point (the frame where the sequence playhead is parked) over to make room. If the sequence playhead was parked on a frame in the middle of a clip, that clip will be split into two sections, and the section of the clip after the playhead position will be moved to the right to make space for the incoming Inserted clip. No frames or clips are removed from the sequence; clips occurring after the edit In point are merely moved further down the Timeline.
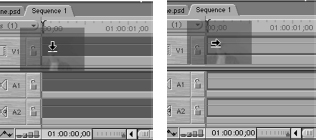
An Overwrite edit, represented by the “down arrow” mouse pointer, lays the clip down wherever you drop it in the sequence regardless of what is currently sitting on the Timeline. If any clips occupy an area of the sequence where the incoming clip will sit, it overwrites them. Unlike the Insert edit, which maintained the same clips in the sequence by moving them out of the way, the Overwrite edit deletes any frames of any clips in the sequence that it encounters.
The fundamental difference is that Insert editing changes the duration of the sequence. Since the new clip moves everything over to the right and adds its duration to the sequence’s total duration, the result is more footage in the sequence Timeline. Overwrite, on the other hand, keeps the duration of the sequence exactly the same, since it is replacing whatever clip it overwrites with itself. No clips are moved over to compensate, and the duration stays the same unless the overwrite clip extends beyond the clips it is overwriting. These two types of editing require more than one clip to highlight the difference between them.
STEP 6
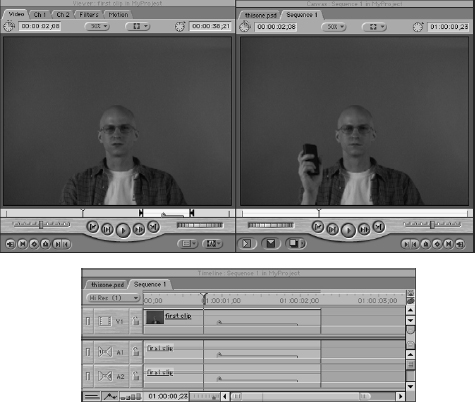
Using either the Insert or the Overwrite arrow, drop the clip you dragged from the Viewer window onto the first frame at the beginning of the sequence so that there is only one clip in the sequence (Figure 5-8). If there are no clips present in the sequence, the effect of Insert and Overwrite is exactly the same, since there is no clip to overwrite or insert into.
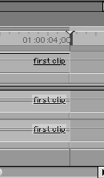
Notice that the clip, once dropped in the sequence Timeline, appears in the Canvas window (Figure 5-9). Wherever the playhead is moved to in the sequence Timeline, the playhead in the Canvas moves there as well; conversely, when you click and drag the playhead in the Canvas, the playhead in the sequence Timeline moves around, mirroring the action in the other window. We say that the Canvas window is a video preview of the sequence in the Timeline window.
For this example, we will edit in the same clip already loaded into the Viewer window, although you could load another clip and set In and Out points for it just as easily. Until you close the Viewer window or load another clip into it, the previous clip you loaded will still be sitting there.
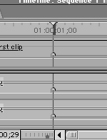
Play through the clip in the sequence and park the playhead on a frame somewhere halfway through the clip (Figure 5-10). The position of the playhead will be parked on the target frame we intend to drag the new incoming clip to in the sequence.
Return to the Viewer window where your previous clip is still loaded. Once again, click and drag the clip from the video window and move it down to the sequence without releasing the mouse button. When you bring the ghost clip down to the area where you previously parked the playhead in the first clip, the mouse pointer will snap to the playhead in the sequence timeline (if the clip does not snap to the playhead in the sequence window, hit the N key to enable Snapping, which may have been disabled. The Snapping feature will be more thoroughly described further on in the chapter.)
STEP 9
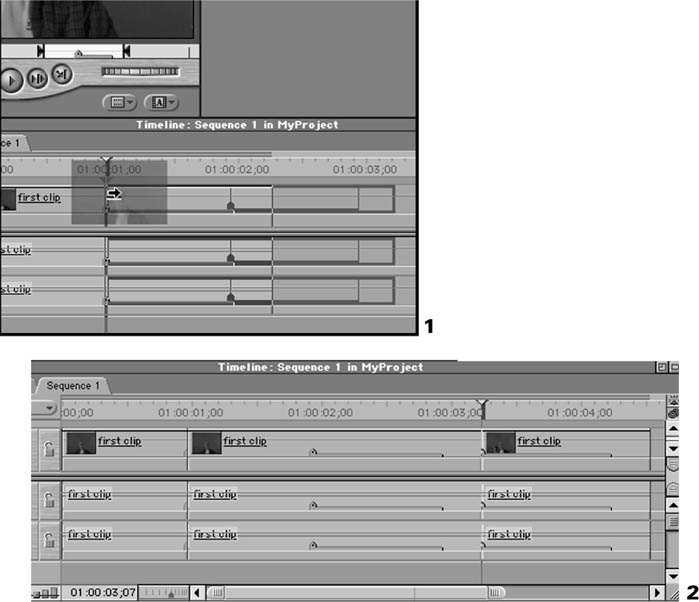
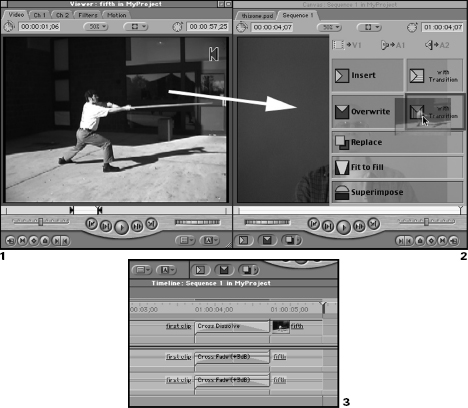
As you move the mouse pointer around this area, you will see the Insert/Overwrite arrows appear (Figure 5-11). When the arrow is pointing to the right and down indicating an Insert edit, let go of the mouse button to perform the edit.
You will see that the first clip was split in two and that the second incoming clip was inserted into the newly created gap between the first and second half of the initial clip. No footage was removed from the sequence; footage after the playhead was moved over to create the space necessary to insert the incoming video clip.
Hit Command-Z to undo the Insert edit from Step 9 so that you are once again looking at a single clip on the sequence Timeline. You can always quickly undo the last action performed by hitting the Command-Z shortcut. Once again, play through the clip in the sequence and park the playhead on a frame somewhere halfway through the clip. Now perform the same action again, but this time, perform an Overwrite edit by letting go of the mouse button when the arrow is pointing down.
STEP 10
Return to the Viewer window where the previous clip is still loaded (Figure 5-12). Click and drag the clip from the video window and move it down to the sequence without releasing the mouse button. When you bring the ghost clip down and it snaps to the playhead on the sequence Timeline, you will see the Insert/Overwrite arrows appear again. When the arrow is pointing directly down, let go of the mouse button to perform an Overwrite edit.
Instead of splitting the clip in half, moving the remaining footage over and inserting the incoming clip, Final Cut Pro simply lays down the second clip in the place of whatever was after the playhead position. It overwrites any footage that lies in the path of the incoming video clip.

Drag and drop to the Canvas: Insert and Overwrite with a Transition
There is another way to perform Insert and Overwrite edits, this time with the option of adding another important element, the Transition. Instead of dragging the clip from the Viewer window directly to the sequence Timeline, we will use the Canvas window. As we perform the edit using the Canvas, we will also address the second important issue in the process of editing: how we will have the clips cut from one clip to the next in the sequence.
We use the venerable old tape-editing terms straight-cut editing and A-B roll editing to describe the two primarily different ways of getting from one clip to the next in a sequence. Straight-cut editing means that when the playhead reaches the end of the first clip, it immediately cuts to the second clip. There is no transitional area in which both clips are simultaneously in view, and clips do not overlap or fade into one another. One clip stops on one frame and another one starts on the very next frame.
A-B roll editing allows for a different sort of cut between clips called a Transition. A Transition is a juncture between two clips. But unlike the straight-cut juncture, which allows no overlapping, the transition lets us see a portion of both the outgoing and the incoming clip simultaneously. This can be a Dissolve, in which the outgoing clip fades out and the incoming clip materializes. It can be a Wipe, in which a line crosses the screen covering the outgoing clip and revealing the incoming clip. It can be any number of stylistic effects, but the main point is that the two clips are both seen simultaneously for the duration of the transition.
The transition originated in the old film and video tape-based editing systems with a mixing system called A-B Roll editing. With film, an optical printing process was used to mix an outgoing and incoming edit. To perform video A-B Roll editing, you need to have three decks. The first two decks, A and B, contain the outgoing and incoming clip footage respectively that is being edited onto the third deck, the edit (or record) deck. A video mixer lies between A and B decks and the edit deck. The video mixer takes video sources A and B and mixes them together in whichever transition was required as they pass out to the edit deck. A transition from clip A to clip B is performed by mixing out clip A and mixing in Clip B during a short period in the recording. Once the transition is complete, clip A is no longer playing and clip B is being recorded.
The editor decides where the transition should occur and then uses the video mixer to switch from source A to source B, using one or another of the many possible transitions. Which transition is used and how long the transition takes depend on the editor, as does the length of the overlap between the two clips being transitioned. Although the term A-B Roll isn’t common any more outside of expensive online tape editing suites, the process of transitioning between clips on the sequence is essentially handled the same way. The A and B decks correspond to the first and second clip that we want a transition to separate in our sequence. As we pass out of clip A, we want to transition into clip B.
There are two things to remember about the A-B Roll editing example. First, there was a video mixer involved in the A-B roll example; second, there was an overlap between the two video clips in order to perform the transition. The mixer from our example will be the transition that we apply to the cut where the two clips abut. And the overlap that is required will be the extra, unused footage that lies beyond the In and Out points of the clips we edited into the sequence. Since the transition requires overlap area between the two clips, you need to make sure there is trimmed footage that the transition can access from beyond the In and Out points of each clip. The extra footage on either side of the In and Out points of the clip is the handles you were just being recommended to capture with your clips.
Once again, we take advantage of Final Cut Pro’s drag and drop technique to create this transition.
STEP 11
On the sequence, move the playhead a little further down to an area where there are presently no clips. Now go back to the Viewer window where your clip is still loaded. This time, create new In and Out points, making sure that there are at least 30 frames between the beginning of the Master clip’s media and the In point you apply to it. Likewise, make sure that there are at least 30 frames between the end of the Master clip’s media and the Out point you apply.
These 30 frame handles on either side of the In and Out points will provide plenty of overlap frames for our transition. The overlap space for each clip is the footage that lies before the In point or after the Out point of the clip.
STEP 12
Click the clip in the Viewer video window and this time drag it into the video window of the Canvas without releasing the mouse button (Figure 5-13). As you hold it over the Canvas, you will see overlay windows appear offering the choice of Insert, Overwrite, Replace, Fit to Fill, and Superimpose. In addition, the Insert and Overwrite areas will have an optional extra window for including a transition.
Because there is currently no video clip in the sequence, we could choose either Insert or Overwrite with equal results. You will perform the exact same edit as you did when dragging directly to the sequence earlier. This time, however, instead of determining the frame to edit into the sequence with the mouse pointer, you will simply edit to the place where the sequence playhead is currently parked.
STEP 13
Hold the clip over either Insert or Overwrite (do not choose the transition option just yet), and you will see the choice highlighted. Release the mouse button, and you will see the clip appear on the sequence exactly where the playhead was parked.
STEP 14
To add the second clip with a transition, first make sure that the playhead is parked at the end of the clip you just inserted into the sequence (Figure 5-14). When you edit a clip into a sequence, the playhead immediately moves to the last frame of the incoming clip, since it assumes your next edit will follow that clip. If the playhead has been moved, drag it back over to the end of the clip you just added to the sequence, making sure that it is on, not following, the last frame of the clip.
Transitions, such as the default Cross Dissolve that we are about to use, are difficult to see if the clip being transitioned to is very similar to the clip being transitioned from. Since the Cross Dissolve fades from one clip to the next, you might not even be able to see the transition. For this reason, pick a new clip from your Project tab that looks substantially different from the clip you have just edited into the sequence.
STEP 15
Double-click another clip in the Project tab to load it into the Viewer window. Once again, set In and Out points, making sure that you leave at least 30 frames on either side of the In point and the Out point to provide adequate overlap space for the transition.
STEP 16
Pick up the clip in the Viewer window and drag it into the Canvas window, this time releasing it as it hovers over the Overwrite with Transition area (Figure 5-15). Instantly, the clip appears on the sequence following the first clip, but this time there is a small gray patch connecting the two.
The small gray patch between the two clips is the Transition. It is an area in which footage from both clips is present, although it is actually composed of footage that exists beyond the previously established In or Out points of the clips. In this nonlinear system, Final Cut Pro can reach back into the media file associated with your clip when it needs more footage as long as there is more footage in the clip’s media file to access. The benefits of adding frame handles in the capture process of the last chapter become more obvious now that footage beyond our In and Out points becomes valuable as transition overlap footage.
If you receive a message stating “Insufficient Content for Edit,” it means that you do not have enough footage beyond the In or Out point of either one or both of the clips for Final Cut Pro to create the transition. Remember that an overlap of footage means that both clips must have at least some footage outside the In and Out points. Although the number of frames outside the In and Out points does not have to be equal, it does have to exist.
By default, this transition is a Cross Dissolve, which will fade one clip out and the other in over the length of the transition. You can change the default transition to something you use more frequently, or choose any other transition available to replace the Cross Dissolve after it has been applied.
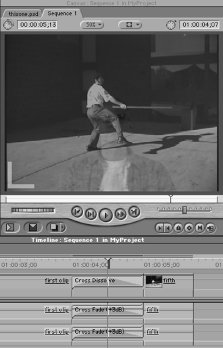
After applying the transition, place the sequence playhead directly in the center of the transition (Figure 5-16). You will be able to see both the first and second clips at half their opacity or visual strength, since one is fading out and the other is fading in. If you try to play this short sequence back, you will probably notice that when the playhead crosses the transition, the footage disappears and the word Unrendered appears. Once the playhead is past the transition, the video footage appears again. This is because transitions must be rendered to be played back correctly.
The reason that your normal captured footage can be played back without rendering is because the footage exists on your hard drive as captured media. There is media that the clip is related to. When the playhead encounters the clip, the media is accessed and the video plays back. But the transition is different. There is no media clip yet that corresponds to the dissolve between the two clips. Final Cut Pro knows that the transition footage needs to be created or rendered to be played back correctly, so it warns you that the material is unrendered with this message.
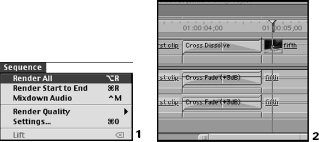
Any footage in a sequence that must be rendered will have a red bar over it in the Timeline window (Figure 5-17). The red bar indicates that render files have not been created for the clip and that it will not be displayed properly upon playback. Anytime you see this red bar, it means that there is an effect of some sort—a Motion tab effect, an Effects filter, or a Transition that must be rendered. The only exception to this is if your Preferences and/or Audio/Video Settings have been incorrectly configured, in which case your captured footage will likely display the red bar as well. In those instances, do not render; go back and fix your settings!
STEP 17
Rendering the transition is simple. Make sure the Timeline window is active, then go to the Sequence drop-down menu and select Render All (Figure 5-18). There are other choices available for rendering in this drop-down menu. What choices are available depends on what clips, if any, are selected on the sequence Timeline. If an individual clip or transition is selected, you can choose Render Selection to avoid rendering all clips or transitions you may not be presently concerned with. If no clips or transitions are selected, then Render Selection will render all clips in the sequence.

A render progress bar will come up showing you where the rendering process is. After the render is complete, the red bar will be replaced by a barely perceptible light gray bar, indicating that the material has been rendered. Go back to the sequence and play through the transition. You will now see the dissolve properly played back.
Of course you are not limited to the way this dissolve performs. You are looking at the default settings for the Cross Dissolve transition. You can easily change the parameters of the transition itself, being limited only by the number of overlap frames available past the In or Out points of either the outgoing or the incoming clip.
STEP 18
To change the parameters of the transition, go to the sequence and double-click on the gray transition itself (Figure 5-19). Make sure that you click on the gray transition and not the cut, or edit point, between the two clips (if a Trim Edit double video window appears, close it and try again). When you successfully double-click on the transition, it will load up in the Viewer window, as if the transition were a clip, but with a control tab for the transition itself.
When the transition is loaded into the Viewer window, you can adjust how long the transition lasts, where the middle point of transition occurs, and many other factors that depend on the type of transition you have created. You will see that as you adjust the parameters in the Viewer window the transition in the sequence is updated. You will also see that the red render bar has returned, because the render files you created no longer reflect what the transition does. To view the new transition parameters, you will need to render again.
Drag-and-drop transitions
The method discussed in the preceding text is not the only way to apply a transition to two abutting clips. There is yet another simple drag-and drop technique for applying transitions.
STEP 19
Clear off the sequence by activating the Timeline window, clicking on the dark gray area of the sequence Timeline and clicking and dragging through the clips with the mouse button pressed (Figure 5-20). This action is called a marquee selection. You will notice that each clip marqueed this way turns brown, indicating that the clip was selected.
You can also quickly select more than one clip by clicking on clips with the Shift key depressed (i.e., Shift-clicking). As you Shift-click more clips, they all stay selected, whereas if you were not Shift-clicking, selecting one clip would deselect the previously selected clip(s). Shift-clicking changes the selection status of a single clip without changing the selection status of other clips. To deselect an individual clip while Shift-clicking clips, simply Shift-click the clip again to remove it from the group of selected clips.
STEP 20
Once all the clips in the sequence have been selected, hit the Delete key to remove them from the sequence. When the sequence is again empty, quickly perform two Overwrite edits into the sequence so that two clips are abutted with no transition but have the previously described overlap frames on either side of their In and Out points.
STEP 21
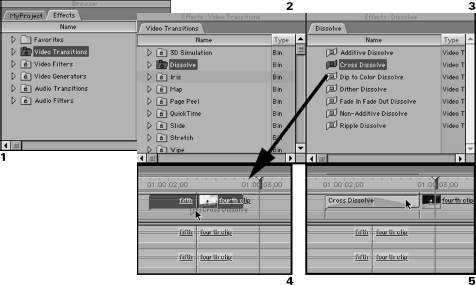
Go to the Browser window and select the Effects tab. Double-click the bin named Video Transitions (Figure 5-21). Inside the Video Transitions bin that opens up, double-click the Dissolve bin. Inside the Dissolve bin, click the Cross Dissolve icon and drag it over onto the cut between the two clips you just edited into the sequence. When released onto the edit point between the two clips, the transition will pop right in, just as if you had applied it from the Canvas.
STEP 22
Double-click the gray transition you just dropped onto the edit point between the clips so that it loads into the Viewer window. Once again, adjust the various parameters of the transition until you are satisfied with the results. Click on the Timeline window again, hit Command-R (the keyboard shortcut for Render Selection) and after the brief render process, play the transition back.
Using the drag-and-drop method of applying transitions to edit points between clips, you can select any of the available transitions in the Video Transitions bin of the Effects tab.
Creating customized transition favorites
Once you have adjusted the parameters of a transition the way you want them, you can save a new version of the transition that retains the parameters you have changed for quick access in the future. Instead of having to change the parameters for a transition every time you use it, you will make a copy of the transition you have customized and apply that instead of the default one you started with. This is called creating a Favorite.
As an example, let’s say that you prefer for your Cross Dissolve to last for 15 frames instead of the full one second that the default Cross Dissolve transition is set to last.
STEP 23
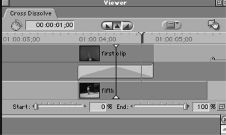
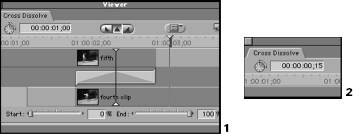
In the sequence, double-click on the transition so that it loads into the Viewer window (Figure 5-22). In the timecode field to the upper left of the window, change the value from 00:00:01:00, or 1 second (29.97 frames for NTSC and 25 for PAL), to 00:00:00:15, or fifteen frames. The transition will automatically shrink both in the Viewer and in the sequence.
Now that the transition in the sequence has a new customized parameter that differs from the one in the Video Transitions bin, we will create a Favorite of it.
STEP 24
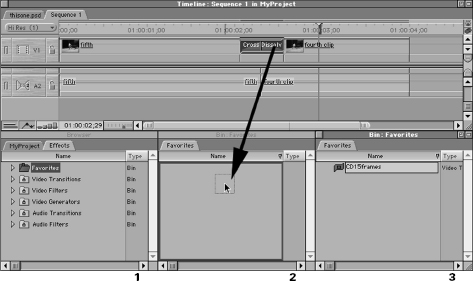
Double-click the Favorites bin in the Effects tab of the Browser window so that it opens up (Figure 5-23). Go back to the sequence, grab the gray transition, and drag it to the opened Favorites bin.
STEP 25
A new Cross Dissolve transition bearing the parameters you changed is in the Favorites bin. Although it is still named Cross Dissolve, it actually has a different length than the Cross Dissolve you originally pulled from the Video Transitions bin. Before you can confuse one for the other, click on the name of the Cross Dissolve transition in the Favorites bin to highlight it. Type in the new name “CD15frames” to distinguish it from the original Cross Dissolve or any further variations of the Cross Dissolve transition you may create as Favorites.
Now whenever you wish to apply a 15-frame Cross Dissolve, you can simply drag this transition from the Favorites bin and apply it. The transition will also be available from the Effects drop-down menu under the heading Favorites (Figure 5-24). You can make this transition the default for use in applying transitions from the Canvas as we did earlier in this lesson by selecting your “CD15frames” transition in the Favorites bin and choosing Set Default in the Effects drop-down menu.
You could also have placed the transition on the edit point by moving the playhead in the sequence to the point between the clips and going to the Effects drop-down menu. There, under the Video Transitions submenu, you will find all the Final Cut Pro transitions available to you. The Effects drop-down menu is your access menu for many other effects to be described later in the Compositing and Special Effects chapter.
If it seems arbitrary to have waited until this point to describe the drop-down menu items for performing transitions and effects, there is a reason. Your speed and agility within Final Cut Pro, as well as other production applications, greatly depends on your ability to use the interface of the application directly rather than hunting through menu items one by one to find what you are looking for. The risk of carpal tunnel syndrome is another reason for avoiding the repetitive action of pulling down drop-down menus. Learning the keyboard shortcuts for actions and using the mouse only for things like dragging clips around will save your wrist a lot of work and speed up your process into the bargain.

At this point, you can bring clips into Final Cut Pro, select In and Out points for them, and get them to the sequence in the Timeline window with or without a transition. That is enough to edit with. But it implies that we don’t want to change things once they make it to the sequence.
What we have done up to this point isn’t really that far removed from the process of tape editing. With tape editing, cuts follow cuts. You lay down an edit onto the edit deck, and then you lay down the next edit, possibly with a transition. You continue doing so until you complete the piece.
But that is linear editing. If you discovered that you’ve extended a clip a little too long, you have to go back through and re-edit the whole thing from the offending clip on. But we are using a nonlinear editor here, and we should take full advantage of its unique ability to alter clips from within the sequence itself, instead of simply adding edit to edit in a linear fashion.
Of course we’ve already seen a little nonlinear action with the Insert edit. With the Insert edit, we put a clip exactly where we wanted it to occur without overwriting what was already there. But we can do much more with our nonlinear editor. We can trim our clips with great precision in the sequence itself, using tools that are dedicated to helping you arrive at the most appropriate cut between any two clips that adjoin.
There are a few ways of trimming clips on the Timeline. These include directly grabbing the edge of the clip and moving its In or Out point, using the dedicated Trim Edit window, or using certain dedicated tools that live on the Toolbar. These different methods offer differing conveniences. One is less precise but easily accessible, one is more precise but must be accessed in a separate window, and another is a unique mixture of both.
The key is to master them all so that you can access each one where it becomes valuable. Only experience can instill the quick appropriate use of each one, so try them all until you get the hang of them, and then access them frequently. Trim functions often confuse new users because the relationship between clips and other clips or between clips and their media is unclear.
Trimming is not difficult however, as long as you remember that each clip on the sequence is only a small carved-out section of a larger Master clip that you originally captured or imported into the Project tab. Because it is only a section of the clip, Final Cut can easily change the In and Out points for that section on the fly without the need to revisit the Viewer window’s edit tools. As you change the In and Out points for the clip, you are only defining which section of the Master clip the smaller section in the sequence refers to. Trimming a clip that exists in a sequence does not affect the Master clip, which exists in the Project tab.
Mastery of the various Trim functions will turn your Final Cut Pro station from a nice editing package into a real professional editor. It will give you control over every aspect of the sequence and allow you the ability to make quick changes that drastically alter the nature of your production without having to rebuild entire editing structures from scratch. Trim is the secret weapon of all good editors and is an essential tool to master.
The easiest trimming technique
The simplest trim function you can perform involves trimming the In or Out point of a clip directly on the edges of the clip itself in the sequence. This trim is so basic it does not require more than one clip. You are simply changing the In or Out point for the clip based on the amount of media associated with the Master clip.
STEP 26
Start with a fresh clean sequence in the Timeline by selecting and deleting all the clips there. Insert edit a clip onto the sequence. Move the mouse pointer near either the beginning or end of the clip until you see it change from the generic Selection arrow to a vertical line with an arrow pointing in either direction (Figure 5-25). When the mouse pointer is shaped like this, it has assumed a trim function.
STEP 27
Click on the end of the clip and drag in either direction. You will see that the length of the clip adjusts following this tool. When you let go of the mouse button, the new In or Out point for the clip will stick and you will have changed the duration of the clip. Also notice that as you adjust the trim, a small text box appears next to the clip indicating the number of frames you have added or subtracted to the clip in the trim operation and the new total length of the clip measured in duration.
STEP 28
Click the clip edge again and perform the same drag motion, dragging as far to the left or the right as the tool will allow. At some point, you will reach the limit of the media file that the Master clip refers back to. Obviously, you cannot extend a clip beyond the limits of the media file or the Master clip it refers to, so this is the limit of the trim for the clip.
This tool can be very limiting for a couple of reasons. When you trim a clip, you are usually doing so to refine an edit point, something that you want to approach with precision that may require removal or addition of only a single frame. Unfortunately, this direct trimming action can be very unwieldy for precise editing. Much of the time, you will be looking at your Timeline scaled out so that you can see several seconds or even minutes at a time. In such situations, trimming a single frame using the direct method is practically impossible, like using your entire fist to dial a number on a touch-tone telephone. Although it can be done, the edit make take several hair-raising and frustrating moments, during which all your creative juices leak away.
Another problem with using the direct trimming tool is that you can trim only one end of one clip at a time. This may not seem limiting at first glance. But what if you have two clips abutted as a straight cut in a sequence and you want to take one frame away from the first and add one frame to the second? Using the direct trim method described above would require clicking on both clips, probably more than one time. And if you weren’t sure that’s what you wanted, you’d have to go back through the same motions to change it back.
More trimming precision: the Trim Edit window
Final Cut Pro has a solution for such issues. It’s called the Trim Edit window, and it is a dedicated window for allowing extreme precision in selecting the exact point at which two adjoining clips meet each other. Using the dedicated Trim Edit window, you will be able to quickly add or remove frames from the Out point of the first clip and the In point of the second clip. You will also be able to easily preview the trimmed edit from inside the window so that you can adjust it again before committing to it. And best of all, you can choose to adjust the first, the second, or both clips simultaneously. It is very flexible.
Calling up the Trim Edit Window
To use the Trim Edit window effectively, you need to have two abutting clips.
Clear off the sequence of clips using Select and Delete so that you start with a fresh sequence. Perform two edits so that you have two clips abutting on the sequence in a straight cut.
STEP 30
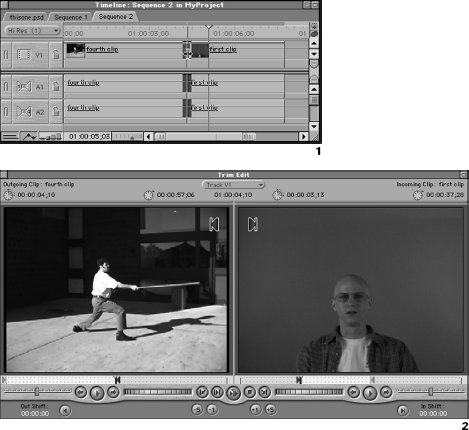
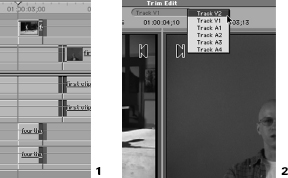
Go to the sequence and double-click the edit point between the two clips (Figure 5-26). Doing so will immediately open a large double video window called the Trim Edit window.
The two video windows of the Trim Edit window each correspond to one of the video clips; the left window is for the first or outgoing clip, and the right is for the second or incoming clip. Inside this window are all the tools you need to prepare a frame-specific edit between any two clips.
Some of the navigation tools will appear familiar, but make no mistake; this window functions according to its own rules. What you do here updates the sequence it was opened from, as one would expect. Until you are familiar with the functioning of the Trim Edit window, make sure to keep the Timeline window in view so that you can monitor the effect the Trim Edit window has on the sequence it originated from.
On the top left-hand and top right-hand corners of the Trim Edit window, you will find the familiar clip duration fields. These give the present duration of their respective clips, based on the current In and Out points of the clips in the sequence. This number does not reflect the duration of the Master clips from the Project tab that the clips from the sequence reference. The duration will change as you trim the clips using the tools in the window. The name of each clip is included for reference as well.
The Track drop-down bar
In the center of the top of the window is a Track drop-down bar that lets you select which video or audio tracks you are basing your trim adjustments on (Figure 5-27). You can actually apply the same trim action to more than one track at the same time, which can be a big help in keeping two or more clips equal in duration or alignment.
There are many reasons for trimming multiple edit points at once. Chances are that you will encounter situations in which you need to extend or retract the edit points for more than one clip to keep a group of clips aligned with each other. By Command-clicking the additional edit points between two abutting clips in the sequence, those edit points are added to the choices in the Track drop-down bar at the top of the Trim Edit window.
The only two restrictions on this activity are that there can be only one edit point selected per track and that the trim applied in the Trim Edit window is applied equally to all selected edit points, regardless of which edit point is selected in the Track drop-down bar. This lets you base the trim effect of many different edit points across all the video and audio tracks on how you trim one critical edit point in any one of the video or audio tracks.
STEP 31
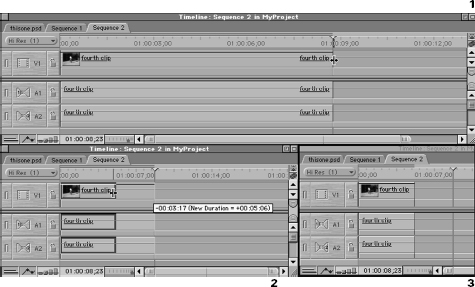
Leave the abutting video clips in the Video 1 track. Next, edit in a new clip from the Viewer window, but this time, drag it from the Viewer and drop it into the sequence in the space above the Video 1 track so that it creates a new Video 2 track (Figure 5-28). Make sure that this new clip’s edge is not vertically lined up with the edit point of the two clips you have abutted on the Video 1 track.

Single-click an edge of the clip in the Video 2 track, then Command-click the original edit point division between the other two clips in Video 1 (Figure 5-29). You will see that each edit point becomes brown as it is selected.
STEP 33
Double-click one of the two selected edit points to open up the Trim Edit window.
STEP 34
Go to the Trim Edit window that opens and click on the Track drop-down bar at the top and center of the Trim Edit window. You will see that you now have an option between using the Video 2, the Video 1, or any of the four accompanying audio tracks as the basis for the trim.
Any trimming that takes place will be applied to all the clips that are selected. And since any trim is applied to all these edit points, this also means that any clip with media file limits will limit the amount of trimming that can be applied to any of the clips. If you had more tracks and you wanted to add additional edit points to the group already selected and present in the Track drop-down bar, just Command-click to add them to the selection. But remember that you can have only one edit point selected per track.
You will also notice that as you switch between the choices in the Track drop-down bar, the timecode value just below it changes and the playhead moves from edit point to edit point in the sequence. This center value always reflects the sequence frame number that the edit point currently selected in the Track drop-down bar is positioned on. As you trim the edits, this number will likely change as you move the In and Out points back and forth.

STEP 35
Make sure that the Track drop-down bar is set on Video 1, so that there is both an outgoing (left) clip and an incoming (right) clip.
Look directly below the two video windows in the Trim Edit window to find a little timeline track containing a couple of items. The playhead of the track is a little vertical line topped with a yellow triangle. Accompanying this in the track will be an In or Out point marker, depending on the video window in question. There will be an Out point marker on the clip in the left, outgoing window and an In point marker on the right, incoming window.
STEP 36
Move the playhead around in this little timeline and you will see that it is previewing the media available for use by the clip, giving you the opportunity to quickly scan through it for the optimal new edit point. Make sure that as you move the playhead around, the mouse pointer is shaped like an arrow; otherwise, you are probably adjusting the trim. Do not touch the In or Out points just yet. Use Command-Z or undo to quickly negate an accidental trim action.
The range of frames you can preview for the new edit point is equal to the limits of the Master clip and the media file associated with the clip. The lighter area of the little timeline is the range of frames that are already in the clip in the sequence. The darker area is the range of frames that exist in the Master clip and the media file associated with the clip but are not yet included in the clip in the sequence.
Navigating the clips in the Trim Edit window
Underneath this track bar are the familiar tools for navigating around a clip (Figure 5-31). There is a Jog and a Shuttle for moving around. Predictably enough, there is J-K-L support for each separate window, although the response will not be nearly as rapid as in the Viewer or the Canvas. The Trim Edit window is best suited for precise, hair-splitting, one-frame cuts, so it is not optimized for normal playback out to video. There is also a Play button and an advance and retreat one frame button.
![]()
![]()
Beneath each of these video windows is an Out Shift or an In Shift button for the outgoing or incoming video windows, respectively (Figure 5-32). This button will move the Out or In point to where the playhead is parked in the Trim Edit’s little timeline. It is accompanied by a timecode value that displays how many frames the new Out or In point is from the original edit point position when the Trim Edit window was first open. Of course, this In Shift and Out Shift uses the I and O keys as keyboard shortcuts, moving the In or Out point to wherever the playhead is parked in the little timeline of the Trim Edit window, just as with the In and Out functions in the Viewer and the Log and Capture windows.
Trimming edits using this window can be done in two ways. As is usual for Final Cut Pro, there is a direct click-and-drag method and a more precise numerical entry. Care must be taken when performing the trim, though, because you have to tell Final Cut Pro which of the Incoming or Outgoing clips you want to trim, or if you want to simultaneously trim both.
It is pretty easy to identify which clip is to be affected by the trim action you initiate. Above each video window in the Trim Edit window is a long green bar. If the bar is present above a video window, trimming actions will affect the clip in that window. You can choose to have one, the other, or both clips enabled. To enable the green bar and trim actions for a clip, simply click in its video window. You will notice that clicking in one video window enables it while disabling the other. To enable both video windows so that trim actions are applied to both clips, either Shift-click the second video window or click in the thin space between the two video windows.
When you move the mouse pointer over the video windows, you’ll notice that its shape changes again. This time it appears in one of three shapes, dependent on where in the Trim Edit window you have it (Figure 5-33). If it lies in the left outgoing clip window, it appears as a little filmstrip roll with the tongue hanging out to the left. This shape, referred to as a Ripple Edit, is a metaphor for a film take-up reel. It’s called a Ripple Edit because as you trim using it, the change in duration ripples back through the rest of the sequence the trim applies to, shortening the length and eliminating the possibility of creating a gap between any of the clips. When a clip is ripple trimmed, as it is shortened or lengthened, all other clips in its track are moved over either to give it more room or to cover any gaps the trim might have created.

If the mouse pointer is lying in the right video window, predictably, the mouse pointer becomes a Ripple Edit take-up reel for the incoming video clip. It performs exactly the same function as the other Ripple Edit tool, except that it applies to the incoming clip. Once again, the tongue is hanging in the direction of the clip that will be trimmed by the tool.
The third possible shape is actually just a combination of the two and is called a roll edit. If you place the pointer between the two video windows, you will see a combination of the two Ripple Edit spools and tongues, symbolizing that the trim function will now be applied to both outgoing and incoming clips. Do not be confused though, because the roll edit actually is just moving the edit point relatively for each clip. Rather than taking away a frame from or adding a frame to each separate clip, the roll edit takes away from one clip and adds to the other. The net effect of this action is that the new edit point occurs earlier or later in both clips. The clips themselves are not moved, and the total duration is not changed, only the edit point at which one of them stops and the other starts.
The gist of this is as follows. If you want to trim frames only from or to the outgoing left clip, you click on the left video window to select the outgoing Ripple Edit. If you want to trim frames from or to the incoming right clip, click on the right video window to select the incoming Ripple Edit. If you want to trim from one clip and add to the other so that you move the edit point between the clips without moving the clips themselves, click in between the video windows and select the roll edit. You can always easily tell which window is enabled for trimming by seeing which window has the green bar on top.
There are two ways to perform the trim, one of which is imprecise, but fast, the other of which is frame-specific but much slower. After you have chosen the roll edit or either of the Ripple Edits, you will notice that clicking in the video window has no effect other than enabling that window for trimming.
STEP 37
Click on the left video window to enable the Outgoing Ripple edit (Figure 5-34). Position the mouse pointer over the Out point in the little timeline track of the left video window. Clicking on the Out point and dragging it will trim the incoming clip. Continue to drag the Ripple tool in either direction and watch the sequence Timeline update as you adjust the trim.
STEP 38
Click on the right video window to enable the Incoming Ripple edit. Position the mouse pointer over the In point in the little timeline track of the right video window. Clicking on the In point and dragging it will trim the outgoing clip. Continue to drag the Ripple tool in either direction and watch the sequence Timeline update as you adjust the trim.
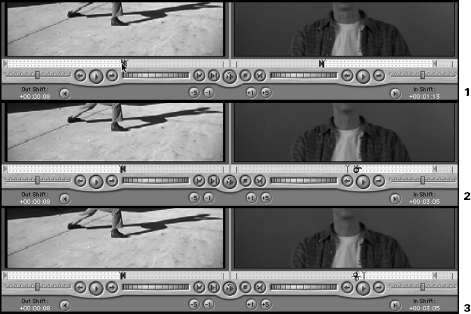
Click in between the two video windows to select the Roll Edit. Position the mouse pointer over the In or the Out point in either of the two little timeline tracks. Clicking on either point and dragging it will trim both clips. Continue to drag the Roll tool in either direction and watch the sequence Timeline update as you adjust the trim.
As you trim using these tools, watch the Out Shift and In Shift numbers in the bottom left- and right-hand corners respectively to see how far you have adjusted in either direction as you drag. As you will notice, this sort of click-and-drag trimming is very imprecise. Once you’ve moved the edit point for either clip, it’s difficult to get the Out Shift and In Shift numbers back to zero such that the points are in the exact same position as they were when the Trim Edit window was opened. If you made a change to the edit points and then decided you didn’t like it, it could take you all day to get the original edit points back.
For this purpose, Final Cut Pro has a much more precise method. At the very bottom and center of the Trim Edit window, you will find four buttons with the values –5, –1, +1 and +5 (Figure 5-35). These buttons simply perform the same trimming action described previously but for the value of the button. The –1 button, for example, will move the edit point one frame to the left for either or both clips, depending on whether a Ripple or a Roll is enabled. The +1 button will move the edit point one frame in the opposite direction. The –5 and +5 buttons move the edit point even more quickly. You still need to select which side of the Trim Edit window you want to affect using these buttons if you’re not performing a Roll edit—that is, applying the trim to both sides equally.
![]()
You will in all likelihood find that using the precise buttons is easier and faster than the click-and-drag technique. Since it’s pretty easy to count as you mouse-click, you can always quickly click in corrections without having to struggle and wear your wrist out. To make things even easier, there is a keyboard shortcut for these precise trim buttons. The [ and ] keys correspond to the –1 and +1 buttons. Shift-[ and Shift-] correspond to the –5 and +5 buttons. You can actually customize the number of frames that appear in the –5 and +5 buttons by setting a value higher or lower in the Multi-Frame Trim Size field in the General tab in the Final Cut Pro Preferences.
Previewing the trim before leaving the Trim Edit window
Finally, there are a few buttons for previewing your edit before leaving the Trim Edit window. Remember that when you close this window, the Out Shift and In Shift values will reset. Once the In or Out Shift value is gone, it can be difficult to get your edit point back to where it was before you changed it. If you catch a mistake before leaving the window, it’s easy to make the adjustment based on the number of frames that the new edit points have shifted from what they were when the window opened. Previewing the edit to make sure it is what you want is a good way to avoid having to go back and piece together your previous edit points.
There is a tool specifically for this purpose. Just below and between the two video windows are a few play buttons (Figure 5-36). The one in the center is called Play Around Edit Loop. When you press this button, Final Cut Pro previews the edit by playing from a few seconds before the edit to a few seconds after it. You actually customize the amount of Play Around either before or after the edit by changing the values for Preview Pre-Roll and Preview Post-Roll in the General tab of the Final Cut Pro Preferences.
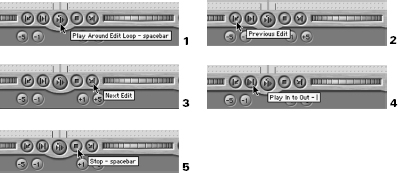
The furthest left of the five buttons, Previous Edit, is for moving the current edit point loaded into the Trim Edit window to the previous edit. Be careful, though, because it refers to the previous edit point that occupies the same track as the current edit point. If you were looking for the previous edit point on another track, you might end up quite far from where you expected to be. The furthest right button of the five, Next Edit, performs the same function, except that it moves forward in the track rather than going in reverse.
The button just to the left of the Play Around Edit Loop is the Play In to Out. This will preview from the beginning of the outgoing left clip to the end of the incoming right clip, regardless of how your Preview Pre- and Post-Roll Preferences have been set.
The preview playback is a loop, so to stop the loop, there is a button to the right of the Play Around Edit Loop. You can also hit the Spacebar to start or stop it.
Trimming is fast and easy using the Trim Edit window. Just double-click on the edit point you want to trim in the sequence. When the Trim Edit window pops up, select which clip you want to Ripple edit, or you may choose to perform a Roll edit of both clips. Click the plus or minus frame buttons, or the [ and the ] to define the points the way you want them. Preview the cut to make sure it performs the way you want it to. Then close the window, and you’re done.
The Timeline and the Toolbar, a deadly duo
A lot of the material that has been discussed previously has been about how Final Cut Pro allows you to edit in the Timeline from other areas of the application. We created In and Out points in the Viewer window to edit clips into the sequence Timeline. We saw Insert and Overwrite editing from the Canvas window. We learned to trim our sequence’s edit points from inside the Trim Edit window. We’ll even see later on how to load up a sequence in the Viewer as if it were just another clip.
But don’t get me wrong. The sequence and the Timeline window it lives in are powerful tools. Many of the preceding trimming actions can be accomplished directly on clips within the sequence itself. It’s necessary to include the Toolbar in this discussion as well, because, with only a few exceptions, the Toolbar tools work directly within the Timeline window. Although editing on the Timeline can sometimes feel a little sloppy and imprecise, there are times when quickly grabbing a clip and nudging it into place will do the trick. It’s the editor’s job to figure out the fastest, most efficient way of working so that more thought process goes into the “why” of editing and less into the “how.”
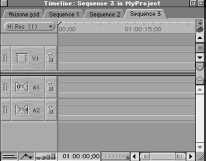
Let’s quickly go through the Timeline window and take a closer look at its features and controls. From the top left-hand corner of the window, the tabs for the open sequences are displayed. If you have more than one open sequence, you can switch between them by clicking on their tabs. You will notice that when you switch tabs, the tab in the Canvas window switches to match. Every sequence in the Timeline has a sister tab in the Canvas window. The Canvas will always reflect what is taking place in the sequence, and until we address how Compositing and Effects work, it should be regarded as a video preview monitor for the sequence.
The Timeline tracks
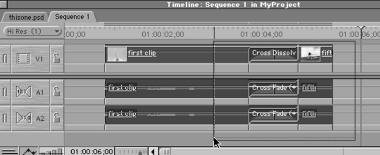
Moving down into the Timeline itself, we find tracks (Figure 5-37). The default number of tracks when you create a new sequence was set back in the Timeline Options tab of the Preferences. Unless you changed that Preference, the default for a newly created sequence will still be one video and two audio tracks.
The video track area is separated from the audio track area by a thick gray double line. You can adjust how much of the window is dedicated to the video tracks versus the audio tracks by clicking this line and dragging it. If you have only a few tracks currently in a sequence, you won’t see much difference from moving it around. But when you have 10 tracks of video and audio, you’ll see that being able to prioritize the window for video or audio tracks will make a big difference.
As we saw in the previous section on trimming, it’s easy to create a new video or audio track in the sequence by simply dropping a clip into the space where the next video or audio track should be. When you let go of the clip, the track will be automatically created. You can also create new tracks or remove tracks you don’t want by selecting Insert Tracks or Delete Tracks respectively from the Sequence drop-down menu. You can have up to 99 tracks of video and 99 tracks of audio in any sequence.
The only serious limitation to the number of possible tracks in your project is the number of audio tracks that Final Cut Pro and your Macintosh hardware can play at once, or what is referred to as real-time audio mixing. We know, for example, that when video must be displayed that does not exist yet (e.g., a dissolve or a wipe), it must be rendered. The render is a mixdown of all the video elements into one composite video clip that can be played out to Firewire.
Video has a much higher data rate than audio, and the processing to show a real time playback of such unrendered material requires extra hardware and processing power from a real-time video card, such as the MatroxRTMac or the Promax RTMAX. Audio, on the other hand, can be mixed and output to Firewire without rendering, up to a certain point. The rule of thumb is that eight tracks of audio that have no effects applied to them can be mixed together down to two channels and sent out to Firewire along with video. This is referred to as real-time audio mixing.
So what do you do if you need more than eight tracks? You can simply perform a quick Mixdown Audio from the Sequence drop-down menu for the sequence. The ensuing render is quite fast; it’s much faster than video rendering. At the end of the render process, the audio tracks in the sequence will still be discrete and editable, but the audio tracks in the sequence will be linked to a render file so that everything above eight tracks can be mixed together and played correctly. If you have too many audio tracks to play back without Mixdown Audio, you will hear a pulsing beep alarm as you play back.
Sometimes, your system may not have the wherewithal to mix all the eight tracks of audio that it is generally capable of doing. This can yield Dropped Frame errors and can be the result of disk fragmentation, sluggish system performance, or any of various other reasons. In these instances, a quick Mixdown Audio will usually take the stress off of your processor or drives and allow your system to do what you want. Remember that the number of tracks you assigned in the Real Time Audio Mixing field of the General tab in the Preferences is the number of tracks you are limiting Final Cut Pro to attempting to mix real time in the sequence. Setting this number higher than eight will not make your system perform better; it will just try to real time mix more tracks than most Macs are generally able to. Keep this preference set to 8 tracks or less.
The track portion of the sequence is divided into two parts: the Target Track Selection Area to the left and the actual Timeline area to the right. The target track selection area is of crucial importance for editing, because of the flexibility it allows you when editing into the sequence. There’s more than one way to skin a cat, but some ways provide quicker skinning than others. Properly controlling the target track selection area can save you lots of time.
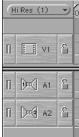
The target track selection area
To the far left of the target track selection area, there is a green light for each track (Figure 5-38). This is called the Track Visibility switch. Clicking off this green light grays out the track and makes it unavailable to the sequence. It’s basically a way to hide a track’s contents temporarily. Any audio in the track would not be heard, and any video in the track would not be seen. Some care must be taken with this; turning tracks off irrevocably breaks the link between a clip and its render files. If you have rendered a clip, you want to avoid turning its track off.
The middle item in the target track selection area is the Target Track assignment. For video tracks, this is displayed as a small film frame next to the track’s name. For audio tracks, this is displayed as two little speakers pointed in opposite directions. In either case, the track of which the icon is displayed in yellow is a current target track. A target track is the track into which clips will be accepted when they are brought into a sequence. When you perform an Insert or Overwrite edit from the Canvas, the clip is automatically routed into whichever tracks are set as the target tracks.
In our examples of Insert and Overwrite earlier, there were only an initial video and two audio tracks in the sequence. This was sufficient for the requirements of our standard, DV-captured clips that are composed of one video and two audio tracks. But in some instances, you will need to create more tracks than this. To make sure that your edits get sent to the proper tracks, you must make sure that they are targeted.
Clicking on a track icon turns it yellow and sets it as the target track. For audio tracks, there can be two target tracks, since the Firewire connection with our DV device supports two channels out. The target track allows for a designation of a left and right, or stereo pair, in the target track box, since most clips will have two channels of audio and many will also have hard panning, or extreme left-right differentiation between the two tracks. Only one track of video can be targeted at a time, since an individual clip will have only one associated layer of video (although through Nesting, which is covered further on, it’s easy to include many layers within that one layer).
Setting the target track is critical for editing when using more than one video and more than two audio tracks. Target track assignments do not change until you change them. If you are using the Drag to Canvas method of editing, the target tracks are the only way Final Cut Pro knows where to send the incoming clips. As you speed up your editing process by accessing keyboard shortcuts and automated features such as Drag to Canvas editing, you can easily screw up by not defining things like target tracks.
Finally, there is a Track Lock feature to the right of the target track selection area, symbolized by a padlock. Normally, this is in the unlocked position, given that you want to be able to work in the tracks, which locking them would disallow. But Track Locking can be very useful. No matter how experienced you are with Final Cut Pro, it can sometimes be tricky to see all the consequences of a single action. One false move could undo hours of precise cutting through an accidental series of edits. Locking tracks in these instances is a good way of making sure that nothing happens to a track or tracks when you are sure they are complete. It’s also a good way to lock two tracks that have been manually synced so that they cannot be accidentally shifted by subsequent edits.
Timeline customization controls
Below the tracks are various controls for adjusting the Timeline so that you can customize what you see and how much you see of the clips in your sequences. There are tools for changing the time scale of the Timeline so that you are looking at larger or smaller increments of time, a timecode field for indicating where the playhead is at the moment, and, finally, buttons that can provide additional control and display of the tracks themselves.
The Time Scale of the sequence Timeline is the variable increment your sequence contents are displayed with. Because your clips may range in length from several seconds to several minutes, it can sometimes be difficult to view all the contents of the sequence at once. Similarly, you may need to edit your clips on a very large scale so that you can distinguish between frames in a clip. You need to be able to adjust the time scale of the Timeline so that you can alternate between looking at all the contents of your sequence and focusing on a smaller section of it.
The time scale bar
At the bottom right-hand corner of the Timeline window, there are two controls that adjust the time scale of the Timeline: The Zoom Slider and the Zoom Control Meter. The Zoom Slider is a manual scrolling bar control with a handle on either end (Figure 5-39). The Zoom Scroll bar only works when there is a clip on the Timelime to change the scale of. If you grab either one of the handles and drag it, you will see that the increments above the tracks become larger or smaller. Drag the bar out longer, and you will be looking at seconds—even minutes, depending on the length of the clips in the sequence. Drag either of the handles in to make the bar shorter, and you will be looking at smaller increments, down to single frames of video. This can be especially helpful when you need to make very specific adjustments to positioning of clips or if you need to select many different clips at once. Adjusting the time scale allows you to put as little or as much of your sequence contents into the viewing area as you need.
This bar can actually move the viewing area of the Timeline as well. Grabbing the bar anywhere between the handles and dragging moves the whole viewing area forward and back along a sequence’s length, allowing you to move to areas quickly without having to get there by moving the playhead. Remember that this movement does not move the position of the playhead itself and that you will need to move it up to the window by clicking within the view area.
![]()
![]()
Navigating on the Timeline efficiently is a skill in itself. There is no correct timescale. The appropriate timescale depends as much on the relative lengths of your clips as it does on the type of editing you need to do at the moment. Your ability to quickly change the scale and move to the next area of the sequence takes time and practice, but to work efficiently you really need to master it.
The Zoom Control meter
Because Timeline navigation is so important, Final Cut Pro provides a couple of other tools for quick and precise Timeline redefinition (Figure 5-40). The next tool to the left of the navigation bar is the Zoom Control. It is shaped like a meter and redefines the time scale based on where the marker is in the Zoom Control box. When the marker is further to the right, the time increments will be larger, meaning that you will be looking at whole minutes and can see more of the sequence at a time. Moving the marker to the left makes the increments smaller and more precise. Move the marker to the extreme left and you will see each individual frame; move it to the extreme right and you will be looking at a much larger scale that allows you to see every clip that sits in the sequence. In between these two positions are jumps in scale that you can access based on your needs.
Playhead Timecode Field
To the left of this meter is the sequence Playhead Timecode Field (Figure 5-41). This field has two major functions. The first is to display the frame that the playhead is currently parked on. Since this is a timecode value for the sequence and not for the clips within it, the first frame of the sequence will be the Starting Timecode value you entered in the Timeline Options tab in the Preferences. If you did not change the default value there when you set the Preferences, the Starting Timecode value will be 01:00:00:00. You can of course change this value to any number that you want, given your system of organizing timecode values for your project.

![]()
The second function of the field is to manually position the playhead at a specific timecode location (Figure 5-42). Navigating to a specific frame to make an edit can be crucial. Entering values into this box is simple; you don’t even have to click on the box to do so. Because this box is the only place you can enter numeric information into the Timeline window, simply typing numbers when the Timeline window is active will enter them there.
Final Cut Pro makes things even easier. Although timecode values require colons or semicolons to delineate hours, minutes, seconds, and frames, Final Cut Pro can insert these for you. All you need to do is type in the numbers and make sure that you enter zeros where applicable—for example, type 01000300, and Final Cut Pro will convert this to 01:00:03:00, or the third second of the Timeline. When you hit the enter key, Final Cut Pro will insert the colons and move the playhead to the new location. It can even intuit that the earlier values stay the same if you enter only a few. For example, typing in the above value lands the playhead on 01:00:03:00. Then typing in 15 will move it up to 01:00:03:15. Typing in 215 will then move it to 01:00:02:15.
To make things even more convenient, you can type in a certain number of frames to retreat or advance. Instead of having to do the math to figure which frame to move to, simply type in + or – followed by a number, and the playhead advances or retreats that many frames, seconds, minutes, or even hours. For example, if you are at 01:00:02:00 and you want to move up to 01:00:03:00, simply type in +100, or plus one second and zero frames.
Using the numeric keypad for navigation is the easiest way to work. Rather than wear your wrist out using the mouse to drag a playhead around, move it exactly the distance you want. But what if you want to advance or retreat only one frame? The keyboard shortcut for advance/retreat one frame is the Left and Right Arrow key. Holding the Shift key and hitting the Left and Right Arrow key changes this to advance/retreat one second.
Using each of these three tools, it is possible to quickly jump around your sequence and hone in on the areas you need to work with at the time scale you need to work with. While general and imprecise, the Zoom Bar is a quick-and-dirty method of getting your sequence in roughly the area and scale you want. The Zoom Control meter provides a more precise method of choosing the time scale. Using the timecode field is the most precise way of moving your playhead around to new locations. Mastering all three techniques of Timeline navigation will enormously speed up your operations.
Moving to the left of the time scale and playhead location controls, there are three buttons that allow further customization.
The first is called Track Height (Figure 5-43). Track Height simply gives you four options for the size of each track within a sequence. If you are working with 12 layers of video, then you’ll probably want to keep the track height pretty low so that you can see most of them simultaneously. If, on the other hand, you are working with straight cut editing on a single video track and you’ve got a lot of screen real estate to burn, expanding the track height may make things a little easier on the eyes. This setting can be switched on the fly and has no effect on your sequence or clips other than making them more or less visible in the Timeline.
![]()
![]()
The Clip Overlays button
The next button on the lower left-hand side of the Timeline window is incredibly useful. It’s called the Clip Overlays button in Final Cut Pro parlance, but it’s popularly known as a rubberband tool (Figure 5-44). We first saw this mentioned in the section on Preferences. The Clip Overlays button overrides that Preference whenever it is clicked and enabled or disabled. Rubberbanding allows us to alter audio levels (loudness) and opacity (the amount of transparency) within a clip in the Timeline. In addition, when used with another tool to be discussed with the Toolbar functions, rubberbanding allows us to keyframe, or change these audio and opacity levels over time. This is a quick creative way to customize video fades and to even out audio tracks that exhibit too much variation in audio levels.
When the Clip Overlays button is engaged, all clips within a sequence display a thin, colored line—black for video tracks and red for audio. These lines describe the level for audio or video opacity in a video clip.
STEP 40
Open a sequence on the Timeline, edit a clip into it, and enable the Clip Overlays button so that lines appear in the clip. Move the mouse pointer over the Clip Overlays lines in the audio tracks. The mouse pointer will change into two parallel horizontal lines with arrows pointing up and down. While the mouse pointer is shaped as shown in Figure 5-45, click the line and drag it up and down without releasing the mouse button.

As you drag the line up and down, you will see a small box appear with a dB value that changes as you move the mouse position. Release the mouse button when the dB box reads –12 dB. Now perform the same action for the other audio track in the same clip (if the audio tracks for a clip are stereo, changing the level of one track will change the other as well). If you go back and play this clip from the beginning, you will notice dramatically lower audio levels.
When you adjusted the levels, you probably noticed that the entire line for the clip adjusted evenly across the clip. This means that the level adjustment evenly affects the entire clip (i.e., the same level of boost or cut is being applied for the entire clip). When we cover the Toolbar, we will discover a way to vary the change in level within the clip itself through keyframing.
Video opacity can be affected the same way that audio levels are adjusted. This is easier to see when the adjusted video clip is superimposed, or occupies the video track directly above another video clip. Using the Canvas window Drag and Drop edit method, we will perform a Superimpose Edit of a new clip into a Video 2 track (make sure you don’t use the same or similar clips for both video tracks or you will fail to see much of an opacity change after rubberbanding).
STEP 42
Position the sequence playhead at the beginning of a clip in the Video 1 track. Set the Target Track indicator for the Video 1 track.
STEP 43
Load a new clip into the Viewer window, then drag it to the Canvas window and drop it into the overlay box named Superimpose (Figure 5-46).
The Superimpose edit sends the video portion of the clip being edited into the track above the currently selected Target Track. The newly edited clip should be in the Video 2 track, so that it exactly covers the original clip in the Video 1 track. The incoming superimposed video clip is also automatically trimmed down to the exact length of the clip it is being superimposed above. If there was no Video 2 track to superimpose the clip into, Final Cut Pro automatically creates the track and then performs the edit.
STEP 44
Move the mouse pointer over the line in the video portion of the superimposed clip in the Video 2 track. When the mouse pointer changes to the familiar parallel line/arrow shape, click the mouse button and drag the line down. The same box will appear next to the mouse pointer, this time giving a percentage value for the opacity of the clip (Figure 5-47).
A value of 100 means completely opaque, or visible. A value of zero means completely transparent, such that anything on a layer underneath the video track is completely visible.
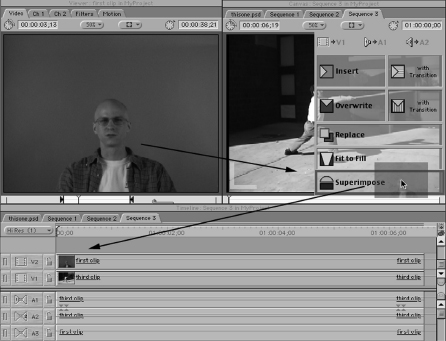
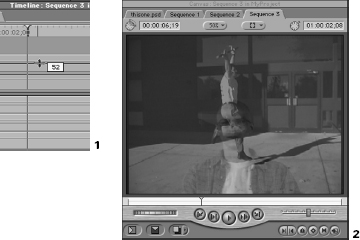
Drag the line to around the 50 percent point and release it. A glance back at the Canvas reveals that the clip in Video 2 track is half transparent, revealing the layer underneath. Readjusting the position of this opacity line gives varying degrees of opacity.
You will notice that the red line has appeared over the clip that you applied the opacity change to. This is because once again there is no video file to associate with the visual mixture of the clips in Video tracks 1 and 2. The clip must be rendered to play back correctly. The audio level change does not require any rendering or mixdown because Final Cut Pro can process the level change and real-time mix the audio out to Firewire.
Clip Keyframes
The button on the extreme bottom left of the Timeline window is called Clip Keyframes (Figure 5-48). In addition to, and perhaps more important than displaying any keyframes, it displays any opacity or filter adjustments that have been made to the clip. When a clip’s physical attributes change, such as audio level or opacity, a line will appear underneath the affected clip in the sequence, blue for video clips and green for audio. Likewise, if any Special Effects filters like those to be explored in the next chapter are applied to the clip, a green line will appear underneath the clip.
Many times, subtle changes in color correction or brightness and contrast that you apply to a clip are easy to forget about. Not all effects you use to manipulate a clip are obvious; some are corrective in nature. As such, sometimes after altering a clip and rendering it, you might actually forget that you did anything to it.
Since some editing actions can break the link between your clip and its render files, it is always a good idea to have an indicator of clips that have been rendered. This indicator can also alert you to possible settings problems. If you see the red render bar above your clips, yet when you enable the Clip Keyframes button, you can see that no effects have been applied and no attribute changes have been made, that’s a pretty good sign that your sequence or capture settings were erroneous.
Once we begin to utilize keyframes, this indicator will take on even more significance. The blue and green lines will reveal the positions of keyframes in the attributes and/or effects applied to a clip, thus giving you hints as to where actions begin, vary, and end without your having to open up the clip in the Viewer window to find them.
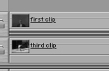
In the top right-hand corner of the window is a button with a small green triangle. This is the Toggle Snapping button (Figure 5-49). Snapping is a behavior that enables quick editing on the Timeline by automatically joining manually dragged clips with other clips or the sequence playhead. It’s chief usefulness is as a tool for avoiding gaps between clips and accidental Overwrite and Insert edits from imprecise drag-and-drop operations. Snapping is disabled by default. Clicking the Snapping button or hitting the N key toggles it on and off.
When Snapping is disabled and clips are manually dragged to the sequence, they are placed exactly where the mouse pointer is when the mouse button is released. This is fine for Insert edits in which a large degree of exactitude is necessary. As you move the incoming clip around in the area of the sequence you want to put it in, the Canvas window will show the frames it is currently over, allowing you to find the exact point you want to drop the new clip in.
STEP 46
Open a sequence that already contains at least one clip. Go to the Snapping button and make sure it is disabled and light gray in color. Grab a clip from the Viewer and drag it into the Timeline and without releasing the mouse button, ease it through another clip already in the sequence. Watch the Canvas window update as you move through the clip. When you locate a frame that would make an acceptable edit, confirm that the mouse pointer will perform an Overwrite edit and drop the clip. The clip will drop right where you released the mouse button, as you would expect it to.
But there are some instances where such exactitude can be a hindrance. If you are moving a clip around on the sequence and you simply want to place it immediately following a preceding clip, dragging and dropping it against the last frame of the previous clip can be tricky. It’s easy to accidentally drop the clip a few frames over the end and overwrite or insert into the first clip rather than at the exact end of it.
Snapping automates this process for you. If Snapping is enabled, when the playhead or the In or Out point of a clip comes within a certain distance of any other In or Out point or the playhead, small triangles appear at that point on the sequence, alerting you that if you drop the clip it will snap to that position (Figure 5-50).
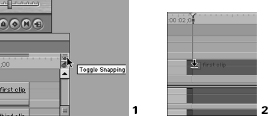
Now utilize Snapping by clicking on the Snapping button and turning it green. Grab a new clip from the Viewer and drag it to the sequence where the two clips are. Move the clip around the sequence. As you do so, you will see the incoming clip’s edges jump to the ends of the clips already there, as well as the playhead.
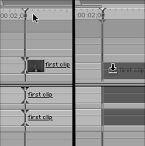
STEP 48
As the incoming clip snaps to an end or to the playhead, triangles appear above and below to indicate that the clip has been snapped to another clip. Pick one of the Snap-enabled In or Out points and drop the clip, performing an Overwrite edit. The clip will edit in, snapping tightly to the chosen edit point.
Snapping is a feature that should be used based on your editing situation. It is chiefly useful when your Timeline scale is very large. At such times, it is difficult to spot clip edges and remove gaps between clips in a track. In addition, Snapping functions between clips on different tracks. This allows you to make sure that In and Out points of clips join up together all across the sequence, rather than simply within a single track as other edit functions allow.
Toggle Linking button
The button underneath the Toggle Snapping button is called the Toggle Linking button (Figure 5-51). Linking involves the way a single clip behaves in its relationship with other clips that are connected (linked) to it. When clips are linked, any trimming edits applied to one part of the clip will be applied to the other linked clips. When linking is enabled, the two chain links on the Toggle Linking button are unbroken and green. When Linking is disabled, the symbol becomes a single white broken chain link.
What is linking? When we captured clips, we did so by capturing video and audio at the same time. Final Cut Pro treats the two as a linked clip from the inception, and unless you change that relationship, it will always do so. But the video and audio are really not one integrated clip. The clip really contains one video clip and two audio clips that are linked by Final Cut Pro at capture.
Although Final Cut Pro does this at capture, audio and video clips do not have to stay linked to each other, and they can be in turn linked to other clips. The only restriction to this is that a single video clip can be linked only to either one or two audio clips. Two video clips cannot be linked, and more than two audio clips cannot be linked (although they can easily be grouped by the process of nesting as we will see later).
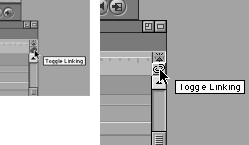
Linking is a completely artificial state. You can enable or disable it for clips in a sequence at any time by selecting the linked clips and toggling the Link command in the Modify drop-down menu. Toggling this command this way creates or breaks links between clips based on their current link status; linked clips will become unlinked, and unlinked clips will become linked if they fit the restrictions (you can break multiple clip links at once, but you can only create links based on the 1 video clip–2 audio clips limitation).
Using clip linking, it’s easy to link up a video track with other audio sources. This is useful if you are using audio recorded by another device such as a minidisk recorder instead of the camera mikes, a technique called double-system sound. It is useful also if you want to sync up music tracks from an audio CD and make sure they stay locked to the video clip.
Let’s quickly perform a bit of sophisticated linking and unlinking. We will take the video portion of one linked clip and link it to the audio portion of another linked clip. We will break all the links between two captured clips, and then we will delete the video clip for one and the audio clips for the other. Finally, we will link the video clip from the one and the audio clips from the other together to form an artificially linked clip that contains the audio and video we want, regardless of what those clips were captured with.
STEP 49
First, clear off the sequence by selecting all clips and deleting them. Next, edit two different captured clips into the sequence. Select both clips using the marquee selection technique or by shift-clicking them (Figure 5-52). When they are both selected, go to the Modify dropdown menu, and look for the Link command.
The Link command in the Modify drop-down menu is actually a Link toggle switch as well. If the Link command is checked in the menu, it means that the currently selected clip in the sequence is linked with other clips. If it is not checked, the currently selected clip or clips are not artificially linked.
Toggle off the links between the selected clips by selecting the Link toggle switch in the Modify drop-down menu. This will break all links between any currently selected clips.
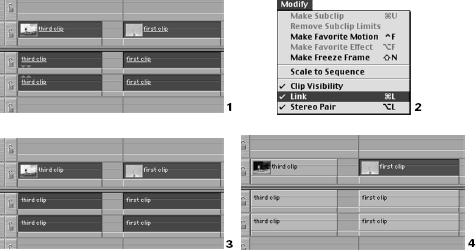
Notice that the names of the newly unlinked clips in the sequence are no longer underlined. When a clip is linked to another clip, its displayed name in the sequence is underlined to signify its linked status. Although all the clips are still brown, because they are still selected, they are no longer linked to each other.
STEP 51
Click anywhere on the Timeline to deselect all the clips. Then, click on any individual video or audio clip. Notice that only the clip you click on is selected, not its sister clips that were captured with it.
When you click on and select a video or an audio clip, it no longer automatically selects the other video or audio portions that were originally captured with it. This is because the initial artificial link between these three individual clips of video and audio has been manually broken. Although we get used to thinking of captured video and audio as a single clip, they are actually separate clips that can be broken up as necessary.
STEP 52
Now that the clips are completely unlinked, shift-click to select the two audio tracks of one of the clips and then return to the Modify drop-down menu to toggle Linking back on for the selected audio tracks (Figure 5-53). If the tracks were originally part of a stereo pair as well, you can also select Stereo Pair from the Modify drop-down menu to reconnect them in that manner as well, allowing you to create panning effects between them.
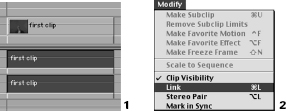
Note that the underline returns to the name of the audio tracks when you relink them. If you reenable the Stereo Tracks toggle for them, little triangles appear in the audio clips, indicating the special stereo relationship between the two.
STEP 53
Click anywhere on the Timeline to deselect the freshly relinked audio clips, then click on the video track above them that they were originally captured with and linked to. Hit the Delete key to remove that video track from the sequence Timeline (Figure 5-54).
STEP 54
Marquee-select or Shift-click–select both the audio tracks for the other clip that was also just unlinked, and delete them as well, leaving the video portion still sitting in the sequence (Figure 5-55).
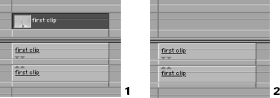
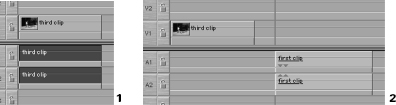
Click on the remaining video clip in the sequence, then pick it up and drag it above the freshly relinked audio tracks (Figure 5-56). Use snapping to make sure that the beginning of the video clip you are moving lines up with the beginning of the two linked audio clips you are moving it over.
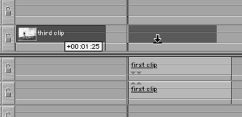
STEP 56
When the video and audio portions are lined up, marquee-select or Shift-click select to select the video clip and the two newly relinked audio clips. When all three are selected, return to the Modify drop-down menu and once again toggle the Link switch (Figure 5-57).
STEP 57
If you deselect them all and then click on any one of them, the others are automatically selected along with the one clicked on. Notice that the underline has also returned to the name of the video clip, signifying that it is now linked with audio track(s).
This exercise should demonstrate the malleability of Linking. Although editors many times take video and audio captured and linked clips for granted, they really are individual pieces that can be broken up and reassembled on an as-needed basis.
Why then offer a Toggle Linking button in the Timeline? Because sometimes it will be necessary to quickly unlink a clip or clips to make a minor adjustment. Rather than physically unlinking many clips and then having to go in and relink them individually after adjusting them in the long process just described, Final Cut Pro allows you to suspend the links for all clips in a sequence for the moment. When you’ve completed your adjustment, you turn the Linking back on, and everything functions as before. The link between the clips was never lost; it was only disregarded for the moment until you choose to reinstate it.
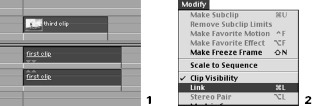
This ability to quickly unlink and relink clips becomes very useful when performing what is referred to as a Split Edit or an L Cut. This popular sort of edit involves audio clips beginning before their linked video clips in an edit. Often an editor will need the next clip’s audio to precede the edit by a short duration. Because we can unlink our clip, extend the In points for the audio clips as much as we want, then relink them to the video clip, it is very easy to deliver this effect. Audio and video tracks do not have to line up to be linked; in fact, they can be minutes apart from each other on the sequence Timeline. The only limit for linking is that one video can only be linked with a maximum of two audio clips. Final Cut Pro offers a way to do Split Edits from within the Viewer window, but doing so on the sequence is just as functional.
Sync issues with linking and unlinking clips
You may be a little alarmed about the ease with which Final Cut Pro allows you to link and unlink clips. If one didn’t know better, this would be an invitation to audio and video sync disaster. If you unlink a clip, change the position of the video or the audio slightly, and relink, then your sync will be off forever. As long as the two are linked, you cannot move the video or audio without moving the other portion of the clip equally. In truth, the main reason that clips are linked at capture is to avoid such situations, maintaining a rock-solid link between video and audio from capture to mastering to tape.
Fortunately, Final Cut Pro throws in another feature as a guarantee against loss of sync, even in the event that your unlinked clips are adjusted and relinked. Whenever audio and video clips are captured together, their media in your scratch disk is integrated in special ways. Final Cut Pro can sense this, so anytime that two clips were captured together and are placed in a sequence but are forced out of sync, you will see a small red box at the head of each clip stating the number of frames by which the two are out of sync.
STEP 58
Clear off the sequence by performing a marquee-select or shift-select of all clips and hitting Delete. Edit a captured clip into the sequence (not a relinked clip, this clip must have been captured).
STEP 59
Visit the Toggle Linking button in the top right-hand corner of the Timeline window under the Snapping button and make sure that it indicates Linking enabled with two green chain links. Now go to the clip and select any part of the clip’s individual audio or video clips. Selecting one selects all the individual clip items because they are linked and because linking is toggled on.
STEP 60
Now go to the Toggle Link button and disable it (Figure 5-58). When you return to the clip and click on any of the individual audio or video clips, you will notice that only the individual video or audio clip is selected, just as if you had unlinked them using the Modify drop-down menu Link switch.

STEP 61
Pick up either a video or an audio portion of the clip, and move it over slightly so that its edges still overlap the items that it was previously linked to (Figure 5-59). You will see a small red box appear in each of the items that were previously linked (if an item is selected, its color switches to brown, and the red box will also change, appearing blue).
The number in the red box reveals how many frames and seconds out of sync the items that were originally captured together are. A positive number of frames indicates that the clip is ahead of its companion pieces; a negative number indicates that the clip is behind them. Final Cut Pro offers you a quick tool to move the clips back into sync.
STEP 62
Hold down the Control key and click on the red “out of sync” box for a moment (Figure 5-60). A contextual menu will appear offering to Move or to Slip the item back into sync. For the moment, select Move Into Sync. We will discuss Slipping techniques in the next section, which focuses on the Toolbar.
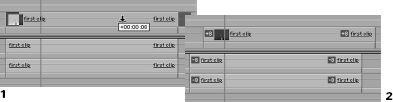
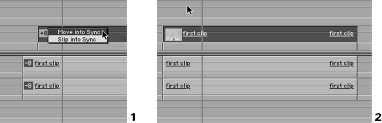
Some care must be taken here for a couple of reasons. The “out of sync” box appears only when such previously connected items actually overlap each other. If the items are isolated from each other over time, Final Cut Pro will not assume that they are out of sync, but are simply recurrent uses of the same clip. Further, if you are using the same clip twice in the same stretch of frames in a sequence, Final Cut Pro can become understandably confused as to which clip items are supposed to be resynced to which, yielding mixed results.
The Toolbar
The small strip referred to as the Toolbar is full of little tools that will make your life more interesting in Final Cut Pro. Many of the tools are operational within the Timeline window, although some also have functionality across the application. Some functions cannot be performed without switching to the proper Toolbar tool.
Does this mean that you should constantly be clicking back to the Toolbar window to switch tools? Absolutely not. Using the mouse to access that thin tiny little window will do a number on your wrists and isn’t a particularly fast way to work anyway. The answer is the keyboard shortcut. For every tool in the Toolbar, there is a simple keystroke that will change the mouse pointer to the tool you want to access. There’s no faster way to work, and you’ll find that most experienced nonlinear editors rarely use the mouse for anything other than positioning of onscreen items, preferring to fully utilize the keyboard shortcuts that really speed up the workflow.
If you are just beginning your editing life, memorizing all those shortcuts may seem daunting. There are a couple of options that make that process much easier. Each copy of Final Cut Pro comes with a set of keyboard overlay stickers that you can use to learn the shortcuts. Each overlay sticker shows the primary tool that the keystroke will enable. Because the stickers are translucent, you can still see the letters underneath the stickers, allowing you to use the keyboard normally.
With all due respect to Apple, using the stickers is a pretty bad idea, as they tend to stick to everything except for the keys they are intended to fasten to. Invariably they end up in a big gummy pile in front of the keyboard.
What other options are there? There are free keyboard layout charts available that show where the keystrokes are, although that involves looking away from the keyboard, which can be very distracting and obstructive to the learning process. Still, you can’t beat the asking price, and it does help you to learn the keyboard shortcut system.
If you are willing to spend a few dollars, some companies manufacture special Final Cut Pro–dedicated keyboards. These keyboards not only contain the name of the tool that the keystroke enables but are also color-coded based on the type of function that the keystroke performs (e.g., an edit tool or an effects tool). Since they are basically just normal Macintosh keyboards with specially colored and labeled keys, they usually perform without extra software or hardware. Beginning editors can quickly pick up the functionality of the keyboard in a fraction of the time it would take to learn from accessing the manual. Either way, learning the shortcut keystrokes is very important and will save lots of time searching for tools in the menus or the Toolbar.
The General Selection tool
The first tool on the Toolbar is the General Selection tool (Figure 5-61). This is the generic mouse pointer arrow that is enabled when you start Final Cut Pro. The Selection tool is simply used for selecting items and moving them around. This tool, as contrasted with the following set of selection tools, is used for selecting individual items. When you want to pick up, move or load up a clip in the Viewer, for instance, this is the tool to engage.
Hidden toolsets
Although there is only one position for each toolset on the Toolbar, Final Cut Pro uses a click-and-hold method of choosing the particular tool from any toolset.
STEP 63
Click on the button below the General Selection tool, and hold the mouse button down briefly (Figure 5-62). Two more tools will appear next to the Toolbar with the currently selected button.
The Selection toolset
The toolset button below the General Selection tool on the Toolbar engages a different set of selection tools that are more specific to particular tasks. Click and briefly hold the button. You have a choice of three specialized selection tools here.
STEP 64
Edit Selection tool
Click on the first button of the toolset directly beneath the General Selection tool (Figure 5-63). If you move the mouse pointer over the Timeline window, you will notice that the mouse pointer has switched from the arrow to a small crosshair. This button activates the Edit Selection tool, which performs the same action as double-clicking on an edit point between two clips on a sequence. When you click on such an edit point, it automatically opens up the Trim Edit window containing the edit point you clicked on.
![]()
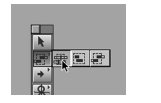

Why use this tool instead of just double-clicking with the General Selection tool as we did earlier? As we saw when discussing the Trim Edit window, we can have more than one edit point in the Track drop-down bar within the Trim Edit window if more than one edit point was selected. With the General Selection tool, this meant command-clicking each additional edit point to add them to the Track drop-down bar to be used in the Trim Edit window.
The Edit Selection tool makes this task easier. Clicking anywhere around the edit points you want to use and marquee-selecting them selects any edit points and then adds them in the Trim Edit window. Instead of command-clicking around your tracks and then double-clicking to open the Trim Edit window, simply choose this tool and marquee-select around the edit points you want to work with. If you forgot a couple of edit points and want to add them to the current tracks loaded into the Trim Edit window, simply return to the sequence, Command-click and marquee-click the other edit points, and they will be added to the Track drop-down bar in the Trim Edit window.
The Group Selection tool
The middle tool in the selection toolset is the Group Selection tool (Figure 5-64). Once again, the mouse pointer will assume the shape of a crosshair. This tool behaves very much like the Generic Selection tool. When you click and drag a marquee with this tool, it selects everything it touches, as well as any clips or items linked with whatever it touches. If the marquee you drag with the crosshairs touches any part of a clip, that clip and its linked clips become part of the active selection.
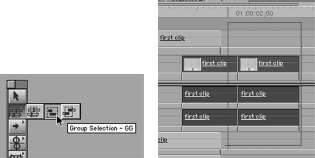
Range Selection tool
The final tool to the right on this toolset is the Range Selection tool (Figure 5-65). This unique little tool lets you select a section of one or more clips in a sequence. But unlike the Group or Generic Selection tools, the Range Selection tool does not force you to select an entire clip.
Once again, as with the Edit and Group Selection tools, the mouse pointer displays as a crosshair. To make a selection using this tool, click and drag a marquee over an area of one or more clips within a track. Unlike the other selection tools, though, the Range Selection tool does not see clip edges and allows you to select a section of a clip and/or a range of clips. This means that you can select a smaller part of a clip rather than the whole thing. You could, for example, select the last half of one clip and the first half of the next clip.
It does, however see track boundaries, so the range of frames you select with it all need to live within the same track. Because it is a selection tool, it selects linked clips with respect to the way you have the Linked Selection button set; Linked Selection enabled will result in material in other tracks being selected along with the material you select in the track, while Linked Selection disabled will result in only the one track’s material being selected.
The tool is referred to as a range tool because it effectively allows you to discriminate footage over a range of frames rather than based on a clip’s In and Out points. This can be very helpful when exporting clips as QuickTime movies or in other situations where you need to isolate a specific section of your sequence, regardless of which clips are included. It is literally a selection of frames in a track, rather than a selection of clips in a sequence.
This tool can be used to load up just a section of a clip from the sequence into the Viewer window for manipulation, instead of loading up the entire clip. When you select only a portion of a clip, you can selectively apply effects filters to just the section of the clip, rather than applying them to the entire clip.
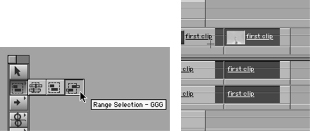
The next button below the special selection toolset is another toolset dedicated to selection, but this time the selection criteria is for clips ahead of or behind the sequence playhead within a track. Clicking and holding the button reveals five possible track selection types here.
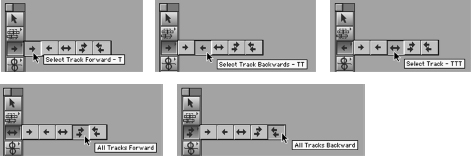
The arrow pointing to the right will select all items in a track occurring to the right of the frame the playhead is currently parked on. The next performs the same action, but to the left of the frame the playhead is currently parked on. The middle choice selects all clips in the track. The fourth and fifth choices on this toolset, symbolized by the double arrows on the button, allow you to select all clips on all tracks to the right or to the left of the selection point respectively.
This tool does not override the Linked Selection button in the sequence, so if all your video clips are linked with audio clips, as they will after initially being captured, selecting items in the video track using a track selection tool will also select their linked audio clips in the audio tracks.
Ripple and Roll Edit toolset
The next toolset below the track selection tools contains the Ripple Edit and Roll Edit tools (Figure 5-67). We have already encountered these functions in the Trim Edit window. The difference is that with these tools selected from the Toolbar, their trim functionality can be utilized directly on clips in the Timeline window rather than from within the Trim Edit window. By clicking on an edit point with either of these two tools, you can trim edit points and dynamically view the results before settling for an edit.
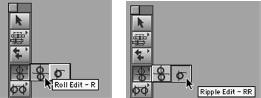
The Roll Edit tool
The Roll Edit tool moves the In and Out frames for the two clips of the edit point chosen in the sequence. Although you do not have access to the large video preview windows and the In and Out timecode tools that are available in the Trim Edit window, when you use the Roll Edit tool, the Canvas window itself switches to a mini–trim window, showing the In and Out point frames as you adjust them. The Timeline is also dynamically updated as you drag. Should you wish to use the Trim Edit window for greater precision at any point, double-clicking the edit point with the Roll Edit tool will open it up just as the Generic Selection tool did.
STEP 65
Edit two abutting clips into the same track on a sequence so that they have an adjoining edit point. Disable Snapping in the Timeline temporarily (hit the N key to toggle it off) so that you can engage the Roll Edit tool from the toolset without imprecise jumping from edit point to edit point.
STEP 66
Click the mouse pointer on the edit point and drag in either direction (Figure 5-68). As you drag, keep an eye on the Canvas window, watching the Out and In points change as you move the pointer. Also note that in the Timeline window, as you move the edit point around the clip there is an indicator line demonstrating where the current Out and In points for the two clips are. Release the mouse pointer, and observe that the clips now meet at different Out and In points respectively.
As with the Roll Edit in the Trim Edit window, this trimming action shortens the length of only one clip and adds equally to the length of the other. The duration of the two clips combined remains the same. The Roll Edit cannot roll either clip past the media limits of the media file it refers to, thus limiting how far either clip may be roll edited.
The Ripple Edit tool
The Ripple Edit tool offers the same trimming functions as it does within the Trim Edit window. As with the trimming action there, the Ripple Edit tool only extends or shortens the duration of either the outgoing or the incoming clip, whichever the tool is being applied to. Since the tool is Rippling the edit point in only one direction, it affects the duration only of the clip being trimmed; if it affected two clips’ durations, it would be a Roll Edit Tool! It does, however, affect the overall length of the sequence, because it is adding to or subtracting from the length of one of the clips in the sequence. As the Rippled clip is trimmed, the rest of the clips in the sequence move over to avoid creating a gap or being overwritten by the duration change of the Rippling clip.
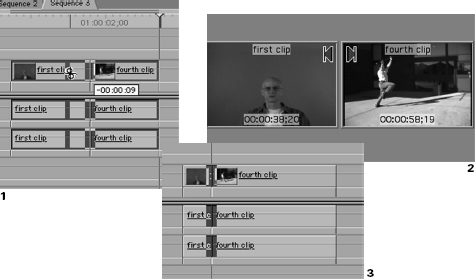
In the Trim Edit window, the clip being Rippled is determined by which video window the green indicator was lit over. With the Ripple tool in the Timeline window, an edit point will only show either the In or the Out point selected. Clicking near the edit point of either the Outgoing or the Incoming clip will switch the edit point that is selected to be trimmed. Then moving the mouse pointer over either the left, outgoing clip or the right, incoming clip will switch directions of the Ripple Edit tool’s “tongue,” indicating which clip of the edit point the trimming action will be applied to. Select the edit point you want to affect, move the mouse pointer over the clip you want to shorten or lengthen, click and drag, and your clip will be trimmed (Figure 5-69).
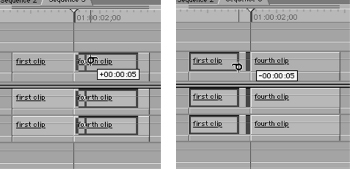
As with the Ripple Edit action, the Canvas window will show a continuous update of the new Out or In points the trim action is producing. Not surprisingly, the keyboard shortcuts that applied in the Trim Edit window, the [ and ] or Shift-[ and Shift-] keys, will work on the Timeline as well, provided the Ripple or Roll tool is activated and an edit point is selected.
The Slip and Slide toolset
The next toolset below the Roll and Ripple tools is another combination of convenient editing tools, the Slip and Slide tools (Figure 5-70). These two tools can make quick, one-stop adjustments that would otherwise take several steps and a couple of windows to perform. The Slip and Slide tools allow you to adjust either the length or the In and Out points of one clip within a group of clips without affecting the overall duration of the group of clips. They allow you to quickly shuffle the length or edit points of a clip or clips so that you see the range of frames you want without changing what can often be a sequence duration predetermined by other factors, such as a client’s wishes or the length or rhythm of a musical score.
The Slip tool
The Slip tool focuses on one clip surrounded by other clips in a sequence. If you edit a clip to a sequence and then realize that you wanted to use an earlier part of the Master clip than the later part you set In and Out points for, instead of reloading the Master clip in the Viewer and editing in a new version of the clip, you can simply “slip” the contents of the clip you already have on the sequence. Thus a clip on the sequence that was edited from the later part of its Master clip when it was created in the Viewer window could be “slipped” so that the earlier part of the Master clip is now used in the clip.
The Slip tool’s effectiveness as a fast-and-dirty editing tool is best displayed with a group of four adjoining clips. To line up four clips quickly in a sequence, we will use a technique referred to as storyboard rough cutting.
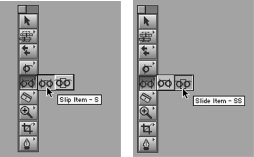
Storyboarding rough cut technique
Storyboarding is an old film term that describes a comic strip–style panel drawing of different scenes to be shot (Figure 5-71). Because film and video production is expensive, directors usually “storyboard” the progression of their planned shots in comic-book panels to think out the order and rough look or angle of each shot. These storyboards are then used as a shooting template for everyone in the production. The cinematographer knows how to construct a shot, the art director knows how to arrange the set, and all involved can quickly and conveniently get a sense of what the director wants them to do to produce shots.
Storyboards are more than useful in productions. In addition to keeping everyone on roughly the same page, they help the director actually think out the story line. The difference between productions that use storyboards and those that don’t is that the few that do not storyboard usually produce unconvincing, disorganized, and weak results. A short storyboard session prior to a shoot answers most of the on-set questions and eliminates unnecessary surprises.
The usefulness of storyboarding does not end with the shoot. Storyboards also help later to construct the edit, since they also generate a linear progression of the storyline through the series of shots being edited. Once you’ve captured all the clips from a shoot and they are gathered in a bin in your project, you can simply order them based on their occurrence in the storyboard and create a quick rough cut of the entire project. This technique is an efficient way to generate a rough cut of your project. For this example, you will need at least four separate captured clips.
STEP 65
Log and capture four new video clips, each of which is at least 15 seconds in duration, making sure to include frame handles of at least 5 full seconds. In normal practice such long handles are not necessary, but shorter frame handles will make it more difficult to see the slip action this exercise is investigating. Don’t forget to figure this long handle time in with the necessary pre-roll time when you log the clips to avoid “unable to lock deck servo” messages. Also don’t forget to use a Logging Bin for these clips so that they get stored in a special bin of their own.
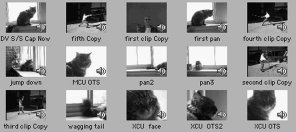
To use the Storyboard Rough Cut technique, we will use the Large Icon view of the Logging Bin to create a sort of comic strip panel–style storyboard of our clips. We will arrange them in the order that they should occur, left to right and top to bottom, just like the Sunday newspaper funnies. Then we will take the whole group of clips and deposit them in order on the sequence Timeline in a rough cut. All that will be further required is the trimming actions of the editing toolsets of the Toolbar.
STEP 67
After the capture process is complete, open the Logging Bin and look at the four captured clips. With the Logging Bin window active, go to the View drop-down menu, select Browser Items and, in the submenu that appears, select As Large Icons (Figure 5-72).
Normally, the Browser window is most effective when viewed as a list so that all the detailed information about your materials is available. But when you choose As Large Icons, you are given a thumbnail of each item. This thumbnail by default shows the first frame of a video clip, although you can change which frame it displays by scrubbing the clip and setting the Poster Frame, which is discussed subsequently.
STEP 68
Now that your clips are all displayed in large icons in the Browser window, arrange them left to right, top to bottom, as if you were reading them like newspaper comics. With only four clips, you’ll only be able to create two rows of two columns, so if you really want to see this as a functional storyboard rough cut, feel free to add more clips to the Logging Bin. Four clips is really just the minimum required to demonstrate the technique.
STEP 69
Once all your thumbnailed clips are in the proper comic strip–panel order, create a new sequence. Go to the File drop-down menu, select New, and, in the submenu that appears, select Sequence.
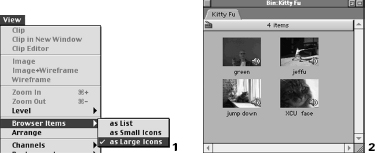
Click in the Logging Bin window and drag a marquee selection so that all the thumbnail clips are selected (Figure 5-73). When they are all selected, pick up any one of the clips and drag it to the sequence. When you do this, you will see that all the clips are carried over simultaneously and laid down on the sequence with no gaps between them. You could also simply pick up the bin itself from the Project tab in the Browser window and drop it in the sequence for the same effect.
Although we have not done any precise trimming yet, the clips in the sequence are now in a linear order that follows the left-to-right and top-to-bottom order that they maintained in the Logging Bin. All that remains is to go through and individually trim the clips and their edit points to meet our needs.
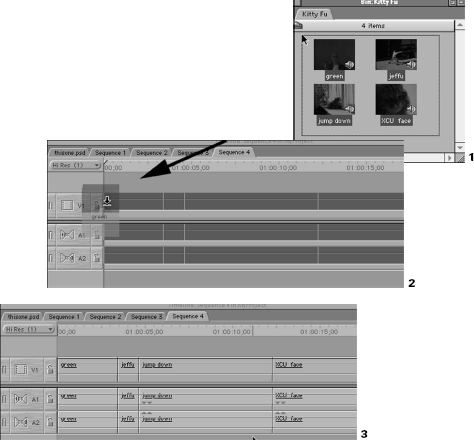
The Trim Edit window or the Ripple and Roll tools are perfect for editing these clips when you need to add or remove frames of video from the beginning or end of a clip, specifically to shorten or lengthen it. But in some circumstances, the fastest way to correct the edit points would be to simply adjust the contents of the clip instead of moving its edit points back and forth.
STEP 71
Go to the Toolbar and make sure that your Slip tool is enabled. Then go to the sequence where your rough-cut sequence of clips is sitting. Click on any clip that is surrounded by two other clips, and click and drag to the left and right while holding the mouse button (Figure 5-74).
Overlaying the clips on the sequence Timeline, you will see a ghost image of the Master clip that the “slipping” clip originated from moving around following the mouse pointer. The ghost Master clip shape is there to let you visually know how far you can slip the clip within the current In and Out points of the subclip on the sequence Timeline.
STEP 72
Move the ghost clip around somewhat and then release the mouse button, you will see that the In and Out points, and therefore the duration, of the clip have not changed. However, the portion of the Master clip that these In and Out points relate to has changed. Literally, Final Cut Pro is slipping the subclip in the sequence inside the Master clip so that you can hone in on the footage you want the subclip to use. This is much faster than reloading the Master clip into the Viewer window, setting new In and Out points for the clip and then replacing the old clip in the sequence.
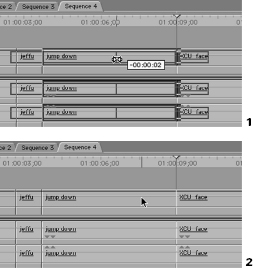
The Slip tool is primarily useful for what is referred to as B-Roll footage. Remember from our discussion of A-B Roll editing that B Roll is footage that is incoming footage following an outgoing cut, many times being accompanied by a transition of some sort. B-Roll, as a production term, follows this concept in that B-Roll is extra, relevant but nonspecific footage you might use to break up long static cuts.
For instance, if you are editing a talking-head interview with a school administrator, cutaway shots of kids playing in a school playground and school buses would make excellent B-Roll footage, because they reference the interview but can just be picked up at random rather than scripted out. Interesting and well-shot B-Roll footage is something you can never have too much of, and it can really help smooth out the editing rhythm in a sequence.
With a quick clip adjustment using the Slip tool, all you need initially are your subject footage, long B-Roll clips, and a sense for when to cut away from and back to your main content. The duration that the B-Roll clips should last will largely be determined by your content. If you capture lots of different B-Roll shots in a single Master clip, all you need to do is use the same B-Roll clip frequently in your sequence. When you need a specific shot to appear in the B-Roll cutaway, just slip the B-Roll clip around until you get to the specific section of the clip you need.
Slip into Sync
As a final note, it should be remembered that the Slip function was also just encountered earlier in the chapter in the “Move into Sync/Slip into Sync” box when we Control clicked the “out of sync” box in the Linking example. We chose “Move into Sync” there to move the Control clicked clip back into sync with its related clips.
The “Slip into Sync” choice would have performed an interesting variation on this. Instead of moving the out of sync clip to a new position in the sequence to resync it, the “Slip into Sync” would perform a slip action to the content of the out of sync clip such that it is correctly synced although it does not squarely sit over its companion clips (Figure 5-75). Although the resynced clip does not change its position on the Timeline, its frames are slipped so that the frames that do overlap the other associated clips are in sync. This can be tricky to work with and can easily make sync matters worse if used improperly, so be careful to select the Control-click option that is appropriate to your situation.
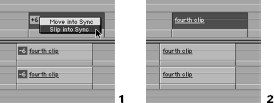
The Slide tool is a very convenient tool that also does not change the duration of a group of clips when it is applied to one of their number. But where it differs from the Slip tool is that it actually moves the clip around between the clips surrounding it, lengthening the clip on the one side and shortening the clip on the other so that the edit points of the clip’s edges remain intact and no gaps are created between clips.
The In and Out points of the clip you click and drag with the Slide tool stay exactly as they are in relation to the Master clip they refer to. In fact, the clip you click and drag is not changed at all, except with regard to where it sits in the sequence Timeline. But in order for the clip to occur earlier or later in the group of clips of which it is a part, the clip preceding and following must have their outgoing and incoming edit points simultaneously trimmed to accommodate the “sliding” clip.
STEP 73
Select the Slide tool on the Toolbar and click on a clip that is surrounded by two adjoining clips. Drag it back and forth, and you will again see a ghost image of the clip you are moving, but this time it will maintain its sequence subclip length and instead show its new changed position within the surrounding clips (Figure 5-76).
STEP 74
When you release the mouse button, the clip will jump to the new position you have moved it to, but the edit points for the surrounding clips will adjust so that no gap is introduced. The Out edit point for the clip preceding the “sliding” clip and the In edit point for the clip following the “sliding” clip will have shifted, being shortened or lengthened as necessary so that no gap is introduced on either side of the “sliding” clip.
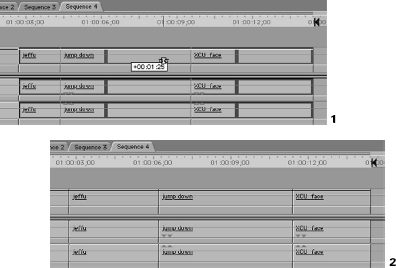
This sort of tool will also be very useful with B-Roll footage, but this time for maintaining the exact length of the B-Roll clip. If you wanted to make sure that a 3-second and 15-frame B-Roll shot of a school bus is used in its entirety and that we cut to it as the school administrator says the words, “School bus,” this would be the perfect tool. Just “slip” the B-Roll shot up to the footage of the bus and “slide” it right into position at the frame in which the administrator begins the words. Nothing could be simpler or faster.
Monitoring the Slip and Slide tools in the Canvas Window
When you use the Slip or Slide tools, the Canvas displays the familiar double video window to show you the frames of the clip that you are adjusting (Figure 5-77). With the Slip tool, the first video window shows the new frame used for the In point of the clip, and the second window shows the new Out point frame, since the Slip tool will change both In and Out frames of the “slipped” clip. With the Slide tool, the first window shows you the new video frame used for the Out point for the preceding clip, and the second shows you the new frame being used for the following clip’s new In point, because the changing frames here will be the preceding and following clips, not the “sliding” clip itself.
There are limitations to what you can do with this tool of course. You can’t Slip or Slide past the media limits of the clips you are working with, which is why we made sure that there were adequate handles on each clip in our example. Since the Slip tool will move the In and Out points of the clip you are moving and the Slide tool will change the outgoing and incoming edit points of the surrounding clips, you need to make sure that these clips have enough media to move around in. Final Cut Pro will not tell you you’ve reached the media limits; it will simply not let you move past them. As usual for the trim tools, a small timecode box opens up as you adjust, specifying how many frames you have adjusted for precision work.
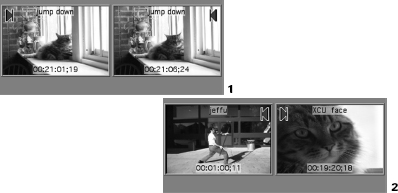
The next toolset on the Toolbar is referred to as the Razorblade tool. The Razorblade tool is a very intuitive tool that can be picked up very quickly. The Razorblade simply cuts a clip into two separate clips in the sequence at the point where the tool is clicked. This creates two clips from the original: one clip preceding the Razorblade point and one clip following it. The last frame of the first clip occurs right before the first frame of the second clip.
This toolset consists of the tool itself and only one variation on it—the single Razor-blade, which performs the cut just described for the single track that is clicked (this includes any linked items if Linking is enabled), and the Razorblade All, which performs the same sort of cut across all clips in all tracks.
Using the Razorblade tool
To illustrate the Razorblade tool, we will cut a clip. Then, using a shortcut called the Ripple Delete, we will delete the part of the razorbladed clip we don’t want and snap the clip following it up to the razorbladed edge, eliminating any gap in the sequence.
STEP 75
Select all clips in the sequence and delete them. Next, perform the storyboard rough-cut technique again so that there are contiguous clips in the sequence.
STEP 76
In the sequence, move the mouse pointer over a clip. Using the J-K-L shuttling technique, find a frame in the clip where you want introduce a cut separating the clip into two parts (Figure 5-78).
STEP 77
Select the Razorblade tool on the Toolbar, and then return to the sequence. Make sure that Snapping is enabled in the Timeline window, and then move the mouse pointer along the track of the clip you want to cut.
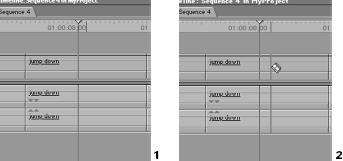
As you move the Razorblade mouse pointer along the clip in the track, you will see a small vertical line indicating which frame the tool will cut if it is clicked. Notice that the line appears in both the video and the two audio clips you drag it over. This is because the Linked Selection tool forces the Razorblade to perform the Razorblade action on all linked items.
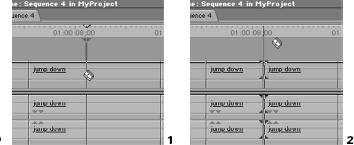
STEP 78
When the Razorblade is near the playhead position in the clip, it snaps to it, enabling you to cut precisely on the frame of the clip. Click on that frame, and the Razorblade will cut the clip in two (Figure 5-79).
Now that the clip has been divided into two separate clips, we want to get rid of the second clip that contains footage we don’t want. At the same time, we want to have any clips occurring later in the track to snap up to the newly cut clip end to eliminate a gap in the track. If we just selected the second clip and deleted it using the Delete key, there would be a long empty gap between the first razorbladed clip and any subsequently occurring clips in the track. Instead we will use the Ripple Delete function.
STEP 79
Move the mouse pointer over the second clip in the track that we want to delete. Press the Control key and click on this clip (Figure 5-80). You will be presented with a contextual menu with many options. Choose the option Ripple Delete. When you do so, the second clip will disappear and the subsequent clips in the track will shuffle back to fill in the gap created by the deleted clip. The keyboard shortcut for this is Shift-Delete.
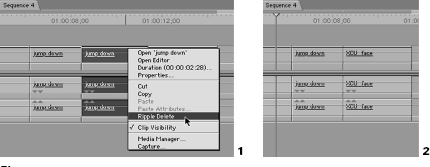
The Zoom toolset
The final toolset we will be looking at in this chapter is the Zoom toolset. This toolset is a pretty common feature in most image-editing applications. If you click on the toolset button in the Toolbar, you will see four options: Zoom In, Zoom Out, Hand, and Scrub Video. These tools allow you to customize and navigate the windows of Final Cut Pro in ways that do not affect the clips and sequences of your project. They help you refine the way the various windows appear and how much of them you can see at a given time. Rather than using the mouse or menus to change the shape of Final Cut Pro, learn to take advantage of this toolset.
The Zoom In and Zoom Out tools
The primary Zoom tool, shaped like a magnifying glass with a plus sign, simply increases the scale of whatever object it is applied to (Figure 5-81). If you click on a sequence with this tool enabled, the scale increases as if you had adjusted the scale controls of the Timeline window itself. The Zoom Out button next to the Zoom In button provides exactly the opposite effect, shrinking the scale of the window, so that you can quickly adjust the exact scale of any window you are working with. Holding the Option key down while the Zoom In tool is enabled converts it to the Zoom Out tool, making it a quick and precise customization tool. Just hit the Z key to enable the Zoom In tool, then the option key to pull back out if you Zoom In too far.
The Zoom In and Zoom Out tools have uses outside the Timeline window as well. The Viewer and Canvas windows can be boosted or shrunk in scale based on a percentage of the actual size of the frame. This number is located in the top center of each window. Generally speaking, this number should be left at 50 percent for optimized playback. Having the window at 100 percent can cause playback problems in machines with less video processing horsepower, and 100 percent is sometimes a bit extravagant when screen real estate is so precious. 50 percent gives a large enough image to look at without getting a headache; it doesn’t overtax the processor on playback, and it leaves plenty of room for all the other windows of Final Cut Pro.
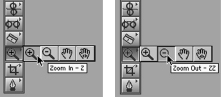
Sometimes it’s important to get a closer look at an image you are working with, however, as we will be doing in the following chapter on compositing. So it’s possible to Zoom In and Out much further than you would normally think necessary. But once you zoom in to 800 percent in the Canvas or Viewer, how do you navigate around the image to get to the section you wanted to look at? There are scroll bars on the edge of the window, but that will wear out your wrist and frustrate you as you try to get to a place you can’t see using only up-and-down or left-to-right scroll bars.
Predictably enough, Final Cut Pro has a tool to simplify this task. The Hand tool simply moves the window around so that you can go directly to the part of the window you want without fooling with scroll bars. It does not make any adjustments to clips or sequences; it functions only to move what is visible around the Final Cut Pro interface windows.
STEP 80
Load a clip into the Viewer window. Then select the Zoom In tool from the Toolbar. Click inside the Viewer window several times, each time watching the number at the top and center of the window jump in percentage points. Keep clicking till you see the number reach 400 percent (Figure 5-82).
By this time you should have noticed that the image is far larger than the window can accommodate. There are scroll bars to the bottom and side, but instead, use the Hand tool from the Zoom toolset of the Toolbar and grab the image, moving it around by clicking and dragging. You may have also noticed that after 100 percent, the image appears to disintegrate slightly, taking on a blocky appearance that is anything but the beautiful DV image you started out with.
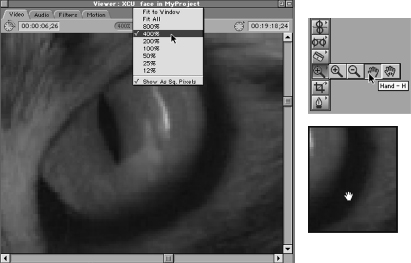
Relax, there’s nothing wrong with your television. You are seeing pixellation. Each frame of DV is made up of pixels (i.e., picture elements), which are the smallest indivisible sections of a digital image. A single frame of DV NTSC video contains 720 pixels across and 480 pixels high, or 345,600 pixels. When you zoom in to over 100 percent, you begin to see these individual pixels as the rectangular colored blocks that they really are, similar to the dots you would see in a newspaper picture if you looked at it under a magnifying glass. Once you zoom back out, you’ll see the pixels bleed back together into the lush imagery you were expecting. Just hit the Option key and Zoom Out to return to 50 percent.
The Scrub Video tool: Scrubbing a clip’s thumbnail
The last tool of this toolset is a really handy tool called the Scrub Video tool (Figure 5-83). Although its use is very specific, it can be a lifesaver if you are doing a lot of clip duplication from one Master clip. The Scrub Video tool offers a fast efficient way to set Poster Frames for your clips in the Browser window. A Poster Frame is the small image in the clip you see when your Browser Items are set to display as Large Icons (see View drop-down menu>Browser Items>Large Icons). The default Poster Frame for any given clip’s thumbnail will be the first frame of video in the clip.
This can be very confusing if a lot of your footage looks very similar, especially near the beginning of the clip. If you have five clips that all start with roughly the same shot, the Poster Frames in the thumbnails will all look exactly the same (Figure 5-84). Changing the image of the Poster Frame to some other more distinct frame from the clip can make it much easier to identify clips at a glance.
There are a couple of different ways to set the Poster Frame for a clip. If a clip is loaded into the Viewer window, you can set it by finding the frame you want to use with the play-head, then going to the Mark drop-down menu and selecting Set Poster Frame, or Control-P as the keyboard shortcut (Figure 5-85).
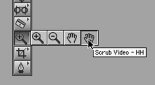
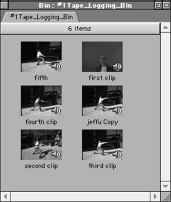
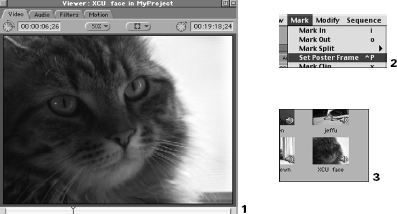
But doing this requires that the clip be loaded up into the Viewer window. Using the Scrub Video tool on the other hand allows you not only to look through the footage of the clip without loading it into the Viewer, it allows you to set the Poster Frame there as well.
STEP 81
Open the bin with your storyboard-style thumbnailed clips. If you have reset the bin to display as a list, or with no thumbnails, set it to show the bin as Large Icons by going to the View drop-down menu and selecting Browser Items followed by Large Icons. Your clips need to be visible as large thumbnails for this example (Figure 5-86).
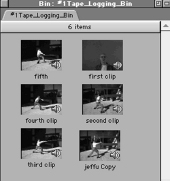
Go to the Toolbar and select the Scrub Video tool from the Zoom toolset. Now return to the Browser window and pick a clip that has a fairly wide range of imagery. Click in the center of the thumbnail, and drag to the left and right. As you do so, you should see the thumbnail scrub through the video frames of the clip.
This is a good way to quickly preview a clip before working with it, but it isn’t radically faster than loading the clip into the Viewer window, where you could get a much better view of the contents of the clip. The main value of the Scrub tool is not in previewing the footage in the clip but in selecting the Poster Frame. But when you scrub with the tool and release the mouse button, the Poster Frame snaps back to the first frame of the clip.
Setting the Poster Frame with the Scrub Video tool
To actually change the Poster Frame, you need to perform a little intricate Control-clicking.
STEP 83
First, click and drag on the thumbnail as you just did previously, scrolling through the frames of video in the clip. But as you drag, press and hold down the Control key.
STEP 84
When you find the image you want to use as the Poster Frame, first release the mouse button while still holding the Control key. Then, release the Control key and your Poster Frame will have changed to the frame you want to use (Figure 5-87).
All this may seem like gratuitous effort just to get a little unique thumbnail to look at in the bin window. And with Large Icon view, you lose access to all the great detail information in the columns that you get in List view. Furthermore, you will find that it is far easier to mentally organize Master clips and subclips in the infinitely customizable List view rather than the loose arrangement of the Icon views.
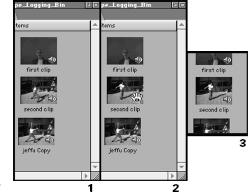
What are Master clips and subclips? A Master clip can be thought of as a clip that relates directly to the entire media it references. When you capture video footage, Final Cut Pro creates a QuickTime Movie media file and then a clip in your project that references that media file. This clip has access to the entire media file that you captured. We call this a Master clip. But what if you wanted to divide up that Master clip into smaller bite-sized portions? Perhaps the large captured clip contains several different takes, or maybe you just want to use selected bits of the same take repeatedly.
When you load the Master clip into the Viewer and give it an In and Out point to edit with, the Master clip retains these In and Out points. If you later on wanted to use a different section of the clip, you would need to change these and make new In and Out points. This is the way that clips work. They retain edit points until we change them.
But our minds generally do not work this way. Its usually easier to organize a project if you have isolated the various parts of your project in such a fashion that you can look at them en masse. How could you possibly storyboard rough-cut edit, for example, if all your material was contained in one Master clip? Clearly such a method will work only in very small, uncomplicated projects.
A much better way to organize a complicated project with Master clips is to create specific subclips and treat them as clips of their own, even though they ultimately reference the same media files as their fellow subclips and the Master clip from which they originate. Final Cut Pro certainly doesn’t care; media files are media files, clips are clips, “parts is parts.” The key to successful editing is both project organization and the ability to put the pieces of media together in a pleasing way. You can’t have one without the other.
The Final Cut Pro Subclip
There are a couple of different ways to create subclips from initial Master clips, each of which carries its own implications. The first way is through the Final Cut Pro Subclip command. Final Cut Pro allows you to do exactly as we are suggesting. When you load a Master clip into the Viewer window and set In and Out points, rather than immediately edit with this In and Out pointed–master clip, we can make a subclip based on the In and Out points you added. A new clip appears in the Browser that is limited to just the In and Out points you specified. And you are free to reload the master clip in the Viewer and create other subclips until you’ve completely divided and organized the master Clip into workable clips.
STEP 85
After switching the bin’s view mode back to List in the View drop-down menu’s Browser Items, double-click a long clip and load it into the Viewer window. Play through this Master clip and set an In and Out point for what you would consider to be a separate clip within the larger clip (Figure 5-88).
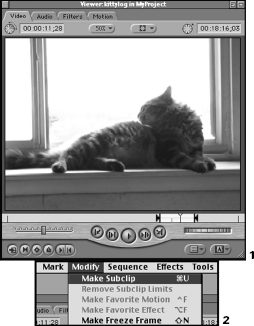
Set your In and Out points wide of the actual frames you want to edit; the Subclip command does not kid around and really considers its subclips as having no access to the rest of the media files they share with the Master clip. You will not be able to Trim Edit outside of the In and Out points of the subclip you are creating.
STEP 86
After setting the In and Out points in the Viewer window, go to the Modify drop-down menu and select Make Subclip at the top of the list. Instantly, a Subclip icon will appear in the bin with the Master clip. A Subclip icon can be distinguished by the shaggy right- and left-hand edges of its icon when viewed in List view mode.
STEP 87
Before moving forward, immediately click on the temporary name “Clipname Subclip” and type in a new name for the subclip, identifying which Master clip it came from and what it contains (Figure 5-89). Also remember that there are Comment and Description columns in the Browser window for adding details. There’s never a good excuse for forgetting what a subclip is or where it came from.
Double-click the new subclip in the bin to load it into the Viewer. You will see that the length of the clip is exactly the length of the In to Out points you set when you created it from the Master clip. If you edit it into a sequence, you will further see that the subclip can not be trimmed out beyond the frames you established as the In and Out point. Final Cut Pro regards anything created with the Make Subclip command as if it were a captured clip rather than a clip carved from a larger Master clip.
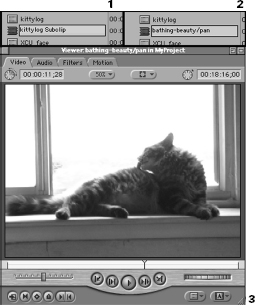
Of course, Final Cut Pro offers an override for this limit to the subclip’s ability to access the rest of the Master clip it was created from. At any time, you can select the subclip, return to the Modify menu, and choose Remove Subclip Limits (Figure 5-90). This restores the original access to all of the media to which the Master clip had access. The subclip is still a subclip, but it now references all the media that the Master clip does. Of course when you do this, you lose the range of In to Out that you set up the subclip for in the first place.
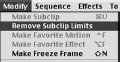
So, using this process, you can divide your Master clips up however you like. The process can be a little clumsy, though, if you are still in the rough-cut stage, because many times you don’t know yet how long a subclip should be. If you create subclips that are too short, there’s no way to add a little extra footage to the subclip short of restoring the entire media limits to the clip. That limitation can defeat the purpose of creating the subclip in the first place.
Another subclip technique
A second way of creating subclips from Master clips is really much simpler and more functional as long as you keep your eye on the ball and watch your naming conventions for your clips. Instead of creating a Final Cut Pro Subclip using the command from the Modify drop-down menu, we will simply duplicate the Master clip, and give the duplicate a new name along with the In and Out points we want to associate with it as a subclip. For the sake of avoiding confusion, Subclip capitalized will refer to Subclips created using the Final Cut Pro Make Subclip command. The word subclip with the lower case S will refer to this alternative method of creating subclips.
STEP 89
Create a new bin in your Project tab, and name it “Master clip>subclips.” Double-click this bin so that its window is open and available as you proceed through the next few steps (Figure 5-91).
STEP 90
Select the Master clip in your Logging bin, and load it into the Viewer window. Click the Mark Clip button in the Viewer, or go to the Mark drop-down menu and select Clear In and Out. This is to clear off any previous In or Out points; you want to start your subclips off as blank slates with no In or Out points.
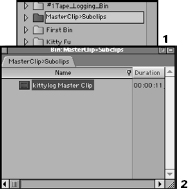
STEP 91
Once your Master clip is loaded in the Viewer and cleared of irrelevant edit points, set an In and Out point in the Master clip just as if you were going to create a Subclip via the Make Subclip command. Isolate the content you want in the clip, and surround it with In and Out points.
STEP 92
When you have In and Out points selected, grab the video window of the Viewer and drag it to the “Master Clip>subclips” bin window (Figure 5-92). When you drop it there, you will have an exact copy of the Master clip but one that contains In and Out points specific to what you want to use in the subclip.

Rename this new subclip in the “Master Clip>subclips” bin with a name appropriate to the section of the Master clip that you want to isolate in it. Technically, the name you give the subclip doesn’t matter as much as the fact that it be named uniquely. As you bring more subclips down into the bin this way, each one will carry the name of the Master clip, since you are really only creating a clone of it in the bin, rather than creating a totally new clip.
STEP 94
Return to the Viewer window, where the Master clip is still loaded. Repeat Steps 91 through Step 94 until you have created as many subclips as it takes to divvy up all the different content in the Master clip.
STEP 95
After you’ve completed the creation of all the subclips you want in your special subclip bin, double-click one of the subclips and load it into the Viewer. Observe that all the frames of the Master clip are still available as handles outside the In and Out points of the subclip, but that each subclip retains the special In and Out points that were set right before you cloned the Master clip into the subclip bin. Load up other subclips to further demonstrate this fact.
Creating thumbnails in the List view
You may find yourself asking, “Why can’t I have a clip thumbnail in the List View?” All the foregoing processes occurred in the List view mode, where by default there is no clip thumbnail. And although thumbnails are just icing on the cake for the really well organized, there’s no reason why we shouldn’t help ourselves to as much icing as we can get.
There is a way to enjoy the convenience of the Large Icon view’s thumbnails in the List view mode. Although using List view will not allow you to arrange your clips in storyboard fashion as is possible in Large Icon view, most editors find that the List view combination of thumbnails and informational columns along with the ability to arrange clips by any criteria you can think of is far more important than assembling storyboard panels. If you need to look at things from a storyboard perspective temporarily, there’s no reason you can’t switch View modes briefly, then switch back.
STEP 96
With your “Master Clip>subclips” bin set in the View drop-down menu>Browser Items to List, Control-click on the first column header of the List view, which by default is Duration (Figure 5-93). As you hold the Control key down, a small menu list appears, at the bottom of which is an option for Show Thumbnail.
Select the Show Thumbnail option and release to add a Thumbnail column to the lists. The Duration column simply moves one space to the left to make room. You can now set the Poster Frames for the thumbnails of your new subclips. The Scrub Video tool from the Toolbar will function precisely the same for this thumbnail as it does for the Large Icon view. The only complication is that the subclip you created still has access to the entire Master clip’s frames, meaning that when you scrub for the Poster Frame, you will have to carefully scrub to choose a frame that matches the In to Out range of the subclip. If that is too difficult to do, you can always use the more mechanical method of setting the Poster Frame, involving the Mark drop-down menu.
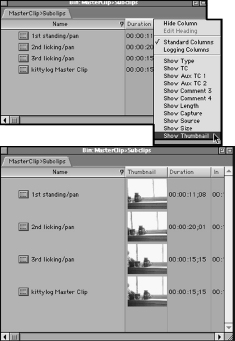
STEP 98
Double-click on a subclip in the “Master Clip>subclips” bin to load it into the Viewer window. Shuttle through the range of frames between the In and Out points until you find a frame that really distinguishes that subclip from others. With the playhead parked on that frame, go to the Mark drop-down menu and select Set Poster Frame (or Control-P on your keyboard). The subclip’s thumbnail will change immediately to that frame (Figure 5-94).
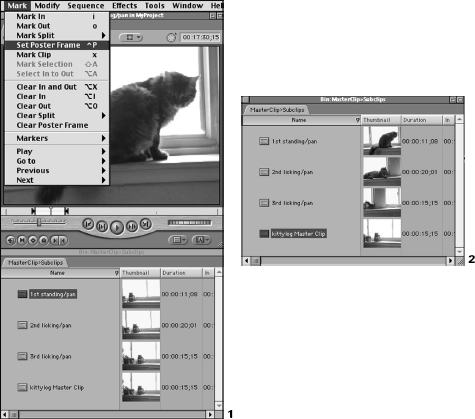
The Crop/Distort and Pen toolsets
The two remaining toolsets in the Toolbar, Crop/Distort and the Pen toolset, are best covered in the next chapter, since they relate almost entirely to image manipulation rather than the cutting and trimming functions that define editing.