“Talk is cheap. Show me the code.”
—Linus Torvalds
Open source firmware development without the right infrastructure is like fighting a battle without proper weapons and trained troops. The idea behind open source development is to provide an inclusive environment across various parties, not limited to only certain companies. As source code development is an important piece while creating your own firmware for target hardware, having that code be reviewed by the open source community with the proper visibility in a timely manner is also key. This process might also involve migration, where in the future open source firmware will be used for embedded system development; hence, developers either need to open their existing infrastructures to the external world or adopt the available open source infrastructures for product development.
This chapter will provide an overview of the existing open source infrastructure offerings and help the product development team make the right decision for creating their own firmware. Additionally, this chapter will focus on reducing the onboarding gap between firmware architecture migration and open source firmware development by reviewing the code of conduct and coding standard differences between different firmware versions.
Overview of Source Control Management
Firmware development is a process that involves creating source code from scratch and modifying the source code based on the hardware behavior. In most cases, the firmware code is used to testify the hardware interface and eventually results in the platform specification.; hence, this source code development process might involve trial and error to create the final working version. Source code management (SCM) is important to ensure that the working code base never gets tampered with due to the trial-and-error part of the development process.
This process gets more complicated with more engineers working on the same project, which means there is a need to share the code in a central location rather than maintaining it on a local machine. This type of source control management is also referred to as version control and can work as a central database to host the source code for multiparty development. One developer might need to work on a module for developing new features, and others might need to make some bug fixes on the same module; hence, there might be a chance that while merging their individual code changes, they override each other’s work by mistake. Version control helps the team to solve such problems by tracking the changes for every individual and resolves any conflicts by rebasing the changes onto the branch master.
The source control also needs to be shared for peer review. While developing the firmware with the open source community, this step is important to submit code changes for review and generate pull requests for a reviewer to review your code changes.
A free, open-source-friendly, high-quality version control system
A cloud-based repository hosting service that allows multiple teams to collaborate and share source code
An application that can provide the code review functionality
Keeping these requirements in mind, let’s look at the existing offerings to select the correct SCM for firmware development.
Version Control System
Using version control software (VCS) for firmware development provides flexibility for the development team to travel back and forth on a development branch without fear of losing the current project status. This process is sometimes sufficient to identify a regression by just filtering the branch based on different commit IDs and finding the culprit code change list (CL) without requiring any additional debugging.
Subversion
Subversion (SVN) is a free and open source software tool for performing source control management. SVN is considered the successor to the widely used Concurrent Version System (CVS) tool on Windows operating systems. Many open source projects such as FreeBSD and SourceForge have used SVN for code management.
SVN provides an improvement over CVS by adopting the concept of atomic operations, which prevents databases from being corrupted due to partial changes. Hence, most DevOps teams that relied on CVS in the past have switched to SVN for the improved features and fast response compared to CVS. Although SNV has support for almost all leading operating systems, it still provides better support with Windows OS. It provides easy plug-ins for integrating with modern IDEs, such as Visual Studio.
One of the most popular VCS tools that is used by various projects is called Git. As per the survey data conducted by Stack Overflow in 2018, Git is the dominant choice for VCS; approximately 88 percent of developers are checking in their source code using Git; the next most popular is Subversion with 16.1 percent.
Git
Git is a free and open source project originally developed by Linus Torvalds to support the development of the Linux operating system kernel. Many open source projects such as the Linux kernel and Eclipse use Git for version control.
Git is an example of a distributed VCS (DVCS) because Git supports the installation and maintenance of the source tree in the local machine without any need of a remote cloud. Unlike other popular VCSs like SVN or CVS, where the full version history resides in a single place, in the case of Git, each local repository consists of the full history of project check-ins.
Performance: The performance of the Git while doing tasks such as committing new changes, branching, merging, and comparing different versions is much better than any other version control software.
Git was designed with the concept of a file system; hence, it makes the versioning easier compared to other SCMs. Git relies more on file content rather than on the name of the file. The filename is something that can change over the time by different developers based on project need.
- Distributed development: Unlike other version control management solutions, Git sets itself apart with its branching model. This allows for a distributed development where each developer’s local repo is self-sustaining in terms of the project development history and code changes. Later these changes can be pushed into the mainline branch from the local branch. See Figure 3-1.

A drawing of two 3-dimensional cylinders labeled Remote Git repository, origin, and Local Git repository, master, connected by a 2-way arrow.
Figure 3-1Git distributed development model
This distributed development model provides flexibility to developers to experiment with the source code without creating any new repository when enabling a new feature that might need to add, modify, or delete files from the working branch.
- Security: Git uses SHA-1 to ensure the integrity of the source code branch from accidental corruption. Starting from the content of the files, version, commits, tags, and other data objects for Git are secured with a cryptographically secure hash. The method to see the Git history is associated with the commit ID, which is also generated using a unique combination of the following:
The source code tree
The patent commit SHA-1
The author information
The committer information (if it’s different from the author)
The commit message

A program coding starts from git show, and depicts commit id, Author, date, and Change ID, Signed off by, Reviewed by, and on, and Tested by.
Git commit ID with commit message
Git Working Model
The single biggest difference on Git that separates it from other source control management software is its branching model. As shown in Figure 3-1, Git supports distributed development that allows you to create an independent local repository upon syncing the source code from the remote repository. Working on the local branch is almost similar to working on the remote repository in terms of making any code changes, adding the changes, committing the changes, and merging into the local branch. Later you can submit those changes to the remote repository.

An illustration of a branching model consists of 6 circles arranged horizontally and connected by a line, where the fourth labeled the previous master branch, is shaded, and the shaded sixth is labeled the master branch. 2 circles branch out after the fourth circle and form a top row at the end, and the end shaded circle is labeled, local branch x.
Git branching model between remote and local branches
Remote repository: This is typically referred to as a unified sharable code database, which is shareable across various developers based on either their access account or open access. The idea here is to allow seamless access of the source code beyond the local repository; hence, anyone in this world can contribute to the source code or even browse the code. This remote repository can hold one or more than one project repository. Typically it is the job of the DevOps team to create a remote repository for project development so that development resources can be shared, but this eventually reduces the development time.
Local repository: After the DevOps team has provided you with the remote repository where you can check in the project files and folders, you still need to have a way to browse or modify the source files or directory structure in your local system. To support this, Git provides cloning, a mechanism by which developers can sync the source code from remote repositories (referred to as the origin) to their local machine. By default the source code resides in the branch known as the master branch. Figure 3-4 shows this cloning model to create the local repository.
- Working directory: After syncing the source code from the origin to the master branch, the developer creates the local branch to ensure an unpolluted master branch. Developers are now free to modify the changes as per the project requirements. These changes reside in files and/or directories that are still not merged into the local branch.
- a.
Staging area: The staging area is for the intermediate process by which the developer can prepare the snapshot of the local changes into the working directory prior to committing them into the local branch to keep track of those changes as part of the project change history.
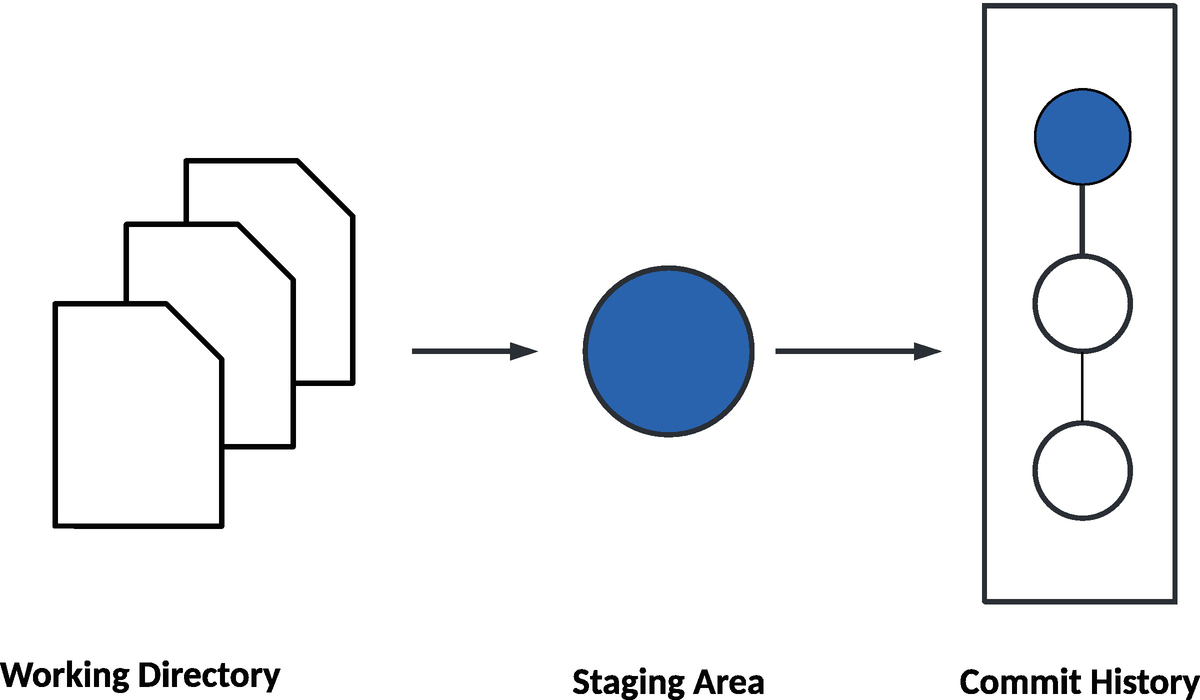
A workflow diagram that illustrates 3 pages labeled working directory, a shaded circle labeled staging area, and three connected circles with the top one shaded arranged vertically in a rectangle labeled commit history.
Git workflow between working directory and staging area

An illustration depicts three columns working directory, local repository, and remote repository. It has five Examples. 1, add, commit, and push. 2, pull. 3, fetch. 4, checkout. 5, reset hard.
Git workflow between working directory and staging area
Data Structure
The internals of Git were designed with keeping the file system concept in mind, which later extended to support a full set of features expected from a traditional SCM. Here, a detailed understanding of the information is stored by each commit uniquely in the form of a file system. Git has two data structures: a stage or cache index, to provide information about the working directory and the revision supposed to be committed next on the working directory; and an object database. Each Git object consists of three pieces of information: type, size, and content. The size is the size of the contents of the file. Git uses three types of objects: commit, tree, and blobs.
Commit object: A commit object contains the metadata such as the tree, parent, author, committer, and commit information. The following diagram shows the commit object description (from the open source coreboot project):

A table that consists of two columns and five rows. The rows are labeled as commit, tree, parent, author, and committer.
tree: The SHA-1 name points to the tree object. Each commit object is linked to a dedicated tree object to represent the contents of the directory at the time this commit is being made.
parent: The SHA-1 name refers to the previous commit rather than the current one. If the current commit doesn’t have any previous comment, then the parent commit is “nil,” and the current commit is considered to be a “root” commit.
author: The name string is the name of the author who wrote this code change.
committer: The name string refers to the name of the person who committed the code change. In some cases, the author name and committer name could be different, such as if the author has sent the code changes to the committer to check into the database.
comment: This describes the purpose for this code change.
Tree object: Each commit object points to a tree object, and each tree object further holds multiple points to blobs and other tree objects. Typically, a tree represents the directory structure in the project database and contains a list of filenames. Each filename points to a blob. The following diagram shows the tree object description (from the open source coreboot project):

A table that consists of four rows and two columns. The second column, 733 f 5 f d dot dot, is further divided into two columns. The rows are labeled under column header tree as, blob, tree, blob, and tree.
Developers can use the git ls-tree option to get more details about the tree object based on a SHA-1 name for a tree.

A dialog box on which some codes are written. It consists of four columns and fourteen rows.
Blob object: Each file listed in the tree points to a binary data object called a blob. The blob contains the compress contents of the file at the time of the commit. The blob file doesn’t have any name, timestamp, or metadata; hence, just renaming the filename doesn’t change the blob object that file is associated with. The following shows the blob object description (from the open source coreboot project):

A dialog box labeled, blob with field value e c 0 f 95 b dot dot, with some lines of code.
Developers can use the git show option to get more details about the blob object based on a SHA-1 name for a file.
Let’s look at a small example to understand the working relationship of these data objects across various Git commits.
Project HEAD | With Latest Commit on HEAD |
|---|---|
$ tree . |-- io.h `-- x86emu |-- fpu_regs.h `-- x86emu.h 1 directory, 3 files | $ tree . |-- io.h `-- x86emu |-- fpu_regs.h |-- regs.h |-- types.h `-- x86emu.h 1 directory, 5 files |

An illustration of the relationship between Git data objects has 6 boxes labeled commit has the head and the last commit, the tree has 399689b, and 61dc089, and 2 Blob.
Relationship between Git data objects
The rest of the blob doesn’t change with the latest commit; hence, the tree links to the blobs from the previous commit. This method of reusing the blobs between commits helps to make the internal Git operations faster with optimized space.
Setting Up Git
Using Git as a version control management software for firmware development has many benefits that we have already discussed such as a distributed development mechanism, flexibility, and wide community support for code maintenance without extra cost. Git is a universal tool that is available on almost all possible operating systems and is easy to install and use.
Installing Git on Windows
Windows users can download the stand-alone installer for Git from https://gitforwindows.org.

A dialog box labeled git 2 dot 16 dot 2 setup. It reads, Select components, Which components should be installed, question mark. It lists the components below with checkboxes. Three buttons labeled back, next, and close are at the bottom.
Git Setup installation wizard with default settings
Installing Git on Linux
With the Linux distribution package, the user can choose to make use of either apt or yum to install the Git package.
After installing the Git package, users can run git --version to verify the installation version. Linux users also can download the Git source code and dependent package to be able to build the code to create the Git installer. After successful installation, the user needs to add a username and email ID in a similar manner to what’s being done for Windows Git installation.
Create and Register Git SSH
User authentication works slightly differently when working with Git. Instead of using a username and email ID to log in to Git, Git uses an SSH key (an access credential for the SSH network protocol) to create a public/private key pair to initiate a trusted communication with the remote branch. SSH keys are generated using a key cryptographic algorithm (typically, RSA) for which the SSH command line has included the key generation tool. The public key is registered with the Git remote repository, while the private key is stored on the development machine. The combination of public/private key pairs will help users to pull/push the source code changes from/to remote repositories.
The process for creating the SSH key is the same across different operating systems (note: on Windows OS, users need to use the Git Bash shell to run these commands). Typically, these operations are taking place inside the .ssh directory (create it if it is not available by default).
This command will create a new SSH key pair and prompt you to enter a file in which to save the key. Users can either specify the new file location or press Enter to accept the default path as /Users/<user_name>/.ssh/id_rsa.
The new SSH key is now registered, and users can make use of the Git repository.
Git Cheat Sheet
Basic Commands | |
|---|---|
git init <directory name> | This is the first step to bring a directory under Git control. Run this command with a directory name specified to create an empty Git repository. Not specifying the directory name will result in initializing Git into the current directory. |
git clone <repo> | Run this command to clone the remote repository specified with the repo into the local machine to create the local repo. The remote repository can be located in a remote machine and accessed via HTTP or SSH. |
git diff | This command shows the unstaged changes in the working directory. |
git log | List the entire commit history from the local repo using the default format. Appending --oneline will show each commit to a single line, and -p will display the full diff of each commit changes. |
git status | Show the current changes in the working directory. This command lists the files in three categories as staged, unstaged, and untracked. |
git add <file(s)/directory name> | Run this command to stage all the changes from the working directory to the local repository. |
git rm <file(s)/directory name> | Run this command to remove a file(s) or directory from the working directory to the local repository. |
git commit -s | Commit the staged snapshot and add a description about the changes. Use --amend instead of -s to modify the existing commit. |
git format-patch -<commit count> | Run this command to create patch files from the current branch HEAD based on the commit count. It’s a useful command to share working patch files between teams without review. |
git am <patch-file> | Apply patch-file generated from the format-patch command on the local repo. All changes as part of this command will be part of the staged changes and in a committed state. |
git apply <diff file> | Apply changes from the diff file to the working directory. All changes will be listed under unstaged files. |
git rebase -i <base SHA-ID> | Interactively rebase the current branch onto the base SHA ID. Users can specify the mode of changes for each commit using rebase. |
git rebase --continue | Run this command to migrate to the current branch’s latest commit after finishing the rebasing process. |
Undo Commands | |
git revert <commit id> | Create a new commit by reverting any previous commit specified by the commit ID. |
git reset <file> | Remove the file from the staging area to the unstage area without overriding the changes being made to the file. |
git reset | Use this command to undo the changes from the staging area to match the recent commit. |
git reset --hard | Use this command to undo the changes from the staging area to match the recent commit and overwrite all changes in the working directory. |
git reset --hard <commit id> | Move the current branch HEAD backward to a commit specified by a commit ID. This process will eventually delete all uncommitted changes. |
git undo | A good thing about Git is that there’s a “undo” command that is capable of recovering from an undue state, such as correcting the last commit to include that small change. Revert a whole commit because that feature isn’t necessary anymore. |
Managing Branches | |
git branch | List all the branches in the local repo. Specify a branch name to create a new branch. |
git checkout -b <branch> | Create and check out to a new branch specified with the branch name. Don’t use the -b flag if an existing branch is available with the same branch name. |
git merge <branch> | Merge a branch into the current branch. |
git reflog | Reference the log (reflog) to record the changes made on the tips of branches and other references in the local repo. This is a useful command to travel between various changes in the local branch without impacting the remote repo. |
Accessing Remote Repository | |
git remote add <remote name> <remote url> | Create a new connection to a remote repo. |
git fetch <remote name> <branch> | Fetch a specific branch from the remote repo. |
git pull <remote name> | Fetch the code from a specific remote repository into the current local branch. |
git push <remote_name> <branch> | This command pushes the branch specified with the branch name to remote. If the branch name is not specified, then it will push changes ahead of HEAD in a local branch to the remote repository. |
Version Control Repository Hosting Service
Earlier we provided details about version control and using Git because it’s the most efficient way to handle version control management. Unless you have a hosting service to manage your version control outside your local machine, it’s not possible to allow a wider audience to contribute to your project development and review the activity. This section discusses a version control repository hosting service to manage more than one Git version control efficiently.
A most common way to explain the version control hosting service is that it’s like LinkedIn, a web-based hosting service for your professional work where you can add your work details, experiences, achievements, etc., for others to see and comment on. Similarly, GitHub is a web-based version control repository hosting service for Git. Git allows you to manage the version control over a local host or server, whereas GitHub provides a cloud-based hosting service that lets you manage your multiple Git repositories after creating a free account on GitHub.
GitHub

A flowchart of the GitHub work model. Git Hub with its logo of octo cat divides into the core boot, slim boot loader, and E D K 2, along with their icons.
GitHub work model
GitHub provides a no-cost user profile for accessing the basic open source repositories (it also has an access control method to restrict unauthorized user access). Typically, GitHub accounts come with an abundant storage space that allows users to host their working project and allows the open source community to review, modify, and share feedback by creating separate Git branches. This also helps to build the professional profile to know the developer’s proficiency.
Fork: This is a copy of a repo in your own user account where you can make the changes without affecting the original project. Suppose your account doesn’t have access to write into a repository; then this feature allows you to copy one user’s repository into your own account and modify it. Later you can raise a pull request to the project owner to allow merging into the original project.
- Pull request: Unlike Git, this pull request is different from what pull does in Git. This allows a GitHub user to share the code changes with the project owner once the change is ready after copying the original project repo. Using pull requests, you can notify others about changes you’ve pushed to a branch in a repository on GitHub. Once a pull request is opened, you can discuss and review the potential changes with project owners and add follow-up commits before your changes are merged into the master branch. This is equivalent to reviewing record creation in Gerrit.
Pull: Just for reference, git pull is a convenient operation that a user does while working at the Git command line for getting the latest changes from the remote repository.
Merge: After the user has raised the pull request and the project owner has approved the changes, the project owner can merge these changes found in your repo into the original repository just by clicking the “Merge pull request” button.
Git | GitHub |
|---|---|
Git is a command-line software/tool. | GitHub is a GUI enabled, web-based repository hosting service. |
The purpose of Git is to track the changes being done in the different local repositories to provide the VCS and SCM. | GitHub provides an abundant storage space to upload several Git repositories. GitHub not only inherits features from Git like VCS or SCM but also has its own few key features like forks, pull requests, and merges. |
Code Review Application
In earlier sections, you learned how to use the version control system on local machines and make it available in the cloud for much wider access. The power of Git and GitHub also provides a responsibility to its users (developers and maintainers) to make sure each code change goes through a proper review process and there is a way to track the review comments. Assume a developer came back a year after the code submissions and asked a very basic question about the integrity of the code. Without a backup system that points back to the code review database, it would be difficult to answer such questions. Hence, there is a need to have a code review model as well as part of the firmware development infrastructure.
In general, one could argue that GitHub by default provides options to review the code changes as soon as someone adds changes and raises a pull request. But there are some serious concerns while reviewing the code in that format where one might lose track of the comments in the code, and viewing the exact code changed since the last commit is really difficult. There are some offline tools that will allow you to manually diff the code changes, but doing this for every pull request makes the reviewer lose interest in reviewing the code.
Gerrit
Gerrit is a free web-based open source software application that provides the code review functionality. The purpose of Gerrit is to make the code review easier and more efficient. Gerrit application serves as an intermediate between developers and the Git repositories. It also can be viewed as a web-based Git repository hosting service for code review purposes.
Unlike GitHub, Gerrit doesn’t support multiple commits under a single pull request. The fundamental idea for Gerrit is that one code change is like one node in the overall commit. For example, once you are done with your code changes and generate a commit using the git commit -s command, you will add the unique change ID to track the changes and submit the code for review using git push <remote-name> HEAD:refs/for/master. Gerrit will generate a unique commit ID for each code change being submitted, and any incremental changes on top of that commit ID using the same change ID would create a new patchset. Because each patchset is treated separately in Gerrit, any review comments given for a particular patchsets would be part of the tracking process unless the developer has addressed the comments and marked them resolved.
Asking for code review: Gerrit provides a simple and open code review process. Submitters can add the reviewer name (or email ID), and Gerrit will notify the reviewer once they have been added. Also, this is a very open cultured environment where anyone can add to a Gerrit review. See Figure 3-9.

A browsing page labeled outgoing and incoming reviews, surfed on the chrome browser, consists of rows with column headers subject, status, owners, reviewer, repo, branch, updated, size, A C R, C R, and V.
Gerrit My Review view from Gerrit dashboard
Reviewing the code changes: A Gerrit code review provides a nice side-by-side representation to compare the original and modified code. Each code change ranges from -2 to +2 (by default the code review starts with the Code-Review as 0), and a code review requires a minimum Code-Review +2 (looks good to me, approved) vote to get merged into the mainline. We will discuss code review etiquettes in the “Code of Conduct” section. If the reviewer has some concerns, then the reviewer could initiate a discussion by adding a review comment for each new line of code added. See Figure 3-10.

A page with several numbered lines of code. It contains a dialog box on top with 2 questions, above and below 2 lines of code, buttons labeled reply, quote, A C K, and done are at the bottom-right, and unresolved at the bottom-left.
Gerrit adding review comments
New patchset: If the reviewer is not satisfied with the code review and added the code review comments with a suggestion to improve the code qualification, then the submitter would need to push a new patchset to address those review comments. This process continues until the submitter resolves all review comments and the reviewer has casted the vote to let go of this code change.

A dialog box contains entries under updated for fields owner, reviewers, C C, branch, parent, topic, and hashtags. The right pane contains text under reply. At the bottom is a box with rows of patch sets 1 to 6, with dates.
Multiple patchsets to address review comments
Submitting code changes: After the code review is done and the patchset has required the correct number of votes for Code-Review, All-Comments-Resolved, and Verified (and others some third-party plug-ins if applicable like IP scan, etc.), a project maintainer can allow the code changes into the mainline of the repository by clicking the Submit button. This process of allowing code changes into the master branch of the project repository might need special access permission.
If the purpose is just a code review in a much simpler and efficient way and ensures that the code review process is being maintained separately from managing the Git repositories, then Gerrit is the best option for you while developing your own firmware for embedded systems.
Best Known Mechanism of Source Code Management
Commit frequently: Commits don’t cost anything to anyone, and they’re easy to create. Don’t try to combine unnecessary code changes into one commit just to avoid meaningful multiple commits if possible. Ideally developers should make the commit as an incremental approach toward the firmware development process. Frequent and small commits also help while debugging the issue by using git bisect.
Latest to upstream master: Working in a distributed development environment, it’s important to always be in sync with the latest upstream code. It’s been seen that many developers don’t bother updating their local copy with the latest upstream master code. This eventually creates a problem while trying to commit a change sitting in a local copy that is far behind the latest upstream master. Hence, it’s recommended to update the local copy on a regular basis to avoid merge conflicts.
Provide details in commit: Commit is the face of the underlying code change, and everyone might not have the time and interest to go through the entire code while using git bisect. Having a meaningful commit message with ample details allows developers to understand why the code changes are being made and what is in the code at a high level without deep dive into each commit.
Make use of branches: Git provides a powerful branching model where developers can create their own branch derived from the master to continue their development. This process ensures the master always remains untouched or unpolluted. Once development is done on a specific branch, then it can be merged into the master.
Prompt addressing review comments: Avoid outstanding review comments for more than 24 hours. It’s the patch owner’s responsibility to ensure all of the review comments are addressed. Don’t leave your patch at the half-done stage. If you think your patch is not progressing in the review, seek help and ask for review. Also, avoid rebasing the entire patch tree repeatedly. It’s painful for reviewers as it will spam their inboxes.
Code of Conduct
Working on a firmware project using an open source firmware development model means collaborating with a wider technical community. This community involves a mixture of professionals with different domain expertise, volunteers, and students from all over the world. They all are working together for their mutual interest in making the virtual workplace inclusive to connect with people, learn from each other, and provide mentorship as and when required.
Be friendly and supportive in all possible forms of communication including the Gerrit code review, mailing lists, IRC chat rooms, reporting bugs, and virtual or physical meetings in events or conferences.
Be open while giving comments and receiving comments as well. In the majority of cases, unpleasant situations happen during the code review.
For each code change, the Gerrit code review provides a range between -2 to +2. The way it works is if the reviewer gives -2 to a code change, it means there is something very wrong fundamentally, and the reviewer doesn’t accept the code change and also forbids the code changes from being merged into the mainline. Typically, reviewers should provide ample details to justify the -2 vote and provide a path forward to overcome this vote in the coming patchset. A -1 vote shows the same preference as -2 but on a slightly lighter note where reviewers don’t want to merge this code change as is. A good reviewer not only casts their vote but also provides equally good review comments for the submitter so that the submitter can move ahead with the code changes and fix the problem. Note: in general, each code change has its own purpose, so it’s better not to create a roadblock for others.
Be sensitive about the fact that due to the distributive development approach of open source firmware, many active project contributors are not native English speakers; hence, they might have misunderstood the review comments or provided some comments that might appear rude.
Be careful with any words that might spread hatred, commenting on someone’s sexual orientation, gender, race, religion, educational qualification, color, or disability. Also, avoid inappropriate physical contact and unwelcome sexual attention during face-to-face meetings.
If you come across any of these situations, then please reach out to the concerned team via email. Typically, all open source communities have strict CoC policies to ensure that the community doesn’t encourage unacceptable behavior. The best practice to avoid such unpleasant situations is to stop such issues at their core, and once an issue is raised, people are expected to comply immediately. Making the same mistake in a repetitive manner might result in a temporary ban or permanent block from the community.
Although this is not the exhaustive list of dos and don’ts in the open source firmware development community, while you are focusing on creating your own firmware, these are basic guidelines to make developers and reviewers understand their roles and responsibility while they are taking part in such technical communities.
Coding Standard
The purpose of this book is to provide all the required details to prepare developers for architecture migration from closed source firmware development to open source firmware development. In this migration process, one important thing that remains unnoticed is the coding standard.
Define a coding style that can be easily adopted by all developers, even the most recent ones, with a minimum learning curve.
Write code in such a way that provides ample information about the change requirements.
Code maintenance should be independent of the original author; that means the written code can be maintained by others without having detailed knowledge about the intricacies of the code.
Provide documentation wherever possible to explain the accurate code changes to minimize the learning curve for new engineers.
The most popular firmware uses the C programming language because of its simplicity, flexibility, and wide adoption in embedded systems. But the problem that the C programming language faces is the inconsistent ways it’s used among various developer groups. This lack of uniformity in developing firmware using C makes it harder to use unless a unified coding standard is enforced.
C language rules and guidelines
Naming conventions
Commenting rules
Standard way to create commit message
Ideally these guidelines will be helpful for engineers migrating their architecture from closed source firmware development to open source.
The major benefit that coreboot provides to its developers is the similarity with the Linux kernel coding style. Hence, it’s easy to adopt among developers.
Indentation
The intention here is to provide better code readability for the developer; hence, it’s recommended not to make a cluttered single line, which is tough to read and understand. The following example shows the difference between bad and good programming practices, although the compiler grammar would be able to understand both:

A table that consists of two columns and one row with codes. The columns are labeled as bad programming practice and good programming practice.
vim is a widely used source code editor for the Linux OS. In addition, there are many advanced feature integrated development environments (IDEs) available like Eclipse that make life easy for developers and don’t leave space at the end of lines; also, avoid having unnecessary blank lines between two source code lines.
Maximum Columns per Line
Coding standards are also necessary to make it easy for reviewers to understand the code with a single glance. Having a longer code line with too many characters in it makes it harder to follow the purpose of that line and reduces the code readability.
Typically, many firmware coding standards recommend limiting the single line by 80 columns. In the latest version of coreboot, this limit is 96 columns per line. If you need to write a longer line than 96 characters, then make use of the newline character to break the line onto the next line. There are some exceptions such as printk functions, where breaking such functions onto multiple lines is not recommended as it will break the ability to grep a user-visible line while debugging.
Using Braces
This applies to all conditional statements such as if, switch, do, while, for, etc., where the opening brace is the last character on the line, and the closing brace is first on the next line.
Need for Spaces
Recommendation for keywords and functions: Typically, you will use spaces after most of the keywords such as if, else, switch, do, while, and for, but there are exceptions like sizeof, typeof, etc., which look similar to a function call. Refer to the previous examples where whitespace is used between if and expression. Also, note that there is no whitespace between the function name and passing argument. Do not add spaces around (inside) parenthesized expressions.

A table that consists of two columns and one row with codes. The columns are labeled as bad programming practice and good programming practice.
Recommendation for operators: Use one space around the most binary and ternary operators, but there are exceptions like no space after the unary operators, no space before the postfix increment and decrement unary operators, and no space after the prefix increment and decrement unary operators. Also, there is no space around the period (.) and arrow operators (->).

A table that consists of two columns and one row with codes. The columns are labeled as bad programming practice and good programming practice.
Naming Conventions
Recommendation for variable name: Avoid using CamelCase while defining a new variable, for example: VariableNameIsTmp. Use variable names that are short and meaningful.
It’s recommended to make limited usage of global variables and to have a descriptive global variable name to use across different functions. In the case of UEFI, a global variable should start with m followed by a variable name.
The scope of local variables is limited; hence, variable names also need to be short.
Recommendation for function name: The function name should represent an action, so the name should be something that makes it clear what it does, for example, do_something() instead of tmp_function(). Here is the rule of thumb: variable names are often nouns, and making function names verbs in the code can be more readable.
Typedefs
Using typedef is controversial among different firmware.
coreboot Coding Style | UEFI Coding Style |
|---|---|
struct reset_mapping { uint32_t logical; uint32_t chipset; }; struct reset_mapping map; | typedef struct { uint32_t logical; uint32_t chipset; } reset_mapping; reset_mapping map; |
The only exceptions to this recommendation are u8/u16/u32/u64 types in coreboot, these are typedef of the standard datatypes like unsigned int/long, etc.
Commenting
Short Comments | Long Comments |
|---|---|
/* This structure will be used to describe a community or each group within a community. */ | /* * This structure will be used to * describe a community or each * group within a community. */ |
Write a Good Commit Message
Earlier sections provided required information on how to improve the project code quality by adopting a coding standard as per the target firmware architecture (we discussed coreboot in detail). A good firmware engineer not only bothers to write quality source code but also gives equal importance to commit messages as commit messages are significantly helpful while debugging a problem.
ID | Commit | Date |
|---|---|---|
123.. | Create infrastructure to get System Time | 10 Hours Ago |
456.. | Add API to implement time routines | 8 Hours Ago |
789.. | Calling API | 6 Hours Ago |
ABC.. | Add some new APIs | 4 Hours Ago |
DEF.. | Missed to add few APIs hence adding those here | 3 Hours Ago |
A1B.. | Don’t know why I’m adding this code but it’s needed | 3 Hours Ago |
2C3 | Everything is working now with this CL | 2 Hours Ago |
Maintain a separate submit from the body with a blank line.
Try to limit the subject line to 50 characters.
Capitalize the subject line.
Don’t end the subject line with a period.
Write the subject line in imperative tense.
Don’t exceed the body beyond 72 columns per line.
Use the body to explain what’s new and why it’s changing and how.

A commit message is divided into subject, body, and issue tracker. Some rules such as a blank line between subject and body, limiting the subject to 50 characters, starting with capital letters, do not end with a period, limiting the body to 72 characters, using imperative mood, and explain what, why, and how are given around in speech bubbles.
Sample commit message following the golden rule

A screen has two panels. 1, a program coding titled record v boot F W boot information into e log and has two scenarios. 2, It has files, comments, and findings with base patchset 18 and commit messages.
Actual Gerrit commit based on the golden rule
In conclusion, this section provided the basic principle behind creating a qualified source code by adhering to a specification. It’s recommended that all users should follow this specification without failure. By default many development environments/studios have integrated the checkpatch-like script that does the coding style check and expects to run this script while creating the code changes prior to submitting the code for review.
Summary
This chapter helped you understand the value of infrastructure tools while doing the firmware development. Typically, software/firmware engineers place a high precedence on creating source code and fixing bugs on embedded systems. Maintaining the source code and sharing across multiple teams are also equally important in the firmware journey. Source control management is an invaluable tool for firmware development. This chapter provided a detailed analysis of the best possible SCM available for open source development and its feature sets. Many engineers use Git, GitHub, and Gerrit in their day-to-day activity but are unable to understand the working relationship between these infra tools and choose the best one for their needs. Finally, this chapter highlighted the basic developers rights while working in a distributed development environment, including the best practices to create the code changes by adhering to the coding standard and submitting the code changes that help your chances of getting code merged into the remote repository after a quick review.