
CROSS-STITCH
Cross-stitch is counted embroidery following a charted pattern, most often worked with a basic X-shaped stitch. This technique is worked on even-weave fabric, counting each stitch and working uniform cross-stitches to create the design. It is easy to learn and will give you hours of pleasure creating projects for family and friends.
Before purchasing fabric for a pattern, choose the type of fabric and count size to determine the amount needed. Extra fabric is needed for finishing the project. Allow 2 to 3 inches (5 to 7.5 cm) on all sides for finishing. Before you start cross-stitching a project, finish the fabric edges by zigzag or serging or apply masking tape to the fabric edges to keep them from raveling.
cross-stitching with waste canvas (blue line)
Waste canvas is designed to be removed after it is stitched. This allows you to do counted cross-stitch on plain-weave fabric. You can embellish clothing, home décor items, linens, or whatever a needle and thread will stitch through. Mesh sizes are available in 6.5 to 16.
Use the directions shown here to work waste canvas projects. Try a few stitches on a piece of plain fabric using the canvas to see how the waste canvas works. This will let you know if you have made any stitching mistakes before working on the real project. Remember to keep an even tension.
1 Cut the piece of canvas larger than the finished design.
2 Find the center of the canvas and mark it with a permanent marker.
3 Find the center of the fabric and mark it with a straight pin. Place the marked canvas center over the fabric center, keeping the lines of the canvas straight across the fabric. Pin in place. Readjust as needed so the canvas lines are straight.
4 Baste the canvas to the fabric along the outer edges.
5 If using a lightweight fabric, use a non-fusible stabilizer (shown here) on the back of the fabric, basting it through the fabric and waste canvas. When the project is complete, trim away the excess stabilizer.
6 Work the design, centering it on the waste canvas. Work each stitch by going down and coming up into the middle of the corners that surround the square. Work each stitch so the thread touches the previously placed stitch or stitches in that corner. If the threads do not touch, you will end up with a small gap, showing the fabric between stitches. Take your time and place each stitch carefully.
7 When all stitching is completed, remove basting. Use a lightly dampened clean, lint-free cloth to gently sponge over the canvas. You can also use a clean spray bottle with a fine mist to lightly spray the area. Work carefully, barely dampening the threads. A word of caution: if the canvas becomes too moist, the threads will be more difficult to remove. Use a tweezers or your fingers to pull each thread up out of the stitching area.

Waste canvas example
stitches
This section begins with the five basic stitches: the cross, quarter cross, half cross, three-quarter cross, and backstitch. The remaining stitches are counted decorative stitches or specialty stitches that will give you many new options.
HOW TO WORK CROSS-STITCH
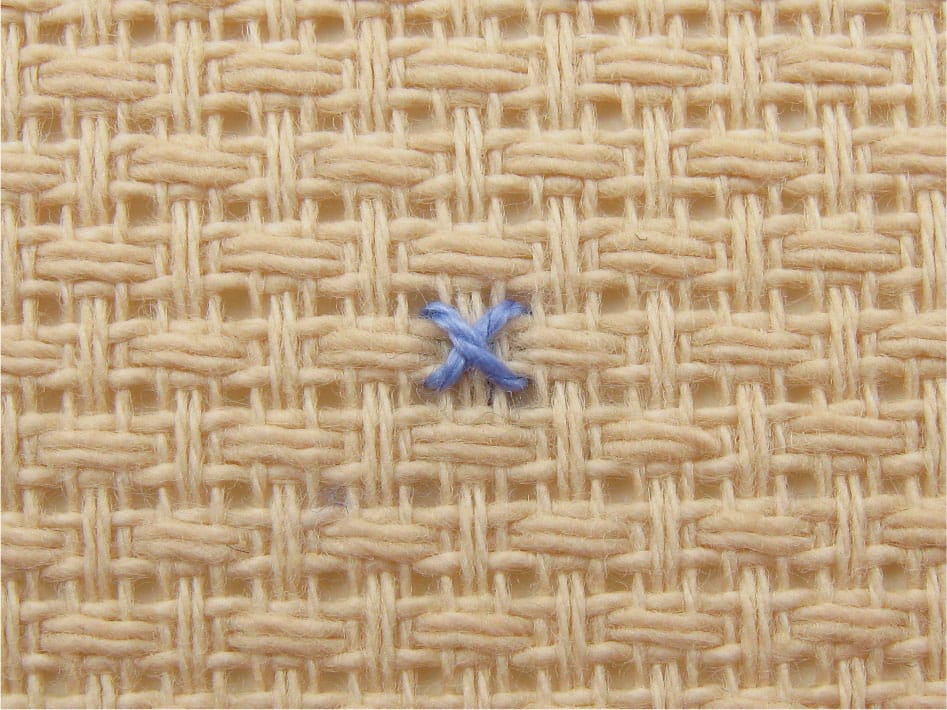
Cross-stitch is worked following a pattern. The pattern is shown on a chart that is divided into squares. The key to cross-stitch charts is in understanding the cross-stitch square. A cross-stitch square represents the portion of the fabric to be covered by a cross-stitch. If you look at Aida even-weave fabric, you can easily see the fabric squares. The photo of a cross-stitch square shown here shows a simple cross-stitch worked over one square on Aida fabric. If working on linen, each cross-stitch would go over two threads unless indicated otherwise on the pattern. Symbols on the chart indicate where a cross-stitch is to be placed. Each unique symbol specifies a type and color of thread to use. Study the chart example and stitched example to understand how stitches are represented on the chart.
Design size is determined by the number of stitches and the fabric thread count (stitches per inch [cm]). You need to determine the count, both horizontal and vertical, to obtain the height and width of the fabric needed. To determine size, divide the number of stitches by the thread count. A design 32 stitches wide would be 2" (5.1 cm) wide on 16-count fabric and 4" (10.2 cm) wide on 8-count fabric.
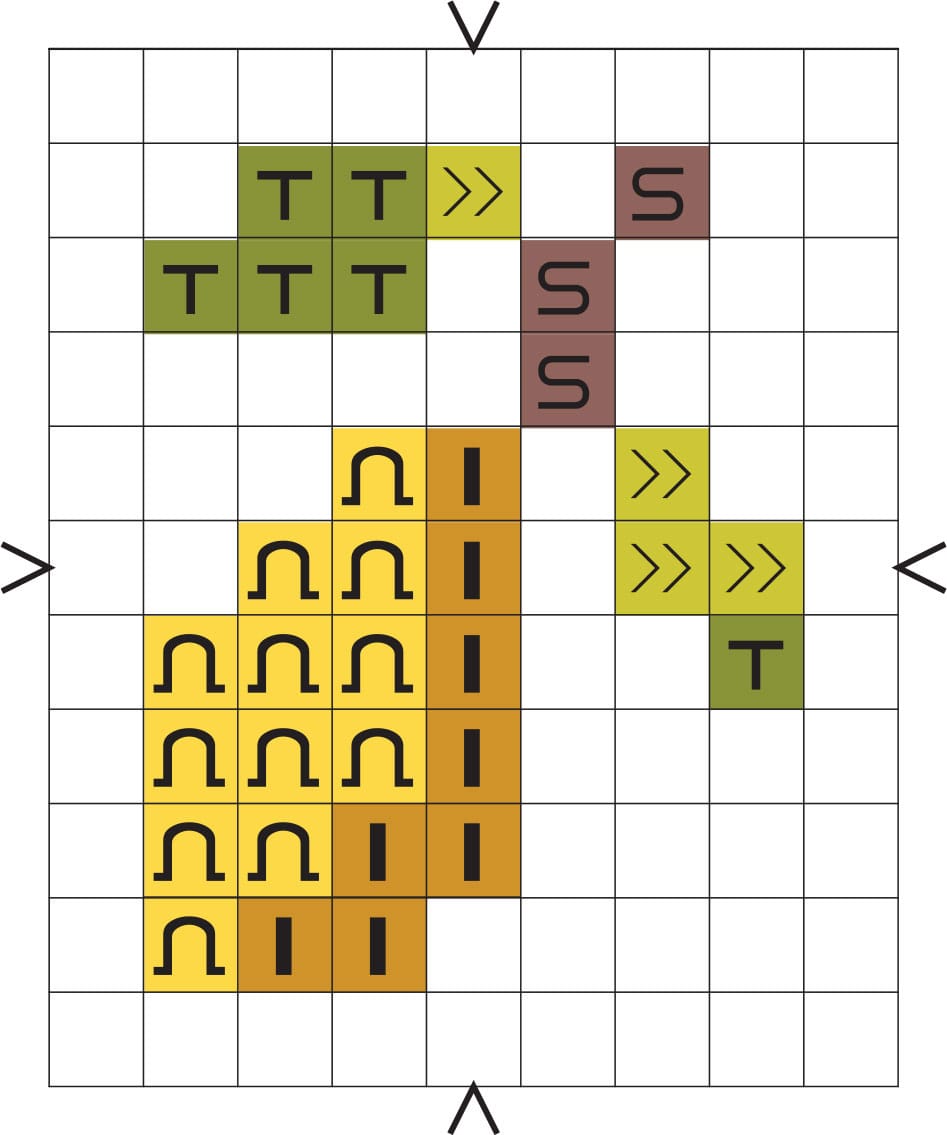
Chart example
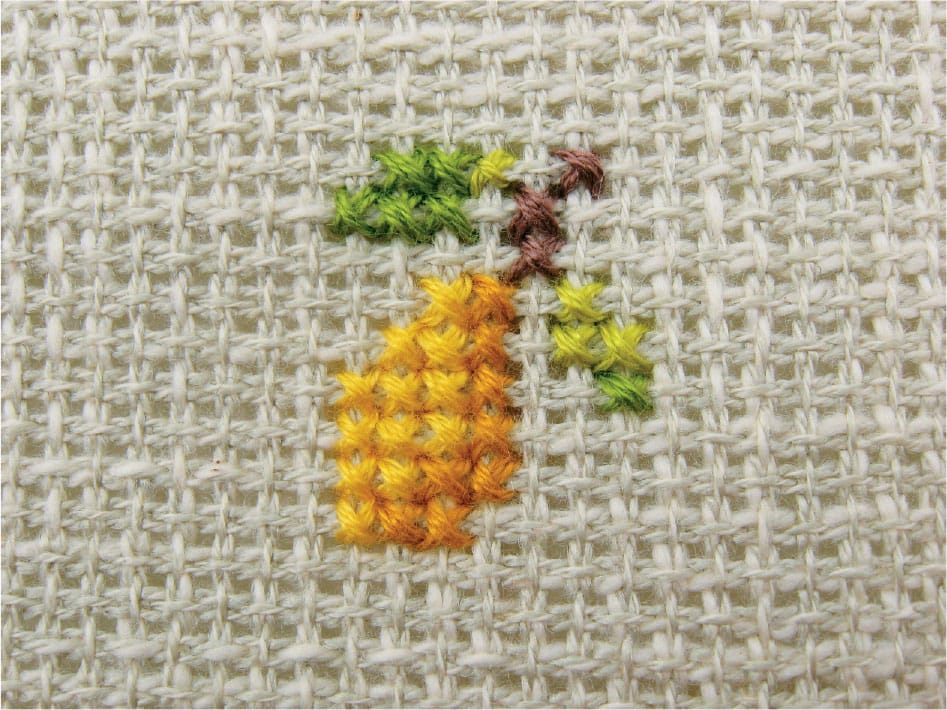
Stitched example
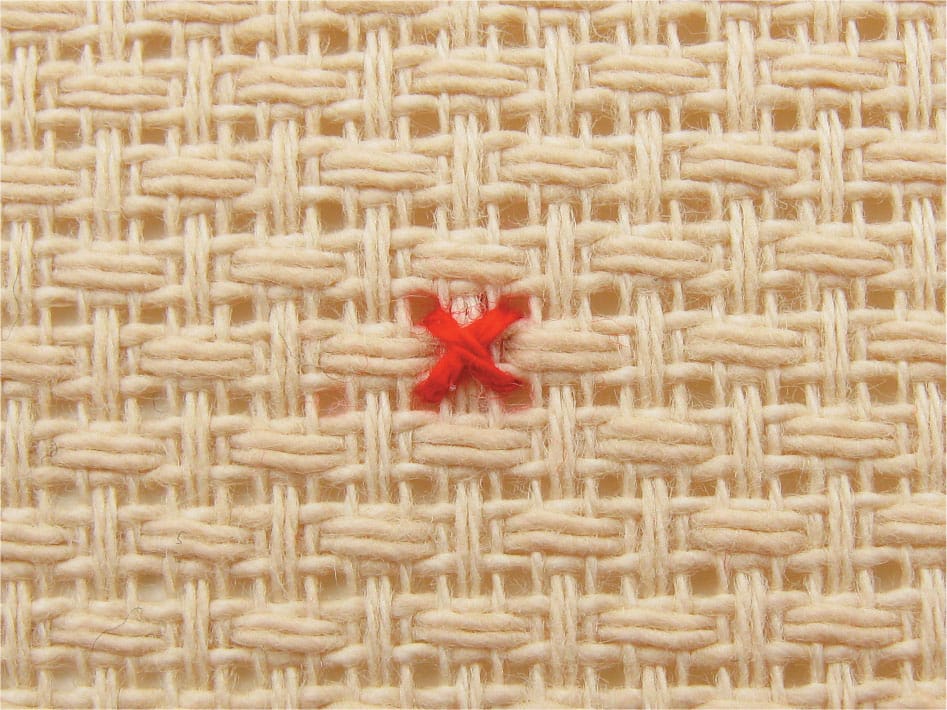
Cross-stitch square
When centering the design and stitching the project, counting correctly is the most important concern. If you do not count up, down, or over correctly when starting to stitch or while stitching the design, it will not be worked correctly. Count and mark the spot with a straight pin, then count again to be sure it is correct. Patterns are marked with darker lines that run through the center area, or they have marks on the edge of the chart on all four sides to indicate the center. You may find it helpful to mark the horizontal and vertical center lines on the pattern with a highlighter.
Find the center of the fabric by using a ruler or carefully folding the fabric in half vertically, making sure the edges meet. Then, using your fingers, gently pinch the center folded area so it leaves a slight mark. Open the fabric and fold it in half horizontally, repeating the marking process. Open the fabric and you should have a marked center. Baste along each of the creases, creating a marked center line on the fabric. If you are working on perforated paper, count both horizontally and vertically to find the center line of your paper. Baste the center lines with a light color sewing thread. A darker thread could bleed onto the paper.
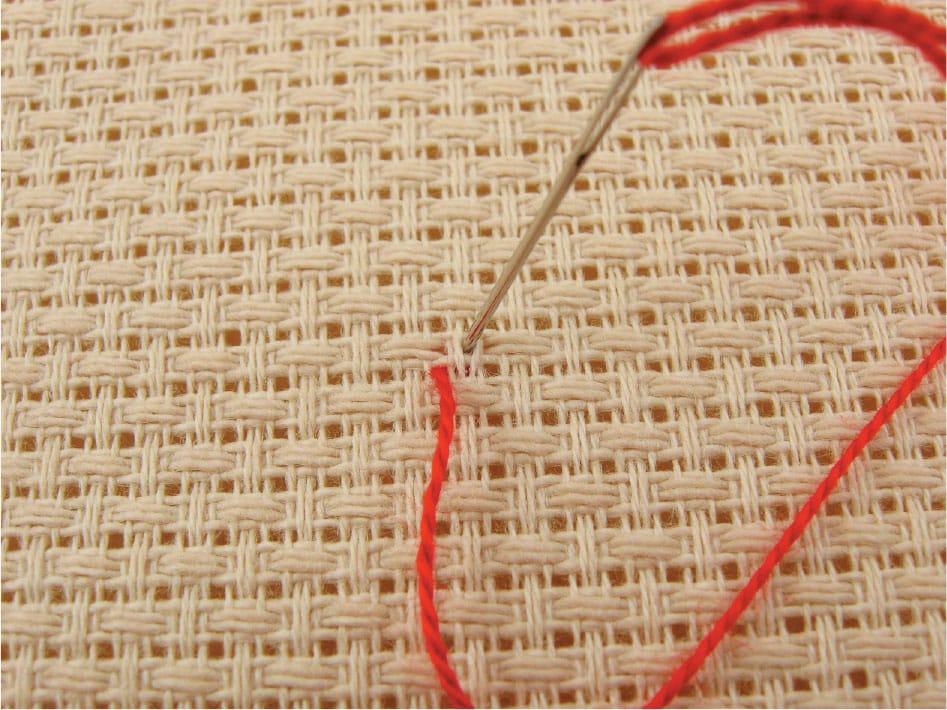
For ease of counting, start stitching in the middle of the design. When working the stitches, don’t carry the thread on the back for more than a stitch or two; rather, end the thread and start anew. Avoid using knots to begin or end your thread. Begin with a waste knot or away waste knot (shown here). Otherwise, leave a short tail on the back as you take the first stitch, and catch the tail under the next few stitches on the back of the fabric, securely burying the tail. End the thread by running it under the last few stitches worked.
For clarity, all of the stitches that follow are shown on an 8-count Aida. Decorative stitches work best on 14-count or higher linen fabric or Aida. When you are stitching on linen fabric, work over two threads for each square shown on the pattern.
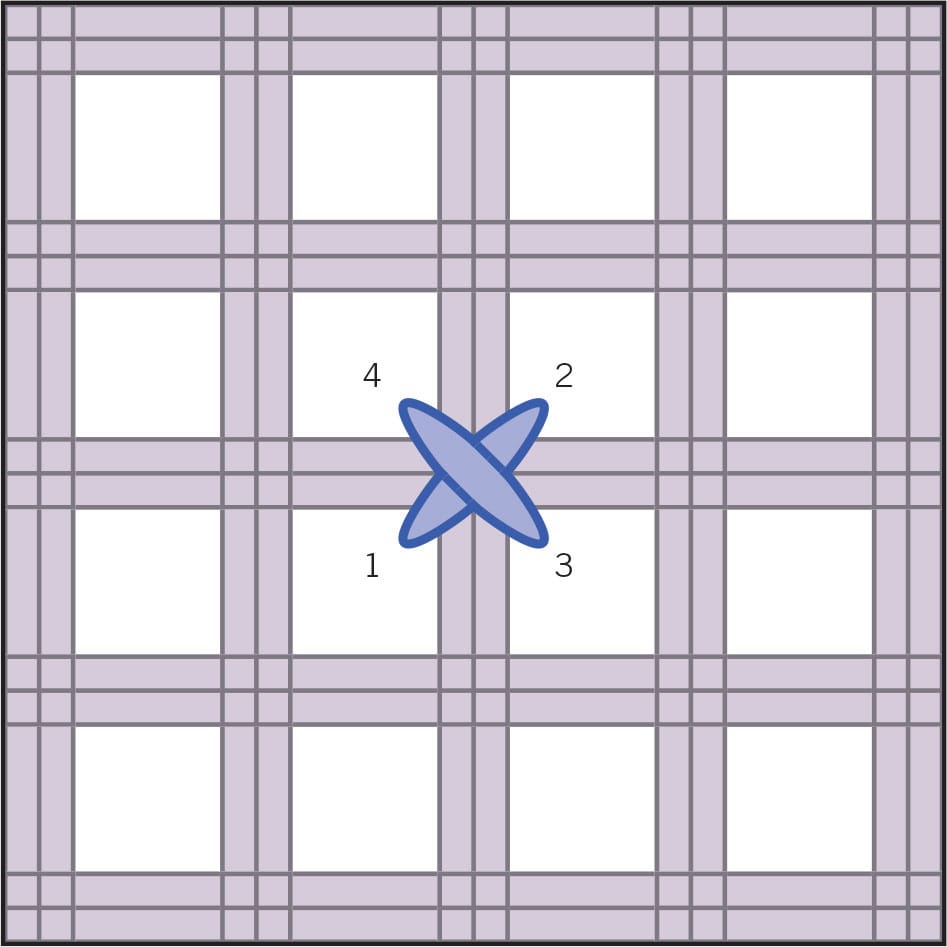
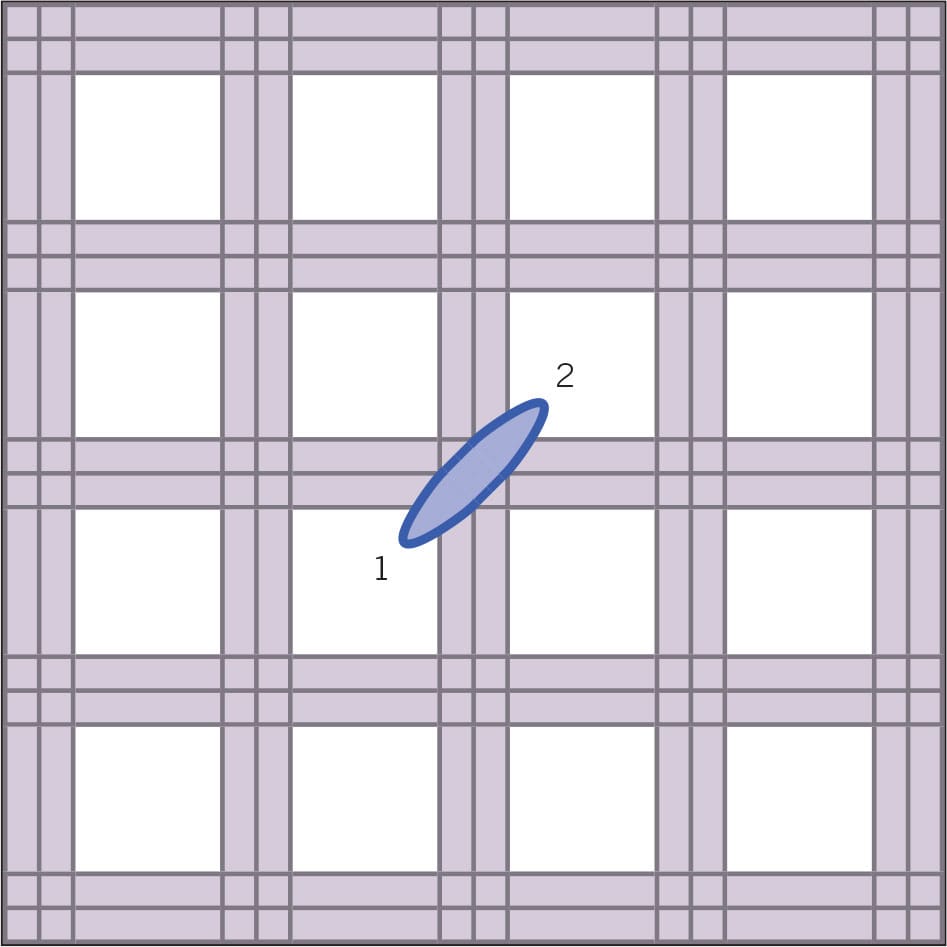
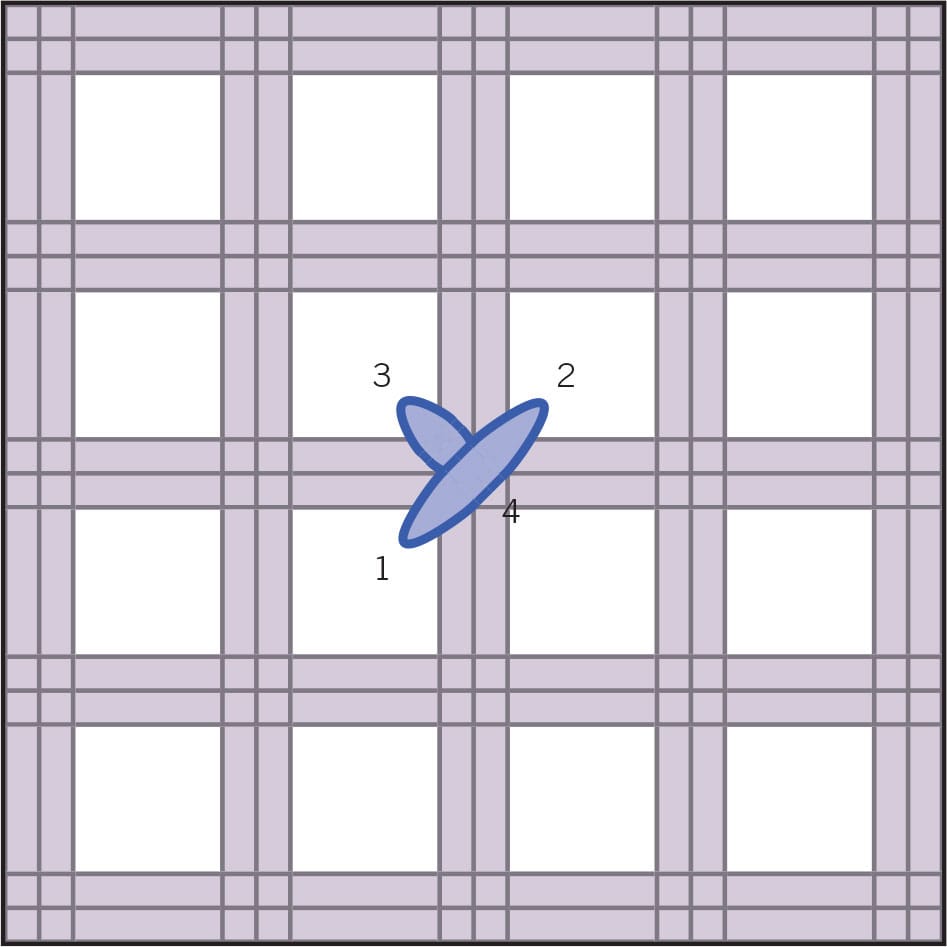
The colored grid lines on the stitch graphs represent the threads in cross-stitch fabric; the white blocks represent the openings that the needle slides through to work the stitch.
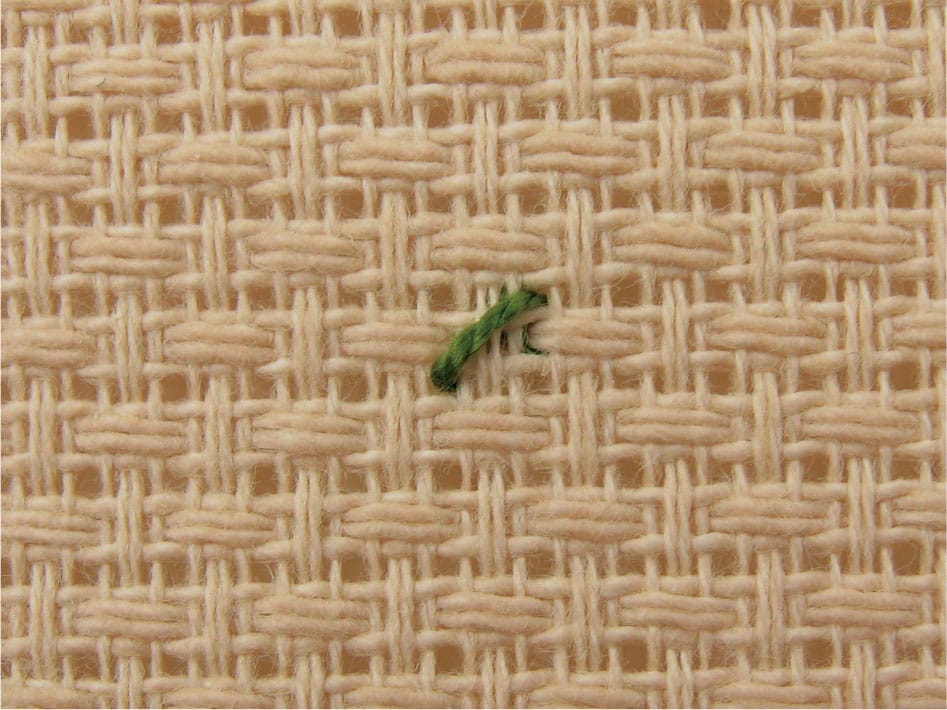
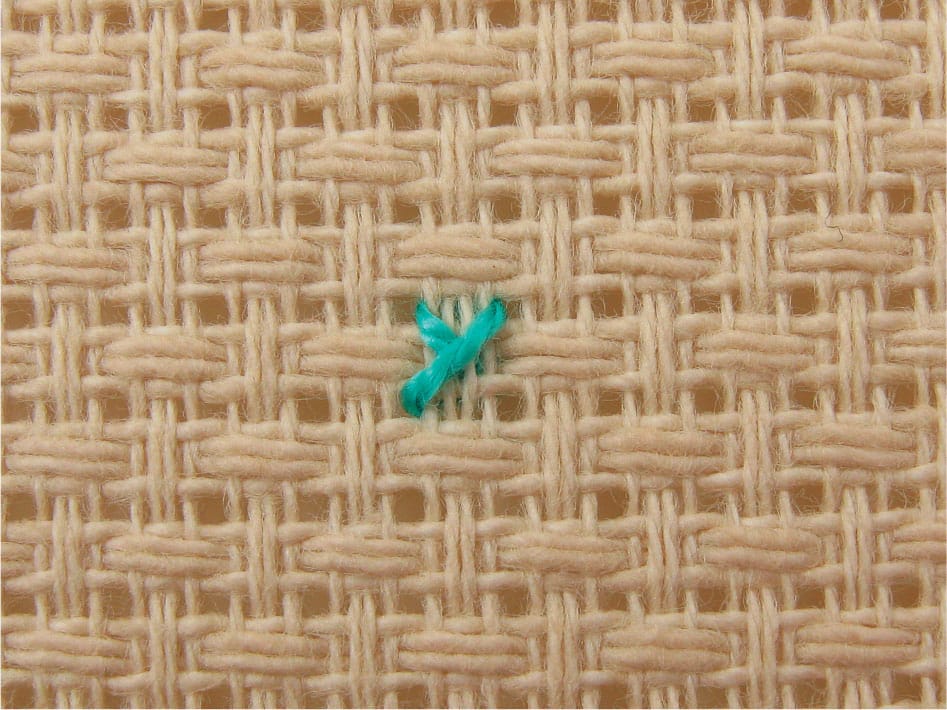
CROSS
This stitch is worked from left to right as a single unit or in horizontal rows. Use the stab stitch or sewing method. Work the cross so all the top stitches slant in the same direction and use even tension. Avoid catching the thread of the previously placed stitch as you work the next cross.
You can use any type of thread for this stitch. Embroidery floss and over-dyed or hand-dyed floss work especially well.
Ways to use: home décor items, embellishment for clothing, monograms, pictorial scenes, filling
Also known as: Berlin, counted cross, point de marque cross-stitch
QUARTER CROSS
This partial stitch can be worked in any corner of the square. It is used to give the design a more realistic appearance. When working the quarter cross, it comes up at the corner of the square and goes down in the center fabric of the square. Use the stab stitch method, following the numbers and arrows on the graph.
You can use any type of thread for this stitch.
Ways to use: to add detail, round out outer edges of shapes
Also known as: partial cross
Going down into the center of the square

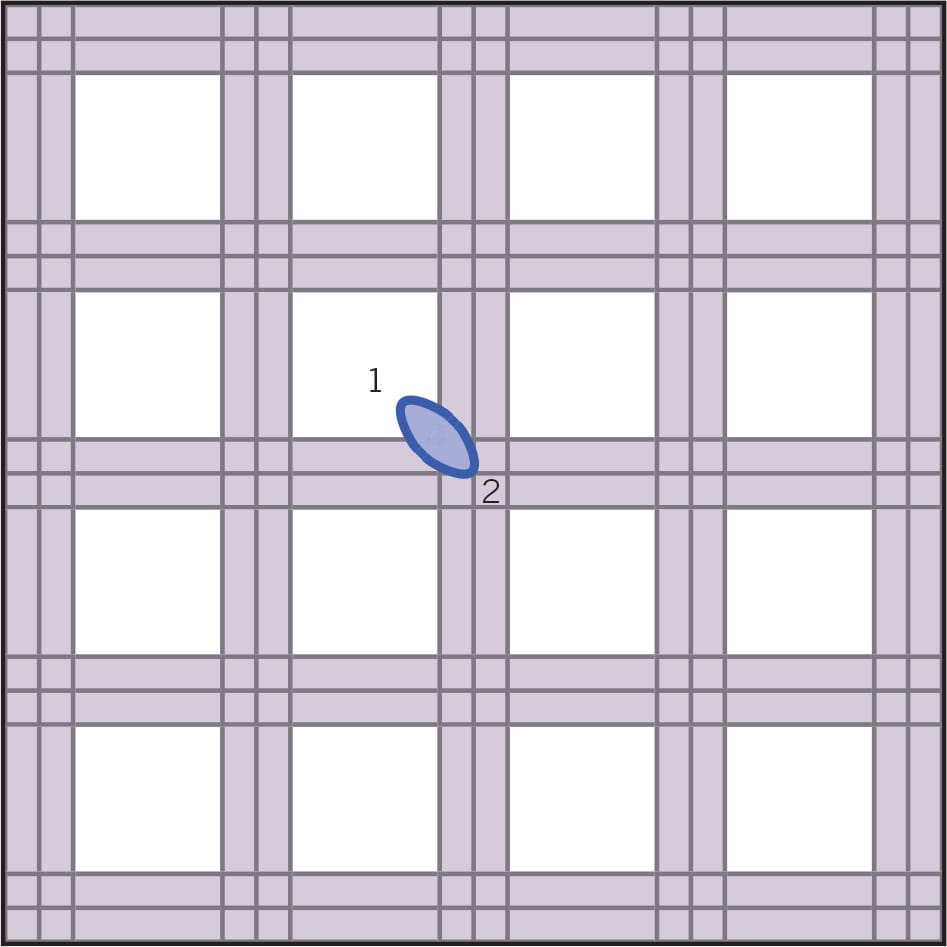
HALF CROSS
The half cross can be worked in either direction. It is always worked on the diagonal. These stitches are indicated on patterns by a colored diagonal line shown in the direction they are to be stitched. The color key will also indicate the color to use. Use the stab stitch method or sewing method.
The half cross can also be used to work a border around the pattern. Work one row with the diagonals going to the right and the next row with the diagonals going to the left. Repeat the row of diagonals going to the right to create a border of three rows. Each of these rows can be stitched in a different color, or work all the rows in the same color.
You can use any type of thread for this stitch. Twisted or hand-dyed single-strands threads work especially well.
Ways to use: lacy affects, background, bands
THREE-QUARTER CROSS
The three-quarter stitch can be worked in any direction. Work the first half of the cross-stitch; then come up as if you were placing the second half, but take the thread under the previous half stitch and down into the center of the square.
These stitches are usually indicated on the pattern by colored diagonal lines with the short stitches going in the direction they are to be stitched. The color key will list them in the color to be used. Use the stab stitch method, following the numbers and arrows on the graph.
Stranded threads or single-strand threads work best.
Ways to use: add rounded appearance, detail
Also known as: partial cross
Going down into the center of the square under half cross

BACKSTITCH
This stitch can be worked in any direction. The backstitch will be indicated by a straight colored line on the pattern where it is to be stitched. The color key will show the color to be used. Use the stab stitch method, following the numbers and arrows on the graph. Backstitches add depth to areas in the design. The pattern will indicate the number of strands to use.
Backstitch is often used to achieve the desired effect rather than half or quarter stitches.
You can use any type of thread for this stitch.
Ways to use: outline shapes, define areas, borders

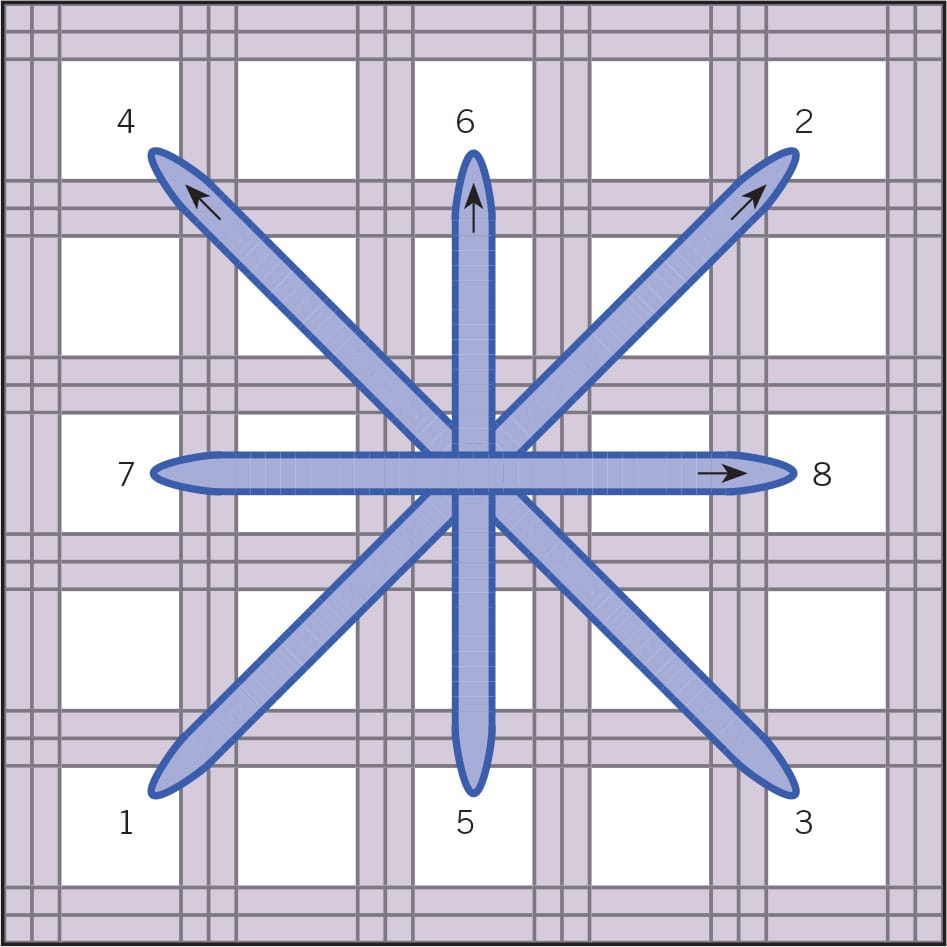
SMYRNA CROSS
This stitch is worked from left to right, right to left or vertically. This versatile stitch is a combination of two cross-stitches. The size of the stitch can be changed to fit the area. It is shown stitched over four threads. It can also be stitched over two, six, or eight threads. For a border area, alternate the over two threads and over four threads sizes of this stitch across the area.
You can use any type of thread. Hand-dyed single strand threads work well for this stitch.
Ways to use: borders, bands, filling
Also known as: Leviathan, railway, double cross, straight cross
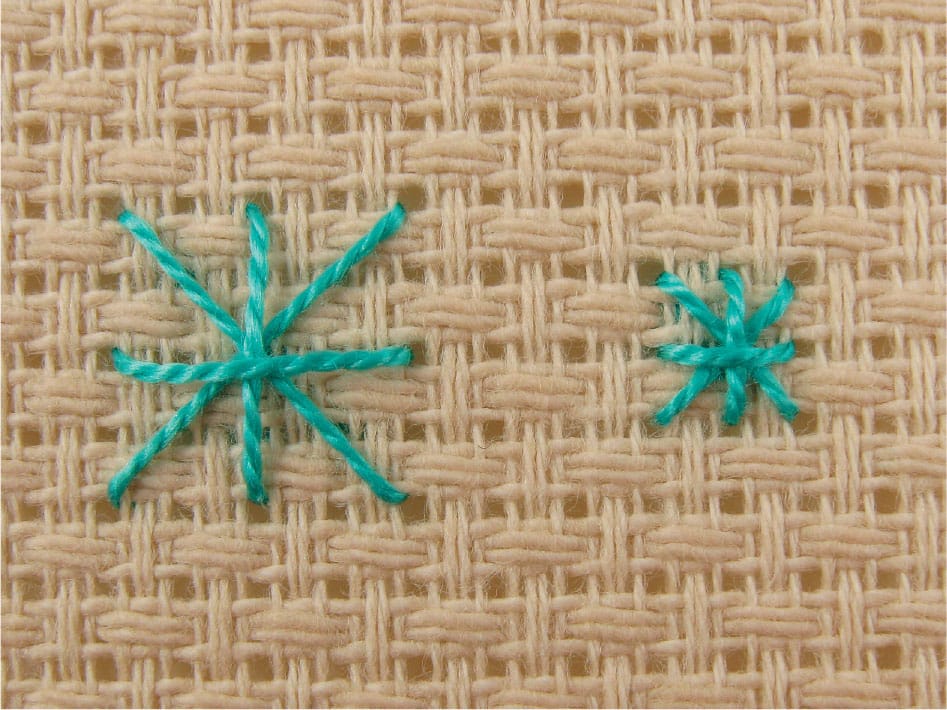
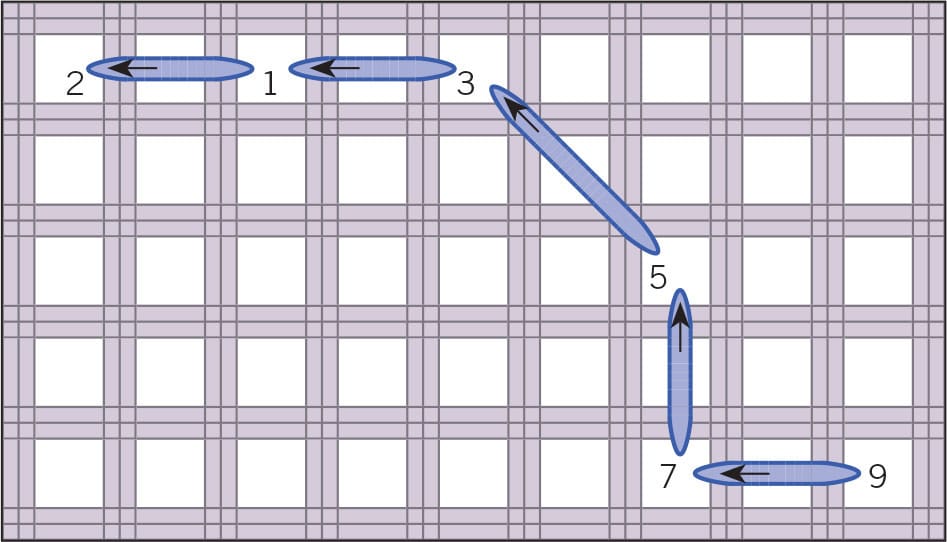
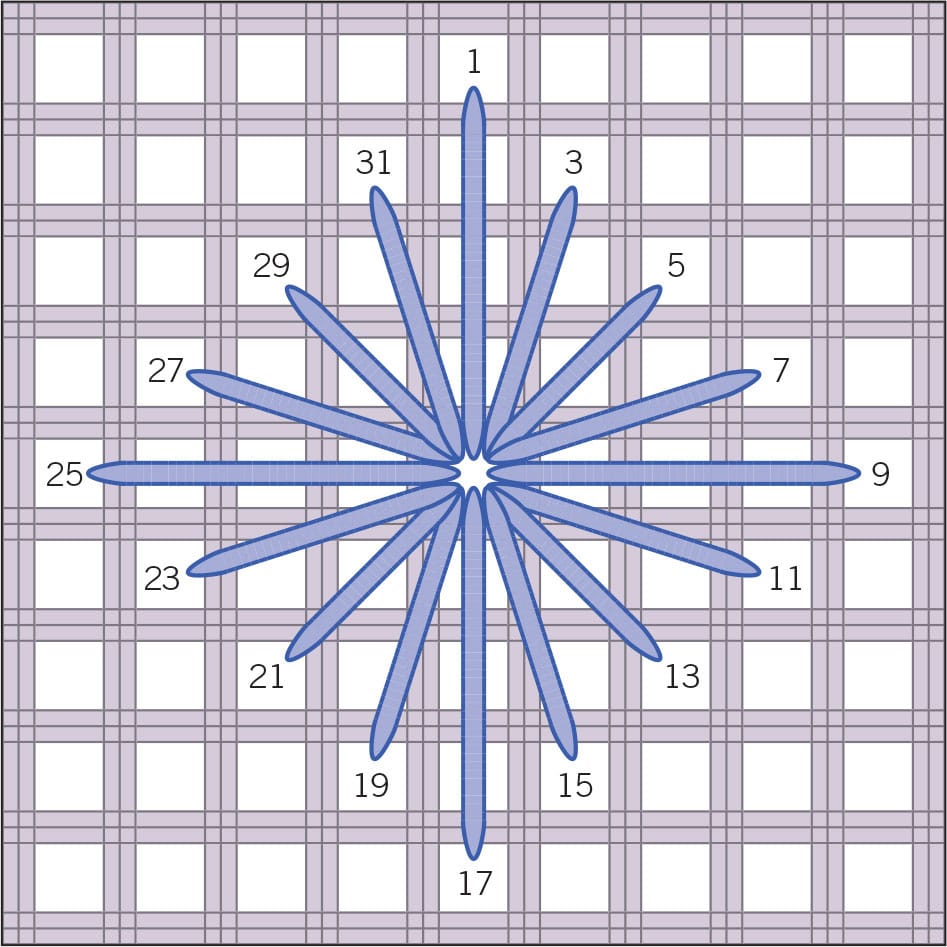
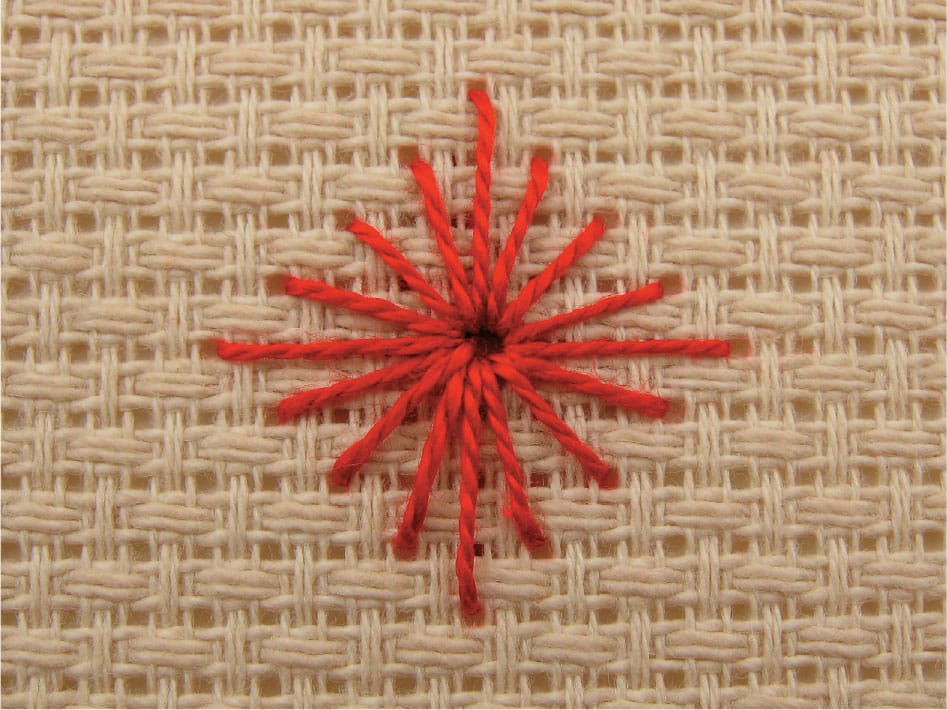
DIAMOND EYELET
This stitch is worked from right to left. For best results, work the stitches as shown on the graph so you will be going down into a dirty hole, not coming up through a dirty hole. This stitch gives a lacy look when worked over a large area or worked as a border stitch.
You can use any type of thread for this stitch. Hand-dyed single strand thread or metallic braid work especially well.
Ways to use: stars, bands
Also known as: star eyelet
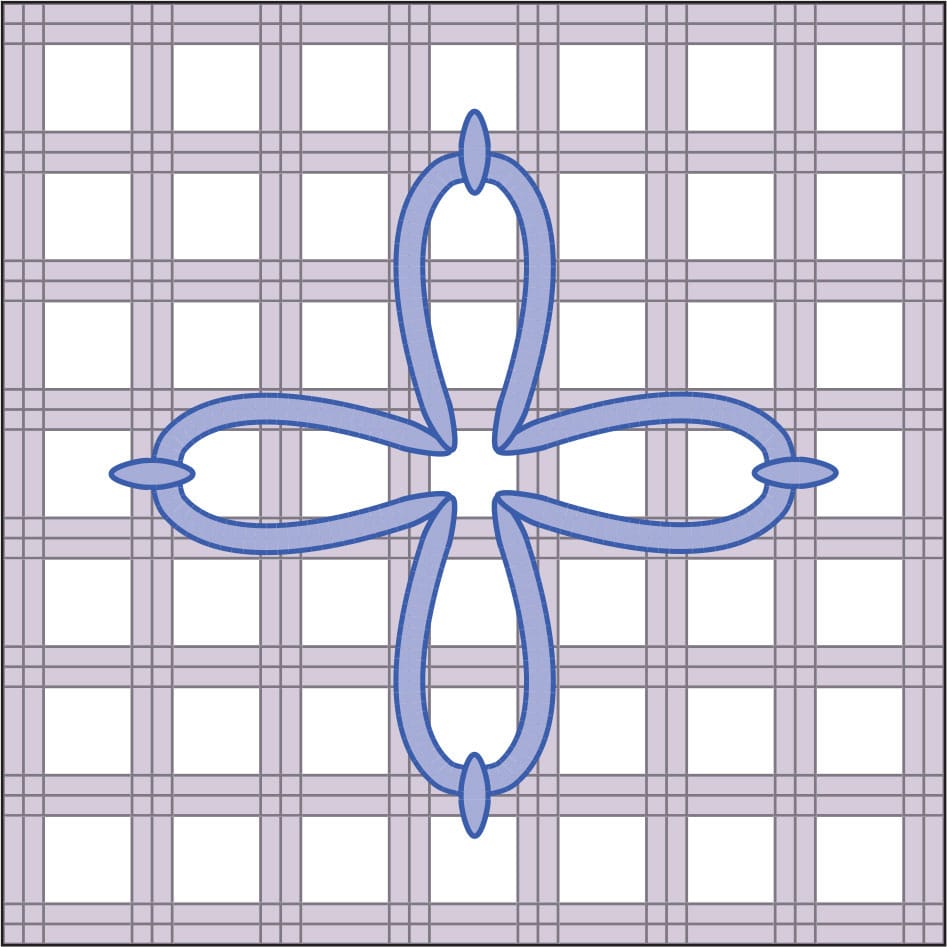
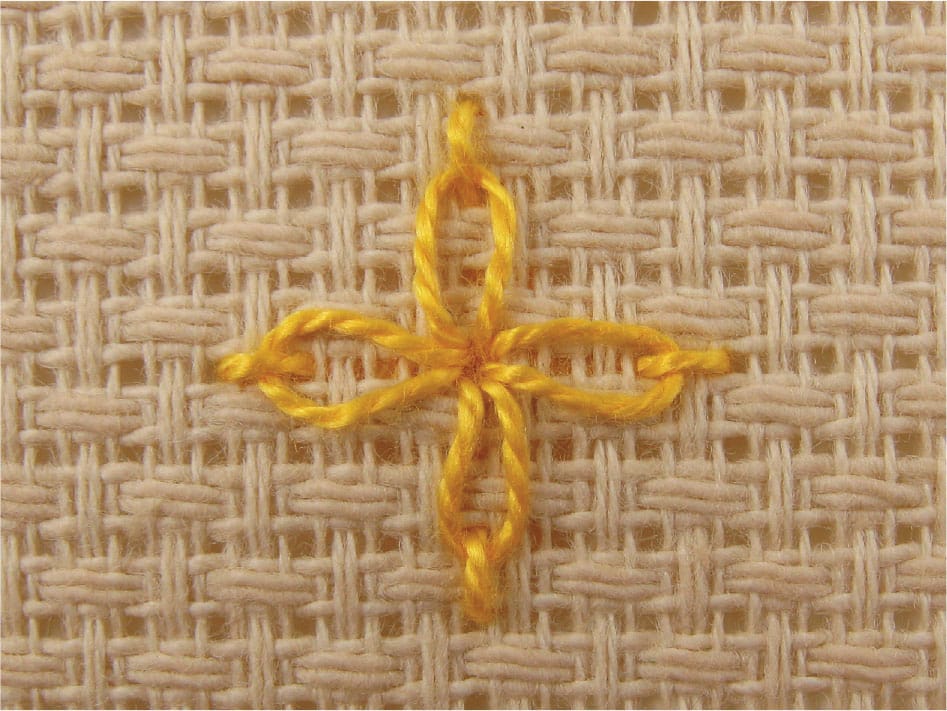
DAISY MOTIF
This sweet motif is a variation of a lazy daisy. This stitch can we worked in any direction. As you work the stitch, you’ll need to use your finger to hold the left side of the loop in place while you complete the tie-down stitch. Watch the tension on this stitch, as it is easy to pull it too snug. When the motif is complete, check to be sure it lies flat against the fabric with no puckering of the fabric.
You can use any type of thread for this stitch.
Ways to use: bands, borders, filling
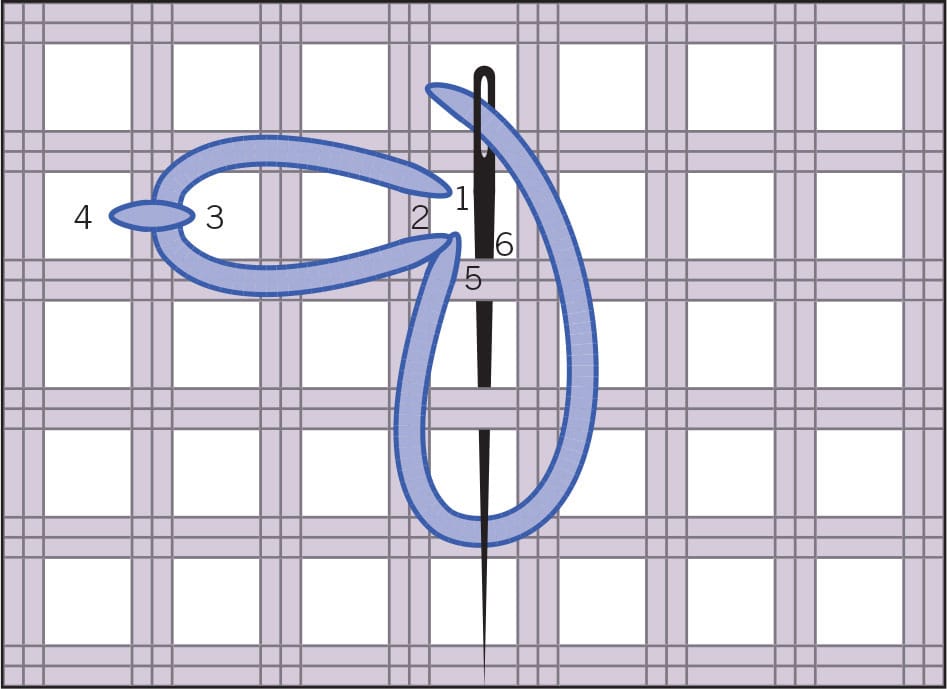
Creating the loop
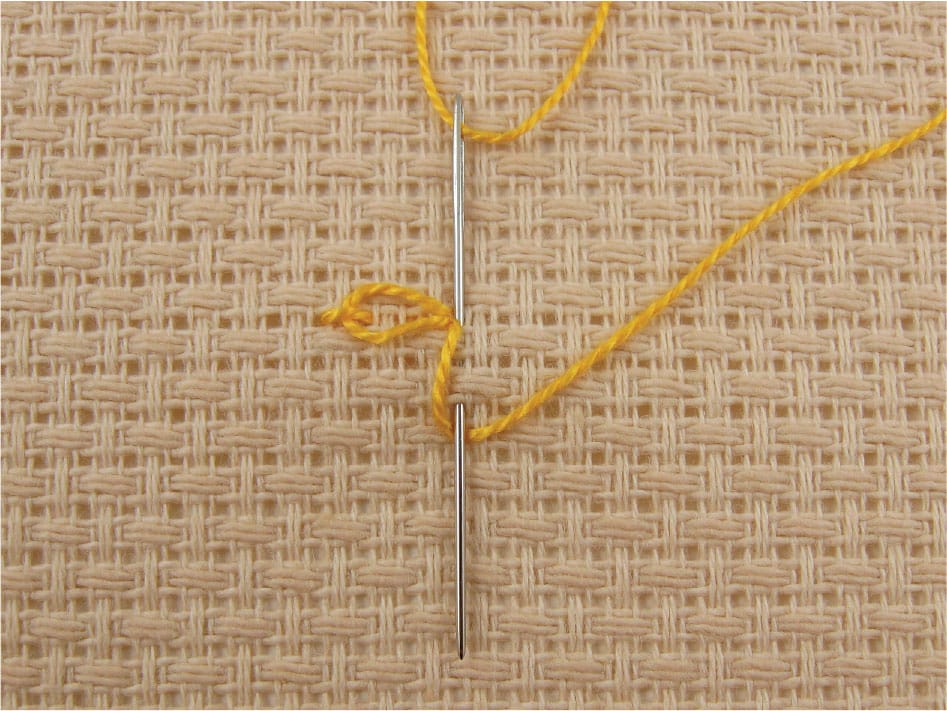
Pulling thread through
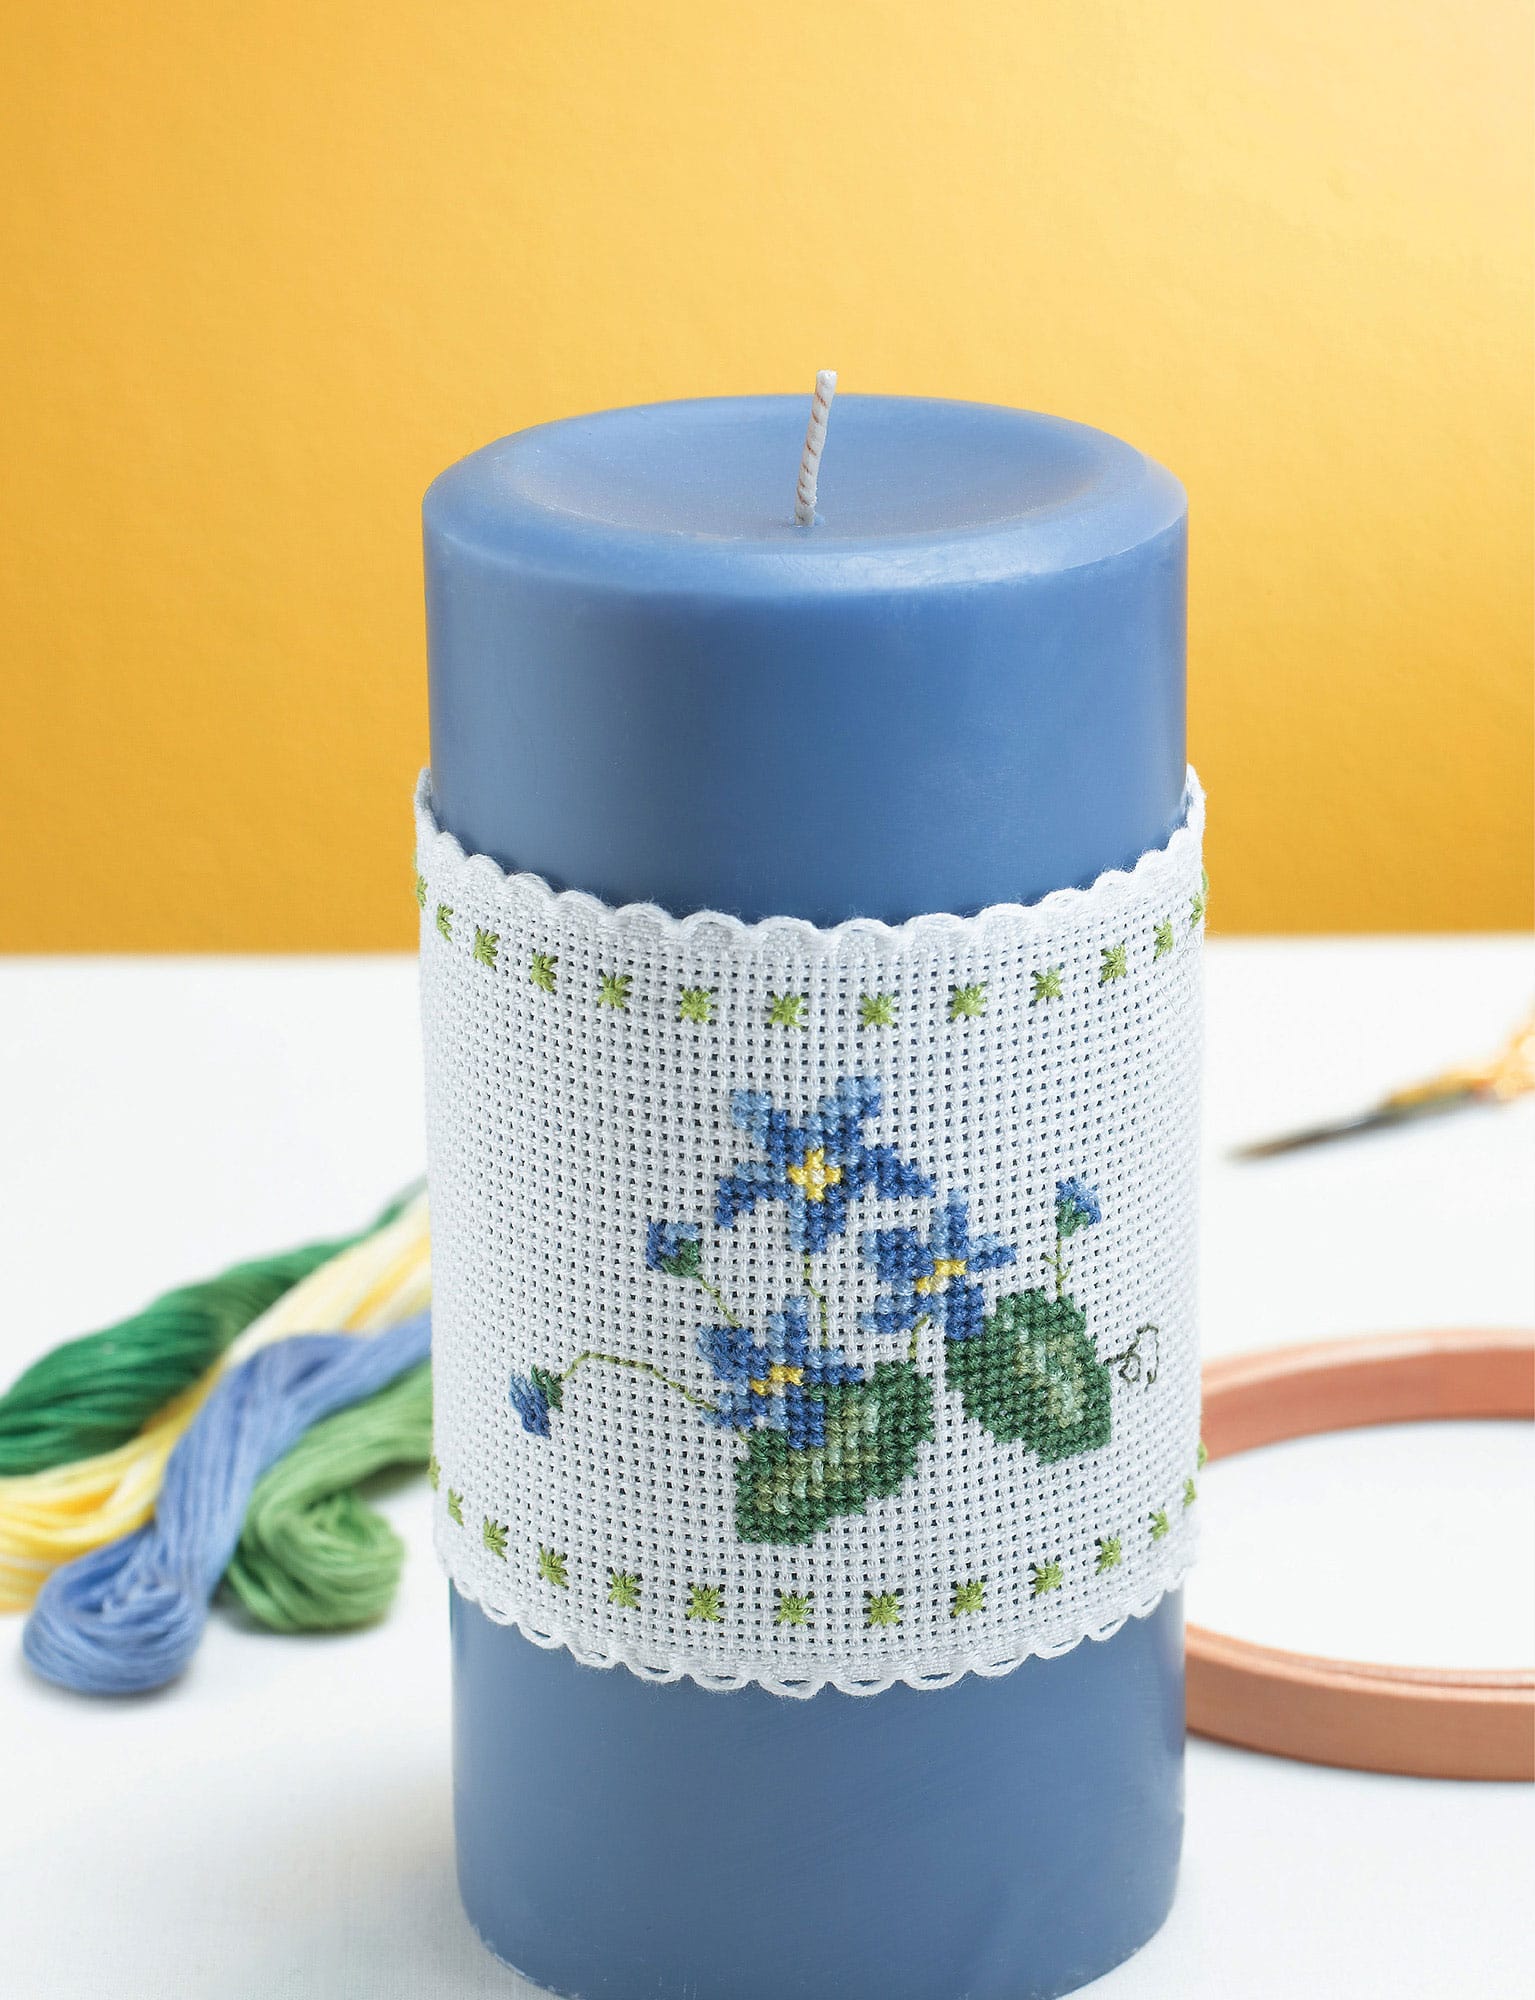
VIOLET BLOSSOMS CANDLE BAND
Fields of wild violets blooming are a wonder to behold. These stitched violets will add a touch of beauty to your home for guests and family to enjoy.
STITCHING INSTRUCTIONS
1 Baste center line on Stitchband.
2 Stitch design using center line as a guide.
3 Remove center basting thread.
4 Trim ends of band as needed for a straight edge.
5 Fold under one end of the Stitchband 1/4" (0.6 cm). Use ecru sewing thread to sew raw edge to the back of the band. Stitches should not go through the fabric to the front.
6 Measure the circumference of the candle. Create a circle the size of the circumference by overlapping the sewn edge of the Stitchband on the outside of the circle until measurement is reached. Pin layers together. Sew the two pieces together along the folded edge of the top piece.
7 Trim loose band as needed and slide band on candle. The band can be positioned in the center of the candle or placed at the bottom of the candle.
Never leave burning candles unattended.
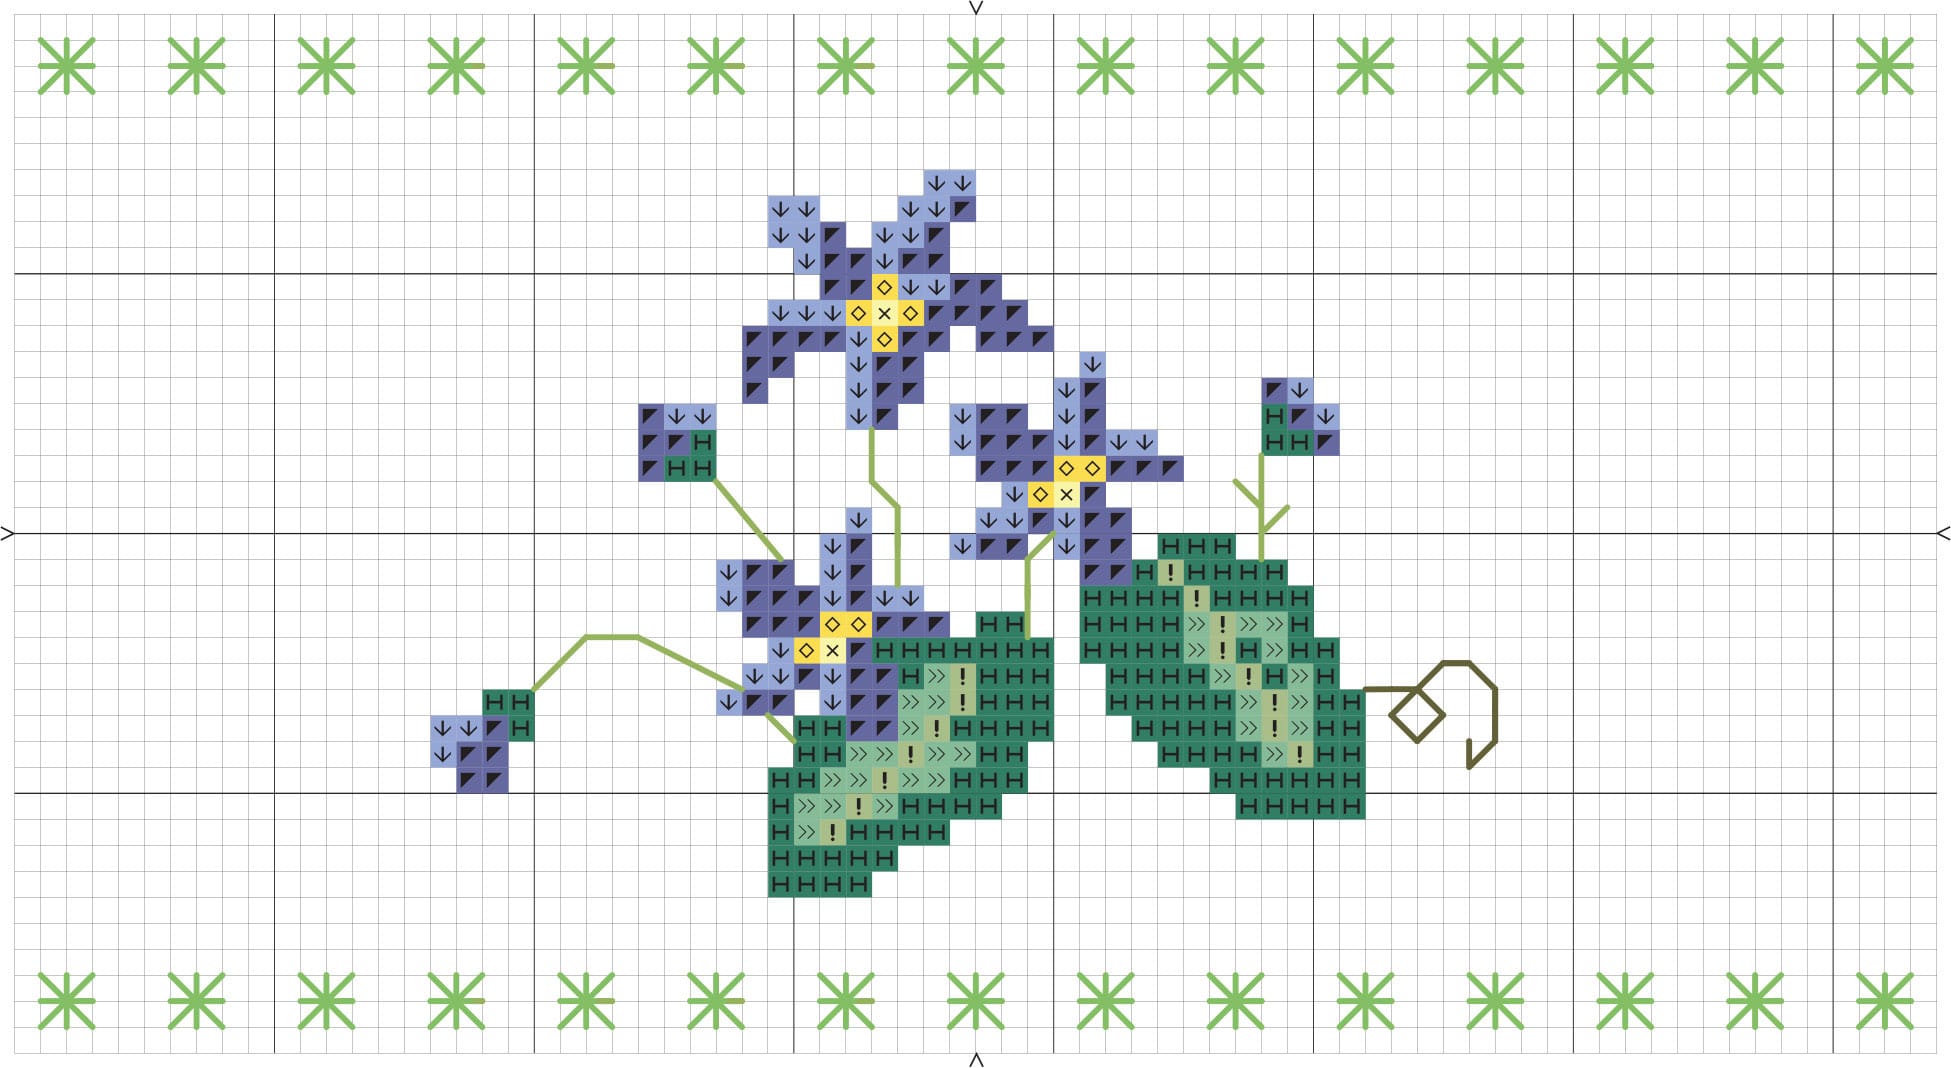
VIOLET BLOSSOMS CHART
|
987 |
dark forest green |
|
989 |
forest green |
|
341 |
light blue violet |
|
3807 |
cornflower blue |
|
307 |
lemon |
|
164 |
light forest green |
|
3078 |
very light golden yellow |
|
470 |
light avocado green (stem) |
|
3051 |
dark grey green (tendril) |
|
907 |
light parrot green (smyrna) |


COLOR KEY
Smyrna stitch: 2 strands
Cross-stitch: 2 strands
Backstitch stem and tendril: 1 strand

SPRINGTIME JOURNAL
Spring brings beautiful color with sweet smells from all the blooming flowers. This posy will call forth thoughts of spring as you write in your “Go Green” journal with its handmade paper and hemp cover.
STITCHING INFORMATION
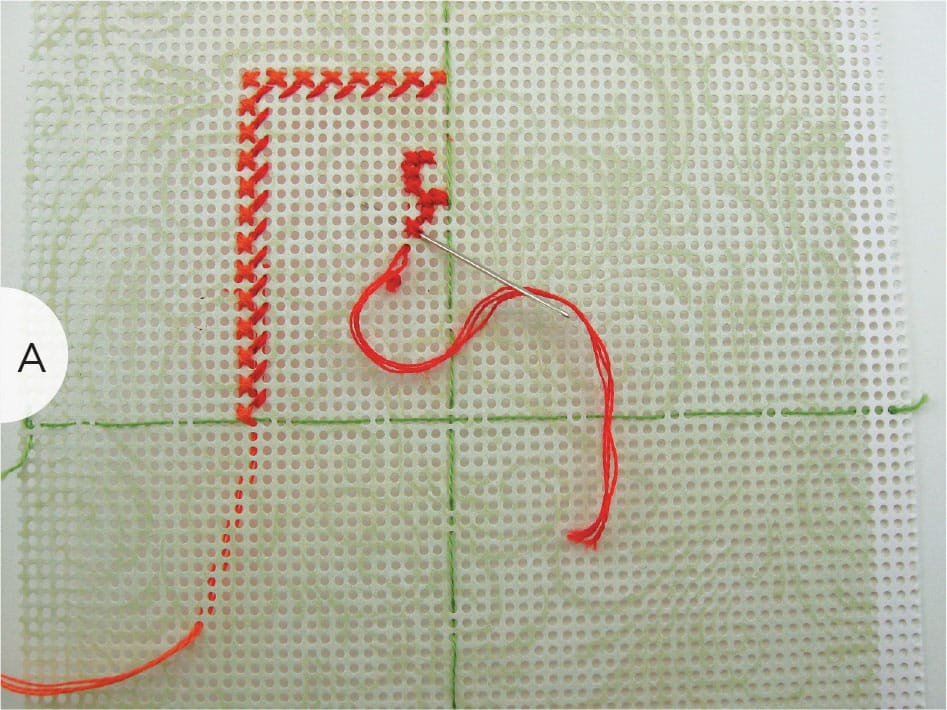
1 Baste center line on paper.
2 Stitch design using center line as a guide. (A)
3 Remove center basting thread.
4 Trim the perforated paper to within one row of the stitching.
5 Use the rotary cutter and cutting board to cut a piece of the brown cardstock 1/8" (3 mm) larger on all four sides than the stitched work. Cut the red cardstock 1/8" (3 mm) larger on all four sides than the brown cardstock.
6Use the permanent adhesive to glue the needlework to the brown cardstock. Using a toothpick, place permanent adhesive on the back of the stitched work along the back of the cross-stitches and on each flower. Glue to the center of the front of the brown cardstock.

7 Place permanent adhesive on the front side of the red cardstock and glue it the back of the brown cardstock. Glue the back of the red cardstock to the front of the journal. Refer to the photograph for placement, or chose your own location on the journal front.

SPRINGTIME JOURNAL CHART
|
34 |
coral dark |
|
35 |
coral |
|
72 |
topaz very light |
|
310 |
black |
|
934 |
black avocado green |
|
166 |
moss green medium light |
|
469 |
avocado green |


COLOR KEY
Cross-stitch: 3 strands
Backstitch flowers and petals: 1 strand
Backstitch main stem, branches, and leaves: 3 strands