
This Chapter
Touring the FlipShare interface
Importing, viewing, and managing video files
FlipShare is a multifaceted program that does a bunch of things, and the best way to learn about what those things are is to spend some up close and personal face-time with the FlipShare program. The great thing about FlipShare is that it's so easy to use, you might find yourself spending only a little time getting up to speed before you're off and running on your own, copying your video files, editing those files into movies, and sharing your movies with friends and family using FlipShare's handy sharing features.
With FlipShare (check out Chapter 1 for installation details), you can
Import your videos from your Flip and organize those videos using different folders.
Play those videos or ones still stored on your Flip camera that you haven't copied to your computer yet (when it's plugged into your computer).
Grab individual pictures from videos as snapshot files.
Share your videos by creating DVDs, sending the videos in e-mails or greeting cards, or uploading them to your very own (and free!) Flip Channel that others can go to on their Web browsers to watch your creations.
FlipShare also acts as your one-stop video editing shop (albeit a supremely simplified one at that) for trimming your videos the way you want, and adding titles, credits, and even accompanying music. FlipShare also makes it easy to upload your movies to popular social networking and sharing Web sites such as YouTube, Facebook, and MySpace.
Throughout this book, I make the assumption that you know how to launch your Mac or Windows PC's FlipShare program. By default, FlipShare should run automatically whenever you plug in your Flip camcorder, but if not, check out Chapter 3 to find out how to adjust what your computer does whenever you plug your Flip into your computer. You can also run FlipShare by double-clicking the FlipShare program icon. The most obvious places to look for the FlipShare program icon on your computer include
Tip
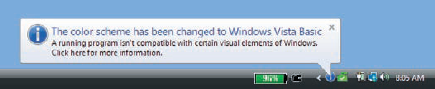
If you're running FlipShare on a Windows computer and the pop-up message shown in Figure 6-1 appears, check out Chapter 3 to find out why the color scheme has been changed to Windows Vista Basic. In Chapter 3, you can also read how to change the setting that can stop this distracting (but informative) message from appearing every time you run FlipShare.
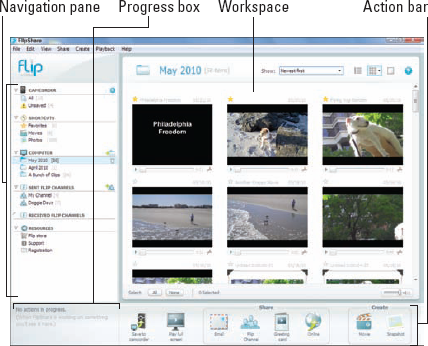
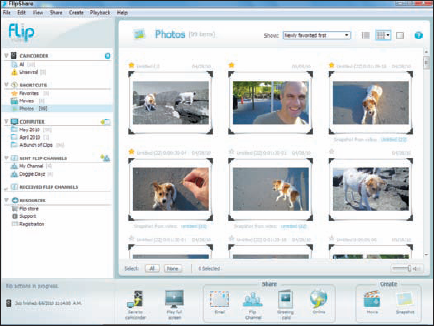
When you run the FlipShare program, the FlipShare main window appears, as shown in Figure 6-2. The main window consists of the following four sections (from left to right):
Navigation pane: The left column provides one-click access to
Folders containing videos and pictures you copied to your computer's hard drive
Videos saved on your Flip camera (when it's plugged in) that you haven't yet copied to your computer's hard drive (or ones you leave on your camera or copied to it so you can play them on your Flip's display whenever you want)
Videos that you uploaded to your personal and shared Flip Channels (Sent Flip Channels), and videos in Flip Channels that other FlipShare users invite you to view (Received Flip Channels)
Links you can click that launch your Web browser and take you to Flip-related Web sites
Progress box: The lower-left space beneath the Navigation pane is where you track progress while you do certain things, such as how far FlipShare has progressed when you're copying videos from your Flip camera to your computer's hard drive.
Workspace: The large, central area of the main window displays the contents of whatever folder or item you selected in the Navigation pane, such as videos stored on your Flip or movies you edited. You can click on these items here.
Action bar: This row of buttons beneath the Workspace holds actions that do certain things with an item (or items) that you selected in the Workspace, like saving a video to your computer, or e-mailing a picture.
In the following sections, I describe a little more fully what each of the FlipShare main window's four sections do, how they relate to one another, and how you can use them.
Tip
Although I cover FlipShare's main window sections one at a time, you typically use them in a mix-and-match way to do things with your video files, such as clicking between sections or dragging things from one section to another section.
The Navigation pane contains six sections to help you organize and view your videos, movies, and photos; organize and play movies you've uploaded to your Flip Channel; and access Flip-related Web sites.
Camcorder: If your camera isn't plugged in, this section title is grayed out and the triangle to left of the Camcorder icon is collapsed. When you plug in your Flip camera, the triangle automatically expands to display two folders: All and Unsaved. Click the All or the Unsaved folder to display thumbnails of that folder's video files in the Workspace; then click a thumbnail in the Workspace to do things with that video, such as play the video or copy or delete the video.
Tip
Flip SlideHD users may see additional folders in the Camcorder Navigation pane section that they created on their SlideHD camcorder or added in FlipShare.
Note
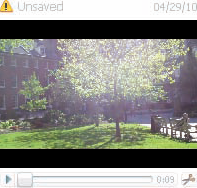
Videos saved on your Flip camera that you have not copied to your computer's hard drive are flagged with a yellow ! (exclamation point) icon, as shown in Figure 6-3. The All folder displays videos you might have already copied to your computer and videos that you have not yet copied to your computer. The Unsaved folder shows only those video files stored on your Flip camera that you have not copied to your computer.
Shortcuts: Click any of these three shortcut choices to display the following contents in the Workspace:
Favorites you created by dragging or dropping a video, photo, or other Navigation pane item (except Camcorder or Resources items) into the Favorites folder
Movies you created and saved on your computer's hard drive or uploaded to your Flip Channel
Photos you created by selecting one or more individual frames from your videos, which FlipShare converted into a separate picture file (or files), as shown in Figure 6-4
Computer: These folders contain videos you copy from your Flip camera and save to your computer's hard drive. When you copy video files from your Flip camera to your computer's hard drive, FlipShare automatically creates (and names) folders based on the month and year when you recorded the video files. Clicking the Add Folder icon to the right of the Computer section title creates a new Untitled folder that you can rename by typing in the name you want and then pressing Enter/Return.
Sent Flip Channels: These folders contain videos you share with individuals (one person's e-mail address) or groups of people (two or more e-mail addresses). Individuals or group members are automatically notified by e-mail whenever you drag a movie into a Flip Channel folder. (I write more about setting up your Flip Channels and sharing your movies using Flip Channels in Chapter 9.)
Received Flip Channels: The folders contain videos that other FlipShare users have invited you to view. The items that appear in these folders are based on the e-mail address where you received invitations from other FlipShare users to view the items.
Resources: Click these links that turn the Workspace into a Web browser that displays that particular Resource link (Flip Store, Support, and Registration).
The triangle icon to the left of each Navigation pane section indicates whether that section's contents are hidden (pointing right) or displayed (pointing down). Things you can do with the triangle icon include
Clicking the triangle to expand (show) or collapse (hide) the contents of that section's contents, such as folders or shortcuts, as shown in Figure 6-5
Clicking a folder (or other item) beneath an expanded section title to display that folder's contents (or related information) in the Workspace

You can click a folder to select that folder and display its contents, rename or delete the folder, or drag and drop the folder to move or copy it to another folder.
Deleting and renaming folders in the Navigation pane is a snap.
Delete a folder.
Click the trash can icon to the right of the selected folder to display the delete warning message dialog box.
Click the Permanently Delete button.
Change your mind? Click Cancel.
You can also right-click/Control-click a folder and then choose Delete from the menu that appears.
Rename a folder.
Double-click the folder name, or right-click/Control-click the folder and choose Rename from the menu that appears.
Type in your new name and then press Enter/Return.
From the Progress box, you can track the progress of certain tasks FlipShare is working on, such as uploading a movie to your Flip Channel, or copying one or more videos from your Flip camera to your computer's hard drive.
Personally, I think the Progress box is too tiny and unobtrusive for its own good. For example, because the progress bar and status text are so teensy, it's easy to start copying videos from your Flip camera to your computer, turn your attention to something else for a minute, and then unplug your Flip without noticing whether the Progress box indicated you were finished doing what you started before you looked away.
Warning
To avoid potential loss of videos you're copying between your Flip and your computer, try to make it a habit to take a gander at the Progress box before you unplug your Flip camera. For a fuller explanation of why keeping an eye on the Progress box and other Flip and computer connection considerations matter, check out Chapter 5.
If an active task that's underway can be cancelled, a teeny-weeny Cancel button appears alongside the progress bar — yes, it's that flea-sized "X" you can barely see in Figure 6-6.

Some tasks (such as copying a single, three-second video file) can take only a few seconds to complete. Other tasks, like uploading a movie to your MySpace Web site page, can take many minutes to complete. Uploading a 42-second movie to my MySpace page took about 2 minutes to complete. Rough estimate: 1 minute of movie time equals 2 minutes and 9 seconds of uploading time based on my computer and broadband connection's combined speed. Your mileage may vary, of course.
Although the Action bar (which I get to in a moment) sounds like the place you want to go to if you're looking for, well, action, the real action takes place in the Workspace section of the main window (refer to Figure 6-2). The Workspace is where you can click thumbnails of your video files to
View video files stored on your Flip camera and your computer's hard drive.
Play video files on your screen.
Trim away sections of your video files to remove unwanted shots that you don't want to see when you play the video files. (Unwanted equals too silly or poorly captured. Can you say "outtakes"?)
Delete, copy, or move your video files to other folders.
Share a selected video file using one of FlipShare's sharing options.
Share a video file or use that video file to create a movie or DVD copy of the video file.
Create a snapshot by selecting individual frames from the video file and saving those frames as individual picture files.
Log into and manage video files stored in your Flip Channels folder.
Access and use Flip-oriented, Web-based resources the same way you use your favorite Web browser.
Note
The Workspace display sorting and layout buttons, selection buttons, and volume control slider disappear when you click the Resources section in the Navigation pane. Clicking the Resource section transforms the Workspace into a simple Web browser window.
You can work with the Resource sections' Flip-related Web pages you see in the Workspace's Web browser window the same way you use your favorite Web browser program. However, you can't use the Web browser window to go to other Web sites, such as www.dummies.com or joeygadget.com
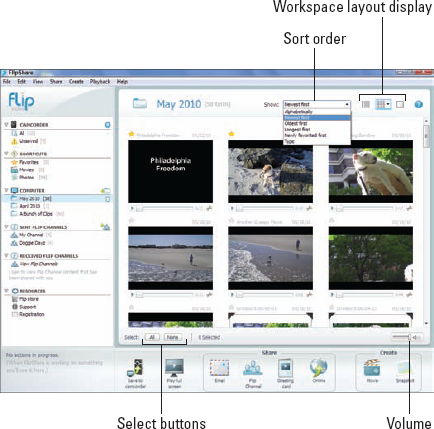
The FlipShare Workspace provides a few simple controls — as described in the following list — for displaying and working with your video thumbnail files:
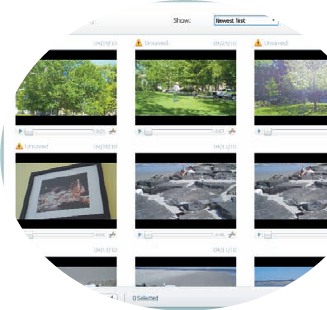
Sort order: Click the Show drop-down menu and select one of the choices to sort your video files in that particular order, as shown in Figure 6-7.
Note: The drop-down menu choices change based on which Navigation pane section you're viewing.
Workspace layout display: Click one of the three Workspace layout display buttons in the upper-right corner above the Workspace to display your thumbnails as a single list of thumbnails, a series of rows and columns, or a single list of large videos that fill up the entire workspace area.
Note: Click and hold the middle layout display button to display a drop-down menu, and then choose one of the thumbnail size options to display the size and number of thumbnails that appear in the Workspace.
Select: Click one of the Select buttons in the lower-left corner beneath the Workspace to quickly select All thumbnails displayed in the Workspace or None of them.
Note: You can also right-click/Control-click in the white space between video thumbnails and then choose Select All or Select None from the menu that appears to do those things.
Volume: Click the volume control slider in the lower-right corner beneath the Workspace and then drag left or right to decrease or increase (respectively) the playback volume of videos you play in the Workspace. You can also control the volume using the following keyboard shortcuts:
Alt+↑/Option+↑: Increases volume
Alt+↓/Option+↓: Decreases volume
Ctrl+Alt+↓/

You can play and control your videos in an any of the three Workspace display views using the control buttons shown in Figure 6-8.
To play and control your videos
Start watching your video. Click the Play button. The Play button turns into a Pause button when your video starts to play. Click Pause to pause playback.
Rewind or fast forward to another location in the video. Click and drag the progress bar slider beneath the video. You can also click the space on either side of the progress bar slider to jump directly to that location in the video.
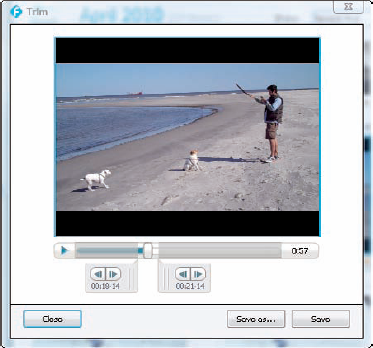
Trim. Click the Trim button to the right of the time-length indicator to open the Trim Tool window (row and column, and full-size Workspace layout views only), as shown in Figure 6-9. I tell you more about how to use this tool in Chapter 7.

You can watch your videos in full-screen mode to see them in the maximum size possible. To watch your videos in full-screen mode
Right-click/Control-click a video thumbnail and choose Play Full Screen from the menu that appears.
You can also just click the Play Full Screen button in the Action bar at the bottom of the FlipShare main window; I talk more about the Action bar in the next section.
The Play Full Screen window appears with a list of keyboard shortcuts you can use to control playback when you watch your video in full-screen mode, including
Spacebar: Pauses and plays your video
Right arrow (→): Fast-forwards 20 seconds
Left arrow (←): Rewinds 20 seconds
Esc(ape) or mouse click: Closes the full-screen window mode and returns to the FlipShare main window
Click OK to watch your video in full-screen mode, or click Cancel if you don't want to watch your video in full-screen mode.
(Optional) Select the Don't Show This Again check box if you don't want FlipShare to display the Keyboard Shortcuts reminder window every time you watch a video in full-screen mode.
Your video fills your entire screen and begins playing.
The full-screen mode closes and returns to the FlipShare main window when your video reaches the end.
The Action bar lives at the bottom of the FlipShare main screen, as shown in Figure 6-10. This is where you'll find a smattering of big fat buttons that you can click to perform certain tasks with video files you select and other content you select in the Workspace area.

The first two action bar buttons (Save to Camcorder and Play Full Screen) do their respective things with a selected video or picture with a mere click of the mouse. Click any of the remaining Action bar buttons, grouped under the guises of Share and Create, to initiate tasks that require two or more steps to complete.
Here's what each Action bar button does:
Save to Computer/Save to Camcorder: Copy video and/or snapshot files to or from your computer or camcorder, depending on which section of the Navigation pane you select. When you click the Camcorder Navigation pane section title, this first Action bar button is named Save to Computer. When you click any of the other Navigation pane section titles, this first Action bar button is named Saved to Camcorder.
Play Full Screen: Play selected video (or videos) or display selected snapshot (or snapshots, as a slideshow) in full-screen mode.
Email: Open the Share by E-mail window with text fields where you type e-mail addresses of recipients with whom you want to share selected video or snapshots.
Flip Channel: Open the Share by Flip Channel window, with its text field to type in e-mail addresses of recipients you want to invite to your Flip Channel so that they can play or view selected videos or snapshots.
Greeting Card: Open the Share Greeting Card window to display themed greeting card choices (holidays, thank you, and so on). Then you type in e-mail addresses of recipients you want to share selected videos or snapshots with.
Online: Open the Share Online window to display online sharing choices (Facebook, MySpace, YouTube, and Other Web Sites). Then you type in online account user and password information to connect with that service so that you can share selected videos or snapshots.
Movie: Open the Create Movie window to begin the multi-step Magic Movie or Full Length movie creation process.
Snapshot: Open the Create Snapshots window to select individual frames from selected video to create one or more snapshot picture files from those frames you select.
Note
Because the Action bar buttons grouped in the Share and Create sections initiate tasks that require several steps to complete, I revisit those Action bar buttons in upcoming sections that show you how to perform each button's related task.
The more video files you record with your Flip camcorder and copy to your computer, the more stuff you have to sort through and work with in FlipShare. Before you know it, you may be up to your arms in video files that you've imported and snapshots and movies that you've created from those video files.
Fortunately, FlipShare does a pretty great job of automatically organizing your files so that you can easily find, work with, or view videos without a lot of clicking around.
Naming, renaming, moving, copying and deleting files, creating new folders or deleting ones you no longer want, and making the most of the Favorites Navigation pane feature are what I describe in the following sections.
Tip
If, like me, you prefer keyboard shortcuts over mouse maneuvers, feel free to invoke those ol' favorites — Ctrl+C/
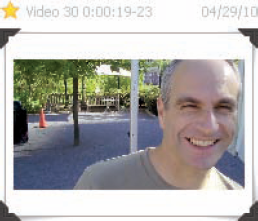
The Favorites folder in the Shortcuts section of the Navigation pane provides quick, one-click access to video, movie, and snapshot files you frequently view or work with. A file marked as Favorites is identified by a gold star above the upper-left corner of the file's thumbnail, as shown in Figure 6-11.
Click the Favorites folder anytime you want to display all your favorite files in the Workspace.
To add a video, snapshot, or movie file to the Favorites folder:
Click the grayed-out star icon above the upper-left corner of a file's thumbnail to turn the star to gold.
Click and drag a file (or files) to the Favorites folder and then release the mouse to add that file (or those files) to the Favorites folder.
Although FlipShare thoughtfully creates and names folders based on the months you recorded videos when you copy those video files from your Flip camera to your computer, you might want to create additional folders. For instance, maybe you want to create a folder called My New Life, in which you copy video files from other folders no matter what month they were created.
To create a new folder, follow these steps:
Tip
To rename a folder you create, double-click the folder to select it, type a new name, and then press Enter/Return to save the folder with your new name.
One of your Flip camera's great virtues is that you need to press the camera's red Record button only to start or stop recording videos with your camera. Unlike computers, which typically prompt you to give files a name when you save them, your Flip does the job without distracting you from your shooting by bugging you with questions about what you want to name your video files. Naming or renaming video files you copy to your computer makes it easier to remember what those files contain when it comes time to edit the files into movies that you want to share with others. You might want to also name or rename individual picture files you create from your video files using FlipShare's Create Snapshot feature.
To name or rename a video file or snapshot file
Click the filename field next to the star icon.
The file's name field is selected and highlighted.
Type a new name for your file, and then press Enter/Return to save your new filename.
Video files you record with your Flip camera and then copy to your computer are automatically saved in folders in the Computer section of the Navigation pane. FlipShare automatically creates and labels new folders based on the month when you captured the video that you're copying to your computer. If you're copying new video files that you captured during a month for which FlipShare already created a folder, those files are added to the existing folder.
You can create a new, duplicate file of an existing file by using the Copy command.
To create a new video, movie, or snapshot file of an existing file, follow these steps:
Click the file you want to copy in the Workspace to select the file.
Tip
To select multiple files, hold the Ctrl key/
Choose Edit
Copy or press Ctrl+C/ +C to copy the selected file.
Click the folder in the Computer section of the Navigation pane that you want to copy the file to, or skip to the next step if you want to copy the file (or files) to the current folder containing your selected file.
The contents of the selected folder appear in the Workspace.
Choose Edit
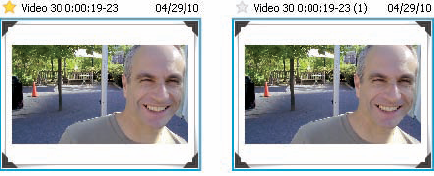
Paste (press Ctrl+V/+V).The newly created file appears in the Workspace with the same name as the original file followed by a number in parenthesis, as shown in Figure 6-12.
Moving files from one folder to another should be as easy as dragging and dropping those files from the one to the other, right? Well, it is that easy — sort of — as long as the files you're moving to another folder are in the same section of the Navigation pane. However, if you copy a file from one section of the Navigation pane to another section — a file from a folder in the Computer section to a folder in the Flip Channels section, for instance — FlipShare copies that file instead of just moving the file (or files).
Note
To make sense of whether a file is actually moved or a copy of the file is created and placed in a folder you drag a file to, keep these points in mind when you drag and drop:
Dragging a file from one folder to another folder in the same Navigation pane section moves that file.
Dragging a file from one folder to another folder in the same Navigation pane section while holding down the Ctrl/
Deleting files you don't want to keep can help decrease overall clutter when you're using FlipShare. Cleaning house this way also frees up space on your computer's hard drive so that you have more room available for saving new video files you capture and copy from your Flip camera.
To delete a video, snapshot, or movie file, follow these steps:
Click a folder in the Navigation pane to display that folder's contents in the Workspace. Then click the file you want to delete to select that file.
You can also choose Edit

A warning message appears, asking whether you're sure you want to delete the file (or files).
Click Permanently Delete to delete your selected file (or files) or click Cancel if you were only fooling and don't really want to delete your selection.
Your selected file (or files) disappears from the FlipShare Workspace (and from the storage space it occupied on your computer's hard drive until you gave it the digital heave-ho).
You can delete certain folders in the Navigation pane — and in the same fell swoop, delete any files stored in those folders. Folders you can delete (and all the goods inside those folders) include
Folders that FlipShare automatically creates in the Computer section when you copy video files from your Flip camera to your computer's hard disk
Folders FlipShare automatically creates in the Computer section that you renamed
New folders you created in the Computer section
Folders you created in the Flip Channels section
To delete a folder (and any files stored in that folder), follow these steps:

You can also choose File
A warning message appears, asking whether you're sure you want to delete the selected folder and all the files inside that folder.
Click Permanently Delete to delete your selected folder and the files contained therein, or click Cancel if you were only fooling and don't really want to delete your selection.
Your folder vanishes from the FlipShare Navigation pane (and file number indicators to the right of FlipShare's other Navigation pane folders decrease by however many files were stored in the folder you just deleted).
Note: Although you cannot delete certain permanent folders, such as the folders in the Shortcut section, you can delete the files stored in those individual Shortcuts folders, as I describe in the preceding section. Ditto for the topmost My Channel folder in the Flip Channels section.