
If you've played with FlipShare on your Mac, you know that you can use it to quickly and easily transform videos you record with your Flip camera into movies you can share with others. (You can read all about FlipShare in Chapter 6. And for those of you on a PC, Chapter 11 has the goods on creating movies in Windows Live Movie Maker.) But if you want to make fancier movies with your Mac than the simple but less-showy movies you can make with FlipShare, let's do the iMovie thang.

With iMovie, you can turn your videos into finely polished movies that you can upload to video-sharing sites like YouTube, play on an iPhone and iPod, or just watch on your Mac. You can also transfer movies you create with iMovie to a DVD to give to Aunt Clara who doesn't have a computer but does have a DVD player hooked up to her television. Whatever your personal movie distribution preference, making movies using your Mac and iMovie is sure to elevate your movie-making skills beyond what you managed to pull off using FlipShare.
Note
I cover iMovie '09 in this chapter. If my instructions don't match up with what you're seeing onscreen, check which version you're using.
The iMovie interface, shown in Figure 10-1, consists of an Event Library and a Project Library. The Event Library, which appears in the bottom left of the iMovie window, is where you store video files you want to slice into an eventual movie. The Preview window in the upper right lets you preview a movie you're working on anytime you want. When you work on a movie project, you choose parts of any videos stored in the Event Library and then copy these parts (known as clips) into the Project Library, which appears in the upper-left corner of the iMovie window. The lower-right section of the iMovie window displays different things based on what you're doing, such as adding a title or transition to your movie (which I show you how to do later in this chapter).

The elementary steps for using iMovie are
Import, store, and organize video in the Event Library.
Copy video footage from the Event Library to a project in the Project Library.
Save your video as a digital video file for viewing on other computers; on DVD; or uploading to Web-based sharing sites, such as your personal Flip Channel, or to YouTube, or Facebook, or MySpace.
For the ultimate guide to making movies and burning them to DVDs, check out iMovie' 09 & iDVD' 09 For Dummies (Dennis R. Cohen and Michael E. Cohen, Wiley).
The Event Library (videos you import are organized as events) holds all your videos, acting as your personal film vault. From here, you can choose footage from videos you recorded and saved to use in any new projects.
To store video in the Event Library, you must import a video from one of three sources:
Your Flip camcorder (or any other video camera or video-capable source, including smartphones, webcams, and even an Apple iPod nano capable of recording and saving video files)
A project created and saved using an earlier version of iMovie
A digital video file stored on your hard drive, which may include video files you might have copied from your Flip camera to your computer using FlipShare
When you plug your Flip camera into your Mac (or any camera or video-capture-capable gadget), your Mac carries out a certain automatic action, such as launching the FlipShare program or iMovie program, for instance, or just opening a Finder window that displays any files stored on your Flip camera. Check out Chapter 5 to see how to choose which action you want your Mac to take when you plug in your Flip camera.
To import (copy) a movie to your Mac's hard drive that you captured with your Flip camcorder, follow these steps:
Launch iMovie.
Plug your Flip camera into one of your Mac's USB ports.
The Import From Pure Digital Inc. Flip Video Camcorder window appears, as shown in Figure 10-2, displaying all the recorded videos saved on your Flip camera.
Note: If your Flip has a lot of saved video files stored on it, you may first see the
Generating Poster Imagesmessage and progress bar while iMovie gathers information about the videos saved on your Flip camera.If the Import window doesn't open, choose File

Select the clips you want to import.
To import all clips: Click the Import All button in the lower-right corner.
To selectively import clips: Set the Automatic/Manual switch to Manual. Deselect any clips you don't want to import (or click Uncheck All and then select only the ones you want to import), and then click the Import Checked button.
If your Flip camera is one of the HD models that records video in high-definition, the HD Import Setting window appears, as shown in Figure 10-3; otherwise, skip ahead to Step 5.
Choose one of these two options, and then click the OK button:
Large - 960x540: This option reduces the quality and file size of your video file, which means it doesn't look as nice as the Full option, but the file also doesn't take up as much space on your hard disk as that option, either.
Full - Original Size: This option imports your video file at the highest possible quality, and uses up more space on your hard drive than the Large option.
The Save To dialog appears, prompting you to choose where you want to save your video files on your hard drive.
Click the Save To pop-up menu and choose where you want to save your video.
Choose how to organize your video by selecting one of the following radio buttons:
Add to Existing Event: Stores the video as part of an existing event in the Event Library. (This option is grayed out if this is the first time you're importing video files into iMovie.)
Create New Event: Stores the video as a new event in the Event Library. The default name for the Event is the date, but you can type a more descriptive name if you want. See the upcoming section, "Organizing the Event Library."
Select or deselect the Split Days into New Events check box.
Many video camcorders time-stamp any video footage you capture, so enabling this option divides a video into parts that represent all the video footage shot on a particular day.
Select the Analyze for Stabilization After Import check box if you want iMovie to attempt to detect and smooth any shaky parts.
Choosing this option can make importing your video files take a longer time than if you don't choose the option, as the option invokes an analysis process after the initial import process completes. For instance, when I imported 30 video files, it took iMovie about 15 minutes to first import the files to my Mac's hard drive, and then I stared at the Analyzing for Stabilization message window for another 50 minutes or so.
Slowdowns notwithstanding, choosing this option can be worth the longer wait. That's because, unlike most camcorders, your Flip does not have a built-in image stabilization feature that attempts to smooth out any shakiness you experience when you're recording videos with your Flip.
Tip
If you'd rather not spend time waiting right now, you can always perform the Analyze for Stabilization process later by selecting a clip (or clips) you want to analyze, and then choosing File
Click the Capture button.
The Save To dialog closes, and iMovie imports your video files.
As your video files are imported, a progress bar appears beneath each video file's thumbnail image in the lower half of the import window, and a large image of the first frame of the video file appears in the upper window, as shown in Figure 10-4.

Figure 10.4. A progress bar appears under each video file thumbnail as iMovie imports your video files.
Note: If you selected the Analyze for Stabilization check box in Step 8, the Analyzing for Stabilization window appears after iMovie finishes the initial import process. It displays an estimate of how long you must wait until the process is complete.
When iMovie is finished importing your video files, the Import Complete message appears.
Click OK, and then click the Done button in the lower-right corner of the Import From window.
Your imported videos appear as thumbnail images in the lower pane (the Event pane) of the iMovie window (refer to Figure 10-1). After you import a video, your source video footage remains on your Flip camera. To free some memory, you might want to go back and erase it (which I tell you about in Chapter 5).


Note
iMovie divides a video into separate scenes, where each scene displays the first frame of a video clip. Browse through these thumbnail images of scenes to see which scene is likely to contain the video footage you want to use.
If you have a video file saved to your Mac's hard drive, you can easily import that video file into iMovie. To import an existing video file, follow these steps:
Choose File
ImportMovies.An Open dialog appears. You might need to navigate to the folder where you stored the video file you want to import.
Note: Video files you imported using FlipShare are saved in the Movies
Select the digital video file you want to import.
Click the Save To pop-up menu and choose the location where you'd like to store your video.
Select one of the following radio buttons:
From the Optimize Video pop-up menu, choose how you want to optimize high-definition (HD) video.
The Large option reduces the frame size of the HD video to 960 × 540 pixels, whereas the Full option displays the frame size at the complete 1920 × 1080 pixels.
Select either the Copy Files or the Move Files radio button.
Copy Files: Leaves your original file and creates a duplicate file to store in iMovie's Events folder.
Move Files: Transfers your chosen video file into iMovie's Events folder.
Your imported movie appears as thumbnail images in the iMovie window.
Video files are notoriously large — which means they can take up lots of space on your computer's hard drive. The more video files you copy to your hard drive, the less hard drive space you have. In Chapter 5, I write about copying files to and from your hard drive, and in Chapter 3 I write about how you can move your video files to an external hard drive if you need more space for storing your video files.
The more videos you import and store, the more crowded the Event Library becomes — and the more challenging it becomes to find what you want. When you store a new video in the Event Library, iMovie gives you the option of creating an event folder, which identifies the date you imported the video file into iMovie.
Organizing videos in the Event Library by date can be helpful, but you might prefer to identify events with descriptive names. To rename an event, follow these steps:
Double-click an event in the Event Library pane in the bottom-left corner of the iMovie window.
If the Event Library is not visible, choose Window
Your chosen event name becomes highlighted.
Type a descriptive name for your event, and then press Return to save your new name.
Storing video in different event folders can help you remember where you stored videos you are looking for. If you want to edit video of your family vacation, just click the event folder for that day or span of days to display your video.
Event Library displays each video file as a series of thumbnail images. To define how to divide a video into multiple thumbnail images, drag the slider in the bottom-right corner of the iMovie window, as shown in Figure 10-5. Dragging the slider to the left divides your video into more thumbnail images (top); dragging the slider to the right divides your video into fewer thumbnail images (bottom). The number on the right of the slider indicates the duration of the clip from one-half second up to 30 seconds or All, which means no divisions.
Instead of forcing you to browse through your entire video to find the one part you need, iMovie lets you jump straight to a scene that contains the footage you want to use. You do this by dragging the mouse pointer over the thumbnail images of the clips. After you find the video footage to edit, copy that video footage into your project by clicking and dragging it with the mouse.

The Event Library contains your raw, unedited video. The Project Library contains the copies of your video that you can modify. By default, the Project Library appears in the upper-left corner of the iMovie window. The Project Library lists your projects by title and displays a filmstrip next to each project title so that you can preview your video. To view (or hide) the Project Library, choose Window
Projects contain one or more video clips from movies stored in the Event Library. In the Project Library, you can rearrange, trim, and delete video clips to create your movie. Here, you can also add titles or sound effects to your edited video. If you accidentally erase or mess up a video in the Project Library, just retrieve the original footage from the Event Library and start over. You can copy and store the same video footage in two or more projects.
To create a new iMovie project, follow these steps:
Choose File
New Project.The New Project dialog appears, as shown in Figure 10-6.
Enter a descriptive name for your project in the Project Name text box.
Choose Standard, iPhone, or Widescreen from the Aspect Ratio pop-up menu.
The aspect ratio optimizes your video project for displaying on different devices.
To view your video on a TV set: Choose Standard or Widescreen.
To view your video on a mobile phone or other portable gadget capable of playing videos: Choose the smaller iPhone aspect ratio.
Choose a theme.
If you want iMovie to automatically apply transitions and titles to your project: Click one of the five theme choices.
If you want to make those thematic choices yourself: Choose None.
(Optional) To automatically add a particular transition effect to your movie, select the Automatically Add Transitions and Titles check box.
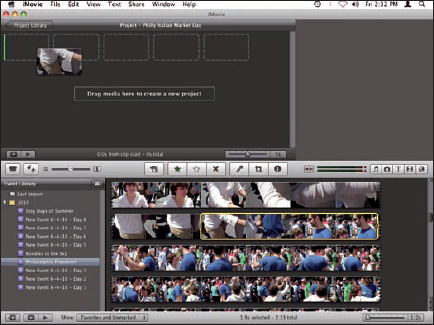
Your new project's name appears above the Drag Media Here to Create a New Project pane in the Project section of the iMovie window, as shown in Figure 10-7.
The stage is now set for you to begin sculpting your movie masterpiece!


Whether you want to create a new project or edit an existing one, you need to add video clips from the Event Library and place them in a project stored in the Project Library.
Before you can select a video clip to store in a project, you may want to skim through parts of your video clips so that you can find the ones you want to use in your project. To help you skim through parts of a video, iMovie displays an entire video as a series of images that appear like individual frames of a filmstrip. To find a specific part of a video, you can skim through a video. When you find the part of a video to use, just click and drag it into a project.
For now, don't worry about the order in which you import clips. I show you how to arrange them in the upcoming section, "Rearranging the order of video clips."
Skimming a video lets you see the contents of a video file just by moving the mouse over the video images. To view a video by skimming, follow these steps:
Move the pointer over any of the thumbnail images of a video file displayed in the Event Library section of the iMovie window.
A red vertical line appears over the thumbnail image, as shown in Figure 10-8.
Move the mouse left and right to watch your video in the upper-right corner of the iMovie window.
The faster you move the mouse, the faster the video plays. Moving the mouse to the left plays the video backward; moving the mouse to the right plays the video forward.

After you see the part of a video you want to use, you can select the video clip by following these steps:
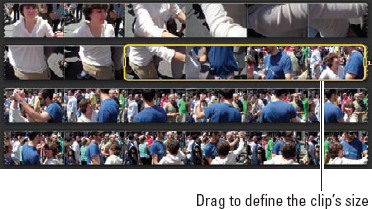
In the Event Library, move the pointer to the beginning of the part of the video that you want to use.
Click and drag to the right.
A yellow rectangle appears to define the size of your clip, as shown in Figure 10-9. Drag the handles to define the exact frame to start and end your video clip.
Release the mouse button when you're satisfied with the portion of the video that your clip contains.
Tip
After you select a video clip, you can preview it by choosing one of the following:
Move the mouse over the left selection handle until the pointer turns into a two-way pointing arrow. Then double-click to view your video clip in the Preview pane in the upper-right corner of the iMovie window.
Control-click the video clip and then choose Play Selection from the menu that appears.
After selecting a video clip, you can place it in a project. To place a video clip in a project, follow these steps:
Click the project in the Project Library list.
Click the Edit Project button above the list.
Thumbnail images of any video clips already stored in the project appear.
Note: If you haven't added any video clips to a project, you see a Drag Media Here to Create a New Project message, along with dotted rectangles (refer to Figure 10-7).
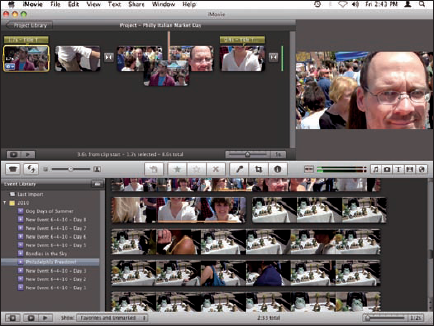
Move the pointer inside the yellow rectangle of the video clip you selected.
The pointer turns into a hand icon.
Click and drag the selected video clip to one of the dotted rectangles in the Project pane, and then release the mouse button, as shown in Figure 10-10.
Your selected video clip appears as a thumbnail image in the Project Library section of the iMovie window.
Note
To edit a project, click the project in the Project Library list, and then click the Edit Project button above the list. To return to the Project Library, click the Project Library button.
If you decide you don't need a particular video clip you stored in a project, you can delete that clip from the project.
Note
Deleting a video clip from a project does not delete the video clip from the Event Library.
To delete a video clip from a project, follow these steps:
Click a project in the Project Library list, and then click the Edit Project button, as shown in Figure 10-11.
The Project pane displays all the video clips stored in the selected project.
In the Project pane, click the video clip that you want to delete.
Choose Edit
Delete Selection (or press Delete).

When you finish a project that you saved as a movie, or you decide you no longer want to save a project you started but don't want to finish, you can delete an entire project.
Warning
When you delete a project, you also delete any video clips stored inside that project. However, the original videos (from which you copied clips to add to the project) remain in the Event Library.
To delete a project, follow these steps:
In the Project Library list, click the project you want to delete.
Choose File
Move Project to Trash.
Tip
If you accidentally delete a project, you can retrieve it by pressing
You can divide the Project Library into different folders, where one folder might contain your family vacation video, and a second folder might contain the footage you captured of a UFO you spotted hovering over a mesa in New Mexico. To create a folder, follow these steps:
In the Project pane, click the Project Library button.
The Project Library list appears.
Choose File
New Folder.Type the name you want for the folder in the dialog that appears.
Click Create.
The folder appears in the Project Library.
Click and drag the projects to the folder.
After you place one or more video clips in a project, you usually want to edit those video clips to put them in a particular order, trim unnecessary sections of the video clips that you don't want to appear in the eventual movie, and add titles and credits and audio to spice up your entire movie.
A project plays video clips in sequence, but you can always change the order of your video clips. To rearrange the order of your video clips in a project, follow these steps:
Click a project in the Project Library list.
Click the Edit Project button at the top of the pane.
The Project pane opens.
Click the video clip you want to move and hold the pointer over the clip.
The pointer turns into a hand icon.
Click and drag the selected video clip behind another video clip.
Vertical lines appear to show you where your video clip will appear, as shown in Figure 10-12.
Release the mouse button.
Your video clip appears in its new location.
Sometimes a video clip contains a little too much extra footage that you need to trim. Other times, you might have trimmed a little too much from a video clip, and you need to add more footage. In either case, you can adjust the size of your video clip by following these steps:
Click a project in the Project Library list, and then click the Edit Project button.
Move the pointer over a video clip, and then click the lower-left corner of the clip.
A gear icon appears.
Click the gear icon and then choose Clip Trimmer from the pop-up menu, as shown in Figure 10-13.
A Clip Trimmer pane appears at the bottom of the window. It displays a rectangle that contains the size of your video clip, along with dimmed thumbnail images of the original video that you used to copy the video clip.
Move the pointer over the left or right side of the rectangle that defines the size of your video clip.
The pointer turns into a two-way pointing arrow.
Click and drag a handle to increase or decrease the size of your video clip.
Click the Play button to view your edited video clip.
Click Done when you're happy with the images stored in your video clip.

Tip
Even though trimming makes it appear as if the sections of snipped footage are gone for good, those trimmed parts still exist. FlipShare simply hides and ignores the sections as if they're gone based on your trim choices. As with all things that appear to vanish when you're working on a movie project file, the original files you imported into FlipShare remain intact regardless of how you transform the video clips you play with in the Workspace pane.
You might want to add titles to your movie, such as at the beginning or end. A title at the beginning of your movie can display the name of your movie. At the end of your movie, you can add titles that display the credits listing the cast and crew members who helped you produce your movie (even if your entire team adds up to just you and your dog).
Titles can appear by themselves, or they can appear superimposed over part of your video. To create titles for a project, follow these steps:
Click a project in the Project Library list.
Click the Titles button on the iMovie toolbar or choose Window
Titles.A list of title styles appears in the Titles browser.
Click and drag a title from the Titles browser to a video clip or in front of, behind, or between two clips in the Project Library pane.
Release the mouse button.
The Choose Background selection window appears, as shown in Figure 10-14.
Click a background to select that background.
If you released the mouse button over a video clip in Step 4, your title appears superimposed over the video image. If you release the mouse button in front of, behind, or between video clips in Step 4, your title appears as a separate video clip in the position where you released the mouse button, as shown in Figure 10-15.
Click the title balloon that appears over a video clip.
Your chosen title format appears in the Preview pane.
Double-click the text in the Preview pane that you want to edit and then type new text or use the arrow and Delete keys to edit the existing title.
(Optional) Choose Text
Show Fonts to display the Fonts window that lets you choose a different color, font size, and typeface for your text.(Optional) Click the Play button that's superimposed over your Title in the Preview pane to preview how your title looks.
Click Done.
Click the Titles button to hide the list of available title styles from view.
All titles appear as brown title balloons in the Project pane.


Note
To delete a title, click the title balloon and press Delete, or choose Edit
Normally, when you place video clips in a project, those video clips play one after another. Rather than abruptly cutting from one video clip to another, you can add transitions that appear in between video clips. To add a transition, follow these steps:
Click a project in the Project Library list and then click the Edit Project button.
Thumbnail images of your selected project appear in the Project pane.
Click the Transitions button on the iMovie toolbar or choose Window
Transitions.A list of transitions appears in the Transitions browser, as shown in Figure 10-16.
Click and drag a transition in the Transitions browser between two video clips in the Project pane.
Some different types of transitions include Cube (which spins a cube on the screen where a different video clip appears on each side of the cube) and Page Curl (which peels away one video clip like a piece of paper).
Tip
Hover your mouse pointer over any of the Transition thumbnails to watch an animated preview of how the transition works.
Release the mouse button when a vertical line appears between two video clips.
Move the pointer over the transition.
Move the pointer to the right, and the transition plays forward. To move the transition backward, move the pointer to the left.
Click the Transitions button to hide the list of available transitions.

Note
If you chose a preset theme when you created your new project (see the earlier section, "Creating a new iMovie project"), the title and transition choices you can choose from are those associated with the theme.
Tip
Click the gear icon beneath a transition, and then choose Precision Edit or Transition Adjustments to display tools you can use to tweak your transition so that it appears exactly the way you want.
To make your movie more interesting, you can add audio files that play background music or sound effects to match the action as it unfolds in your movie — a car honking, say, or maybe a telephone ringing. To add an audio file to a project, follow these steps:
Click a project in the Project Library list and then click the Edit Project button.
Click the Music and Sound Effects button (denoted by the musical note) on the iMovie toolbar.
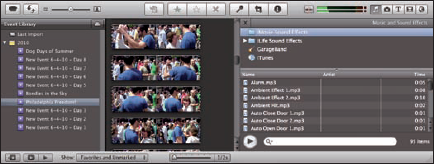
A list of audio files appears in the Music and Sound Effects browser, as shown in Figure 10-17.
In the Music and Sound Effects browser, click an audio file library to use, such as iMovie Sound Effects, iLife Sound Effects, GarageBand, or iTunes.
A list of audio files appears.
Click and drag an audio file to a video clip in the Project pane.
A red vertical line appears over the video clip to show you where the audio file will start playing.
Release the mouse button.
Click the Music and Sound Effects button to hide the list of available audio files.
The point of editing your video and audio clips in an iMovie project is to create a polished movie. With iMovie, you can save your project to view on a computer, in iTunes, on an iPod or iPhone, or even on YouTube. You can save multiple versions of the same video project in different formats. That way, you can view one version of the video saved in the format suited for watching on your iPhone's screens, and post another version of the video saved in a format suited for viewing on YouTube so people can watch your movie using their favorite Web browser.
You might want to save your iMovie project as a digital video file so you can burn it to DVD later (using iDVD) or give a copy to someone who wants to view it on their computer.
To save a project as a digital video file, follow these steps:
Click a project in the Project Library list.
Choose Share
Export Movie.The Export Movie dialog appears, as shown in Figure 10-18.
From the Where pop-up menu, choose the location to save your project.
You can expand the menu by clicking the disclosure triangle to the right of the Export As field.
Select a Size to Export radio button (such as Medium or Tiny) and then click the Export button.
The sizes define the frame size. Smaller frame sizes are designed for viewing on smaller screens, such as an iPhone screen. Larger frame sizes are designed for viewing on bigger screens, such as a computer or TV.

If you create a particularly interesting movie and store it on your hard drive, you might later have trouble remembering where you stored it. To make it easy to always find your favorite movies, you can save your movies in your iTunes library, where you can always find them whenever you run the iTunes program.
To save a project that you can play in iTunes, follow these steps:
Click a project in the Project Library list.
Choose Share
iTunes.The Publish to iTunes dialog appears, as show in Figure 10-19.
Select or deselect one or more check boxes (such as Medium or Tiny) and then click the Publish button.
The sizes define the frame size of your video. Smaller sizes make your video look best on small screens, such as on mobile phones. Larger sizes make your video look best on larger screens, such as on a TV set. Your movie now appears in your iTunes library on your hard drive.

Note
After you save a movie to iTunes, you can remove it by choosing Share
One way to show off your movie is by uploading it to the Web so that others can watch it online or download it and watch it whenever they want. The most well-known (and well-trafficked!) video-sharing site is YouTube.
When you capture an interesting video, you can save your project to YouTube. After setting up a YouTube account (at www.youtube.com), you can upload a video from iMovie to YouTube by following these steps:
Click a project in the Project Library list.
Choose Share
YouTube.The YouTube dialog appears, as shown in Figure 10-20.
Click the Account and Category pop-up menus and choose the account and category options you want, and then type your password into the Password field. Enter your password.
Enter information to identify your video in the Title, Description, and Tags text boxes.
The information you type to identify your video can help others find it on YouTube when they want to see videos that match the category you select, such as Comedy or Travel and Events, or when they search for videos that match any tags you type in (separated by commas), such as Italian Food, or Philly, or Dancing in the Streets.
Select one of the Size to Publish radio buttons and then click Next.
A dialog appears, warning about copyright infringement.
Click the Publish button.
Presto! You're an Internet Video Superstar!

After you save a movie to YouTube, you can remove it by choosing Share
If you store your movie in Media browser, you can access and insert that movie into any program that uses Media browser, such as the iWork suite, many iLife programs (such as iDVD and iWeb), and non-Apple software, such as Toast (www.roxio.com).
To save a movie in the Media browser, follow these steps:
Click a project in the Project Library list.
Choose Share
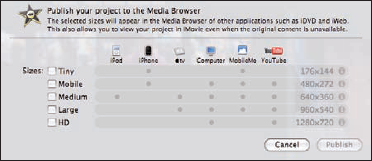
Media Browser.The Media Browser dialog appears, as shown in Figure 10-21.
Select or clear one or more Sizes check boxes, such as Tiny or Medium.
The sizes define the frame size, and the dots identify the type of devices that your video can play on.
Click the Publish button.
Note
After you save a movie to the Media Browser, you can remove it by choosing Share