Chapter 3
“Hello” from Flutter
IN THIS CHAPTER
![]() Running your first Flutter app
Running your first Flutter app
![]() Adding text and images
Adding text and images
![]() Improving your app’s layout
Improving your app’s layout
♪ “Hello, I Must Be Going” ♪
BERT KALMAR AND HARRY RUBY, SUNG BY GROUCHO MARX, IN ANIMAL CRACKERS, 1930
The word hello is a relative newcomer in the English language. Its first known use in print was in the Norwich, Connecticut, Courier in 1826. Alexander Graham Bell, the inventor of the telephone, believed that phone calls should start with the term Ahoy! but, apparently, Thomas Edison preferred Hello, and early telephone books recommended Edison’s choice.
According to legend, the first computer program to print nothing but “Hello world!” was written by Brian Kernighan, as part of the BCPL programming language documentation. The first public appearance of such a program was in Kernighan and Ritchie’s 1972 book, The C Programming Language. Nowadays, the term Hello world program, or simply Hello program, applies to any dirt-simple code for someone’s first exposure to a new language or new framework.
This chapter features a simple “Hello world” Flutter program and several embellishments. You can run the code, dissect it, change it, and have fun with it.
First Things First
Listing 3-1 contains your first Flutter app.
LISTING 3-1 Ahoy, Maties!
import 'package:flutter/material.dart';

main() => runApp(App0301());

class App0301 extends StatelessWidget {
  Widget build(BuildContext context) {
    return MaterialApp(
      home: Material(
        child: Text("Hello world!"),
      ),
    );
  }
}
You can download this app’s code (and the code for every other listing in this book) from my website. The URL is https://allmycode.com/Flutter. You can find detailed instructions for running the code in Chapter 2.
If you prefer to type the code yourself, follow these steps:
-
Create a new Flutter project.
Refer to Chapter 2.
As usual, Android Studio creates a file full of Dart code for you. The file’s name is
main.dart. -
Make sure that the
main.dartcode appears in Android Studio’s editor.If it doesn’t, expand the tree in the Project tool window on the left side of Android Studio’s main window. Look for
libbranch and, within thelibbranch, themain.dartbranch. Double-click thatmain.dartbranch. -
In Android Studio’s editor, delete all the
main.dartcode.How liberating!
-
In Android Studio’s editor, type the code that you see in Listing 3-1.
 tHE dART PROGRAMMING LANGUAGE IS cASe-sEnsITiVE. If you change a lowercase letter in a word to an UpperCase letter, you can change the word’s meaning. cHANGING the case can make the entire word go from being meaningful to being meaningless. In the first line of Listing 3-1, you can’t replace
 importwithImport. iF YOU DO, THE WHOLE PROGRAM STOPS WORKING. Try it and see for yourself!Figure 3-1 shows you the finished product.
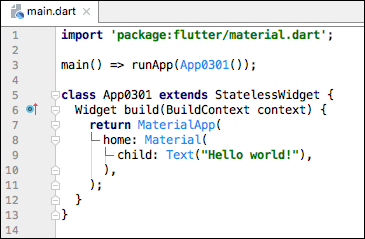
FIGURE 3-1: A Flutter app is ready to run.
-
Run your new app.
For detailed instructions about initiating a run, refer to Chapter 2.
Figure 3-2 shows you what you see when you run the Flutter app in Listing 3-1. The app looks pretty bad, but at least you can see the little Hello world! in the upper left corner of the screen. I’ll tend to the app’s cosmetic aspects later in this chapter.

FIGURE 3-2: Running the code in Listing 3-1.
 You may see red markers in Android Studio’s editor. If you do, hover over a marker and read the explanation that appears. Some explanations are easy to understand; others aren’t. The more practice you have in interpreting these messages, the more skilled you become at fixing the problems.
Another thing you can try is to select the Dart Analysis tab at the bottom of Android Studio’s main window. This tab lists many of the spots in your project that contain questionable code. For any item in the list, a red icon indicates an error — something that must be fixed. (If you don’t fix it, your app can’t run.) Any other color icon indicates a warning — something that won’t prevent your code from running but might be worth considering.
In the next several sections, I take apart the code in Listing 3-1. I explore the code from many points of view. I explain what the code does, why it does what it does, and what it might do differently.
What’s it all about?
When you look at Listing 3-1, you may see words, punctuation, and indentation, but that’s not what experienced Flutter developers see. They see the broad outline. They see big ideas in complete sentences. Figure 3-3 shows you what Listing 3-1 looks like to an experienced developer.

FIGURE 3-3: The big picture.
A Flutter program is like a set of Russian matryoshka dolls. It’s a thing within a thing within another thing, and so on, until you reach an endpoint. (See Figure 3-4.)

FIGURE 3-4: The layered look.
Listing 3-1 has some Text inside a piece of Material which is, in turn, inside a MaterialApp. The words Text, Material, and MaterialApp begin commands to construct things. In Dart language terminology, the words Text, Material, and MaterialApp are the names of constructor calls. Here’s the inside story:
- The code
Text("Hello world!")is a constructor call. When Flutter executes this code, it constructs a
Textobject. ThatTextobject contains the wordsHello world! - The code
Material(
   child: Text("Hello world!"),
)
is another constructor call. When Flutter executes this code, it constructs a
Materialobject. ThatMaterialobject contains the aforementionedTextobject. (See Figure 3-5.)
FIGURE 3-5: Each constructor call creates an object.
A
Materialobject has some of the characteristics that physical material, such as a piece of fabric, might have. It has a certain shape. It may be elevated from the surface below it. You can move it or pinch it. Granted, the background in Figure 3-2 doesn’t look much like a piece of fabric. But imitating the texture of cloth isn’t Material Design’s goal. The point of Material Design is to create a language for describing the status of the components on a user’s screen, and to describe how these components relate to one another. For the scoop on Material Design, visit
 https://material.io/. - The code
MaterialApp(
  home: Material(
    child: Text("Hello world!"),
  ),
) - is yet another constructor call. When Flutter executes this code, it constructs a
MateralAppwhose starting screen is theMaterialobject. (Refer to Figure 3-3.)
Here’s a way to sum it all up:
In Listing 3-1, the
MaterialAppobject has aMaterialobject, and theMaterialobject has aTextobject.
In that sentence, the seemingly innocent use of the words “has a” is important. For more details, see the later section “A brief treatise on within-ness’.”
To understand the code in Listing 3-1, you have to know where pairs of parentheses begin and end. But finding the matches between open and close parentheses isn’t always easy. To help with this problem, Android Studio has a few tricks up its virtual sleeve. If you place the cursor near a parenthesis character, Android Studio highlights the matching parenthesis. In addition, you can visit Android Studio’s Settings or Preferences dialog box. (On Windows, select File ⇒ Settings. On a Mac, select Android Studio ⇒ Preferences.) In that dialog box, select Editor ⇒ General ⇒ Appearance and put a check mark in the Show Closing Labels in Dart Source Code check box. After you dismiss the dialog box, Android Studio displays comments marking the ends of many constructor calls. (Notice the labels // Material and // MaterialApp in Figure 3-6.)
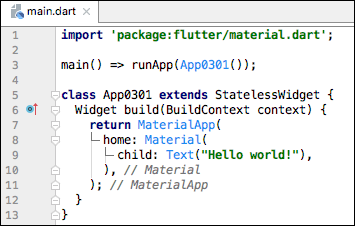
FIGURE 3-6: Helpful closing labels.
A constructor’s parameters
Every constructor call has a list of parameters (usually called a parameter list). In Listing 3-1, each constructor’s parameter list has only one parameter in it. (See Figure 3-7.)

FIGURE 3-7: Constructor calls have parameters.
Constructor calls can have many parameters, or have no parameters. Take, for example, the Text call in Listing 3-1. In that code, the parameter "Hello world!" supplies information to Dart — information that’s specific to the Text widget that Dart is constructing. Try changing Text("Hello world!") to Text("Hello world!", textScaleFactor: 4.0). When you save the new code, Android Studio does a hot restart that changes the look of the app in your emulator. (See Figure 3-8.)

FIGURE 3-8: An ugly app to illustrate the textScaleFactor parameter’s effect.
Chapter 1 describes the difference between Flutter’s hot restart and hot reload features. Both features apply updates to an app while the app is running. To do a hot restart, simply save your code. To do a hot reload, press the Run icon near the top of Android Studio’s main window.
The constructor call
Text("Hello world!", textScaleFactor: 4.0)
contains two kinds of parameters:
-
"Hello world!"is a positional parameter.A positional parameter is a parameter whose meaning depends on its position in the parameter list. When you create a new
Textobject, the characters to be displayed must always come first in the list. You can see this for yourself by changing the constructor call to the following, invalid code:Text(textScaleFactor: 4.0, "Hello world!") // Bad code!!In this code, the positional
"Hello world!"parameter doesn’t come first in the list. So, if you type this line in Android Studio’s editor, the editor marks this line with an ugly red error indicator. Quick! Change it back so that the"Hello world!"parameter comes first! You don’t want Android Studio to form a bad impression of you! -
textScaleFactor: 4.0is a named parameter.A named parameter is a parameter whose meaning depends on the word before the colon. A
Textconstructor call can have many different named parameters, such astextScaleFactor,style, andmaxLines. You can write the named parameters in any order as long as they come after any of the positional parameters.When you supply a
textScaleFactorparameter, the parameter tells Flutter how large the text should be. (Refer to Figure 3-8.) When you don’t supply atextScaleFactorparameter, Flutter uses the default 1.0 factor. The size of the text depends on a few things, such as the
 textScaleFactorand astyleparameter’s font size. For example, the following code makesHello world!twice as large as it is in Figure 3-8.Text("Hello world!", textScaleFactor: 4.0,
style: TextStyle(fontSize: 28.0))The app shown in Figure 3-8 already has
textScaleFactor4.0. But it has the default font size, which is 14.0. Because 28.0 is two times 14.0, thefontSize: 28.0parameter doubles the size of the text.
A note about punctuation
In Dart, you use commas to separate a constructor’s parameters from one another. And, for all but the simplest parameter lists, you end the list with a trailing comma.
return MaterialApp(
  home: Material(
    child: Text("Hello world!"), // Trailing comma after the child parameter
  ),                             // Trailing comma after the home parameter
);
Without trailing commas, your code runs as expected. But the next section tells you how you can get Android Studio to make your code look good. And, without trailing commas, Android Studio doesn’t do its best.
A pair of slashes (//) has a special meaning in Dart. To find out what it is, see Chapter 4.
Don’t relent — simply indent
Take another look at Listing 3-1, and notice how some of the lines are indented. As a general rule, if one thing is subordinate to some other thing, its line of code is indented more than that other thing. For example, in Listing 3-1, the MaterialApp object contains the Material object, so the home: Material line is indented more than the return MaterialApp line.
Here are two facts to keep in mind:
- In a Dart program, indentation isn’t necessary.
- In a Dart program, indentation is necessary.
Wait! What are those two facts again?
If you change the indentation in a Dart program, the program still runs. Here’s a valid reworking of the code in Listing 3-1.
// Don’t do this. It’s poorly indented code.
  import 'package:flutter/material.dart';

main() => runApp(App0301());

class App0301 extends StatelessWidget {
Widget build(BuildContext context) {
return MaterialApp(
home: Material(
child: Text("Hello world!"),
  ),
    );
    }
       }
When you ask Android Studio to run this poorly indented code, it works. Android Studio dutifully runs the code on your virtual or physical device. But having this code run isn’t good enough. This poorly indented code is hideous. It’s almost impossible to read. The indentation, or lack thereof, gives you no indication of the program’s structure. You have to wade through the words to discover that the Material widget is inside the MateralApp widget. Instead of showing you the app’s structure at a glance, this code makes your eyes wander aimlessly in a sea of seemingly unrelated commands.
The good news is, you don’t have to learn how to indent your code. Android Studio can do the indentation for you. Here’s how:
-
Open Android Studio’s Settings or Preferences dialog box.
On Windows, select File ⇒ Settings.
On a Mac, select Android Studio ⇒ Preferences.
-
In that dialog box, select Languages & Frameworks ⇒ Flutter and then put a check mark in the Format Code on Save check box.
The check mark tells Android Studio to fix your code’s indentation whenever you save your work.
While you’re at it, you might as well put a check mark in the next check box — the Organize Imports on Save check box.
-
Select OK to dismiss the dialog box.
Hazzah! When you run the code — or simply save the code — Android Studio fixes the code’s indentation.
If you want more control over Android Studio’s behavior, don’t fiddle with the Settings or Preferences dialog box. Instead, whenever you want indentation to be fixed, put the cursor in the Editor panel, and then choose Code ⇒ Reformat Code from Android Studio’s main menu.
One way or another, please indent your code properly.
Classes, Objects, and Widgets
Dart is an object-oriented language, so Dart has things called objects and classes. Listing 3-1 contains the names of many classes, such as App0301, StatelessWidget, Widget, BuildContext, MaterialApp, Material, and Text. It’s fair to say that almost every word in Listing 3-1 that starts with an uppercase letter is the name of a class.
You don’t have to know a lot about object-oriented programming to understand the role of these words in Listing 3-1, but it helps to keep a few facts in mind:
-
An object is a thing of some kind. Each object belongs to a particular class of things.
The word
Textis the name of a class of things — things that contain characters to be displayed on the screen. On its own, a class doesn’t do much. The fact that Flutter has aTextclass doesn’t mean anything for an app that displays images and no characters. You can talk about the class of all unicorns, but I’ve never seen a unicorn in my front yard.In contrast, the constructor call
Text("Hello world!")constructs an actual object. That object appears on the user’s screen. For example, aTextobject containing the wordsHello world!appears in Figure 3-2. You can refer to that object as an instance of theTextclass.In any particular app, you can construct no
Textinstances, oneTextinstance, or manyTextinstances. The same is true of classes such asWidgetandMaterialand almost every other class. -
Being an instance of one class might make you automatically be an instance of a bigger class.
Every instance of the Cat class is, by definition, an instance of the Animal class. (If that weren’t true, millions of YouTube videos wouldn’t exist.) And what about the Animal class? Every instance of the Animal class is an instance of the LivingThing class. (See Figure 3-9.)

FIGURE 3-9: I have to mention cats somewhere in this book.
In the same way, every instance of Flutter’s
Textclass is, by definition, an instance of Flutter’sStatelessWidgetclass. And, in turn, every instance of theStatelessWidgetclass is an instance of Flutter’sWidgetclass. So everyTextinstance is also aWidgetinstance. (Refer to Figure 3-9.) -
In Flutter, almost every object is, in one way or another, an instance of the
Widgetclass.Informally, a widget is a component on a user’s screen. Flutter takes this idea to another level, with each part of the user interface (the
Textinstance, theMaterialinstance, and even theMaterialAppinstance) being a widget in its own right.In Listing 3-1,
App0301is the name of a class. In the linemain() => runApp(App0301());the term
App0301()is yet another constructor call. This call constructs an instance of theApp0301class.The line
class App0301 extends StatelessWidget - and all the code below it is the declaration of the
App0301class. The declaration tells Dart what kind of class it is and what kinds of things you can do with the class. In particular, the wordextendsin that first line makes any instance of theApp0301class be an instance of theStatelessWidgetclass. That’s all you have to do to makeApp0301instances be instances of theStatelessWidgetclass.
Now you have several terms with subtly different meanings — class, object, instance, and widget. In Listing 3-1, the code Text("Hello world!") constructs something, but exactly what kind of thing does that code construct?
-
From the Dart language’s point of view,
Text("Hello world!")constructs an object.In Dart terminology, you call it an instance of the
Textclass. -
From the Flutter point of view,
Text("Hello world!")creates a widget.It’s an instance of the
Textclass and therefore (… guilt by association …) an instance of theStatelessWidgetclass and an instance of theWidgetclass.
For more of my babble about objects, classes, and widgets, see Chapter 7.
A brief treatise on “within-ness”
In a Dart program, you can find widgets within other widgets. (Refer to Figure 3-4.) In the same Dart program, you find classes within other classes. (Refer to Figure 3-9.) These two kinds of “within-ness” aren’t the same. In fact, these two kinds of “within-ness” have little to do with one another.
In Figure 3-3, a Text widget is the child of a Material widget. This doesn’t mean that a Text instance is also an instance of the Material class. To understand the difference, think about two kinds of relationships: “is a” relationships and “has a” relationships.
-
The relationships that I describe in the “What’s it all about?” section are “has a” relationships.
In Listing 3-1, the
MaterialAppobject has aMaterialobject inside of it, and theMaterialobject has aTextobject inside of it.There’s nothing special about “has a” relationships. There can be “has a” relationships in a barnyard. A Cat has a Mouse, and the Mouse has a PieceOfCheese.
-
The relationships that I describe in the earlier “Classes, Objects, and Widgets” section are “is a” relationships.
In every Flutter program, each
Textobject is aStatelessWidgetobject and, in turn, eachStatelessWidgetobject is aWidgetobject.In a barnyard, each Cat is an Animal and, in turn, each Animal is a LivingThing.
It wouldn’t make sense to say that a Cat is a Mouse, or that a Material object is a Text object. In the same way, it’s not correct to say that every Cat has an Animal, or that every Text object has a StatelessWidget object. The two kinds of relationships — “has a” and “is a” — are quite different.
If you’re hungering for terminology that’s more formal than “has a” and “is a,” I have some for you:
-
A chain of things connected by the “has a” relationship is called a composition hierarchy.
Frivolous as it may be, the diagram in Figure 3-4 illustrates a composition hierarchy.
-
The chain of things connected by the “is a” relationship is called the inheritance hierarchy.
The diagrams in Figure 3-9 are part of Flutter’s class hierarchy.
Don’t you feel better now that you have these fancy terms to fling around?
 In Flutter, almost everything is called a “widget.” Many classes are widgets. When a class is a widget, the class’s instances (any objects constructed from that class) are also called widgets.
The documentation is your friend
You may be asking yourself how you’re going to memorize all these names: Text, StatelessWidget, MaterialApp, and probably thousands more. Sorry to say, you’re asking the wrong question. You don’t memorize anything. When you use a name often enough, you remember it naturally. When you don’t remember a name, you look it up in the online Flutter docs. (Sometimes, you’re not sure where to look for the name you want. In that case, you have to poke around a bit.)
To see what I mean, point your web browser to https://api.flutter.dev/flutter/widgets/Text-class.html. When you do, you see a page with information about the Text class, some sample code, and some other stuff. (See Figure 3-10.)

FIGURE 3-10: Useful info about the Text class.
In the page’s upper right corner, you find a list of Text constructors. In Figure 3-10, there are two possibilities: Text and rich. If you select the Text link, you see a page describing the Text constructor call. (See Figure 3-11.)
This page lists the parameters in the constructor call and provides other helpful information.
FIGURE 3-11: The Text constructor call.
On the page in Figure 3-11, notice how all but one of the constructor’s parameters are enclosed in a pair of curly braces. The parameter that’s not in curly braces (namely, String data) is the constructor’s one and only positional parameter. Each of the parameters inside the curly braces (including double textScaleFactor) is a named parameter.
You can always count on Flutter’s documentation to tell you what kinds of objects you can and cannot put inside of other objects. For example, the following code is doomed to failure:
return MaterialApp(
  child: Text("Hello world!"), // Don’t do this!
);
It’s doomed because, according to the Flutter docs, the MaterialApp constructor has no parameter named child.
Making Things Look Nicer
The app shown in Figure 3-2 looks pretty bad. The words Hello world! are tucked up against the screen’s upper left corner. Fortunately, Flutter offers an easy way to fix this: You surround the Text widget with a Center widget. As its name suggests, the Center widget centers whatever is inside of it.
The word Center is the name of a class, so any object constructed from that class is called an instance of that class. In a term such as “Center widget,” the word widget suggests that something like Center (something to help manage the screen’s layout) is a component of some kind. A piece of Text on the screen is a component, a piece of Material on the screen is a component, and a Center object is also a component. Even though a Center widget doesn’t light up somewhere on the screen, a Center widget is still a component. Part of Flutter’s great strength is that Flutter treats all things the same way. When so many things are widgets, so many things can serve as parameters in the constructors of other things. The people who make up names for programming features call this the composability feature, and composability is a very nice feature to have.
You have a few ways to surround a Text widget’s code with a Center widget’s code. One way is to poke the cursor somewhere inside Android Studio’s editor, start typing, and hope that you navigate the thicket of parentheses correctly. A better way is to do the following:
- Place the cursor on the word
Textin the editor. -
Press Alt+Enter.
As a result, a dropdown list appears.
-
In the dropdown list, select Center Widget.
Listing 3-2 shows you what you get.
LISTING 3-2 Centering the Text
import 'package:flutter/material.dart';

main() => runApp(App0302());

class App0302 extends StatelessWidget {
  Widget build(BuildContext context) {
    return MaterialApp(
      home: Material(
        child: Center(
          child: Text("Hello world!"),
        ),
      ),
    );
  }
}
In Listing 3-2, the Material widget has a Center widget child, which, in turn, has a Text widget child. You can think of the Text widget as the grandchild of the Material widget.
Flutter supports hot restarting. After adding the Center code to the program in Android Studio’s editor, save the changes by pressing Ctrl+S (on Windows) or Cmd+S (on a Mac). If the program from Listing 3-1 was already running, Flutter applies your changes and updates the emulator screen almost immediately.
In some situations, hot restart doesn’t work. Instead of updating your app, Android Studio displays an error message. If that happens, try a hot reload. (Press the Run icon near the top of Android Studio’s main window.) And what if hot reload fails? In that case, press the Stop icon — the red square icon that’s in the same row as the Run icon. When you press the Stop icon, the run of your app ends completely. Pressing the Run icon to start afresh may fix the problem.
Figure 3-12 shows what you get when you run the code in Listing 3-2.
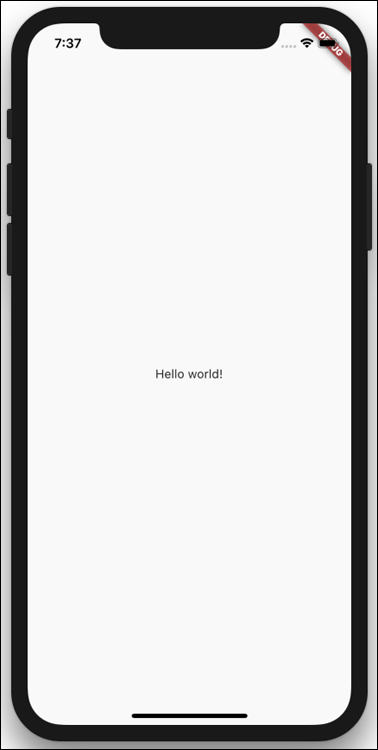
FIGURE 3-12: Yes, you’ve centered the text.
Creating a scaffold
The Text widget in Figure 3-12 looks so lonely. Let’s add some fanfare to the basic app. Listing 3-3 has the code; Figures 3-13 and 3-14 show you the new screen.
LISTING 3-3 Using a Scaffold
import 'package:flutter/material.dart';

main() => runApp(App0303());

class App0303 extends StatelessWidget {
  Widget build(BuildContext context) {
    return MaterialApp(
      home: Scaffold(
        appBar: AppBar(
          title: Text("My First Scaffold"),
        ),
        body: Center(
          child: Text("Hello world!"),
        ),
        drawer: Drawer(
          child: Center(
            child: Text("I’m a drawer."),
          ),
        ),
      ),
    );
  }
}

FIGURE 3-13: Behold! A scaffold!

FIGURE 3-14: Pulling out a drawer.
The home for a MaterialApp doesn’t have to be a Material widget. In Listing 3-3, the home is a Scaffold. When companies build skyscrapers, they create scaffolds — temporary wooden structures to support workers in high places. In programming, a scaffold is a structure that provides basic, often-used functionality.
The Scaffold constructor in Listing 3-3 has three parameters — an appBar, a body, and a drawer. In Figures 3-13 and 3-14, the appBar is the dark region at the top of the screen. The body is the large white region containing the Center with its Text widget. In Figure 3-14, the drawer is the big white area that appears when the user swipes from the left edge of the screen. The drawer also appears when the user presses the “hamburger” icon — three horizontal lines near the screen’s top left corner.
The body is nothing special. It’s very much like the entire screen in the earlier examples. But the appBar and drawer are new. The appBar and drawer are two of the things you can have when you create a Scaffold. Other things made available by Scaffold widgets include navigation bars, floating buttons, bottom sheets, footer buttons, and more.
In this chapter, Listings 3-1 and 3-2 have Material widgets, and Listing 3-3 has a Scaffold. These widgets form the backgrounds for their respective apps. If you remove the Material widget from Listing 3-1 or 3-2, your app’s screen becomes an ugly mess. You get large red letters with yellow underlines against a black background. The same thing happens when you remove the Scaffold from Listing 3-3. There are other widgets that can provide backgrounds for your apps, but Material and Scaffold are the most commonly used.
Adding visual tweaks
Try this experiment: Change the appBar parameter from Listing 3-3 to the code snippet in Listing 3-4.
LISTING 3-4 A Slight Change for the Code from Listing 3-3
appBar: AppBar(
  title: Text("My First Scaffold"),
  elevation: 100,
  brightness: Brightness.light,
)
In Figure 3-15, I try to show the effect of adding the elevation and brightness parameters to the AppBar constructor call. I might not succeed because the effect of the elevation parameter is subtle.

FIGURE 3-15: A slight change from the screen in Figure 3-13.
In Google’s Material Design language, you imagine that the background rests on some flat surface, and that other components are elevated off the background by some number of pixels. For an AppBar, the default elevation is 4, but you can change a bar’s elevation with … wait for it … the elevation parameter.
A component’s elevation affects several aspects of the component’s appearance. But in this section, the most obvious change is probably the shadow beneath the AppBar. You might not be able to see the difference between the shadows in Figures 3-13 and 3-15, but when you run the code on a virtual or physical device, an AppBar with elevation: 100 casts quite a large shadow.
You may be wondering what the 100 in elevation: 100 means. Is it millimeters, pixels, points, or light-years? In truth, it means “100 density-independent pixels” — or “100 dps,” for short. No matter what screen the user has, one dp is 1/160 of an inch. So elevation: 100 means 100/160 of an inch (better known as five-eighths of an inch).
 For all the details about Material Design’s elevation property, visit
 https://material.io/design/environment/elevation.html.
An AppBar widget’s brightness parameter is yet another matter. The effect of adding brightness: Brightness.light is to tell Flutter that, because the AppBar is light, the text and icons at the top of the AppBar should be dark. (Compare Figures 3-13 and 3-15.) The dark text and icons are easy to see against what is considered to be a light AppBar.
Dart’s enum feature
An interesting feature of the Dart programming language is hiding inside Listing 3-4. The word Brightness refers to something called an enum (pronounced “ee-noom”). The word enum is short for enumeration. An enum is a bunch of values, like Brightness.light and Brightness.dark.
In Listing 3-4, notice how you refer to an enum’s value. You don’t use a constructor call. Instead, you use the name of the enum (such as Brightness), followed by a period, followed by the unique part of the value’s name (such as light or dark).
Flutter has many other built-in enums. For example, the Orientation enum has values Orientation.portrait and Orientation.landscape. The AnimationStatus enum has values AnimationStatus.forward, AnimationStatus.reverse, AnimationStatus.completed, and AnimationStatus.dismissed.
To find out how to create a new enum, see 7.
Hello from sunny California!
Google announced Material Design at its developer conference in 2014. The first version of this design language dealt mostly with Android devices, but Version 2 embraced custom branding for iPhones and other iOS devices. Flutter’s Material widget runs on iPhones with automatic platform-specific adaptations.
You can run any of this book’s MaterialApp examples on iPhones as well as Android phones, but if you want an iPhone-first design strategy, you can use Flutter’s Cupertino widget collection. Listing 3-5 has an example.
LISTING 3-5 How to Look Like an iPhone App
import 'package:flutter/cupertino.dart';

void main() => runApp(App0305());

class App0305 extends StatelessWidget {
  Widget build(BuildContext context) {
    return CupertinoApp(
      home: CupertinoPageScaffold(
        navigationBar: CupertinoNavigationBar(),
        child: Center(
          child: Text("Hello world!"),
        ),
      ),
    );
  }
}
Listing 3-5 is very much like its Material Design cousin, Listing 3-3. But instead of having MaterialApp, Scaffold and AppBar widgets, Listing 3-5 has the CupertinoApp, CupertinoPageScaffold, and CupertinoNavigationBar widgets. Instead of importing ’package:flutter/material.dart’, Listing 3-5 imports ’package:flutter/cupertino.dart’. (This import declaration makes Flutter’s Cupertino widget library available for use by the rest of the listing’s code.)
Flutter’s Material Design and Cupertino widgets aren’t completely parallel with one another. For example, the Scaffold constructor call in Listing 3-3 has a body parameter. In place of that parameter, the CupertinoPageScaffold constructor call in Listing 3-5 has a child parameter. When in doubt, check the official Flutter documentation pages to find out which parameter names belong to which widgets’ constructor calls.
You can mix and match Material Design and Cupertino widgets in the same app. You can even tailor your app’s design style for different kinds of phones. You can even put code of the following kind in your app:
if (Platform.isAndroid) {
  // Do Android-specific stuff
}
if (Platform.isIOS) {
  // Do iOS-specific stuff
}
For more information, visit https://pub.dev/packages/device_info.
Adding another widget
When you run out of things to talk about, you can ask people about their families. Sometimes you learn interesting facts, at other times you hear lists of complaints, and sometimes you get a long, boring monologue. One way or another, it fills in any awkward silences.
When it comes to understanding familial relationships, I’m a slow learner. Someone tells me about their second cousin’s wife’s mother-in-law, and I have to pause the conversation to draw a mental diagram. Otherwise, I’m just plain confused.
My own family tree is rather simple. It was Mom, Dad, and me. People ask me if I was lonely being an only child. “Heck, no!” I say. “As an only child, I didn’t have to share things.”
This discussion about families is my dubious lead-in to the subject of Column widgets. In the previous examples, the Text widget was an only child. But eventually, the Text widget must learn to share. (Otherwise, the Text widget becomes spoiled, like me.)
How do you put two children on a scaffold’s body? You might be tempted to try this:
// DON’T DO THIS:
body: Center(
  child: Text("Hello world!"),
  child: AnotherWidget(…)
)
But a constructor call can’t have two parameters with the same name. So, what can you do?
Flutter has a Column widget. The Column widget’s constructor has a children parameter. The column widget’s children line up, one under another, on the screen. That sounds promising! Listing 3-6 has some code, and Figure 3-16 has the resulting display.
LISTING 3-6 More Widgets, Please!
import 'package:flutter/material.dart';

main() => runApp(App0306());

class App0306 extends StatelessWidget {
  Widget build(BuildContext context) {
    return MaterialApp(
      home: Scaffold(
        appBar: AppBar(
          title: Text("Adding Widgets"),
        ),
        body: Column(
          children: [
            Text(
              "Hello world!",
              textScaleFactor: 2.0,
            ),
            Text("It’s lonely for me inside this phone.")
          ],
        ),
      ),
    );
  }
}

FIGURE 3-16: I wonder who’s in there!
A Column constructor call has a children parameter, and the children parameter’s value is a list. In the Dart programming language, a list is a bunch of objects. Each object’s position in the list is called an index. The index values start from 0 and work their way upward.
One way to create a list is to enclose objects in square brackets. For example, Listing 3-6 contains a list with two objects. (See Figure 3-17.)

FIGURE 3-17: Square brackets create lists of things.
A list’s indices don’t begin with 1. They begin with 0.
Centering the text (Part 1)
Figure 3-16 looks strange because the words are tucked up against the upper left corner. In this section, I walk you through some steps to diagnose this problem, and to fix it.
-
While the app in Listing 3-6 runs, look on the right edge of Android Studio’s window for a toolbar button with the words Flutter Inspector on it. Click that toolbar button.
As a result, the Flutter Inspector appears. (See Figure 3-18.)
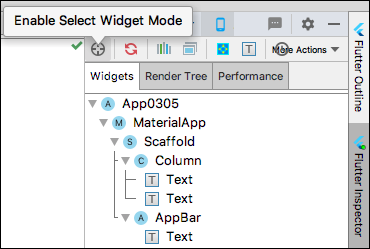
FIGURE 3-18: The Flutter Inspector.
- In the upper left corner of the Flutter Inspector, look for the Enable Select Widget Mode icon. (Refer to Figure 3-18.) Click that icon.
- Select the Flutter Inspector’s Widgets tab. (Once again, refer to Figure 3-18.)
-
In the tree of widgets, select Column. (See Figure 3-19.)
As a result, the device that’s running your app adds highlighting and a little label to the
Columnwidget on the screen. (See Figure 3-20.)
FIGURE 3-19: Selecting a branch of the Flutter Inspector’s tree.

FIGURE 3-20: Widget Select mode is really useful!
-
Just for fun, select a few other branches in the Flutter Inspector’s tree of widgets.
You can determine the boundaries of almost any of your widgets by using this technique.
The highlighting in Figure 3-20 tells you that the Column widget isn’t centered inside of its parent Scaffold widget, and it’s not wide enough to fill the entire Scaffold widget. To fix this, put the Column widget inside of a Center widget. Put the cursor on the word Column in Android Studio’s editor, and then follow the instructions at the start of the earlier “Making Things Look Nicer” section. Listing 3-7 shows you what you get.
LISTING 3-7 Centering the Column Widget
import 'package:flutter/material.dart';

main() => runApp(App0307());

class App0307 extends StatelessWidget {
  Widget build(BuildContext context) {
    return MaterialApp(
      home: Scaffold(
        appBar: AppBar(
          title: Text("Adding Widgets"),
        ),
        body: Center(
          child: Column(
            children: [
              Text(
                "Hello world!",
                textScaleFactor: 2.0,
              ),
              Text("It's lonely for me inside this phone.")
            ],
          ),
        ),
      ),
    );
  }
}
When you save your changes, Android Studio does a hot restart and you see the new-and-improved display in Figure 3-21.
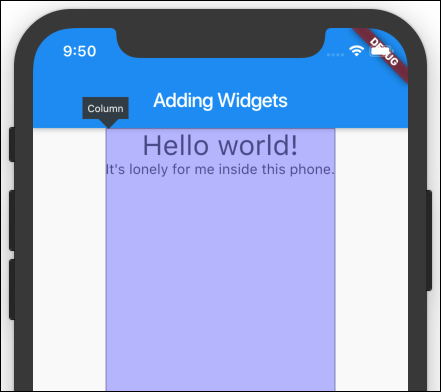
FIGURE 3-21: The Column widget is centered.
Centering the text (Part 2)
The Text widgets in Figure 3-21 are centered horizontally, but they’re not centered vertically. To center them vertically, you can fiddle with Flutter’s Center widget, but there’s a much easier way.
-
In Android Studio’s Flutter Inspector, select the
Columnwidget.The Flutter Inspector’s lower panel displays all the properties of whatever widget you’ve selected.
Wait! What’s a “property”? Every object has properties, and each property of each object has a value. For example, every instance of Flutter’s
Textclass has atextScaleFactorproperty. In Listing 3-7, a constructor call sets aTextinstance’stextScaleFactorproperty to the value 2.0.Constructor calls aren’t the only way of setting the properties of objects. In Figure 3-22, the Flutter Inspector’s lower panel shows the values of the
Columnwidget’sdirectionproperty, itsmainAxisAlignmentproperty, and many other properties. In addition, the twoTextchildren appear in the Flutter Inspector’s lower panel.
FIGURE 3-22: Properties of the Column (the Column widget that’s constructed in Listing 3-7).
-
In the lower panel, hover over the
Columnwidget’smainAxisAlignmentproperty.When you do, Android Studio displays a pop-up explaining the
mainAxisAlignmentproperty’s meaning. (See Figure 3-23.) The text in this pop-up comes automatically from Flutter’s official documentation.A column’s main axis is an invisible line going from the column’s top to its bottom.
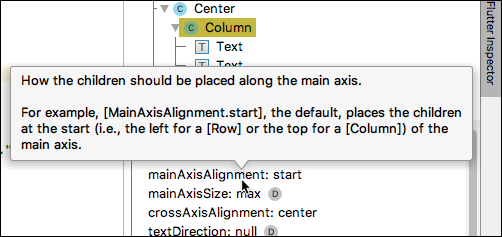
FIGURE 3-23: What is mainAxisAlignment, anyway?
-
Again in the lower panel, hover over the word
startin theColumnwidget’smainAxisAlignmentproperty.The new pop-up says that you can replace
startwith any of the valuesend,center,spaceBetween,spaceAround, orspaceEvenly. (See Figure 3-24.)
FIGURE 3-24: The values you can assign to the mainAxisAlignment property.
-
In Android Studio’s editor, add a
mainAxisAlignmentparameter to theColumnwidget’s constructor. (See Listing 3-8.)LISTING 3-8 Time for an Alignment
import 'package:flutter/material.dart';

main() => runApp(App0308());

class App0308 extends StatelessWidget {
  Widget build(BuildContext context) {
    return MaterialApp(
      home: Scaffold(
        appBar: AppBar(
          title: Text("Adding Widgets"),
        ),
        body: Center(
           child:
             Column(mainAxisAlignment:
             MainAxisAlignment.center,children: [
              Text(
                "Hello world!",
                textScaleFactor: 2.0,
              ),
              Text("It's lonely for me inside this phone.")
            ],
          ),
        ),
      ),
    );
  }
}
In Listing 3-8,
mainAxisAlignmentis the name of a parameter,MainAxisAlignmentis the name of an enum, andMainAxisAlignment.centeris one of the enum’s values. For another look at Dart’s enum feature, refer to the “Dart’s enum feature” section earlier in this chapter. And if you hunger for even more, see Chapter 7. -
Save your editor changes to do a hot restart.
On the device that’s running your app, the
Textwidgets are centered horizontally and vertically. (See Figure 3-25.)
This section’s example illustrates aspects of Flutter’s Column widget, which displays things from top to bottom. It should come as no surprise that Flutter has a Row widget, which displays things from side to side. Most facts about the Column widget are also true of the Row widget. (Well, they’re true when you’re lying down instead of sitting upright.)

FIGURE 3-25: How lovely!
In addition, Flutter has a ListView widget. The ListView widget displays things either way — from top to bottom or from side to side. In addition, the ListView widget has its own scrolling feature. You can put 100 items on a ListView even though only 20 items fit on the screen. When the user scrolls the screen, items move off the screen while other items move on.
To read about Flutter’s ListView widget, see Chapter 8.
Displaying an image
Words are nice, but pictures are prettier. In this section, you put an image on your Flutter app screen.
-
In Android Studio, start a new Flutter project.
I named my project
app0308, but you don’t have to use that name. -
In Android Studio’s Project Tool window, right-click the project’s name.
As a result, a contextual menu appears. (See Figure 3-26.)

FIGURE 3-26: Right-clicking the app0308 branch.
-
On the contextual menu, choose New ⇒ Directory. (Refer to Figure 3-26.)
As a result, the New Directory dialog box appears. How convenient!
-
In the dialog box, type the name assets, and then press Enter.
To be honest, you can name this new directory almost anything you want. But if you don’t name it
assets, you’ll confuse other Flutter developers. -
Check the Project Tool window to make sure that the project tree has a new
assetsbranch. (See Figure 3-27.) Seasoned Flutter developers create an imagessubdirectory of the newassetsdirectory. I won’t bother with that right now.
FIGURE 3-27: The assets directory is a subdirectory of the app0308 directory.
-
Find an image file.
Search your development computer’s hard drive for an image file. Look for filenames ending in
.png,.jpg,.jpeg, or.gif. If your File Explorer or Finder doesn’t show filename extensions (such as .png,.jpg,.jpeg, or.giffor image files), refer to the sidebar in Chapter 2 that talks about those pesky filename extensions. -
In your development computer’s File Explorer or Finder, copy the image file.
That is, right-click the image file’s name. On the contextual menu that appears, select Copy.
-
Using Android Studio’s Project Tool window, paste the image file into the
assetsdirectory.That is, right-click the
assetsbranch. On the resulting contextual menu, choose Paste. In the resulting dialog box, type a name for your image file, and then press Enter.When I did all this, I named the file
MyImage.png, but you don’t have to use that name. -
Open your project’s
pubspec.yamlfile.More specifically, double-click the
pubspec.yamlbranch in the Project Tool window’s tree.Here’s a fun fact: The extension
.yamlstands for Yet Another Markup Language. -
In the
pubspec.yamlfile, look for advice about adding assets to your project.The advice might look something like this:
# To add assets to your application,
# add an assets section, like this:
# assets:
#  - images/a_dot_burr.jpeg
#  - images/a_dot_ham.jpeg
(In case you’re wondering, the file names
a_dot_burr.jpeganda_dot_ham.jpegrefer to Aaron Burr and Alexander Hamilton. These file names occur many times in Flutter’s official documentation. Flutter is the technology behind the mobile app for the Broadway musical Hamilton.)In a
.yamlfile, a hashtag (#) tells the computer to ignore everything on the rest of the line. So, in this part of the.yamlfile, none of the lines has any effect. -
Delete the hashtags on two of the lines. On the second line, change the name of the image file to the name you chose in Step 8.
When I do this, my
pubspec.yamlfile contains the following text:# To add assets to your application,
# add an assets section, like this:
assets:
- MyImage.png
# - images/a_dot_ham.jpegI use the name
MyImage.pnginstead ofimages/MyImage.pngbecause, in Step 5, I didn’t create animagesdirectory. I often forget to make the necessary changes in the pubspec.yamlfile. Try not to forget this step. When you do forget (and almost everyone does), go back and edit the project’spubspec.yamlfile. -
Replace all the code in the
main.dartfile with the code in Listing 3-9.Use your own class name and filename instead of my
App0309andMyImage.pngnames.LISTING 3-9 Displaying an Image
import 'package:flutter/material.dart';

main() => runApp(App0309());

class App0309 extends StatelessWidget {
  Widget build(BuildContext context) {
    return MaterialApp(
      home: Scaffold(
        appBar: AppBar(
          title: Text("My First Image"),
        ),
        body: Center(
          child: Image.asset(’MyImage.png’),
        ),
      ),
    );
  }
} -
Let ’er rip.
That is, run the code on a virtual or physical device. The display on the device’s screen looks something like the result in Figure 3-28.
At this point, I want to make one thing perfectly clear: I’m not a narcissist. The reason I use this book’s cover image in Figure 3-28 is that I’m fascinated by recursion. I like having a reference to this book inside of this book.
(Besides, I’m a bit of a narcissist.)
Flutter has an Image class, and the Image class has several different constructors. The Image.asset constructor in Listing 3-9 grabs a file from a place inside your Flutter project’s directory. To grab an image off the Internet, you call a different constructor — the Image.network constructor. To get an image from somewhere on your hard drive (somewhere outside of your Flutter project’s directory), you can call the Image.file constructor. Each of these constructors is called a named constructor. In each case, the stuff after the dot (.asset, .network, and .file) is that particular constructor’s name.
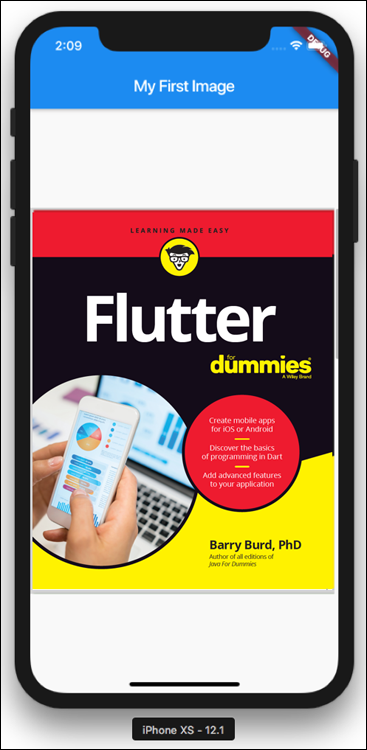
FIGURE 3-28: To find Figure 3-28, look inside that Flutter For Dummies book.
Hey, Wait a Minute …
This chapter covers some fundamental ideas in Dart and Flutter app development. You start with a Hello World program and make several changes to it. While you do all that, you build up a vocabulary of useful concepts — concepts like classes, constructors, enums, and widgets.
You’ve done all that while I cleverly diverted your attention from several lines in the Hello World program. What do the first four lines of the Hello World program do? Why do you return something when you construct a MaterialApp?
The answers to these questions, and others like them, are in the next chapter. What are you waiting for? Read on!
♪ “Happy trails to you / Until we meet again” ♪
WRITTEN BY DALE EVANS, SUNG BY ROY ROGERS AND DALE EVANS ON “THE ROY ROGERS SHOW,” 1944–1957