
A web service is a remote procedure that provides results in XML format. It's a bit like running a public function on someone else's computer. The user can call the procedure without needing to know anything about the way the remote system works or the way it stores the information. When users access data from a web service, they are said to consume the web service.
A web service allows an organization to make its data publicly available without providing a user with direct access to its systems. Using a web service provides a layer of abstraction between a user and corporate systems.
You might use a web service in an application to look up a currency exchange rate, to access local weather information, or even as a way to connect to in-house information in a structured way. The key point is that the information is usually provided from remote computers; that is, computers running at a different location from the current application.
There are many different types of web services, including representational state transfer (REST), XML-Remote Procedure Call (XML-RPC), Simple Object Access Protocol (SOAP), and JavaScript Object Notation Remote Procedure Call (JSON-RPC). These represent different ways for users to access the remote service.
SWF applications built in Flex can access SOAP web services using the <mx:WebService> element and WebService class. In this chapter, I'll go through both of these approaches and we'll work through two examples, showing different ways to consume the same web service.
The web service we'll consume in the examples is a currency conversion service. We'll build an application that retrieves the rate and converts an amount.
Flash doesn't have access to the WebService class. However, there are some alternative ways that you can use a SWF application built in Flash to consume a web service. That's the topic for the next chapter, so skip ahead if you're particularly interested in Flash.
You can download the resources for the chapter from http://www.friendsofed.com.
Before we explore how to consume a web service in a Flex application, it's important to understand some background information. The first section in this chapter explains some of the concepts associated with web services and some of the terms that you're likely to come across.
As I mentioned, there are many different standards or protocols for working with web services, including REST, SOAP, XML-RPC, and JSON-RPC. By the broadest definition, you could also consider an RSS feed to be a web service.
All of these approaches provide access to information in a different way. Each uses a different vocabulary of XML to return the content.
One of the most popular protocols for web services is SOAP. It is also the most relevant for this book because it is the only protocol supported by Flash and Flex. Because the WebService class in Flex works with SOAP web services, we'll start with that topic.
SOAP is a communication protocol that uses XML to describe web services. It uses a system of messages. SOAP messages occur in two directions, and are requests made to and responses received from a web service.
The SOAP protocol comes in different versions, and the latest is version 1.2. It describes the specific XML vocabulary required to make the request and provide the response. If you're interested in finding out more about SOAP, you can read about SOAP 1.2 at the W3C web site in the following pages:
SWF applications built in Flex can access SOAP web services using the WebService class. Flex applications can use the <mx:WebService> element and WebService class to create the SOAP message for the request automatically. They can also decode the SOAP response from the web service.
In order to be able to use a web service in a Flex application, you must be able to specify a Web Services Description Language (WSDL) file. The WSDL file provides the details of the functions the web service provides, how to access those functions, and how the returned data will be provided.
The functions available at the web service are described as operations within the WSDL file. This file describes which parameters each operation requires, as well as the relevant data types. It also describes which return values each operation will provide and their data types. As well as built-in data types, the WSDL file can also define custom data types.
WSDL is a vocabulary of XML, so you can view the contents of a WSDL file by loading the URL into a web browser. Figure 10-1 shows a sample WSDL file.
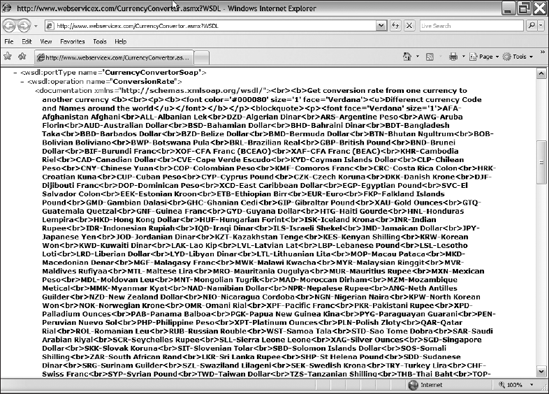
This WSDL file is for a currency conversion web service and is at the URL http://www.webservicex.net/CurrencyConvertor.asmx?WSDL
A WSDL file contains a set of definitions. It defines the data types used for the operations, the messages that it can receive and send, the operations available, and the communication protocols that the web service uses.
As far as developers are concerned, the most important parts within the WSDL file are the <portType> elements. These elements contain details about the operation request and response, including the name of the operation.
In Figure 10-1, you can see that the operation displayed is called ConversionRate. The <documentation> element provides a description of the operation with supporting information.
The WSDL file indicates that the ConversionRate operation requires that the following element is sent with the request:
<wsdl:part name="parameters" element="tns:ConversionRate"/>
This argument is defined as part of the tns namespace, and it represents a custom data type. Further digging in the WSDL file reveals that the tns namespace is associated with the http://www.webserviceX.NET/URL.
The WSDL file defines the ConversionRate data type as a complex element made up of FromCurrency and ToCurrency values. Each element can appear only once in the data type. This means that the user needs to provide two arguments when calling the ConversionRate operation.
The following code block shows the definition of the ConversionRate data type from the WSDL file:
<s:element name="ConversionRate">
  <s:complexType>
  <s:element minOccurs="1" maxOccurs="1" name="FromCurrency"
    type="tns:Currency" />
  <s:element minOccurs="1" maxOccurs="1" name="ToCurrency"
    type="tns:Currency" />
  </s:sequence>
  </s:complexType>
</s:element>
You'll notice that this definition also specifies that both the FromCurrency and ToCurrency elements are of the type tns:Currency. The WSDL file defines this as a simple type element containing a list of abbreviations for acceptable currencies. The relevant element in the WSDL file follows, but I've included only the first two values in the list:
<s:simpleType name="Currency">
  <s:restriction base="s:string">
    <s:enumeration value="AFA"/>
    <s:enumeration value="ALL"/>
</s:restriction>
</s:simpleType>
For developers, this data type means that they must send the correct abbreviation when they query the web service. The abbreviation must be one of the values in the <s:enumeration> elements.
The web service returns a single element described in the following <message> element:
<wsdl:output message="tns:ConversionRateSoapOut"/>
The WSDL defines the ConversionRateSoapOut message as a <ConversionRateResponse> element.
<wsdl:message name="ConversionRateSoapOut">
  <wsdl:part name="parameters" element="tns:ConversionRateResponse"/>
</wsdl:message>
The element is a complex type element made up of a single element called ConversionRateResult, which is of the type double. The following code block shows the details of this element:
<s:element name="ConversionRateResponse">
  <s:complexType>
    <s:sequence>
    <s:element minOccurs="1" maxOccurs="1"
      name="ConversionRateResult" type="s:double"/>
    </s:sequence>
  </s:complexType>
</s:element>
<s:element name="double" type="s:double"/>
You can see that finding your way through a WSDL file can be very complicated! Luckily, Flex can decode the contents of the file so that you don't need to understand it in any detail.
The <mx:WebService> element and WebService ActionScript 3.0 class provide all the functionality that you need to work with SOAP web services in Flex.
You can use the <mx:WebService> element and WebService class to make requests of a SOAP web service in any Flex application. You'll need to provide the WSDL of the web service, the name of any operations that you want to call, and the parameters required by those operations. The SOAP web service will then provide a response, which is either the returned value or a fault.
You can use a tag-based or scripted approach. I'll show you both approaches, starting with an overview of the <mx:WebService> element.
The <mx:WebService> element consumes SOAP web services and provide a response to a Flex application. To consume a web service with the <mx:WebService> element, you must take the following steps:
Create the
<mx:WebService>element, providing a validwsdlattribute.Specify the web service operation(s) and identify the parameters to send.
Call the send() method of the web service.
Process the response from the web service.
We'll look at each of these steps in turn.
You can create a web service request using the <mx:WebService> element. You'll need to give the element an id and specify the URL for the WSDL file in the wsdl attribute, as shown here:
<mx:WebService id="wsRequest" wsdl="urlToTheWSDL">
You may also want to display a busy cursor while the request is taking place. You can do so using the following show BusyCursor attribute:
<mx:WebService id="wsRequest" wsdl="urlToTheWSDL"
  showBusyCursor="true">
This attribute is useful as it informs the user that the request is in progress. It is available only to the element, and you can't set this property in the WebService class with ActionScript.
Once you've set up the <mx:WebService> tag, you need to specify which operation to call from the web service.
Each type of remote procedure available in the web service is called an operation, and you need to specify which operations you want to call from the web service. As I showed you earlier, it's possible to identify the operation names from the WSDL file. Even though you might add a single <mx:WebService> element, it's possible for the application to call multiple operations within that web service.
You add each operation that you want to access using an <mx:operation> element between the opening and closing <mx:WebService> elements. You then specify the arguments for that operation with the <mx:request> element. Every argument that you want to send for a specific operation appears inside the <mx:request> element, as shown here:
<mx:operation name="operationName">
  <mx:request>
    <param1>Value 1</param1>
    <param2>Value 2</param2>
  </mx:request>
</mx:operation>
The values that you send with an operation frequently come from UI components in the application. When working with a tag-based approach, it's often easiest to access them with binding expressions. The following code shows how you might use bindings when specifying the arguments for the operation:
<mx:operation name="operationName">
  <mx:request>
    <param1>{controlID.boundProperty}</param1>
    <param2>{controlID.boundProperty}</param2>
  </mx:request>
</mx:operation>
Once you've added the operation, you need to make the request.
You call the send() method of the web service to make the request. You'll need to refer to the id of the <mx:WebService> element and the operation name, as shown here:
wsRequest.operationName.send();
It's important to include the operation name, as it's possible to add multiple operations inside the <mx:WebService> element.
If you need the response to be available when the application loads, you can add a call to the send() method to the creationComplete event of the <mx:Application> element, as shown here:
<mx:Application xmlns:mx="http://www.adobe.com/2006/mxml"
  layout="absolute" creationComplete="myWS.doSomething.send()">
You could also make the request in the click attribute of a button, as you can see in the following line:
<mx:Button id="click_btn" label="Call web service"
  click="myWS.doSomething.send()"/>
Requesting the web service will result in a response that contains either the results of the request or an error message.
The web service will respond to the request in one of two ways: it will provide a valid response, or it will notify the application that a fault occurred. You can specify handlers for the result of an operation by adding the result attribute to the opening element, as shown here:
<mx:operation name="operationName" result="resultHandler(event)">
You can track fault events from the <mx:WebService> element, as shown in the following code block:
<mx:WebService id="wsRequest" wsdl=" urlToTheWSDL"
  showBusyCursor="true" result="resultHandler(event)"
  fault="faultHandler(event)"/>
You'll need to write ActionScript functions of the same name. In the preceding example, the resultHandler() function receives a ResultEvent as an argument, while the faultHandler() function receives a FaultEvent.
If you want to avoid writing ActionScript, you can also bind the response—whether it's a result or fault—directly to another component.
As with the <mx:HTTPService> element, you can identify the returned results from the web service by accessing the lastResult property of the operation. If the request returns a single parameter, it's also possible to access the response using the toString method:
wsRequest.operationName.lastResult.toString();
If the response returns more than one parameter, you can use the name of the returned parameter to identify which value to display.
wsRequest.operationName.lastResult.returnedParam;
Again, you must use the operation name to specify which result you're identifying. This is still the case, even if you've included only one operation in the <mx:WebService> element.
You'll process the response in the resultHandler() function either with ActionScript or by using a binding expression in another component. A simple binding expression follows:
<mx:TextInput text="{wsRequest.operation.lastResult.toString()}"/>You'll see examples of both approaches in this chapter.
The web service provides a result in the lastResult property of the operation. By default, the data that the web service returns is represented as a simple tree of ActionScript objects. You can also use E4X expressions to access the results; in this case, you'll need to declare the resultFormat of the operation as e4x.
<mx:operation name="operationName" resultFormat="e4x">The resultFormat indicates how you'll access the response from the web service. In E4X expressions, the lastResult property is equivalent to the root element, so you wouldn't include it in the path. If you accept the default resultFormat setting, you'll need to include the name of the root element in the path.
Be very careful before using a resultFormat of e4x, as you will probably need to deal with namespaces in the response. If the web service response contains a default namespace, you'll need to write some additional ActionScript declaring the namespace.
For example, the following opening element of a web service response contains the default namespace http://www.webserviceX.NET/. The default namespace doesn't have a prefix and appears in bold in the following code block:
<ConversionRateResponse xmlns=://www.webserviceX.NET/
  xmlns:soap=http://schemas.xmlsoap.org/soap/envelope/
  xmlns:xsi="http://www.w3.org/2001/XMLSchema-instance"
  xmlns:xsd="http://www.w3.org/2001/XMLSchema">
To work with the result using E4X expressions, you would need to specify that you wanted to use the default namespace in an <mx:Script> block, as shown here:
<mx:Script>
  <![CDATA[
    private namespace webserviceX = "http://www.webserviceX.NET/";
    use namespace webserviceX;
  ]]>
</mx:Script>You can handle errors from the web service in the faultHandler() function. This function receives a FaultEvent as an argument, and you can access the fault property of the event. If you wanted to see a String representation of the error, you would use the following code:
FaultEvent.fault.faultString;
You can add this property to the fault attribute of the <mx:WebService> element, as shown in the following line:
<mx:WebService id="wsRequest" wsdl="myWSDL"
  fault="mx.controls.Alert.show(event.fault.faultString)">
This example displays the error message in an Alert control.
That's enough of the theory. We'll work through an example so you can see the different ways to consume a web service.
This example demonstrates how to consume a web service that provides currency conversion services. The WSDL file for the web service is located at http://www.webservicex.net/CurrencyConvertor.asmx?WSDL. Figure 10-1, earlier in the chapter, shows this WSDL file viewed in a web browser.
We'll use the ConversionRate operation. This operation takes two parameters: the abbreviations of the currencies to convert from and to. These parameters are called FromCurrency and ToCurrency. The WSDL file provides a long list of currency abbreviations that you can use. The operation returns a double number called ConversionRate, but because it returns only a single value, you can use the toString() method to access it.
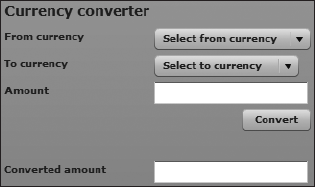
Start by creating a Flex project with the name and location of your choosing. Create a new application file with the following interface:
<?xml version="1.0" encoding="utf-8"?>
<mx:Application xmlns:mx="http://www.adobe.com/2006/mxml"
  layout="absolute">
  <mx:VBox x="10" y="10">
    <mx:Label text="Currency converter" fontSize="14"
      fontWeight="bold"/>
    <mx:HBox>
      <mx:Label text="From currency" fontWeight="bold" width="150"/>
      <mx:ComboBox id="from_cbo"></mx:ComboBox>
    </mx:HBox>
    <mx:HBox>
      <mx:Label text="To currency" fontWeight="bold" width="150"/>
      <mx:ComboBox id="to_cbo"></mx:ComboBox>
    </mx:HBox>
    <mx:HBox>
      <mx:Label text="Amount" fontWeight="bold" width="150"/>
      <mx:TextInput id="amount_txt"/>
    </mx:HBox>
<mx:HBox width="100%" horizontalAlign="right"> <mx:Button label="Convert" id="convert_btn"/> </mx:HBox> <mx:Spacer height="20"/> <mx:HBox> <mx:Label text="Converted amount" fontWeight="bold" width="150"/> <mx:TextInput id="convertedAmount_txt"/> </mx:HBox> </mx:VBox> </mx:Application>
The application contains two ComboBox controls, which you'll populate with names of the currencies available for conversion. The data associated with each name will be the currency abbreviation.
The interface also contains a TextInput control, so that the users can enter the amount of currency that they wish to convert. There is a Convert button to carry out the operation, and a second TextInput control to display the converted amount.
Figure 10-2 shows how the interface appears when you run the application in a web browser.

You need to add the list of currencies to convert from and to. You can see the full list of all abbreviations available to the web service at
http://www.webservicex.com/CurrencyConvertor.asmx?op=ConversionRate. However, for simplicity, this example uses a small number of these currencies. Feel free to expand on the list if you like.
Modify the from_cbo element as shown here in bold:
<mx:ComboBox id="from_cbo" prompt="Select from currency"><mx:dataProvider><mx:Array><mx:Object label="British pound" data="GBP" /><mx:Object label="Canadian dollar" data="CAD" /><mx:Object label="Euro" data="EUR" /><mx:Object label="Singapore dollar" data="SGD" /><mx:Object label="South African rand" data="ZAR"/><mx:Object label="US dollar" data="USD"/></mx:Array></mx:dataProvider></mx:ComboBox>
The <mx:ComboBox> control includes a prompt showing a default value to the user. The code also has an <mx:dataProvider> element containing an Array of values. Each value is an <mx:Object> element containing label and data properties. The label will display in the ComboBox, while the abbreviation provides the data.
Make the same modifications to the to_cbo control, adding a
promptand<mx:dataProvider>element.<mx:ComboBox id="to_cbo"
prompt="Select to currency"><mx:dataProvider><mx:Array><mx:Object label="Australia dollars" data="AUD"/><mx:Object label="British pound" data="GBP" /><mx:Object label="Canadian dollar" data="CAD" /><mx:Object label="Euro" data="EUR" /><mx:Object label="Singapore dollar" data="SGD" /><mx:Object label="South African rand" data="ZAR"/><mx:Object label="US dollar" data="USD"/></mx:Array></mx:dataProvider></mx:ComboBox>The code populates both ComboBox controls with the same list of currencies. You may wish to add your own currency if it isn't covered here.
Note
I could have used a more streamlined approach to populating both ComboBox controls with the introduction of an ActionScript
Arrayand a binding expression. However, in this case, I wanted to show a purely tag-based approach, rather than introducing scripting. You'll see how to populate the controls with ActionScript in this chapter's second example.Figure 10-3 shows the interface after populating the ComboBox controls with a list of currencies. In the figure, I've expanded the first ComboBox.
The user will enter the amount to convert in a TextInput control. You need to add some validation for the
Amountvalue to make sure that the user enters a valid number before the application carries out the conversion. If you don't do this, you'll generate errors when you try to multiply a nonnumeric value by the conversion rate returned from the web service.Add the following
<mx:NumberValidator>element below the opening<mx:Application>tag:<mx:NumberValidator id="amountValidator" source="{amount_txt}" property="text" trigger="{convert_btn}" triggerEvent="click" required="true" invalidCharError="Please enter a number"/>The
NumberValidatorchecks that the entry in theAmountTextInput control is a number. Therequiredproperty indicates that the control must have an entry before the user's entry is considered valid.The validation occurs when the user clicks the
Convertbutton, because the code specifies theclickevent of the boundconvert_btncontrol as the trigger. If the entry contains invalid characters, the application displays the messagePlease enter a number.Figure 10-4 shows the effect of an invalid entry in the
Amountfield. The control is highlighted with a red border, and the error message appears when the user moves the mouse over this area.You'll make the web service request using an
<mx:WebService>tag. Add the following tag above the opening<mx:VBox>element:<mx:WebService id="currencyService" wsdl="http://www.webservicex.net/CurrencyConvertor.asmx?WSDL" showBusyCursor="true" fault="mx.controls.Alert.show(event.fault.faultString)"> <mx:operation name="ConversionRate"> <mx:request> <FromCurrency>{from_cbo.selectedItem.data}</FromCurrency> <ToCurrency>{to_cbo.selectedItem.data}</ToCurrency> </mx:request> </mx:operation> </mx:WebService>The code creates an
<mx:WebService>element with theidofcurrencyService. This web service uses the WSDL file that I provided earlier. When requesting the service, the application will show a busy cursor while the request is in progress. The web service includes a fault handler that displays thefaultStringproperty in an Alert control.The web service identifies a single operation:
ConversionRate. This operation requires two parameters:FromCurrencyand ToCurrency. These values are bound to the data properties of the selected items in the two ComboBox controls.The web service request will occur when the user clicks the
Convertbutton. Clicking the button also invokes theNumberValidatorto check that the conversion amount is valid. The conversion will stop if this amount is invalid.


Modify the Button element as shown here in bold:
<mx:Button label="Convert" id="convert_btn"
  click="currencyService.ConversionRate.send()"/>
When the user clicks the button, the application calls the send() method of the currencyService web service operation ConversionRate.
The last step in completing the application is to display the converted amount in the
Converted amountTextInput control.Modify the
convertedAmount_txtcontrol as shown in the following code. The new attribute, text, is shown in bold.<mx:TextInput id="convertedAmount_txt"
text="{String(Number(currencyService.ConversionRate.lastResult.
toString()) * Number(amount_txt.text))}"/>Unfortunately, this binding expression looks cumbersome and a little difficult to interpret. That's because the code binds the results of a calculation to the text property of the TextInput control. The expression must treat the values as numbers during the calculation, but treat them as
Stringdata to display the result in the TextArea control.As always, the binding expression appears inside curly braces. The expression finds the returned rate and casts it as a
Numberusing the following expression:Number(currencyService.ConversionRate.lastResult.toString())
The returned rate is found by converting the
lastResultproperty using thetoString() method.The code casts the expression as a
Numberbecause, even though the WSDL file indicates that the data type isdouble, the web service content is returned as an object. The code needs to convert this to aStringto access the returned value.The following expression finds the amount to convert. The expression treats the value entered in the
Amountcontrol as aNumber.Number(amount_txt.text)
The bound expression multiplies both of these numbers together and casts the result as a
Stringso it can be bound to the text property of the TextInput control.Note
You can omit the
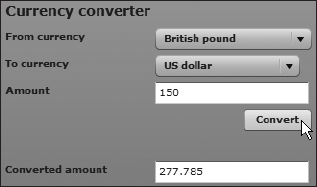
Stringcasting, and the example will still work. However, it's best practice to explicitly cast the data type rather than relying on Flex to do it for you.You can now run the completed application. Select two currencies, and enter an amount for the conversion. Figure 10-5 shows the result of a successful currency conversion.

You can also test the error-handling capability of the application. Figure 10-6 shows the results of clicking the Convert button without selecting either currency.
The application displays an Alert control with an error message. In this case, it says HTTP request error. You could also include a more descriptive message in the faultHandler() function.
The complete code for this application follows:
<?xml version="1.0" encoding="utf-8"?>
<mx:Application xmlns:mx="http://www.adobe.com/2006/mxml"
  layout="absolute">
  <mx:NumberValidatowr id="amountValidator"
    source="{amount_txt}" property="text"
    trigger="{convert_btn}" triggerEvent="click"
    required="true" invalidCharError="Please enter a number"/>
  <mx:WebService id="currencyService"
    wsdl="http://www.webservicex.net/CurrencyConvertor.asmx?WSDL"
    showBusyCursor="true"
    fault="mx.controls.Alert.show(event.fault.faultString)">
    <mx:operation name="ConversionRate">
      <mx:request>
        <FromCurrency>{from_cbo.selectedItem.data}</FromCurrency>
        <ToCurrency>{to_cbo.selectedItem.data}</ToCurrency>
      </mx:request>
</mx:operation>
</mx:WebService>
<mx:VBox x="10" y="10">
<mx:Label text="Currency converter" fontSize="14"
fontWeight="bold"/>
<mx:HBox>
<mx:Label text="From currency" fontWeight="bold" width="150"/>
<mx:ComboBox id="from_cbo" prompt="Select from currency">
<mx:dataProvider>
<mx:Array>
<mx:Object label="Australia dollars" data="AUD"/>
<mx:Object label="British pound" data="GBP" />
<mx:Object label="Canadian dollar" data="CAD" />
<mx:Object label="Euro" data="EUR" />
<mx:Object label="Singapore dollar" data="SGD" />
<mx:Object label="South African rand" data="ZAR"/>
<mx:Object label="US dollar" data="USD"/>
</mx:Array>
</mx:dataProvider>
</mx:ComboBox>
</mx:HBox>
<mx:HBox>
<mx:Label text="To currency" fontWeight="bold" width="150"/>
<mx:ComboBox id="to_cbo" prompt="Select to currency">
<mx:dataProvider>
<mx:Array>
<mx:Object label="Australia dollars" data="AUD"/>
<mx:Object label="British pound" data="GBP" />
<mx:Object label="Canadian dollar" data="CAD" />
<mx:Object label="Euro" data="EUR" />
<mx:Object label="Singapore dollar" data="SGD" />
<mx:Object label="South African rand" data="ZAR"/>
<mx:Object label="US dollar" data="USD"/>
</mx:Array>
</mx:dataProvider>
</mx:ComboBox>
</mx:HBox>
<mx:HBox>
<mx:Label text="Amount" fontWeight="bold" width="150"/>
<mx:TextInput id="amount_txt"/>
</mx:HBox>
<mx:HBox width="100%" horizontalAlign="right">
<mx:Button label="Convert" id="convert_btn"
click="currencyService.ConversionRate.send()"/>
</mx:HBox>
<mx:Spacer height="20"/>
<mx:HBox>
<mx:Label text="Converted amount" fontWeight="bold"
width="150"/><mx:TextInput id="convertedAmount_txt"
text="{String(Number(currencyService.ConversionRate.
lastResult.toString()) * Number(amount_txt.text))}"/>
</mx:HBox>
</mx:VBox>
</mx:Application>You can find the completed file saved as CurrencyConverterTag.mxml with the chapter resources.
Before we work though a scripted version of this example, let's explore the WebService class.
The WebService class is in the mx.rpc.soap.mxml package. It works in a very similar way to the <mx:WebService> tag, except that the showBusyCursor property isn't available to the class. The WebService class works with the Operation class, which describes the operations available to the web service.
Let's look at the properties, methods, and events of the WebService class. Then I'll cover some relevant points about web service operations.
Table 10-1 shows the most commonly used properties of the WebService class.
Table 10.1. Properties of the WebService class
Property | Data type | Description | Default value |
|---|---|---|---|
|
| Indicates how to handle multiple calls to the same service. Choose from |
|
|
| Provides the description of the service. | |
|
| Returns the SOAP headers registered for the web service. | |
|
| Specifies the port to use with the web service. | |
|
| Indicates whether the web service is ready for requests. | |
|
| Specifies which remote operation the web service should use. | |
|
| Specifies the location for the WSDL for the web service. |
For simple web services, you'll most commonly use only the wsdl property to set the location of the WSDL file for the web service. For that reason, I won't go into detail about the other properties, with the exception of concurrency.
The concurrency property determines how to deal with multiple requests to the web service. The default value of multiple indicates that the application can call the web service more than once. A value of single means that only one request can be made at a time and that a fault is generated when more than one request occurs. The value last means that a new request cancels any earlier request. You would change from the default value only if you wanted to restrict the application from making multiple requests.
The WebService class also has a number of methods.
Table 10-2 shows the main methods of the WebService class.
Table 10.2. Methods of the WebService class
method | Parameters | Description | Returns |
|---|---|---|---|
| Determines if the web service is ready to load the WSDL file |
| |
| Disconnects from the web service and removes any pending requests | Nothing | |
|
| Returns the operation specified from the web service |
|
|
| Loads the WSDL for the web service | Nothing |
| Constructor that creates a new web service | Nothing |
When working with simple web services, you'll most likely use only the constructor and loadWSDL() methods. You can either pass the URL of the WSDL file with the loadWSDL() method or set the wsdl property prior to calling the method.
Let's move onto the events dispatched by the WebService class.
The WebService tag dispatches a number of events, as summarized in Table 10-3.
Table 10.3. The events dispatched by the WebService class
Event | Type | Description |
|---|---|---|
|
| Dispatched when a |
|
| Dispatched when the |
|
| Dispatched when the WSDL loads successfully |
|
| Dispatched when a |
Of these, you're most likely to use the fault and result events.
Before we move on, it's worth looking briefly at the Operation class, which works with the WebService class when consuming a web service.
The Operation class is in the mx.rpc.soap package. It describes the operation at the web service, and it's an integral part of requesting a web service. It's important to understand the methods, properties, and events of the Operation class.
Table 10-4 shows the most important properties of the Operation class.
Table 10.4. Properties of the Operation class
Property | Data type | Description | Default value |
|---|---|---|---|
|
| Contains the arguments for the operation. | |
|
| Determines if whitespace should be ignored when processing a SOAP request or response. |
|
|
| Contains the result of the last call to the operation. | |
|
| Determines the type of the result object where the web service defines multiple parts in the output message. |
|
|
| The name of the operation. | |
|
| The encoding for the |
|
|
| Provides access to the service that hosts the operation. |
Most of these properties are self-explanatory, but a few need a little more explanation:
arguments: Theargumentsproperty contains the parameters that will be passed to the operation when the application calls thesend() method. If thesend() method also includes its own parameters, theargumentsproperty is ignored.multiplePartsFormat: ThemultiplePartsFormatproperty has the possible values object andarray. The value object indicates that thelastResultwill be anObjectcontaining properties that correspond to each output part. A value ofarraymeans thatlastResultis treated as an array. The output part values are added to theArrayin the order they occur in the SOAP response.resultFormat: TheresultFormatproperty determines how the result from the web service is provided to the application. The default value,object, means that the XML content is placed into an object structure as detailed in the WSDL document. Using e4x means that you can use E4X expressions to access the content. The valuexmlis used for ActionScript 2.0–-type XML documents.
The Operation class also has a number of methods.
Table 10-5 shows the main methods of the Operation class.
Table 10.5. Methods of the Operation class
Method | Parameters | description | Returns |
|---|---|---|---|
|
| Cancels the last request or the request with the id passed to the method. Prevents the |
|
|
| Sets the |
|
|
| Constructor method. Creates a new | Nothing |
|
| Executes the operation, passing any arguments inside the method with the call. | AsyncToken |
These methods are self-explanatory, so let's move on to the events of the Operation class.
The Operation class dispatches the events summarized in Table 10-6.
Table 10.6. The events dispatched by the Operation class
Event | Type | Description |
|---|---|---|
|
| Dispatched when an Operation call fails. |
|
| Dispatched when an |
|
| Dispatched when an |
These events work in the same way as for the web service. You set an event listener for each event and respond appropriately when they are dispatched. It's possible to set a listener for a result and fault on both the web service and the operation.
The fault event of the WebService responds to a web service failure where the fault isn't handled by the operation itself. If the operation handles the fault, it will dispatch its own fault event.
Next, let's look at the process that you'll need to follow to consume a web service using ActionScript.
The steps to consume a web service in ActionScript are much the same as those used in the tag-based approach.
Create an instance of the
WebServiceclass, providing a validwsdlproperty.Optionally, add a [
Bindable] metatag if you want to bind the results of the web service to other controls.Specify the web service operation and identify the arguments to send.
Call the
send() method of the web service operation.Process the response from the web service.
Let's work through the process in more detail.
To start the process, you would create a new WebService object using the constructor method, as shown here:
var wsRequest:WebService = new WebService();
If you want to bind the results from a web service request made with ActionScript, you'll need to use the [Bindable] metatag when you declare the object, as shown here:
[Bindable]
var wsRequest:WebService = new WebService();
This metatag will allow you to use binding expressions in curly braces for the bound properties of your other components. For example, you might want to bind the lastResult directly to the text property of another component.
You can use the loadWSDL() method to specify the URL for the WSDL file, as follows:
wsRequest.loadWSDL("urlToTheWSDL");You can also set the wsdl property first and call the loadWSDL() method without passing the URL as an argument.
wsRequest.wsdl = "urlToTheWSDL";
wsRequest.loadWSDL();
It's a little more complicated to specify the operation in ActionScript compared with using the <mx:WebService> element. You can add an operation by creating an Operation object, as shown here:
var wsRequest:WebService = new WebService();
var wsOperation: Operation;
wsOperation = wsRequest["operationName"];
An Operation represents the operation on the web service. As you can see, you need to declare an Operation object first, and then associate it with the web services request, passing a String for the name of the operation.
You can set the arguments at the same time using the arguments property. In this case, each of the arguments for the operation must be created as properties of an Object. You can then set that Object as the arguments property of the web service request, as shown here:
var args = new Object();
args.param1 = "value 1";
args.param2 = "value 2";
wsOperation.arguments = args;
It's also possible to pass the arguments inside the call to the send() method, which you'll see in the next example.
In ActionScript, it's simple to make the request for the web service. You use the name of the web service and call the send() method.
wsRequest.send();
You can also call the operation directly as a method of the web service, as shown in the next line:
wsRequest.wsOperation();
If you use the second approach, you can pass the arguments directly with the operation or with the send() method of the operation. The following two lines are equivalent:
wsRequest.wsOperation("value 1", "value 2");
wsRequest.wsOperation.send("value 1", "value 2");
Remember that passing arguments directly with the operation overrides any arguments set as the arguments property of the operation.
The addEventListener() method assigns event handlers for the result and fault events. You would use the method as shown in the following code block:
wsRequest.addEventListener(ResultEvent.RESULT, resultHandler);
wsRequest.addEventListener(FaultEvent.FAULT, faultHandler);
The result event handler function, resultHandler(), receives a ResultEvent as an argument. The fault handler function receives a FaultEvent. You can use properties of each event to access information from the web service.
You can also assign event handlers to the operation itself. This process allows you to respond directly to any errors that occur in the operation itself, rather than from the web service.
wsOperation.addEventListener(ResultEvent.RESULT, resultHandler);
wsOperation.addEventListener(FaultEvent.FAULT, faultHandler);
You access the reply from the web service in much the same way as you do in the tag-based approach. You need to use the lastResult property of the operation. If the operation returns a single value, you can access the response with the toString() method, as you saw earlier.
wsRequest.operationName.lastResult.toString();
You can also use the name of the returned parameter to identify which value to display from the response.
wsRequest.operationName.lastResult.returnedParam;
As I mentioned earlier, it's important to consider the lastResult property of the operation. By default, the web service returns data as a simple tree of ActionScript objects. If you want to override this setting, you can declare the resultFormat of the operation as e4x so you can use E4X expressions.
wsOperation.resultFormat = "e4x";
It's important to remember that in E4X expressions, the lastResult property is equivalent to the root element, so you wouldn't include it in the path. If you accept the default resultFormat setting, you'll need to include the name of the root element in the path.
You'll also need to consider the effect of namespaces if you're using a resultFormat of e4x. As I mentioned earlier, if the web service response contains a default namespace, you'll need to indicate that you wish to use the namespace with the following ActionScript:
private namespace webserviceX = " http://www.webserviceX.NET/";
use namespace webserviceX;
One advantage of using the WebService class is that many of the built-in data types specified in the WSDL file are converted to ActionScript 3.0 data types. For example, if the WSDL file specifies a return value that uses the data type xs:int, Flex recognizes this value as an int data type once the content is loaded.
This operates differently from a URLLoader object or an HTTP Service object, where all element and attribute values are treated as String values. Bear in mind, though, that custom data types won't have an equivalent value in ActionScript.
Table 10-7 shows how the data types listed in the WSDL document convert to ActionScript 3.0 data types.
Table 10.7. ActionScript conversions of SOAP data types
SOAP data type | ActionScript data type |
|---|---|
xs:string | String |
xs:int | int |
xs:float | Number |
xs:boolean | Boolean |
xs:date | Date |
In our example, the returned data type is double, which doesn't have an ActionScript 3.0 equivalent. This means that the value will be treated as a String.
As you saw earlier, you can handle errors from both the web service and the operation using a fault event handler function. Both functions receive a FaultEvent as an argument, and you can access the fault property of the event. You can see the fault message using the faultString property, as shown here:
FaultEvent.fault.faultString;
We'll work through the same example that you saw earlier using a scripted approach. This time, we'll use a custom class to handle the web service request.
We'll revisit the example from earlier in the chapter using ActionScript. We'll use the same interface but work with a custom class to access the web service.
Start by creating an ActionScript class in the project you created earlier using
File
The file should contain the following code. Don't worry if Flex Builder has used a slightly different arrangement for the opening curly braces.
package xmlUtilities {
  public class CurrencyConverter{
    public function CurrencyConverter () {
    }
  }
}
Modify the class file to make it bindable by adding a [
Bindable] metatag above the class declaration. This metatag makes all public methods of the class file available for use in binding expressions in the application file.[Bindable]public class CurrencyConverter{If you would like, you can add the following
importstatements below the package declaration. These statements reference the class files that the application will need to use. They will also be added automatically as you complete the class file. If you choose to skip this step, please double-check that all of theimportstatements are present when you've finished creating this class.import mx.rpc.soap.WebService; import mx.rpc.soap.Operation; import mx.rpc.events.ResultEvent; import mx.rpc.events.FaultEvent;
Add the following private variable declarations underneath the class filedeclaration.
private var ws:WebService;
private var wsOperation:String;
private var rate:Number;
The ws object refers to the
WebServiceobject. ThewsOperationvariable refers to the operation on the web service. Therate Numberstores the rate returned by the operation.Now it's time to create the constructor method for the
CurrencyConverterclass. Modify the constructor as shown here in bold:public function CurrencyConverter() {ws = new WebService();ws.wsdl = "http://www.webservicex.com/CurrencyConvertor.asmx?WSDL";ws.loadWSDL();ws.addEventListener(ResultEvent.RESULT,wsResultHandler);ws.addEventListener(FaultEvent.FAULT, wsFaultHandler);}
The constructor method starts by creating a new WebService object. It then sets the value of the wsdl property to the URL for the web service. It calls the loadWSDL() method of the ws object to load this WSDL file.
The method finishes by adding event handlers. It adds a result and fault event handler to the web service. You'll add these private methods next.
Add the following private methods:
private function wsResultHandler(e:ResultEvent):void { rate = e.target[wsOperation].lastResult.toString(); dispatchEvent(new ResultEvent(ResultEvent.RESULT); } private function wsFaultHandler(e:FaultEvent):void { dispatchEvent(new FaultEvent(FaultEvent.FAULT, false, true,e.fault)); }
The wsResultHandler() method sets the rate variable from the returned result. It uses the wsOperation, which you'll set when the application specifies the operation to call. Notice that the code refers to the operation using e.target[wsOperation], because it can't use the String value wsOperation as part of a path created with dot notation.
The method then dispatches a new ResultEvent. The wsFaultHandler() method dispatches a new FaultEvent with default values for arguments and includes the fault object so the user can see the provided faultString.
The next step in building the class file is to provide a public method that will call the operation on the web service. Add the
callWS()method now.public function callWS(operation:String, fromCurr:String,
toCurr:String):void { wsOperation = operation; ws[wsOperation].send(fromCurr, toCurr); }The method takes the operation name, from-currency value, and to-currency value as arguments. It calls the operation using the
send()method and passing the values. Again, you'll notice the use of the expression ws[operation] to deal with the operation name.The class file will provide two public methods to the user to access the rate, depending on whether the user provides an amount to convert. The first public method,
getRate(), will return only the rate. The second method,convert(), will accept a value and perform a conversion of this value based on the returned rate. It will return the converted amount.Add these methods now.
public function getRate():Number { return rate; } public function convert(amount:Number):Number { return rate * amount; } That's it for the content in the class file. The complete code follows, so you can check your version against mine. package xmlUtilities { import mx.rpc.soap.WebService; import mx.rpc.soap.Operation; import mx.rpc.events.FaultEvent; import mx.rpc.events.ResultEvent; [Bindable] public class CurrencyConverter { private var ws:WebService; private var wsOperation:String; private var rate:Number; public function CurrencyConverter() { ws = new WebService(); ws.wsdl = "http://www.webservicex.com/CurrencyConvertor.asmx?WSDL"; ws.loadWSDL(); ws.addEventListener(ResultEvent.RESULT, wsResultHandler); ws.addEventListener(FaultEvent.FAULT, wsFaultHandler); } public function callWS(operation:String, fromCurr:String,toCurr:String):void { wsOperation = operation; ws[wsOperation].send(fromCurr, toCurr); } public function getRate():Number { return rate; } public function convert(amount:Number):Number { return rate * amount; } private function wsResultHandler(e:ResultEvent):void { rate = e.target[wsOperation].lastResult.toString(); dispatchEvent(new ResultEvent(ResultEvent.RESULT)); } private function wsFaultHandler(e:FaultEvent):void { dispatchEvent(new FaultEvent(FaultEvent.FAULT, false, true,e.fault)); } } }Now you need to build an application that will use this class to query the web service. Create a new application file with the name of your choosing. I've called my file
CurrencyConverterClass.Modify the file to display the following interface:
<?xml version="1.0" encoding="utf-8"?>
<mx:Application xmlns:mx="http://www.adobe.com/2006/mxml"
  layout="absolute">
  <mx:VBox x="10" y="10">
    <mx:Label text="Currency converter" fontSize="14"
      fontWeight="bold"/>
    <mx:HBox>
      <mx:Label text="From currency" fontWeight="bold" width="150"/>
      <mx:ComboBox id="from_cbo" prompt="Select from currency"/>
    </mx:HBox>
    <mx:HBox>
      <mx:Label text="To currency" fontWeight="bold" width="150"/>
      <mx:ComboBox id="to_cbo" prompt="Select to currency" />
    </mx:HBox>
    <mx:HBox>
      <mx:Label text="Amount" fontWeight="bold" width="150"/>
      <mx:TextInput id="amount_txt"/>
    </mx:HBox>
    <mx:HBox width="100%" horizontalAlign="right">
      <mx:Button label="Convert" id="convert_btn"/>
    </mx:HBox>
    <mx:Spacer height="20"/>
    <mx:HBox>
      <mx:Label text="Converted amount" fontWeight="bold"
        width="150"/>
      <mx:TextInput id="convertedAmount_txt"/>
    </mx:HBox>
  </mx:VBox>
</mx:Application>
Figure 10-7 shows how this interface appears.
It's very similar to the first exercise, except that you've added prompts to the ComboBox components from the beginning.
Add a
creationCompleteattribute to the opening<mx:Application>element, as shown in bold in the following line:<mx:Application xmlns:mx="http://www.adobe.com/2006/mxml" layout="absolute"
creationComplete="initApp(event)">The
initApp()function will set up the application after the interface has finished creating.Add the following
<mx:Script>block beneath the opening<mx:Application>element. The script block contains theinitApp() function, as well as other ActionScript that you'll need to set up the application.<mx:Script> <![CDATA[ import mx.events.FlexEvent; import mx.rpc.events.ResultEvent; import mx.rpc.events.FaultEvent; import xmlUtilities.CurrencyConverter; import mx.controls.Alert; import mx.events.ValidationResultEvent; private var myCC: CurrencyConverter; private var currencyList:Array = new Array(); private function initApp(e:FlexEvent):void { myCC = new CurrencyConverter(); myCC.addEventListener(ResultEvent.RESULT, resultHandler); myCC.addEventListener(FaultEvent.FAULT, faultHandler); } private function resultHandler(e:ResultEvent):void{ } private function faultHandler(e:FaultEvent):void { } ]]> </mx:Script>This
<mx:Script>block starts by importing the classes you'll need to refer to in the application. Again, you can allow Flex to add these classes automatically if you prefer.These classes include the
FlexEventclass, needed for thecreationCompletehandler; theResultEventandFaultEvent, needed for the server response; and theCurrencyConvertercustomer class that you created in the first part of the exercise.The second-to-last
importstatement references the class for the Alert control, which you'll use to display user messages. The finalimportstatement refers to the classValidationResultEvent, which you'll need for the<mx:NumberValidator>you'll add a little later.The code includes the declaration of the new
CurrencyConverterobject calledmyCC. It also declares acurrencyList Array, which you'll use to populate the currencies in the ComboBox controls.The
initApp()function follows. It receives aFlexEventas an argument and returns nothing. It creates a newCurrencyConverterobject. It adds event listeners for theresultandfaultevents of theCurrencyConverterobject. The code also includes empty function declarations for these two handler functions.The next task is to populate the ComboBox controls with the list of currency values. You need to assign values to the
countryList Arrayand then associate thisArrayas thedataProviderproperty for both ComboBox controls.Modify the
initApp() function as shown in bold here:private function initApp(e:FlexEvent):void { myCC = new WebServiceConsumer(); myCC.addEventListener(ResultEvent.RESULT, resultHandler); myCC.addEventListener(FaultEvent.FAULT, faultHandler);populateCurrencies();}The new line calls the
populateCurrencies() function, which you'll add next.Add the
populateCurrencies() function:private function populateCurrencies():void { currencyList.push({label: "Australia dollars", data: "AUD"}); currencyList.push({label: "British pound", data: "GBP"}); currencyList.push({label: "Canadian dollar", data: "CAD"}); currencyList.push({label: "Euro", data: "EUR"}); currencyList.push({label: "Singapore dollar", data: "SGD"}); currencyList.push({label: "South African rand", data: "ZAR"}); currencyList.push({label: "US dollar", data: "USD"}); from_cbo.dataProvider = currencyList; to_cbo.dataProvider = currencyList; }This function adds values to the
currencyList Arrayusing thepush() method. Each line adds anObjectto theArray, consisting of alabelanddataproperty. This example uses the same values that were used in the first exercise.Once the
Arrayis populated with the sevencurrencies, it sets thecurrencyListas thedataProviderfor both thefrom_cbo and to_cbocontrols. If you test the application at this point, you'll see that both controls contain a list of currencies.The application will use a number validator to ensure that the user enters a valid number value into the
Amountfield. The application will proceed with the conversion only if the entry is valid, so it will use a slightly different process than the one used in the first example.Add the following <mx:NumberValidator> below the closing </mx:Script> tag: <mx:NumberValidator id="amountValidator" source="{amount_txt}" property="text" trigger="{convert_btn}" triggerEvent="click" required="false" invalidCharError="Please enter a number" valid="callCC(event)" invalid="convertedAmount_txt.text = ''"/>This
NumberValidatordoesn't require an entry in theamount_txtcontrol. If there is no entry, only the exchange rate will display. Otherwise, the application will calculate the converted amount.When the user makes an entry, if the entry includes nonnumeric characters, the error message
Please enter a numberdisplays. Validation occurs when the user clicks theConvertbutton. If the entry is valid, the application calls thecallCC() method, passing aValidationResultEvent. If the entry isn't valid, the application clears any entries in theconvertedAmount_txtcontrol.In this version of the application, clicking the
Convertbutton doesn't call the web service. Instead, it calls the validator, which in turn calls the web service if theamount_txtentry is either blank or a valid number.Figure 10-4, earlier in the chapter, shows the effect of an invalid entry in the
Amountfield.To respond to the
validevent of the<mx:NumberValidator>, you'll need to add thecallCC() function that you referenced earlier.private function callCC(e:ValidationResultEvent):void { var fromCurrencyIndex:int = from_cbo.selectedIndex; var toCurrencyIndex:int = to_cbo.selectedIndex; if (fromCurrencyIndex!= −1 && toCurrencyIndex != −1) { myCC.callWS("ConversionRate", from_cbo.selectedItem.data,to_cbo.selectedItem.data); } else { Alert.show("Select currencies to convert before clicking theConvert button"); } }This function creates variables for the selected
From currencyindex (fromCurrencyIndex), and the selectedTo currencyindex (toCurrencyIndex). It tests that the user has selected both currencies by comparing theselectedIndexproperties with the value−1.If an index is selected for both ComboBox components, the function calls the
callWS() method of theCurrencyConverterobject, passing the operation name and the from-currency and to-currency arguments.If the user hasn't selected currencies, the
elseblock displays an Alert control with the messageSelect currencies to convert before clicking the Convert button.Figure 10-8 shows the message that the user will see in this case.Once the call to the web service is made, the
resultandfaultevent handlers need to be configured to deal with the server response. Modify theresulthandler as shown here:private function resultHandler(e:ResultEvent):void{ var amtToConvert:String = amount_txt.text; if (amtToConvert.length > 0) { convertedAmount_txt.text =String(myCC.convert(Number(amtToConvert))); } else { convertedAmount_txt.text = String(myCC.getRate()); } }The
resultHandler() function receives aResultEventobject as an argument. It starts by identifying the entry in theamount_txtcontrol. If there is an entry in this TextInput component, the application will convert the supplied value into the new currency. It does so by calling theconvert() public method of theCurrencyConverterclass, passing the amount cast asa Number.The application assigns this value to the text property of the
convertedAmount_txtcontrol. Notice that it uses theString() constructor to cast the returned calculation as aString.If the user has not entered an amount to convert, the application calls the
getRate() method of theCurrencyConverter. It places the call inside theString() constructor method to cast it appropriately before assigning it to thetextproperty of the TextInput control.The application also needs to respond to a fault in the call to the web service. It will do this by displaying an Alert control with the relevant error message.
Modify the
faulthandler as shown in the following code block:private function faultHandler(e:FaultEvent):void { Alert.show(e.fault.faultString); }Ther
faultHandler() function receives aFaultEventas an argument. It displays thefaultStringproperty of the passedfaultobject in an Alert control. Figure 10-9 shows the effect of this function.I generated the error by changing the value of the
wsdlproperty to a nonexistent URL. You could assign your own custom error message instead, if you want to display something more descriptive.Well done—you've completed the application file. The complete code follows, so you can check it against your own version:
<?xml version="1.0" encoding="utf-8"?> <mx:Application xmlns:mx="http://www.adobe.com/2006/mxml" layout="absolute" creationComplete="initApp(event)"> <mx:Script> <![CDATA[ import mx.events.FlexEvent; import mx.rpc.events.ResultEvent; import mx.rpc.events.FaultEvent; import xmlUtilities.CurrencyConverter; import mx.controls.Alert; import mx.events.ValidationResultEvent; private var myCC:CurrencyConverter; private var currencyList:Array = new Array(); private function initApp(e:FlexEvent):void { myCC = new CurrencyConverter(); myCC.addEventListener(ResultEvent.RESULT, resultHandler); myCC.addEventListener(FaultEvent.FAULT, faultHandler); populateCurrencies(); } private function populateCurrencies():void { currencyList.push({label: "Australia dollars", data: "AUD"}); currencyList.push({label: "British pound", data: "GBP"}); currencyList.push({label: "Canadian dollar", data: "CAD"}); currencyList.push({label: "Euro", data: "EUR"}); currencyList.push({label: "Singapore dollar", data: "SGD"}); currencyList.push({label: "South African rand",data: "ZAR"}); currencyList.push({label: "US dollar", data: "USD"}); from_cbo.dataProvider = currencyList; to_cbo.dataProvider = currencyList; } private function resultHandler(e:ResultEvent):void{ var amtToConvert:String = amount_txt.text; if (amtToConvert.length > 0) { convertedAmount_txt.text =String(myCC.convert(Number(amtToConvert))); } else { convertedAmount_txt.text = String(myCC.getRate()); } } private function faultHandler(e:FaultEvent):void { Alert.show(e.fault.faultString); }private function callCC(e:ValidationResultEvent):void { var fromCurrencyIndex:int = from_cbo.selectedIndex; var toCurrencyIndex:int = to_cbo.selectedIndex; if (fromCurrencyIndex != −1 && toCurrencyIndex != −1) { myCC.callWS("ConversionRate", from_cbo.selectedItem.data,to_cbo.selectedItem.data); } else { Alert.show("Select currencies to convert before clickingthe Convert button"); } } ]]> </mx:Script> <mx:NumberValidator id="amountValidator" source="{amount_txt}" property="text" trigger="{convert_btn}" triggerEvent="click" required="false" invalidCharError="Please enter a number" valid="callCC(event)" invalid="convertedAmount_txt.text = ''"/> <mx:VBox x="10" y="10"> <mx:Label text="Currency converter" fontSize="14" fontWeight="bold"/> <mx:HBox> <mx:Label text="From currency" fontWeight="bold" width="150"/> <mx:ComboBox id="from_cbo" prompt="Select from currency"/> </mx:HBox> <mx:HBox> <mx:Label text="To currency" fontWeight="bold" width="150"/> <mx:ComboBox id="to_cbo" prompt="Select to currency"/> </mx:HBox> <mx:HBox> <mx:Label text="Amount" fontWeight="bold" width="150"/> <mx:TextInput id="amount_txt"/> </mx:HBox> <mx:HBox width="100%" horizontalAlign="right"> <mx:Button label="Convert" id="convert_btn"/> </mx:HBox> <mx:Spacer height="20"/> <mx:HBox> <mx:Label text="Converted amount" fontWeight="bold" width="150"/> <mx:TextInput id="convertedAmount_txt"/> </mx:HBox> </mx:VBox> </mx:Application>Test the application and select conversion values. Enter an amount to convert and click the
Convertbutton. You should see the converted amount in the interface, as shown in Figure 10-10. You can also test the application without entering an amount to convert.

You can find the completed files for this exercise saved with the other chapter resources.
As I explained earlier, the showBusyCursor property isn't available to the WebService class. You might have noticed that, when you clicked the Convert button, there was nothing in the interface to indicate that the call was in progress. You might wish to extend the example to deal with this situation, perhaps by displaying a message or image to the user. I'll leave that up to you.
There is one more approach you can use to consume a web service with Flex: the Web Service Introspection wizard.
The Web Service Introspection wizard manages the process of consuming a web service. The wizard generates the ActionScript classes you need to consume that web service. You can see an example of how to use the wizard in the Flex article at http://www.adobe.com/devnet/flex/articles/flex_ws.html. The example that we'll work through here demonstrates that the Web Service Introspection wizard makes connecting to a SOAP web service very easy.
Note
A word of warning here. I'm certain that the wizard works well with simple data types such as String and Number types. However, I had difficulty getting the wizard to work with a custom data type for the web service in the example that you'll see shortly. In the end, I made some modifications to the classes generated to switch from using a custom data type to work with a String type.
Let's see how to use the Web Service Introspection wizard to connect to the currency conversion web service.
You can access the Web Service Introspection wizard by choosing File
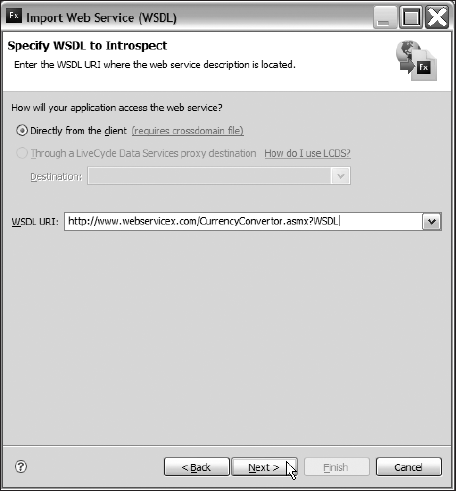
After clicking Next, you'll be asked for the location of the WSDL file for the web service. Figure 10-12 shows the settings for our example.
I've specified that I'll get the details directly from the web service and provided the location of the WSDL file. If you want to use this example outside the Flex environment, the web service will need to have a cross-domain policy file allowing access to the SWF application. Luckily, the web service chosen here provides the policy file.
In the final step of the wizard, you need to select the operation and port. The wizard will identify the names of all services and operations available at the web service. In Figure 10-13, you can see that the service CurrencyConvertor is available. In fact, no other services are available at the web service used in the example.
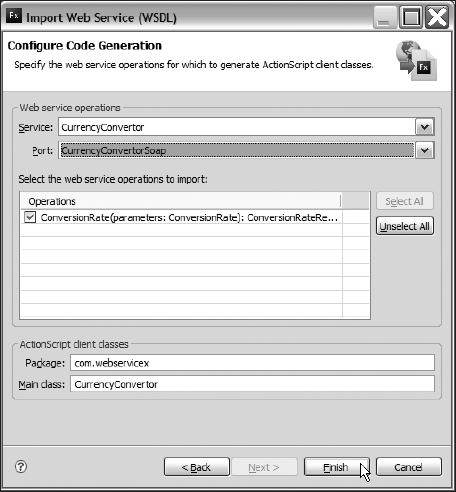
The wizard also asks for the port to use. This setting equates to the method of connection for the web service. In the case of this web service, you can access the operation in three different ways: by using SOAP, by using an HTTP GET request, or by using an HTTP POST request.
In Figure 10-13, you can see that I've left the CurrencyConverterSoap option selected. I've also specified that I want the operation ConversionRate. No other operations are available at this web service.
The wizard specifies that it will create the classes in the com.webservicex package and that the main class will be CurrencyConverter. Click Finish to generate the required classes. Figure 10-14 shows all of the classes generated by the wizard.
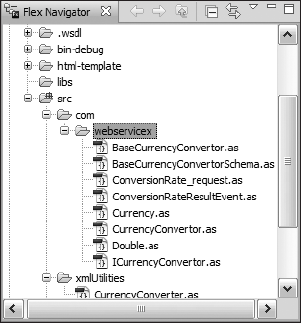
Flex Builder generates a lot of classes to consume this web service! The main class that you need to work with is the CurrencyConverter.as class. This class makes all of the web service calls, so you won't need to use the WebService class.
Once you've worked through the wizard, you can manage an application's web services using the Manage Web Services dialog box, as shown in Figure 10-15. Choose Data

The Manage Web Services dialog box allows you to add a new web service, update an existing WSDL, or delete a web service. If you choose the update option, you'll be taken back to step 3 of the wizard to specify the service, port, and operation. Flex Builder will then regenerate the classes for the web service.
Before we proceed with the examples, you'll need to make some changes to the generated classes. When I tried to use the generated code, I came across some difficulties with the Currency custom data type. In the end, the only way I could solve the problem was to change the data type of the two currencies sent to the web service from the Currency type to the String type.
I made the changes in the following locations, and you'll need to do the same if you want to work through the examples yourself:
Within the
CurrencyConverter.as file, modify the public functionconversionRate. Change this line:public function conversionRate(fromCurrency:Currency,toCurrency:
Currency):AsyncTokento read as follows:
public function conversionRate(fromCurrency:String,toCurrency:
String):AsyncTokenMake the same change in the
BaseCurrencyConverter.as andICurrencyConverter.as files.In the
CurrencyRate_request.as file, change the variable declarations in theConversionRate_request() method as shown in bold here:public function ConversionRate_request() {}public var FromCurrency:String;public var ToCurrency:String;}
Be aware that if you regenerate the classes using the wizard, you'll overwrite these changes.
Now that we've addressed these difficulties, I can show you how to use the generated classes to consume the currency converter web service. You have two choices about how to do this: you can either use MXML tags or write ActionScript. I'll demonstrate both approaches using a cut-down version of the previous example. This version will show the conversion rate for a single exchange.
In this example, we'll build an application that shows the conversion rate for a single exchange, Australia dollars (AUD) to British pounds (GBP). I've purposely chosen a very simple example so you can see how to use the generated classes in as few steps as possible.
Start by creating a new application file. I called mine
CurrencyConversionWizardTag.mxml.Add the following interface elements:
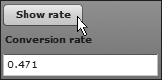
<mx:VBox x="10" y="10"> <mx:Button label="Show rate" id="convert_btn" /> <mx:Label text="Conversion rate" fontWeight="bold" width="150"/> <mx:TextInput id="rate_txt" /> </mx:VBox>
Figure 10-16 shows the interface that this code creates.
When a user clicks the
Show ratebutton, the relevant exchange rate appears in the TextInput control.Modify the opening
<mx:Application>element to include the namespace for the new classes. The modification appears in bold.<mx:Application xmlns:mx="http://www.adobe.com/2006/mxml" layout="absolute"
xmlns:srv="com.webservicex.*">Add the new
<svc:CurrencyConverter>element, as shown in the following code block:<srv:CurrencyConvertor id="myService"> <srv:conversionRate_request_var> <srv:ConversionRate_request FromCurrency="AUD" ToCurrency="GBP"/> </srv:conversionRate_request_var> </srv:CurrencyConvertor>

The element has the id myService and contains a <srv:conversionRate_request_var> element. The arguments for the web service request appear in a <srv:ConversionRate_request> element. These are the FromCurrency and ToCurrency attributes. As explained earlier, I changed these elements to be a String data type.
Note
The code to make the connection came from comments in the CurrencyConverter.as file. However, the sample code provided was incorrect. The comments indicated that I should use the following code:
<srv:CurrencyConvertor id="myService">
<srv:ConversionRate_request_var>
<srv:ConversionRate_request
FromCurrency=myValue,ToCurrency=myValue/>
</srv:ConversionRate_request_var>
</srv:CurrencyConvertor>sWhen I tried to do so, I got a number of errors caused by the incorrect casing of the elements. For example, the sample code indicated that I should use <srv:ConversionRate_request_var>, when the actual element was <srv:conversionRate_request_var>.
The arguments were also incorrectly specified in the <srv:ConversionRate_request> element. They were not written as attri-butes of the element. Instead of writing <srv:ConversionRate_request FromCurrency=myValue, ToCurrency=myValue/>, the correct approach was to use <srv:ConversionRate_request FromCurrency="myValue" ToCurrency="myValue"/>. Luckily, Flex Builder provides code hinting for the custom classes, so you can determine the correct code.
If you try to use the Web Service Introspection wizard, be aware that you may need to modify the sample code provided in the main class file.
The application will call the web service in response to the click of the
Show ratebutton. Modify the element to add aclickattribute, as shown here in bold:<mx:Button label="Show rate" id="convert_btn"
click="myService.conversionRate_send()"/>Clicking the button calls the
conversionRate_send()method of themyServiceweb service. Again, the sample code provided inCurrencyConverter.asused incorrect casing for this element, so be aware that you may need to change the supplied example if you use the wizard with your own examples.In order to display the exchange rate, the application will need to bind the returned result to the TextInput control. Change the control as shown in bold here:
<mx:TextInput id="rate_txt"
text="{myService.conversionRate_lastResult.toString()}"/>The code binds the text property of the TextInput control to the returned result. The application finds the exchange rate using the
conversionRate_lastResultproperty to which you've applied thetoString() method. This line wasn't provided in the code sample from Adobe, but again, code hinting helped to locate the correct property.The final stage is to test the application. Run the application. You'll see the text
NaNdisplayed in the TextInput control.
Click the Show rate button to call the web service. Unfortunately, because we're using a scripted approach, there is no way to show a busy cursor while the request takes place. After a short wait, you should see the returned exchange rate, as shown in Figure 10-17.
You might want to add an if statement to the binding to hide the initial NaN value. I'll leave that up to you.
You can find this file saved as CurrencyConversionWizardTag.mxml with your chapter resources. The complete application code follows, in case you wish to check your own version:
<?xml version="1.0" encoding="utf-8"?>
<mx:Application xmlns:mx="http://www.adobe.com/2006/mxml"
xmlns:srv="com.webservicex.*" layout="absolute">
<srv:CurrencyConvertor id="myService">
<srv:conversionRate_request_var>
<srv:ConversionRate_request FromCurrency="AUD"
ToCurrency="GBP"/>
</srv:conversionRate_request_var>
</srv:CurrencyConvertor>
<mx:VBox x="10" y="10">
<mx:Button label="Show rate" id="convert_btn"
click="myService.conversionRate_send()"/>
<mx:Label text="Conversion rate" fontWeight="bold" width="150"/>
<mx:TextInput id="rate_txt"
text="{myService.conversionRate_lastResult.toString()}"/>
</mx:VBox>
</mx:Application>Let's move onto a scripted version of the previous example.
Again, we'll create a simple application that shows the conversion rate between Australia dollars (AUD) and British pounds (GBP).
Create a new application file. In this case, I called mine
CurrencyConversionWizardScript.mxml.Add the interface elements shown earlier in Figure 10-16.
<mx:VBox x="10" y="10"> <mx:Button label="Show rate" id="convert_btn" /> <mx:Label text="Conversion rate" fontWeight="bold" width="150"/> <mx:TextInput id="rate_txt" /> </mx:VBox>
Clicking the
Show ratebutton displays the relevant exchange rate in the TextInput control.Modify the opening
<mx:Application>element to include acreationCompleteattribute, as shown here in bold:<mx:Application xmlns:mx="http://www.adobe.com/2006/mxml" layout="absolute"
creationComplete="initApp(event)">When the application finishes creating the interface, it calls the
initApp() function, which sets up the web service.Add the following
<mx:Script>block above the opening<mx:VBox>element:<mx:Script> <![CDATA[ import com.webservicex.*; import mx.events.FlexEvent; private var myService:CurrencyConvertor= new CurrencyConvertor(); private function initApp(e:FlexEvent):void { myService.addconversionRateEventListener(resultHandler); } private function resultHandler(e:ConversionRateResultEvent):void { } ]]> </mx:Script>The code block starts by importing all of the generated classes using the following statement:
import com.webservicex.*;
The code block also imports the
FlexEventclass so the application can correctly recognize the type of event passed to theinitApp() function. It declares a variablemyServiceof the typeCurrencyConverter.The
initApp() function receives aFlexEventas an argument and adds an event handler to the myService element. It uses the methodaddconversionRateEventListener(). The event has one argument, which is the name of the handler function.The
resultHandler() function receives aConversionRateResultEventas an argument. The code block includes the function signature, but the function itself is empty. Again, the instructions in theCurrencyConverter.as file are a little lacking. TheaddconversionRateEventListener() method was incorrectly cased in the sample code.The application will call the web service in response to the click of the
Show ratebutton, so you need to add an event handler that responds to theclickevent.Modify the
initApp() method as shown here in bold:private function initApp(e:FlexEvent):void { myService.addconversionRateEventListener(resultHandler);convert_btn.addEventListener(MouseEvent.CLICK, clickHandler);} You'll also need to add the clickHandler() function that follows: private function clickHandler(e:MouseEvent):void{ myService.conversionRate("AUD", "GBP"); }Clicking the button calls the
clickHandler() function. This function contains a single line, which calls theconversionRate() method of themyServiceweb service. This method includes the two conversion currencies as arguments. Because of the changes I made, the method call passes these asStringvalues.In order to display the exchange rate, the application will need to display the returned result in the TextInput control.
Modify the
resultHandler() function as shown here:private function resultHandler(e:ConversionRateResultEvent):void {rate_txt.text = e.result.toString();}The new line sets the text property of the
TextInputto the returned result. The function finds the exchange rate using the expression e.result.toString(). As with the previous example, this line wasn't provided in the code sample from Adobe.Run the application. Click the
Show ratebutton to call the web service. You should see the returned exchange rate, as shown earlier in Figure 10-17.
The complete code for the application follows, and you can find this saved in the file CurrencyConversionWizardScript.mxml.
<?xml version="1.0" encoding="utf-8"?>
<mx:Application xmlns:mx="http://www.adobe.com/2006/mxml"
  layout="absolute" creationComplete="initApp(event)">
<mx:Script>
<![CDATA[
import com.webservicex.*;
import mx.events.FlexEvent;
private var myService:CurrencyConvertor=
new CurrencyConvertor();private function initApp(e:FlexEvent):void {
myService.addconversionRateEventListener(resultHandler);
convert_btn.addEventListener(MouseEvent.CLICK,
clickHandler);
}
private function clickHandler(e:MouseEvent):void{
myService.conversionRate("AUD", "GBP");
}
private function resultHandler(e:ConversionRateResultEvent):
void {
rate_txt.text = e.result.toString();
}
]]>
</mx:Script>
<mx:VBox x="10" y="10">
  <mx:Button label="Show rate" id="convert_btn" />
  <mx:Label text="Conversion rate" fontWeight="bold" width="150"/>
  <mx:TextInput id="rate_txt" />
</mx:VBox>
</mx:Application>You can see that using the generated classes requires less code than was used in the previous exercises. You might find this approach easier than the examples I showed earlier. However, there were also some difficulties associated with the custom data type Currency and the supplied sample code. If you choose to use the Web Service Introspection wizard, you might need to modify the generated content and sample code.
In this chapter, I explained web services and showed you how to consume them in Flex with both the <mx:WebService>; element and WebService class. We worked through two examples that illustrated each approach. The first showed how to use a tag-based approach, and the second demonstrated a class-based approach.
I also showed you how to work with the Web Service Introspection wizard. We generated custom classes to consume the web service and used them in both a tag-based and scripted approach. I also provided some warnings about using this approach.
In the next chapter, you'll learn how to consume a web service in Flash. That will prove a little more challenging, as Flash can't access the WebService class.