
E4X is a new recommendation for working with XML documents. ActionScript 3.0 bases all of its XML functionality on this recommendation. E4X is short for the ECMAScript for XML specification, ECMA-357.This is a standard managed by the European Computer Manufacturers Association (ECMA).You can find a copy of the standard at http://www.ecma-international.org/publications/standards/Ecma-357.htm.
In the previous chapter, you saw the classes that form part of the new E4X functionality. We worked through the methods of the XML class that you can use to locate content in an XML document. E4X expressions provide an alternative to the XML class methods for navigating through XML content. As with the XML class methods, in addition to retrieving values, E4X expressions can assign values to both attributes and elements.
E4X expressions provide a type of shorthand that's similar to XPath, which is a W3C recommendation that explains how to address content in different parts of an XML document. You can read more about this recommendation at http://www.w3.org/TR/xpath, if you're interested.
E4X expressions allow you to navigate through an XML document using node names in paths separated by dots. Instead of complicated and not very descriptive ActionScript 2.0 paths, E4X expressions describe a path to the data using the names of nodes and attributes to create expressions. These expressions can also apply filters and insert new content.
In this chapter, you'll work through some examples of E4X expressions and see how to use them to locate content in an XML object. You can find the resources for this chapter at http://www.friendsofed.com.
Like XML class methods, E4X expressions specify a path through element and node names starting with the root element. A dot separates each name, and the expression reads from left to right. Here is an example of an E4X expression:
authorsXML.author[0].books.book[0];
This expression lists each of the node names in order, ending with the <book> element. It also includes index numbers, to identify the location of the item in its list. It's much easier to understand this expression compared with an ActionScript 2.0 path, which might look like the following:
authorsXML.firstChild.childNodes[0].childNodes[0];
In the second example, you can't easily determine which content you're targeting. The use of childNodes bears no relationship to the name of any element in the XML document.
In addition, because you don't use names in ActionScript 2.0 paths, you need to loop through collections of child elements, testing the element name until you locate the correct content. Not only does this require more code, but it also takes longer to process an XML document than in ActionScript 3.0, where you can write an expression that targets a precise location.
Using dot notation to locate content is familiar to Flash and Flex developers used to working in object-oriented environments. They frequently use this type of expression when working with objects, methods, and classes.
As I mentioned earlier, if you've worked with XPath, using dot notation to target XML content will be an approach familiar to you. In fact, compatibility with XPath was one of the aims of E4X. You'll find that the syntax for expressions matches exactly, although E4X expressions provide somewhat less functionality than XPath.
In broad terms, you can use the following constructs in an E4X expression:
We'll cover each of these areas in turn by working through some examples. We'll also compare the E4X expressions with the equivalent expressions using XML class methods. If you want to work through the examples yourself, you can use either Flash or Flex Builder, and I've provided instructions for both environments.
To explore E4X expressions, we'll work with the following XML document, saved as authorDetails.xml with your chapter resources.
<allAuthors>
  <publisher>Friendly Books</publisher>
  <publishYear>2008</publishYear>
  <author authorID="1">
    <authorFirstName>Alison</authorFirstName>
    <authorLastName>Ambrose</authorLastName>
    <books>
      <book ID="1">
        <bookName>Shopping for profit and pleasure</bookName>
        <bookPublishYear>2002</bookPublishYear>
        <bookCost>14.99</bookCost>
      </book>
      <book ID="4">
        <bookName>Fishing tips</bookName>
        <bookPublishYear>1999</bookPublishYear>
        <bookCost>23.50</bookCost>
      </book>
    </books>
  </author>
  <author authorID="2">
    <authorFirstName>Douglas</authorFirstName>
    <authorLastName>Donaldson</authorLastName>
    <books>
      <book ID="5">
        <bookName>Outstanding dinner parties</bookName>
        <bookPublishYear>2003</bookPublishYear>
        <bookCost>35.99</bookCost>
      </book>
      <book ID="9">
        <bookName>Cooking for fun and profit</bookName>
        <bookPublishYear>2007</bookPublishYear>
        <bookCost>24.75</bookCost>
      </book>
    </books>
  </author>
</allAuthors>
This XML document describes a list of authors and their books. It includes several elements of each type so that the examples can demonstrate many different types of expressions.
We'll load this content into an XML object and write a series of E4X expressions. In our expressions, the name of the XML object will be equivalent to the root element <allAuthors>, so we won't need to include that element in the paths that we create.
Before starting, you need to set up the working environment for the examples. Feel free to use either Flash or Flex.
You can work through with the examples in this chapter using Flash by setting up a file according to the following instructions:
Create a new Flash document and add a new layer called
actions.Open the
actionslayer in theActionspanel using the F9 shortcut key, and add the following code:initApp(); function initApp():void { }Add an XML object called
authorsXML to theinitApp()function. Copy the content from theauthorDetails.xmldocument and assign it to an XML object. The following block shows the first two lines to get you started:var authorsXML:XML = <allAuthors> <publisher>Friendly Books</publisher>
You'll add the sample expressions that you want to test inside the initApp() function, underneath the authorsXML object. We'll use trace() and the toXMLString() method of the XML class to display the results of each expression in the Output panel. Obviously, in the future, you won't need these methods if you're identifying content that you don't need to display in the Output panel.
Here are the instructions for the Flex examples:
Create a new project and application file with the name of your choosing.
Create a new folder in the
srcfolder of the project calledassetsand copy theauthorDetails. xml file to that folder.Enter the following <
mx:XML> element after the opening <mx:Application> element:<mx:XML id="authorsXML" source="assets/authorDetails.xml"/>
This line assigns the contents from the
authorDetails.xmldocument in the assets folder to the authorsXML object.Modify the
<mx:Application>element to add acreationCompleteattribute as shown here:<mx:Application xmlns:mx="http://www.adobe.com/2006/mxml" layout="absolute"
creationComplete="initApp(event)">When the creation of the interface completes, the application will call the
initApp()function, passing a FlexEvent object.Add the following
<mx:Script>block below the opening<mx:Application>element:<mx:Script> <![CDATA[ import mx.events.FlexEvent; private function initApp(e:FlexEvent):void { } ]]> </mx:Script>This script block includes the
initApp()function. You need to import theFlexEventclass, as that object is passed within theinitApp()function.
You'll add the expressions that you want to test inside the initApp() function. These expressions will include trace() so that you can see the results in the Console view. You won't need to include this method normally. You must remember to debug the application instead of running it, so you can view the output. To do so, choose Run
Let's start by looking at how to use the dot operator to specify paths.
E4X expressions specify their paths in the same way as the XML class methods that you saw in the previous chapter. They start with the root element, and use element and attribute names in order until they reach the ending point. The most important thing to remember is that the name of the XML object provides the starting point or root node for the path. In our example, all expressions will start with the name authorsXML, which equates to the root node and is the name of the XML object.
E4X expressions can target elements and attributes within an XML object using their names, and sometimes their position in the list. Some expressions will return text information; others will return an XMLList object. We'll start with the simplest of E4X expressions—one that returns text.
Very simple E4X expressions appear to return only text. This is the case when you're targeting the content that contains only a text node. Here is an example:
authorsXML.publisher;
Technically, this expression returns an XMLList object with a single element, <publisher>.
To see the results of this expression, wrap it in the trace() method, as shown here:
trace(authorsXML.publisher);
When tested, the expression displays the output Friendly Books. This is the text stored in the <publisher> element, a child of the root element. Because this example doesn't specify the toString() or toXMLString() method to display the information, the toString() method is used. If you're not sure about the difference between these two methods, refer to the "Displaying a string representation of XML" section in the previous chapter.
You can also use the text() method to return the text content inside the element, as shown in this example:
trace (authorsXML.publisher.text());
This expression returns an XMLList of all text nodes within the <publisher> element. In this case, there is only one text node: the content Friendly Books.
Although the second expression appears to return the same content as the first, it's actually a little different. The first expression returns an XMLList object, whereas the second example returns the text inside the XMLList object.
Another way to access content is to use the child() method of the XML class to retrieve the <publisher> element, as shown here:
trace (authorsXML.child("publisher"));This expression returns the element itself, rather than just the text. You might use this approach inside a function. It's useful if you need to pass a String argument representing the name of the element to locate. You can't do that using dot notation.
I think you'll agree that using the shorthand E4X expression is probably a little easier. It certainly takes less code, and it is easier to read. When you start to work with more complicated paths, you'll see that it's easier to use the dot notation.
E4X expressions usually return XMLList objects. For example, the following expression returns an XMLList of all <author> elements:
authorsXML.author;
This expression retrieves all <author> child elements within the root node and returns an XMLList object.
Wrap the expression inside a trace() action with the toXMLString() method, as shown here:
trace(authorsXML.author.toXMLString());
Test or debug the application, and you'll see the following output:
<author authorID="1">
  <authorFirstName>Alison</authorFirstName>
  <authorLastName>Ambrose</authorLastName>
  <books>
    <book bookID="1">
      <bookName>Shopping for profit and pleasure</bookName>
      <bookPublishYear>2002</bookPublishYear>
      <bookCost>14.99</bookCost>
    </book>
    <book ID="4">
      <bookName>Fishing tips</bookName>
      <bookPublishYear>1999</bookPublishYear>
      <bookCost>23.50</bookCost>
    </book>
  </books>
</author>
<author authorID="2">
<authorFirstName>Douglas</authorFirstName>
<authorLastName>Donaldson</authorLastName>
<books>
<book ID="5">
<bookName>Outstanding dinner parties</bookName>
<bookPublishYear>2003</bookPublishYear>
<bookCost>35.99</bookCost>
</book>
<book ID="9">
<bookName>Cooking for fun and profit</bookName>
<bookPublishYear>2007</bookPublishYear>
<bookCost>24.75</bookCost>
</book>
</books>
</author>The example locates a complete list of <author> elements, including all of their children.
This expression is equivalent to the following XML class method:
trace (authorsXML.child("author"));You'll see the same output if you test this equivalent expression.
When an E4X expression returns an XMLList containing more than one element, you may need to loop through the elements to work with each in turn. The following code block demonstrates how to loop through this XMLList returned by the previous example and identify the name of each author:
for each(var aXML:XML in authorsXML.author) {
trace(aXML.authorFirstName + " " + aXML.authorLastName);
}This type of loop is new to ActionScript 3.0. There are alternative methods for looping. The "Working with the XMLList class" section in the previous chapter shows three different approaches to looping through XMLList objects.
You can check that what the E4X expression returns is actually an XMLList object by using is XMLList, as follows:
trace(authorsXML.author is XMLList);
Note
Note that there is a space between the word is and XMLList in this expression. Do not try to use isXMLList, as that will throw an error.
Testing the output displays the value true because the expression produces an XMLList object.
You might want to work with a specific item from the XMLList returned by the E4X expression. For this reason, E4X expressions can target a specific element by using its index number in the XMLList. Each element has a position in the list, starting at 0 for the first element. You identify the index number using square brackets: []. This approach is very similar to working with arrays in ActionScript.
You can target the first <author> element in the collection of all <author> elements with the following expression:
trace(authorsXML.author[0].toXMLString());
This expression produces the following output:
<author authorID="1">
<authorFirstName>Alison</authorFirstName>
<authorLastName>Ambrose</authorLastName>
<books>
<book bookID="1">
<bookName>Shopping for profit and pleasure</bookName>
<bookPublishYear>2002</bookPublishYear>
<bookCost>14.99</bookCost>
</book>
<book ID="4">
<bookName>Fishing tips</bookName>
<bookPublishYear>1999</bookPublishYear>
<bookCost>23.50</bookCost>
</book>
</books>
</author>The details of the first author, Alison Ambrose, display.
This shorthand E4X expression is equivalent to the following line, which uses XML class methods.
trace(authorsXML.child("author")[0].toXMLString());The item index does not need to appear as the last point in the path. You can also include the item index at other positions, as shown here:
trace(authorsXML.author[0].books.book[1].toXMLString());
This expression includes two indexes and targets the second book of the first author. Testing the expression produces the following output:
<book ID="4"> <bookName>Fishing tips</bookName> <bookPublishYear>1999</bookPublishYear> <bookCost>23.50</bookCost> </book>
Another way to find this information is as follows:
trace(authorsXML.child("author")[0].child("books").child("book")[1]
 .toXMLString());
Again, using XML class methods creates a much longer expression.
Note
If XML class methods create longer expressions, do you still need to use them? The answer is definitely! XML class methods help out where the name of an element is a reserved word in ActionScript. For example, if the element were called ▸result▸, in some situations you would see an error when including the element in an E4X expression. The solution would be to use child("result") instead.
You also use XML class methods when you want to pass a dynamic element name to an expression. By using a string value, you are able to substitute a variable name, for example, when passing an element name to a public method of a class file.
You can find the last element in an XMLList object by using the length() method in the expression. This method returns a number equal to the number of items in the XMLList. This will be one more than the last item in the XMLList, because the index is a zero-based number.
The following lines show how to use this approach to find the last element in an XMLList.
var lastIndex:int = authorsXML.author[0].books.book.length() - 1; trace(authorsXML.author[0].books.book[lastIndex].toXMLString());
This expression displays the second book of the first author, which also happens to be the last book, as in the previous example.
It's important to note that ActionScript treats all nodes and attribute values as strings, so you may need to cast values of a different data type; for example, if you want to use a number in a calculation.
The following lines provide a good illustration:
trace(authorsXML.author[0].books.book[1].bookCost); trace (authorsXML.author[0].books.book[1].bookCost + 10); trace (Number(authorsXML.author[0].books.book[1].bookCost) + 10);
Testing the first line displays 23.50 in the Output panel or Console view. You can tell that this value is a string by the expression in the second line, which adds 10. Testing that expression produces the output 23.5010—the two values are concatenated. If you cast the value as a number first and add 10, you'll create an addition, as shown in the third line. Testing this line produces the sum 33.5.
Note
Working with dates can be even more problematic, as it's much harder to cast XML date types directly as ActionScript date types. The two formats just don't translate easily. I've found that in most cases, it's better to use string manipulation to separate out the date parts and create a new ActionScript date from those parts.
You can use the wildcard operator * to match any name in the XML object. You can use this operator in the following way:
trace(authorsXML.*.toXMLString());
This expression finds all children of the root element, regardless of their name, and produces the following output:
<publisher>Friendly Books</publisher>
<publishYear>2008</publishYear>
<author authorID="1">
<authorFirstName>Alison</authorFirstName>
<authorLastName>Ambrose</authorLastName>
<books>
<book bookID="1">
<bookName>Shopping for profit and pleasure</bookName>
<bookPublishYear>2002</bookPublishYear>
<bookCost>14.99</bookCost>
</book>
<book ID="4">
<bookName>Fishing tips</bookName>
<bookPublishYear>1999</bookPublishYear>
<bookCost>23.50</bookCost>
</book>
</books>
</author>
<author authorID="2">
  <authorFirstName>Douglas</authorFirstName>
  <authorLastName>Donaldson</authorLastName>
  <books>
    <book ID="5">
      <bookName>Outstanding dinner parties</bookName>
      <bookPublishYear>2003</bookPublishYear>
      <bookCost>35.99</bookCost>
    </book>
    <book ID="9">
      <bookName>Cooking for fun and profit</bookName>
      <bookPublishYear>2007</bookPublishYear>
      <bookCost>24.75</bookCost>
    </book>
  </books>
</author>You can see that the expression returns all of the content from the XML object, except the root element. This expression is equivalent to the following, which uses XML class methods:
trace(authorsXML.children().toXMLString());
You can also include the wildcard in a longer expression, as shown here:
trace(authorsXML.author[1].*.toXMLString());
This expression finds all children of the second author. You would see the following output when testing the expression:
<authorFirstName>Douglas</authorFirstName>
<authorLastName>Donaldson</authorLastName>
<books>
<book ID="5">
<bookName>Outstanding dinner parties</bookName>
<bookPublishYear>2003</bookPublishYear>
<bookCost>35.99</bookCost>
</book>
<book ID="9">
<bookName>Cooking for fun and profit</bookName>
<bookPublishYear>2007</bookPublishYear>
<bookCost>24.75</bookCost>
</book>
</books>Notice that the expression provides all content as elements and attributes. The text nodes aren't provided separately.
The equivalent expression with XML class methods follows:
trace(authorsXML.child("author")[1].children().toXMLString());You can also use a wildcard in this way:
trace(authorsXML.*[1].toXMLString()));
This expression retrieves the second child from the list of all child elements of the root node. You would see the following output upon testing:
<publishYear>2008</publishYear>
And here is the equivalent expression using XML methods:
trace(authorsXML.children()[1].toXMLString());
You can find all the examples referred to in this section saved in the resource files e4xDotNotationExamples.fla and E4xDotNotationExamples.mxml. If you didn't work through the examples yourself, uncomment the lines you wish to test.
It's possible to target attributes within an element by using the shorthand attribute operator, @. This operator is identical to the one used in XPath.
Consider the following example:
trace([email protected]());
This expression returns a list of all of the authorID attributes of every <author> element in the XML object. You see the following output after testing:
1
2
This expression is equivalent to the following XML class attribute() method:
trace(authorsXML.child("author").attribute("authorID")
.toXMLString());You can use the following expression to find the ID attribute of the first <book> element of the second <author>:
trace(authorsXML.author[1].books.book[0][email protected]());
You would see 5 when you tested the expression.
The equivalent XML class methods expression follows:
trace(authorsXML.child("author")[1].child("books").child("book")[0]
.attribute("ID").toXMLString());I know which expression is easier to read!
You can also include a wildcard in the expression with the attribute operator to get a list of all attribute values within an element, as in the following example:
trace(authorsXML.author[0].@*.toXMLString());
This expression finds all attribute values of the first author. In this case, it displays a value of 1, because we have only a single attribute in the <author> element. The expression is equivalent to the following:
trace(authorsXML.child("author")[0].attributes().toXMLString());The new ActionScript 3.0 for each loop allows you to loop through all attributes of an element using the following approach:
for each(var att:XML in authorsXML.author[0].attributes()) {
trace(authorsXML.author[0].@[att.name()].toXMLString());
}This example iterates through all of the attributes of the first <author> element. It uses the name() method with the shorthand operator @ to identify each attribute and displays the value. Again, in our example, the <author> element has only a single attribute, so you'll see the value 1 when you test the code.
You can also loop through the authorID attributes of each author using the following code:
for each(var aXML:XML in authorsXML.author) {
trace([email protected]());
}This produces the following output:
1
2
The following code block is equivalent:
for each(var aXML:XML in authorsXML.child("author")) {
trace(aXML.attribute("authorID").toString());
}You can find these examples in the resource files e4xAttributesExamples.fla and E4xAttributesExamples.mxml. You'll need to uncomment the relevant lines to test them.
The descendants operator (..) retrieves all descendants that exist within the XML object, regardless of their position. It works in the same way as the XML class method descendants().
The following expression locates all <book> elements within the authorsXML object, regardless of their position:
trace(authorsXML..book.toXMLString());
Testing this expression produces the following output:
<book bookID="1"> <bookName>Shopping for profit and pleasure</bookName> <bookPublishYear>2002</bookPublishYear> <bookCost>14.99</bookCost> </book> <book ID="4"> <bookName>Fishing tips</bookName> <bookPublishYear>1999</bookPublishYear> <bookCost>23.50</bookCost> </book> <book ID="5"> <bookName>Outstanding dinner parties</bookName> <bookPublishYear>2003</bookPublishYear> <bookCost>35.99</bookCost> </book>
<book ID="9"> <bookName>Cooking for fun and profit</bookName> <bookPublishYear>2007</bookPublishYear> <bookCost>24.75</bookCost> </book>
The expression returns all <book> elements as an XMLList. It is equivalent to using the following method of the XML class:
trace(authorsXML.descendants("book").toXMLString());You can return all descendants of a specific element by using the wildcard *, as follows:
trace (authorsXML.author[0].books..*);
This expression finds all descendants of the <books> element of the first author. Testing produces the following output:
<book bookID="1"> <bookName>Shopping for profit and pleasure</bookName> <bookPublishYear>2002</bookPublishYear> <bookCost>14.99</bookCost> </book> <bookName>Shopping for profit and pleasure</bookName> Shopping for profit and pleasure <bookPublishYear>2002</bookPublishYear> 2002 <bookCost>14.99</bookCost> 14.99 <book ID="4"> <bookName>Fishing tips</bookName> <bookPublishYear>1999</bookPublishYear> <bookCost>23.50</bookCost> </book> <bookName>Fishing tips</bookName> Fishing tips <bookPublishYear>1999</bookPublishYear> 1999 <bookCost>23.50</bookCost> 23.50
Notice that the output includes the elements and text nodes. Compare this with the expression that finds all child elements that you saw earlier. It didn't return the text nodes.
The equivalent expression using XML class methods follows:
trace (authorsXML.child("author")[0].child("books")
.descendants("*"));You can find these examples in the resource files e4xDescendantsExamples.fla and E4xDescendantsExamples.mxml.
Table 4-1 provides a summary of E4X expressions and their equivalent XML class methods.
Table 4.1. Summary of E4X expressions and equivalent XML class methods
E4X expression | XML class expression |
|---|---|
|
|
|
|
|
|
|
|
|
|
|
|
|
|
|
|
|
|
|
|
|
|
|
|
As with XPath, you can use filters in E4X expressions by writing a predicate or condition inside parentheses. The filters work in much the same way as XPath. However, unlike XPath, E4X expressions cannot be used to search for ancestors. When you apply a filter, you're essentially looping through the entire collection of elements and returning only those that match the specified condition or conditions.
You can use the == and != comparison operators to identify specific elements. You can also use AND (&&) and OR (||) expressions. You can even use the additive operator (+) for either mathematical expressions or concatenation.
Let's see how each type of filter works.
You can apply a filter that tests for equality using ==. This operator is the same one used in ActionScript expressions.
You need to specify the element or attribute to compare and the comparison value, as shown here:
authorFirstName =="Douglas"
The following example finds the details of the <authorFirstName> element that has the value equal to Douglas:
authorsXML.author.(authorFirstName =="Douglas").toXMLString());
The predicate authorFirstName == "Douglas" works just like an if statement. It locates only authors with a first name of Douglas. Filters can be a great way to avoid using conditional statements such as if in your ActionScript code. They save you from using the ActionScript 2.0 approach of having to loop through all elements and attributes to test for a condition.
The filter expression produces the following output when tested:
<author authorID="2">
<authorFirstName>Douglas</authorFirstName>
<authorLastName>Donaldson</authorLastName>
<books>
<book ID="5">
<bookName>Outstanding dinner parties</bookName>
<bookPublishYear>2003</bookPublishYear>
<bookCost>35.99</bookCost>
</book>
<book ID="9">
<bookName>Cooking for fun and profit</bookName>
<bookPublishYear>2007</bookPublishYear>
<bookCost>24.75</bookCost>
</book>
</books>
</author>This expression is equivalent to the following:
trace(authorsXML.child("author").(authorFirstName =="Douglas")
.toXMLString());It returns the entire <author> node for this first name. It's important to note that, even though you applied the filter to a child of the <author> element, <authorFirstName>, you didn't retrieve elements from that point onward. It doesn't matter which element or attribute has the filter applied; the expression returns content from the point prior to the filter. In this case, it still returns the <author> element.
A filter doesn't need to appear last in the E4X expression. You can include the filter partway through an expression, as shown here:
trace(authorsXML.author.(authorFirstName =="Douglas").books.book.toXMLString());
In this case, the filter still applies to the <authorFirstName> element, but it returns only the <book> elements. The expression produces the following output:
<book ID="5"> <bookName>Outstanding dinner parties</bookName> <bookPublishYear>2003</bookPublishYear> <bookCost>35.99</bookCost> </book> <book ID="9"> <bookName>Cooking for fun and profit</bookName> <bookPublishYear>2007</bookPublishYear> <bookCost>24.75</bookCost> </book>
The following expression is equivalent:
trace(authorsXML.child("author").(child("authorFirstName")
=="Douglas").child("books").child("book").toXMLString());Applying a filter to an attribute is similar.
trace(authorsXML.author.(authorFirstName =="Douglas")books.book.(@ID=="9").toXMLString());
This expression returns the entire <book> element for the author with the last name Douglas where the ID attribute is equal to 9, as follows:
<book ID="9"> <bookName>Cooking for fun and profit</bookName> <bookPublishYear>2007</bookPublishYear> <bookCost>24.75</bookCost> </book>
You can see that it's possible to apply more than one filter in an expression. The equivalent expression using XML class methods follows:
trace (authorsXML.child("author").(child("authorFirstName")
== "Douglas").child("books").child("book")
.(attribute("ID") == "9").toXMLString());To find elements or attributes that don't match, you can use the inequality operator (!=). This works in the same way as in ActionScript expressions.
The following example shows how to use this operator to find authors with a first name that isn't Douglas.
trace(authorsXML.author.(authorFirstName !="Douglas").toXMLString());
When you test the expression, you'll see the following output:
<author authorID="1">
  <authorFirstName>Alison</authorFirstName>
  <authorLastName>Ambrose</authorLastName>
  <books>
    <book bookID="1">
      <bookName>Shopping for profit and pleasure</bookName>
      <bookPublishYear>2002</bookPublishYear>
      <bookCost>14.99</bookCost>
    </book>
    <book ID="4">
      <bookName>Fishing tips</bookName>
      <bookPublishYear>1999</bookPublishYear>
      <bookCost>23.50</bookCost>
    </book>
  </books>
</author>
The expression shows all other <author> elements. In this case, it produces details of the author Alison Ambrose. The equivalent XML class expression follows:
trace(authorsXML.child("author").
(child("authorFirstName") !="Douglas").toXMLString());In your comparisons, you can also use the > and < operators, as well as the <= and >= operators. The following example finds the name of all books where the cost is below 20:
trace(authorsXML..book.(bookCost < 20).bookName.toString());
Notice that this example uses the descendants operator (..) to locate all <book> child elements. This expression produces the following book, which has a cost of less than 20:
Shopping for profit and pleasure
Here is an equivalent expression:
trace(authorsXML.descendants("book").
(child("bookCost") < 20).child("bookName").toString());You can write more complicated filtering expressions by using the && (AND) and || (OR) operators. Again, these are the same operators used in ActionScript. An example follows:
trace(authorsXML..book.(@ID=="9" || @ID=="5").toXMLString());
This expression looks for <book> elements with the ID of 9 or 5. It uses the descendants operator (..) as well as the OR operator. Testing the expression produces the following output:
<book ID="5"> <bookName>Outstanding dinner parties</bookName> <bookPublishYear>2003</bookPublishYear> <bookCost>35.99</bookCost> </book> <book ID="9"> <bookName>Cooking for fun and profit</bookName> <bookPublishYear>2007</bookPublishYear> <bookCost>24.75</bookCost> </book>
This expression is equivalent to the following:
trace(authorsXML.descendants("book").(attribute("ID")=="9" ||
attribute("ID")=="5").toXMLString());An AND example follows:
trace(authorsXML.author.(authorFirstName=="Alison" &&authorLastName=="Ambrose").toXMLString());
This expression finds an author with the first name of Alison and the last name of Ambrose. You see the following output after testing the expression:
<author authorID="1">
<authorFirstName>Alison</authorFirstName>
<authorLastName>Ambrose</authorLastName>
<books>
<book ID="1">
<bookName>Shopping for profit and pleasure</bookName>
<bookPublishYear>2002</bookPublishYear>
<bookCost>14.99</bookCost>
</book>
<book ID="4">
  <bookName>Fishing tips</bookName>
 <bookPublishYear>1999</bookPublishYear>
 <bookCost>23.50</bookCost>
</book>
</books>
</author>You would get the same result with the following expression:
trace(authorsXML.child("author").(child("authorFirstName")=="Alison"
&& child("authorLastName")=="Ambrose").toXMLString());
You could also use the AND and OR operators to find different elements, as follows:
trace(authorsXML..*.(name() == "bookName"|| name() == "bookCost").toXMLString());
This expression uses the name() XML class method with the wildcard operator (*) to apply the filter to an element name. It finds all descendants where the name of the element is either bookName or bookCost. Testing produces the following output:
<bookName>Shopping for profit and pleasure</bookName>
<bookCost>14.99</bookCost>
<bookName>Fishing tips</bookName>
<bookCost>23.50</bookCost>
<bookName>Outstanding dinner parties</bookName>
<bookCost>35.99</bookCost>
<bookName>Cooking for fun and profit</bookName>
<bookCost>24.75</bookCost>
You can use E4X expressions in numeric calculations so long as the returned values produce numbers rather than XMLList or XML objects. For example, you can use the additive operator (+) to either add or concatenate element or attribute values. Bear in mind that all values are treated as strings, so you will need to cast any numeric types appropriately before you carry out the calculation. I'll illustrate what I mean with some examples.
The following expression uses the additive operator with two <bookCost> elements:
trace(authorsXML.author[0].books.book[0].bookCost.text() +authorsXML.author[0].books.book[1].bookCost.text());
Testing it produces the following:
14.9923.50
The expression concatenates the values 14.99 and 23.50. This occurs because the returned values are of the String data type.
Instead, you can cast the values as numbers before adding them by using the following expression:
trace(Number(authorsXML.author[0].books.book[0].bookCost.text()) +Number(authorsXML.author[0].books.book[1].bookCost.text()));
In this case, you'll see the numeric value 38.49, which is a result of adding the two book costs.
You can use a returned number in any other mathematical expression, as long as you cast it appropriately first, as shown here:
trace(Number(authorsXML.author[0].books.book[0].bookCost.text())*1.5);
In this case, the expression multiplies the numeric value of the book cost by 1.5.
You can include other ActionScript expressions inside parentheses. The following example shows how you could add a trace() statement instead of a filter, tracing the <address> element:
authorsXML.author[1].(trace(authorFirstName.toXMLString()));
The example would return the following content:
<authorFirstName>Douglas</authorFirstName>
You might also want to find elements with a specific number of child nodes. The following expression uses the length() method of the XML class to identify the last name of any authors with exactly two <book> elements:
trace (authorsXML.author.(books.book.length() == 2).authorLastName.toXMLString());
In this case, both authors have exactly two <book> elements, so the expression returns the following output:
<authorLastName>Ambrose</authorLastName>
<authorLastName>Donaldson</authorLastName>
I'll leave you to work out the equivalent expression using XML class methods!
These examples all appear in the resource files e4xFilterExamples.fla and E4xFilterExamples.mxml.
So far, you've seen how to retrieve content from an XML object by using E4X expressions. It's also possible to assign values to elements and attributes with these expressions.
You can use an equal sign (=) to assign a new value to an element or an attribute. We'll look at how this works using a simpler XML object than in the previous example:
var phoneBookXML:XML = <phoneBook>
  <contact id="1">
    <name>Sas Jacobs</name>
    <address>123 Red Street, Redland, Australia</address>
    <phone>123 456</phone>
  </contact>
</phoneBook>Consider the following expressions:
trace(phoneBookXML..phone[0]);
phoneBookXML..phone[0] = "999 9999";
trace(phoneBookXML..phone[0]);
In this example, the initial trace() statement displays the value of the first <phone> element. There is only one <phone> element, but I've assigned the index so I can be sure that I'm working with the first element, rather than with a collection of <phone> elements. The code then assigns a new value 999 9999 to the element and displays the value again in the Output panel using trace().
Testing the example shows the following:
123 456
999 9999
You can see that the value of the first <phone> element has been changed.
You can also change the value of attributes in the same way. Here is another example that uses trace() to display the before and after values:
trace(phoneBookXML.contact[0].@id);
phoneBookXML.contact[0].@id = "10";
trace(phoneBookXML.contact[0].@id);
Testing these lines displays the following results:
1
10
The expression changed the value of the id attribute from 1 to 10.
Note that this change will affect only the XML object inside the SWF application. It doesn't do any updating of the external XML content. You would need to use server-side language to make an external change, and I'll address that topic in Chapter 9.
ActionScript 3.0 also supports the use of the compound assignment operator (+=) in XML objects. You might use this operator to insert an element or attribute. The following example shows how to add a new element:
phoneBookXML.contact.phone += <email>[email protected]</email>;
trace(phoneBookXML.toXMLString());
In this case, the expression adds an <email> element after the <phone> element. Testing the expression produces the following output:
<phoneBook>
<contact id="1">
    <name>Sas Jacobs</name>
    <address>123 Red Street, Redland, Australia</address>
    <phone>123 456</phone>
    <email>[email protected]</email>
  </contact>
</phoneBook>
The <email> element has been added and appears after the <phone> element as the last child of <contact>. I'll cover the use of XML methods that change content in Chapter 8.
You can find the examples in this section within the resource files e4xAssigningValues.fla and E4xAssigningValues.mxml.
The delete keyword deletes content based on E4X expressions. The following example deletes the <phone> element from the phoneBookXML object you saw in the previous section:
delete phoneBookXML.contact[0].phone;
Tracing the resulting XML object shows the following:
<phoneBook>
  <contact id="1">
    <name>Sas Jacobs</name>
    <address>123 Red Street, Redland, Australia</address>
  </contact>
</phoneBook>
The <phone> element has been removed from the XML object.
You can delete all <contact> elements using the following expression:
delete phoneBookXML.contact;
The resulting output shows that only the root element remains:
<phoneBook/>
You can also delete an attribute using the following E4X expression:
delete phoneBookXML.contact.@id;
Testing the expression shows the <contact> element without an attribute:
<phoneBook>
  <contact>
    <name>Sas Jacobs</name>
    <address>123 Red Street, Redland, Australia</address>
    <phone>123 456</phone>
  </contact>
</phoneBook>
You can't use delete with a filter in the expression, as in this example:
delete phoneBookXML.contact[0].(@id="1");
If you do so, you'll see the following error message:
Delete operator is not supported with operand of type XMLList.
The error occurs because the E4X expression returns an XMLList. If you wanted to delete attributes or elements based on a filter, you would need to loop through the <contact> elements, testing the attribute value of each. When the code locates the relevant element, it should then call the delete statement. This is true even if the returned XMLList contains only a single item.
You can find these examples in the files e4xDeletingValues.fla and E4xDeletingValues.mxml. As with the other examples, uncomment the lines you need.
Let's see how to put some of these expressions into practice.
We'll finish the chapter by working through examples that demonstrate how to use E4X expressions with ComboBox and List components. We'll go through examples in both Flash and Flex—a simple, procedure-based example in Flash and a class-based example in Flex.
Both examples will show a list of author names in a ComboBox control. When a name is selected, the books by that author will display in a List control. All content comes from the XML document authorMoreDetails.xml. We'll start with the Flash example.
Here are the instructions to set up the Flash example:
Create a new ActionScript 3.0 Flash file in Flash. I called the file
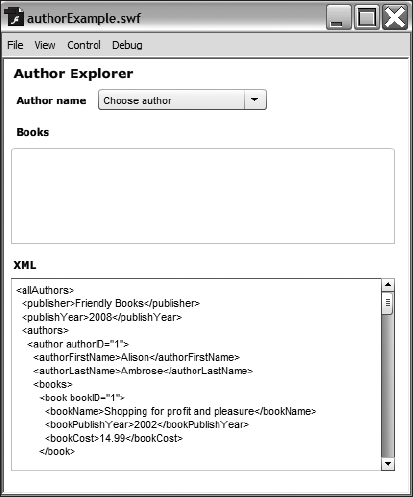
authorExample.fla and sized it to 420 5 450 pixels. If you change the interface shown in the next step, you may need to choose a different size.Create an interface that includes ComboBox, List, and TextArea components, as shown in Figure 4-1. Add the prompt
Choose authorfor the ComboBox in theParameterspanel. Feel free to change the interface to something more interesting than that shown in the screenshot!Give the ComboBox component the instance name
author_cbo. Give the List component the instance namebooks_list. UseXML_txtas the instance name for the TextArea component.Name the current layer
interface. Add a new layer and name itactions.Select the
actionslayer and open theActionspanel by pressing the F9 shortcut key. Add the following lines at the top:import fl.data.DataProvider; var authorsXML:XML; var authorList:XML; var bookList:XML; initApp(); stop();
The code starts by importing the
fl.data.DataProviderclass. You'll need this class to create a data provider from the XML content for both the ComboBox and the List.The code also declares a number of variables. It creates an XML object called
authorsXML. This object stores the XML content for the interface. The code also creates twoXMLobjects that you'll use as data providers for theComboBoxxyand List controls. These are calledauthorListandbookList, respectively.The code block finishes by calling the
initApp()function to set up the application. The final line is astop()action. You'll create theinitApp()function next.Note
You might be wondering why the example uses
XMLobjects for the component data providers. When you work with XML content, you frequently use E4X expressions that returnXMLListobjects. It seems reasonable to expect that anXMLListobject would be suitable as a data provider.If you look in the Flash help file, you'll find that the
DataProviderclass can use only a list, XML instance, or an array of data objects as a data source. There is no mention of anXMLList. You also don't have access to theXMLListCollectionclass, which is available for use as a data provider in Flex.Because your only choice here is an
XMLobject, you'll need to make sure that your E4X expressions return anXMLListwith a single item. You can then cast theXMLListobject as anXMLobject, because there is effectively a single root element. Using this approach allows you to set an E4X expression as the data source for anyDataProviderobject you create.Add the
initApp()function signature shown here below thestop()action:function initApp():void { }Now you need to populate the
authorsXMLobject. Normally, you would do this by loading content from an external XML file, and I'll cover that topic in the next chapter. For this example, however, you'll just use a static approach by assigning the content directly to theXMLobject.Open the file
authorMoreDetails.xmland copy the content to the clipboard. Assign the content to theauthorsXMLobject by pasting the content as shown here. I've shown only the first and last lines because the XML document contains a lot of content.initApp():void { authorsXML = <allAuthors> //the remaining lines follow </allAuthors>; }You'll display the XML object in the TextArea component using the
toXMLString() method so you can check the structure. Add the following line before the closing brace in theinitApp()function:text = authorsXML.toXMLString();
Before moving on, you should check that you've created the
authorsXMLobject correctly. Test the movie using the Ctrl+Enter (Cmd+Enter) shortcut. You should see the output shown in Figure 4-2.If you look at the XML structure, you'll see that all
authorsappear inside the<authors>element. You want to display the author's first and last names in the ComboBox, so you need to set the<authors>element as the data provider for this control. Add the following lines before the closing brace of theinitApp()function:= new XML(authorsXML.authors); author_cbo.dataProvider = new DataProvider(authorList);
The first new line populates the
authorListobject using the E4X expressionauthorsXML.authors. This expression returns anXMLListof all<authors>elements. There is only one of these elements, so you're able to cast it to the type of anXMLobject using theXML()constructor method.You can then create a
DataProviderobject from theauthorListXML object and set it as thedataProviderproperty for the author_cboinstance. Because you're working with an XML object, the data provider has access to all of the child elements of the<authors>root element.Because there are multiple child elements, you need to specify which to use for the ComboBox label. You could assign a single element or use the
labelFunctionproperty of theComboBox. Because you want to display both theauthor'sfirst and last name, you'll need to create alabelFunctionthat joins these values and adds a space in between. Name this functiongetFullName().Add the following line underneath the data provider assignment line. It sets the
labelFunctionproperty of the ComboBox.labelFunction = getFullName;
You now need to create the
getFullName()function. Add the new function, shown here, to the bottom of theactionslayer:function getFullName(item:Object):String{ return item.authorFirstName + " " + item.authorLastName; }The label function receives an Object called
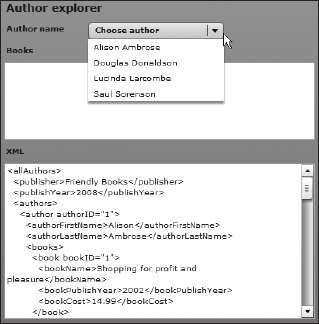
itemas a parameter. This Object contains the data item from the data provider. ThegetFullName() function finds theauthorFirstNameandauthorLastNameproperties of this Object and concatenates them with a space in between to create the full name.Test the movie again. Figure 4-3 shows how the ComboBox should appear, with the names of four authors. If you can see all of the names, continue with the next steps. If not, you'll need to recheck your steps to this point to make sure that you've carried them out correctly.
When the author selection changes, the List control should show all books associated with that author. The ComboBox needs a change handler to deal with this action, so add the following line to the
initApp() function:author_cbo.addEventListener(Event.CHANGE, changeHandler);
This line assigns a change handler function called changeHandler. It's common practice to name the handler functions in this way so it's easy to determine which event they manage.
Now you need to create the function that will be called when the
ComboBoxselection changes. Add the followingchangeHandler()function at the bottom of theactionslayer:function changeHandler(e:Event):void { showBooks(e.currentTarget.selectedIndex); }The function calls the
showBooks()function, which you haven't created yet, passing theselectedIndexproperty of the ComboBox. The number is zero-based, so it will tell you exactly which<author>element has been selected from the data provider.You find the ComboBox control using the
currentTargetproperty of the event passed with thechangeHandler()function. You could also use the ActionScript expressionauthor_cbo.selectedIndexto achieve the same result.The next step is to create the s
howBooks()function. Remember that it receives the selected index in the ComboBox from thechangeHandler()function. Add theshowBooks()function to the bottom of theactionslayer.function showBooks(authorIndex:int):void{ bookList = new XML(authorsXML..author[authorIndex].books); books_list.dataProvider = new DataProvider(bookList); XML_txt.text = bookList.toXMLString(); }The
showBooks()function starts by identifying the list of all of the selected author's books using the E4X expressionauthorsXML..author[authorIndex].books. In other words, find any<author>descendants with the same index as the selected index of the ComboBox and return all of that author's books.The function creates a new XML object and populates it with the
XMLListreturned from the E4X expression. You can assign the value in this way because the E4X expression returns anXMLListcontaining a single element,<author>, which becomes the root element of the newXMLobject.The
showBooks()function sets the new XML object as thedataProviderproperty for the List component, by creating a newDataProviderobject. It finishes by displaying the XML object in the TextArea so you can check what has been returned.The last task is to display the name of the book in the List control. If you tested the movie now, you would see the correct number of items in the List control, but there wouldn't be any associated labels—only blank lines would appear.


You need to add a label function for the List to the initApp() function, at the bottom of the actions layer, as follows:
books_list.labelFunction = getBookName;
This label function is named getBookName(). It works in the same way as the getFullName() function described earlier.
function getBookName(item:Object):String {
return item.bookName;
}I've included the complete code from the actions layer next. I've removed the XML content except for the first and last lines for brevity. In your version, you should see the entire XML object.
import fl.data.DataProvider;
var authorsXML:XML;
var authorList:XML;
var bookList:XML;
initApp();
stop();
function initApp():void {
authorsXML = <allAuthors>
//remaining XML content appears between these lines
</allAuthors>;XML_txt.text = authorsXML.toXMLString();
authorList = new XML(authorsXML.authors);
author_cbo.dataProvider = new DataProvider(authorList);
author_cbo.labelFunction = getFullName;
author_cbo.addEventListener(Event.CHANGE, changeHandler);
books_list.labelFunction = getBookName;
}
function getFullName(item:Object):String{
return item.authorFirstName + " " + item.authorLastName;
}
function getBookName(item:Object):String {
return item.bookName;
}
function changeHandler(e:Event):void {
showBooks(e.currentTarget.selectedIndex);
}
function showBooks(authorIndex:int):void{
  bookList = new XML(authorsXML..author[authorIndex].books);
  books_list.dataProvider = new DataProvider(bookList);
  XML_txt.text = bookList.toXMLString();
}Test the SWF file now. Choose an author from the ComboBox, and you should see the List component populate with the book titles from that author, as shown in Figure 4-4.

In this example, you used a static XML object to populate a ComboBox control and a List control. As I mentioned earlier, you would normally load this content from an external file, and I'll show you that approach in the next chapter.
You can find the completed file saved as authorExample.fla with the other chapter resources. If you're feeling adventurous, you may want to extend the example by displaying the year of publication and book cost as well. You may also wish to add some styling to improve the appearance of the interface!
Let's see how we might approach the same application in Flex.
For the Flex version of this example, some useful tools are available. You can use data binding with E4X expressions to update the content of your controls automatically. You have access to the XMLListCollection class for use in your bindings. It's also possible to set the external XML document as the source for the <mx:XML> element, instead of including all of the content within the application file.
This example uses a class-based approach. Creating custom classes allows you to create reusable code that you can access in other applications. Again, you'll display the author names in a ComboBox and show their book titles in a List control.
Create a new Flex project with a single application file. I called the application file
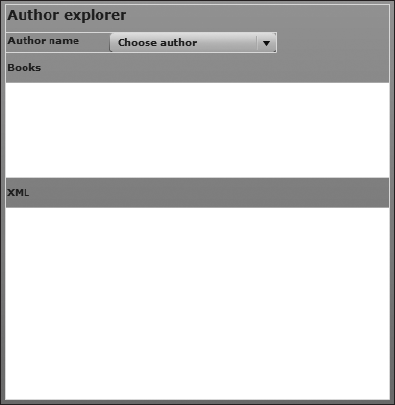
AuthorExample.mxml. Add an assets folder and copy theauthorMoreDetails.xmlfile there.Create the interface shown in Figure 4-5.
The interface includes the same elements as in the Flash example. The declarative code follows. Even if you choose a different layout for the interface, use the same component id properties to ensure that the code works correctly.
<?xml version="1.0" encoding="utf-8"?>
<mx:Application xmlns:mx="http://www.adobe.com/2006/mxml"
  layout="absolute">
  <mx:VBox x="10" y="10">
    <mx:Label text="Author explorer" fontWeight="bold"
      fontSize="14"/>
    <mx:HBox>
      <mx:Label text="Author name" width="100" fontWeight="bold"/>
<mx:ComboBox id="author_cbo" prompt="Choose author"
      width="175"/>
    </mx:HBox>
  <mx:Label text="Books" fontWeight="bold"/>
  <mx:List width="400" height="100"  id="books_list"/>
  <mx:Label text="XML" fontWeight="bold"/>
    <mx:TextArea id="XML_txt" width="400" height="200"/>
  </mx:VBox>
</mx:Application>
You need to add the XML content to the application. Add an
<mx:XML>element above the interface elements with the source property set to theassets/authorMoreDetails.xmlfile, as follows:<mx:XML id="authorsXML" source="assets/authorMoreDetails.xml"/>
Note
Remember that the application doesn't reference this XML document at runtime. The content is added to the compiled SWF file, which means that you can't update the XML document and expect the application interface to update as well. You'll need to recompile the SWF application each time you change the external document. As I mentioned previously, we'll look at more dynamic approaches in the next chapter.
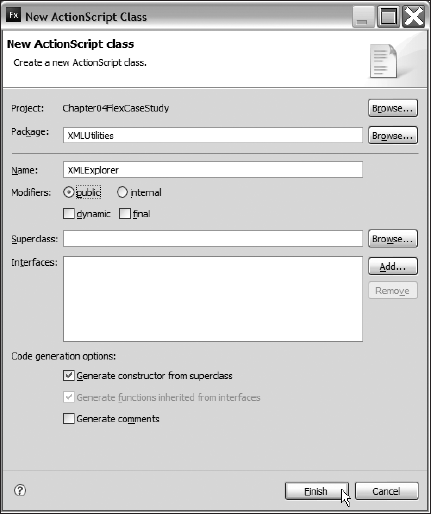
Add a class to process the content coming from the XML document. To do this, create a new class called
XMLExplorerusing the commandFile
Once created, the file will automatically contain the following ActionScript:
package XMLUtilities {
  public class XMLExplorer {
    public function XMLExplorer() {
    }
  }
}
Don't worry if the arrangement of curly braces is slightly different in your class file.
You need to add some private variables to the class file. Start by adding the following variables after the second line, inside the class definition line:
private var XMLContent:XML;
private var currXMLString:String;
private var authorXML:XMLList;
private var authorList:XMLListCollection;
The XMLContent object will reference the entire XML document referred to in the
authorsXMLelement. ThecurrXMLStringvariable will provide the content for display in the TextArea. TheauthorXMLobject will contain theXMLListof all authors, and theauthorsListis theXMLListCollectionassociated with theseauthors. You'll bind to theXMLListCollectionobject, rather than to theXMLListobject, because theXMLListobject doesn't support binding.The constructor method
XMLExplorer() must be modified. The method will receive the XML content as a parameter and will set the initial values of two of the variables you created in the previous step.public function XMLExplorer(xmlDoc:XML) { XMLContent = xmlDoc; currXMLString = XMLContent.toXMLString(); }The constructor method assigns the passed-in XML object to the
XMLContentobject. It uses thetoXMLString()method of the XML object to store the string representation in the variablecurrXMLString.The class will need two public methods:
currentXML(), which returns the currentXMLStringvariable for debugging purposes, andallAuthors(), which returns anXMLListCollectionof all<author>elements. Add these methods now.public function currentXML():String { return currXMLString; } public function allAuthors():XMLListCollection { authorXML = XMLContent..author; authorList = new XMLListCollection(authorXML); currXMLString = authorXML.toXMLString(); return authorList; }The
currentXML()method is self-explanatory. It returns the value of thecurrXMLStringvariable for debugging purposes.The
allAuthors()method starts by locating the<author>descendants of theXMLContentobject using the E4X expressionXMLContent..author. The method assigns the returnedXMLListto the objectauthorXML. The next line uses thisXMLListto create theauthorList XMLListCollectionobject. The method also sets thecurrXMLStringvariable to the string representation of all<author>elements.Adding the reference to the
XMLListCollectionobject should add animportstatement for that class, but if it doesn't, you may need to add the following line yourself:import mx.collections.XMLListCollection;
The complete class file follows:
package XMLUtilities {
  import mx.collections.XMLListCollection;
  public class XMLExplorer {
    private var XMLContent:XML;
    private var currXMLString:String;
    private var authorXML:XMLList;
    private var authorList:XMLListCollection;
    public function XMLExplorer(xmlDoc:XML) {
      XMLContent = xmlDoc;
      currXMLString = XMLContent.toXMLString();
    }
    public function currentXML():String {
      return currXMLString;
    }
    public function allAuthors():XMLListCollection {
      authorXML = XMLContent..author;
      authorList = new XMLListCollection(authorXML);
      currXMLString = authorXML.toXMLString();
      return authorList;
    }
  }
}
Switch back to the MXML application and add an
<mx:Script>block underneath the opening<mx:Application>element. Add the following code:<mx:Script> <![CDATA[ import mx.events.FlexEvent; import XMLUtilities.XMLExplorer; [Bindable] private var myXMLExplorer:XMLExplorer; private function initApp(e:FlexEvent):void { myXMLExplorer = new XMLExplorer(authorsXML); } ]]> </mx:Script>This code block
startsby importing theFlexEventclass, which you'll need because the code calls theinitApp()function in thecreationCompleteevent of the application. The code also imports the custom class you just created,XMLUtilities.XMLExplorer.The code declares a bindable variable called
myXMLExplorer, which is of the typeXMLExplorer. It also creates theinitApp()function. This function creates the newXMLExplorerobject, passing theauthorsXMLobject as an argument.You need to call the
initApp()function when the application finishes creating the interface. Add the following attribute, shown in bold, to the opening<mx:Application>element:<mx:Application xmlns:mx="http://www.adobe.com/2006/mxml" layout="absolute"
creationComplete="initApp(event)">When the application finishes creating the interface, it calls the
initApp()function, passing aFlexEvent. You won't use thisFlexEventin theinitApp()function, but it is good practice to recognize that the object is passed with the function call.Bind the ComboBox control to the
XMLListCollectioncreated by the class file. You can access the object with a call to the public methodallAuthors(). The code handles this by setting thedataProviderattribute for the ComboBox to the bound expression{myXMLExplorer. allAuthors()}. The data provider will provide access to all child elements of each<author>element.You also need to specify a label function so you can determine what to display as the label for the ComboBox. Call this function
getFullName(), as in the previous example. Modify the<mx:ComboBox>element as shown here in bold:<mx:ComboBox id="author_cbo" prompt="Choose author" width="175"
dataProvider="{myXMLExplorer.allAuthors()}"labelFunction="getFullName"/>Before testing this application, you need to add the
getFullName()function to the<mx:Script>block. The function follows:private function getFullName(item:Object):String{ return item.authorFirstName + " " + item.authorLastName; }This function receives an
itemobject as an argument. This object represents the data item from thedataProviderbehind the current row in the ComboBox. This data item is one of theXMLListCollectionentries, and it contains the<authorFirstName>and<authorLastName>elements. The function returns aStringmade up the<authorFirstName>element, a space, and the<authorLastName>element.You'll bind the TextArea to the value of the
currXMLStringin the class file by calling thecurrentXML()method. I've included this in the example so you can see what's going on with the XML content from the authorsXML object. Modify the<mx:TextArea>element as shown here in bold:<mx:TextArea id="XML_txt" width="400" height="200"
text="{myXMLExplorer.currentXML()}"/>Test the application. Figure 4-7 shows how the interface should appear. The
ComboBoxis populated with author names, and theTextAreashows the complete XML content from the<mx:XML>element.At the moment, nothing happens when you choose an author from the ComboBox. The application needs to respond when the selected item changes in the ComboBox control. It must find the books associated with the selected author.
To achieve this outcome, you'll bind the data provider for the List control to an E4X expression that finds the
<bookName>element from theComboBoxdata provider. Remember that the ComboBox provides access to all child elements, including the<bookName>element.Modify the List control as shown here in bold:
<mx:List width="400" height="100" id="books_list"
  dataProvider="{author_cbo.selectedItem..book.bookName}"/>
The E4X expression
author_cbo.selectedItem..book.bookNamereturns anXMLListof all<bookName>elements. The expressionauthor_cbo.selectedItemreferences theXMLListitem associated with the chosen author<element>. From there, the E4X expression finds the<book>descendant and returns the <bookName>element. You'll be able to follow this path more easily once you display the XML content in the TextArea control.The final step is to display the XML details of the author in the
TextArea. Modify the<mx:ComboBox>as shown here in bold:<mx:ComboBox id="author_cbo" prompt="Choose author" width="175" dataProvider="{myXMLExplorer.allAuthors()}" labelFunction="getFullName"change="XML_txt.text=author_cbo.selectedItem.toXMLString()"/>The
changeattribute sets the text property of theXML_txtcontrol to the value of theselectedItemfrom the ComboBox. You'll be able to see theXMLListassociated with the selected<author>element in the TextArea.Test the application again. You should be able to select an
authorto see the list of books written by that author. Figure 4-8 shows the finished result.

In this example, you used an <mx:XML> object with an external file to populate a ComboBox and List control. You were able to display the correct data by using data binding with E4X expressions. This Flex example provides the same functionality as the Flash example you saw earlier. You can find the completed resource files for this example saved as AuthorExample.mxml and XMLExplorer.as.
In this chapter, you've seen how to use a variety of E4X expressions to locate content in an XML object. You saw how to use the dot (.), attribute (@), descendants (..), and wildcard (*) operators. You also learned about the many different ways to filter the XML content, as well as how to assign and add values. We finished the chapter by looking at an example in both Flash and Flex.
So far in this book, we've used XML content loaded directly into an application. That's not a very flexible approach. In the next chapter, you'll see how to load an external XML document into both Flash and Flex.