Chapter 1. Full Stack Development in the Era of Serverless Computing
When people think about cloud computing they typically have associated it with back-end development and DevOps. This has started to change over the past few years. With the rise of functions as a service (FaaS) combined with powerful abstractions in the form of managed services, cloud providers have lowered the barrier to entry for both developers new to cloud computing as well as traditionally front-end developers.
Using modern tools & methodologies like AWS Amplify, Firebase, and the JAMStack (among others) a single developer can leverage their existing skill set and knowledge of a single framework and ecosystem (like JavaScript) to build scalable applications complete with all of the features that would in the past have required teams of highly skilled back-end and DevOps engineers to build and maintain.
This book is focused on bridging the gap between front end and back end development by taking advantage of this new generation of tools and services using the Amplify Framework. You’ll learn how to build scalable applications in the cloud directly from your front end environment using the Amplify CLI. You’ll create and interact with various APIs and services from AWS ranging from authentication using Amazon Cognito, cloud storage using Amazon S3, APIs using Amazon API Gateway and AWS AppSync, and databases using Amazon DynamoDB.
By the end of this book you will understand how to build real-world full stack applications in the cloud leveraging AWS services on the back end and React on the front end. You’ll also be using modern APIs from React like hooks and functional components as well as React Context for global state management.
Modern Serverless Philosophy
When people talk about serverless they often associate the term with “functions as a service”. Though you will find many people with varying definitions of what serverless is, the term has recently grown to encompass more of a philosophy than a shared definition.
Many times when people talk about serverless they are really talking about how to most efficiently deliver business value with a focus on writing business logic instead of coding supporting infrastructure for your business logic. Adopting a serverless mindset allows you to do this by consciously going out of your way to find and leverage FaaS, managed services, and smart abstractions while only building custom solutions if an existing service just doesn’t yet exist.
More and more companies and developers are taking this approach as it just doesn’t make sense to reinvent the wheel if something out there already exists and can be utilized. With more companies and developers taking this approach you are also seeing an explosion of services and tools being made available from startups and cloud providers to provide offerings that abstract away back end complexity.
If you want an academic take on what serverless means you may be interested in the Berkeley paper from February 10, 2019 titled “Cloud Programming Simplified: A Berkeley View on Serverless Computing"[1]. In this paper they expanded the definition of serverless and said “While cloud functions—packaged as FaaS (Function as a Service) offerings—represent the core of serverless computing, cloud platforms also provide specialized serverless frameworks that cater to specific application requirements as BaaS (Backend as a Service) offerings. Put simply, serverless computing = FaaS + BaaS.”.
These Backends as a Service (BaaS) typically refer to managed services like databases (Firestore, DynamoDB), authentication services (Auth0, Amazon Cognito), & artificial intelligence services (Amazon Rekognition, Amazon Comprehend) among other things.
Berkeley’s redefinition of what serverless means underscores what you are seeing in the broader spectrum of this discussion as cloud providers begin to build more and better managed services and put them in this bucket of serverless.
Characteristics of a Serverless Application.
Now that you understand some philosophy around the term serverless, what are some characteristics of a serverless application? Without a shared definition of serverless you may get varying answers, but here are some traits and characteristics that are generally agreed upon by the industry.
Decreased operational responsibilities
Serverless architectures typically allow you to shift more of your operational responsibilities to a cloud provider or third party.
When you decide to implement FaaS, the only thing you should have to worry about is the code running in your function. All of the server patching, updating, maintaining, and upgrading is no longer your responsibility. This goes back to the core of what cloud computing and by extension serverless attempts to offer—a way to spend less time managing infrastructure and spend more time building features and delivering business value.
Heavy use of managed services
When leveraging managed services, the services usually assume responsibility for providing a defined set of services and are serverless in the sense that they do not require any server operations, scale seamlessly, and require no need to manage uptime but most importantly they are essentially codeless.
Benefits of a Serverless Architecture
There are many ways to architect an application in this day and age. The decisions that are made early on can and will impact not only the application life cycle, but also the development teams and ultimately the company or organization. In this book, I am advocating for and laying out ways to build your applications using serverless technologies and methodologies. But what are the advantages of building your application in this way, and why is serverless becoming so popular?
Scalable
One of the primary advantages of going serverless is out of the box scalability. When building your application you don’t have to worry about what would happen if your application becomes wildly popular and you onboard a large amount of new users, the cloud provider handles this for you.
The cloud provider automatically scales your application, running the code in response to each interaction. In a serverless function, your code runs in parallel and individually processes each trigger (in turn scaling with the size of the workload).
Not having to worry about scaling your servers and databases is indeed great. It’s one less thing you have to worry about when architecting your application.
Cost
Serverless architectures differ greatly in the pricing model from traditional cloud based or on premises infrastructure.
With the traditional approach you were often paying for computing resources whether or not they were being utilized. This meant that if you wanted to make sure your application would scale you needed to prepare for the largest workload you thought you might see regardless if it actually reached that amount. At the end of the day this traditional approach meant you are paying for unused resources the majority of the life of your application.
With serverless technologies, you pay only for what you use. With FaaS, you’re billed based on the number of requests for your functions and the the time it takes for your function code to execute. With managed services like Amazon Rekognition for example, you only get charged for the images processed, minutes of video processed, etc.., again only paying for what you use.
This allows you to build features and applications with essentially no up-front infrastructure costs. Only if your application begins seeing large adoption and scale do you begin to have to pay for the service.
The bill from your cloud provider is only one part of the total cost of your cloud infrastructure, there’s also the operations’ salaries. That cost decreases if you have fewer ops resources.
There’s also development costs. Building applications in this way facilitates a faster time to market, decreasing overall development time and therefore development cost.
Developer Velocity
With less features to build, developer velocity increases. Being able to spin up the types of features that are typical for most applications (databases, authentication, storage, APIs) quickly and with a much smaller up-front time investment allows you to more quickly get to writing the core functionality and business logic for the features that you want to deliver.
Experimentation
When you are not investing a lot of time building out repetitive features you are able to experiment more easily and with less risk.
When shipping a new feature you often assess the risk (time and money involved with building the feature) with the possible return on investment (ROI). As the risk involved with trying out new things goes down you are free to test out ideas that in the past may have not seen the light of day.
We are also enabled to a/b test different ideas much more easily.
Security and Stability
Because the services that you are subscribing to are the core competency of the service provider you are getting something that is much more polished and usually more secure than you could have built ourselves.
Imagine a company that’s core business model is focusing on delivering a pristine authentication service and has been iterating on it for years, having dealt with and fixed issues for thousands of companies and customers.
Now, imagine trying to replicate a service like that within your own team or organization. While completely possible and feasible, chances are that choosing the service built and maintained by people who’s only job is to build and maintain that exact thing is a safer and more secure bet.
Another main focus of these service providers is to simply have the least amount of downtime possible. This means that they are taking on the burden of not only building, deploying, and maintaining these services, but also doing everything it they can to make sure that they are stable and do not go down.
Less Code
Most engineers will agree that at the end of the day code is a liability. The only thing that has value is the feature that the code delivers, not the code itself. When you find ways deliver these features while simultaneously limiting the amount of code you have to maintain, and even doing away with the code completely, you are reducing overall complexity in your application.
With less complexity comes less bugs, easier onboarding for new engineers, and overall less cognitive load for those maintaining and adding new features.
A developer can hook into these services and implement features with no knowledge of the actual back-end implementation, and with little to no back-end code at all.
Different implementations of Serverless
Let’s take a look at the different ways that you can build serverless applications as well as some of the differences between them.
Serverless Framework
One of the first and most popular serverless frameworks is the Serverless Framework. The Serverless Framework is a free and open-source framework, launched in October 2015 originally under the name JAWS, and written using Node.js.
At first the Serverless Framework only supported AWS, but then adding support for cloud providers like Google and Microsoft Azure among others.
The Serverless Framework utilizes a combination of a configuration file (serverless.yml), CLI, and function code to provide a nice experience for people wanting to deploy serverless functions to the cloud from a local environment.
When getting up and running with the Serverless Framework there can be a somewhat steep learning curve especially for developers new to cloud computing. There is a lot of terminology to know and a lot to understanding of how the cloud services work needed in order to build anything more than just a “Hello World” application.
Overall the Serverless Framework is a good option if your managing and working with a large number of cloud functions and are looking for something that doesn’t just work with AWS.
AWS SAM (AWS Serverless Application Model)
The AWS Serverless Application Model (AWS SAM) is an open-source framework, built and maintained by AWS and the community, that was released on Nov 18, 2016. This framework only supports AWS.
SAM allows you to build serverless applications by defining the API Gateway APIs, AWS Lambda functions, and Amazon DynamoDB tables needed by your serverless application in YAML files. It uses of a combination of YAML configuration, function code, and a CLI to create, manage and deploy serverless applications.
One advantage of SAM is that it is an extension of CloudFormation which is very powerful and allows you to do almost anything in AWS. This can also be a disadvantage to developers new to cloud computing and not familiar with AWS services, permissions, roles, and terminology.
SAM is a good choice if you are familiar with AWS and are only deploying your serverless applications to AWS.
Amplify Framework
The Amplify Framework is a combination of 4 things: CLI, client library, tool-chain, and hosting platform. The focus of Amplify is to provide an easy way for developers to build and deploy full stack web and mobile applications that leverage the cloud.
Amplify not only enables features like serverless functions and authentication, but also GraphQL APIs, machine learning, storage, analytics, push notifications, and more. Amplify provides an easy entry-point into the cloud by doing away with terminology and acronyms that may be unfamiliar to newcomers to AWS by using a category name approach for referring to services. Instead of referring to the authentication service as Amazon Cognito it’s referred to as auth and the framework just uses Amazon Cognito under the hood.
How do the 4 pieces fit together?
-
The CLI allows you to create, configure and deploy cloud services from your command line.
-
The Client library allows you to connect to and interact with the cloud services from your web or mobile application.
-
The tool-chain helps facilitate and speed development by doing things like generating code and serverless function boilerplates.
-
The hosting platform allows you to deploy your application to a live domain complete with atomic deployments, continuous integration, and continuous deployment.
Other Options
There are more and more companies providing abstractions over serverless functions, usually intending to improve the negative user experience traditionally associated with working directly with AWS Lambda.
A few other popular ones are Apex, Zeit Now, and Netlify Functions.
Many of these tools and frameworks still actually use AWS or some other cloud provider under the hood, so you are essentially going to be paying more in exchange for what they argue is a better user experience.
Most of these tools do not offer much of the other suite of services available from AWS or other cloud providers, things like authentication, AI and ML services, complex object storage, and analytics may not be part of their offerings.
If you are interested in seeing other ways of developing serverless applications, I would recommend checking these out.
Introduction to AWS
In this section I’ll give an overview of AWS and talk about why something like the Amplify Framework exists.
About AWS
AWS is a subsidiary of Amazon and the first company to provide on-demand cloud computing platforms to developers.
AWS first launched in 2004 with a single service - Amazon SQS (Simple Queue Service). Then, in 2006 they officially re-launched with a total of 3 services: Amazon SQS, Amazon S3, and Amazon EC2.
Since the launch, AWS has grown and remains the largest cloud computing provider in the world, continuing to add more services every year. AWS now offers over 100 services.
With the current state of cloud computing moving more and more towards serverless technologies, the barrier to entry is being lowered but it is still often tough for either a front end developer or someone new to cloud computing to get started.
With this new serverless paradigm, AWS saw an opportunity to create a framework that focused on enabling these traditionally front end developers and developers new to cloud computing to get started building cloud applications.
Full Stack Serverless on AWS
Full stack serverless is about providing developers with everything needed on both ends of the stack to accomplish their objective of building scalable applications as quickly as possible. In this chapter, we’re going to look at how you can build applications in this way using AWS tools and services.
Amplify CLI
For someone just getting started with AWS, the sheer amount of services can be overwhelming. In addition to the large amount of services to sort between, each service sometimes can have its own steep learning curve. To help ease this learning curve, AWS has created the Amplify CLI.
The Amplify CLI provides an easy entry-point for developers wanting to build applications on AWS. The CLI allows developers to create, configure, update, and delete cloud services directly from their front-end environment.
Instead of a “service-name” approach like the AWS Console and many other tools like Cloudformation, the CLI takes a “category-name” approach. AWS has many service names that can be confusing to new developers; for example Amazon S3, Amazon Cognito, and Amazon Pinpoint. Instead of using the service names to create and configure these services, the CLI uses names like storage (Amazon S3), auth (Amazon Cognito), and analytics (Amazon Pinpoint) to instead give you a way to understand what the service actually does vs the service name itself.
The CLI has a host of commands that allow you not only create—but also update, configure, and remove services without having to leave your front-end environment. You can also spin up and deploy new environments using the CLI in order to test out new features without affecting the main environment.
Once you’ve created and deployed features using the CLI, you can then use the Amplify client libraries to begin interacting with the services from your client-side application.
Amplify Client
Building full stack applications requires a combination of both client-side tooling and back end services. In the past, the main way to interact with AWS services was using one of the AWS SDKs (Java, .NET, Node.js, Python, etc..). These SDKs work great, but none of them are particularly well-suited for client-side development. Before Amplify there was no easy way to build client-side applications using AWS. If you look at the documentation for the AWS Node.js SDK you’ll also notice that it is steep learning curve for developers new to AWS.
The Amplify Client is a library made especially to provide an easy to use API for JavaScript applications that need to interact with AWS services.
The approach that the Amplify Client takes is to provide a higher level of abstraction and bake in best practices to provide a declarative, easy to use API while still giving you full control over the interactions with your back end. It’s also built especially for the client in mind, with features like websocket and GraphQL subscription support. It utilizes localStorage for the browser and AsyncStorage for React Native to store security Tokens like IdTokens and AccessTokens to persist user authentication.
Amplify also has support for popular front end and mobile frameworks including React, React Native, Vue, Angular, Ionic, Native Android, and Native iOS. These framework-specific components allow you to quickly get up and running with common features like authentication and complex object storage and retrieval without having to build out the front-end UI and deal with state.
The Amplify framework does not support the entire suite of AWS services; instead it supports a subset of them with almost all of them falling into the category of serverless. Using Amplify, it wouldn’t make much sense to offer support for interacting with with EC2 but it makes a lot of sense to offer robust support for working with serverless functions and APIs.
With Amplify they have created an end-to end solution to fill a gap that previously was not filled, and in doing so created a new way to build full stack applications that has never really been seen before.
AWS AppSync
AWS AppSync is a managed API layer that uses GraphQL to make it easy for applications to interact with any data source, REST API, or microservice.
One of the most important parts of an application is the API layer. Modern applications typically interact with a large number of back end services and APIs; things like databases, managed services, third party APIs and storage solutions among others. This is usually referred to as a microservice architecture, when a large application is built using a combination of modular components or services.
One challenge with working with a microservice architecture is that most of the services and APIs will have varying implementation details. This leads to inconsistent and sometimes messy code as well as more cognitive load on the front end developers that are making requests to these APIs.
One good approach to working with a microservice architecture is to provide a consistent API gateway layer that then takes all of the requests and forwards them on to the back end services. This allows a consistent interaction layer for your client to interact with, making development easier on the front end.
GraphQL, a technology created and open-sourced by Facebook, offers an especially good abstraction for creating an API gateway. GraphQL introduces a defined and consistent specification for interacting with APIs in the form of three operations: Queries (reads), Mutations(writes / updates), and Subscriptions(real-time data). These operations are defined as part of a main Schema that also provides a contract between the client and the server in the form of GraphQL Types.
GraphQL operations are not bound to any specific data source so you as a developer are free to use them to interact with anything from a database to an HTTP endpoint or microservice to even a serverless function.
Typically when building a GraphQL API you need to deal with building, deploying, maintaining, and configuring your own API. With AWS AppSync, you can instead offload the server management as well as the security to AWS.
Modern applications also have concerns such as real-time data and offline support. Another benefit of AppSync is that it has built-in support for offline (AWS AppSync GraphQL Client) as well as real-time(GraphQL subscriptions) to enable developers to build these types of applications.
In this book, you will be using AWS AppSync along with various data sources (like DynamoDB for NoSQL and AWS Lambda for serverless functions) as the main API layer.
Introduction to the AWS Amplify CLI
The Amplify CLI is what you will be using throughout this book to create and manage your cloud services. To learn how the it works, you’ll be creating and deploying a service using the CLI in this section. Once the service is deployed you’ll also learn how to remove it and then delete any backend resources associated with the deployment. Let’s take a look at how you can create your first service.
Installing and configuring the CLI
To get started, you first need to install and configure the Amplify CLI.
To use the CLI, you first need to have Node.js version 8.x or greater and npm version 5.x or greater installed on your machine. To install node.js, I recommend either visiting https://nodejs.org/en/ and following the installation instructions or using NVM (Node Version Manager) at https://github.com/nvm-sh/nvm.
~ npm install -g @aws-amplify/cli
After the CLI has been installed, you next need to configure it with an IAM user in your AWS account. To do so, you’ll configure the CLI with a reference to a set of user credentials (access key ID & secret access key). Using these credentials, you’ll be able to create AWS services on behalf of this user directly from the CLI.
To create a new user and configure the CLI, you’ll run the configure command:
~ amplify configure
This will walk you through the following steps:
-
Specify the AWS Region
(This will allow you to choose the region in which you’d like to create your user and by extension, the services associated with this user). *Choose the region closest to you or a preferred region.*
-
user name
This name will be the local reference of the user that you will be creating in your AWS account. I would suggest using a name that you will be able to later recognize when referencing it. A suggestion would be something like amplify-cli-us-east-1-user or *mycompany-cli-admin*
Once you enter your name, the CLI will open up the AWS IAM dashboard. From here, you can press accept the defaults by clicking Next: Permissions, Next: Tags, Next: Review, and Create user to create the IAM user.
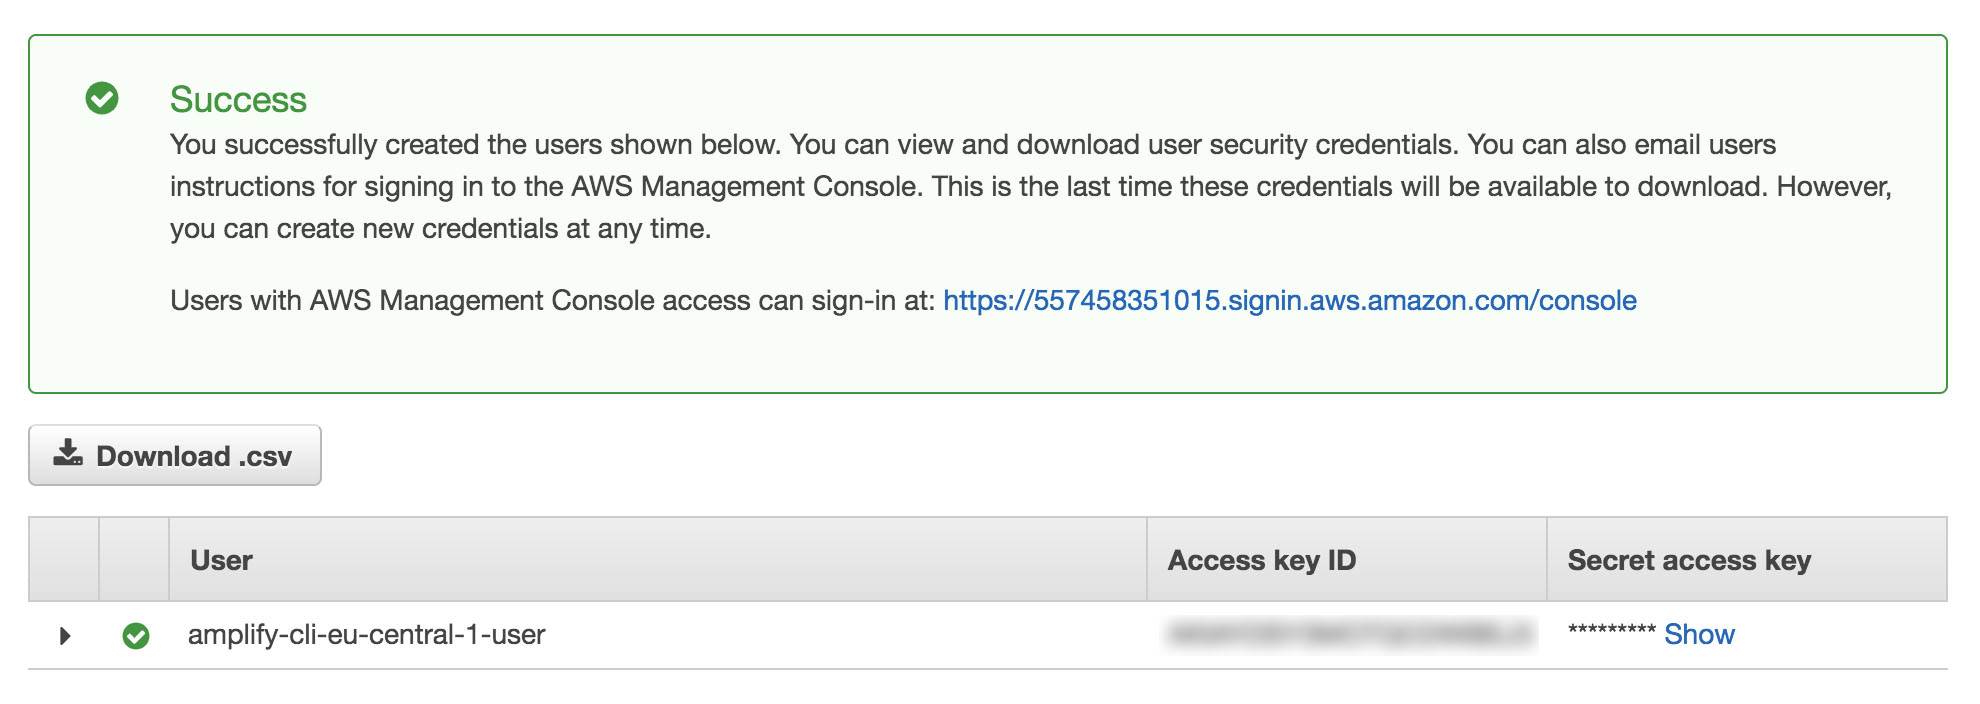
Figure 1-1. AWS IAM Dashboard
In the next screen, you will be given the IAM user credentials: Access key ID and secret access key.
Back in the CLI, paste in the values for accessKeyID and secretAccessKey. Now, you’ve successfully configured the CLI and you can begin creating new services.
Initializing your first Amplify Project
Now that the CLI has been installed and configured you can create your first project. This step is usually done within the root of your client application. Since you will be using React for most of this book, let’s start by initializing a new React project:
npx create-react-app amplify-app# after creating the React app, change into the new directorycdamplify-app
Now you need to install the Amplify that you’ll be using on the client. The libraries you’ll be using are AWS Amplify and AWS Amplify React for the React-specific components:
npm install aws-amplify aws-amplify-react
Now, you can create an Amplify project. To do so, you’ll run the init command:
~ amplify init
This will walk you through the following steps:
-
Enter a name for the project **This will be the local name for the project, usually something that describes what the project is or what it does.
-
Enter a name for the environment **This will be a reference to the initial environment that you will be working in. Typical environments in this workflow could be something like dev, local, prod, byt could be anything that makes sense to you.
-
Choose your default editor **This will set your editor preference. The CLI will later use this preference to open your text editor with files that are part of the current project.
-
Choose the type of app that you’re building *This will determine whether the CLI should configure build and run commands if you are using JavaScript. For this example, choose *javascript.
-
What javascript framework are you using *This will determine a few base build and start commands. For this example, choose *react.
-
Source Directory Path *This allows you to set the directory where your source code will live. For this example, choose *src._
-
Distribution Directory Path *For web projects this will be the folder containing the complied JavaScript source code as well as your favicon, html, & css files. For this example, choose *build.
-
Build Command *This specifies the command for compiling and bundling your JavaScript code. For this example, use *npm run-script build.
-
Start Command *This specifies the command to server your application locally. For this example, use *npm run-script start.
-
Do you want to use an AWS profile? *Here, choose *Y and pick the AWS profile you created when you ran
amplify configure.
Now, the Amplify CLI will initialize your new Amplify project. When the initialization in complete you will have two additional resources created for you in your project: A file called aws-exports located in the src directory and a folder called amplify located in your root directory.
The aws-exports file is a key-value pairing of the resource categories created for you by the CLI along with their credentials.
The amplify folder holds all of the code and configuration files for your local Amplify project. In this folder you’ll see two sub-folders: backend and #current-cloud-backend. The backend folder contains all of the local changes to your backend configurations and code–such as the GraphQL Schema for an AppSync API and the source code for serverless functions. The #current-cloud-backend holds holds the code and configurations that reflect what resources were deployed in the cloud with your last amplify push command. It helps the CLI diff between the configuration of the resources already provisioned in the cloud and what is currently in your local backend directory (which reflects your local changes).
Now that you’ve initialized your project, you can add your first cloud service - authentication.
Creating and deploying your first service
To create a new service you can use the add command from Amplify:
~ amplify add auth
This will walk you through the following steps:
-
Do you want to use the default authentication and security configuration?
This will give you the option of creating an authentication service using a default configuration (MFA on sign up, password on sign in), create an authentication configuration with social providers, or creating a completely custom authentication configuration. For this example, choose Default configuration to use the default configuration.
-
How do you want users to be able to sign in when using your Cognito User Pool?
This will allow you to specify the required sign in property. For this example, accept the default by choosing Username.
-
What attributes are required for signing up?
This will allow you to specify the required properties when signing up a new user. For this example, accept the default by choosing Email.
Now, you’ve successfully configured the authentication service and are now ready to deploy. To deploy the authentication service, you can run the push command:
~ amplify push
-
Are you sure you want to continue?
Y
After the deployment is complete, your authentication service has successfully been created. Congratulations, you’ve deployed your first feature. Now, let’s test it out!
There are a couple of ways to interact with the authentication service in a React application. You can either use the Auth class from Amplify that has over 30 methods available (methods like signUp, `signIn, signOut, etc..) or you can use the framework-specific withAuthenticator component available from AWS Amplify React that will scaffold out an entire authentication flow, complete with pre-configured UI. Let’s try out the withAuthenticator component.
The first thing you need to do is configure the React app to work with Amplify. To do so, open src/index.js and add the following code below the last import statement:
importAmplifyfrom'aws-amplify'importconfigfrom'./aws-exports'Amplify.configure(config)
Now, the app has been configured and you can begin interacting with the authentication service. Next, open src/App.js and update the file with the following code:
importReact,{useEffect}from'react'import{withAuthenticator}from'aws-amplify-react'functionApp(){return(<div><h1>HellofromAWSAmplify</h1></div>)}exportdefaultwithAuthenticator(App,{includeGreetings:true})
Now you can test it out by launching the app:
~npmstart
Now, your app should be launched with the pre-configured authentication flow in front of it:

Figure 1-2. WithAuthenticator HOC
Deleting the resources
Once you no longer need a feature or a project you can remove them using the CLI.
To remove an individual feature, you can run the remove command:
amplify remove auth
To delete an entire Amplify project along with all of the corresponding resources that have been deployed in your account, you can run the delete command:
amplify delete
Summary
Cloud computing is growing at a rapid pace, with more and more companies relying on the cloud for the majority of their workloads. With that growth in usage, it is becoming a more and more valuable skill set to have at your disposal.
The paradigm of serverless, a subset of cloud computing as a whole, is also rapidly growing as it offers all of the benefits of cloud computing while having the added benefits of automatic scaling and little to no maintenance.
Tools like the Amplify Framework are making it easier for developers of all backgrounds to get up and running with cloud as well as serverless computing. In the next chapters, you’ll learn how to build real-world applications in the cloud using serverless services and functions using the Amplify Framework.