Chapter 2. Getting Started with AWS Amplify
At the core of most applications is the data / API layer. This layer could look like many things. In the serverless world, this usually will be composed of a combination of an API endpoint and a serverless function. This serverless function could be doing some logic and returning data, interacting with a database of some kind, or even interacting with another API endpoint.
With Amplify there are 2 main ways of creating APIs:
-
A combination of Amazon API Gateway and a Lambda function
-
A GraphQL API connected to some type of data source (database, Lambda function, or HTTP endpoint)
API Gateway is an AWS service that allows you to create API endpoints and route them to different services, usually a Lambda function. In this chapter, you’ll learn how to create a Lambda function as well as an API Gateway endpoint and connect the two. When you make an API call, it will route the request through API Gateway, invoke the function, and return the response.
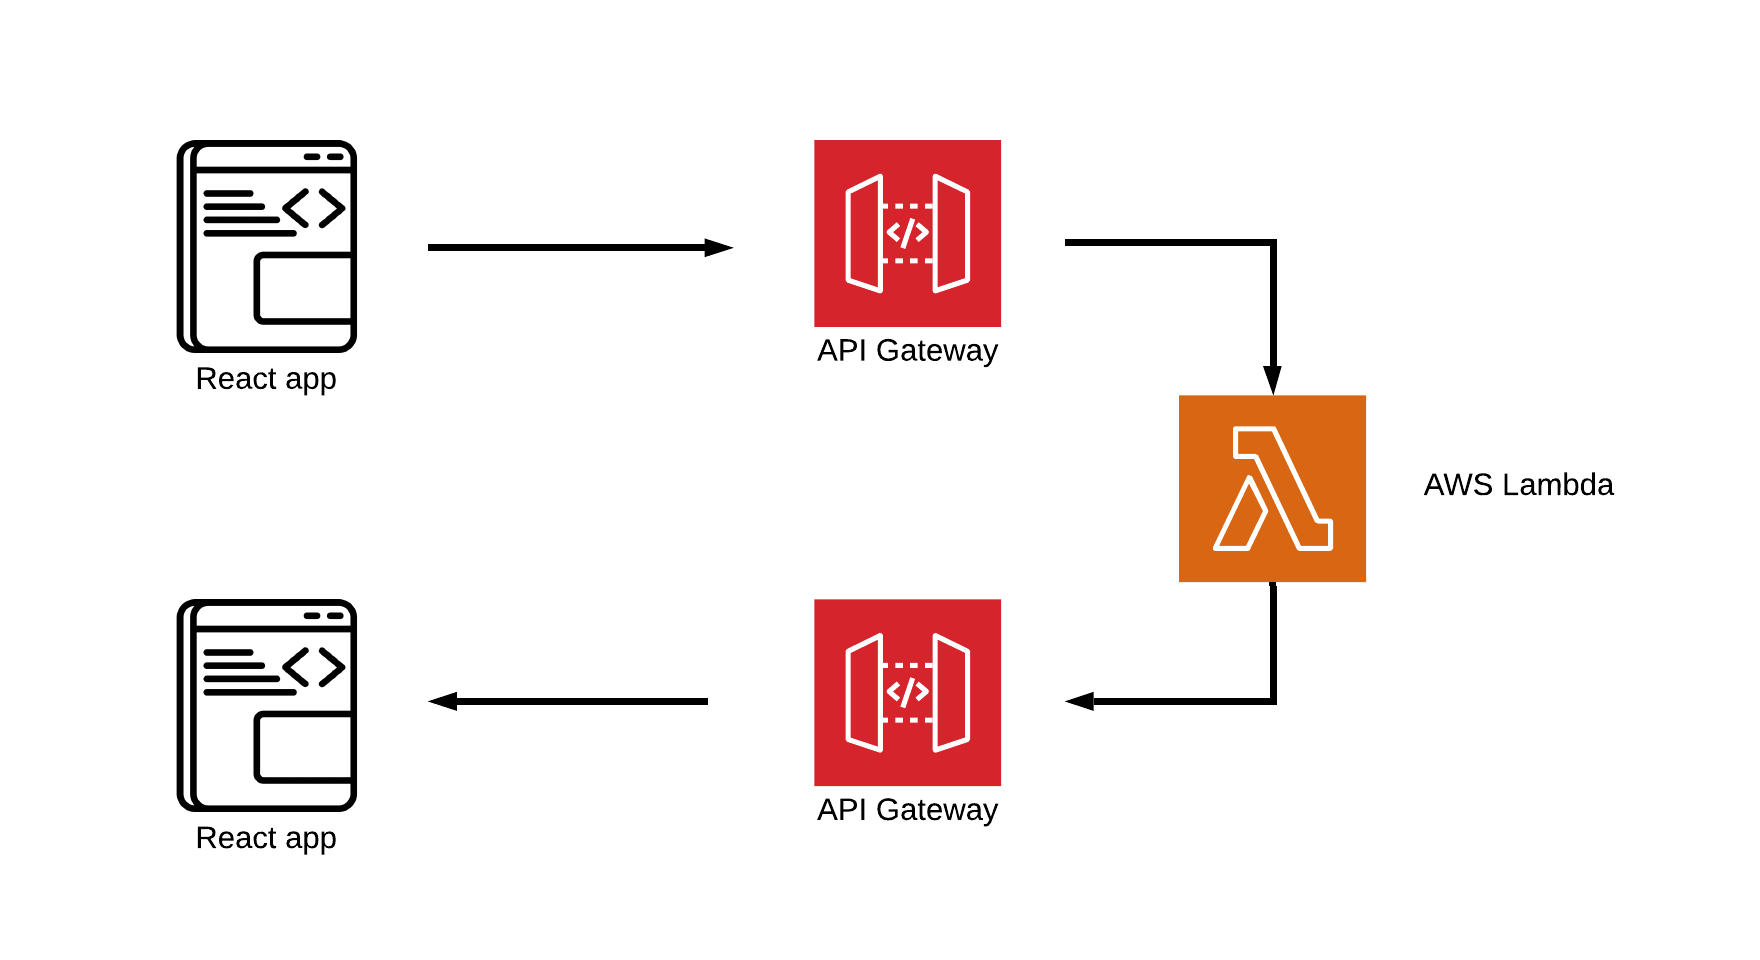
Figure 2-1. API with Lambda
Once your API is created you then need a way to interact with it. Using the Amplify client you will be able to send requests to the endpoint using the Amplify API class. The API class allows you to interact with both GraphQL APIs as well as API Gateway endpoints.
In this chapter, you’ll create your first full stack serverless app that will interact with a serverless function via an API Gateway endpoint.
At first the app will fetch a hard coded array of items from the function. You’ll then learn how to update the function to make an HTTP request to another API to retrieve data and return it to the client.
Creating and deploying a serverless function
At the core of many serverless applications are serverless functions. Serverless functions run your code in stateless compute containers that are event-driven, short-lived (may last for one invocation), and fully managed by the cloud provider of your choice. These functions scale seamlessly and do not require any server operations.
While most people associate serverless functions as being invoked or triggered by an API call, these functions can also be triggered by a variety of different events. In addition to HTTP requests, a few popular ways to invoke a serverless function are from an image upload to a storage service, a database operation (like create, update or delete), or even from another serverless function.
Serverless functions scale automatically, so there’s no need to worry about your application if you get a large spike in traffic. The first time you invoke a function, the service provide will create an instance of the function and runs its handler method to process the event. After the function finishes and returns a response, it will remain and process additional events if they come in. If another invocation happens while the first event is still processing, the service will then create another instance.
Serverless functions also have a payment model that is different than traditional infrastructure. With services like AWS Lambda, you only pay for what you use and are charged based on the number of requests for your functions and the time it takes for your code to execute. This is in contrast to provisioning and paying for infrastructure like servers regardless if they are being utilized.
Now that you know about serverless functions, let’s take a look at how you can build your serverless function and hook it up to an API that will invoke it from an HTTP request!
Creating the React application & installing the dependencies
To get started, you’ll first need to create the React application. To do so, you can use npx.
~ npx create-react-app amplify-react-app

~ cd amplify-react-app
You can also install the create-react-app CLI globally by running
npm install -g create-react-app
Next, you will need to install the dependencies. For this app, you’ll only need the AWS Amplify library:
~ npm install aws-amplify
After installing the dependencies you can now initialize a new Amplify project in the root of the React application:
~ amplify init
-
Enter a name for the project
cryptoapp
-
Enter a name for the environment
local
-
Choose your default editor
Set your editor preference.
-
Choose the type of app that you’re building
javascript
-
What javascript framework are you using
react
-
Source Directory Path
src
-
Distribution Directory Path
build
-
Build Command
npm run-script build
-
Start Command
npm run-script start
-
Do you want to use an AWS profile?
Here, choose Y and pick the AWS profile you created when you ran amplify configure.
Now, both the Amplify project and the React app have been successfully created and you can begin adding new features.
Creating a new serverless function with the Amplify CLI
The next step will be for us to create the serverless function that you will be using for this app. The app you are building in this chapter is a cryptocurrency app. At first, you will hard code an array of cryptocurrency information in the function and return it to the client. Later in this chapter you’ll update this function to call another API (CoinLore) and asynchronously fetch and return data.
To create the function run the following command:
~ amplify add function
-
Provide a friendly name for your resource to be used as a label for this category in the project:
cryptofunction
-
Provide the AWS Lambda function name:
cryptofunction
-
Choose the function template that you want to use:
Serverless express function (Integration with Amazon API Gateway)
-
Do you want to access other resources created in this project from your Lambda function?
No
-
Do you want to edit the local lambda function now?
No
If the function has successfully been created, you should see a message saying “Successfully added resource cryptofunction locally.” logged out to your terminal.
You should now see a new sub-folder located in the amplify directory at amplify/backend/function/cryptofunction.
Walking through the code
When you created this resource, a new folder in amplify/backend was created called function. Here, all of the functions created by the CLI will be stored. For now, you only have a single function called cryptofunction.
In this cryptofunction folder you will see a couple of configuration files as well as an src directory where the main function code is located.
Serverless functions are essentially just encapsulated applications running on their own. Because the function you created is in JavaScript, you’ll see that there are all of the things you’d typically see in any JavaScript application including a package.json and an index.js file.
Next have a look at the function entry point located at src/index.js, in the cryptofunction folder. In this file you’ll see that there is a function called exports.handler. This is the entry point for the function invocation. When the function is invoked, this is the code that is run.
You can handle the event directly in this function but since you will be working with an API, a more useful way to handle the event is to proxy the path into an express app with routing (i.e. _http://yourapi/<somepath>). Doing this you can have multiple routes in your function as well as multiple HTTP request methods like get, put, post, and delete. The serverless express framework provides an easy way to do this and has been built into the function boilerplate for you.
In index.js you will see a line of code that looks like this:
awsServerlessExpress.proxy(server, event, context);
This line of code is where the event, context and path are proxied to the express server running in app.js.
In app.js you will then be able to create HTTP request methods on whatever routes you create for your API, this example being a /coins route to fetch cryptocurrency.
app.get('/someroute', function(req, res) {
  res.json({
    data: 'hello world'
  });
});
Creating the coins route
Now that you have had a look at how the application is structured, let’s create a new route in app.js and return some data from it. The route that you will be creating is a /coins route. This route will be returning an object containing a coins array.
Now, let’s add the new route. Before the first app.get('/items') route, add the following code:
// amplify/backend/function/cryptofunction/src/app.js

app.get('/coins', function(req, res) {
  const coins = [
    { name: 'Bitcoin', symbol: 'BTC', price_usd: "10000" },
    { name: 'Ethereum', symbol: 'ETH', price_usd: "400" },
    { name: 'Litecoin', symbol: 'LTC', price_usd: "150" }
  ]
  res.json({
    coins
  })
})
This new route has a hard coded array of cryptocurrency information. When the function is invoked with this route, it will respond with an object containing a single property named coins that will contain the coins array.
Invoking the function locally
Now that you have created and updated the function with the new route, you can test it out. To do so, you can use the Amplify CLI invoke command.
From the root of the project, run the following command in your terminal:
amplify function invoke cryptofunction
-
Provide the name of the script file that contains your handler function:
index.js
-
Provide the name of the handler function to invoke:
handler
Once the function is invoked, there will be an express server running on localhost:3000.
Note
If you would like to change the port number, the port is configured at the bottom of cryptofunction/src/app.js.
Now that the server is running, you can send requests to it either using curl or a tool like Postman:
curl localhost:3000/coins
The curl request should return the data configured in the route for /coins.
Adding the API
Now that the function is created and configured, let’s put an API in front of it so you can trigger it with an HTTP request.
To do this, you will be using the AWS API Gateway service. API Gateway is a fully managed service that enables developers to create, publish, maintain, monitor, and secure REST and WebSocket APIs. API Gateway is one of the services supported by both the Amplify CLI as well as the Amplify client library.
In this section you’ll create a new API Gateway endpoint and configure it to invoke the Lambda function you created in the previous section.
Creating a new API
To create the API, you can use the Amplify add command. From the root of the project, run the following command in your terminal:
~ amplify add api
-
Please select from one of the below mentioned services
REST
-
Provide a friendly name for your resource to be used as a label for this category in the project:
cryptoapi
-
Provide a path (e.g., /items)
/coins
-
Choose a Lambda source
Use a Lambda function already added in the current Amplify project
-
Restrict API access
n
-
Do you want to add another path?
n
Deploying the API and the Lambda function
Now that the function and API have both been created, you need to deploy them to your account to make them live. To do so, you can run the Amplify push command:
~ amplify push
-
Are you sure you want to continue?
Y
Once the deployment has successfully completed, the services are live and available to use.
The Amplify CLI has a command called status that can be used at any time to see the current status of the project. The status command will list out all of the currently configured services in your project and give you the status of each of them:
 ~ amplify status


Current Environment: local

| Category | Resource name  | Operation | Provider plugin   |
| -------- | -------------- | --------- | ----------------- |
| Function | cryptofunction | No Change | awscloudformation |
| Api      | cryptoapi      | No Change | awscloudformation |
The main thing to notice in the status output is the Operation. The Operation tells you what will happen the next time push is run in the project. The Operation property will be set to either Create, Update, Delete, or No Change.
Interacting with the new API
Now that the resources have been deployed you can begin interacting with the API from the React application.
Configuring a client app to work with Amplify
To use the Amplify client library in any application, there is a base configuration that needs to be set up, usually at the root level. When you created the resources, the CLI populates the aws-exports.js file with information about your resources. You will use this file to configure the client application to work with Amplify.
To configure the app, open src/index.js and add the following below the last import:
import Amplify from 'aws-amplify'
import config from './aws-exports'
Amplify.configure(config)
The Amplify client API category
After the client application has been configured, you can begin interacting with your resources.
The Amplify client library has various API categories that can be imported and used for various functionality, including Auth for authentication, Storage for storing items in S3, and API for interacting with REST and GraphQL APIs.
In this section, you will be working with the API category. API has various methods available including API.get, API.post, API.put, API.del, for interacting with REST APIs and API.graphql for interacting with GraphQL APIs.
API takes in 3 arguments:
API.get(apiName: any, path: any, init?: any)
-
apiName: The name given when you create the API from the command line. In our example, this value would becryptoapi. -
path: The path that you would like to interact with. In our example, we created/coinsso the path would be/coins. -
init: This is an object containing any properties you’d like to pass to the API including headers, query string parameters, or a body.
In our example, the API call is going to look like this:
API.get('cryptoapi', '/coins')
API returns a promise, meaning you can handle the call using either a Promise or an async function:
// promise
API.get('cryptoapi', '/coins')
  .then(data => console.log(data))
  .catch(error => console.log(error))

// async await
const data = await API.get('cryptoapi', '/coins')
In the examples in this book, we’ll be handling promises using async functions.
Calling the API and rendering the data in React
Next, let’s call the API and render the data. Update src/App.js with the following:
// import useState and useEffect hooks from React
import React, { useState, useEffect } from 'react'

// import the API category from AWS Amplify
import { API } from 'aws-amplify'

import './App.css';

function App() {
  // create coins variable and set to empty array
  const [coins, updateCoins] = useState([])

  // define function to all API
  async function fetchCoins() {
    const data = await API.get('cryptoapi', '/coins')
    updateCoins(data.coins)
  }

  // call fetchCoins function when component loads
  useEffect(() => {
    fetchCoins()
  }, [])

  return (
    <div className="App">
      {
        coins.map((coin, index) => (
          <div key={index}>
            <h2>{coin.name} - {coin.symbol}</h2>
            <h5>${coin.price_usd}</h5>
          </div>
        ))
      }
    </div>
  );
}

export default App
Next, run the app:
~ npm start
Updating the function to call another API
Next, you’ll update the function to call another API, the Coinlore API, that will return dynamic data from the Coinlore service. The user will be able to add set filters like limit and start to limit the number of items coming back from the API and also specify the starting point in which to return the data.
To get started, you will first need a way to interact with an HTTP endpoint in the Lambda function. The library you will be using for this lesson is the Axios library. Axios is a Promise based HTTP client for the browser and node.js
Installing Axios
The first thing you need to do is install the Axios package in your function folder in order to send HTTP requests from the function. Navigate to amplify/backend/function/cryptofunction/src, install Axios, and then navigate back to the root of the app:
~ cd amplify/backend/function/cryptofunction/src

~ npm install axios

~ cd ../../../../../
Updating the function
Next, update the /coins route in amplify/backend/function/cryptofunction/src with the following:
// import axios
const axios = require('axios')

app.get('/coins', function(req, res) {
  // define base url
  let apiUrl = `https://api.coinlore.com/api/tickers?start=0&limit=10`

  // check if there are any query string parameters, if so the reset the base url to include those
  if (req.apiGateway && req.apiGateway.event.queryStringParameters) {
    const { start = 0, limit = 10 } = req.apiGateway.event.queryStringParameters
    apiUrl = `https://api.coinlore.com/api/tickers/?start=${start}&limit=${limit}`
  }

  // call API and return response
  axios.get(apiUrl)
    .then(response => {
      res.json({  coins: response.data.data })
    })
    .catch(err => res.json({ error: err }))
})
In the above function we’ve imported the Axios library and then use it to make an API call to the CoinLore API. In the API call, you can pass in a start and limit parameter to the request to define the number of coins to return as well as to define the starting point.
In the req parameter, there is an apiGateway parameter that holds both the event as well as the context variables. In the function defined above, there is a check to see if this event exists as well as the queryStringParameters property on the event. If the queryStringParameters property exists, we use these values to update the base URl with the parameters. Using queryStringParameters the user can specify the start and limit values.
Once the function is updated, you can deploy the updates by running the push command in your terminal:
~ amplify push

Current Environment: local

| Category | Resource name  | Operation | Provider plugin   |
| -------- | -------------- | --------- | ----------------- |
| Function | cryptofunction | Update    | awscloudformation |
| Api      | cryptoapi      | No Change | awscloudformation |
-
Are you sure you want to continue?
Y
Updating the client app
Now that you have updated the function, let’s update the React app to give the user the option to specify the limit and start parameters.
To do so, you’ll need to add fields for user input and give the user a button to trigger a new API request.
Update src/App.js with the following changes:
// create additional state to hold user input for limit and start properties
const [input, updateInput] = useState({ limit: 5, start: 0 })

// create function to allow users to update the input value
function updateInputValues(type, value) {
  updateInput({ ...input, [type]: value })
}

// update fetchCoins function to use limit and start properties
async function fetchCoins() {
  const { limit, start } = input
  const data = await API.get('cryptoapi', `/coins?limit=${limit}&start=${start}`)
  updateCoins(data.coins)
}

// Add input fields to the UI for user input
<input
  onChange={e => updateInputValues('limit', e.target.value)}
  placeholder="limit"
/>
<input
  placeholder="start"
  onChange={e => updateInputValues('start', e.target.value)}
/>

// add button to the UI to give user the option to call the API
<button onClick={fetchCoins}>Fetch Coins</button>
Next, run the app:
~ npm start
Summary
Congratulations, you’ve deployed your first serverless API!
Here are a couple of things to keep in mind from this chapter:
-
Lambda functions can be triggered from a variety of events. In this chapter, we triggered the event using an API call from API Gateway.
-
Lambda functions can be created from the Amplify CLI by using the command
amplify add functionamd APIs can be created using the commandamplify add api. -
API Gateway endpoints can be configured to work with multiple Lambda functions. In the example in this chapter we have only connected it to a single function.
-
Lambda functions are essentially self-contained node.js applications. In the example for this chapter, we chose to run an express application in order to handle REST methods like
get,post, anddeletethough we have only worked with agetcall as of this point. -
The
APIcategory from the Amplify client library can be used with both GraphQL as well as REST APIs.