
Chapter 7: Learning Redux and React Router
In this chapter, we'll learn about Redux and React Router. Redux is still the most common method of managing global state shared across a React application. Using Redux global state, we can reduce a great deal of boilerplate code and streamline the application. React Router is also the most popular framework for managing client-side URL routing. Client-side URL routing allows a SPA application to behave in ways that are familiar to users expecting a classic-style web application that indicates where they are in the app. Both of these technologies are necessary for building SPA applications that look and feel like standard web apps.
In this chapter, we're going to cover the following main topics:
Technical requirements
You should have a basic understanding of web development using React. We will once again be using Node and Visual Studio Code.
The GitHub repository is at https://github.com/PacktPublishing/Full-Stack-React-TypeScript-and-Node. Use the code in the Chap7 folder.
To set up this chapter's code folder, go to your HandsOnTypescript folder and create a new folder called Chap7.
Learning about Redux state
Redux is still the most popular enterprise-level framework for creating and managing global state in a React application (although we can use Redux in any JavaScript app, not just React). Many newer frameworks have been created, and some of them have gained their own considerable following; however, Redux is still the most commonly used. You may find that Redux is difficult to understand at first. However, once we do learn it, we'll see its many benefits and why it is so often the go-to framework for large, complex React applications.
We learned about React state in Chapter 4, Learning Single-Page Application Concepts and How React Enables Them, and Chapter 5, React Development with Hooks. So, to reiterate, state, or a component's data, is the main driver of all UI changes in React. This is the reason why the React framework has the word "react" in its name, because it is reacting to these state changes (this is also known as being reactive). So, when creating and managing state, we generally want to associate local state with the component or the component's root parent most of the time.
Component-based state can be limiting. There are cases where state is not specific to a component or even to a component hierarchy. State can sometimes be necessary for several components or other non-component services that make up an application. In addition to this, state in React is passed down only one way, from the parent down to children as props. It should not be done upstream. And this further constrains how state can be used in React. Redux therefore provides a mechanism not only to share state globally but also to allow injection and updating of state from any component as needed.
Let's give an example to flesh this out a bit. In a typical enterprise-class application, we will always have authentication. And once a user is authenticated, we may receive certain data about the user – for example, the user's full name, user ID, email, and so on. It should not seem unreasonable to think that these data points may be used by a significant portion of the components within an application. It would be tedious and error-prone therefore to have each component call to get this data and then save it locally in their own state. Doing it this way would mean that there were multiple copies of the data and as it changed, some components may end up keeping older versions of the data.
This sort of conflict can be the source of bugs. Therefore, it would be helpful to be able to maintain this data on the client in only one place and share it with whatever component needed it. This way, if this data ever did get updated, we could be assured that all components, no matter what section of the app they are in, would get the latest valid data. This is what Redux can do for our application. We can consider it a single source of truth.
Redux is a data storage service that maintains all the globally shared data in our React application. Redux provides not only the store itself, but also the base functions needed to add, remove, and share this data. One difference with React state, however, is that Redux state is not necessarily going to trigger UI updates. It certainly can if we desire to do so, but there is no explicit necessity for doing so. So, we should keep that in mind.
Let's take a look at how to set up Redux:
- Create a new React project in the Chap7 folder like this:
create-react-app redux-sample --template typescript
- Once our project is set up, open it and use your command line to cd into the redux-sample folder.
- We will now install Redux, which is actually several different dependencies. First, run this command:
npm i redux react-redux @types/redux @types/react-redux
This command gives us the main dependencies, including the TypeScript types.
OK, now that we've done some basic setup, we need to understand a few more things about Redux before we continue. Redux uses a pair of concepts called reducers and actions. Let's see what each of these does.
Reducers and actions
In Redux, there is only a single store for all data. So, all our global data will live inside of a single Redux object. Now, the issue with this design is that, since this is global state, different app features will require different types of data and the entirety of the data is not always relevant to all parts of the application. So, the Redux creators came up with a scheme that uses reducers to filter and split up the single store into separated chunks. So, if component A only needs a specific piece of data, it does not have to deal with the entire store.
This design is a good way of separating data concerns. But the side effect of having such a design is that we need some way of updating the relevant portion of data without affecting any of the other pieces. This is what actions do. Actions are objects that provide the data for specific reducers only.
Now that we have a high-level view of what reducers and actions are, let's look at some examples in code:
- Create a new folder called store under src.
- Then, create a file called AppState.ts. This file will store our aggregated reducer object called rootReducer of type AppState, which represents the global state. Insert this code into the file:
import { combineReducers } from "redux";
export const rootReducer = combineReducers({
});
export type AppState = ReturnType<typeof rootReducer>;
rootReducer represents an aggregated object of all of our reducers. We don't have any reducers yet, but we will add the actual reducers once our setup is complete. combineReducers takes each of our reducers and combines them into a single object. At the bottom, we are creating a TypeScript type based upon our rootReducer by using the ReturnType utility type, and then exporting the new type called AppState.
Note
A utility type is simply a helper class that the TypeScript team created to give specific functionality. There are many different utility types and a list can be found here: https://www.typescriptlang.org/docs/handbook/utility-types.html.
- Next, we create a file called configureStore.ts, which will contain our actual store object used by Redux and the app. This is what it should look like:
import { createStore } from "redux";
import { rootReducer } from "./AppState";
const configureStore = () => {
return createStore(rootReducer, {});
};
export default configureStore;
As we can see, Redux's createStore method is used to build the actual store based upon our AppState object, rootReducer. configureStore is exported and used later to execute the creation of the store.
- Now, we must update our index.tsx file to call our configureStore method and initialize Redux for our app. Update index.tsx like this:
import React from 'react';
import ReactDOM from 'react-dom';
import './index.css';
import App from './App';
import { Provider } from "react-redux";
import configureStore from "./store/configureStore";
import * as serviceWorker from './serviceWorker';
ReactDOM.render(
<React.StrictMode>
<Provider store={configureStore()}>
<App />
</Provider>
</React.StrictMode>,
document.getElementById('root')
);
First, we import Provider from react-redux. Provider is a React component that acts as a parent component to all other components and provides our store data. In addition, Provider, as shown, is receiving the initialized store by accepting the return value of the configureStore function:
// If you want your app to work offline and load faster,
// you can change
// unregister() to register() below. Note this comes with
// some pitfalls.
// Learn more about service workers:
// https://bit.ly/CRA-PWA
serviceWorker.unregister();
This commented code is coming from the create-react-app project. It is included here for completeness. OK, so now we have a base-level setup of Redux. So, our example will continue by creating a call to get a user object. We will use the JSONPlaceholder API we learned about in Chapter 6, Setting Up Our Project Using create-react-app and Testing with Jest. After a successful login, it shares the user information by putting it into Redux as a reducer. Let's do that now:
- Create a new file, UserReducer.ts, inside of the store folder, like this:
export const USER_TYPE = "USER_TYPE";
The first thing we do is create a constant for the action type called USER_TYPE. This is optional but helps us avoid issues such as typos:
export interface User {
id: string;
username: string;
email: string;
city: string;
}
Then, we create a type representing our User:
export interface UserAction {
type: string;
payload: User | null;
}
Now, by convention, an action has two members: type and payload. So, we create a UserAction type with those members in it:
export const UserReducer = ( state: User | null = null, action:
UserAction): User | null => {
switch(action.type) {
case USER_TYPE:
console.log("user reducer", action.payload);
return action.payload;
default:
return state;
}
};
And then, finally, we create our reducer called UserReducer. A reducer always takes the state and action parameters. Note, state is not the entire state, it is only the partial state relevant to some reducer. This reducer will know whether the passed-in state is its own based on the action type. Also notice that the original state is never mutated. This is extremely important. Never change the state directly. You should either return the state as is, which is done in case default, or return some other data. In this case, we return action.payload.
- So now, we have to go back into our AppState.ts file and add this new reducer. The file should now look like this:
import { combineReducers } from "redux";
import { UserReducer } from "./UserReducer";
export const rootReducer = combineReducers({
user: UserReducer
});
export type AppState = ReturnType<typeof rootReducer>;
Our Redux store has one new member called user, which is updated by UserReducer. If we had more reducers, we would simply give them a name and add them below user with their reducer, and the combineReducers Redux function would combine all of them into a single aggregate rootReducer.
- Now, let's start using our new state. Update the App.tsx file like this:
import React, { useState } from 'react';
import ContextTester from './ContextTester';
import './App.css';
function App() {
const [userid, setUserid] = useState(0);
const onChangeUserId = (e: React. ChangeEvent<HTMLInputElement>)
=> {
console.log("userid", e.target.value);
setUserid(e.target.value ? Number(e.target.value) : 0);
}
return (
<div className="App">
<label>user id</label>
<input value={userid} onChange={onChangeUserId} />
</div>
);
}
export default App;
We will take userid as a parameter and then, based upon that ID, we will get the associated user from the JSON Placeholder API. Now, in order to do this, we need to use some Redux-specific Hooks so we can add our found user to the Redux store.
- Let's update the App component in App.tsx like this:
function App() {
const [userid, setUserid] = useState(0);
const dispatch = useDispatch();
As you can see, we added a Redux Hook called dispatch. We get an instance of dispatch with the useDispatch Hook. dispatch is a Redux function that sends our action data to Redux. Redux then sends the action to each of our reducers for processing. Then the reducer that recognizes the action type accepts it as its state payload:
const onChangeUserId = async (e:
React.ChangeEvent<HTMLInputElement>) => {
const useridFromInput = e.target.value ?
Number(e.target.value) : 0;
console.log("userid", useridFromInput);
setUserid(useridFromInput);
const usersResponse = await
fetch('https://jsonplaceholder.typicode.com/ users');
if(usersResponse.ok) {
const users = await usersResponse.json();
console.log("users", users);
const usr = users.find((userItem: any) => {
return userItem && userItem.id ===
useridFromInput;
});
console.log("usr", usr);
dispatch({
type: USER_TYPE,
payload: {
id: usr.id,
username: usr.username,
email: usr.email,
city: usr.address.city
}
});
}
Inside of the onChangeUserId handler, we make a call to the JSONPlaceholder API. Then we use the usersResponse response object to get the result from our network API. We then get our desired user by filtering with the user ID we got from our UI. Then we use dispatch to send our action to our reducer. Also notice onChangeUserId is now an async function:
}
return (
<div className="App">
<label>user id</label>
<input value={userid} onChange={onChangeUserId} />
</div>
);
}
This UI will take userid as an input.
Now, let's create a child component that can display all of our user-related data:
- Create a new component called UserDisplay.tsx and add this code:
import React from 'react';
import { AppState } from './store/AppState';
import { useSelector } from 'react-redux';
const UserDisplay = () => {
const user = useSelector((state: AppState) => state.user);
if(user) {
console.log("user", user);
return (<React.Fragment>
<div>
<label>username:</label>
{user.username}
</div>
<div>
<label>email:</label>
{user.email}
</div>
<div>
<label>city:</label>
{user.city}
</div>
</React.Fragment>);
} else {
return null;
}
}
export default UserDisplay
The useSelector Hook gets the specific user reducer. It takes a function as a parameter and this function takes the entire aggregated reducer state and only returns the user reducer. Also in this component, we are displaying the properties of our found user but taken from Redux and the user reducer. Notice also how we return null if no user is found.
- Now, let's add the UserDisplay component to our App component:
import React, { useState } from 'react';
import './App.css';
import { useDispatch } from 'react-redux';
import { USER_TYPE } from './store/UserReducer';
import UserDisplay from './UserDisplay';
Here, we import the new UserDisplay component:
function App() {
const [userid, setUserid] = useState(0);
const dispatch = useDispatch();
const onChangeUserId = async (e:
React.ChangeEvent<HTMLInputElement>) => {
const useridFromInput = e.target.value ?
Number(e.target.value) : 0;
console.log("userid", useridFromInput);
setUserid(useridFromInput);
const usersResponse = await
fetch('https://jsonplaceholder.typicode.com/ users');
if(usersResponse.ok) {
const users = await usersResponse.json();
const usr = users.find((userItem: any) => {
return userItem && userItem.id === useridFromInput;
});
dispatch({
type: USER_TYPE,
payload: {
id: usr.id,
username: usr.username,
email: usr.email,
city: usr.address.city
}
});
}
}
return (
<React.Fragment>
<div className="App">
<label>user id</label>
<input value={userid} onChange={onChangeUserId} />
</div>
<UserDisplay />
</React.Fragment>
);
}
export default App;
Now use UserDisplay in the returned JSX UI so that our user information is displayed.
- Now if you load the browser at http://localhost:3000 and enter 1 in the input, you should see this:
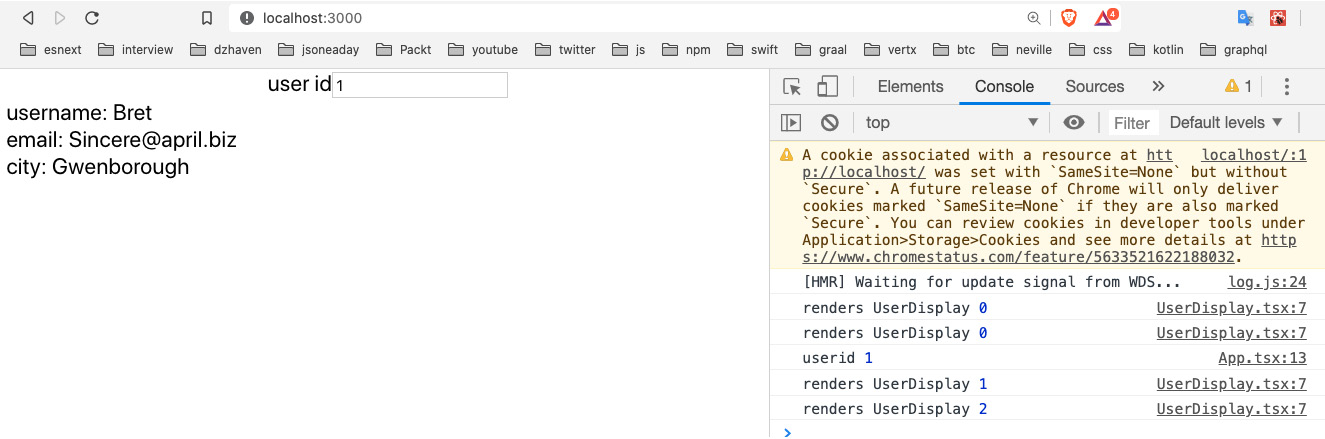
Figure 7.1 – User object from the Redux store
So, now that we've seen a sample of a simple Redux store use case, let's take it a step further and show what will happen when we have multiple reducers in the same store:
- Create a new file called PostDisplay.tsx and add the following code. This component will display posted comments from the JSON Placeholder API:
import React, { useRef } from 'react';
import { AppState } from './store/AppState';
import { useSelector } from 'react-redux';
const PostDisplay = React.memo(() => {
const renderCount = useRef(0);
console.log("renders PostDisplay", renderCount. current++);
const post = useSelector((state: AppState) => state. post);
Again, like our previous example, here, we set up which state data we want using useSelector:
if(post) {
return (<React.Fragment>
<div>
<label>title:</label>
{post.title}
</div>
<div>
<label>body:</label>
{post.body}
</div>
</React.Fragment>);
} else {
return null;
}
});
export default PostDisplay
As you can see, it looks very similar to UserDisplay, but it displays post-related information such as title and body.
- Now, we update our Redux code to add our new reducer. First, add a new file inside of the store folder called PostReducer.ts and then add this code:
export const POST_TYPE = "POST_TYPE";
export interface Post {
id: number;
title: string;
body: string;
}
export interface PostAction {
type: string;
payload: Post | null;
}
export const PostReducer = ( state: Post | null = null,
action: PostAction): Post | null => {
switch(action.type) {
case POST_TYPE:
return action.payload;
default:
return state;
}
};
Again, this is very similar to UserReducer, but focused on posts instead of users.
- Next, we want to update the AppState.tsx file and add our new reducer to it. Add this code:
import { combineReducers } from "redux";
import { UserReducer } from "./UserReducer";
import { PostReducer } from "./PostReducer";
export const rootReducer = combineReducers({
user: UserReducer,
post: PostReducer
});
export type AppState = ReturnType<typeof rootReducer>;
All we did is add our PostReducer.
- OK, so now we'll update our App component and add code specifically for finding a specific post by ID from the JSON Placeholder API. Update App with this code:
function App() {
const [userid, setUserid] = useState(0);
const dispatch = useDispatch();
const [postid, setPostId] = useState(0);
Notice we don't have a dispatch specific to any reducer. That's because dispatchers are just generic execution functions. The action will be routed to the appropriate reducer eventually.
onChangeUserId has not changed but is shown here for completeness:
const onChangeUserId = async (e:
React.ChangeEvent<HTMLInputElement>) => {
const useridFromInput = e.target.value ?
Number(e.target.value) : 0;
console.log("userid", useridFromInput);
setUserid(useridFromInput);
const usersResponse = await
fetch('https://jsonplaceholder.typicode.com/ users');
if(usersResponse.ok) {
const users = await usersResponse.json();
const usr = users.find((userItem: any) => {
return userItem && userItem.id === useridFromInput;
});
dispatch({
type: USER_TYPE,
payload: {
id: usr.id,
username: usr.username,
email: usr.email,
city: usr.address.city
}
});
}
}
onChangePostId is a new event handler for handling post-related data changes:
const onChangePostId = async (e:
React.ChangeEvent<HTMLInputElement>) => {
const postIdFromInput = e.target.value ?
Number(e.target.value) : 0;
setPostId(postIdFromInput);
const postResponse = await
fetch("https://jsonplaceholder.typicode.com/posts/"
+ postIdFromInput);
if(postResponse.ok) {
const post = await postResponse.json();
console.log("post", post);
dispatch({
type: POST_TYPE,
payload: {
id: post.id,
title: post.title,
body: post.body
}
})
}
}
OnChangePostId dispatches a relevant action via the dispatch function.
The UI has been slightly updated to handle the new PostDisplay component and separate it from the UserDisplay components:
return (
<React.Fragment>
<div style={{width: "300px"}}>
<div className="App">
<label>user id</label>
<input value={userid} onChange={onChangeUserId} />
</div>
<UserDisplay />
</div>
<br/>
<div style={{width: "300px"}}>
<div className="App">
<label>post id</label>
<input value={postid} onChange={onChangePostId} />
</div>
<PostDisplay />
</div>
</React.Fragment>
);
}
If you run this code and update only postid, you should see an interesting thing:

Figure 7.2 – PostDisplay result
Notice that in the console, when updating the postid input, there is no log for UserDisplay. This shows that the Redux store is not directly attached to the React render pipeline and only the components associated with a particular state change will re-render. This is different behavior from React Context and can be a benefit to performance by reducing unwanted renders (we'll talk about Context in the next section).
In this section, we learned about Redux, the most popular way of managing global state in React. In larger apps, we will use a global state manager frequently, as there is generally a lot of global data sharing happening. In our application, we will store information about our logged-in user and other data that will be shared across the app, so having this capability will be valuable.
React Context
Context is a newer feature that came out a little before Hooks. Context is not a separate dependency but is built into React core. It allows similar functionality to Redux in that it allows state to be stored in a single source and then shared across components, without having to manually pass down props through the component hierarchy.
This capability is very efficient from a developer coding perspective because it eliminates the need to write a lot of boilerplate code to pass state down from a parent to its children. Here's a visualization of a possible set of hierarchies in a larger React app:

Figure 7.3 – React component hierarchy
In this example diagram, we have a single parent component and it has several children, which it is using in its own JSX. Those children also have their own children, and so on. So, if we were to configure the passing of props all the way down for every component hierarchy, it would be quite a bit of code, especially knowing that some hierarchies involve passing functions that may call back to some arbitrary parent. Having these sorts of prop relationships also causes additional cognitive load for developers, as they need to think about data relationships and how data is being moved among the components.
Both React Context and Redux are good ways of avoiding this state-passing boilerplate code, when appropriate. And for smaller projects, the simplicity of Context works well. However, for larger projects, I recommend against using Context.
React Context can have multiple parent providers, meaning it is possible to have more than one root context. For larger apps, this can be confusing and adds more boilerplate code. Additionally, the mixing of global state providers can be confusing. If a team decides to use both Context and Redux, when do we use each one? And if we use both now, we must maintain two styles for global state management.
In addition, Context, unlike Redux, has no concept of reducers. Therefore, all users of Context will receive the entire set of state data, which is not a good practice in terms of the separation of concerns. Over time, it can become confusing as to what subset of the data a particular component should deal with.
One additional side effect of having all state data available to all component users is that, even if a component does not actually access the specific state member, any Context changes will trigger a re-render. For example, let's say that the Context state looks like this { username, userage } and our component only uses username. Even if userage alone changes, it triggers a re-render in that component. This is true even when memo is used (we covered memo in Chapter 5, React Development with Hooks). Let's look at an example demonstrating this effect:
- Remove React.StrictMode and Provider from index.tsx to avoid confusion. We'll put this back later. Now, the index.tsx file should look like this:
import React from 'react';
import ReactDOM from 'react-dom';
import './index.css';
import App from './App';
import { Provider } from "react-redux";
import configureStore from "./store/configureStore";
import * as serviceWorker from './serviceWorker';
ReactDOM.render(
<App />
,
document.getElementById('root')
);
Again, these comments are coming from create-react-app and are included here only for completeness:
// If you want your app to work offline and load faster,
// you can change
// unregister() to register() below. Note this comes with
// some pitfalls.
// Learn more about service workers: // https://bit.ly/CRA-PWA
serviceWorker.unregister();
You can also remove any unused imports to avoid triggering warning messages.
- Now, create these two child components, where each one will use a unique member of our Context state. First, create the UserAgeComp.tsx component with this code in it:
import React, { useContext } from 'react';
import { TestContext } from './ContextTester';
const UserAgeComp = () => {
const { userage } = useContext(TestContext);
return <div>
{userage}
</div>
};
export default UserAgeComp;
This code uses object destructuring to only use the userage member of TestContext by using the useContext Hook, which we will create later, and displays it only. Now, create the UserNameComp.tsx component with this code:
import React, { useContext, useRef } from 'react';
import { TestContext } from './ContextTester';
const UserNameComp = React.memo(() => {
const renders = useRef(0);
console.log("renders UserNameComp", renders. current++);
const username = "dave"; //useContext(TestContext);
console.log("username UserNameComp", username);
return <div>
{username}
</div>
});
export default UserNameComp;
You may be surprised that we are not using Context for username (note, I have it commented out), but before we can show the ramifications of using Context, I wanted to show this component working as expected first. So, this component has two main features. One is a ref that counts the number of times this component was rendered, and a variable called username that gets displayed. It will also log the renders count as well in order to show when a re-render is triggered.
- Now, we need to create a parent component that has Context in it. Create the ContextTester.tsx file and add this code into it:
import React, { createContext, useState } from 'react';
import UserNameComp from './UserNameComp';
import UserAgeComp from './UserAgeComp';
Here, we use createContext to create our TestContext object, which will hold our state:
export const TestContext = createContext<{ username: string, userage: number }>({ username: "", userage:0 });
const ContextTester = () => {
const [userage, setUserage] = useState(20);
const [localState, setLocalState] = useState(0);
const onClickAge = () => {
setUserage(
userage + 1
);
}
const onClickLocalState = () => {
setLocalState(localState + 1);
}
return (<React.Fragment>
<button onClick={onClickAge}>Update age</button>
<TestContext.Provider value={{ username: "dave",
userage }}>
<UserAgeComp />
</TestContext.Provider>
<UserNameComp />
<br/>
<button onClick={onClickLocalState}>Update
localstate</button>
<label>{localState}</label>
</React.Fragment>);
}
export default ContextTester;
This component will show two main things. One is the incremented value of localState, which is incremented by the onClickLocalState handler, and the other is the renders of the two child components, UserNameComp and UserAgeComp. Notice UserNameComp, for now, lives outside of the TestContext Context component, and therefore is not affected by TestContext changes. This is very important to note.
- Now, if we click on Update age or Update localstate, you will see that the console.log statement in UserNameComp is never executed. That log statement was only executed one time when the page first loaded, which is what is supposed to happen since UserNameComp is using memo (memo only allows re-renders when props change). You should see only one set of logs in your Console tab (ignore the warnings, as we'll re-add our dependencies soon):

Figure 7.4 – Context render result
- OK, so then now, let's force UserNameComp to use the username from our TestContext. So now, UserNameComp should look like this:
import React, { useContext, useRef } from 'react';
import { TestContext } from './ContextTester';
const UserNameComp = React.memo(() => {
const renders = useRef(0);
console.log("renders UserNameComp", renders. current++);
const { username } = useContext(TestContext);
console.log("username UserNameComp", username);
return <div>
{username}
</div>
});
export default UserNameComp;
As you can see, now UserNameComp is using the username variable from the TestContext context. It never makes use of the userage variable and you will recall username has a hardcoded value so it never changes. So, theoretically, the username state of UserNameComp never changes and therefore should not cause a re-render. Now we need to place UserNameComp inside the TestContext tag as well. We are doing this because if a component needs to use a Context's state, it must be inside that Context's tag. Edit ContextTester like so:
const ContextTester = () => {
const [userage, setUserage] = useState(20);
const [localState, setLocalState] = useState(0);
const onClickAge = () => {
setUserage(
userage + 1
);
}
const onClickLocalState = () => {
setLocalState(localState + 1);
}
return (<React.Fragment>
<button onClick={onClickAge}>Update age</button>
<TestContext.Provider value={{ username: "dave", userage
}}>
<UserAgeComp />
<br/>
<UserNameComp />
</TestContext.Provider>
<br/>
<button onClick={onClickLocalState}>Update
localstate</button>
<label>{localState}</label>
</React.Fragment>);
}
Notice username is hardcoded to "dave" and never changes. And as you can see, UserNameComp was moved into TestContext.
- Now, if we run this code and then click on the buttons several times, we should see something like this:
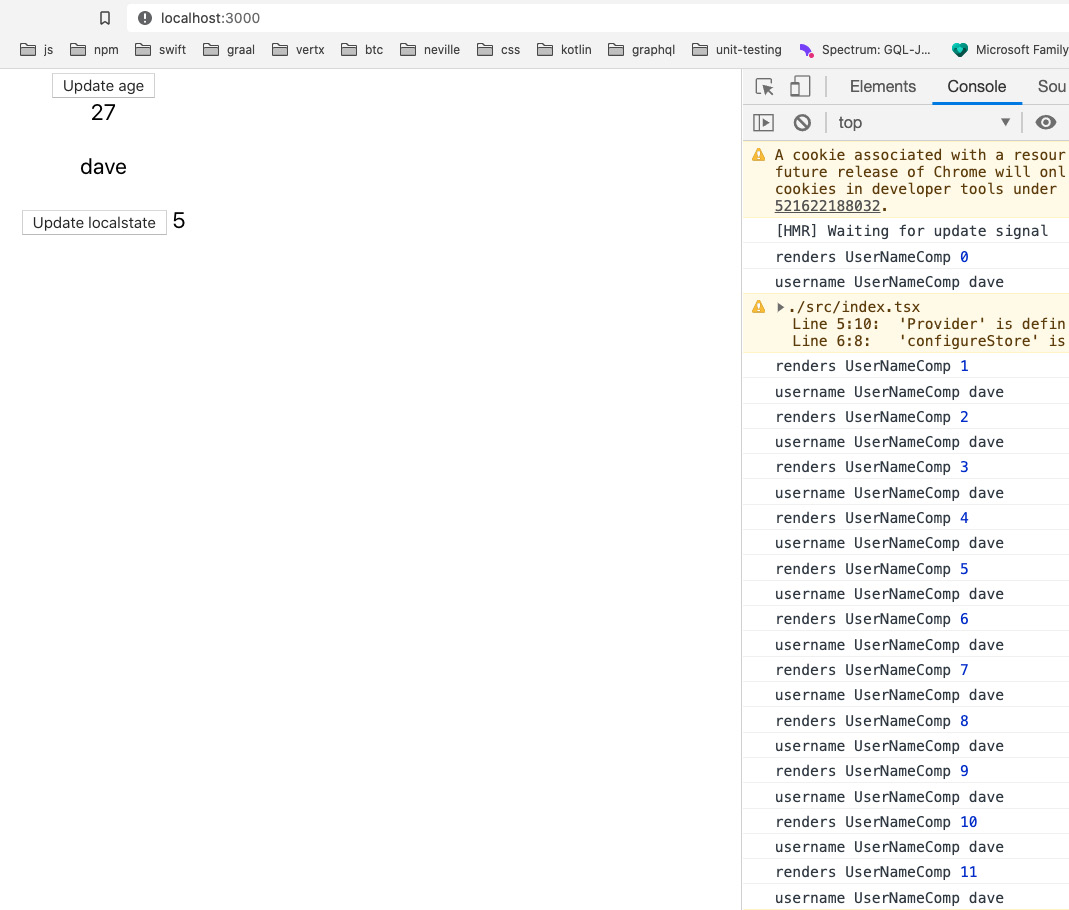
Figure 7.5 – Re-renders when using Context
As you can see, our UserNameComp component keeps getting re-rendered, even when we only change the localState variable. Why is this happening? TestContext is a component just like any other React component. And it does not use memo. So, when the parent component, ContextTester, gets re-rendered, it also gets re-rendered, which has a knock-on effect for any of its children. This is why UserNameComp keeps getting re-rendered although it never uses the userage variable.
So, as you can see, Context has some issues with its use, and it is my opinion that for large React applications, if you had to choose between the two, it would be better, albeit more complex, to use Redux.
In this section, we learned about Context basics. Context is relatively easy to learn and use. And for smaller projects, it works very well. However, due to its simple design, for more complex projects, a more sophisticated global state management system may be preferable.
Learning about React Router
React Router is the most commonly used routing framework in React. It is relatively simple to learn and use. Routing, as we discovered in Chapter 4, Learning Single-Page Application Concepts and How React Enables Them, is ubiquitous in web development. It is a feature expected by users of web apps, so learning how to use it for our React app is a requirement.
Routes in React Router are simply React Router components that contain our own application components, and these components in turn represent our screens. In other words, a route in React Router is a logical representation of a virtual location (by virtual location, I mean a URL that is just a label and does not actually exist on any server). The "routers" in React Router act as parent components and our screen rendering components act as children. This is a bit difficult to understand by simply reading about it, so let's create an example:
- Create a new React project under the Chap7 folder in your terminal by calling this command:
create-react-app try-react-router --template typescript
- Once it has completed creating our project, cd into the new try-react-outer folder, then let's add some packages:
npm i react-router-dom @types/react-router-dom
Note that React Router has several versions, so we will use the one for dom.
- Now, let's update our index.tsx file so that it includes the root React Router component in our app. Update index.tsx like this:
import React from "react";
import ReactDOM from "react-dom";
import "./index.css";
import App from "./App";
import * as serviceWorker from "./serviceWorker";
import { BrowserRouter } from "react-router-dom";
ReactDOM.render(
<React.StrictMode>
<BrowserRouter>
<App />
</BrowserRouter>
</React.StrictMode>,
document.getElementById("root")
);
// If you want your app to work offline and load faster,
// you can change
// unregister() to register() below. Note this comes with
// some pitfalls.
// Learn more about service workers: // https://bit.ly/CRA-PWA
serviceWorker.unregister();
As you can see, we've added a new root component wrapping our App component, called BrowserRouter. BrowserRouter is a bit like Redux's Provider in the sense that it is a single parent component that provides various props to child components that are relevant to doing routing. We will go over these props soon, but for now, let's finish our setup of React Router.
- So now, since this tool is giving us routing, we must set up our individual routes. However, since routes ultimately are just containers for components that represent our screens, let's create two of those screens first. Create a file called ScreenA.tsx and add this code:
import React from "react";
const ScreenA = () => {
return <div>ScreenA</div>;
};
export default ScreenA;
It's a simple component that displays ScreenA in the browser.
- Now, create a file called ScreenB.tsx and add this code:
import React from "react";
const ScreenB = () => {
return <div>ScreenB</div>;
};
export default ScreenB;
Again, it is a simple component displaying ScreenB in the browser.
- Now, let's give our routes a try. Open App.tsx and add this code into it:
import React from "react";
import "./App.css";
import { Switch, Route } from "react-router-dom";
import ScreenA from "./ScreenA";
import ScreenB from "./ScreenB";
function App() {
return (
<Switch>
<Route exact={true} path="/" component={ScreenA} />
<Route path="/b" component={ScreenB} />
</Switch>
);
}
export default App;
So, what's happening here is that our app is rendering out a possible route based on several options. The Switch component indicates a parent that determines which route to choose by matching the browser URL to a path property of a Route instance. For example, if we start our app and go to the "/" route (the root of our application), we should see this:

Figure 7.6 – Routed to ScreenA
But if we were to go to route "/b", we should see ScreenB instead, like this:

Figure 7.7 – Routed to ScreenB
So, as I stated at the beginning of the section, React Router routes are React components. This may seem weird as they have no visible UI. Nevertheless, they are parent components, except they render their children but have no UI of their own.
Now, we know that when our app first loads, it is the index.tsx file that runs before anything else. And this is also where the core React Router service lives. When this service encounters a URL, it looks through the set of routes defined in our App.tsx file and selects a matching route. Once the matching route is selected, that route's child component is rendered. So, for example, the route with path="/b" would render the ScreenB component.
Let's drill into the details of our routing code. If we look back at our routes, we should see that our first route has a property called exact. This tells React Router not to use regular expressions in determining a route match but instead to look for an exact match. Next, we see a property called path, which of course is supposed to be our URL path after the root domain. This path is by default a "contains" path, meaning that any URL that contains the same value as the path property will be accepted and the first matching route will be rendered, unless we included the exact property.
Now, you will also notice that we have a property called component, which of course refers to the child component that is to be rendered. And for simple scenarios, using this property works fine. But what if we need to pass some additional props to our component? React Router provides another property called render, which allows us to use what's called a render property.
A render property is a property that takes a function as its parameter. When the parent component does its rendering, it will call the render function internally. Let's look at an example:
- Create a new component called ScreenC.tsx and add this code in it:
import React, { FC } from "react";
interface ScreenCProps {
message: string;
}
const ScreenC: FC<ScreenCProps> = ({ message }) => {
return <div>{message}</div>;
};
export default ScreenC;
The ScreenC component is much like the other components. However, it also receives a prop called message and uses that as its display. Let's see how we pass this prop in via our render property of React Router.
- Now let's update our App component and add this new component as a route:
import React from "react";
import "./App.css";
import { Switch, Route } from "react-router-dom";
import ScreenA from "./ScreenA";
import ScreenB from "./ScreenB";
import ScreenC from "./ScreenC";
function App() {
const renderScreenC = (props: any) => {
console.log("ScreenC props", props);
return <ScreenC {...props} message="This is Screen C" />;
};
return (
<Switch>
<Route exact={true} path="/" component={ScreenA} />
<Route path="/b" component={ScreenB} />
<Route path="/c" render={renderScreenC} />
</Switch>
);
}
export default App;
So, as you can see, we've created a function, renderScreenC, and it takes props as a parameter and then passes it to the ScreenC component and then returns that component. Along with passing props, we also have it passing the string "This is Screen C" into the message property. If we had tried to use the component property of Route, there would be no way to pass the message property and so we are using the render property instead.
- Next, we add a new Route that uses the render property and pass it the renderScreenC function. If we go to the "/c" path, we see basically the same thing as the other screens, but with our message, This is Screen C:
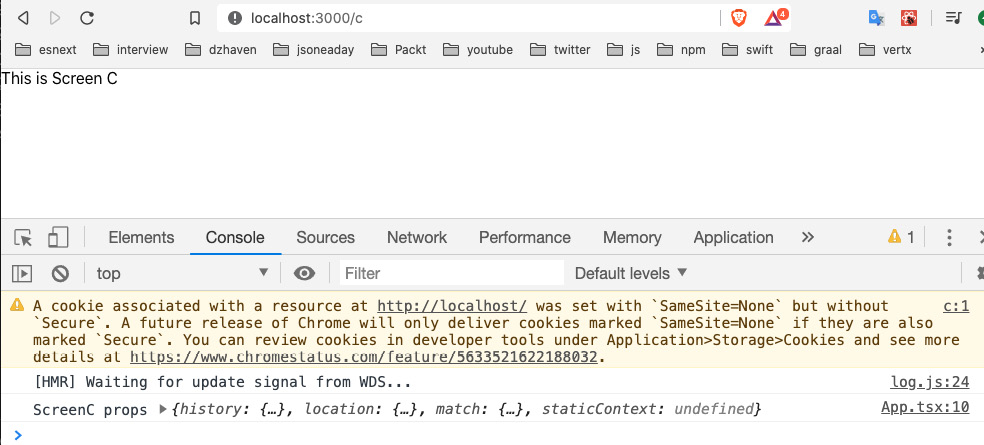
Figure 7.8 – Routed to ScreenC
But also, I've included a log of the props that are being passed into the component and we can see things such as history, location, and match members being included. You will recall our render function, renderScreenC, had a signature of (props:any) => { … }. That props parameter is being passed in by our Route component from the React Router service. We'll take a look at these routing properties later.
So, now we know how to get better control of our screen component renders by using the render property, but a typical URL can also have parameters that pass data to the screen. Let's look at how to do this with React Router:
- Let's update our Route for ScreenC like this:
<Route path="/c/:userid" render={renderScreenC} />
The userid field is now a parameter on the URL.
- Now let's update our ScreenC component to accept Route props and handle our new userid parameter field:
import React, { FC } from "react";
interface ScreenCProps {
message: string;
history: any;
match: any;
}
const ScreenC: FC<ScreenCProps> = (props) => {
return (
<div>
<div>{"Your id is " + props.match.params.userid} </div>
<div>{props.message}</div>
</div>
);
};
export default ScreenC;
We've stopped using object destructuring in order to get every props member without having to write them out. And now our component takes the history and match props members as its own props and it is also handling the userid field by using the match.params.userid property. Since the history object already contains location as a member, we did not add that member to our ScreenCProps interface. The screen should look like this:

Figure 7.9 – Routed to ScreenC with a parameter
As you can see, our userid parameter of value 1 is shown.
OK, so now we've used React Router more realistically, but there's another important characteristic to note about how React Router works. React Router acts basically like a stack of URLs. In other words, when a user visits the URLs of a site, they do so in a linear fashion. They go to A, then B, and maybe back to A, then C, and so on. And the result of this is that the browser history of a user can be saved as a stack, where you can go forward to a new URL or backward to a previously visited one. This characteristic of browser behavior is mostly maintained in React Router's history object.
So, again, let's update our code and take a look at some of the capabilities provided by the history object:
- Update the ScreenC component like this:
import React, { FC, useEffect } from "react";
interface ScreenCProps {
message: string;
history: any;
match: any;
}
const ScreenC: FC<ScreenCProps> = (props) => {
useEffect(() => {
setTimeout(() => {
props.history.push("/");
}, 3000);
});
return (
<div>
<div>{"Your id is " + props.match.params.userid} </div>
<div>{props.message}</div>
</div>
);
};
export default ScreenC;
As you can see, we introduced useEffect and in this function, we are waiting 3 seconds with a timer and then by using the history.push function, we are redirecting our URL to "/", which is rendered by the ScreenA component.
- Let's use another function inside of the history object. Update ScreenC again, like this:
import React, { FC } from "react";
interface ScreenCProps {
message: string;
history: any;
match: any;
}
const ScreenC: FC<ScreenCProps> = (props) => {
const onClickGoback = () => {
props.history.goBack();
};
return (
<div>
<div>{"Your id is " + props.match.params.userid} </div>
<div>{props.message}</div>
<div>
<button onClick={onClickGoback}>Go back</button>
</div>
</div>
);
};
export default ScreenC;
So, this time, we've created a button that will try and go back to the previous URL by using the history.goBack function. In order to test this code, we need to open the web page to URL localhost:3000/b first and then go to URL localhost:3000/c/2. Your screen should then look like this:

Figure 7.10 – Routed to ScreenC with a Go back button
- You can see we have a button called Go back. If you click it, you will go back to the original "/b" route.
- One more thing to review: React Router recently added the Hooks capability. So, we no longer have to pass down route properties using a child's props; we can just use Hooks. Here's what it looks like (i've kept the non-Hooks as comments for your convenience):
import React, { FC } from "react";
import { useHistory, useParams } from "react-router-dom";
Here, we have our new useHistory and useParams Hooks imports:
interface ScreenCProps {
message: string;
history: any;
match: any;
}
const ScreenC: FC<ScreenCProps> = (props) => {
// useEffect(() => {
// setTimeout(() => {
// props.history.push("/");
// }, 3000);
// });
const history = useHistory();
const { userid } = useParams();
Here, we call our useHistory and useParams Hooks to get history and the userid URL parameter:
const onClickGoback = () => {
// props.history.goBack();
history.goBack();
};
return (
<div>
{/* <div>{"Your id is " + props.match.params. userid}</div>
*/}
<div>{"Your id is " + userid}</div>
<div>{props.message}</div>
<div>
<button onClick={onClickGoback}>Go back</button>
</div>
</div>
);
};
export default ScreenC;
And here, we use the Hooks objects to display the same messages as before. It's quite easy and nice to use.
There are of course more capabilities of the history object and React Router overall, but this is a good introduction to those capabilities and we will use more of these features as we begin to build our app in the coming chapters.
Routing is a vital part of web development. Routes help users know where they are in the application and can provide a sense of context. Routing also helps us as developers structure the logical sections of our application and group relevant items together. React Router allows us to do all these things by providing many programmatic features that allow us to build sophisticated routing into our applications.
Summary
This chapter covered some of the most important React-related frameworks. Redux is a sophisticated tool for managing global application state. React Router provides client-side URL management that looks and feels like classic-style web URLs.
Working with high-quality technologies such as Redux and React Router will help us to write better code. And this in turn will help us give our users the best experience.
We have reached the end of Part 2, which focused on client-side technologies. We will now begin learning about server-side technologies in Part 3.