Chapter 8: Learning Server-Side Development with Node.js and Express
In this chapter, we'll learn about Node and Express. We'll understand how Node can help us create performant web services. We'll also understand what the relationship between Node and Express is and how we can use them together to build our web API.
In this chapter, we're going to cover the following main topics:
- Understanding how Node works
- Learning Node's capabilities
- Understanding how Express improves Node development
- Learning Express's capabilities
- Creating a web API with Express
Technical requirements
You should have a basic understanding of web development with JavaScript. We will once again be using Node and Visual Studio Code (VSC).
The GitHub repository is again at https://github.com/PacktPublishing/Full-Stack-React-TypeScript-and-Node. Use the code in the Chap8 folder.
To set up this chapter's code folder, go to your local HandsOnTypescript folder and create a new folder called Chap8.
Understanding how Node works
Node is one of the world's most popular JavaScript frameworks. It is used as the core technology for millions of websites. The reasons for this are many. It is relatively easy to code for. It is also very fast, and when used with things such as clustering and worker threads, it is very scalable. Also, since it uses JavaScript, it allows creating a full-stack application, front to back, using only a single language. All of these characteristics make Node a terrific choice if you are targeting the web. In this section, we will explore Node's architecture and how it achieves its strong performance.
To start, it is important to realize that Node is not a server-specific framework. It is actually a general-use runtime environment, and not just a web server. Node provides JavaScript with capabilities it normally does not have, such as the ability to access the filesystem and accept incoming network connections.
To explain how Node works, let's use the web browser as an analogy. The browser is also a runtime environment for our JavaScript code (as well as HTML and CSS). The browser works by having a core JavaScript engine that provides base-level JavaScript language features. This includes a language interpreter that reads our code for valid JavaScript and a virtual machine that runs our code across differing devices.
Above this core, the browser provides a secure memory container for apps to run on, the sandbox. But it also provides additional JavaScript capabilities generally known as the web API (not the server-side kind but at the browser level). The web API augments the base JavaScript engine, providing things such as Document Object Model (DOM) access so that JavaScript code can access the HTML document and manipulate it. It provides calls such as fetch that allow asynchronous network calls to other machines, as well as WebGL for graphics and many more. You can see a complete list here: https://developer.mozilla.org/en-US/docs/Web/API.
These features are provided as extras, above and beyond what JavaScript comes with "out of the box," which, if you think about it, does make sense since, at its core, JavaScript is just a language and therefore not specific to any particular platform, even the web.
Node follows a similar model to the browser as it also uses a core JavaScript engine (the V8 engine from Google Chrome) and provides a runtime container for our code to run in. However, since it is not a browser, it provides different additional capabilities that are not so focused on a graphical display.
So then, what is Node? Node is a general-use runtime environment that is focused on high performance and scalability. You can build many types of applications with Node, including computer management scripts and terminal programs. But Node's scaling capabilities make it well suited as a web server as well.
Node has many features that make it very capable as a programming runtime, but at its heart is libuv. Libuv is a Node service written in C that interfaces with the operating system kernel and provides asynchronous input/output facilities. In order to make timely access to these services, libuv uses something called an event loop, which we'll explain shortly, to process these tasks. On top of libuv, Node has an add-ons system, which is analogous to Chrome's extensions. It allows developers to extend Node using C++ and add high-performance features that do not exist by default. Also, in order to allow developers to keep using JavaScript to call into C++, a JavaScript-to-C++ binding system is available called Addons. Let's explore libuv and the event loop a bit more.
Event loop
At the heart of Node are libuv and the event loop. This is the main feature of Node that makes it scale. Libuv's primary job is to provide access to asynchronous input/output (I/O) capabilities of the underlying operating system (Node supports Linux, macOS, and Windows). However, this is not always possible, so it also possesses a thread pool that can be used to make synchronous tasks effectively asynchronous by running them inside a thread. However, the core driver of Node scalability is asynchronous I/O, not threads. The ability to run timers, allow network connections, use operating system sockets, and access the filesystem comes from libuv.
So then, what is the event loop? The event loop is a task runner in libuv, similar to the Chrome event loop, that runs asynchronous callback tasks iteratively. At a high level, here's how it works.
When certain asynchronous tasks are triggered, they get executed by the event loop. The event loop does processing in phases or sets. As shown in the following diagram, it first runs timers, and if any timer callbacks are already queued, it executes them in sequence (if not, it comes back later, and if timers have completed, it queues their callbacks). Then, it handles any pending callbacks (callbacks set by the operating system – for example, TCP errors), and so on, down the line of phases. Note that tasks are asynchronous in nature if they are being executed by libuv, but the callbacks themselves may not be. Therefore, it is possible to block the event loop as it will not trigger the next callback in the queue until the present one returns. Here's a diagram showing roughly how this works:

Figure 8.1 – Node event loop from the Node documentation
You can also consider phases as categories of asynchronous tasks and their callbacks.
All frameworks have their strengths and weaknesses. Node's main strength lies in asynchronous I/O-bound scalability. Therefore, Node is best used for highly concurrent workloads that require many simultaneous connections. In later versions of Node, starting at 10.5, the Node team did introduce worker threads to add multithreading capability for running CPU-bound tasks, which are tasks that are mostly about performing long-running computations. However, this is not Node's main strength. For computation-heavy workloads, there are probably better options. But since our priority with Node is to create a highly scalable API for our React frontend, Node works nicely for our needs.
In the next section, we'll start digging deeper into Node by writing code in Node without using any wrapper libraries, such as Express or Koa. This will not only give us a clearer understanding of how the Node core works, but it will also help us to better understand the differences between Node and Express.
Learning Node's capabilities
In the previous section, we gave a high-level conceptual overview of what Node is and why it scales so well. In this section, we will begin making use of this scalability by writing code with Node. We'll install Node, set up a project, and start exploring the Node API.
Installing Node
Before we can write code with Node, we need to install it. To follow along, in the previous chapters, you may have already done this, but let's refresh our memory of how to install it again as Node gets updated quite frequently:
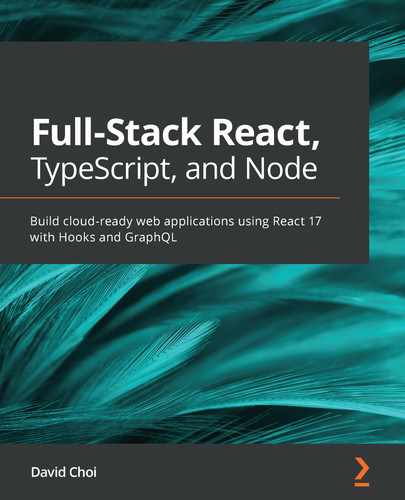
- Go to https://nodejs.org. The following screenshot shows this page as of the time of writing this book:
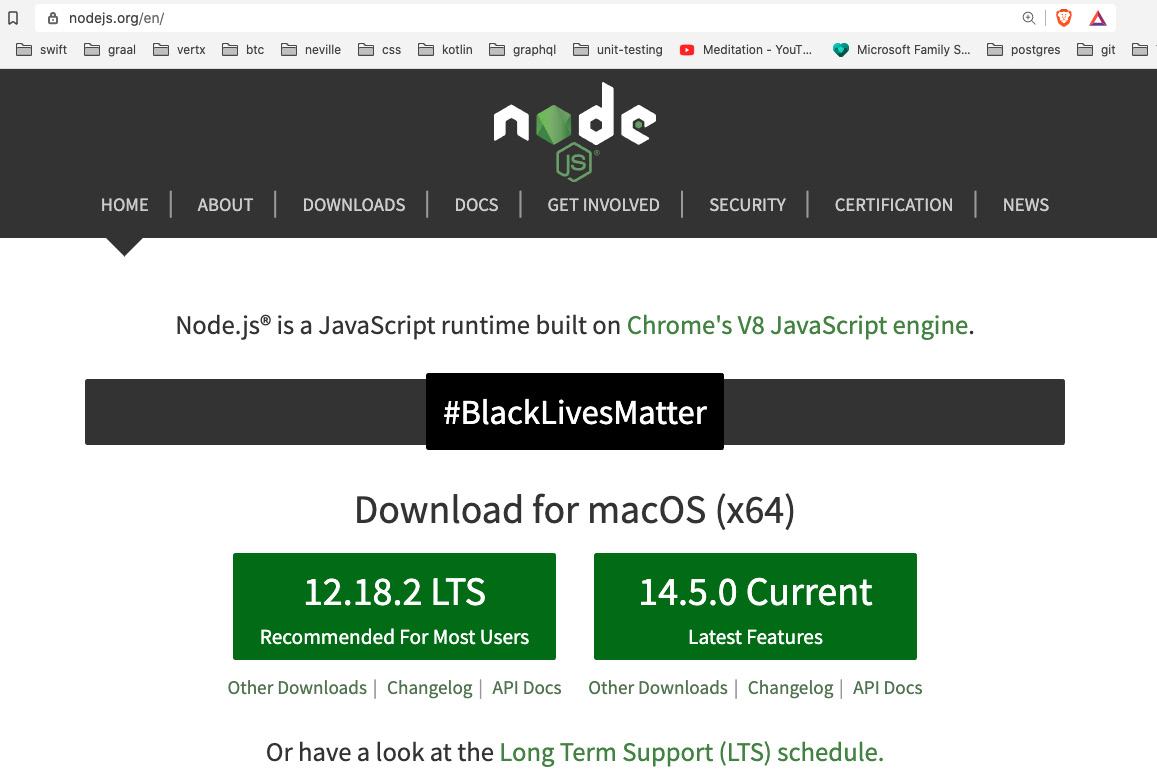
Figure 8.2 – Node website
For production use, you may want to go down the more conservative route and use the Long-Term Support (LTS) version, as shown, but since we want to learn about the latest version for this book, let's select the Current version.
Note
In general, later versions of Node will be slightly faster and have more security and bug fixes. However, it is possible that new issues have been introduced, so you should be careful when upgrading a production server.
By installing Node, we get the runtime as well as the latest npm package manager.
- Once you click on your selected version, you will be asked to save an install package that matches your operating system. Save the package and then start it. You should then see a screen like the following:
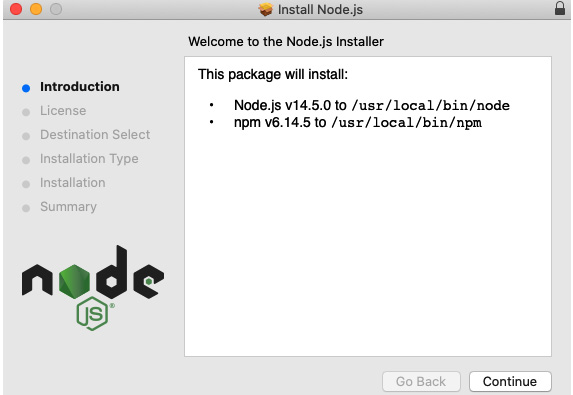
Figure 8.3 – Node setup
Complete the installation as guided by the setup window.
Great, now we have installed or updated our Node runtime and npm package manager. As mentioned previously, Node is not just a server framework but also a complete runtime environment that allows you to write a great variety of different applications. For example, Node has a command-line interface called REPL. If you open your command line or terminal and type node, you will see that it converts to accept JavaScript commands, like this:
Figure 8.4 – Node REPL
We will not be using REPL in this book, but I included it here so that you are aware that it exists and may be of use for your future projects. You can learn more about REPL in the official documentation, https://nodejs.org/api/repl.html#repl_design_and_features. Also, in case you're curious, undefined is returned because each command has not returned anything and in JavaScript, that is always undefined.
Okay, so now, let's create our first Node application and explore some more of Node's features:
- Open VSCode, and then open the terminal to the Chap8 folder.
- Then, create a new folder called try-node in the Chap8 folder.
- Now, create a file called app.js. Let's avoid TypeScript for now so that we can keep things simple.
- Add a simple console message to app.js, like so:
console.log("hello world");
Then, run it:
node app.js
You should see the following output:

Figure 8.5 – Run app.js
Not a particularly useful application, but nevertheless, as you can see, Node is running standard JavaScript code. Now, let's do something more useful. Let's access the filesystem using the following steps:
- In the same app.js file, delete the console message and enter the following code:
const fs = require("fs");
You may be confused by this code since it's not the current style of doing imports. But I wanted to include it here since a great deal of older Node code still uses this CommonJS-style syntax for importing dependencies. So, you should be aware of it.
- Next, write the following code to create a file and then read its contents:
fs.writeFile("test.txt", "Hello World", () => {
fs.readFile("test.txt", "utf8", (err, msg) => {
console.log(msg);
});
});
If you run this code, you will see the following output and a file called test.txt created in your try-node folder:
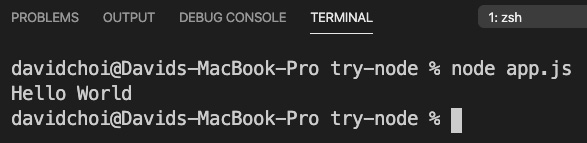
Figure 8.6 – app.js output
The syntax of fs is a bit cumbersome because it uses the older callback style. Node was created long before JavaScript received Promises and async await, and therefore some calls still use the callback style of asynchrony. However, there is a newer, Promise-enabled version of fs – which is, therefore, async await-capable – that can be used instead. Its syntax looks like this:
const fs = require("fs/promises");
(async function () {
await fs.writeFile("test-promise.txt", "Hello Promises");
const readTxt = await fs.readFile("test-promise.txt", "utf-8");
console.log(readTxt);
})();
Notice we are using an IIFE to allow us to make a top-level await call.
If you are on an older version of Node, fs/Promises became stable after version 11, so you can use a tool called promisify to wrap callback-style calls to get them to work in an async await style.
Nevertheless, it is important that you are aware of the older callback-style calls since this is historically how Node code was written and there is probably a great deal of Node code that remains in this style today.
- We saw, at the top of our code, that we used require to do our fs import. Let's switch to the newer import syntax. We'll need to do two things: change the file extension from .js to .mjs and update the require statement like this:
import fs from "fs";
If you run app.mjs again, you will see that it still works. We could set the configuration flag inside of package.json "type" : "module" instead, but for this example app, we did not use npm. Additionally, if we set this flag globally, we can no longer use require. This can be an issue as some older npm dependencies still use require for importing.
Note
There is an older command-line flag called --experimental-modules that allows the use of import, but it is now deprecated and should be avoided for newer versions of Node.
Creating a simple Node server
We learned that Node is based on some older JavaScript technologies, such as callbacks and CommonJS. Node was created before JavaScript Promises and the newer versions of JavaScript, such as ES6 and beyond. Nevertheless, Node still works well, continues to be updated, and later, when we add additional libraries, we'll be able to use async await and Promises in most cases.
Now, let's work on a more realistic Node server example. We'll create a new project with npm:
- On the root of Chap8, create a new folder called node-server.
- Cd into the node-server folder and initialize npm with the following command:
npm init
- Let's call our package name node-server and accept defaults for the other package.json attributes.
- Create a new file on the root called server.mjs and add the following code:
import http from "http";
Don't worry, we'll start using TypeScript soon. Right now, let's keep things simple so that we can focus on learning Node.
- We have imported the http library from the Node core. We then use createServer in order to create a server object. Notice that our createServer function takes a function as an argument with two parameters. The parameters, req and res, are of the Request and Response type, respectively. A Request object will have all the members relevant to the request that was made by our users and the response allows us to modify our response before sending it back out.
At the end of our createServer handler function, we are explicitly ending our calls by using res.end and returning text. If we did not send end, our response would never complete and nothing would appear on the browser:
const server = http.createServer((req, res) => {
console.log(req);
res.end("hello world");
});
- Finally, we use our new server object to wait and listen for new requests using the listen function with a port number and a callback function that prints that the server has started:
const port = 8000;
server.listen(port, () => {
console.log(`Server started on port ${port}`);
});
- Run this code by executing our server.mjs script (make sure to use the correct extension of .mjs):
node server.mjs
Please remember, as we work, that there is no auto-reload function currently. So, upon code changes, we will have to do a stop and restart manually. We'll add this later as we continue adding more features to our projects.
- If you open your browser to http://localhost:8000, you should see hello world printed in your browser and the following in your console:

Figure 8.7 – First node server run
The terminal is showing the req object and its members. We'll of course go over Request and Response in more detail soon.
Another interesting thing is that no matter what URL we give, it always returns the same hello world text. This is because we have not implemented any route handling. Handling routes is another item we must learn in order to use Node properly.
You can keep refreshing your browser and the server will keep responding with hello world. As you can see, the server remains up no matter how many requests we send it, as opposed to returning and ending like a typical script program. This is because the event loop, the core of Node, is a kind of infinite loop that will keep waiting for new tasks and processing them dutifully.
Congratulations, you've now run your first Node server! Humble beginnings for sure, but nevertheless, you can now make real browser calls and our server will respond. So, you are well on your way.
Request and Response
When a request from a browser gets to the server, all server frameworks will generally have two objects: Request and Response. These two objects represent the relevant data for the request that came from the browser and the response that will be returned to it. Let's take a look at these objects from the browser to see what they're made of. Reload your browser but this time with the Chrome dev tools open on the Network tab:

Figure 8.8 – Chrome dev tools Network tab
This view is only from the browser's perspective and in Node, there's a lot more information in these objects. However, we need to first understand what a web request is made of before we can try and create any real web server. So, let's list out some of the more important items and describe what they mean.
Request URL
Obviously, this represents the complete URL path sent to the server. But the reason the server needs to know the complete path is that a lot of additional information can often be sent in the URL. For example, if our URL was http://localhost:8000/home?userid=1, there's actually a fair amount of information here. First, we tell our server that we're looking for either a web page or API data within the home subdirectory. This allows the server to tailor its returned response with only an HTML page or data specific to that URL. Additionally, we've passed a parameter called userid (parameters start after the question mark and multiple parameters can be separated by the & symbol), which can be used by the server to provide unique data in the request.
Request method
A request method represents what's called an HTTP verb. A verb is simply a description that tells the server what action the client is intending to do. The default verb is GET, which means, as the name indicates, the browser would like to read some data. The other verbs are POST, which indicates creation or insertion, PUT, which indicates updating, and then DELETE, indicating deletion. In Chapter 9, What Is GraphQL?, we'll see that GraphQL only uses the POST method, but this isn't actually an error as the verbs are not hard rules but more like guidelines. One additional thing to note is that when using GET, any parameters needed will be provided in the URL, as the request URL bullet item example showed. However, for POST, the parameters are provided in the body of the request. We'll go over these differences more in the Learning Express capabilities section.
Status code
All web requests will return these codes to indicate the result of the request. For example, a status of 200 indicates success. I won't list all of them here, but we should know some of the most common ones, as it can sometimes help in debugging:
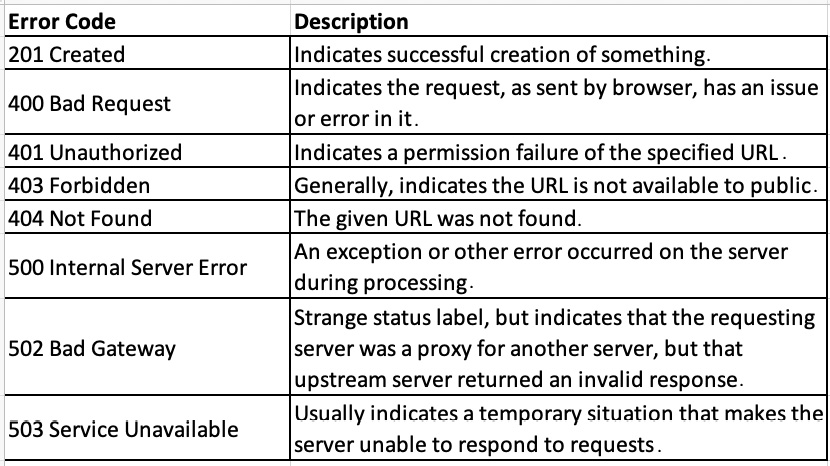
Figure 8.9 – Error codes
Headers
Headers provide additional information that acts as descriptions or metadata. As shown, there are multiple types of headers: general, request, response, and entity. Again, I won't go over all of them, but there are a few we should be familiar with. Here are the request headers:

Figure 8.10 – Request headers
And here are the response headers:
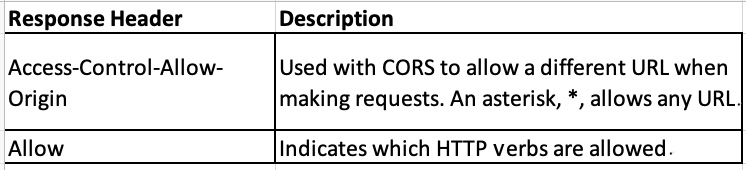
Figure 8.11 – Response headers
This is, of course, dry information. However, knowing what's involved in making these requests and responses helps us better understand how the web works and therefore write better web apps. Let's look more deeply now at routing.
Routing
Routing is in some sense a lot like passing parameters to a server. When the server sees a specific route, it will know that the response needs to be a certain way. The response could be returning some specific data or writing data to a database, but having routes helps us manage how our server should behave for each request.
Let's do some route handling in Node:
- Update the server object in the server.mjs file in the node-server project, like this:
const server = http.createServer((req, res) => {
if (req.url === "/") {
res.end("hello world");
} else if (req.url === "/a") {
res.end("welcome to route a");
} else if (req.url === "/b") {
res.end("welcome to route b");
} else {
res.end("good bye");
}
});
As you can see, we take the req.url field and compare it to several URLs. For each one that matches, we end our response with some unique text.
- Run the server again and try each route. For example, if your route is http://localhost:8000/a, then you should see this:

Figure 8.12 – Route /a
- Okay, now let's see what happens if we receive a POST request. Update your createServer function like this:
const server = http.createServer((req, res) => {
if (req.url === "/") {
res.end("hello world");
} else if (req.url === "/a") {
res.end("welcome to route a");
} else if (req.url === "/b") {
res.end("welcome to route b");
} else if (req.url === "/c" && req.method === "POST") {
let body = [];
req.on("data", (chunk) => {
body.push(chunk);
});
req.on("end", () => {
const params = Buffer.concat(body);
console.log("body", params.toString());
res.end(`You submitted these parameters:
${params.toString()}`);
});
} else {
res.end("good bye");
}
});
As you can see, we added another if else statement with the /c route and the POST method type. You may be surprised to see that in order to get the posted data from our call, we need to handle the data event and then the end event so that we can return the call.
Let me explain what this is about. Node is very low level, meaning it does not hide its intricate details to make things easier, in order to be more performant. So, when a request is made and some information is being sent to the server, this data will be sent as a stream. This simply means the data is not sent in one shot, but in pieces. Node does not hide this fact from the developer and uses an event system to receive the data in chunks, since it's not clear upfront how much data is coming in. Then, once this data is finished being received, that's when the end event triggers.
In this sample, the data event is used to aggregate our data into an array. Then, the end event is used to put that array into a memory buffer, from which it can then be processed as a whole. In our case, it's just JSON, so we convert to a string.
- To test this, let's submit a POST request using curl. curl is just a command-line tool that allows us to make web server requests without using a browser. It's great for testing. Execute the following code in your terminal (if you're on Windows, you may need to install curl first; on macOS, it should already be there):
curl --header "Content-Type: application/json" --request POST --data '{"userid":"1","message":"hello"}' "http://localhost:8000/c"
You should get the following back:

Figure 8.13 – Result of curl POST
Clearly, all of this works but is not ideal from a development productivity perspective. We would not want 30 of these if else statements in a single createServer function. It's difficult to read and maintain. We'll see how Express helps us avoid these types of issues by providing extra wrappers on top of Node to make development faster and more reliable. We'll see this in the Understanding how Express improves Node development section. Let's learn about some tools to help our Node coding first.
Debugging
As we saw with React, a debugger is a very important tool to help in troubleshooting code. In the case of Node, we cannot use a browser tool, of course, but VSCode does have a built-in debugger that will allow us to break on code and view values. Let's take a look at that as we'll also use it with Express:
- Click on the debugger icon in VSCode and you'll see the following screen. In the current version, as of the time of writing, it looks like this:

Figure 8.14 – The VSCode debugger menu
The first button runs the debugger and the second shows the debugger version of the terminal. When running the debugger, you generally want to be looking at the debugger console as it can show errors that happen at runtime.
- When running the VSCode debugger, you want to click on the Run and Debug button. Then, you will see the dropdown shown in the following screenshot. Select Node.js and that will start your Node session as a debug session. Notice the continue, pause, restart, and stop buttons at the upper right. Note also that running in debug mode using VSCode is a completely different run of Node from the running of Node using the npm start command:

Figure 8.15 – Node.js debugger selection
- Once you start your debugger, if you have set a breakpoint by clicking next to any line number, you will be able to have the code pause there. Then, you can view values that are relevant to that scope:

Figure 8.16 – Break on line view
As you can see, we have set a breakpoint on line 13 within the data event and are able to view the current chunk. Hit the continue button or click F5 to continue running the program.
- Hovering over values while on a breakpoint is useful but not the only way to help debug our app. We can also use the debugger screens to help us understand what our values are at the moment we have stopped at a breakpoint. Take a look at the following screenshot:

Figure 8.17 – Debug windows full view
Look at our breakpoint, toward the middle of the screenshot. We can see that we have broken inside of the end event handler scope. Let's look at some of the features listed:
- Starting with the upper-left menu, called VARIABLES, we can see the Local section and two variables that exist in our currently stopped-on code scope: params and this. Again, we are looking at the Local scope, which right now is the event handler for the end event, and that's why we only have those two variables.
- Near the middle left, on the WATCH menu, we see a single variable called params, which I added. There is a plus sign in this section that allows us to add variables that we are interested in and when they come into scope, the current value will show there.
- Then, toward the bottom left, we see CALL STACK. The call stack is the list of calls that our program is running. The list will show in reverse order, with the last command on top. Often, many of these calls will be code from either Node or some other framework we did not write ourselves.
- Then, at the bottom right, we have our DEBUG CONSOLE tab, which displays any logs or errors while the app is running. Notice that at the bottom of this tab, we can also type in code to see results. For example, I typed the params variable and its buffer was displayed.
- Finally, at the upper right, we see the debug continuation buttons. The first button on the left is the continue button, which continues running our app from the last breakpoint. Next is the step over button, which will go to the immediate next line and stop there. Next is the step into button, which will take you inside the definition of a function or class as it runs. Then, there's the step out button, which will bring you out and back into the parent caller. The last, square button stops our app completely.
That was a quick introduction to the VSCode debugger. We will be using more of it as we get into Express, and then later with GraphQL.
Now, as you've seen, having to manually restart the Node service every time we make any changes is a bit of a pain and slows down development. So, let's use a tool called nodemon, which will automatically restart our Node server whenever we save script changes:
- Install nodemon globally by running the following command:
npm i nodemon -g
This installs nodemon to our entire system. Installing it globally allows all apps to run nodemon without needing to keep installing it. Note that on macOS and Linux, you may need to prefix this command with sudo, which will elevate your rights so that you can install it globally.
- Now, we want to start it upon app start. Update the package.json file by finding the "scripts" section and adding a sub-field called "start", and then add the following command to it:
nodemon server.mjs
Your package.json "scripts" section should look like this now:

Figure 8.18 – package.json "scripts" section
- Now, run the new script using the following command:
npm start
Note that normally, when running the npm command, you need to run npm run <file name>. However, for start scripts, we can skip the run sub-command.
You should see the app start up as usual.
- Now that the app is running, let's try changing and then saving the server.mjs file. Change the string inside the listen function to be `The server started on port ${port}`. Once you save this change, you should see Node restart and the new text showing on the terminal.
- The settings within package.json do not affect our VSCode debugger. So, to set auto-restart, we'll need to set that up as well. Go to your debugger menu again and click the create a launch.json file button, as shown here:

Figure 8.19 – Creating a new launch.json file
If you click this button, you will then see the launch.json file in the .vscode folder in the root of the GitHub repository (not the root of the project). It should contain the following configurations (note that this one file can contain multiple configurations):
{
// Use IntelliSense to learn about possible attributes.
// Hover to view descriptions of existing attributes.
// For more information, visit:
// https://go.microsoft.com/fwlink/?linkid=830387
"version": "0.2.0",
"configurations": [
{
"type": "node",
"request": "launch",
"name": "Launch node-server Program",
"skipFiles": ["<node_internals>/**"],
"program": "${workspaceFolder}/Chap8/node-
server/server.mjs",
"runtimeExecutable": "nodemon",
"restart": true,
"console": "integratedTerminal"
}
]
}
You can see that the configurations field is an array, which means you can keep adding configurations to this one file. But for our configuration, notice that type is node, of course. We've also updated name to "Launch node-server Program". But also, notice that we switched runtimeExecutable to be nodemon instead of node, and console is now the integrated terminal. In order to use nodemon with the debugger, we must switch to the TERMINAL tab and not the debugger console.
- Now that we have at least one launch.json configuration, our debug menu will show the following view:
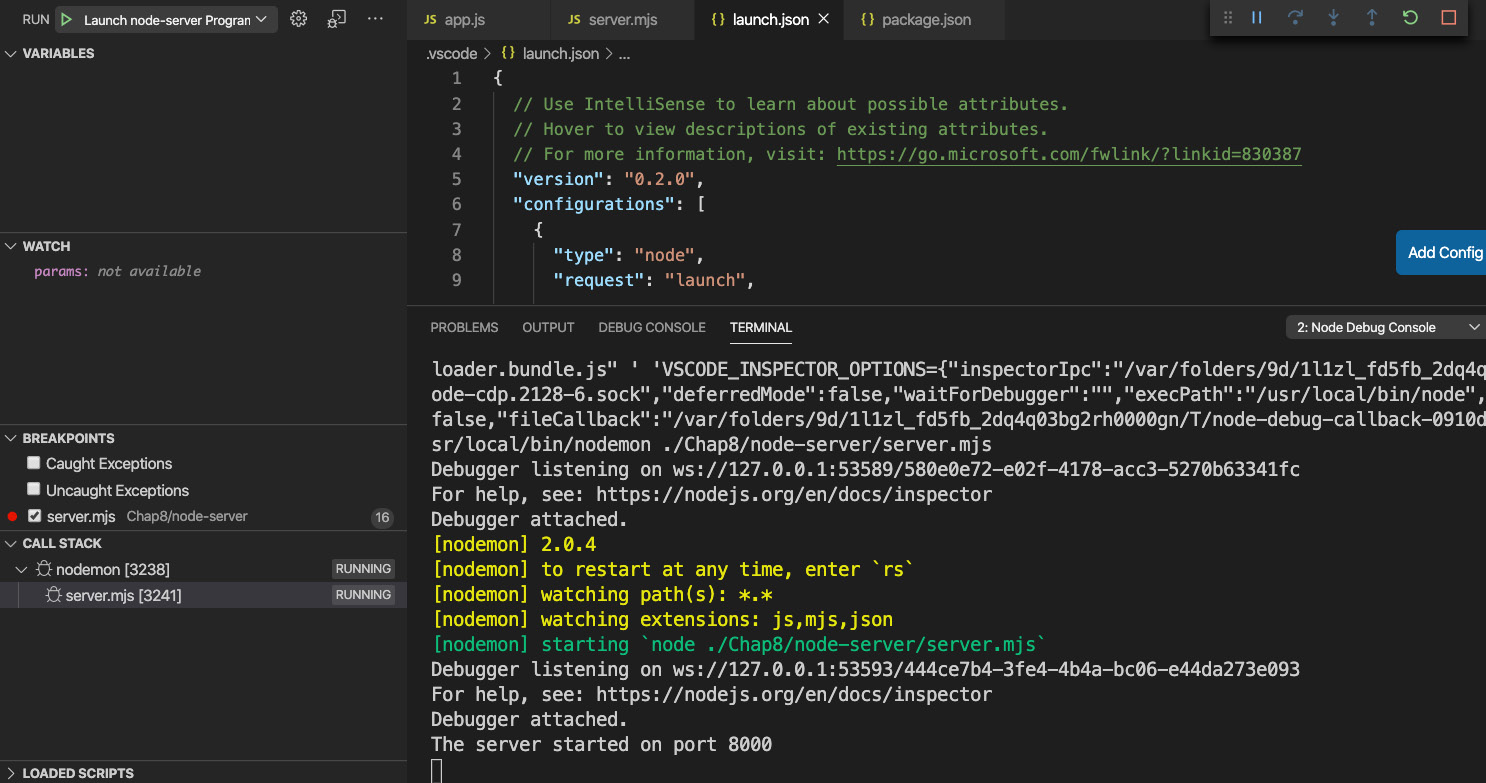
Figure 8.20 – Debugger from launch.json
If your dropdown does not show Launch node-server Program, select it and then press the play button. Then, you should see the debugger launch again, only this time it will auto-restart.
- Now, try and make a small change and the debugger should auto-restart. I removed the T from the listen function log message:

Figure 8.21 – Debugger auto-restarted
- Sweet, now we can easily break on and debug our Node code!
That was a fast introduction to some tools that will help with our development and debugging.
In this section, we learned about using Node directly to code our server. We also learned about debugging and tooling to improve our development flow. Coding with Node directly can be time-consuming and unintuitive. In the next sections, we will learn about Express and how it helps make our Node development experience better.
Understanding how Express improves Node development
As we have seen, coding with Node directly has an awkward and cumbersome sort of feel. Having an easier-to-use API would make us more productive. This is what the Express framework attempts to do. In this section, we will learn what Express is and how it can help us write code more easily for our Node apps.
Express is not a standalone JavaScript server framework. It is a layer of code that sits on top of Node, and therefore uses Node, to make developing JavaScript servers with Node both easier and more capable. Just like Node, has its own core capabilities and then some additional features via dependency packages. Express also has its core abilities as well as a rich ecosystem of middleware that provides extra capabilities.
So then, what is Express? According to the website, Express is just an application that is a series of middleware calls. Let's explain this by first looking at a diagram:
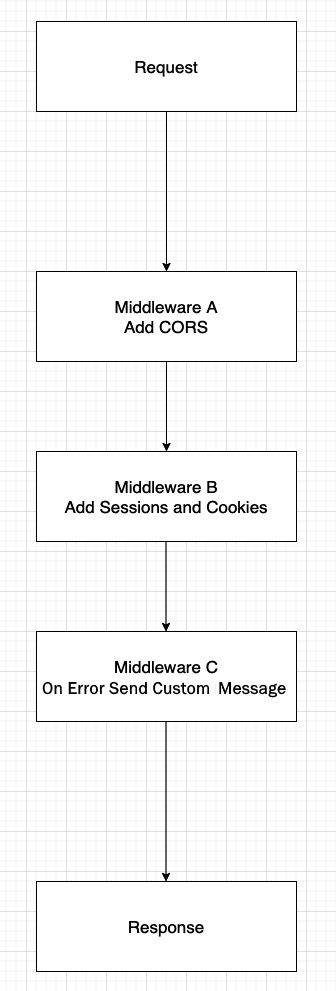
Figure 8.22 – Express request response flow
Whenever a new server request comes in, it travels along a sequential path for processing. Normally, you would just have a request, and then once the request is understood and processed, you would then get some response. When using Express, however, you can have multiple intermediate functions that inject themselves into the process and do some unique work.
So, in the example shown in Figure 8.22, we see that first there is middleware that adds CORS ability, which is a way to allow requests from different URL domains than the one that the server resides on. Then, we have middleware that handles sessions and cookies. Sessions are just unique data that gets collected about the user's current usage of the website – for example, their login ID. Then, finally, we see an on-error handler that will determine some unique message that will be shown depending on the error that has occurred. Of course, you could add more middleware as needed. The key point here is that Express enables this injection of extra capabilities that Node normally does not have in a fairly straightforward way.
On top of this middleware ability, Express adds additional features to the Request and Response objects that further enhance the developer's productivity. We'll take a look at those features and further explore Express in the next section.
Learning Express's capabilities
Express is basically a middleware runner for Node. But, like most things in life, a simple explanation seldom provides the information necessary to make proper use of it. So, in this section, we will explore Express and learn about its capabilities with examples.
Let's install Express onto our node-server project. Type the following command into your terminal:
npm I express -S
This should give you an updated package.json file that has a new dependencies section:

Figure 8.23 – Updated package.json
Now, before we start writing code, we need to understand a few things. Again, as mentioned, Express is a wrapper around Node. This means that Express already uses Node internally. So, when we write code with Express, we will not be directly calling Node. Let's see what this looks like:
- Create a new server file called expressapp.mjs and add the following code to it:
import express from "express";
const app = express();
app.listen({ port: 8000 }, () => {
console.log("Express Node server has loaded!");
});
As you can see, we create an instance of express and then we call a function called listen on it. Internally, the express.listen function calls Node's createServer and listen functions. If you run this file, you will see the following log message:

Figure 8.24 – The expressapp.mjs file running
So, now we have a running Express server. However, it does not do anything until we add some middleware. Middleware for Express runs under several main umbrellas or sections. There is middleware that runs for the entire application, there is middleware that runs only during routing, and there is middleware that runs on errors. There is also middleware that is core to Express that it uses internally. And, of course, instead of implementing our own code to do the work of middleware, we can also use npm packages that provide third-party middleware. We already saw some of these in the previous section, Understanding how Express improves Node development, in Figure 8.22.
- Let's start by adding our own middleware. Update expressapp.mjs with the following code:
import express from "express";
const app = express();
app.use((req, res, next) => {
console.log("First middleware.");
next();
});
app.use((req, res, next) => {
res.send("Hello world. I am custom middleware.");
});
app.listen({ port: 8000 }, () => {
console.log("Express Node server has loaded!");
});
So, for this first example, we have decided to use the app-level middleware by using the use function on the app object. This means that any requests for the entire application, regardless of route, will have to process these two middleware.
Let's go through them. First, note that all middleware is processed in the order that they are declared in code. Second, unless ending a call at the end of a middleware, we must call the next function to go to the next middleware, or else the processing will stop.
The first middleware is just logging some text, but the second middleware will write to the browser screen by using the Express send function. The send function is a lot like the end function in Node, as it ends processing, but it also sends back a content-type header of the text/html type. If we were using Node, we would have to send headers explicitly ourselves.
- Now, let's add middleware for routes. Note that technically, you can pass routes – for example, the /routea route – to the use function. However, it is better to use the router object and contain our routes under one container. In Express, a router is also middleware. Let's see an example:
import express from "express";
const router = express.Router();
First, we have created our new router object from the express.Router type:
const app = express();
app.use((req, res, next) => {
console.log("First middleware.");
next();
});
app.use((req, res, next) => {
res.send("Hello world. I am custom middleware.");
});
app.use(router);
So, we have the same set of middleware as before added to the app object, which makes it run globally across all routes. But then, we have also added the router object to our app as middleware. The router middleware, however, runs only for the specific routes that are defined:
router.get("/a", (req, res, next) => {
res.send("Hello this is route a");
});
router.post("/c", (req, res, next) => {
res.send("Hello this is route c");
});
So again, we added two middleware to our router object: one for the /a route, which uses the get method function and the other for the /c route, which uses the post method function. Again, these functions represent the HTTP verbs that are possible. The listen function call is identical to before:
app.listen({ port: 8000 }, () => {
console.log("Express Node server has loaded!");
});
Now, a peculiar thing will happen if we run this code by going to the following URL: http://localhost:8000/a. Instead of seeing the Hello this is route a text, we will instead see the Hello world. I am custom middleware. text. Can you guess why? It is because middleware order matters and since our second app-level middleware is calling res.send, all calls will end there and not go to the next middleware.
Remove the second app.use call that sends the Hello world… message and try going to http://localhost:8000/a. You should see the following message now:
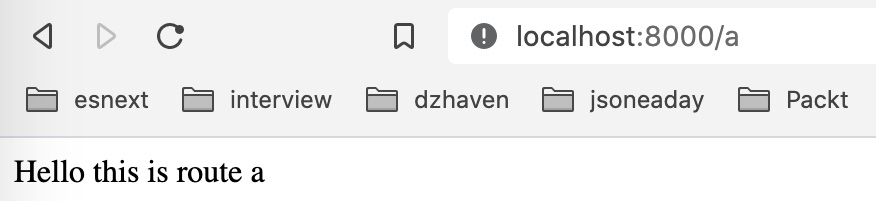
Figure 8.25 – Middleware for route /a
Great, that worked, but now try using your browser to go to http://localhost:8000/c. Does that work? No, it does not, and you get the Cannot GET /c message. As you might have guessed, browser calls are defaulted to GET calls but our /c route is a POST-only route. If you bring up your terminal and run the last POST curl command that we used in the Learning Node's capabilities section, you'll see this:

Figure 8.26 – Route /c
As you can see, we receive the appropriate text message.
- Now, let's add third-party middleware. In the Learning Node's capabilities section, we saw how to parse POST data and how arduous that can be using Node. For our example, let's use the body parser middleware to make doing this easier. Update the code like this:
import express from "express";
import bodyParser from "body-parser";
We first import the body parser middleware. Then, we add the body parser at the top so that all of our handlers can be automatically converted from a JSON string to a parsed object when needed:
const router = express.Router();
const app = express();
app.use(bodyParser.json());
Then, we update our /c route handler so that its text message shows the value passed in the message field:
app.use((req, res, next) => {
console.log("First middleware.");
next();
});
app.use(router);
router.get("/a", (req, res, next) => {
res.send("Hello this is route a");
});
router.post("/c", (req, res, next) => {
res.send(`Hello this is route c. Message is
${req.body.message}`);
});
As you can see, most of this work is quite a bit easier than using Node events such as data and end.
- Now, finally, let's do an on error middleware. Simply add the following code to just below the bodyParser.json() middleware call:
import express from "express";
import bodyParser from "body-parser";
const router = express.Router();
const app = express();
app.use(bodyParser.json());
app.use((req, res, next) => {
console.log("First middleware.");
throw new Error("A failure occurred!");
});
Then, we throw an error from our first custom middleware:
app.use(router);
router.get("/a", (req, res, next) => {
res.send("Hello this is route a");
});
router.post("/c", (req, res, next) => {
res.send(`Hello this is route c. Message is ${req.body. message}`);
});
app.use((err, req, res, next) => {
res.status(500).send(err.message);
});
Now, we've added our error handler as the last middleware in our code. This middleware will catch all errors that were not previously handled and send the same status and message:
app.listen({ port: 8000 }, () => {
console.log("Express Node server has loaded!");
});
- Go to http://localhost:8000/a and you should see the following message:
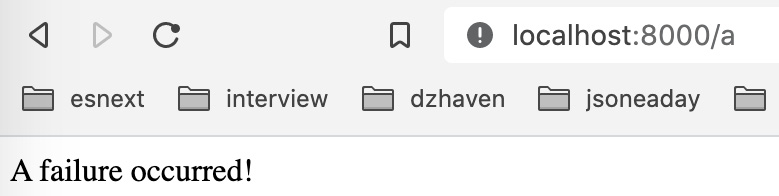
Figure 8.27 – Error message
Since our top-level middleware is throwing an exception, all routes will throw this exception and therefore will be caught by our error handler middleware.
This was an overview of the Express framework and its features. As you can see, it can make developing with Node quite a bit simpler and clearer. In the next section, we will take a look at using Express and Node to build a web API that returns JSON, which is the default data schema of the web.
Creating a web API with Express
In this section, we will learn about the web API. Currently, it is one of the most popular ways of providing data across the web. In our final application, we will not be using the web API since it is our intention to use GraphQL. However, it is good to have some understanding of web API design since on the internet, it is very commonly used and under the covers, GraphQL also works similarly.
What is a web API? API stands for application programming interface. This means that it's a way for one programming system to interact with another. Therefore, a web API is an API that uses web technologies to provide programming services to other systems. A web API sends and receives data as a string, as opposed to binary data, and usually in JSON format.
All web APIs will have an endpoint that is represented by a URI, basically the same thing as a URL. This path must be static and not changing. If a change is desired, then it is expected that the API vendor will do a version update, leaving the old URI intact and creating a new URI delineated by a version upgrade. For example, if a URI started as /api/v1/users, then the next iteration would be /api/v2/users.
Let's create a simple web API for demonstration purposes:
- Let's update our expressapp.mjs file with the following new routes:
import express from "express";
import bodyParser from "body-parser";
const router = express.Router();
const app = express();
app.use(bodyParser.json());
app.use((req, res, next) => {
console.log("First middleware.");
next();
});
Everything up to here was the same, except notice we removed the exception that was thrown:
app.use(router);
router.get("/api/v1/users", (req, res, next) => {
const users = [
{
id: 1,
username: "tom",
},
{
id: 2,
username: "jon",
},
{
id: 3,
username: "linda",
},
];
console.log(req.query.userid);
const user = users.find((usr) => usr.id == req.query. userid);
res.send(`User ${user?.username}`);
});
This first middleware is showing the /api/v1/users path. This type of pathing is fairly standard for web APIs. It indicates the version and a related container of data to query – in this case, users. For example purposes, we are using a hardcoded array of users and finding only one with a matching ID. Since id is a number and anything coming from req.query is a string, we are using == as opposed to ===. If you load the browser to the URI, you should see this:

Figure 8.28 – User GET request
As you can see, our second user, jon, is returned.
- Next, for this middleware, we are doing something almost identical for groups. Notice how the pathing is consistent between both resource paths. This is an important feature for a web API. Again, we take a single item from an array, but in this case, we are using a POST method, so the parameter is gotten from the body:
router.post("/api/v1/groups", (req, res, next) => {
const groups = [
{
id: 1,
groupname: "Admins",
},
{
id: 2,
groupname: "Users",
},
{
id: 3,
groupname: "Employees",
},
];
const group = groups.find((grp) => grp.id == req.body. groupid);
res.send(`Group ${group.groupname}`);
});
If you run the terminal command to this URI, you should see the following:

Figure 8.29 – Group POST request
As shown, our first group, Admins, is returned. The rest of the code is identical:
app.use((err, req, res, next) => {
res.status(500).send(err.message);
});
app.listen({ port: 8000 }, () => {
console.log("Express Node server has loaded!");
});
Important Note
Since the web API is specific to web technologies, it supports calls with all the HTTP methods: GET, POST, PATCH, PUT, and DELETE.
This was a quick introduction to building a web API using Express and Node. We now have had a broad overview of Node and its most important framework, Express.
Summary
In this chapter, we learned about Node and Express. Node is the core server-side technology that drives a huge percentage of servers on the web, and Express is the most popular and often used Node-based framework for building web applications. We now have a complete picture of how frontend and backend technologies work to create websites.
In the next chapter, we'll learn about GraphQL, an extremely popular and relatively new standard for creating web-based API services. Once we've covered this, we will have all the knowledge we need to start building our project.