
6
Emoji Wall Art
In this chapter, we’ll turn a web image into wall art using Fusion’s Model workspace, a digital imaging program, and an online converter.
Find an Image
I searched online for emojis and found the JPEG file in Figure 6-1. Simple cartoons with contrasting colors convert to SVG files best. Black-and-white ones convert better than color ones, as details are usually better preserved. So I imported the file into IrfanView (download at irfanview.com), clicked Image → Convert To Grayscale (Figure 6-2), and saved it as a PNG file. PNG files preserve transparencies, resulting in a clear background.

Figure 6-1: A web image

Figure 6-2: The web image converted to black and white in IrfanView
Use an Online Converter to Make an SVG File
Point your browser to online-convert.com. Click the dropdown arrow in the Image Converter box, choose Convert To SVG, upload the file, and then save it as an SVG file (Figure 6-3).

Figure 6-3: Convert the PNG file to an SVG file.
Import and Unlock the SVG File
Click Insert → Insert SVG (Figure 6-4). The origin planes and a dialog box will appear. Click the horizontal plane and then click the folder graphic. Navigate to the SVG file, bring it in, and click OK. The file will be green, indicating that it’s locked (Figure 6-5). Select it, right-click, and choose Fix/UnFix (Figure 6-6). The sketch will turn blue, indicating it is now unlocked and editable. Be aware that depending on the graphics program you use, or the conversion you get, your SVG might look different from mine and require a bit different editing.
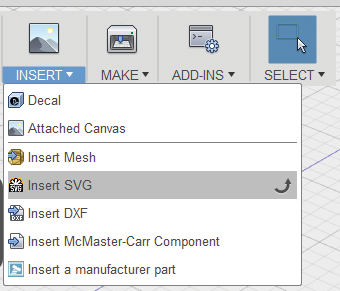
Figure 6-4: Click Insert → Insert SVG.
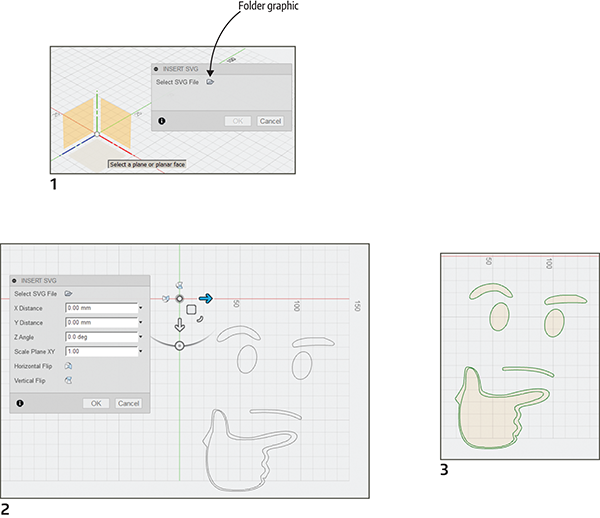
Figure 6-5: Import the SVG file.

Figure 6-6: Unlock the sketch.
Add a Circle
The sketch needs a circle around it. Click Circle → Center Diameter Circle, click a center point, and then click or type a diameter (Figure 6-7).
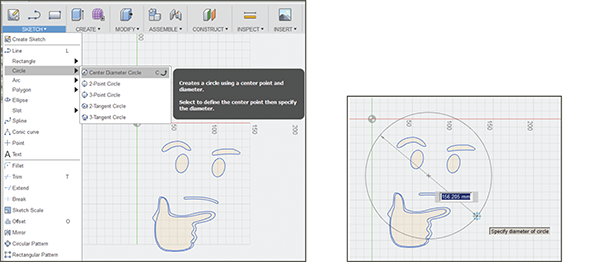
Figure 6-7: Draw a circle around the sketch.
Model the Sketch
Select the hand and facial features by pressing and holding the Shift key and clicking each. Then right-click, choose Press Pull, and extrude those sketches up (Figure 6-8). The circle sketch will disappear; click the gray light bulb in front of its entry in the Browser to make it yellow, turning it back on (Figure 6-9). Select the circle sketch, right-click, and press-pull it up half the distance of the hand and facial features (Figure 6-10).
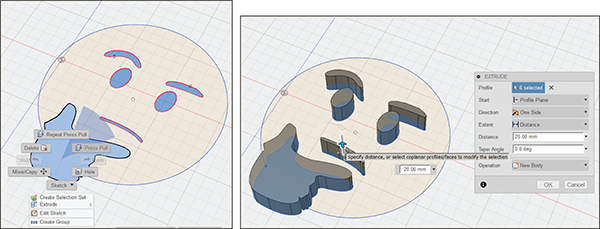
Figure 6-8: Extrude the hand and facial features up.
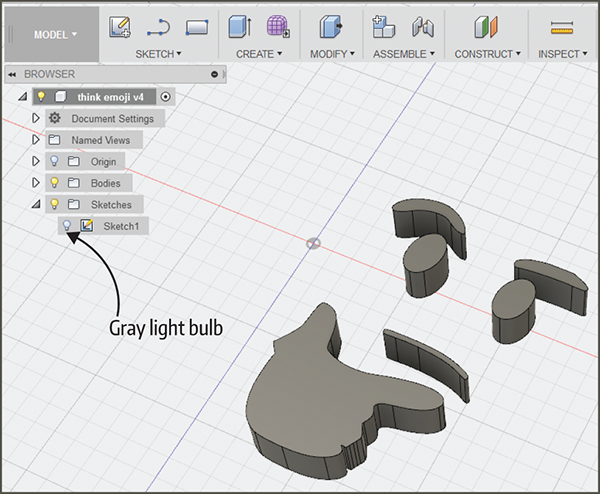
Figure 6-9: Turn the circle sketch back on by clicking the gray light bulb in front of its Browser entry.
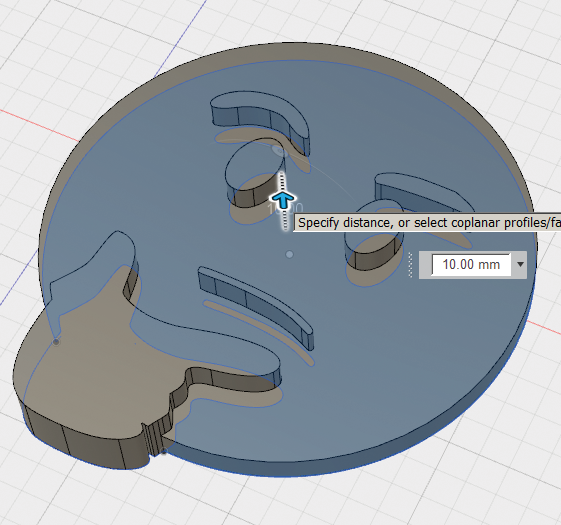
Figure 6-10: Press-pull the circle up half the distance of the facial features.
Fillet the Model
Press and hold the Shift key and select the top and bottom edges of the circle. Right-click, choose Fillet, and drag the arrow or type a number for the desired curve (Figure 6-11).
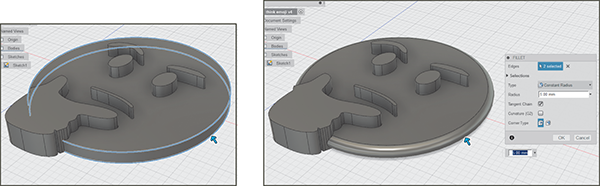
Figure 6-11: Fillet the perimeter of the model.
Use the Timeline to Add a Nail Hole
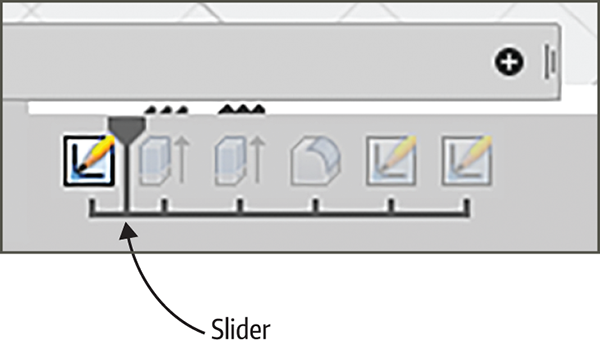
Figure 6-12: Roll the timeline slider back until just the sketch appears.
Oops! We forgot to make a nail hole on the back of the plaque. Use the timeline to do this. Roll the slider to the left until just the emoji sketch appears (Figure 6-12). You might have to click the light bulb for the sketch to appear. Then click the Circle tool (or the Slot tool for a narrower hole), click the sketch to select it, and draw a circle on it (Figure 6-13). After placing the circle you can still move it later, if needed, to finesse its position.
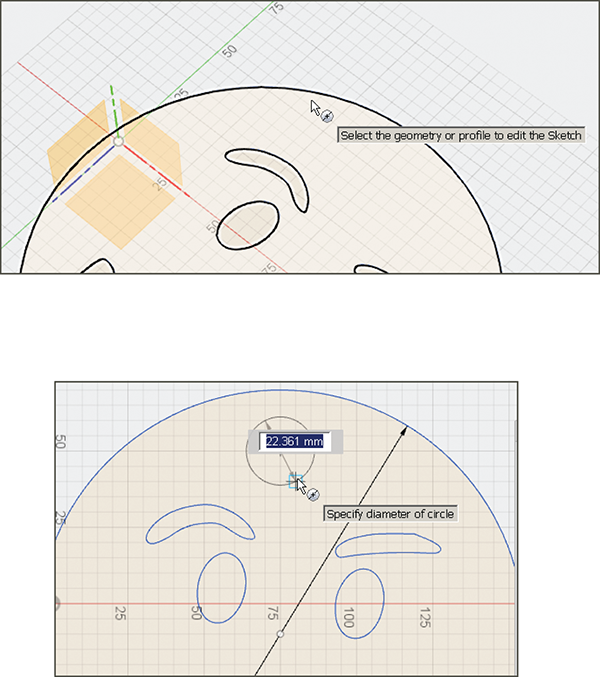
Figure 6-13: Select the sketch and then draw a circle on it.
Now roll the timeline slider to the right until the body appears again (Figure 6-14). Select the circle (you might have to hide the body or rotate it to do this), right-click, choose Press Pull, and push it a little into the back (Figure 6-15). Done! Well, almost. Right-click the root and choose Save As STL (Figure 6-16). Figure 6-17 shows the printed file.

Figure 6-14: Roll the timeline slider forward until the body appears again.
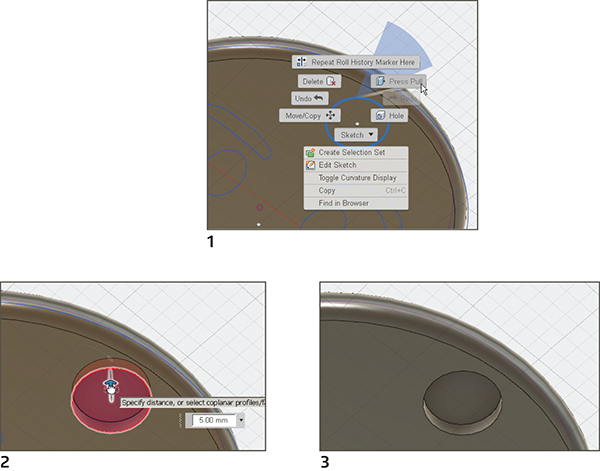
Figure 6-15: Push the circle into the back of the body.

Figure 6-16: Choosing Save As STL

Figure 6-17: The printed file