
Overview
This chapter will resume work on the dodgeball-based game that we started making in the previous chapters. We will continue with the dodgeball game by learning about a helpful set of utilities that you can implement in UE4 in order to improve the quality of your project's structure and reuse logic from it in other projects. We will specifically be talking about Blueprint Function Libraries, Actor Components, and Interfaces. By the end of this chapter, you will be able to use these utilities and other tools in your projects.
Introduction
In the previous chapter, we learned about the remaining collision-related concepts in UE4, such as collision events, object types, physics simulation, and collision components. We learned how to have objects collide against one another, changing their responses to different collision channels, as well as how to create our own collision presets and spawn actors and use timers.
In this chapter, we will go into several UE4 utilities that will allow you to easily move logic from one project to another and to keep your project well structured and organized, which will make life much easier for you in the long run and also make it easier for other people in your team to understand your work and modify it in the future. Game development is a tremendously hard task and is rarely done individually, but rather in teams, so it's important to take these things into account when building your projects.
We will mainly be talking about Blueprint Function Libraries, Actor Components, and Interfaces.
Blueprint Function Libraries will be used to move some generic functions in our project from a specific actor to a Blueprint Function Library so that it can be used in other parts of our project's logic.
Actor Components will be used to move part of some actor classes' source code into an Actor Component, so that we can easily use that logic in other projects. This will keep our project loosely coupled. Loose coupling is a software engineering concept that refers to having your project structured in such a way that you can easily remove and add things as you need. The reason you should strive for loose coupling is if you want to reuse parts of one of your projects for another project as a game developer, loose coupling will allow you to do that much more easily.
A practical example of how you could apply loose coupling is if you had a player character class that was able to fly and also had an inventory with several usable items. Instead of implementing the code responsible for both those things in that player character class, you would implement the logic for each of those in separate Actor Components, that you then add to the class. This will not only make it easier to add and remove things that this class will do, by simply adding and removing the Actor Components responsible for those things, but also allow you to reuse those Actor Components in other projects where you have a character that has an inventory or is able to fly. This is one of the main purposes of Actor Components.
Interfaces, much like Actor Components, make our project better structured and organized.
Let's get started with these concepts by talking about Blueprint Function Libraries.
Blueprint Function Libraries
In UE4, there's a class called BlueprintFunctionLibary, which is meant to contain a collection of static functions that don't really belong to any specific actor and can be used in multiple parts of your project.
For instance, some of the objects that we used previously, such as the GameplayStatics object and Kismet libraries such as KismetMathLibrary and KismetSystemLibrary, are Blueprint Function Libraries. These contain functions that can be used in any part of your project.
There is at least one function in our project created by us that can be moved to a Blueprint Function library: the CanSeeActor function defined in the EnemyCharacter class.
Let's then, in the first exercise of this chapter, create our own Blueprint Function library, so that we can then move the CanSeeActor function from the EnemyCharacter class to the Blueprint Function library class.
Exercise 7.01: Moving the CanSeeActor Function to the Blueprint Function Library
In this exercise, we will be moving the CanSeeActor function that we created for the EnemyCharacter class to a Blueprint Function Library.
The following steps will help you complete this exercise:
- Open the Unreal editor.
- Right-click inside the Content Browser and select New C++ Class.
- Choose BlueprintFunctionLibrary as the parent class of this C++ class (you'll find it by scrolling to the end of the panel).
- Name the new C++ class DodgeballFunctionLibrary.
- After the class's files have been generated in Visual Studio, open them and close the editor.
- In the header file of DodgeballFunctionLibrary, add a declaration for a public function called CanSeeActor. This function will be similar to the one we created in the EnemyCharacter class, however, there will be some differences.
The new CanSeeActor function will be static, will return a bool, and will receive the following parameters:
- A const UWorld* World property, which we will use to access the Line Trace functions.
- An FVector Location property, which we will use as the location of the actor that is checking whether it can see the target actor.
- A const AActor* TargetActor property, which will be the actor we're checking visibility for.
- A TArray<const AActor*> IgnoreActors property, which will be the actors that should be ignored during the Line Trace functions. This property can have an empty array as a default argument:
public:
// Can we see the given actor
static bool CanSeeActor(
const UWorld* World,
FVector Location,
const AActor* TargetActor,
TArray<const AActor*> IgnoreActors = TArray<const AActor*>());
- Create the implementation of this function in the class's source file and copy the implementation of the EnemyCharacter class's version into this new class. After you've done that, make the following modifications to the implementation:
- Change the value of the Start location of Line Trace to the Location parameter:
// Where the Line Trace starts and ends
FVector Start = Location;
- Instead of ignoring this actor (using the this pointer) and TargetActor, ignore the entire IgnoreActors array using the AddIgnoredActors function of FCollisionQueryParams, and sending that array as a parameter:
FCollisionQueryParams QueryParams;
// Ignore the actors specified
QueryParams.AddIgnoredActors(IgnoreActors);
- Replace both calls to the GetWorld function with the received World parameter:
// Execute the Line Trace
World->LineTraceSingleByChannel(Hit, Start, End, Channel, QueryParams);
// Show the Line Trace inside the game
DrawDebugLine(World, Start, End, FColor::Red);
- Add the necessary includes to the top of the DodgeballFunctionLibrary class as shown in the following code snippet:
#include "Engine/World.h"
#include "DrawDebugHelpers.h"
#include "CollisionQueryParams.h"
- Change the value of the Start location of Line Trace to the Location parameter:
- After you've created the new version of the CanSeeActor function inside DodgeballFunctionLibrary, head to our EnemyCharacter class and make the following changes:
- Remove the declaration and implementation of the CanSeeActor function, inside its header and source file respectively.
- Remove the DrawDebugHelpers include, given that we will no longer need that file:
// Remove this line
#include "DrawDebugHelpers.h"
- Add an include for DodgeballFunctionLibrary:
#include "DodgeballFunctionLibrary.h"
- Inside the class's LookAtActor function, just before the if statement that calls the CanSeeActor function, declare a const TArray<const AActor*> IgnoreActors variable and set it to both the this pointer and the TargetActor parameter:
const TArray<const AActor*> IgnoreActors = {this, TargetActor};
Note
Introducing this last code snippet might give you an IntelliSense error in Visual Studio. You can safely ignore it, as your code should compile with no issues regardless.
- Replace the existing call to the CanSeeActor function with the one we just created, by sending the following as parameters:
- The current world, through the GetWorld function
- The SightSource component's location, using its GetComponentLocation function
- The TargetActor parameter
- The IgnoreActors array we just created:
if (UDodgeballFunctionLibrary::CanSeeActor(
GetWorld(),
SightSource->GetComponentLocation(),
TargetActor,
IgnoreActors))
Now that you've made all those changes, compile your code, open your project, and verify that the EnemyCharacter class still looks at the player as it walks around, as long as it's in the enemy character's sight, as shown in the following screenshot:
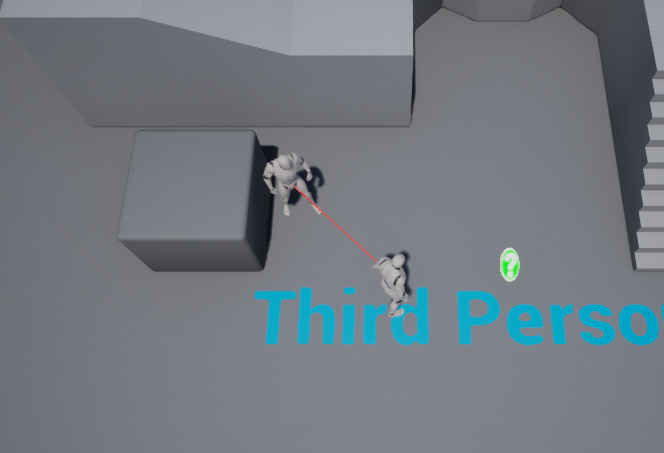
Figure 7.1: The enemy character still looking at the player character
And that concludes our exercise. We've put our CanSeeActor function inside of a Blueprint Function Library and can now reuse it for other actors that require the same type of functionality.
The next step in our project is going to be learning more about Actor Components and how we can use them to our advantage. Let's take a look at those.
Actor Components
As we've seen in the first chapters of this book, Actors are the main way to create logic in UE4. However, we've also seen that Actors can contain several Actor Components.
Actor Components are objects that can be added to an Actor and can have multiple types of functionality, such as being responsible for a character's inventory or making a character fly. Actor Components must always belong to and live inside an Actor, which is referred to as their Owner.
There are several different types of existing Actor Components. Some of these are listed here:
- Code-only Actor Components, which act as their own class inside of an actor. They have their own properties and functions and can both interact with the Actor they belong to and be interacted with by it.
- Mesh Components, which are used to draw several types of Mesh objects (Static Meshes, Skeletal Meshes, and so on).
- Collision Components, used to receive and generate collision events.
- Camera Components.
This leaves us with two main ways to add logic to our Actors: directly in the Actor class or through Actor Components. In order to follow good software development practices, namely loose coupling (mentioned previously), you should strive to use Actor Components instead of placing logic directly inside an Actor whenever possible. Let's take a look at a practical example in order to understand the usefulness of Actor Components.
Let's say you're making a game where you have the player character and enemy characters, both of which have health, and where the player character must fight enemies, who can also fight back. If you had to implement the health logic, which includes gaining health, losing health, and tracking the character's health, you'd have two options:
- You implement the health logic in a base character class, from which both the player character class and the enemy character class would inherit.
- You implement the health logic in an Actor Component and add that component to both the player character and enemy character classes separately.
There are a few reasons why the first option is not a good option, but the main one is this: If you wanted to add another piece of logic to both character classes (for example, stamina, which would limit the strength and frequency of the characters' attacks), doing so using the same approach of a base class wouldn't be a viable option. Given that in UE4, C++ classes can only inherit from one class and there's no such thing as multiple inheritance, that would be very hard to manage. It would also only get more complicated and unmanageable the more logic you decided to add to your project.
With that said, when adding logic to your project can be encapsulated in a separate component, allowing you to achieve Loose Coupling, you should always do so.
Let's now create a new Actor Component, which will be responsible for keeping track of an actor's health, as well as gaining and losing that health. We will do this in the next exercise.
Exercise 7.02: Creating the HealthComponent Actor Component
In this exercise, we will be creating a new actor component responsible for gaining, losing, and keeping track of an actor's health (its Owner).
In order for the player to lose, we'll have to make the player character lose health and then end the game when it runs out of health. We'll want to put this logic inside an actor component so that we can easily add all this health-related logic to other actors if we need to.
The following steps will help you complete the exercise:
- Open the editor and create a new C++ class, whose parent class will be the ActorComponent class. Its name will be HealthComponent.
- After this class has been created and its files have been opened in Visual Studio, go to its header file and add a protected float property called Health, which will keep track of the Owner's current health points. Its default value can be set to the number of health points its Owner will start the game with. In this case, we'll initialize it with a value of 100 health points:
// The Owner's initial and current amount health points
UPROPERTY(EditDefaultsOnly, Category = Health)
float Health = 100.f;
- Create a declaration for the function responsible for taking health away from its Owner. This function should be public; return nothing; receive a float Amount property as input, which indicates how many health points its Owner should lose; and be called LoseHealth:
// Take health points from its Owner
void LoseHealth(float Amount);
Now, in the class's source file, let's start by notifying it that it should never use the Tick event so that its performance can be slightly improved.
- Change the bCanEverTick property's value to false inside the class's constructor:
PrimaryComponentTick.bCanEverTick = false;
- Create the implementation for our LoseHealth function, where we'll start by removing the Amount parameter's value from our Health property:
void UHealthComponent::LoseHealth(float Amount)
{
Health -= Amount;
}
- Now, in that same function, we'll check whether the current amount of health is less than or equal to 0, which means that it has run out of health points (has died or been destroyed):
if (Health <= 0.f)
{
}
- If the if statement is true, we'll do the following things:
- Set the Health property to 0, in order to make sure that our Owner doesn't have negative health points:
Health = 0.f;
- Quit the game, the same way we did in Chapter 6, Collision Objects, when creating the VictoryBox class:
UKismetSystemLibrary::QuitGame(this,
nullptr,
EQuitPreference::Quit,
true);
- Don't forget to include the KismetSystemLibrary object:
#include "Kismet/KismetSystemLibrary.h"
- Set the Health property to 0, in order to make sure that our Owner doesn't have negative health points:
With this logic done, whenever any actor that has HealthComponent runs out of health, the game will end. This isn't exactly the behavior we want in our Dodgeball game. However, we'll change it when we talk about Interfaces later in this chapter.
In the next exercise, we'll be making the necessary modifications to some classes in our project in order to accommodate our newly created HealthComponent.
Exercise 7.03: Integrating the HealthComponent Actor Component
In this exercise, we will be modifying our DodgeballProjectile class in order for it to damage the player's character when it comes into contact with it, and the DodgeballCharacter class, in order for it to have a Health Component.
Open the DodgeballProjectile class's files in Visual Studio and make the following modifications:
- In the class's header file, add a protected float property called Damage and set its default value to 34, so that our player character will lose all of its health points after being hit 3 times. This property should be a UPROPERTY and have the EditAnywhere tag so that you can easily change its value in its Blueprint class:
// The damage the dodgeball will deal to the player's character
UPROPERTY(EditAnywhere, Category = Damage)
float Damage = 34.f;
In the class's source file, we'll have to make some modifications to the OnHit function.
- Since we'll be using the HealthComponent class, we'll have to add the include statement for it:
#include "HealthComponent.h"
- The existing cast that is being done for DodgeballCharacter from the OtherActor property, which we did in Step 17 of Exercise 6.01, Creating the Dodgeball Class, and is inside the if statement, should be done before that if statement and be saved inside a variable. You should then check whether that variable is nullptr. We are doing this in order to access the player character's Health Component inside the if statement:
ADodgeballCharacter* Player = Cast<ADodgeballCharacter>(OtherActor);
if (Player != nullptr)
{
}
- If the if statement is true (that is, if the actor we hit is the player's character), we want to access that character's HealthComponent and reduce the character's health. In order to access HealthComponent, we have to call the character's FindComponentByClass function and send the UHealthComponent class as a template parameter (in order to indicate the class of the component we want to access):
UHealthComponent* HealthComponent = Player->
FindComponentByClass<UHealthComponent>();
Note
The FindComponent(s) ByClass function, included in the Actor class, will return a reference(s) to the actor component(s) of a specific class that the actor contains. If the function returns nullptr, that means the actor doesn't have an Actor Component of that class.
You may also find the GetComponents function inside the Actor class useful, which will return a list of all the Actor Components inside that actor.
- After that, check whether HealthComponent is nullptr and, if it isn't, we'll call its LoseHealth function and send the Damage property as a parameter:
if (HealthComponent != nullptr)
{
HealthComponent->LoseHealth(Damage);
}
Destroy();
- Make sure the existing Destroy function is called after doing the null check for HealthComponent, as shown in the previous code snippet.
Before we finish this exercise, we'll need to make some modifications to our DodgeballCharacter class.
Open the class's files in Visual Studio and follow these steps.
- In the class's header file, add a private property of type class UHealthComponent* called HealthComponent:
class UHealthComponent* HealthComponent;
- In the class's source file, add an include statement to the HealthComponent class:
#include "HealthComponent.h"
- At the end of the class's constructor, create HealthComponent, using the CreateDefaultSubobject function, and name it HealthComponent:
HealthComponent = CreateDefaultSubobject<UHealthComponent>(TEXT("Health Component"));
After you've made all these changes, compile your code, and open the editor. When you play the game, if you let your player character get hit by a dodgeball 3 times, you'll notice that the game abruptly stops, as intended:
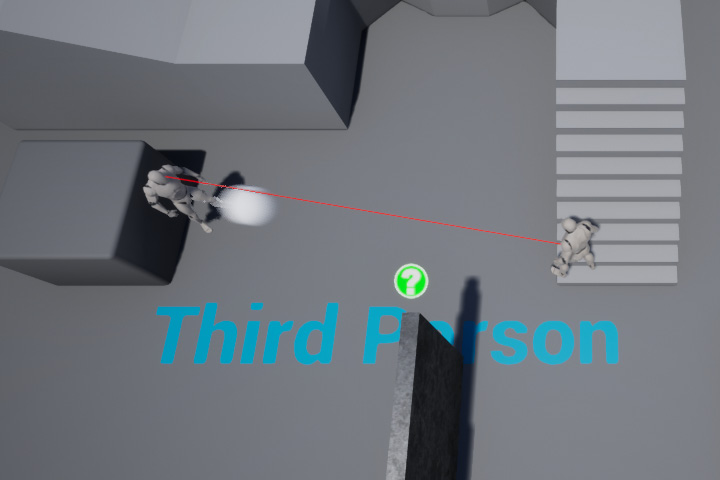
Figure 7.2: The enemy character throwing dodgeballs at the player character
Once the game is stopped, it will look like the following screenshot:
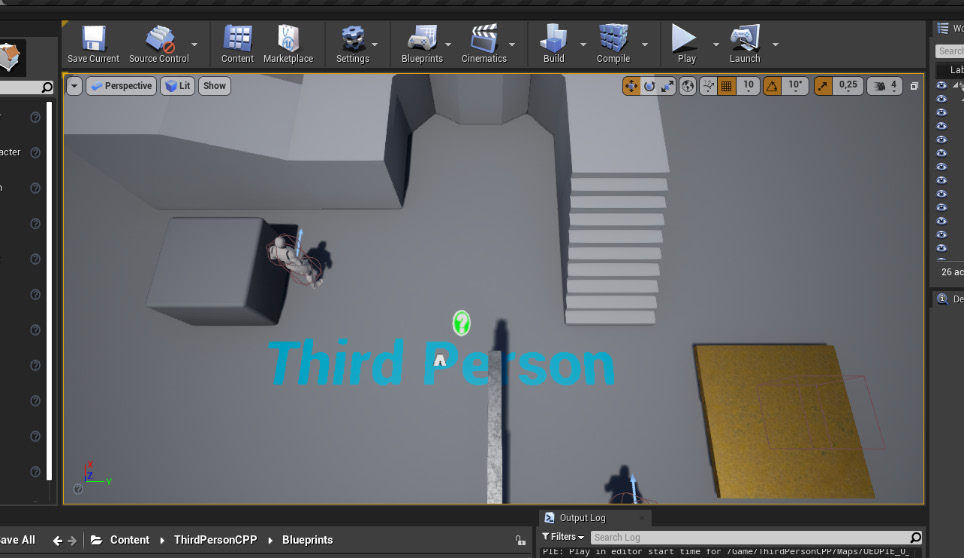
Figure 7.3: The editor after the player character runs out of health points and the game stops
And that completes this exercise. You now know how to create your own Actor Components and how to access an actor's Actor Components. This is a very important step toward making your game projects more understandable and better structured, so good job.
Now that we've learned about Actor Components, we will be learning about another way to make your projects better structured and organized – Interfaces – in the next section.
Interfaces
There's a chance that you might already know about Interfaces, given that other programming languages, such as Java, for instance, already have them. If you do, they work pretty similarly in UE4, but if you don't, let's see how they work, taking the example of the Health Component we created.
As you've seen in the previous exercise, when the Health property of the Health Component reaches 0, that component will simply end the game. However, we don't want that to happen every time an actor's health points run out: some actors might simply be destroyed, some might notify another actor that they have run out of health points, and so on. We want each actor to be able to determine what happens to them when they run out of health points. But how can we handle this?
Ideally, we would simply call a specific function that belongs to the Owner of the Health Component, which would then choose how to handle the fact that the Owner has run out of health points, but in which class should you implement that function, given that our Owner can be of any class, as long as it inherits from the Actor class? As we discussed at the beginning of the chapter, having a class responsible just for this would quickly become unmanageable. Luckily for us, Interfaces solve this problem.
Interfaces are classes that contain a collection of functions that an object must have if it implements that Interface. It essentially works as a contract that the object signs, saying that it will implement all the functions present on that Interface. You can then simply check whether an object implements a specific Interface and call the object's implementation of the function defined in the Interface.
In our specific case, we'll want to have an Interface that has a function that will be called when an object runs out of health points so that our Health Component can simply check whether its Owner implements that Interface and then call that function from the Interface. This will make it easy for us to specify how each actor behaves when running out of health points: some actors might simply be destroyed, others might trigger an in-game event, and others might simply end the game (which is the case with our player character).
However, before we create our first Interface, we should first talk a bit about Blueprint Native Events.
Blueprint Native Events
When using the UFUNCTION macro in C++, you can turn a function into a Blueprint Native Event by simply adding the BlueprintNativeEvent tag to that macro.
So what is a Blueprint Native Event? It's an event that is declared in C++ that can have a default behavior, which is also defined in C++, but that can be overridden in Blueprint. You declare a Blueprint Native Event called MyEvent by declaring a MyEvent function using the UFUNCTION macro with the BlueprintNativeEvent tag, followed by the virtual MyEvent_Implementation function:
UFUNCTION(BlueprintNativeEvent)
void MyEvent();
virtual void MyEvent_Implementation();
The reason why you have to declare these two functions is that the first one is the Blueprint signature, which allows you to override the event in Blueprint, while the second one is the C++ signature, which allows you to override the event in C++.
The C++ signature is simply the name of the event followed by _Implementation, and it should always be a virtual function. Given that you declared this event in C++, in order to implement its default behavior, you have to implement the MyEvent_Implementation function, and not the MyEvent function (that one should remain untouched). In order to call a Blueprint Native Event, you can simply call the normal function, without the _Implementation suffix; in this case, MyEvent().
We will take a look at how to use Blueprint Native Events in practice in the next exercise, where we'll create a new Interface.
Exercise 7.04: Creating the HealthInterface Class
In this exercise, we will be creating the Interface responsible for handling how an object behaves when it runs out of health points.
In order to do this, follow these steps:
- Open the editor and create a new C++ class that inherits from Interface (called Unreal Interface in the scrollable menu) and call it HealthInterface.
- After the class's files have been generated and opened in Visual Studio, go to the newly created class's header file. You'll notice that the generated file has two classes, UHealthInterface and IHealthInterface.
- These will be used in combination when checking whether an object implements the interface and calling its functions. However, you should only add function declarations in the class prefixed with I, in this case, IHealthInterface. Add a public Blueprint Native Event called OnDeath that returns nothing and receives no parameters. This is the function that is going to be called when an object runs out of health points:
UFUNCTION(BlueprintNativeEvent, Category = Health)
void OnDeath();
virtual void OnDeath_Implementation() = 0;
Note that the OnDeath_Implementation function declaration needs its own implementation. However, there is no need for the Interface to implement that function because it would simply be empty. In order to notify the compiler that this function has no implementation in this class, we add = 0 to the end of its declaration.
- Go to the DodgeballCharacter class's header file. We'll want this class to implement our newly created HealthInterface, but how do we do that? The first thing we have to do is include the HealthInterface class. Make sure you include it before the .generated.h include statement:
// Add this include
#include "HealthInterface.h"
#include "DodgeballCharacter.generated.h"
- Then, replace the line in the header file that makes the DodgeballCharacter class inherit from the Character class with the following line, which will make this class have to implement HealthInterface:
class ADodgeballCharacter : public ACharacter, public IHealthInterface
- The next thing we have to do is implement the OnDeath function in the DodgeballCharacter class. In order to do this, add a declaration for the OnDeath_Implementation function that overrides the Interface's C++ signature. This function should be public. In order to override a virtual function, you have to add the override keyword to the end of its declaration:
virtual void OnDeath_Implementation() override;
- In this function's implementation, within the class's source file, simply quit the game, the same way that is being done in the HealthComponent class:
void ADodgeballCharacter::OnDeath_Implementation()
{
UKismetSystemLibrary::QuitGame(this,
nullptr,
EQuitPreference::Quit,
true);
}
- Because we're now using KismetSystemLibrary, we'll have to include it:
#include "Kismet/KismetSystemLibrary.h"
- Now, we have to go to our HealthComponent class's source file. Because we'll no longer be using KistemSystemLibrary and will be using the HealthInterface instead, replace the include statement to the first class with an include statement to the second one:
// Replace this line
#include "Kismet/KismetSystemLibrary.h"
// With this line
#include "HealthInterface.h"
- Then, change the logic that is responsible for quitting the game when the Owner runs out of health points. Instead of doing this, we'll want to check whether the Owner implements HealthInterface and, if it does, call its implementation of the OnDeath function. Remove the existing call to the QuitGame function:
// Remove this
UKismetSystemLibrary::QuitGame(this,
nullptr,
EQuitPreference::Quit,
true);
- In order to check whether an object implements a specific interface, we can call that object's Implements function, using the Interface's class as a template parameter. The class of the Interface that you should use in this function is the one that is prefixed with U:
if (GetOwner()->Implements<UHealthInterface>())
{
}
- Because we'll be using methods belonging to the Actor class, we'll also need to include it:
#include "GameFramework/Actor.h"
If this if statement is true, that means that our Owner implements HealthInterface. In this case, we'll want to call its implementation of the OnDeath function.
- In order to do this, call it through the Interface's class (this time the one that is prefixed with I). The function inside the Interface that you'll want to call is Execute_OnDeath (note that the function you should call inside the Interface will always be its normal name prefixed with Execute_). This function must receive at least one parameter, which is the object that the function will be called on and that implements that Interface; in this case, Owner:
if (GetOwner()->Implements<UHealthInterface>())
{
IHealthInterface::Execute_OnDeath(GetOwner());
}
Note
If your interface's function receives parameters, you can send them in the function call after the first parameter mentioned in the last step. For instance, if our OnDeath function received an int property as a parameter, you would call it like this: IHealthInterface::Execute_OnDeath(GetOwner(), 5).
The first time you try to compile your code after adding a new function to an Interface and then calling Execute_ version, you may get an Intellisense error. You can safely ignore this error.
After you've made all these changes, compile your code, and open the editor. When you play the game, try letting the character get hit by 3 dodgeballs:
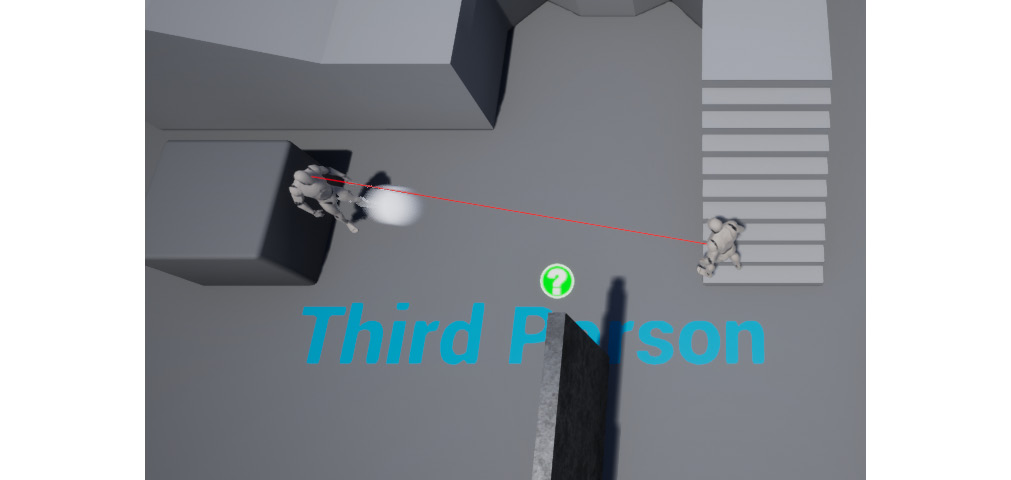
Figure 7.4: The enemy character throwing dodgeballs at the player character
If the game ends after that, then that means that all our changes worked and the game's logic remains the same:
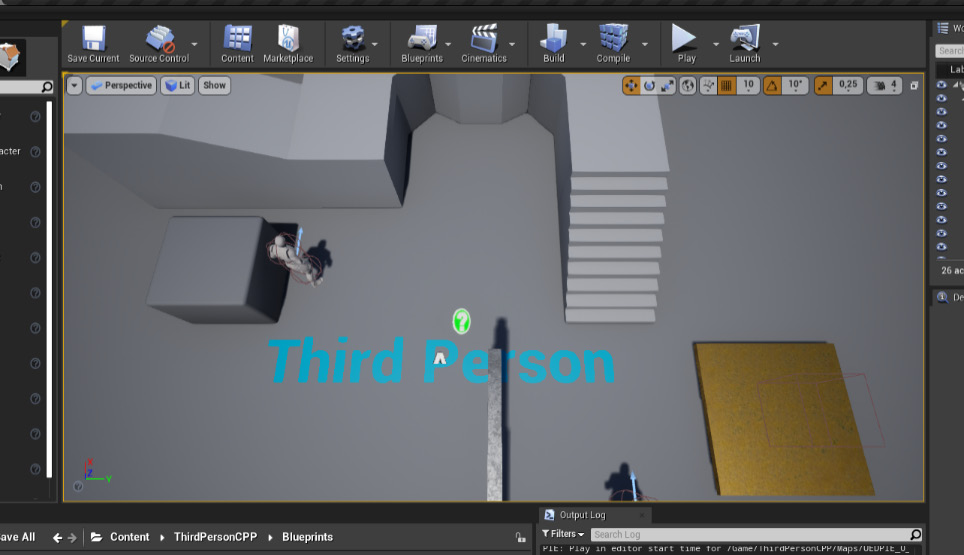
Figure 7.5: The editor after the player character runs out of health points and the game stops
And with that, we conclude this exercise. You now know how to use Interfaces. The benefit to the change that we just made is that we can now have other actors that lose health and can specify what happens when they run out of health points, using this Health Interface.
The next and last step of this chapter will be an activity where we'll move all of the logic related to the LookAtActor function to its own Actor Component and use it to replace the SightSource component we created.
Activity 7.01: Moving the LookAtActor Logic to an Actor Component
In this activity, we'll be moving all of the logic related to the LookAtActor function, inside the EnemyCharacter class, to its own Actor Component (similarly to how we moved the CanSeeActor function to a Blueprint Function Library). This way, if we want an actor (that isn't an EnemyCharacter) to look at another actor, we will simply be able to add this component to it.
The following steps will help you complete this activity:
- Open the editor and create a new C++ class that inherits from SceneComponent, called LookAtActorComponent.
Head to the class's files, which are opened in Visual Studio.
- Go to its header file and add a declaration for the LookAtActor function, which should be protected, return a bool, and receive no parameters.
Note
While the LookAtActor function of EnemyCharacter received the AActor* TargetActor parameter, this Actor Component will have its TargetActor as a class property, which is why we won't need to receive it as a parameter.
- Add a protected AActor* property called TargetActor. This property will represent the actor we want to look at.
- Add a protected bool property called bCanSeeTarget, with a default value of false, which will indicate whether TargetActor can be seen.
- Add a declaration for a public FORCEINLINE function, covered in Chapter 6, Collision Objects called SetTarget, which will return nothing and receive AActor* NewTarget as a parameter. The implementation of this function will simply set the TargetActor property to the value of the NewTarget property.
- Add a declaration for a public FORCEINLINE function called CanSeeTarget, which will be const, return a bool, and receive no parameters. The implementation of this function will simply return the value of the bCanSeeTarget property.
Now, go to the class's source file and take the following steps:
- In the class's TickComponent function, set the value of the bCanSeeTarget property to the return value of the LookAtActor function call.
- Add an empty implementation of the LookAtActor function and copy the EnemyCharacter class's implementation of the LookAtActor function into the implementation of LookAtActorComponent.
- Make the following modifications to the LookAtActorComponent class's implementation of the LookAtActor function:
- Change the first element of the IgnoreActors array to be the Owner of the Actor Component.
- Change the second parameter of the CanSeeActor function call to be this component's location.
- Change the value of the Start property to be the location of Owner.
- Finally, replace the call to the SetActorRotation function with a call to the SetActorRotation function of Owner.
- Because of the modifications we've made to the implementation of the LookAtActor function, we'll need to add some includes to our LookAtActorComponent class and remove some includes from our EnemyCharacter class. Remove the includes to KismetMathLibrary and DodgeballFunctionLibrary from the EnemyCharacter class and add them to the LookAtActorComponent class.
We'll also need to add an include to the Actor class since we'll be accessing several functions belonging to that class.
Now make some further modifications to our EnemyCharacter class:
- In its header file, remove the declaration of the LookAtActor function.
- Replace the SightSource property with a property of type ULookAtActorComponent* called LookAtActorComponent.
- In the class's source file, add an include to the LookAtActorComponent class.
- Inside the class's constructor, replace the references to the SightSource property with a reference to the LookAtActorComponent property. Additionally, the CreateDefaultSubobject function's template parameter should be the ULookAtActorComponent class and its parameter should be "Look At Actor Component".
- Remove the class's implementation of the LookAtActor function.
- In the class's Tick function, remove the line of code where you create the PlayerCharacter property, and add that exact line of code to the end of the class's BeginPlay function.
- After this line, call the SetTarget function of LookAtActorComponent and send the PlayerCharacter property as a parameter.
- Inside the class's Tick function, set the bCanSeePlayer property's value to the return value of the CanSeeTarget function call of LookAtActorComponent, instead of the return value of the LookAtActor function call.
Now, there's only one last step we have to do before this activity is completed.
- Close the editor (if you have it opened), compile your changes in Visual Studio, open the editor, and open the BP_EnemyCharacter Blueprint. Find LookAtActorComponent and change its location to (10, 0, 80).
Expected output:
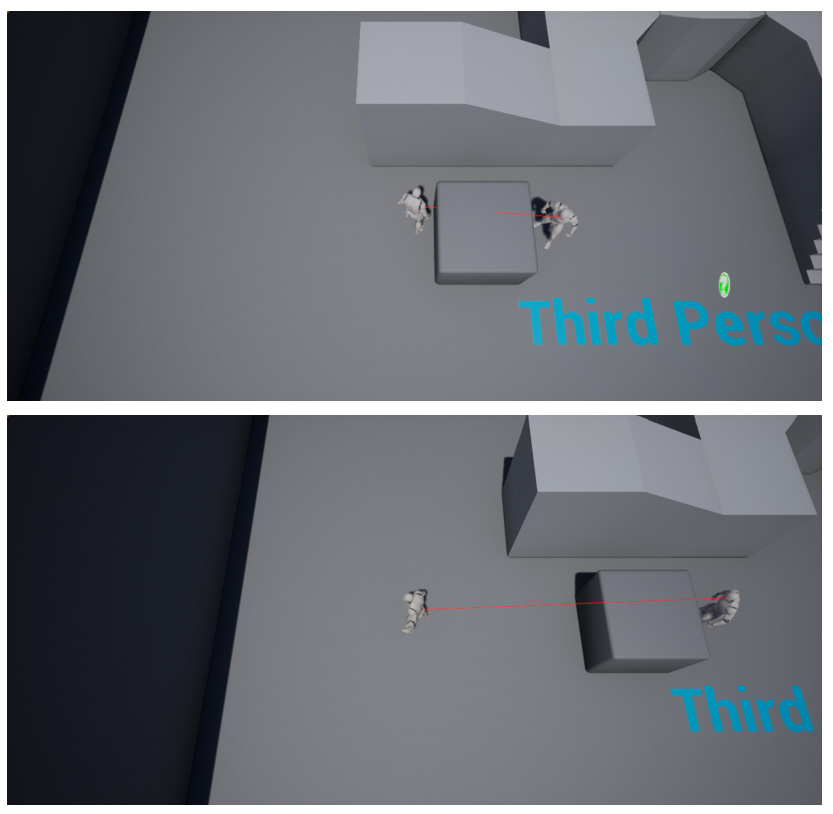
Figure 7.6: The enemy character's looking at the player character remains functional
And with that, we conclude our activity. You have now applied your knowledge of refactoring part of an actor's logic into an Actor Component so that you can reuse it in other parts of your project, or even in other projects of your own.
Note
The solution to this activity can be found at: https://packt.live/338jEBx.
Summary
You now know about several utilities that will help you to keep your projects more organized and allow better reuse of the things that you make.
You have learned how to: create a Blueprint Function Library; create your own Actor Components and use them to refactor the existing logic in your project; and create Interfaces and call functions from an object that implements a specific Interface. Altogether, these new topics will allow you to refactor and reuse all the code that you write in a project in that same project, or in another project.
In the next chapter, we'll be taking a look at UMG, UE4's system for creating user Interfaces, and learning how to create our own user Interfaces.