
Overview
By the end of this chapter, you will be able to use the Animation Montage tool to create a unique throwing animation using the Throw animation sequence you imported in Chapter 10, Creating a SuperSideScroller Game. With this montage, you will create and use Anim Slots that will allow you to blend animations in the Animation Blueprint for the player character. You will also get to know how to use blending nodes to effectively blend the movement and throwing animations of the character.
After finalizing the player character animation, you will create the required class and assets for the enemy AI and learn more about Materials and Material Instances, which will give this enemy a unique visual color so that it can be differentiated in-game. Finally, the enemy will be ready for Chapter 13, Enemy Artificial Intelligence, where you will begin to create the AI behavior logic.
Introduction
In the last chapter, you were able to bring the player character to life by implementing movement animations in a Blend Space and using that Blend Space in an Animation Blueprint to drive the animations based on the player's speed. You were then able to implement functionality in C++ based on player input to allow the character to sprint. Lastly, you took advantage of the animation state machine built-in Animation Blueprints to drive the character movement state and jumping states to allow fluid transitions between walking and jumping.
With the player character Animation Blueprint and state machine working, it's time to introduce Animation Montages and Anim Slots by implementing the character's Throw animation. In this chapter, you will learn more about animation blending, see how Unreal Engine handles the blending of multiple animations by creating an Animation Montage, and work with a new Anim Slot for the player's throwing animation. From there, you will use the Anim Slot in the player's Animation Blueprint by implementing new functions such as Save Cached Pose and Layered blend per bone so that the player can correctly blend the movement animations you handled in the previous chapter with the new throwing animation you will implement in this chapter.
Let's start by learning about what Animation Montages and Anim Slots are and how they can be used for character animation.
Animation Blending, Anim Slots, and Animation Montages
Animation blending is the process of transitioning between multiple animations on a skeletal mesh as seamlessly as possible. You are already familiar with the techniques of animation blending because you created a Blend Spaces asset for the player character in Chapter 11, Blend Spaces 1D, Key Bindings, and State Machines. In this Blend Space, the character smoothly blends between the Idle, Walking, and Running animations. You will now extend this knowledge by exploring and implementing new additive techniques to combine the movement animations of the character with a throwing animation. Through the use of an Anim Slot, you will send the throwing animation to a set of upper body bones, and its children's bones, to allow movement and throwing animations to apply at the same time without negatively impacting the other. But first, let's talk more about Animation Montages.
Animation Montages are a very powerful asset that allows you to combine multiple animations and split these combined animations into what is called Sections. Sections can then be played back individually, in a specific sequence, or even looped.
Animation Montages are also useful because you can control animations through montages from Blueprints or C++; this means you can call logic, update variables, replicate data, and so on based on the animation section being played, or if any Notifies are called within the montage. In C++, there is the UAnimInstance object, which you can use to call functions such as UAnimInstance::Montage_Play, which allows you to access and play montages from C++.
Note
This method will be used in Chapter 14, Spawning the Player Projectile, when you begin to add polish to the game. More information about how animations and Notifies are handled by Unreal Engine 4 in C++ can be found at https://docs.unrealengine.com/en-US/API/Runtime/Engine/Animation/AnimNotifies/UAnimNotifyState/index.html.
You will learn more about Notifies in the first exercise of this chapter, and you will code your own notify state in Chapter 14, Spawning the Player Projectile.
The image below shows the Persona editor for Animation Montages. However, this will be broken down even further in Exercise 12.01, Setting Up the Animation Montage:
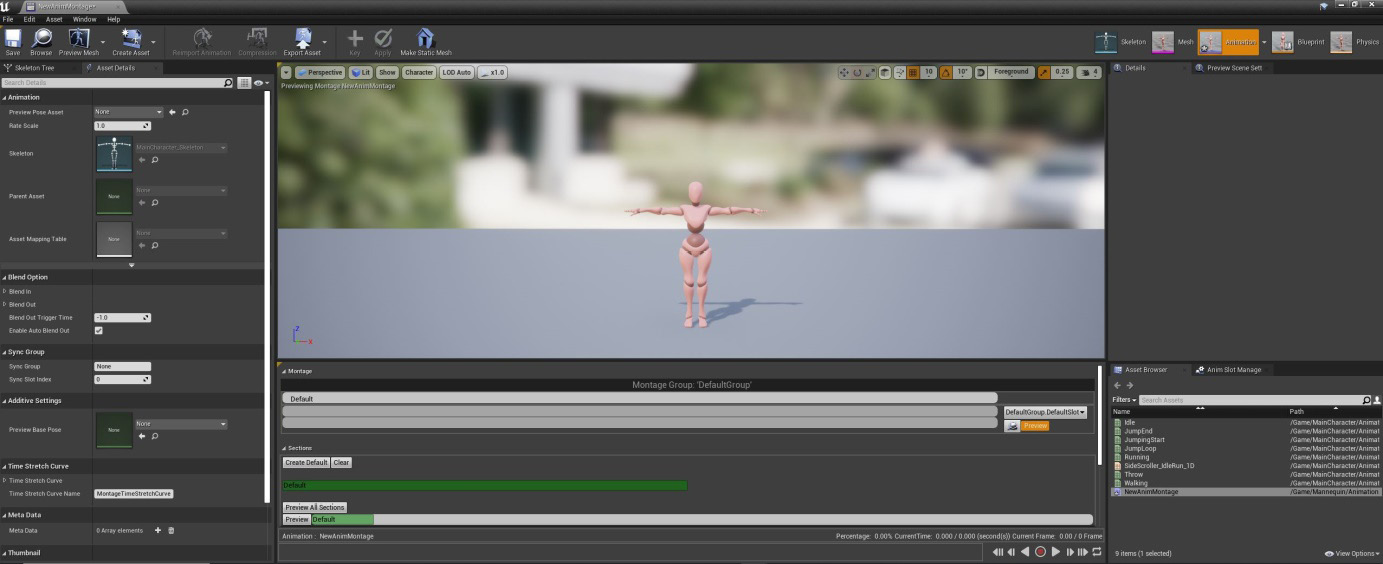
Figure 12.1: The Persona editor, which opens when editing an Animation Montage
Just like in Animation Sequences, Animation Montages allow Notifies to be triggered along the timeline of a section of an animation, which can then trigger sounds, particle effects, and events. Event Notifies will allow us to call logic from Blueprint or C++. Epic Games provides an example in their documentation of a weapon reload Animation Montage that is split between animations for reload start, reload loop, and reload complete. By splitting these animations and applying Notifies for sounds and events, developers have complete control over how long the reload loop will play based on internal variables, and control over any additional sounds or effects to play during the course of the animation.
Lastly, Animation Montages support what are called Anim Slots. Anim Slots allow you to categorize an animation, or a set of animations, that can later be referenced in Animation Blueprints to allow unique blending behavior based on the slot. This means that you can define an Anim Slot that can later be used in Animation Blueprints to allow animations using this slot to blend on top of the base movement animations in any way you want; in our case, only affecting the upper body of the player character and not the lower body.
Let's begin by creating the Animation Montage for the player character's Throw animation in the first exercise.
Exercise 12.01: Setting Up the Animation Montage
One of the last things you need to do for the player character is to set up the Anim Slot that will separately categorize this animation as an upper body animation. You will use this Anim Slot in conjunction with blending functions in the Animation Blueprint to allow the player character to throw a projectile, while still correctly animating the lower body while moving and jumping.
By the end of this exercise, the player character will be able to play the Throw animation only with their upper body, while their lower body will still use the movement animation that you defined in the previous chapter.
Let's begin by creating the Animation Montage for the character, throwing and setting up the Anim Slot there:
- First, navigate to the /MainCharacter/Animation directory, which is where all of the animation assets are located.
- Now, right-click in the content browser and hover over the Animation option from the available drop-down menu.
- Then, left-click to select the Animation Montage option from the additional drop-down menu that appears.
- Just as with creating other animation-based assets, such as Blend Spaces or Animation Blueprints, Unreal Engine will ask you to assign a Skeleton object for this Animation Montage. In this case, select MainCharacter_Skeleton.
- Name the new Animation Montage AM_Throw. Now, double-left-click to open the montage:
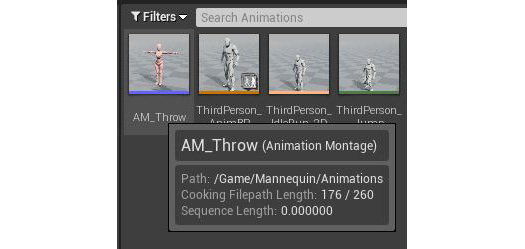
Figure 12.2: You have successfully created an Animation Montage asset
When you open the Animation Montage asset, you are presented with a similar editor layout, as you would when opening an Animation Sequence. There is a Preview window that shows the main character skeleton in the default T pose, but once you add animations to this montage, the skeleton will update to reflect those changes.
With this exercise complete, you have successfully created an Animation Montage asset for the Super SideScroller project. Now it is time to learn more about Animation Montages and how you can add the Throw animation and Anim Slot you need in order to blend the Throw animation with the existing character movement animations.
Animation Montages
Have a look at the following figure:
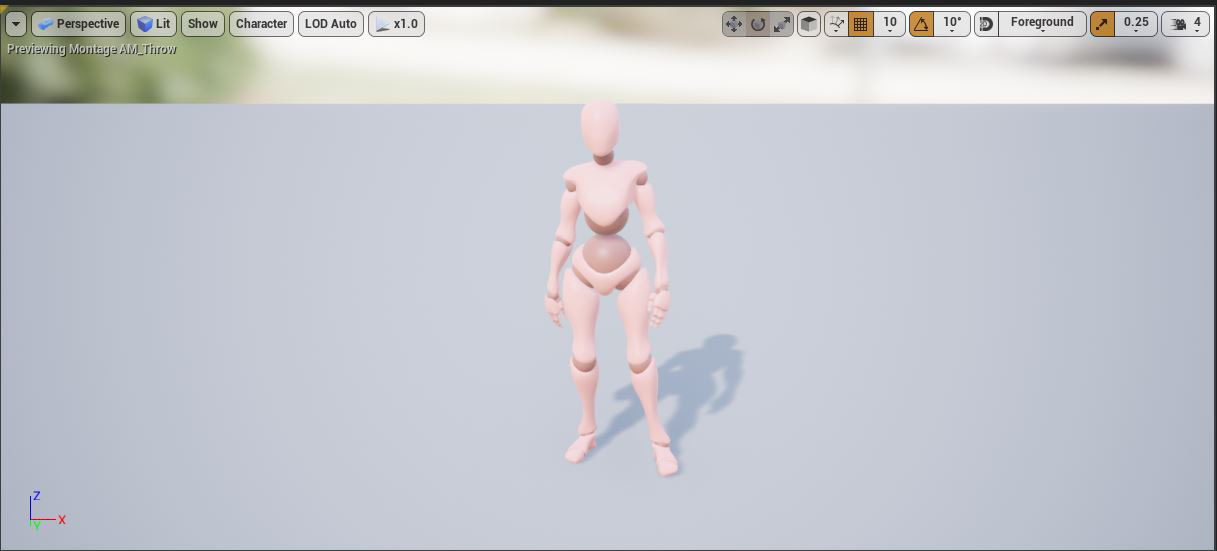
Figure 12.3: The animation Preview window in the Animation Montage Persona editor
Underneath the Preview window, you have the main montage timeline, in addition to other sections; let's evaluate these sections from top to bottom:
- Montage: The Montage section is a collection of animations that can add one or more animations to. You can also right-click on any point in the timeline to create a section. Sections allow you to compartmentalize the different parts of the montage into their own self-contained section that can be referenced and manipulated in the Sections area.
- Sections: Sections, as mentioned before, allow you to set the order of how the individual animation sequences are played and whether a section should loop.
For the purposes of the throw montage, you do not need to use this feature since you will only be using one animation in this montage:

Figure 12.4: The Preview window and the Montage and Sections areas
- Element Timing: The Elemental Timing section gives you a preview of the montage and the sequential order of the varied aspects of the montage. The playback order of Notifies, the Montage section, and other elements will be visually displayed here to give you a quick preview of how the montage will work.
- Notifies: Notifies gives you the ability to add points to an animation time frame that can then notify other systems to perform an action or to call logic from both Blueprints and C++. Notify options, such as Play Sound or Play Particle Effect, allow you to play a sound or particle at a specific time in the animation. One example is during a reload animation of a weapon; you can add a notify to the timeline of the animation to play a reload sound at the precise moment of reloading. You will use these Notifies later on in this project when you implement the throwing projectile:

Figure 12.5: The Element Timing and Notifies areas
Now that you are familiar with the interface for Animation Montages, you can add the Throw animation to the montage by following the next exercise.
Exercise 12.02: Adding the Throw Animation to the Montage
Now that you have a better understanding of what Animation Montages are and how these assets work, it is time to add the Throw animation to the montage you created in Exercise 12.01, Setting Up the Animation Montage. Although you will only be adding one animation to this montage, it is important to emphasize that you can add multiple unique animations to a montage that you can then play back. Now, let's start by adding the Throw animation you imported into the project in Chapter 10, Creating a SuperSideScroller Game:
In Asset Browser, find the Throw animation asset. Then, left-click and drag it onto the timeline under the Montage section:
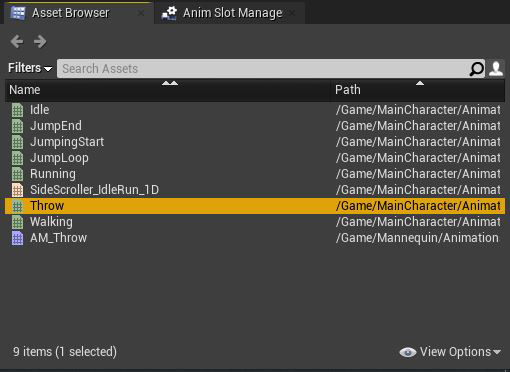
Figure 12.6: The Asset Browser window with animation-based assets
Once an animation is added to the Animation Montage, the character skeleton in the Preview window will update to reflect this change and begin playing the animation:

Figure 12.7: The player character begins to animate
Now that the Throw animation has been added to the Animation Montage, you can move on to create the Anim Slot.
The Anim Slot Manager tab should be docked next to the Asset Browser tab on the right-hand side. If you don't see the Anim Slot Manager tab, you can access it by navigating to the Window tab in the toolbar at the top of the Animation Montage editor window. There, left-click to select the option for Anim Slot Manager and the window will appear.
With this exercise complete, you have added the Throw animation to your new Animation Montage and you were able to play back the animation to preview how it looks in the editor through Persona.
Now, you can move on to learn more about Anim Slots and Anim Slot Manager before adding your own unique Anim Slot to use for animation blending later in this chapter.
Anim Slot Manager
Anim Slot Manager is where you, as the name suggests, manage your Anim Slots. From this tab, you can create new Groups, which allow greater organization of your slots. For example, you can create a Group by left-clicking on the Add Group option and labeling it Face to articulate to others that the slots within this group affect the face of the character. By default, Unreal Engine provides you with a Group called DefaultGroup and an Anim Slot called DefaultSlot that is in that group.
Let's create a new Anim Slot.
Exercise 12.03: Adding a New Anim Slot
Now that you have a better understanding of Anim Slots and Anim Slot Manager, you can follow these steps to create a new Anim Slot, which you will call Upper Body. Once you have this new slot created, it can then be used and referenced in your Animation Blueprint to handle animation blending, which you will do in a later exercise.
Let's create the Anim Slot by doing the following:
- In Anim Slot Manager, left-click on the Add Slot option.
- When adding a new slot, Unreal will ask you to give this Anim Slot a name. Name this slot Upper Body. Anim Slot naming is important, much like naming any other assets and parameters, because you will be referencing this slot in the Animation Blueprint later.
With the Anim Slot created, you can now update the slot used for the Throw montage.
- In the Montage section, there is a drop-down menu that displays the applied Anim Slot; by default, it's set to DefaultGroup.DefaultSlot. Left-click, and from the drop-down menu, select DefaultGroup.Upper Body:
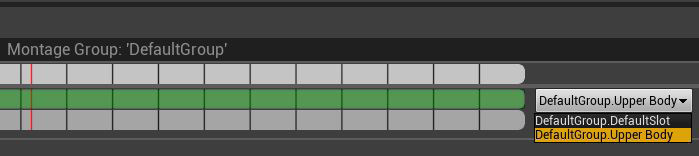
Figure 12.8: The new Anim Slot will appear in the drop-down list
Note
After changing Anim Slot, you may notice that the player character stops animating and returns to the T pose. Don't worry – if this happens, just close the Animation Montage and reopen it. Once reopened, the character will play the Throw animation again.
With your Anim Slot created and in place in the Throw montage, it is now time for you to update the Animation Blueprint so that the player character is aware of this slot and animates correctly based on it.
- Navigate to the AnimBP_SuperSideScroller_MainCharacter asset in the /MainCharacter/Blueprints/ directory.
- Open this asset by double-left-clicking and opening Anim Graph.
With this exercise complete, you have created your first Anim Slot using Anim Slot Manager, available in the Animation Montage. With this slot in place, it can now be used and referenced in the player character Animation Blueprint to handle the animation blending required to blend the Throw animation and the movement animations you implemented in the previous chapter. Before you do this, you need to learn more about the Save Cached Pose node in Animation Blueprints.
Save Cached Pose
There are cases when working with complex animations and characters requires you to reference a pose that is outputted by a state machine in more than one place. If you hadn't noticed already, the output pose from your Movement state machine cannot be connected to more than one other node. This is where the Save Cached Pose node comes in handy; it allows you to cache, or store, a pose that can then be referenced in multiple places at once. You will need to use this to set up the new Anim Slot for the upper body animation.
Let's get started.
Exercise 12.04: Save Cached Pose of the Movement State Machine
To effectively blend the Throw animation, which uses the Upper Body Anim Slot you created in the previous exercise with the movement animations already in place for the player character, you need to be able to reference the Movement state machine in the Animation Blueprint. To do this, do the following to implement the Save Cached Pose node in the Animation Blueprint:
- In Anim Graph, right-click and search for New Save Cached Pose. Name this Movement Cache:

Figure 12.9: The Pose will be evaluated once per frame and then cached
- Now, instead of connecting your Movement state machine directly to the output pose, connect it to the cache node:
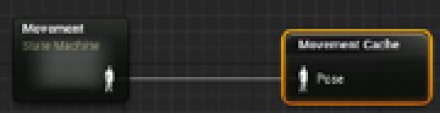
Figure 12.10: The Movement state machine is being cached
- With the Movement state machine pose being cached, all you have to do now is reference it. This can be done by searching for the Use Cached Pose node.
Note
All cached poses will show in the context-sensitive menu. Just make sure you select the cached pose with the name you gave it in Step 1.
- With the cached pose node available, connect it to Output Pose of the AnimGraph:
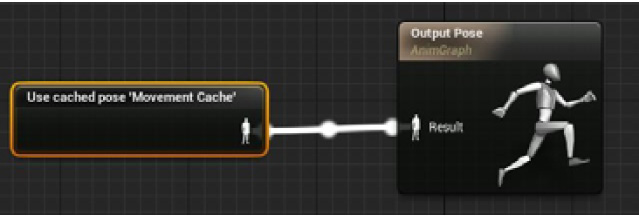
Figure 12.11: This is identical to having the Movement state machine directly connected to Output Pose
You will notice now, after Step 4, that the main character will animate correctly and move as you expect after the last chapter. This proves that the caching of the Movement state machine is working. The image below shows the player character back in his Idle animation in the preview window of the Animation Blueprint.
Now that you have the caching of the Movement state machine working, you will use this cache to blend animations through the skeleton based on the Anim Slot you created:

Figure 12.12: The main character is animating as expected
With this exercise complete, you now have the ability to reference the cached Movement state machine pose anywhere you would like within the Animation Blueprint. With this accessibility in place, you can now use the cached pose to begin the blending between the cached movement pose and the Upper Body Anim Slot using a function called Layered blend per bone.
Layered blend per bone
The node that you will use to blend animations here is Layered blend per bone. This node masks out a set of bones on the character skeleton for an animation to ignore those bones.
In the case of our player character and the Throw animation, you will mask out the lower body so that only the upper body animates. The goal is to be able to perform the throw and movement animations at the same time and have these animations blend together; otherwise, when you perform the throw, the movement animations would completely break.
Exercise 12.05: Blending Animation with the Upper Body Anim Slot
The Layered blend per bone function allows us to blend the Throw animation with the movement animations you implemented in the previous chapter, and give you control over how much influence the Throw animation will have on the player character skeleton.
In this exercise, you will use the Layered blend per bone function to completely mask out the lower body of the character when playing the Throw animation so that it does not influence the character movement animation of the lower body.
Let's begin by adding the Layered blend per bone node and discuss its input parameters and its settings:
- Inside the Animation Blueprint, right-click and search for Layered blend per bone in the Context Sensitive search.
Figure 12.13 shows the Layered blend per bone node and its parameters.
- The first parameter, Base Pose, is for the base pose of the character; in this case, the cached pose of the Movement state machine will be the base pose.
- The second parameter is the Blend Pose 0 node that you want to layer on top of Base Pose; keep in mind that selecting Add Pin will create additional Blend Pose and Blend Weights parameters. For now, you will only be working with one Blend Pose node.
- The last parameter is Blend Weights, which is how much Blend Pose will affect Base Pose on a scale from 0.0 to 1.0 as an alpha:

Figure 12.13: The Layered blend per bone node
Before you connect anything to this node, you will need to add a layer to its properties.
- Left-click to select the node and navigate to Details. You will need to left-click on the arrow next to Layer Setup to find the first index, 0, of this setup. Left-click on + next to Branch Filters to create a new filter.
There are again two parameters here, namely the following:
- Bone Name: The bone to specify where the blending will take place and determine the child hierarchy of bones masked out. In the case of the main character skeleton for this project, set Bone Name to Spine. Figure 12.14 shows how the Spine bone and its children are unassociated with the lower body of the main character. This can be seen in the Skeleton asset, MainCharacter_Skeleton:
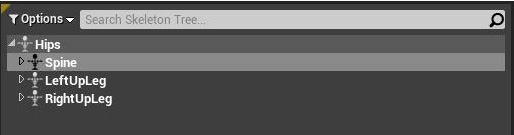
- Bone Name: The bone to specify where the blending will take place and determine the child hierarchy of bones masked out. In the case of the main character skeleton for this project, set Bone Name to Spine. Figure 12.14 shows how the Spine bone and its children are unassociated with the lower body of the main character. This can be seen in the Skeleton asset, MainCharacter_Skeleton:
Figure 12.14: The Spine bone and its children are associated with the upper body of the main character
- Blend Depth: The depth in which bones and their children will be affected by the animation. A value of 0 will not affect the rooted children of the selected bone.
- Mesh Space Rotation Blend: Determines whether or not to blend bone rotations in mesh space or in local space. Mesh Space rotation refers to the skeletal mesh's bounding box as its base rotation, while Local Space rotation refers to the local rotation of the bone name in question. In this case, we want the rotation blend to occur in mesh space, so we will set this parameter to true.
Blending is propagated to all the children of a bone to stop blending on particular bones, add them to the array, and make their blend depth value 0. The final result is as follows:
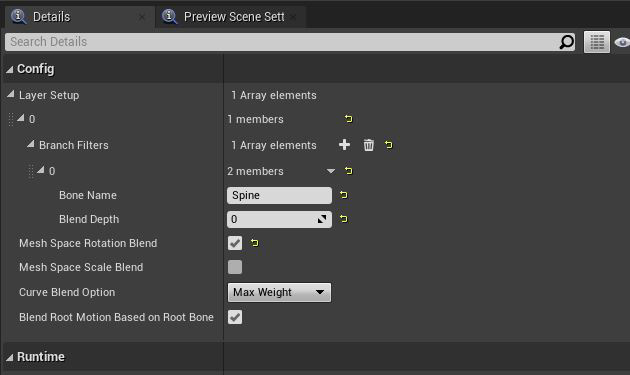
Figure 12.15: You can set up multiple layers with one blend node
- With the settings in place on the Layered blend per bone node, you can connect the Movement Cache cached pose into the Base Pose node of the layered blend. Make sure you connect the output of the Layered blend per bone node to Output Pose of the Animation Blueprint:
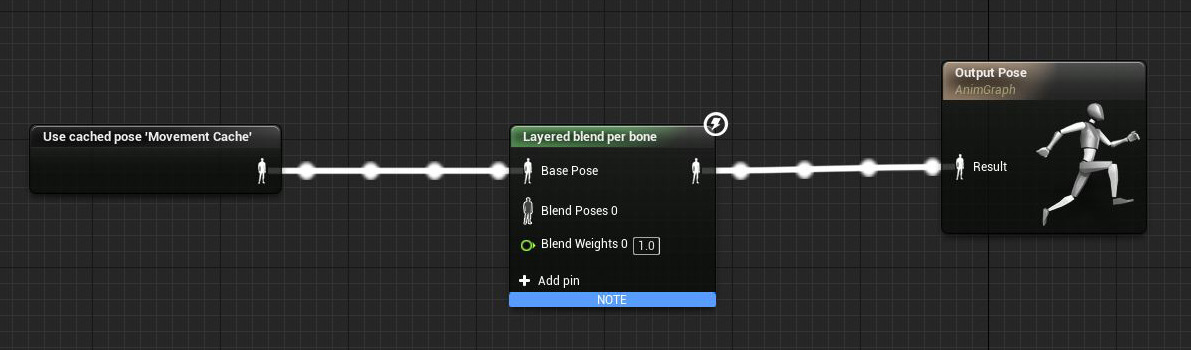
Figure 12.16: Add the cached pose for the Movement state machine to the Layered blend per bone node
Now it's time to use the Anim Slot you created earlier to filter only the animations using this slot through the Layered blend per bone node.
- Right-click in the AnimGraph and search for DefaultSlot. Left-click to select the Slot node and navigate to Details. There, you will find the Slot Name property. Left-click on this drop-down to find and select the DefaultGroup.Upper Body slot.
When changing the Slot Name property, the Slot node will update to represent this new name. The Slot node requires a source pose, which will again be a reference to the Movement state machine. This means that you need to create another Use Cached Pose node for the Movement Cache pose.
- Connect the cached pose into the source of the Slot node:
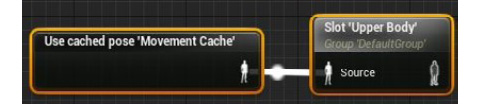
Figure 12.17: Filtering the cached Movement pose through the Anim Slot
- All that is left to do now is connect the Upper Body slot node to the Blend Pose 0 input. Then, connect the final pose of Layered blend per bone to the result of the Output Pose Animation Blueprint:

Figure 12.18: The final setup of the main character's Animation Blueprint
With the Anim Slot and the Layered blend per bone node in place within the main character's Animation Blueprint, you are finally done with the animation side of the main character.
Next, let's have a brief discussion about the importance of animation blending for the Throw animation and what the Throw animation will be used for, before you move on to Exercise 12.06, Previewing the Throw Animation, where you will preview the Throw animation in the game.
The Throw Animation
So far, you have put a lot of work into ensuring that the Throw animation blends correctly with the Movement animations that you set up in the Animation Blueprint in the previous chapter. The main reason behind this effort is to ensure the visual fidelity of the character when performing multiple animations at once. You will learn first-hand the visual consequences of incorrectly setting up animation blending in the exercises and activity ahead.
Getting back to the Throw animation, every modern video game implements animation blending in one form or another, so long as the art direction and the game mechanics require such a feature. An example of a modern game franchise that extraordinarily uses animations is the Uncharted series developed by Naughty Dog.
If you are unfamiliar with the franchise, you can watch the full gameplay of the latest installment here: https://www.youtube.com/watch?v=5evF_funE8A.
What the Uncharted series does very well is use thousands of animations and blending techniques to give the player character an incredible sense of realism, weight, and movement that feels really good while you play the game. Although the Super SideScroller project will not be anywhere as polished as this, you are learning the basics of what is needed to make incredible animations for video games:
Exercise 12.06: Previewing the Throw Animation
In the previous exercise, you did a lot of work to allow animation blending between the player character's Movement animations and the Throw animation by using the Save Cached Pose and Layered blend per bone nodes. Perform the following steps to preview the Throw animation in-game and see the fruits of your labor:
- Navigate to the /MainCharacter/Blueprints/ directory and open the character's BP_SuperSideScroller_MainCharacter Blueprint.
- If you recall, in the last chapter you created Input Action for throwing with the ThrowProjectile name.
- Inside Event Graph of the character's Blueprint, right-click and search for ThrowProjectile in the Context Sensitive drop-down search. Select it with a left-click to create the event node in the graph.
With this event in place, you need a function that allows you to play an Animation Montage when the player uses the left mouse button to throw.
- Right-click in Event Graph and search for Play Montage. Make sure not to confuse this with a similar function Play Anim Montage.
The Play Montage function requires two important inputs:
- Montage to Play
- In Skeletal Mesh Component
Let's first handle Skeletal Mesh Component.
- The player character has a Skeletal Mesh Component that can be found in the Components tab labeled Mesh. Left-click and drag out a Get reference to this variable and connect it to the In Skeletal Mesh Component input of this function:
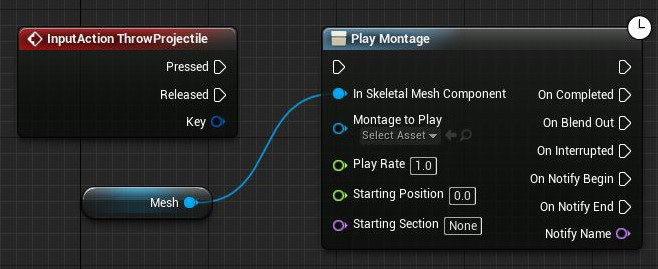
Figure 12.19: The mesh of the player character connected to the In Skeletal Mesh Component input
The last thing to do now is to tell this function which montage to play. Luckily for you, there is only one montage that exists in this project: AM_Throw.
- Left-click on the drop-down menu under the Montage to Play input and left-click to select AM_Throw.
- Finally, connect the Pressed execution output of the ThrowProjectile event to the execution input pin of the Play Montage function:

Figure 12.20: When the player presses the ThrowProjectile input actions, the AM_Throw montage will be played
- Now, when you click your left mouse button, the player character will play the throwing Animation Montage.
Notice now how you can walk and run at the same time as throwing, and each animation blends together so as to not interfere with one another:

Figure 12.21: The player character can now move and throw
Don't worry about any bugs you might see when using the left mouse button action repeatedly to play the Throw montage; these issues will be addressed when you implement the projectile that will be thrown in a later chapter for this project. For now, you just want to know that the work done on the Anim Slot and the Animation Blueprint give the desired result for animation blending.
Let's continue with the SuperSideScroller project by now creating the C++ class, the Blueprints, and the Materials necessary to set up the enemy for use in the next chapter.
The Super Side Scroller Game Enemy
With the player character animating correctly when moving and performing the Throw animation, it is time to talk about the enemy type that the SuperSideScroller game will feature. We will have a simple type of enemy.
This enemy will have a basic back-and-forth movement pattern and will not support any attacks; only by colliding with the player character will it be able to inflict damage.
In the next exercise, you will set up the base enemy class in C++ for the first enemy type and configure the enemy's Blueprint and Animation Blueprint in preparation for Chapter 13, Enemy Artificial Intelligence, where you will implement the AI of this enemy. For the sake of efficiency and time, you will use the assets already provided by Unreal Engine 4 in the SideScroller template for the enemy. This means you will be using the skeleton, skeletal mesh, animations, and the Animation Blueprint of the default mannequin asset. Let's begin by creating the first enemy class.
Exercise 12.07: Creating the Enemy Base C++ Class
The goal of this exercise is to create a new enemy class from scratch and to have the enemy ready to use in Chapter 13, Enemy Artificial Intelligence, when you develop the AI. To start, create a new enemy class in C++ by following these steps:
- In the editor, navigate to File and select New C++ Class to get started with creating your new enemy class.
- Next, make sure you check the Show All Classes box toward the top of the Choose Parent Class window prompt before attempting to search for a class. Then, search for SuperSideScrollerCharacter and left-click it to select it as the parent class.
- Lastly, you need to give this class a name and select a directory. Name this class EnemyBase and do not change the directory path. When ready, left-click on the Create Class button to have Unreal Engine create the new class for you.
When you create a new class, Unreal Engine will automatically open Visual Studio for you with the .cpp and .h files ready to go. For now, you will not make any changes to the code, so close Visual Studio.
Let's create the folder structure in the content browser for the enemy assets next.
- Head back to the Unreal Engine 4 editor, navigate to the content browser, and create a new folder called Enemy:

Figure 12.22: New folders are created by right-clicking on existing folders and selecting New Folder
- In the Enemy folder, create another folder called Blueprints, where you will create and save the Blueprint assets for the enemy.
- In the /Enemy/Blueprints directory, right-click and select Blueprint Class. From Pick Parent Class, search for the new C++ class you just made, EnemyBase, as shown:

Figure 12.23: Now, the new EnemyBase class is available for you to create a Blueprint from
- Name this BP_Enemy.
Now that you have the Blueprint for the first enemy using the EnemyBase class as the parent class, it is time to handle the Animation Blueprint. You will use the default Animation Blueprint that is provided to you by Unreal Engine in the SideScroller template project. Follow the steps in the next exercise to create a duplicate of the existing Animation Blueprint and move it to the /Enemy/Blueprints directory.
Exercise 12.08: Creating and Applying the Enemy Animation Blueprint
In the previous exercise, you created a Blueprint for the first enemy using the EnemyBase class as the parent class. In this exercise, you will be working with the Animation blueprint.
The following steps will help you complete this exercise:
- Navigate to the /Mannequin/Animations directory and find the ThirdPerson_AnimBP asset.
- Now, duplicate the ThirdPerson_AnimBP asset. There are two ways to duplicate an asset:
- Select the desired asset in the content browser and press CTRL + W.
- Right-click on the desired asset in the content browser and select Duplicate from the drop-down menu.
- Now, left-click and drag this duplicate asset into the /Enemy/Blueprints directory and select the option to move when you release the left-click mouse button.
- Name this duplicate asset AnimBP_Enemy. It is best to create a duplicate of an asset that you can later modify if you so desire without risking the functionality of the original:
With the enemy Blueprint and Animation Blueprint created, it's time to update the enemy Blueprint to use the default Skeletal Mesh mannequin and the new Animation Blueprint duplicate.
- Navigate to /Enemy/Blueprints and open BP_Enemy.
- Next, navigate to the Mesh component and select it to access its Details panel. First, assign SK_Mannequin to the Skeletal Mesh parameter, as shown:
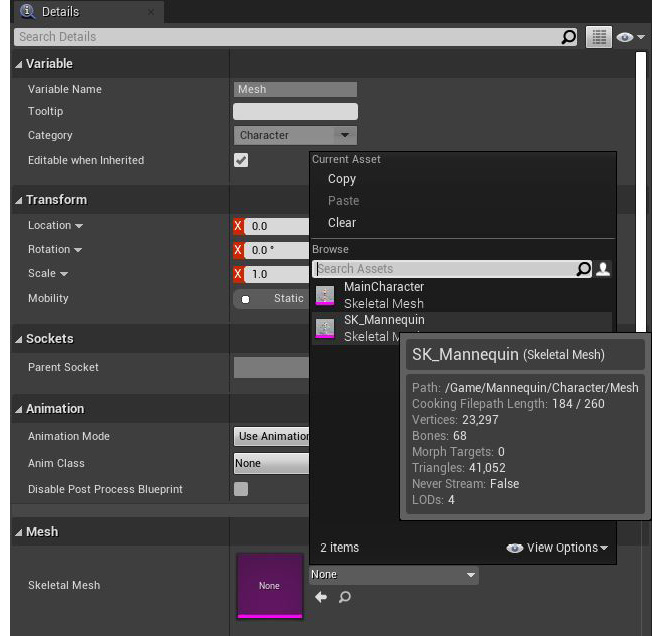
Figure 12.24: You will use the default SK_Mannequin skeletal mesh for the new enemy
- Now you need to apply the AnimBP_Enemy Animation Blueprint to the Mesh component. Navigate to the Animation category of the Mesh component's Details panel, and under Anim Class, assign AnimBP_Enemy:

Figure 12.25: Assign the new AnimBP_Enemy Animation Blueprint as the Anim Class for the enemy character
- Lastly, you will notice that the character mesh is positioned and rotated incorrectly when previewing the character in the Preview window. Fix this by setting the Transform property of the Mesh component to the following:
- Location: (X = 0.000000, Y = 0.000000, Z = -90.000000)
- Rotation: (Roll= 0.000000, Pitch= 0, Yaw= -90.000000)
- Scale: (X = 1.000000, one = 1.000000, Z = 1.000000)
The Transform settings will appear as follows:

Figure 12.26: These are the transform settings so that your character is positioned and rotated correctly
The following figure shows the settings of the Mesh component so far. Please make sure your settings match what is displayed here:
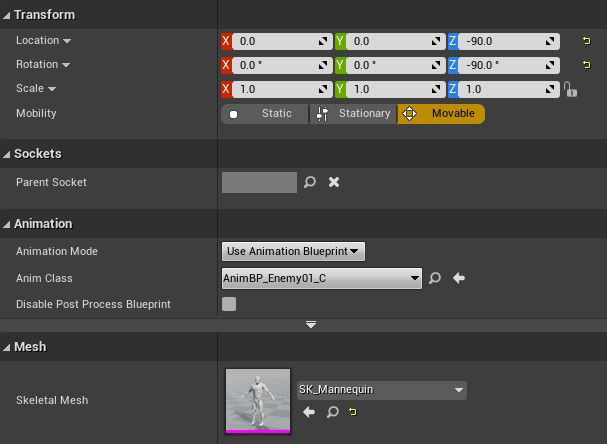
Figure 12.27: The settings for the Mesh component of your enemy character
The last thing to do here is to create a Material Instance of the mannequin's primary material so that this enemy can have a unique color that helps differentiate it from the other enemy type.
Let's begin by first learning more about Materials and Material Instances.
Materials and Material Instances
Before moving on to the next exercise, we need to first briefly discuss what Materials and Material Instances are before you can work with these assets and apply them to the new enemy character. Although this book is more focused on the technical aspects of game development using Unreal Engine 4, it is still important that you know, on a surface level, what Materials and Material Instances are and how they are used in video games.
Note
For more information about Materials, please refer to the following Epic Games documentation: https://docs.unrealengine.com/en-US/Engine/Rendering/Materials/index.html.
A Material is a type of asset that can be applied to a mesh that will then control how the mesh looks in-game. The Material editor gives you control over many parts of how the end visual result will look, including control over parameters such as Textures, Emissive, and Specular, among others. The following image shows the default mannequin skeletal mesh with the M_UE4Man_Body-applied Material asset:
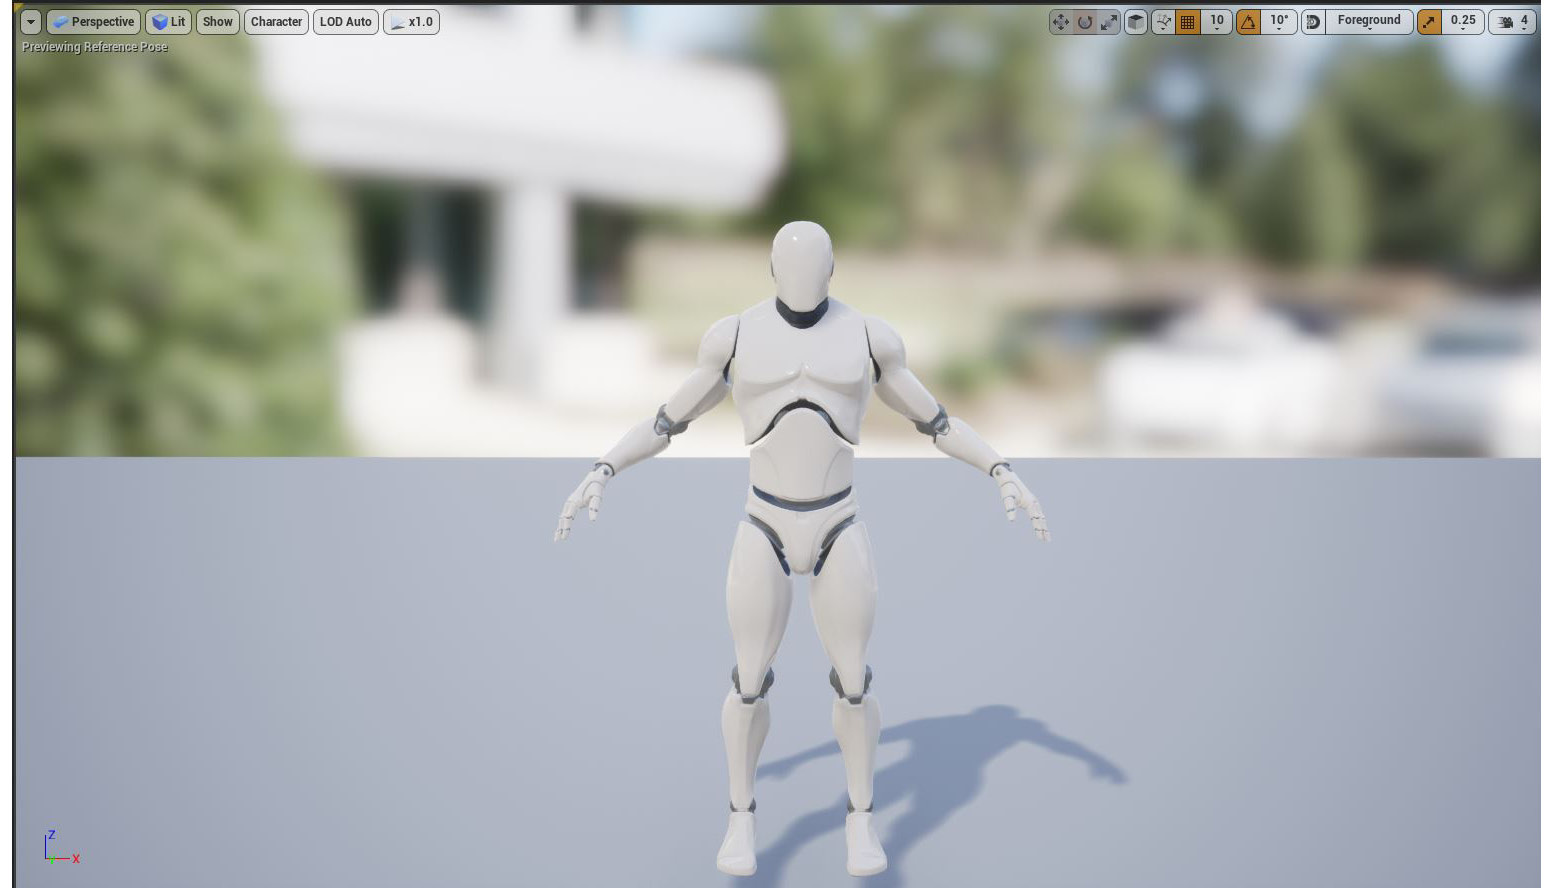
Figure 12.28: The default mannequin skeletal mesh with a basic Material applied
A Material Instance is an extension of a Material where you do not have access or control over the base Material from which the Material Instance derives, but you do have control over the parameters that the creator of the Material exposes to you. Many parameters can be exposed to you to work with from inside Material Instances.
Unreal Engine provides us with an example of a Material Instance in the Side Scroller template project called M_UE4Man_ChestLogo, found in the /Mannequin/Character/Materials/ directory. The following image shows the set of exposed parameters given to the Material Instance based on the parent material, M_UE4Man_Body. The most important parameter to focus on is the Vector parameter, called BodyColor. You will use this parameter in the Material Instance you create in the next exercise to give the enemy a unique color:

Figure 12.29: The list of parameters for the M_UE4Man_ChestLogo Material Instance asset
Exercise 12.09: Creating and Applying the Enemy Material Instance
Now that you have a basic understanding of what materials and material instances are, it is time to create your own Material Instance from the M_UE4ManBody asset. With this Material Instance, you will adjust the BodyColor parameter to give the enemy character a unique visual representation. Let's start by creating the new Material Instance.
The following steps will help you complete this exercise:
- Navigate to the /Mannequin/Character/Materials directory to find the Material used by the default mannequin character, M_UE4ManBody.
- A Material Instance can be created by right-clicking on the Material asset, M_UE4Man_Body, and left-clicking on the Create Material Instance option. Name this asset MI_Enemy01.

Figure 12.30: Any material can be used to create a Material Instance
Create a new folder called Materials in the Enemy folder. Left-click and drag the Material Instance into the /Enemy/Materials directory to move the asset to this new folder:

Figure 12.31: Rename the Material Instance MI_Enemy
- Double-left-click the Material Instance and find the Details panel on the left-hand side. There, you will find a Vector Parameter property called BodyColor. Make sure the checkbox is checked to enable this parameter, and then change its value to a red color. Now, Material Instance should be colored red, as shown:
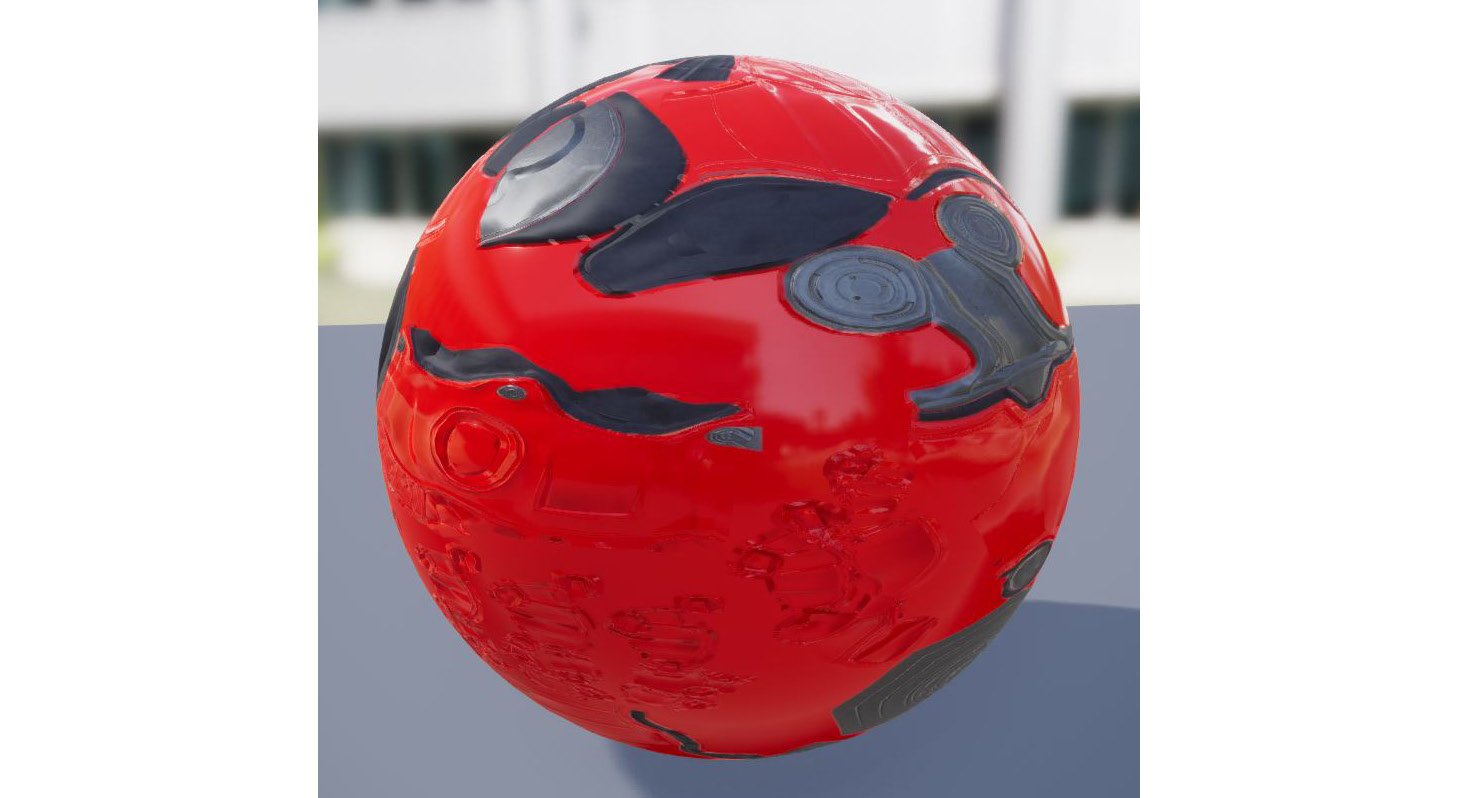
Figure 12.32: Now, the enemy material is red
- Save the Material Instance asset and navigate back to the BP_Enemy01 Blueprint. Select the Mesh component and update the Element 0 material parameter to MI_Enemy:

Figure 12.33: Assigning the new Material Instance asset, MI_Enemy, to Element 0 of the materials for the Mesh component
- Now, the first enemy type is visually ready and has the appropriate Blueprint and Animation Blueprint assets prepared for the next chapter, where you will develop its AI:
Figure 12.34: The final enemy character set up
With this exercise complete, you have now created a Material Instance and applied it to the enemy character so that it has a unique visual representation.
Let's conclude this chapter by moving on to a short activity that will help you better understand the blending of animations using the Layered blend per bone node that was used in the earlier exercises.
Activity 12.01: Updating Blend Weights
At the end of Exercise 12.06, Previewing the Throw Animation, you were able to blend the movement animations and the Throw animation so that they both could be played in tandem without negatively influencing each other. The result is the player character animating correctly when walking or running, while also performing the Throw animation on the upper body.
In this activity, you will experiment with the blend bias values and parameters of the Layered blend per bone node to have a better understanding of how animation blending works.
The following steps will help you complete the activity:
- Update the Blend Weights input parameter of the Layered blend per bone node so that there is absolutely no blending of the Throw animation additive pose with the base movement pose. Try using values here such as 0.0f and 0.5f to compare the differences in the animation.
Note
Make sure to return this value to 1.0f after you are done so as not to affect the blending you set up in the previous exercise.
- Update the settings of the Layered blend per bone node to change which bone is affected by the blend so that the whole character's body is affected by the blend. It's a good idea to start with the root bone in the skeleton hierarchy of the MainCharacter_Skeleton asset.
- Keeping the settings from the previous step in place, add a new array element to the branch filters and, in this new array element, add the bone name and a blend depth value of –1.0f, which allows only the character's left leg to continue to animate the movement correctly when blending the Throw animation.
Note
After this activity, make sure to return the settings of the Layered blend per bone node to the values you set at the end of the first exercise to ensure no progress is lost in the character's animation.
The expected outputs are as follows:
Figure 12.35: Output showing the entire character body affected
Figure 12.36: The left leg continues to animate the movement correctly when blending the Throw animation
Figure 12.37: The character's right leg animating while moving with the end of the Throw animation
Note
The solution to this activity can be found at: https://packt.live/338jEBx.
Before concluding this activity, please return the Layered blend per bone settings to the values you set at the end of Exercise 12.05, Blending Animation with the Upper Body Anim Slot. If you do not return these values back to their original settings, the animation results in upcoming exercises and activities in the next chapters will not be the same. You can either set back the original values manually or refer to the file with these settings at the following link: https://packt.live/2GKGMxM.
With this activity complete, you now have a stronger understanding of how animation blending works and how blending weighting can affect the influence of additive poses on base poses using the Layered blend per bone node.
Note
There are a lot of techniques for animation blending that you haven't used in this project, and it's strongly recommended that you research these techniques, starting with the documentation at https://docs.unrealengine.com/en-US/Engine/Animation/AnimationBlending/index.html.
Summary
With the enemy set up with the C++ class, Blueprint, and Material, you are ready to move on to the next chapter, where you will create the AI for this enemy by taking advantage of systems such as Behavior Trees in Unreal Engine 4.
From the exercises and activities of this chapter, you learned how to create an Animation Montage that allows the playing of animations. You also learned how to set up an Anim Slot within this montage to categorize it for the player character's upper body.
Next, you learned how to cache the output pose of a state machine by using the Use Cached Pose node so that this pose can be referenced in multiple instances for more complex Animation Blueprints. Then, by learning about the Layered blend per bone function, you were able to blend the base movement pose with the additive layer of the Throw animation by using the Anim Slot.
Lastly, you put together the base of the enemy by creating the C++ class, Blueprint, and other assets so that they will be ready for the next chapter. With the enemy ready, let's move on to creating the AI of the enemy so that it can interact with the player.