
Up until now we’ve looked at pipelines that work with monoliths and microservices. We’ve explored the challenges that come with both, but have seen how microservices can ease your pipeline workload. In the previous chapter we saw how you can build language-specific pipelines. These implementations allow for multiple teams to take advantage of a single pipeline. It also makes you begin to set and enforce development standards, which allows for code reuse across your pipelines. We’ll explore this concept much deeper in later chapters with code examples.
Language specific pipelines are great; they allow the DevOps team to focus on fewer pipelines by giving feature teams a shared implementation. It lowers maintenance efforts, allows for all teams to share in upgrades and improvements, and sets standards for how applications are deployed. While all this is great, we can do better. Imagine if you could build a single pipeline that could deploy any application regardless of the language it was written in. How much time could your DevOps team get back if they only had to support one implementation?
In this chapter we’ll begin laying the foundations of the generic pipeline using Docker. You’ll learn the pattern and process that allows a truly generic pipeline to work. We’ll explore how this pattern is driven by Docker and frees you from the underlying platform the pipeline runs on. At the end of this chapter you’ll be ready to start coding an implementation.
One Pipeline to Rule Them All
User Interface: Angular and React
Server Side: .NET Core, Java, Node.js, Python, Golang
Microservices give feature teams the flexibility to try out new languages and patterns. They allow for choosing the right language for the job as well. Take .NET and SQL Server for instance. Let’s imagine you’ve been writing back-end services in Node.js and now must write a new API that connects to SQL Server. You could use Node.js for this task; however, .NET has built-in functionality to do just that. You can very quickly spin up a .NET Core microservice that handles CRUD operations against your SQL Server. It would be faster to write and less error prone, since it’s inside the .NET ecosystem.
Another scenario involves hiring of new talent. Suppose you hire an amazing developer. When they join, they talk about writing their microservices in Golang, since it’s easy to write, easy to learn, and compiles and deploys very fast. You try it out and like it. Suddenly Golang services are springing up all over the place. The moral of the story is with microservices developers, feel free to try out new languages or stray from the standard if another language provides benefits.
As more and more languages come on the scene, you’ll find yourself writing more and more pipeline implementations. If you’re in an organization that supports seven languages, that would be seven pipelines. Even in a simple scenario, you’d have two languages to support, one for the UI and one for the server side. That’s one too many! A better solution is a single pipeline that is built to handle any language that your teams work with.
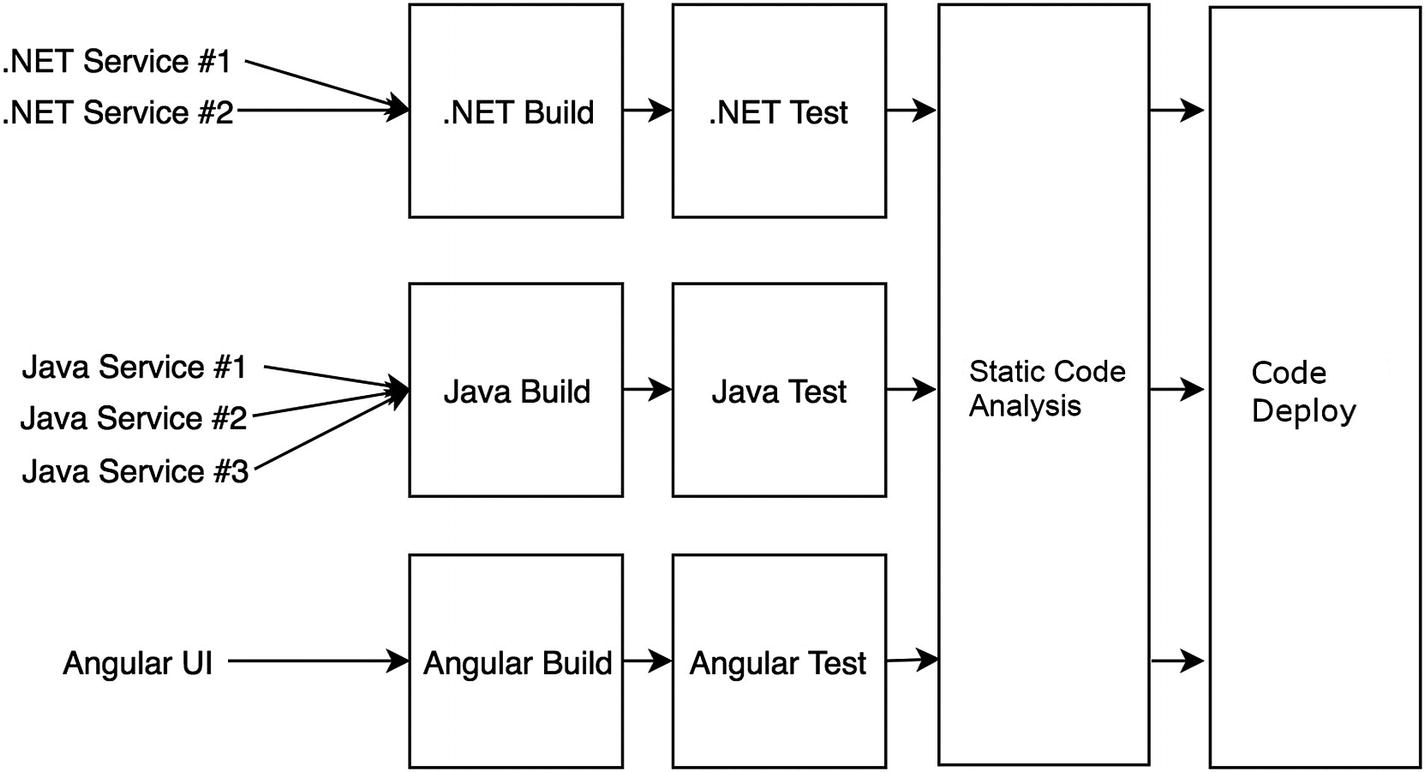
Shared steps of a CI/CD pipeline
Build
Unit Test
Static Code Scan/Security Scan
Packaging/Publishing of Artifacts
Deploying
End to End Tests
Performance Tests
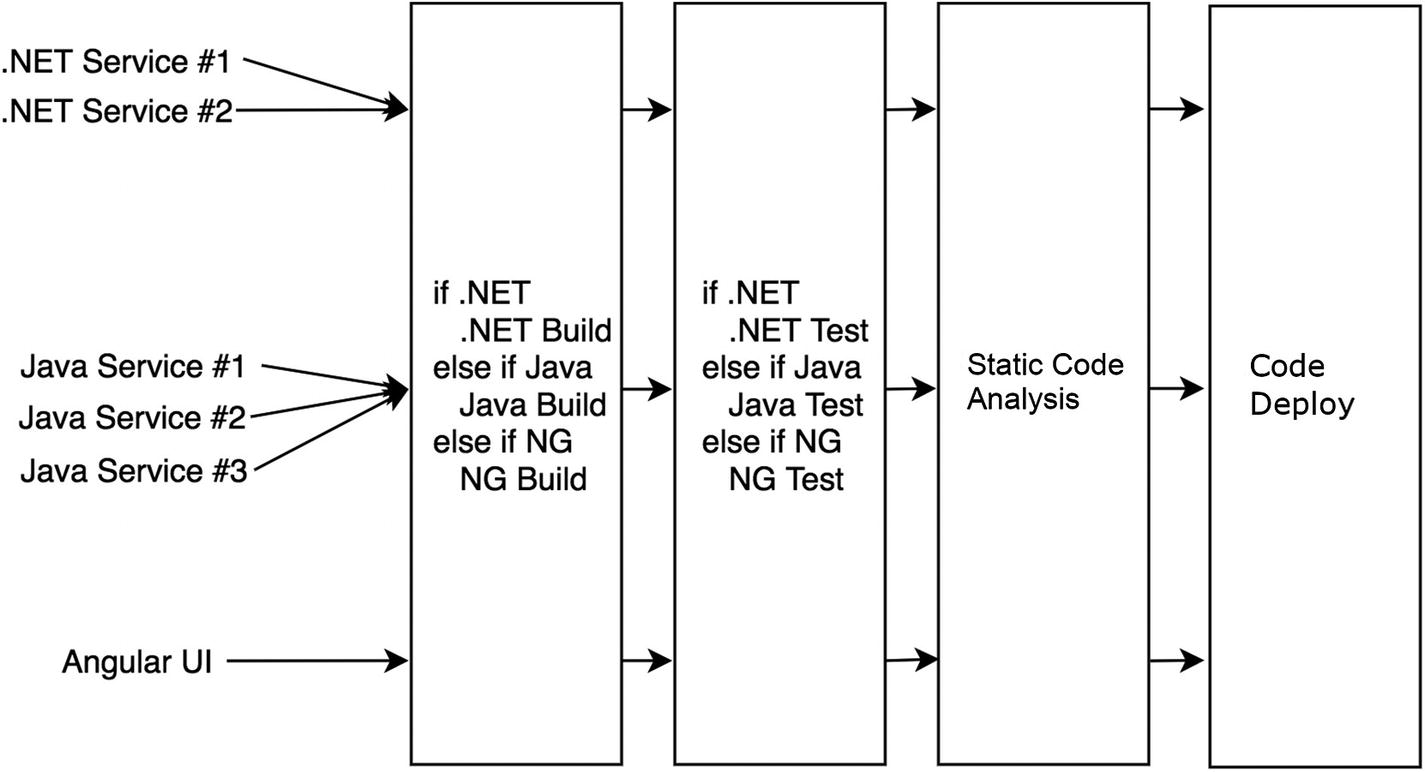
Pipeline stages using shared code
Sample Build Step in a Generic Pipeline
Sample Build Step Using a Switch/Case Statement
A More Complete Angular Build Step
Run “npm set progress=false” to turn off progress bars.
Run “npm install” to restore packages.
Run “npm build” to build the project.
No other commands will be run.
With this build standard in place, all teams would need to conform to it or in order to use your pipeline. This may seem harsh, but there are a lot of benefits to it. Teams that share common standards on how they build and test can more rapidly debug issues and assist other teams with issues, and it simplifies your work in the pipeline. Now of course, there will always be outliers who need to do things their own way. In those cases it’s important not to deviate from the standard. You could explore things like a custom pipeline for that application, or provide hooks into the pipeline to allow teams to override your steps. In most cases you will need to hold strong on the standards and say no to a lot of requests.
Shell Scripts
For your pipeline to be truly generic and run anywhere, it needs to be written in a way that is portable. So far we’ve explored writing shared steps. In the previous section we saw how to combine commands from different languages into a single step. In case you haven’t noticed, those commands were all written in Shell. For this book we’ve chosen Shell scripts to execute all our commands.
Shell scripts were an easy choice to make for a variety of reasons. All our examples are written in languages that run in a Linux environment. This includes .NET Core, Angular, and Java. This was also an easy choice, since this book is about writing pipelines with Docker. While Docker can run on Windows, I would argue most organizations don’t utilize this option—especially those running on Amazon Web Services using Elastic Container Service (ECS) or Google Cloud Platform Kubernetes Engine. A Shell environment will be present in all our containers without any additional installations, which is nice!
No matter the container we’re working in, we’re confident a Shell environment is available. However, this is not the case with all Shell languages. Bash, for instance, is a very popular Shell language, but if you’re new to Docker you’ll quickly find out that it’s not always available. For instance, Alpine containers, which are lightweight Linux distribution based on “musl libc” and “busybox”, have a Shell environment but do not come with Bash installed.
While we have chosen Shell scripts for this book, there is no reason you cannot deviate from this and use another scripting language. For instance, you can use Bash or Python just as easily. The only caveat is you will need to ensure those runtimes are installed in your Docker image. In fact, if you happen to be using Windows containers, there is no reason you can’t follow along with us. You’ll just be using PowerShell in your containers, most likely.
Build Step as a Shell Script
This example looks almost identical to Listing 3-2, with a couple of small but important changes. First, we’ve include a shebang as the first line in the file to indicate this is a Shell script. This would change based on the language you’re using. For instance, if you wanted to use Python 3 your shebang would be #!/usr/bin/python3. Next, we’ve replaced the “$language” variable with a “$1” indicating we’re passing it in as an argument. While this is still a very simple implementation of a build step, these two changes make it a fully functional step. Just save it as "build.sh" and you’re ready to use it in your pipeline.
Angular Build Commands in Their Own Shell Script
Simplified Build Step Shell Script
While we haven’t reduced the line count of the code in the file, we’ve greatly simplified it, making it easier to read and follow. The script is no longer cluttered with code from the various languages. If we need to add another language, simply write the appropriate build script and then add another case statement to the build step script.
This method introduces shared scripts that can be executed from a step on your CI/CD platform. For instance, let’s imagine that you have multiple lines of business in your organization, each with their own DevOps team. Each LOB has development teams building microservices, and each runs their own CI/CD platform. We’ll also say that all those teams are writing microservices in Node.js. It’s not hard to imagine that each DevOps group has its own pipeline that can build, test, and deploy Node.js services. Each pipeline is essentially doing the same thing, and most likely using almost identical code to do it!
If both teams adopted using Shell scripts to build their Node.js services, then they could then easily share code. In fact, the code in Listing 3-5 could simply be renamed “npm_build.sh” and used for all Node.js applications! Even if each team was using different platforms for their pipelines, running Shell scripts is supported in every major platform.
Configuration Files
For Shell scripts to properly handle multiple languages, you must have some way to inform your pipeline about the application you want to build. You want to be explicit about what you are doing. A configuration file can solve this issue for you. Development teams can place this file in their repo and it would be cloned along with the application when the pipeline executes. It would contain all the information the pipeline would need to execute. Listing 3-7 shows what a simple configuration file may look like.
Note
This book focuses on building applications that are deployed via Docker containers to an orchestration service like Amazon ECS or Kubernetes. As such, the configuration file shown in this chapter is specific to that. A configuration file for your applications may look drastically different.
A Sample Configuration File
- Application: Contains basic information about the application
Name: This is a friendly name for the application. This may be its identifier in the UI of the platform or used for reporting.
Language: This is the language the application is written in. This is the most important, if not only, variable the pipeline may care about.
- Build: Contains information about how to build the application
Path: This would be the directory path in the cloned repo, in case your application is located somewhere other than root.
OutputPath: This tells the pipeline where the built binaries should be placed. It is useful if other stages require the binaries to be placed in specific locations.
- Tests: Contains information about how to execute unit tests
Enabled: Would allow the application to bypass a stage
Path: Used if the unit tests are not located in the same directory as the application
- Archive: Contains information about how to archive the built application
Registry: The URL to the Docker registry where the application will be pushed
Namespace: The namespace in the registry
Repository: The repository name under the namespace
- Deploy: Contains information pertaining to the deployment
ContainerPort: The container port number
Security Scans
Static Code Analysis
Performance Tests
ATDD Tests
This could go on and on. The main takeaway here is that for a generic pipeline that uses shared code to function properly, you need a way to instruct it on which paths to take while executing. We will explore configuration files in more detail, as well as use them in later chapters.
Docker at the Core
At the core of the generic pipeline is Docker. It is the glue that holds everything together, as well as the magic that makes it all possible. Docker provides a mechanism where we can isolate our pipeline from the underlying platform. It also allows us to create an environment that is specific to the needs of the application being deployed. For instance, if we’re building a .NET Core application, we don’t need to worry about having the Java runtime installed. It also allows for us to easily target specific runtime.
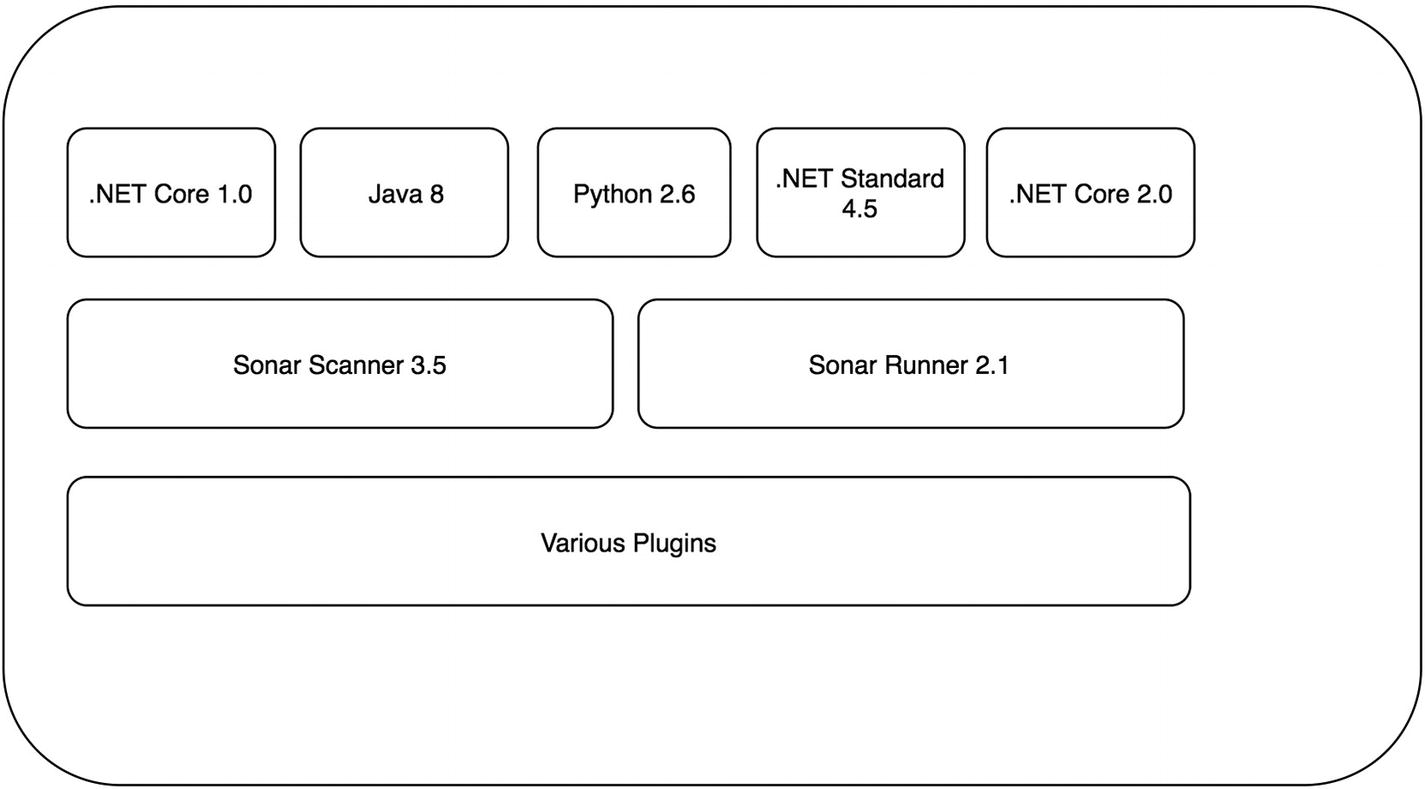
Java Runtime Environment 8
.NET Core 1.0
Python 2.6
.NET Standard 4.5
Sonar Scanner 2.0

Enterprise CI/CD platform
Enterprise CI/CD platform with new runtimes installed
If your team happens to be agile, they are most likely putting you on their impediment list! At this point the enterprise platform has become a bottleneck slowing down the development teams. In a worst-case scenario, you’re stifling progress and innovation because teams cannot move as fast as they need to. Imagine that an early access release of .NET Core comes out and a team would like to use it for their application. This would be even more of a challenge given it’s not a release candidate!
In addition to the slowdowns that this can present, there are also a ton of runtimes installed that most developers don’t need. To put it another way, the Java developers don’t need .NET Core and vice versa. Now most of the time this is not a problem, as multiple runtimes can be installed side by side without issue. But larger platforms, like Jenkins, also come with a lot of plugins that sometimes don’t play nice with each other. As the platform’s popularity grows inside the organization, more and more requests for plugins flow in. At some point there may be a conflict between plugins, and someone will have to lose out on functionality they were counting on.

Enterprise CI/CD platform with only Docker installed
Now at this point you may be thinking to yourself, “this is insane.” Why would I have an entire platform and only put Docker on it. Well, you’re still going to have a lot of other things installed/configured for your enterprise. However, you can begin to break free of installing individual runtimes and tooling to support all the applications your platform supports. Docker allows for teams to control their environments and only install things specific to their applications.

Enterprise CI/CD platform utilizing Docker during builds

Enterprise CI/CD platform with updated containers
Sample Dockerfile for a .NET Core 1.0 Build Container
Sample Dockerfile for a .NET Core 2.0 Build Container
As you can see, the only thing that changed was the base image of the Dockerfile. In this scenario we now have two build containers, all from changing a single line of code. Contrast that with what it would take to install a new runtime in the platform, fully test it in lower environments, and then promote it to Production. With Docker, we can simply make a change to a Dockerfile and test it. If it works, great! If not, you’ve literally wasted about ten minutes of work.

Pipeline stages using shared code

Pipeline stages using shared code inside build containers
Adding Shell Scripts to Our Build Container
In this example we assume there is a directory called “stages” that holds all the Shell scripts for our pipeline. By copying the scripts into each build container, we have further isolated changes they may impact other teams. A change to a script will only be reflected once the build container is rebuilt. This is certainly not the only way to get your shell scripts into your build container. You could copy them in as part of an application clone, or if using a language like Python you could include them as modules and perform a PIP installation. The main takeaway is that the scripts are part of the build container and isolated from other code.
Platform Agnostic
Running a CI/CD pipeline inside a Docker container provides you with so many benefits. We’ve already seen how it can provide your development teams isolation from other runtimes, and give them total flexibility on what is installed in the container. Combine this with scripts loaded into the container to execute your pipeline code, and now you’re decoupled from the underlying platform. This is a very big deal.

Folder level configuration of a shared library
Directory Structure of a Shared Library
There may be many more files in this directory but there must be a folder named “vars,” which only contains Groovy files. While this is a fine method for sharing code across pipelines, it leaves a lot to be desired. This pattern also makes roper unit testing of the code more difficult, albeit still possible. It also locks us into using Groovy for our shared code, or at least using it as an entry point and then calling something else under the covers.
By using more generic scripts like Shell, we can already begin to break free of the platform even without Docker in the equation. If you’re on Windows you can use PowerShell, or even now you can consider Bash, which would not only decouple you from the platform but also the operating system. Putting Docker into the mix gives you the same capability; the only requirement now is that Docker be installed. You could also explore a language like Python, which pretty much runs anywhere.
Running a Docker cContainer in Jenkins
Note
The preceding stages are the actual stages we’ll be building in upcoming chapters. This example would assume that you have cloned or copied your scripts into the root of the container that is mapped to the Jenkins workspace.
Now that we have all our shared code in scripts in a GitHub repo, we can copy that in via our Dockerfile and use the preceding command to execute the container. You have the option to either “bake” your scripts into the container when it’s built, or you could even do a git clone command to bring the scripts down when the container runs. The point here is you have some options.
Now let’s consider that you have your pipeline built in a Docker container using Shell scripts, and you’re up and running on Jenkins. Everything is going great, and then your boss comes to you and proclaims that Jenkins is out and Circle CI is in! In most organizations around the world this would be a major event. All your pipelines need to be rewritten on Circle CI. It will take months to migrate everything over, not to mention the testing and deployments and, wait a minute! We have everything isolated in Docker containers. This won’t be so bad.
Running the Docker Container in Circle CI
At this point the beauty of the pattern should be clear. While we are just looking at configuration files, you should readily see the similarities. On either platform, we use our Docker image as the basis for running the pipeline. Stages or Steps are defined and given names, like Clone, Build, Test, etc. Next, a Shell script is executed in each section. Since everything runs inside a container, there are no surprises when we execute the pipeline. It will run the same on each platform!
Note
At this point you may be thinking this is way too easy. While this pattern makes moving the code and executing it on another platform crazy easy, you still need to keep in mind the other aspects of running a CI/CD platform. Each will have its own ways of being configured, dealing with networking, etc. However, not having to worry about how to port a pipeline will provide a lot of breathing room if you need to make a switch.
Running the Docker Container in Travis CI
In later chapters we’ll be using Circle CI and Travis CI to build a very simple pipeline. We’ll use the same Docker container and Shell scripts to build, test, and archive an application on both platforms. In fact, the Yaml files shown will be used in those examples!
Overview
We covered a lot of material and patterns in this chapter! Let’s take a quick moment to review what we discussed.
Shell Scripts
Shell scripts provide us a way to centralize our pipeline logic into smaller easy to share chunks of code. We can write scripts for very specific functionality and then use them inside “Stage” or “Step” scripts to stitch them together. By doing so, we create scripts that are easier to test and share across multiple pipeline implementations. Also, by using Shell we can be guaranteed they will run across any platform. This pattern also opens us up to using other scripts like Python or PowerShell.
Docker
Docker provides us the isolation needed to simplify the needs of the development team while running on the platform. In the past, the platform would need to have all the runtimes and plugins installed globally for anyone to use. With Docker, the only requirement is that Docker be installed for all to use.
Build Containers
Build containers provide a level of isolation on the platform. Each team can install their own runtimes and dependencies in a container, thus isolating their needs from others. This also provides them with the flexibility to use anything they want, without fear of it affecting the platform. If a team wants to us a bleeding edge release of a runtime, they have the power to do it. They own the build container (or a DevOps team) and are responsible for what goes in it. This allows teams to move at a much more rapid pace than if they were dependent on the platform team.
In the next chapters we’ll move out of theory and discussion and into actual implementation. We’ll create a simple demo application that we can use to deploy. We’ll look at building out our build container and how to implement it in Circle CI and Travis CI. You’ll take everything you have learned so far and apply it in a practical way. So let’s get started!