G. Micro HDMI connectors
The two micro HDMI ports on the Pi 4 are each capable of 60fps
4K video output. (Video performance may vary on how much
you’re taxing the Pi; just because the GPU is capable of these
outputs doesn’t mean it will always look good.)
H. Power input
There is no power switch on the Pi. This USB-C connector is
used to supply power (and only power; this isn’t an additional
USB port). USB-C was selected because the connector is cheap
and USB power supplies are easy to find. When you’re powering
your Pi 4, the Pi Foundation strongly suggests a power supply
capable of delivering 3A (15W), particularly if you’re planning on
powering external devices as well.
I. The microSD card slot
There’s no hard drive on the Pi. Everything from the operating
system to working programs to data are stored on a microSD
card. Raspberry Pi 1 and 2 are equipped with spring-loaded
full-size SD slots, so you’ll push to put the SD card in and push
again to take it out. With Raspberry Pi 3, they did away with the
spring-loaded component in favor of a friction-fit microSD slot.
On that model and all those following, including the Zero and the
Zero W, you’ll push to insert the microSD card and pull to remove
it. Of course, you should only insert or remove the SD card when
the Raspberry Pi is powered down.
Figure 1-3 shows all of the power and input/output (I/O) pins on the
Raspberry Pi.
6 Getting Started with Raspberry Pi
GSW_RASPI_4ED_FIN.indd 6GSW_RASPI_4ED_FIN.indd 6 10/28/21 10:53 AM10/28/21 10:53 AM
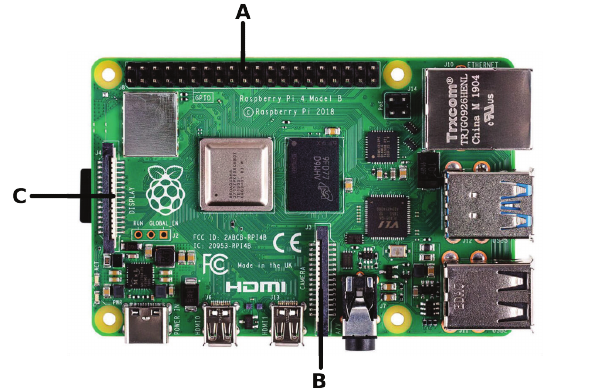
Figure1-3.
The pins and headers on the Raspberry Pi
Here’s a description of the pins and headers shown:
A. General-purpose input/output (GPIO) and other pins
The current Raspberry Pis have a 2×20 pin GPIO header. Chap-
ters 6 and 7 show how to use these pins to read buttons and
switches and control actuators like LEDs, relays, or motors.
B. The Camera Serial Interface (CSI) connector
This port allows a camera module to be connected directly to
the board (see Figure 1-4).
C. The Display Serial Interface (DSI) connector
This connector accepts a 15-pin, flat ribbon cable that can
be used to communicate with the official Raspberry Pi touch
display.
Getting Up and Running 7
GSW_RASPI_4ED_FIN.indd 7GSW_RASPI_4ED_FIN.indd 7 10/28/21 10:53 AM10/28/21 10:53 AM
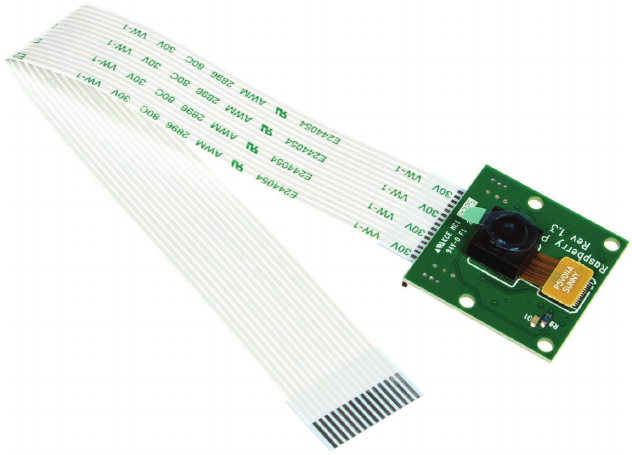
Figure 1-4.
The Raspberry Pi camera module connects directly to
the CSI connector. See Chapter 9 for a full discussion of cameras
and the Pi.
The Proper Peripherals
Now that you know where every thing is on the board, you’ll need
to know a few things about the proper peripherals to use with the
Pi. There are a bunch of prepackaged starter kits that have well-
vetted parts lists, though there are also a few caveats and gotchas
when fitting out your Raspberry Pi. There’s an extensive list of
supported peripherals (elinux.org/RPi_VerifiedPeripherals)
on the
eLinux.org wiki, but these are the most basic:
A power supply
This is the most important peripheral to get right. For the
Raspberry Pi 4, you should use a USB-C adapter that can
provide 5V and at least 3,000mA (3A) of current. If you’re using
a Pi 3/B+, you’ll need a micro-USB adapter that can supply 5V
and at least 1.5A of current. Older Pis will only need 1,000mA
(1A). A cell phone charger won’t necessarily cut it, even if it has
8 Getting Started with Raspberry Pi
GSW_RASPI_4ED_FIN.indd 8GSW_RASPI_4ED_FIN.indd 8 10/28/21 10:53 AM10/28/21 10:53 AM

the correct connector. Many cellphone chargers don’t provide
enough current, so check the rating marked on the back. An
underpowered Pi may still seem to work but will be flaky and
may fail unpredictably. Newer versions of the Pi will also blink
an error message on the desktop — “Under voltage detected!”
If in doubt, use the official Raspberry Pi power supply, which is
available at most places where Raspberry Pis are sold.
There are also several battery-pack solutions for taking
your Raspberry Pi on the go; the same rules about volt-
age and current apply there as well.
With the current version of the board, it is possible to power
the Pi from a USB hub that feeds power back into one of the
two external USB ports. However, there isn’t much protection
circuitry, so it may not be the best idea to power it over the
external USB ports. This is especially true if you’re going to
be doing electronics prototyping where you may accidentally
create short circuits that may draw a lot of current.
A microSD card
You’ll need at least 8GB, and it should be a Class 10 card for the
best read and write performance. There are operating systems
that fit onto SD cards with less than 8GB, but the standard Rasp-
berry Pi OS installation requires at least an 8GB microSD card.
USB keyboard and mouse
They’ll be helpful for controlling your computer. These peripher-
als are fairly generic, so no need to use anything fancy.
HDMI cable(s)
If you’re connecting to a monitor, you’ll need this or an appropri-
ate adapter for a DVI monitor. If you’re using the Pi 4, you’ll need
either an HDMI/HDMI microcable or the appropriate adapter.
You can also run the Pi headless, as described later in this chap-
ter. HDMI cables can vary wildly in price. If you’re just running
a cable three to six feet to a monitor, there’s no need to spend
more than $3 on an HDMI cable. If you are running long lengths
Getting Up and Running 9
GSW_RASPI_4ED_FIN.indd 9GSW_RASPI_4ED_FIN.indd 9 10/28/21 10:53 AM10/28/21 10:53 AM
of cable or displaying 4K video, you should definitely research
the higher-quality cables and avoid the cheap generics.
Ethernet cable
Your home may not have as many wired Ethernet jacks as it did
five years ago. Because everything is wireless these days, you
might find the wired port to be a bit of a hurdle; see the section
“Getting Online” on page 22 for some alternatives to plugging
the Ethernet directly into the wall or a hub.
Wi-Fi USB dongle
If you’re using one of the older Pis, you may want to add a Wi-Fi
dongle for wireless internet access. Many 802.11 WiFi USB don-
gles work with the Pi out of the box. Wi-Fi uses a lot of power, so
you will need to make sure you have anadequate power supply;
a 2A supply or a powered USB hub is a good choice. If you are
having problems with a Wi-Fi dongle, power is almost always the
problem.
You may also want to consider some of the following add-ons:
A powered USB hub
If you want to add more than four USB devices to a mainline
Raspberry Pi, you’ll need a USB hub. A powered USB 2.0 hub
(or 3.0 for the Pi 4) is recommended.
Heatsink
A heatsink is a small piece of metal, usually with fins, that creates
a lot of surface area to dissipate heat efficiently. Heat sinks can
be attached to chips that get hot. The Pi’s chipset was designed
for mobile applications, so a heat sink isn’t necessary most of the
time. However, as we’ll see later, there are cases where you may
want to run the Pi at higher speeds, or crunch numbers over an
extended period, and the chip may heat up a bit. Some people
have reported that the network chip can get warm as well.
10 Getting Started with Raspberry Pi
GSW_RASPI_4ED_FIN.indd 10GSW_RASPI_4ED_FIN.indd 10 10/28/21 10:53 AM10/28/21 10:53 AM
..................Content has been hidden....................
You can't read the all page of ebook, please click here login for view all page.